
Oracle® APEX
SQL Workshop Guide
Release 22.1
F51985-03
June 2022
Oracle APEX SQL Workshop Guide, Release 22.1
F51985-03
Copyright © 2008, 2022, Oracle and/or its affiliates.
Primary Author: John Godfrey
Contributors: Terri Jennings, Steven Muench, Christina Cho, Michael Hichwa, Hilary Farrell, Marc Sewtz,
Jason Straub, John Synders, Doug Gault
This software and related documentation are provided under a license agreement containing restrictions on
use and disclosure and are protected by intellectual property laws. Except as expressly permitted in your
license agreement or allowed by law, you may not use, copy, reproduce, translate, broadcast, modify, license,
transmit, distribute, exhibit, perform, publish, or display any part, in any form, or by any means. Reverse
engineering, disassembly, or decompilation of this software, unless required by law for interoperability, is
prohibited.
The information contained herein is subject to change without notice and is not warranted to be error-free. If
you find any errors, please report them to us in writing.
If this is software or related documentation that is delivered to the U.S. Government or anyone licensing it on
behalf of the U.S. Government, then the following notice is applicable:
U.S. GOVERNMENT END USERS: Oracle programs (including any operating system, integrated software,
any programs embedded, installed or activated on delivered hardware, and modifications of such programs)
and Oracle computer documentation or other Oracle data delivered to or accessed by U.S. Government end
users are "commercial computer software" or "commercial computer software documentation" pursuant to the
applicable Federal Acquisition Regulation and agency-specific supplemental regulations. As such, the use,
reproduction, duplication, release, display, disclosure, modification, preparation of derivative works, and/or
adaptation of i) Oracle programs (including any operating system, integrated software, any programs
embedded, installed or activated on delivered hardware, and modifications of such programs), ii) Oracle
computer documentation and/or iii) other Oracle data, is subject to the rights and limitations specified in the
license contained in the applicable contract. The terms governing the U.S. Government’s use of Oracle cloud
services are defined by the applicable contract for such services. No other rights are granted to the U.S.
Government.
This software or hardware is developed for general use in a variety of information management applications.
It is not developed or intended for use in any inherently dangerous applications, including applications that
may create a risk of personal injury. If you use this software or hardware in dangerous applications, then you
shall be responsible to take all appropriate fail-safe, backup, redundancy, and other measures to ensure its
safe use. Oracle Corporation and its affiliates disclaim any liability for any damages caused by use of this
software or hardware in dangerous applications.
Oracle, Java, and MySQL are registered trademarks of Oracle and/or its affiliates. Other names may be
trademarks of their respective owners.
Intel and Intel Inside are trademarks or registered trademarks of Intel Corporation. All SPARC trademarks are
used under license and are trademarks or registered trademarks of SPARC International, Inc. AMD, Epyc,
and the AMD logo are trademarks or registered trademarks of Advanced Micro Devices. UNIX is a registered
trademark of The Open Group.
This software or hardware and documentation may provide access to or information about content, products,
and services from third parties. Oracle Corporation and its affiliates are not responsible for and expressly
disclaim all warranties of any kind with respect to third-party content, products, and services unless otherwise
set forth in an applicable agreement between you and Oracle. Oracle Corporation and its affiliates will not be
responsible for any loss, costs, or damages incurred due to your access to or use of third-party content,
products, or services, except as set forth in an applicable agreement between you and Oracle.

Contents
Preface
Audience xii
Documentation Accessibility xii
Diversity and Inclusion xiii
Related Documents xiii
Conventions xiii
1
Changes in Release 22.1 for Oracle APEX SQL Workshop Guide
2
Getting Started with SQL Workshop
2.1 SQL Workshop Home Page 2-1
2.2 Selecting a Schema 2-2
3
Managing Database Objects with Object Browser
3.1 Accessing Object Browser 3-2
3.2 Managing Object Browser 3-3
3.2.1 About Object Browser 3-3
3.2.2 Filtering by Object Type in Object Browser 3-4
3.2.3 Searching for Database Objects in Object Browser 3-4
3.2.4 Selecting Database Objects in Object Browser 3-5
3.2.5 Hiding the Object Selection Pane 3-6
3.2.6 Creating Database Objects 3-6
3.3 Managing Tables 3-6
3.3.1 Creating a Table 3-7
3.3.2 Browsing a Table 3-10
3.3.3 Reports Available for Tables 3-10
3.3.4 Editing a Table 3-12
3.3.5 Dropping a Table 3-13
3.3.6 Creating an Application from a Table 3-14
3.3.7 Analyzing Statistics of a Table 3-14
iii

3.3.8 Viewing Sample Queries for a Table 3-15
3.4 Managing Views 3-15
3.4.1 Creating a View 3-16
3.4.2 Browsing a View 3-17
3.4.3 Reports for Views 3-17
3.4.4 Editing a View Manually 3-18
3.4.5 Using Find and Replace 3-19
3.4.6 Downloading a View 3-19
3.4.7 Compiling a View 3-19
3.4.8 Dropping a View 3-20
3.5 Managing Indexes 3-20
3.5.1 Creating an Index 3-20
3.5.2 Browsing an Index 3-21
3.5.3 Reports for Indexes 3-21
3.5.4 Dropping an Index 3-22
3.6 Managing Sequences 3-22
3.6.1 Creating a Sequence 3-22
3.6.2 Browsing a Sequence 3-23
3.6.3 Reports for Sequences 3-23
3.6.4 Dropping a Sequence 3-24
3.6.5 Altering a Sequence 3-24
3.7 Managing Types 3-24
3.7.1 Creating a Type 3-25
3.7.2 Browsing a Type 3-25
3.7.3 Reports for Types 3-26
3.7.4 Dropping a Type 3-26
3.8 Managing Packages 3-26
3.8.1 Creating a Package 3-27
3.8.2 Viewing a Package 3-28
3.8.3 Reports for Packages 3-28
3.8.4 Editing a Package Manually 3-29
3.8.5 Compiling a Package 3-30
3.8.6 Downloading a Package 3-30
3.8.7 Dropping a Package While Viewing Specification 3-30
3.8.8 Dropping a Package While Viewing the Body 3-31
3.9 Managing Procedures 3-31
3.9.1 Creating a Procedure 3-32
3.9.2 Browsing a Procedure 3-32
3.9.3 Reports for Procedures 3-33
3.9.4 Editing a Procedure 3-33
3.9.4.1 Editing a Procedure Manually 3-34
iv

3.9.5 Compiling a Procedure 3-34
3.9.6 Downloading a Procedure 3-34
3.9.7 Dropping a Procedure 3-35
3.10 Managing Functions 3-35
3.10.1 Creating a Function 3-36
3.10.2 Browsing a Function 3-36
3.10.3 Reports for Functions 3-37
3.10.4 Editing a Function Manually 3-38
3.10.5 Compiling a Function 3-38
3.10.6 Downloading a Function 3-38
3.10.7 Dropping a Function 3-39
3.11 Managing Triggers 3-39
3.11.1 Creating Triggers 3-40
3.11.2 Browsing a Trigger 3-40
3.11.3 Reports for Triggers 3-40
3.11.4 Editing a Trigger Manually 3-41
3.11.5 Compiling a Trigger 3-42
3.11.6 Downloading a Trigger 3-42
3.11.7 Dropping a Trigger 3-43
3.11.8 Disabling and Enabling a Trigger 3-43
3.12 Managing Database Links 3-43
3.12.1 Creating a Database Link 3-44
3.12.2 Browsing a Database Link 3-44
3.12.3 Reports for Database Links 3-45
3.12.4 Dropping a Database Link 3-45
3.13 Managing Materialized Views 3-45
3.13.1 Creating a Materialized View 3-46
3.13.2 Browsing a Materialized View 3-47
3.13.3 Reports for Materialized Views 3-47
3.13.4 Dropping a Materialized View 3-48
3.14 Managing Synonyms 3-48
3.14.1 Creating Synonyms 3-49
3.14.2 Viewing a Synonym 3-49
3.14.3 Dropping a Synonym 3-50
3.15 Managing SODA Collections 3-50
3.15.1 About SODA Collections 3-50
3.15.2 Creating a SODA Collection 3-51
3.15.3 Viewing a SODA Collection 3-52
3.15.4 Editing or Dropping a SODA Collection 3-52
v

4
Using SQL Commands
4.1 About SQL Commands 4-2
4.2 Accessing SQL Commands 4-2
4.3 About the SQL Commands Home Page 4-3
4.4 Using the Command Editor 4-6
4.4.1 Running a SQL Command 4-6
4.4.2 About Transactions in SQL Commands 4-7
4.4.3 About Unsupported SQL*Plus Commands 4-7
4.4.4 Terminating a Command 4-7
4.4.5 Using Bind Variables 4-8
4.4.6 Using the Find Tables Button 4-8
4.5 Saving an SQL Command 4-8
4.6 Copying a Command 4-9
4.7 Viewing Results 4-9
4.7.1 Accessing the Results Pane 4-9
4.7.2 About the Results Pane 4-10
4.8 Using Explain Plan 4-10
4.8.1 Viewing an Explain Plan 4-10
4.9 Using Saved Commands 4-11
4.9.1 Accessing Saved Commands 4-11
4.9.2 About the Saved SQL Pane 4-11
4.10 Using SQL Command History 4-12
4.10.1 Accessing a Command from Command History 4-12
4.10.2 About the History Pane 4-12
5
Using Oracle APEX Utilities
5.1 Using Data Workshop 5-2
5.1.1 About the Load Data and Unload Data Wizards 5-2
5.1.2 About Importing, Exporting, Loading, and Unloading Data 5-3
5.1.3 Import, Export, Load, and Unload Options 5-4
5.1.4 Accessing the Load Data and Unload Data Wizards 5-6
5.1.5 Loading Data 5-6
5.1.5.1 About Loading Data 5-7
5.1.5.2 Copying and Pasting CSV data or Selecting a Sample Data Set 5-7
5.1.5.3 Loading an XML Document 5-8
5.1.5.4 Loading a JSON File 5-9
5.1.5.5 Loading a XLSX File 5-10
5.1.6 Unloading Data 5-11
5.1.6.1 Unloading a Text File 5-12
5.1.6.2 Unloading to an XML Document 5-13
vi

5.1.7 Loading Data From the Oracle Cloud (Autonomous Database Only) 5-13
5.1.7.1 Granting Privileges to the Workspace Schema 5-14
5.1.7.2 User Interface Differences for Oracle Cloud Users 5-14
5.1.7.3 About Object Store References 5-15
5.1.7.4 Creating an Object Store Reference 5-15
5.1.7.5 Creating an External Table from Cloud 5-16
5.1.7.6 Loading Avro or Parquet Files into Object Browser from Cloud 5-17
5.1.7.7 Loading Other Files into Object Browser from Cloud 5-18
5.2 Using Data Generator 5-19
5.2.1 About Blueprints 5-19
5.2.2 Accessing Data Generator 5-20
5.2.3 Creating Blueprints 5-21
5.2.3.1 Creating a Blueprint from Existing Tables 5-21
5.2.3.2 Creating a Blueprint from Scratch 5-22
5.2.3.3 Importing a Blueprint 5-22
5.2.4 Running Blueprints 5-23
5.2.4.1 Selecting Data Generation Schema 5-23
5.2.4.2 Generating Data from a Blueprint 5-23
5.2.5 Modifying Blueprints 5-24
5.2.5.1 About Blueprint Designer 5-24
5.2.5.2 Modifying Blueprint Table and Column Attributes 5-25
5.2.5.3 Adding and Deleting Tables and Columns 5-25
5.2.5.4 Saving Blueprints 5-26
5.2.6 Previewing Blueprints 5-26
5.2.7 Exporting Blueprints 5-27
5.2.8 Deleting Blueprints 5-27
5.3 Using Query Builder 5-27
5.3.1 Query Builder Home Page 5-28
5.3.2 Accessing Query Builder 5-29
5.3.3 Understanding the Query Building Process 5-30
5.3.4 Using the Object Selection Pane 5-30
5.3.4.1 Searching and Filtering Objects 5-30
5.3.4.2 Hiding and Restoring the Object Selection Pane 5-31
5.3.4.3 Selecting Objects 5-31
5.3.5 Using the Design Pane 5-31
5.3.5.1 About Supported Column Types 5-32
5.3.5.2 Adding an Object to the Design Pane 5-32
5.3.5.3 Resizing the Design and Results Panes 5-33
5.3.5.4 Removing or Hiding Objects in the Design Pane 5-34
5.3.6 Specifying Query Conditions 5-34
5.3.7 Creating Relationships Between Objects 5-36
vii

5.3.7.1 About Join Conditions 5-36
5.3.7.2 Joining Objects Manually 5-36
5.3.7.3 Joining Objects Automatically 5-37
5.3.8 Working with Saved Queries 5-38
5.3.8.1 Saving a Query 5-38
5.3.8.2 Editing a Saved Query 5-39
5.3.8.3 Deleting a Saved Query 5-39
5.3.9 Viewing Generated SQL 5-39
5.3.10 Viewing Query Results 5-40
5.4 Using Quick SQL 5-40
5.4.1 Getting Started with Quick SQL 5-41
5.4.1.1 About Quick SQL 5-41
5.4.1.2 About Quick SQL Shorthand Syntax 5-41
5.4.2 Accessing Quick SQL 5-42
5.4.3 Using Quick SQL Help 5-42
5.4.3.1 Accessing Quick SQL Help 5-43
5.4.3.2 About Quick SQL Help Tabs 5-43
5.4.4 Generating Quick SQL with SQL Shorthand Syntax 5-44
5.4.5 Managing Quick SQL Models and Scripts 5-46
5.4.5.1 Saving a Quick SQL Model 5-46
5.4.5.2 Loading a Saved Quick SQL Model 5-47
5.4.5.3 Saving a SQL Script 5-47
5.4.5.4 Downloading SQL Scripts 5-48
5.4.6 Loading Quick SQL Samples 5-49
5.4.6.1 About Quick SQL Samples 5-49
5.4.6.2 Loading a Quick SQL Sample 5-50
5.4.7 Creating an Application from a Generated SQL Script 5-50
5.4.8 Configuring Quick SQL Settings 5-51
5.4.8.1 Configuring Settings Declaratively 5-52
5.4.8.2 Configuring Settings Inline 5-54
5.4.9 Recommendations When Using Quick SQL 5-54
5.4.10 Database Terminology Used in Quick SQL 5-55
5.4.11 About Supported Data Types 5-58
5.5 Using Sample Datasets 5-59
5.5.1 About Sample Datasets 5-59
5.5.2 Accessing Sample Datasets 5-59
5.5.3 Installing a Sample Dataset 5-60
5.5.4 Removing a Sample Dataset 5-61
5.5.5 Refreshing a Sample Dataset 5-62
5.5.6 Changing the Schema for a Sample Dataset 5-62
5.6 Generating DDL 5-63
viii

5.7 Managing User Interface Defaults 5-63
5.7.1 About User Interface Defaults 5-64
5.7.2 Creating User Interface Defaults for a Table 5-64
5.7.3 Modifying Table User Interface Defaults 5-65
5.7.4 Creating User Interface Attributes 5-66
5.7.5 Modifying User Interface Attributes 5-66
5.7.6 Exporting and Importing User Interface Defaults 5-67
5.8 Comparing Schemas 5-67
5.9 Managing Methods on Tables 5-68
5.10 Using the Recycle Bin 5-68
5.10.1 Managing Objects in the Recycle Bin 5-69
5.10.2 Emptying the Recycle Bin Without Viewing the Objects 5-69
5.11 Viewing Object Reports 5-70
5.11.1 Viewing Table Reports 5-70
5.11.2 Viewing PL/SQL Reports 5-71
5.11.2.1 Viewing Package Input and Output Parameters 5-71
5.11.2.2 Viewing the Number of Lines of Code for an Object 5-71
5.11.2.3 Searching PL/SQL Source Code 5-72
5.11.3 Viewing Exception Reports 5-72
5.11.4 Viewing Security Reports 5-73
5.11.5 Viewing All Object Reports 5-73
5.12 Viewing Database Details 5-74
5.13 Monitoring the Database 5-75
5.13.1 About Database Monitor Access Requirements 5-76
5.13.2 Accessing Session Page Reports 5-76
5.13.2.1 Accessing Reports on the Session Page 5-77
5.13.2.2 Creating Sessions Reports 5-77
5.13.2.3 Controlling the Number of Rows for Locks Reports 5-78
5.13.2.4 Creating Waits Reports 5-78
5.13.2.5 Creating I/O Reports 5-78
5.13.2.6 Creating SQL Reports 5-78
5.13.2.7 Creating Open Cursors Report 5-79
5.13.3 System Statistics 5-79
5.13.4 Viewing System Statistics 5-79
5.13.5 About Top SQL Page 5-80
5.13.6 Viewing Top SQL Page 5-80
5.13.7 About Long Operations Page 5-80
5.13.8 Viewing the Long Operations Page 5-81
ix

6
Using SQL Scripts
6.1 About SQL Scripts 6-1
6.2 Accessing SQL Scripts 6-2
6.3 About the SQL Scripts Page 6-3
6.4 About the Tasks List 6-4
6.5 Creating a SQL Script 6-5
6.5.1 Creating a SQL Script in the Script Editor 6-5
6.5.2 Uploading a SQL Script 6-5
6.6 Using the Script Editor 6-6
6.6.1 Editing an Existing Script 6-6
6.6.2 Script Editor Controls 6-7
6.7 Creating an Application from a Script 6-8
6.8 Deleting a SQL Script 6-9
6.8.1 Deleting Scripts from the SQL Scripts Page 6-9
6.8.2 Deleting a Script in the Script Editor 6-10
6.9 Copying a SQL Script 6-10
6.10 Executing a SQL Script 6-10
6.10.1 Executing a SQL Script in the Script Editor 6-11
6.10.2 Executing a SQL Script from the SQL Scripts Page 6-11
6.11 Viewing SQL Script Results 6-12
6.12 Exporting and Importing SQL Scripts 6-13
6.12.1 Exporting SQL Scripts 6-13
6.12.2 Importing Scripts 6-14
6.13 Viewing Script and Result Quotas 6-15
7
Enabling Data Exchange with RESTful Services
7.1 About Oracle RESTful Services in Oracle APEX 7-2
7.1.1 RESTful Service Configuration Requirements 7-3
7.1.2 REST and RESTful Services 7-3
7.1.3 Resource Modules 7-4
7.1.4 Resource Templates 7-4
7.1.5 Resource Handlers 7-5
7.1.6 Example RESTful Service 7-5
7.1.7 RESTful Services Terminology 7-6
7.2 Enabling REST Objects from the Object Browser 7-7
7.3 Enabling Authorization for REST Enabled Objects 7-9
7.4 How to Access RESTful Services 7-10
7.4.1 Accessing RESTful Services 7-10
7.4.2 Registering Schema with ORDS 7-11
7.4.3 About ORDS RESTful Services Dashboard 7-12
x

7.5 How to Create the ORDS Based RESTful Services Module Example 7-14
7.5.1 About the Example RESTful Service Module (oracle.example.hr) 7-15
7.5.2 Returning the Result Set Based on a PL/SQL Block (empsecformat/:empname) 7-17
7.5.3 Returning the Result Set in JSON Format with Pagination Set (employees/) 7-19
7.5.4 Retrieving Data Based on a Parameter (employees/:id) 7-20
7.5.5 Returning the Result Set in CSV Format (empinfo/) 7-21
7.5.6 Returning the Result Set as a Feed (employeesfeed/) 7-21
7.6 Managing RESTful Service Modules 7-22
7.6.1 Installing a Sample RESTful Service Module with Schema ORDS not Enabled 7-23
7.6.2 Installing a Sample RESTful Service Module with Schema ORDS Enabled 7-24
7.6.3 Creating an ORDS RESTful Service Module 7-25
7.6.4 Editing an ORDS RESTful Service Module 7-25
7.6.5 Deleting an ORDS RESTful Service Module 7-26
7.6.6 Managing an ORDS RESTful Service Privileges 7-27
7.6.7 Assigning Privileges to an ORDS RESTful Service Modules 7-27
7.6.8 Creating an ORDS RESTful Service Privilege 7-28
7.6.9 Editing an RESTful Service Privilege 7-29
7.6.10 Deleting an ORDS RESTful Service Privilege 7-29
7.6.11 Exporting an ORDS RESTful Service Module 7-29
7.6.12 Importing an ORDS RESTful Service Module 7-30
7.6.13 Generating a Swagger Document 7-31
7.7 Managing Resource Templates 7-31
7.7.1 Adding a Resource Template 7-32
7.7.2 Editing a Resource Template 7-32
7.7.3 Deleting a Resource Template 7-33
7.8 Managing Resource Handlers 7-33
7.8.1 Adding a Resource Handler 7-33
7.8.2 Editing a Resource Handler 7-34
7.8.3 Deleting a Resource Handler 7-35
Index
xi

Preface
Oracle APEX SQL Workshop Guide describes how to use SQL Workshop and Oracle
APEX utilities to load and unload data from an Oracle database, generate DDL, view
object reports, and restore dropped database objects.
• Audience
• Documentation Accessibility
• Diversity and Inclusion
• Related Documents
• Conventions
Audience
Oracle APEX SQL Workshop Guide is intended for application developers who are
building database-centric Web applications using Oracle APEX. The guide describes
how to use Oracle APEX SQL Workshop and utilities to load and unload data from an
Oracle database, generate DDL, view object reports, and restore dropped database
objects.
To use this guide, you must have a general understanding of relational database
concepts and the operating system environment under which Oracle APEX is running.
See Also:
Quick Start in Oracle APEX App Builder User’s Guide
Documentation Accessibility
For information about Oracle's commitment to accessibility, visit the Oracle
Accessibility Program website at http://www.oracle.com/pls/topic/lookup?
ctx=acc&id=docacc.
Access to Oracle Support
Oracle customers that have purchased support have access to electronic support
through My Oracle Support. For information, visit http://www.oracle.com/pls/topic/
lookup?ctx=acc&id=info or visit http://www.oracle.com/pls/topic/lookup?ctx=acc&id=trs
if you are hearing impaired.
Preface
xii

Diversity and Inclusion
Oracle is fully committed to diversity and inclusion. Oracle respects and values having a
diverse workforce that increases thought leadership and innovation. As part of our initiative to
build a more inclusive culture that positively impacts our employees, customers, and
partners, we are working to remove insensitive terms from our products and documentation.
We are also mindful of the necessity to maintain compatibility with our customers' existing
technologies and the need to ensure continuity of service as Oracle's offerings and industry
standards evolve. Because of these technical constraints, our effort to remove insensitive
terms is ongoing and will take time and external cooperation.
Related Documents
For more information, see these Oracle resources:
• Oracle APEX Release Notes
• Oracle APEX Installation Guide
• Oracle APEX App Builder User’s Guide
• Oracle APEX API Reference
• Oracle APEX Administration Guide
• Oracle APEX End User’s Guide
• Oracle Database Concepts
• Oracle Database Development Guide
• Oracle Database Administrator’s Guide
• Oracle Database SQL Language Reference
• SQL*Plus User's Guide and Reference
• Oracle Database PL/SQL Language Reference
Conventions
The following text conventions are used in this document:
Convention Meaning
boldface
Boldface type indicates graphical user interface elements associated with an
action, or terms defined in text or the glossary.
italic Italic type indicates book titles, emphasis, or placeholder variables for which
you supply particular values.
monospace
Monospace type indicates commands within a paragraph, URLs, code in
examples, text that appears on the screen, or text that you enter.
Preface
xiii

1
Changes in Release 22.1 for Oracle APEX
SQL Workshop Guide
All content in Oracle APEX SQL Workshop Guide has been updated to reflect release 22.1
functionality and user interface changes.
New Features and Updates
• Data Generator - Generates sample data to populate in your tables. Easily define data
generation blueprints and fill your tables with randomly generated sample data. Once you
define your blueprint, you can choose to generate sample data exports as CSV or JSON
files, or insert the data directly into your existing tables.
See Using Data Generator.
Deprecated and Desupported Features
See Deprecated Features and Desupported Features in Oracle APEX Release Notes.
1-1

2
Getting Started with SQL Workshop
SQL Workshop provides tools that enable you to view and manage database objects.
Object Browser enables you to use a tree control to view object properties and create new
objects. The SQL Commands tool enables you to enter ad-hoc SQL. Query Builder enables
you to create join queries using drag and drop. SQL Scripts enables you to store and run
scripts. The Data Workshop enables you to load and unload text, DDL, and spreadsheet
data.
• SQL Workshop Home Page
Learn about the SQL Workshop home page.
• Selecting a Schema
Select the default database schema for your SQL Workshop session.
2.1 SQL Workshop Home Page
Learn about the SQL Workshop home page.
You access SQL Workshop by clicking the SQL Workshop icon on the Workspace home
page. The SQL Workshop home page appears.
SQL Workshop home page features the following icons:
• Object Browser.
2-1

• SQL Commands.
• SQL Scripts.
• Utilities.
• RESTful Services.
See Also:
• Managing Database Objects with Object Browser
• Using SQL Commands
• Using SQL Scripts
• Using Oracle APEX Utilities
• Enabling Data Exchange with RESTful Services
2.2 Selecting a Schema
Select the default database schema for your SQL Workshop session.
A schema is a logical container for database objects. Use the Schema list on the right
side of the SQL Workshop home page to select the default database schema for your
SQL Workshop session. Only schemas assigned to your workspace display in the
Schema list.
Chapter 2
Selecting a Schema
2-2

3
Managing Database Objects with Object
Browser
Object Browser enables developers to browse, create, and edit objects in a database.
Oracle APEX has many views defined to help you work with the underlying table structures.
The views combine multiple base tables and use meaningful column names to minimize
complexity and to be more intuitive to use.
• Accessing Object Browser
Learn about how to access Object Browser.
• Managing Object Browser
Use Object Browser to review the database objects in your workspace.
• Managing Tables
You can create, browse, edit, or drop tables as well as view different table reports.
• Managing Views
A view is a logical representation of another table or combination of tables. You can
create, browse, edit, download, compile, drop a view and view reports.
• Managing Indexes
An index is an optional structure associated with tables and clusters. You can create,
browse, drop an index and view reports.
• Managing Sequences
A sequence generates a serial list of unique numbers for numeric columns of a database
table. You can create, browse, drop, alter a sequence and view a report.
• Managing Types
A type is a user-specified object or collection definition. You can create, browse, drop a
type and view a report.
• Managing Packages
A package is a database object that groups logically related PL/SQL types, items,
functions and procedures. You can create, view, edit, compile, drop, download a
package, and view a report.
• Managing Procedures
A procedure is a subprogram that performs a specific action. You can use Object Browser
to view, create, edit, download, and drop procedures.
• Managing Functions
A function is a subprogram that can take parameters and return a single value. You can
use Object Browser to create, browse, edit, compile, download, drop functions and view
report.
• Managing Triggers
A database trigger is a stored subprogram associated with a database table, view, or
event. You can create, browse, edit, compile, download, drop, disable or enable a trigger
and view report.
3-1
• Managing Database Links
A database link is a schema object in one database that enables you to access
objects in another database. You can create, browse, drop a database link and
view report.
• Managing Materialized Views
A materialized view provides indirect access to table data by storing the results of
a query in a separate schema object. You can create, browse, drop a materialized
view and view report.
• Managing Synonyms
A synonym is an alias for a schema object. You can create, view and drop a
synonym.
• Managing SODA Collections
Simple Oracle Document Access (SODA) is a set of NoSQL-style APIs that let you
create and store collections of documents in Oracle Database, retrieve them, and
query them, without needing to know Structured Query Language (SQL) or how
the documents are stored in the database.
See Also:
• Oracle Database SQL Language Reference
• Oracle APEX API Reference for details of the views defined
3.1 Accessing Object Browser
Learn about how to access Object Browser.
To access Object Browser:
1. On the Workspace home page, click SQL Workshop.
2. Click Object Browser.
Chapter 3
Accessing Object Browser
3-2

Note:
If the instance administrator has disabled RESTful Services for this Oracle
APEX instance, RESTful Services are not available for this instance and the
RESTful Services icon does not display.
See Also:
Configuring SQL Workshop in Oracle APEX Administration Guide
3.2 Managing Object Browser
Use Object Browser to review the database objects in your workspace.
• About Object Browser
The Object Browser page is divided into two panes: Object Selection pane and Detail
pane.
• Filtering by Object Type in Object Browser
Choose the type of database objects to view in Object Browser from the Object Type list.
• Searching for Database Objects in Object Browser
Search for database objects in Object Browser with the Search Field.
• Selecting Database Objects in Object Browser
Select a database object from the Object list to view or modify its details.
• Hiding the Object Selection Pane
You can hide the Object Selection pane by selecting the Collapse control which displays
on the right side of the Object Selection pane.
• Creating Database Objects
You can create database objects using the Create Database Object Wizard.
3.2.1 About Object Browser
The Object Browser page is divided into two panes: Object Selection pane and Detail pane.
• The Object Selection pane displays on the left side of the Object Browser page and lists
database objects of a selected type within the current schema. You can further narrow
the results by filtering on the object name.
• The Detail pane displays to the right of the page and displays detailed information about
the selected object. To view object details, select an object in the Object Selection pane.
Click the tabs at the top of the Detail pane to view additional details about the current
object. To edit an object, click the appropriate button.
Chapter 3
Managing Object Browser
3-3

3.2.2 Filtering by Object Type in Object Browser
Choose the type of database objects to view in Object Browser from the Object Type
list.
The Object Selection pane displays on the left side of the Object Browser page and
lists database objects by type with the current schema. You can filter the view by
selecting an object type or entering a case insensitive search term.
3.2.3 Searching for Database Objects in Object Browser
Search for database objects in Object Browser with the Search Field.
To search for a database object in the Object Selection pane:
1. On the Workspace home page, click SQL Workshop and then Object Browser.
Object Browser appears.
2. Select the type of object to display (Tables is selected by default).
Note:
You cannot search across all database object types.
3. In the Search Field, enter a case insensitive search term.
Chapter 3
Managing Object Browser
3-4

The list of objects that appears depends upon the available objects in the current
schema.
Note:
Any object with an adjacent red bar is invalid.
4. (Optional) To view all objects, leave the search field blank.
Once you locate the database object you want to view, simply select it. The selected object
displays in the Detail pane. If no object is selected, the Detail pane is blank.
3.2.4 Selecting Database Objects in Object Browser
Select a database object from the Object list to view or modify its details.
To select a database object in Object Browser:
1. Open Object Browser.
2. In the Object Selection pane (left), select an object from the Object List.
The list of objects that appears depends upon the available objects in the current
schema.
Note:
Any object with an adjacent red bar is invalid.
Chapter 3
Managing Object Browser
3-5

The selected object displays in the Detail pane. If no object is selected, the Detail pane
is blank.
The actions you can take for the selected object depend on the object. For example, if
you select a table, you can modify the columns, edit the rows, view a sample SQL
query, and more with the tabs in the Detail pane.
3.2.5 Hiding the Object Selection Pane
You can hide the Object Selection pane by selecting the Collapse control which
displays on the right side of the Object Selection pane.
If the Object Selection pane appears, selecting this control hides it. Similarly, if the
Object Selection pane is hidden, selecting this control causes the pane to reappear.
3.2.6 Creating Database Objects
You can create database objects using the Create Database Object Wizard.
Once you select an object, a set of tabs and buttons appears at the top of the Detail
pane. Use the tabs to view different aspects of the current items (for example, the
indexes of the table). Use the buttons to modify the current object.
To create an object:
1. On the Workspace home page, click SQL Workshop and then Object Browser.
Object Browser appears.
2. Click the Create icon which displays as a plus (+) sign in the upper right corner of
the Detail pane.
3. From the list of object types, select the type of object you want to create.
4. Follow the on-screen instructions.
3.3 Managing Tables
You can create, browse, edit, or drop tables as well as view different table reports.
Chapter 3
Managing Tables
3-6

A table is a unit of data storage in an Oracle database, containing rows and columns. When
you view a table in Object Browser, a table description appears that describes each column in
the table.
• Creating a Table
Create a table using Object Browser.
• Browsing a Table
Learn how to view different reports about a table.
• Reports Available for Tables
Learn about alternative views available when viewing a table in Object Browser.
• Editing a Table
Click the appropriate buttons on a table in Object Browser to edit a table.
• Dropping a Table
Drop a table using Object Browser.
• Creating an Application from a Table
Use the Create App button to quickly enter the Create Application Wizard based on the
current table.
• Analyzing Statistics of a Table
Use the Statistics tab to examine various metrics of a table.
• Viewing Sample Queries for a Table
View the Sample Queries tab to review a set of example queries (such as sample table
queries and sample column queries for tables with foreign keys) derived from the table
contents.
See Also:
• Oracle Database Administrator’s Guide for information on managing tables
• Oracle Database Concepts for conceptual information on tables types
• Oracle Database SQL Language Reference for the syntax required to create
and alter tables
3.3.1 Creating a Table
Create a table using Object Browser.
To create a table:
1. On the Workspace home page, click SQL Workshop and then Object Browser.
Object Browser appears.
2. Click the Create icon.
3. From the list of object types, select Table.
4. Enter a table name.
Table names must conform to Oracle naming conventions.
Chapter 3
Managing Tables
3-7

5. To have the final table name match the case entered in the Table Name field, click
Preserve Case.
6. Enter column details:
a. Column Name - Enter the column name.
b. Type - Select the column type.
c. Precision - The precision is the number of digits before the decimal point. Not
all column types have this setting. Precision must be a positive integer. Only
NUMBER
,
FLOAT
,
INTERVAL
YEAR
TO
MONTH
, and
INTERVAL
DAY
TO
SECOND
have
this setting. For example, if a column of type
NUMBER
has precision of 4, the
column value can be 0 through 9999.
d. Scale - The function of the scale setting depends on the column type. For
NUMBER
types, scale is the number of digits after the decimal point. For
VARCHAR2
and
CHAR
types, scale is the number of stored characters. For
TIMESTAMP
types, scale is the fractional seconds precision and must be a
number between 0 and 9. Scale must be a positive number. For example, if a
column type
TIMESTAMP
has a scale of 3, seconds are between .000 seconds
and .999 seconds.
e. Not Null - To specify a column must always have a value, select the Not Null
check box.
f. If running Oracle Database 12c - Select an identity option for NUMBER and
FLOAT columns. Options include:
• Always - The Oracle Database always uses the sequence generator to
assign a value to the column. If you attempt to explicitly assign a value to
the column using INSERT or UPDATE, then an error is returned.
• Default - The Oracle Database uses the sequence generator to assign a
value to the column by default, but you can also explicitly assign a
specified value to the column.
• Default on Null - The Oracle Database uses the sequence generator to
assign a value to the column when a subsequent INSERT statement
attempts to assign a value that evaluates to NULL.
g. Move - Click the Up and Down arrows in the Move column to change the
order of previously entered columns.
h. Add Column - Click Add Column to add additional columns.
i. Click Next.
Next, define the primary key for this table (optional). A primary key is a single field
or combination of fields that uniquely identifies a record.
7. For Primary Key, select the appropriate option and click Next:
a. Select an option:
• No Primary Key - No primary key is created.
• Populate from a new sequence - Creates a primary key and creates a
trigger and a sequence. The sequence is used in the trigger to populate
the selected primary key column. The primary key can only be a single
column.
• Populated from an existing sequence - Creates a primary key and
creates a trigger. The selected sequence is used in the trigger to populate
Chapter 3
Managing Tables
3-8

the selected primary key column. The primary key can only be a single column.
• Not populated - Defines a primary key but does not have the value automatically
populated with a sequence within a trigger. You can also select this option to
define a composite primary key (that is, a primary key made up of multiple
columns).
• If running Oracle Database 12c - Populate By Identity Column - Creates a
primary key and a sequence. The sequence is used to populate the selected
primary key column.
b. Click Next.
Next, add foreign keys (optional). A foreign key establishes a relationship between a
column (or columns) in one table and a primary or unique key in another table.
8. Add Foreign Key:
a. Name - Enter a name of the foreign key constraint that you are defining.
b. Select the appropriate option:
• Disallow Delete - Blocks the delete of rows from the referenced table when
there are dependent rows in this table.
• Cascade Delete - Deletes the dependent rows from this table when the
corresponding parent table row is deleted.
• Set to Null on Delete - Sets the foreign key column values in this table to null
when the corresponding parent table row is deleted.
c. Select Key Column(s) - Select the columns that are part of the foreign key, then click
the Add icon to move them to Key Column(s).
d. References Table - Select the table which is referenced by this foreign key. Then,
select the columns referenced by this foreign key. Once selected, click the Add icon
to move the selected columns to Referenced Column(s).
e. Click Add.
f. Click Next.
Next, add a constraint (optional). You can create multiple constraints, but you must add
each constraint separately.
9. To add a constraint:
a. Specify the type of constraint (Check or Unique).
A check constraint is a validation check on one or more columns within the table.
No records can be inserted or updated in a table which violates an enabled check
constraint. A unique constraint designates a column or a combination of columns as
a unique key. To satisfy a unique constraint, no two rows in the table can have the
same values for the specified columns.A check constraint is a validation check on
one or more columns within the table. No records can be inserted or updated in a
table which violates an enabled check constraint. A unique constraint designates a
column or a combination of columns as a unique key. To satisfy a unique constraint,
no two rows in the table can have the same values for the specified columns.
b. Enter the constraint in the field provided. For unique constraints, select the column(s)
that are to be unique. For check constraints, enter the expression that should be
checked such as
flag in ('Y','N')
.
c. Click Add.
Chapter 3
Managing Tables
3-9

10. Click Next.
A confirmation page appears.
11. Click Create.
See Also:
• Using the Table Finder in Oracle APEX App Builder User’s Guide
• Overview of Tables in Oracle Database Concepts for information about
tables
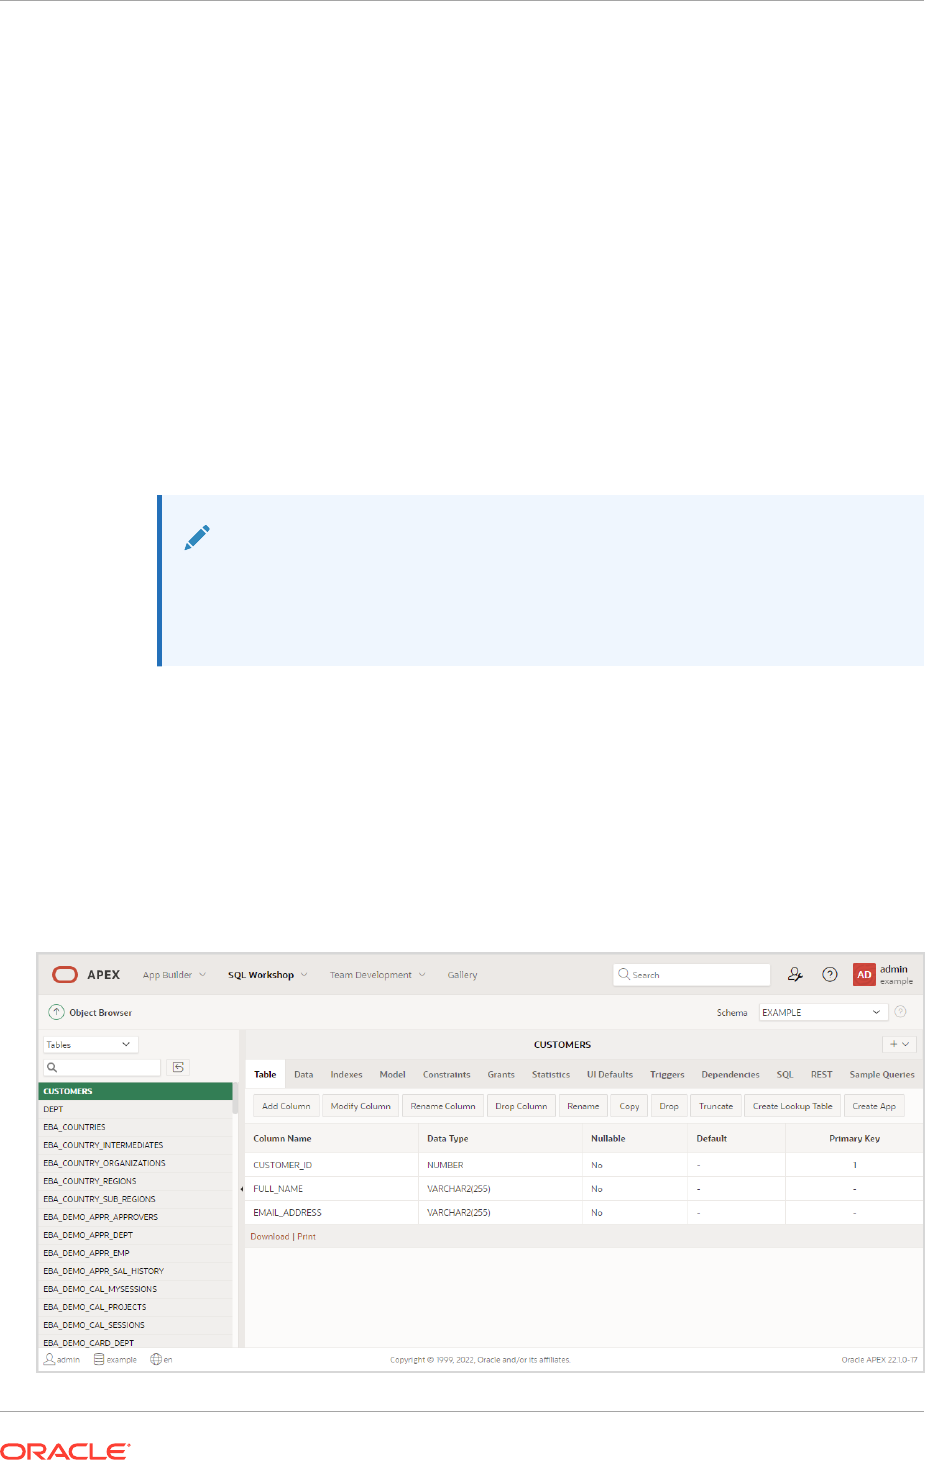
3.3.2 Browsing a Table
Learn how to view different reports about a table.
When you view a table in Object Browser, the table description appears. While viewing
this description, you can add a column, modify a column, rename a column, drop a
column, rename the table, copy the table, drop the table, truncate the table, or create a
lookup table based upon a column in the current table. Additionally, you have access
to other reports that offer related information including the table data, indexes, data
model, constraints, grants, statistics, user interface defaults, triggers, dependencies,
and SQL to create the selected table.
To view a table description:
1. On the Workspace home page, click SQL Workshop and then Object Browser.
Object Browser appears.
2. From the Object list, ensure Tables is selected.
3. From the Object Selection pane, select a table.
The table description appears.
4. Click the tabs at the top of the page to view different reports about the table.
See Also:
Reports Available for Tables
3.3.3 Reports Available for Tables
Learn about alternative views available when viewing a table in Object Browser.
Table 3-1 describes all available reports for tables.
Chapter 3
Managing Tables
3-10

Table 3-1 Available Reports for Tables
View Description
Table Displays details of the first 57 columns including the column name, data type,
nullable status, default value, and primary key. While viewing table details you can
add, modify, delete, or rename a column. Additionally, you can drop, rename, copy,
or truncate the table only if the referencing table has no records and create a
lookup table.
To export the data as a comma-delimited file (.csv) file, click the Download link.
To print the data in a portable document format (.pdf) file, click the Print link.
Please note, this option must have a Report Server configured at the instance
level. See Configuring Report Printing for an Instance in Oracle APEX
Administration Guide.
Data Displays a report of the data in the current table. Actions you can perform include:
•
Query - Enables you to sort by column. To restrict specific rows, enter a
condition in the Column Condition field. Use the percent sign (%) for
wildcards. From Order by, select the columns you want to review and click
Query.
•
Count Rows - Displays a report of the number of rows in the current table.
•
Insert Row - Enables you to insert a row into the table.
•
Download - Exports all data in the table to a spreadsheet. Click the
Download link at the bottom of the page to export all data in the selected
table.
•
Edit - Click the Edit icon to edit a row.
Indexes Displays indexes associated with this table. Actions you can perform include
Create and Drop.
Model Displays a graphical representation of the selected table along with all related
tables. Related tables are those that reference the current table in a foreign key
and those tables referenced by foreign keys within the current table.
You can position the cursor over an underlined table name to view the relationship
between that table and the current table. Click an underlined table name to view
the model of the related table.
Constraints Displays a list of constraints for the current table. Actions you can perform include
Create, Drop, Enable, and Disable.
Grants Displays a list of grants on the current table, including the grantee, the privilege,
and grant options. Actions you can perform in this view include Grant and
Revoke.
Statistics Displays collected statistics about the current table, including the number of rows
and blocks, the average row length, sample size, when the data was last
analyzed, and the compression status (enabled or disabled). Click Analyze to
access the Analyze Table Wizard.
UI Defaults Displays user interface defaults for forms and reports. User interface defaults
enable developers to assign default user interface properties to a table, column, or
view within a specified schema.
Click Edit to edit defined user interface defaults. Click Create Defaults to initialize
user interface defaults for tables that do not currently have user interface defaults
defined.
Triggers Displays a list of triggers associated with the current table. Actions you can
perform include Create, Drop, Enable, and Disable.
To view trigger details, click the trigger name.
Dependencies Displays report showing objects referenced by this table, objects this table
references, synonyms for this table, and synchronization information for this table.
Chapter 3
Managing Tables
3-11

Table 3-1 (Cont.) Available Reports for Tables
View Description
SQL Displays the SQL necessary to re-create this table, including keys, indexes,
triggers and table definition.
REST If the table is REST-enabled, displays REST settings. Toggle the REST Enable
Object switch to either enable or disable the table for REST.
See Also:
• Editing a Table
• Managing Indexes
• Managing User Interface Defaults
• Managing Triggers
• Automatic Enabling of Schema Objects for REST Access (AutoREST) in
Oracle REST Data Services Developer's Guide
3.3.4 Editing a Table
Click the appropriate buttons on a table in Object Browser to edit a table.
While viewing a table description, you can edit it by clicking the buttons above the
table description.
To edit a table:
1. On the Workspace home page, click SQL Workshop and then Object Browser.
Object Browser appears.
2. From the Object list, ensure Tables is selected.
3. From the Object Selection pane, select a table.
The table description appears.
4. Click the appropriate button described in Table 3-2.
Table 3-2 Edit Table Buttons
Button Description
Add Column Adds a column to the table. Enter a column name and select
a type. Depending upon the column type, specify whether the
column requires a value, the column length, precision, and
scale.
Modify Column Modifies the selected column. For Oracle Database 11g
Release 2 (11.2.0.4) and later, a Data Redaction region may
be shown if the current schema selected has been granted
execute on
DBMS_REDACT
.
Chapter 3
Managing Tables
3-12

Table 3-2 (Cont.) Edit Table Buttons
Button Description
Rename Column Renames the selected column.
Drop Column Drops the selected column.
Rename Renames the selected table.
Copy Copies the selected table.
Drop Drops the selected table.
Truncate Removes all rows from the selected table. Truncating a table
can be more efficient than dropping and re-creating a table.
Dropping and re-creating a table may invalidate dependent
objects, requiring you to regrant object privileges or re-create
indexes, integrity constraints, and triggers.
Create Lookup Table Creates a lookup table based on the column you select. That
column becomes a foreign key to the lookup table.
See Also:
Using the Recycle Bin
3.3.5 Dropping a Table
Drop a table using Object Browser.
To drop a table:
1. On the Workspace home page, click SQL Workshop and then Object Browser.
Object Browser appears.
2. From the Object list, ensure Tables is selected.
3. From the Object Selection pane, select a table.
The table description appears.
4. Click Drop.
5. To confirm, click Finish.
See Also:
Using the Recycle Bin
Chapter 3
Managing Tables
3-13

3.3.6 Creating an Application from a Table
Use the Create App button to quickly enter the Create Application Wizard based on
the current table.
APEX Data Dictionary analyzes the table data with DBMS_STATS and adds the
following types pages:
• chart page (if chart recommendation was computed)
• calendar page (if any date or timestamp column type exists)
• interactive report and form page
• dashboard with charts with columns for charting (these dashboard charts
automatically include links to the interactive report page)
• faceted search page (if valid facets found)
To create an application from a table in Object Browser:
1. Select a table in Object Browser.
2. Click Create App.
3. On the confirmation page, click Create App.
The Create Application Wizard appears loaded with the data from the selected table.
Note:
If an error displays after you make DDL or DML changes (such as
modifications to the table structure or column names), refresh the Data
Dictionary Cache (see Refreshing the Data Dictionary Cache in Oracle APEX
Administration Guide).
See Also:
Using the Create Application Wizard in Oracle APEX App Builder User’s
Guide
3.3.7 Analyzing Statistics of a Table
Use the Statistics tab to examine various metrics of a table.
To view the statistics of a selected table:
1. Select a table in Object Browser.
2. Click the Statistics tab.
The Statistics tab displays a number of metrics separated into Table Statistics for
row analysis and Column Statistics for column analysis. The information presented
depends on the table.
Chapter 3
Managing Tables
3-14

To refresh the displayed statistics:
3. Click one of the following buttons:
• Click Analyze to use the traditional analysis algorithm.
• Click Gather Table Statistics to use a modern method of analysis.
4. Proceed through the dialog screens as prompted.
The Statistics tab redisplays in Object Browser.
3.3.8 Viewing Sample Queries for a Table
View the Sample Queries tab to review a set of example queries (such as sample table
queries and sample column queries for tables with foreign keys) derived from the table
contents.
To view the table query examples:
1. Select a table in Object Browser.
2. Click the Sample Queries tab.
The Sample Queries page loads with a Table Query and Column Queries.
Each query has a Run button that you can click to run.
3.4 Managing Views
A view is a logical representation of another table or combination of tables. You can create,
browse, edit, download, compile, drop a view and view reports.
A view does not contain or store data but derives its data from the views or tables on which it
is based. These tables are called base tables. All operations performed on a view affect the
base table of the view. In order to be updatable, a view cannot contain any of the following
constructs:
SET
or
DISTINCT
, operators, aggregate or analytic functions,
GROUP BY
,
ORDER BY
,
CONNECT BY
,
START WITH
clause, subquery, or collection expression in a
SELECT
list.
For an example where using a view might be preferable to a table, consider the
HR.EMPLOYEES
table which has several columns and numerous rows. To allow users to see
only five of these columns or only specific rows, a view is created as follows:
CREATE VIEW staff AS
SELECT employee_id, last_name, job_id, manager_id, department_id
FROM employees
• Creating a View
Create a view using Object Browser.
• Browsing a View
Select a view from the Object Selection pane and view different reports about the view.
• Reports for Views
Alternative views available when browsing a view in Object Browser.
• Editing a View Manually
When you edit a view you can edit the code manually, perform a search and replace, and
compile the view.
Chapter 3
Managing Views
3-15

• Using Find and Replace
Select a view from the Object Selection pane and click Find or Replace.
• Downloading a View
Select a view from the Object Selection pane and download a view by clicking
Download Source.
• Compiling a View
Click the Save & Compile button to save changes to the view.
• Dropping a View
Select a view from the Object Selection pane, select the View or Code tab, and
click Drop.
See Also:
Oracle Database Administrator’s Guide
3.4.1 Creating a View
Create a view using Object Browser.
To create a view:
1. On the Workspace home page, click SQL Workshop and then Object Browser.
Object Browser appears.
2. Click the Create icon.
3. From the list of object types, select View.
4. Define the view:
• View Name - Enter a name for the View.
• Query - Enter a query to define the view.
Tip:
To access Query Builder or SQL Commands, click the appropriate button
at the bottom of the page. The selected tool displays in a pop-up window.
Once you create the appropriate SQL, click Return to automatically
close the popup window and return to the wizard with the SQL.
5. Click Next.
A confirmation page appears, which displays the SQL used to create the view.
6. Click Create View.
Chapter 3
Managing Views
3-16

See Also:
• Using Query Builder
• Using SQL Commands
3.4.2 Browsing a View
Select a view from the Object Selection pane and view different reports about the view.
When you access a view in Object Browser, the Detail pane displays a report listing the
columns in that view.
To browse a view:
1. On the Workspace home page, click SQL Workshop and then Object Browser.
Object Browser appears.
2. From the Object list, select Views.
3. From the Object Selection pane, select a view.
The view definition appears displaying the appropriate columns.
4. Click the tabs at the top of the page to view different reports about the view.
See Also:
Reports for Views
3.4.3 Reports for Views
Alternative views available when browsing a view in Object Browser.
Table 3-3 describes all available reports for views.
Table 3-3 Available Reports for Views
View Description
View (Default) Displays the columns in the current view. Actions you can perform include:
• Compile
• Drop
Code Displays the code editor.
Data Displays a report of the data in the columns in the view. Actions you can perform
include:
•
Query - Enables you to sort by column. To restrict specific rows, enter a
condition in the Column Condition field. Use the percent sign (%) for wildcards.
From Order by, select the columns you want to review and click Query.
•
Count Rows - Enables you to count rows in the table.
•
Insert Row - Enables you to insert a row into the table.
Chapter 3
Managing Views
3-17

Table 3-3 (Cont.) Available Reports for Views
View Description
Grants Displays a list of grants associated with the columns in the view. Grant details include
grantee, privilege, and grant options. Actions you can perform include Grant and
Revoke.
UI Defaults Displays user interface defaults for forms and reports. User interface defaults enable
developers to assign default user interface properties to a table, column, or view
within a specified schema.
Click Edit to edit existing user interface defaults. Click Create Defaults to initialize
user interface defaults for views that do not currently have user interface defaults
defined.
Dependencies Displays a report showing objects referenced by this view, objects this view
references, and synonyms for this view.
SQL Displays the SQL necessary to re-create this view.
See Also:
• Editing a View Manually
• Compiling a View
• Dropping a View
• Managing User Interface Defaults
3.4.4 Editing a View Manually
When you edit a view you can edit the code manually, perform a search and replace,
and compile the view.
You can save the view as a file or drop it.
To edit a view manually:
1. On the Workspace home page, click SQL Workshop and then Object Browser.
Object Browser appears.
2. From the Object list, select Views.
3. From the Object Selection pane, select a view.
4. Select the Code tab.
The code editor appears.
If you edit and make changes to a view, you must compile.
Chapter 3
Managing Views
3-18

See Also:
Compiling a View
3.4.5 Using Find and Replace
Select a view from the Object Selection pane and click Find or Replace.
To use Find and Replace:
1. On the Workspace home page, click SQL Workshop and then Object Browser.
Object Browser appears.
2. From the Object list, select Views.
3. From the Object Selection pane, select a view.
4. To perform a basic search, click the Find icon (which resembles a magnifying glass).
5. To replace existing code, click the Replace icon (which resembles a two-sided arrow).
3.4.6 Downloading a View
Select a view from the Object Selection pane and download a view by clicking Download
Source.
To save the current view as a file:
1. On the Workspace home page, click SQL Workshop and then Object Browser.
Object Browser appears.
2. From the Object list, select Views.
3. From the Object Selection pane, select a view.
4. Select the Code tab.
The code editor appears.
5. Click Download Source.
3.4.7 Compiling a View
Click the Save & Compile button to save changes to the view.
There is no save function since this is just a view of the object within the database.
To re-create the current view:
1. On the Workspace home page, click SQL Workshop and then Object Browser.
Object Browser appears.
2. From the Object list, select Views.
3. From the Object Selection pane, select a view.
4. Select the Code tab.
The code editor appears.
Chapter 3
Managing Views
3-19

5. Click Save & Compile.
3.4.8 Dropping a View
Select a view from the Object Selection pane, select the View or Code tab, and click
Drop.
To drop a view:
1. On the Workspace home page, click SQL Workshop and then Object Browser.
Object Browser appears.
2. From the Object list, select Views.
3. From the Object Selection pane, select a view.
4. Select the View tab or the Code tab.
5. Click Drop.
6. To confirm, click Finish.
3.5 Managing Indexes
An index is an optional structure associated with tables and clusters. You can create,
browse, drop an index and view reports.
You can create indexes on one or more columns of a table to speed access to data on
those columns.
When you view an index in Object Browser, the Detail pane displays a report
containing the index name, index type, table owner, table name, table type,
uniqueness, compression, prefix length, tablespace name, status, last analyzed and a
listing of the indexed columns.
• Creating an Index
Create an index using Object Browser.
• Browsing an Index
Select an index from the Object Selection pane and view different reports about
the an index.
• Reports for Indexes
Alternative views available when browsing an index in Object Browser.
• Dropping an Index
Select an index from the Object Selection pane and click Drop.
3.5.1 Creating an Index
Create an index using Object Browser.
To create an index:
1. On the Workspace home page, click SQL Workshop and then Object Browser.
Object Browser appears.
2. Click the Create icon.
3. From the list of object types, select Index.
Chapter 3
Managing Indexes
3-20

4. Select a table and select the type of index you want to create. Available index types
include:
• Normal - Indexes one or more scalar typed object attributes of a table
• Text - Creates a text index (Oracle Text)
5. Click Next.
6. Create the index definition. Specify an index name, select one or more columns to be
indexed, and click Next.
A confirmation page appears, which displays the SQL used to create the index.
7. To confirm, click Create Index.
3.5.2 Browsing an Index
Select an index from the Object Selection pane and view different reports about the an index.
To browse an index:
1. On the Workspace home page, click SQL Workshop and then Object Browser.
Object Browser appears.
2. From the Object list, select Indexes.
3. From the Object Selection pane, select an index.
The index appears displaying the index name, index type, table owner, table name, table
type, uniqueness, compression, prefix length, tablespace name, status, last analyzed and
a listing of the indexed columns.
4. Click the tabs at the top of the page to view different reports about the index.
3.5.3 Reports for Indexes
Alternative views available when browsing an index in Object Browser.
Table 3-4 describes all available reports for indexes.
Table 3-4 Available Reports for Indexes
View Description
Object Details Displays the index name, index type, table owner, table name, table
type, uniqueness, compression, prefix length, tablespace name,
status, last analyzed and also a listing of the indexed columns.
Actions you can perform while viewing Object Details include:
• Disable - Disables the current index
• Drop - Drops the current index
• Rebuild - Rebuilds the current index
Statistics Displays collected statistics about the current view, including the
number of rows, sample size, when the data was last analyzed, and
the compression status (enabled or disabled). Click Analyze to
refresh the displayed statistics.
SQL Displays the SQL necessary to re-create this index.
Chapter 3
Managing Indexes
3-21

3.5.4 Dropping an Index
Select an index from the Object Selection pane and click Drop.
To drop an index:
1. On the Workspace home page, click SQL Workshop and then Object Browser.
Object Browser appears.
2. From the Object list, select Indexes.
3. From the Object Selection pane, select an index.
4. Under Object Details, click Drop.
5. To confirm, click Finish.
3.6 Managing Sequences
A sequence generates a serial list of unique numbers for numeric columns of a
database table. You can create, browse, drop, alter a sequence and view a report.
Database sequences are generally used to populate table primary keys.
• Creating a Sequence
Create a sequence using Object Browser.
• Browsing a Sequence
Select a sequence from the Object Selection pane and view different reports about
the sequence.
• Reports for Sequences
Alternative views available when browsing a sequence in Object Browser.
• Dropping a Sequence
Select a sequence from the Object Selection pane and click Drop.
• Altering a Sequence
Select a sequence from the Object Selection pane and click Alter.
3.6.1 Creating a Sequence
Create a sequence using Object Browser.
To create a sequence:
1. On the Workspace home page, click SQL Workshop and then Object Browser.
Object Browser appears.
2. Click the Create icon.
3. From the list of object types, select Sequence.
4. For Define:
a. Sequence Name - Enter the name of the sequence.
b. Preserve Case - To have the final sequence name match the case entered in
the Sequence Name field, click Preserve Case.
Chapter 3
Managing Sequences
3-22

c. Start With - Enter the number of the first sequence. The first reference to
sequence_name.nextval
returns this number.
d. Minimum Value - Enter the minimum value this sequence can return.
e. Maximum Value - Enter the maximum value this sequence can return.
f. Increment By - Each call to
sequence_name.nextval
returns a value greater than the
last, until the maximum value is reached. Enter the value used to increment to the
next sequence number.
g. Cycle - Select this option to restart the sequence number to the minimum value when
the maximum value is reached. Note that this is not recommended if using the
sequence for primary key creation.
h. Number to Cache - For faster access, specify how many sequence values are
stored in memory.
i. Order - Specify ORDER to guarantee that sequence numbers are generated in order
of request. This option is necessary if using Real Application Clusters (Oracle RAC).
5. Click Next.
A confirmation page appears, which displays the SQL used to create the sequence.
6. Click Create Sequence.
3.6.2 Browsing a Sequence
Select a sequence from the Object Selection pane and view different reports about the
sequence.
To browse a sequence:
1. On the Workspace home page, click SQL Workshop and then Object Browser.
Object Browser appears.
2. From the Object list, select Sequences.
3. From the Object Selection pane, select a sequence.
The Object Details view appears.
4. Click the tabs at the top of the page to view different reports about the sequence.
3.6.3 Reports for Sequences
Alternative views available when browsing a sequence in Object Browser.
Table 3-5 describes all available reports for sequences.
Table 3-5 Available Reports for Sequences
View Description
Object Details
Displays details about the current sequence. You can perform Alter
and Drop in this view.
Grants Displays a list of grants associated with the sequence. Grant details
include grantee, privilege, and grant options. You can perform Grant
and Revoke in this view.
Chapter 3
Managing Sequences
3-23

Table 3-5 (Cont.) Available Reports for Sequences
View Description
Dependencies Displays a list of objects that use (or depend) upon this sequence.
SQL Displays the SQL necessary to re-create this sequence.
3.6.4 Dropping a Sequence
Select a sequence from the Object Selection pane and click Drop.
To drop a sequence:
1. On the Workspace home page, click SQL Workshop and then Object Browser.
Object Browser appears.
2. From the Object list, select Sequences.
3. From the Object Selection pane, select a sequence.
The Object Details view appears.
4. Click Drop.
3.6.5 Altering a Sequence
Select a sequence from the Object Selection pane and click Alter.
To alter a sequence
1. On the Workspace home page, click SQL Workshop and then Object Browser.
Object Browser appears.
2. From the Object list, select Sequences.
3. From the Object Selection pane, select a sequence.
The Object Details view appears.
4. Click Alter.
3.7 Managing Types
A type is a user-specified object or collection definition. You can create, browse, drop a
type and view a report.
Oracle APEX currently only supports collection definitions. There are two categories of
Oracle collections (SQL collections):
• Variable-length arrays (
VARRAY
types)
• Nested tables (
TABLE
types)
VARRAY
types are used for one-dimensional arrays, while nested table types are used
for single-column tables within an outer table.
Chapter 3
Managing Types
3-24

• Creating a Type
Create a type using Object Browser.
• Browsing a Type
Select a type from the Object Selection pane and view different reports for the type.
• Reports for Types
Alternative views available when viewing a type in Object Browser.
• Dropping a Type
Select a type from the Object Selection pane and click Drop.
See Also:
• Oracle Database Concepts
• Oracle Database PL/SQL Language Reference and for information about
collection types
3.7.1 Creating a Type
Create a type using Object Browser.
To create a collection type:
1. On the Workspace home page, click SQL Workshop and then Object Browser.
Object Browser appears.
2. Click the Create icon.
3. For Name:
a. Type Name - Enter the name of the type to be created.
b. Preserve Case - To have the type name match the case entered in the Type Name
field, click Preserve Case.
c. Type to Create - Specify the kind of type to create.
d. Click Next.
4. Follow the on-screen instructions.
A confirmation page appears, which displays the SQL used to create the type.
5. Click Create Type.
3.7.2 Browsing a Type
Select a type from the Object Selection pane and view different reports for the type.
To browse a collection type:
1. On the Workspace home page, click SQL Workshop and then Object Browser.
Object Browser appears.
2. From the Object list, select Types.
3. From the Object Selection pane, select a type.
Chapter 3
Managing Types
3-25

The Object Details view appears.
4. Click the tabs at the top of the page to view different reports for the type.
3.7.3 Reports for Types
Alternative views available when viewing a type in Object Browser.
Table 3-6 describes all available reports for types.
Table 3-6 Available Reports for Types
View Description
Object Details Displays details about the selected type. To drop a type, click
Drop.
Synonyms Displays a list of synonyms for the current type.
Grants Displays a list of grants associated with the type. Grant details
include grantee, privilege, and grant options. You can perform
Grant and Revoke actions.
SQL Displays the SQL necessary to re-create this type.
3.7.4 Dropping a Type
Select a type from the Object Selection pane and click Drop.
To drop a collection type:
1. On the Workspace home page, click SQL Workshop and then Object Browser.
Object Browser appears.
2. From the Object list, select Types.
3. From the Object Selection pane, select a type.
The Object Details view appears.
4. Click Drop.
5. To confirm, click Finish.
3.8 Managing Packages
A package is a database object that groups logically related PL/SQL types, items,
functions and procedures. You can create, view, edit, compile, drop, download a
package, and view a report.
Packages usually have two parts, a specification and a body. The specification is the
interface to your application. The body implements the specification.
• Creating a Package
Create a package using Object Browser. Select the type of package you want to
create.
Chapter 3
Managing Packages
3-26

• Viewing a Package
Select a package from the Object Selection pane and view different reports about the
package.
• Reports for Packages
Alternative views available when viewing a package in Object Browser.
• Editing a Package Manually
Select a package from the Object Selection pane and click Find or Replace.
• Compiling a Package
Save and Compile the view to save your changes.
• Downloading a Package
Select a package from the Object Selection pane and download a package by clicking
Download Source to save the current package as a file.
• Dropping a Package While Viewing Specification
Select a package from the Object Selection pane and click Drop.
• Dropping a Package While Viewing the Body
Select a package from the Object Selection pane, click Body tab, and click Drop.
See Also:
PL/SQL Packages and PL/SQL Subprograms in Oracle Database PL/SQL
Language Reference for additional information on PL/SQL packages.
3.8.1 Creating a Package
Create a package using Object Browser. Select the type of package you want to create.
To create a package:
1. On the Workspace home page, click SQL Workshop and then Object Browser.
Object Browser appears.
2. Click the Create icon.
3. From the list of object types, select Package.
4. For Create Package, select the type of package you want to create:
• Specification
• Body
• Package with methods on database table(s)
Packages usually have two parts: Specification and Body.
5. Click Next.
6. If you select Specification:
a. Package Name - Enter a package name. To preserve the case of the name you
enter, click Preserve Case.
b. Click Next.
The wizard creates a dummy package specification and displays it for editing.
Chapter 3
Managing Packages
3-27

c. Edit the specification and click Create Package Specification.
7. If you select Body:
a. Package - Select the package you want to create the body for and click Next.
The wizard creates a package body with stubbed out calls identified in the
specification and displays it for editing.
b. Edit the package body and click Create Package Body.
8. If you select Package with methods on database tables:
a. Package Name - Enter a package name. To preserve the case of the name
you enter, click Preserve Case.
b. Select up to ten tables and click Next.
The wizard creates a specification and body with insert, update, delete, and
GET APIs for the selected tables. Note that you have the option to show or
download the specification or body.
c. To confirm, click Create Package.
3.8.2 Viewing a Package
Select a package from the Object Selection pane and view different reports about the
package.
When you access a package in Object Browser the specification appears.
To view a specification:
1. On the Workspace home page, click SQL Workshop and then Object Browser.
Object Browser appears.
2. From the Object list, select Packages.
3. From the Object Selection pane, select a package.
The Specification appears. You can also edit the code in this view.
4. Click the tabs at the top of the page to view different reports about the package.
3.8.3 Reports for Packages
Alternative views available when viewing a package in Object Browser.
Table 3-7 describes all available reports for packages.
Chapter 3
Managing Packages
3-28

Table 3-7 Available Reports for Packages
View Description
Specification Displays the package specification. This defines the interface to your
application. Actions you can perform include:
• Edit the code manually
•
Save & Compile
•
Find
•
Replace
•
Auto Complete
•
Undo
•
Redo
•
Download Source
•
Drop
Body Displays the package body, if one exists, for the selected package.
Actions you can perform include:
• Edit the code manually
•
Save & Compile
•
Find
•
Replace
•
Auto Complete
•
Undo
•
Redo
•
Download Source
•
Drop
Dependencies Displays objects that use (or depend on) on the current package and
objects the package depends on.
Errors Displays errors related to the current package.
Grants Lists details of grants for the current package, including privilege,
grantee, grantable, grantor, and object name.
3.8.4 Editing a Package Manually
Select a package from the Object Selection pane and click Find or Replace.
When you edit a package, you can edit the code manually, perform a search and replace, and
compile the package.
1. On the Workspace home page, click SQL Workshop and then Object Browser.
Object Browser appears.
2. From the Object list, select Packages.
3. From the Object Selection pane, select a package.
The Specification appears. You can edit the code in this view.
4. To perform a basic search, click the Find icon (which resembles a magnifying glass).
5. To replace existing code, click the Replace icon (which resembles a two-sided arrow).
Chapter 3
Managing Packages
3-29

3.8.5 Compiling a Package
Save and Compile the view to save your changes.
There is no save function because this is just a view of the object within the database.
To compile a package:
1. On the Workspace home page, click SQL Workshop and then Object Browser.
Object Browser appears.
2. From the Object list, select Packages.
3. From the Object Selection pane, select a package.
The Specification appears.
4. Click Save & Compile to compile the current package.
Compiling re-creates the object in the database. If the compilation fails, an error
message displays above the code.
3.8.6 Downloading a Package
Select a package from the Object Selection pane and download a package by clicking
Download Source to save the current package as a file.
To download a package:
1. On the Workspace home page, click SQL Workshop and then Object Browser.
Object Browser appears.
2. From the Object list, select Packages.
3. From the Object Selection pane, select a package.
The Specification appears.
4. Click Download Source to save the current package as a file.
3.8.7 Dropping a Package While Viewing Specification
Select a package from the Object Selection pane and click Drop.
To drop a package while viewing the Specification:
1. On the Workspace home page, click SQL Workshop and then Object Browser.
Object Browser appears.
2. From the Object list, select Packages.
3. From the Object Selection pane, select a package.
The Specification appears.
4. Click Drop.
5. To confirm, click Finish.
Chapter 3
Managing Packages
3-30

3.8.8 Dropping a Package While Viewing the Body
Select a package from the Object Selection pane, click Body tab, and click Drop.
To drop a package while viewing the Body:
1. On the Workspace home page, click SQL Workshop and then Object Browser.
Object Browser appears.
2. From the Object list, select Packages.
3. From the Object Selection pane, select a package.
The Specification appears.
4. Click the Body tab.
5. Click Drop.
6. To confirm, click Finish.
3.9 Managing Procedures
A procedure is a subprogram that performs a specific action. You can use Object Browser to
view, create, edit, download, and drop procedures.
• Creating a Procedure
Create procedure using Object Browser.
• Browsing a Procedure
Select a procedure from the Object Selection pane and view different reports about the
procedure.
• Reports for Procedures
Alternative views available when viewing a procedure in Object Browser.
• Editing a Procedure
When you edit a procedure you can edit the code manually or perform a search and
replace.
• Compiling a Procedure
If you edit and make changes to a view, you must compile to save your changes.
• Downloading a Procedure
Select a procedure from the Object Selection pane and click Download Source to save
the current procedure as a file.
• Dropping a Procedure
Select a procedure from the Object Selection pane and click Drop.
See Also:
Overview of PL/SQL in Oracle Database PL/SQL Language Reference
Chapter 3
Managing Procedures
3-31

3.9.1 Creating a Procedure
Create procedure using Object Browser.
To create a procedure:
1. On the Workspace home page, click SQL Workshop and then Object Browser.
Object Browser appears.
2. Click the Create icon.
3. From the list of object types, select Procedure.
4. For Name:
a. Procedure Name - Enter the name of the procedure.
Note:
Object names must conform to Oracle naming conventions and
cannot contain spaces, or start with a number or underscore.
b. Specify whether to Include Arguments or Preserve Case.
c. Click Next.
5. For Arguments, define the arguments by specifying the following information
(optional):
• Argument Name
• In/Out (the parameter mode)
• Argument Type (datatype)
• Default (value)
• Move
To add additional arguments, click Add Argument.
6. Click Next.
7. For Define, enter PL/SQL block you want to use as the procedure body and click
Next.
A confirmation page appears.
8. Click Create Procedure.
3.9.2 Browsing a Procedure
Select a procedure from the Object Selection pane and view different reports about the
procedure.
To browse a procedure:
1. On the Workspace home page, click SQL Workshop and then Object Browser.
Object Browser appears.
Chapter 3
Managing Procedures
3-32

2. From the Object list, select Procedures.
3. From the Object Selection pane, select a procedure.
The Code view appears, displaying the source code for the procedure. You can edit the
code in this view.
4. Click the tabs at the top of the page to view different reports about the procedure.
3.9.3 Reports for Procedures
Alternative views available when viewing a procedure in Object Browser.
Table 3-8 describes all available reports for procedures.
Table 3-8 Available Views for Procedures
View Description
Code (Default) Displays the source code for the procedure. You can edit the
code in this view. Actions you can perform in this view include:
• Edit the code manually
•
Save & Compile
•
Download Source
•
Drop
•
Undo
•
Redo
•
Find
•
Replace
•
Auto Complete
Dependencies Displays objects that use (or depend) on the current procedure and
objects the procedure depends on.
Errors Lists errors related to the current procedure.
Grants Lists details of grants for the current procedure, including privilege,
grantee, grantable, grantor, and object name.
See Also:
• Editing a Procedure
• Compiling a Procedure
• Downloading a Procedure
• Dropping a Procedure
3.9.4 Editing a Procedure
When you edit a procedure you can edit the code manually or perform a search and replace.
• Editing a Procedure Manually
Select a procedure from the Object Selection pane and click Find or Replace.
Chapter 3
Managing Procedures
3-33

3.9.4.1 Editing a Procedure Manually
Select a procedure from the Object Selection pane and click Find or Replace.
To edit a procedure manually:
1. On the Workspace home page, click SQL Workshop and then Object Browser.
Object Browser appears.
2. From the Object list, select Procedures.
3. From the Object Selection pane, select a procedure.
The Code view appears. You can edit the code in this view.
4. To perform a basic search, click the Find icon (which resembles a magnifying
glass).
5. To replace existing code, click the Replace icon (which resembles a two-sided
arrow).
3.9.5 Compiling a Procedure
If you edit and make changes to a view, you must compile to save your changes.
There is no save function because this is just a view of the object within the database.
To compile a procedure:
1. On the Workspace home page, click SQL Workshop and then Object Browser.
Object Browser appears.
2. From the Object list, select Procedures.
3. From the Object Selection pane, select a procedure.
4. Click Save & Compile to compile the current procedure.
Compiling re-creates the object in the database. If the compilation fails, an error
message displays above the code.
3.9.6 Downloading a Procedure
Select a procedure from the Object Selection pane and click Download Source to save
the current procedure as a file.
To download a procedure:
1. On the Workspace home page, click SQL Workshop and then Object Browser.
Object Browser appears.
2. From the Object list, select Procedures.
3. From the Object Selection pane, select a procedure.
4. Click Download Source to save the current procedure as a file.
Chapter 3
Managing Procedures
3-34

3.9.7 Dropping a Procedure
Select a procedure from the Object Selection pane and click Drop.
To drop a procedure:
1. On the Workspace home page, click SQL Workshop and then Object Browser.
Object Browser appears.
2. From the Object list, select Procedures.
3. From the Object Selection pane, select a procedure.
4. Click Drop.
5. To confirm, click Finish.
3.10 Managing Functions
A function is a subprogram that can take parameters and return a single value. You can use
Object Browser to create, browse, edit, compile, download, drop functions and view report.
• Creating a Function
Create a function using Object Browser.
• Browsing a Function
Select a function from the Object Selection pane and view different reports about the
function.
• Reports for Functions
Alternative views available when browsing a function in Object Browser.
• Editing a Function Manually
Select a function from the Object Selection pane and click Edit.
• Compiling a Function
Select a function from the Object Selection pane click Save & Compile.
• Downloading a Function
Select a function from the Object Selection pane click Download Source to save the
current function as a file.
• Dropping a Function
Select a function from the Object Selection pane and click Drop.
See Also:
• Oracle Database SQL Language Reference for information about PL/SQL
functions
• Oracle Database PL/SQL Language Reference
Chapter 3
Managing Functions
3-35

3.10.1 Creating a Function
Create a function using Object Browser.
To create a function:
1. On the Workspace home page, click SQL Workshop and then Object Browser.
Object Browser appears.
2. Click the Create icon.
3. From the list of object types, select Function.
4. For Name:
a. Function Name - Enter the name of the function.
Note:
Object names must conform to Oracle naming conventions and
cannot contain spaces, or start with a number or underscore.
b. Return Data Type - Select a data type.
c. Specify whether to Include Arguments or Preserve Case.
d. Click Next.
5. For Arguments, define the arguments by specifying the following information
(optional):
• Argument Name
• Argument Type (datatype)
• Default (value)
• Move
To add additional arguments, click Add Argument.
6. Click Next.
7. For Function Body, enter PL/SQL block you want to use and click Next.
A confirmation page appears.
8. Click Create Function.
3.10.2 Browsing a Function
Select a function from the Object Selection pane and view different reports about the
function.
To view a function in Object Browser:
1. On the Workspace home page, click SQL Workshop and then Object Browser.
Object Browser appears.
2. From the Object list, select Functions.
Chapter 3
Managing Functions
3-36

3. From the Object Selection pane, select a function.
The Code view appears. You can edit the code in this view.
4. Click the tabs at the top of the page to view different reports about the function.
See Also:
Reports for Functions
3.10.3 Reports for Functions
Alternative views available when browsing a function in Object Browser.
Table 3-9 describes all available reports for functions.
Table 3-9 Available Reports for Functions
View Description
Code (Default) Displays the source code for the function. You can edit the
code in this view. Actions you can perform in this view include:
• Edit the code manually
•
Save & Compile
•
Find
•
Replace
•
Auto Complete
•
Undo
•
Redo
•
Download Source
•
Drop
Dependencies Displays objects that use (or depend) on the current function and
objects the function depends on.
Errors Displays errors related to the current function.
Grants Lists details of grants for the current function, including privilege,
grantee, grantable, grantor, and object name.
See Also:
• Editing a Function Manually
• Compiling a Function
• Downloading a Function
• Dropping a Function
Chapter 3
Managing Functions
3-37

3.10.4 Editing a Function Manually
Select a function from the Object Selection pane and click Edit.
When you edit a function you can edit the code manually, perform a search and
replace, and compile the function.
1. On the Workspace home page, click SQL Workshop and then Object Browser.
Object Browser appears.
2. From the Object list, select Functions.
3. From the Object Selection pane, select a function.
The Code view appears. You can edit the code in this view.
4. Click Edit to activate manual edit mode.
5. To perform a basic search, click the Find icon (which resembles a magnifying
glass).
6. To replace existing code, click the Replace icon (which resembles a two-sided
arrow).
3.10.5 Compiling a Function
Select a function from the Object Selection pane click Save & Compile.
If you edit and make changes to a function, you must compile to save your changes.
There is no save function because this is just a view of the object within the database.
To compile a function in Object Browser:
1. On the Workspace home page, click SQL Workshop and then Object Browser.
Object Browser appears.
2. From the Object list, select Functions.
3. From the Object Selection pane, select a function.
The Code view appears.
4. Click Save & Compile to compile the current function.
Compiling re-creates the object in the database. If the compilation fails, an error
message displays above the code.
3.10.6 Downloading a Function
Select a function from the Object Selection pane click Download Source to save the
current function as a file.
To save a function to a file in Object Browser:
1. On the Workspace home page, click SQL Workshop and then Object Browser.
Object Browser appears.
2. From the Object list, select Functions.
3. From the Object Selection pane, select a function.
Chapter 3
Managing Functions
3-38

The Code view appears.
4. Click Download Source to save the current function as a file.
3.10.7 Dropping a Function
Select a function from the Object Selection pane and click Drop.
To drop a function in Object Browser:
1. On the Workspace home page, click SQL Workshop and then Object Browser.
Object Browser appears.
2. From the Object list, select Functions.
3. From the Object Selection pane, select a function.
The Code view appears.
4. Click Drop.
5. To confirm, click Finish.
3.11 Managing Triggers
A database trigger is a stored subprogram associated with a database table, view, or event.
You can create, browse, edit, compile, download, drop, disable or enable a trigger and view
report.
The trigger can be called once, for example when an event occurs, or many times, for
example for each row affected by an INSERT, UPDATE, or DELETE statement.
• Creating Triggers
Create a trigger using Object Browser.
• Browsing a Trigger
Select a trigger from the Object Selection pane and view different reports about the
trigger.
• Reports for Triggers
Alternative views available when viewing a trigger in Object Browser.
• Editing a Trigger Manually
Select a trigger from the Object Selection pane and click Code.
• Compiling a Trigger
Select a trigger from the Object Selection pane and click Save & Compile.
• Downloading a Trigger
Select a trigger from the Object Selection pane and click Download Source to save the
current trigger as a file.
• Dropping a Trigger
Select a trigger from the Object Selection pane and click Drop.
• Disabling and Enabling a Trigger
Select a trigger from the Object Selection pane and click Disable or Enable.
Chapter 3
Managing Triggers
3-39

See Also:
• Oracle Database Concepts
• Oracle Database Advanced Application Developer's Guide
3.11.1 Creating Triggers
Create a trigger using Object Browser.
To create a trigger in Object Browser:
1. On the Workspace home page, click SQL Workshop and then Object Browser.
Object Browser appears.
2. Click the Create icon.
3. From the list of object types, select Trigger.
4. Select a table name and click Next.
5. Select the appropriate trigger attributes, enter the trigger body, and click Next.
A confirmation page appears, which displays the SQL used to create the trigger.
6. Click Create Trigger.
3.11.2 Browsing a Trigger
Select a trigger from the Object Selection pane and view different reports about the
trigger.
To browse a trigger in Object Browser:
1. On the Workspace home page, click SQL Workshop and then Object Browser.
Object Browser appears.
2. From the Object list, select Triggers.
3. From the Object Selection pane, select a trigger.
The Object Details view appears.
4. Click the tabs at the top of the page to view different reports about the trigger.
See Also:
Reports for Triggers
3.11.3 Reports for Triggers
Alternative views available when viewing a trigger in Object Browser.
Table 3-10 describes all available reports for triggers.
Chapter 3
Managing Triggers
3-40

Table 3-10 Available Reports for Triggers
View Description
Object Details (Default) Lists of the details about the current trigger. Actions you can
perform include:
•
Compile
•
Download
•
Drop
•
Disable
Code Displays the source code for the trigger. You can edit the code in this
view. Actions you can perform in this view include:
• Edit the code manually
•
Save & Compile
•
Find
•
Replace
•
Auto Complete
•
Undo
•
Redo
•
Download Source
•
Drop
Errors Displays errors related to the current trigger.
SQL Displays the SQL necessary to re-create the trigger.
See Also:
• Editing a Trigger Manually
• Compiling a Trigger
• Downloading a Trigger
• Dropping a Trigger
3.11.4 Editing a Trigger Manually
Select a trigger from the Object Selection pane and click Code.
1. On the Workspace home page, click SQL Workshop and then Object Browser.
Object Browser appears.
2. From the Object list, select Triggers.
3. From the Object Selection pane, select a trigger.
The Object Details view appears.
4. Click Code tab.
5. You can edit the code in this view. Other edit controls include:
• Find
Chapter 3
Managing Triggers
3-41

• Replace
• Auto Complete
When you edit a trigger you can edit the code manually, perform a search and replace,
and compile the trigger.
3.11.5 Compiling a Trigger
Select a trigger from the Object Selection pane and click Save & Compile.
If you edit and make changes to a function, you must compile to save your changes.
There is no save function because this is just a view of the object within the database.
Compiling re-creates the object in the database.
To compile a trigger in Object Browser:
1. On the Workspace home page, click SQL Workshop and then Object Browser.
Object Browser appears.
2. From the Object list, select Triggers.
3. From the Object Selection pane, select a trigger.
The Details view appears.
4. To compile the current trigger:
• Under Object Details, click Compile.
• Under Code, click Save & Compile.
If the compilation fails, an error message displays above the code.
3.11.6 Downloading a Trigger
Select a trigger from the Object Selection pane and click Download Source to save the
current trigger as a file.
To save the current trigger as a file:
1. On the Workspace home page, click SQL Workshop and then Object Browser.
Object Browser appears.
2. From the Object list, select Triggers.
3. From the Object Selection pane, select a trigger.
The Details view appears.
4. Click Download Source to save the current trigger as a file.
5. To download the current trigger:
• Under Object Details, click Download.
• Under Code, click Download Source.
If the compilation fails, an error message displays above the code.
Chapter 3
Managing Triggers
3-42

3.11.7 Dropping a Trigger
Select a trigger from the Object Selection pane and click Drop.
To drop a trigger in Object Browser:
1. On the Workspace home page, click SQL Workshop and then Object Browser.
Object Browser appears.
2. From the Object list, select Triggers.
3. From the Object Selection pane, select a trigger.
The Details view appears.
4. Click Drop.
3.11.8 Disabling and Enabling a Trigger
Select a trigger from the Object Selection pane and click Disable or Enable.
To disable and enable a trigger in Object Browser:
1. On the Workspace home page, click SQL Workshop and then Object Browser.
Object Browser appears.
2. From the Object list, select Triggers.
3. From the Object Selection pane, select a trigger.
The Details view appears.
4. Click Disable.
Note:
The Enable button is activated. If you want to enable the trigger, click Enable.
3.12 Managing Database Links
A database link is a schema object in one database that enables you to access objects in
another database. You can create, browse, drop a database link and view report.
Once you create a database link, you can access the remote objects by appending
@dblink
to the table or view name, where
dblink
is the name of the database link.
• Creating a Database Link
Create a database link using Object Browser.
• Browsing a Database Link
Select a database link from the Object Selection pane and view different reports about
the database link.
• Reports for Database Links
Alternative views available when viewing a database links in Object Browser.
Chapter 3
Managing Database Links
3-43

• Dropping a Database Link
Select a database link from the Object Selection pane and click Drop.
3.12.1 Creating a Database Link
Create a database link using Object Browser.
To create a database link:
1. On the Workspace home page, click SQL Workshop and then Object Browser.
Object Browser appears.
2. Click the Create icon.
3. From the list of object types, select Database Link.
4. For Define :
a. Database Link Name - Enter the name of the database link. Database link
names must conform to Oracle naming conventions and cannot contain
spaces, or start with a number or underscore.
b. Connect To Schema- Enter the name of the database schema on the remote
system to access.
c. Password - Enter the password for the remote database schema.
d. Remote Hostname or IP - Enter the hostname or IP address of the database
server you wish to access.
e. Remote Host Port - Enter the network port number on which the Oracle Net
Listener is accepting requests. This is typically 1521.
f. Identified by - Select Service Name or SID.
If you select SID (Oracle System Identifier), enter the SID name if the remote
database is identified by a SID. If you select Service Name, enter the service
name if the remote database is identified by a service name.
5. Click Next.
6. Click Create Database Link.
3.12.2 Browsing a Database Link
Select a database link from the Object Selection pane and view different reports about
the database link.
To browse a database link:
1. On the Workspace home page, click SQL Workshop and then Object Browser.
Object Browser appears.
2. From the Object list, select Database Links.
3. From the Object Selection pane, select a database link.
The Object Details view appears.
4. Click the tabs at the top of the page to view different reports about the database
link.
Chapter 3
Managing Database Links
3-44

3.12.3 Reports for Database Links
Alternative views available when viewing a database links in Object Browser.
Table 3-11 describes all available reports for database links.
Table 3-11 Available Reports for Database Links
View Description
Object Details (Default) Displays details about the database link. Actions you can
perform include:
•
Drop - Deletes the database link
•
Test - Tests the database link
Dependencies Displays a list of objects that use (or depend) upon this database link.
SQL Displays the SQL necessary to re-create this database link.
3.12.4 Dropping a Database Link
Select a database link from the Object Selection pane and click Drop.
To drop a database link in Object Browser:
1. On the Workspace home page, click SQL Workshop and then Object Browser.
Object Browser appears.
2. From the Object list, select Database Links.
3. From the Object Selection pane, select a database link.
The Object Details View appears.
4. Click Drop.
5. To confirm, click Finish.
3.13 Managing Materialized Views
A materialized view provides indirect access to table data by storing the results of a query in
a separate schema object. You can create, browse, drop a materialized view and view report.
Unlike an ordinary view, which does not take up any storage space or contain any data, a
materialized view contains the rows resulting from a query against one or more base tables
or views. A materialized view can be stored in the same database as its base tables or in a
different database.
Materialized views are often used to improve performance, especially when storing data
locally that is sourced from tables or views using a database link. Similarly, materialized views
are often used instead of views when there are extensive calculations or summarizations,
especially on particularly large data sets. Materialized views are refreshed at specified
intervals which means the data is not always up-to-date but queries against them are
significantly faster for the examples given above.
• Creating a Materialized View
Create a materialized view using Object Browser.
Chapter 3
Managing Materialized Views
3-45

• Browsing a Materialized View
Select a materialized view from the Object Selection pane and view different
reports about the materialized view.
• Reports for Materialized Views
Alternative views available when viewing a materialized view in Object Browser.
• Dropping a Materialized View
Select a materialized view from the Object Selection pane and click Drop.
See Also:
Oracle Database Concepts for information about materialized views
3.13.1 Creating a Materialized View
Create a materialized view using Object Browser.
To create a materialized view:
1. On the Workspace home page, click SQL Workshop and then Object Browser.
Object Browser appears.
2. Click the Create icon.
3. From the list of object types, select Materialized View.
4. For Define:
a. Materialized View Name - Enter the name of the view. View names must
conform to Oracle naming conventions and cannot contain spaces, or start
with a number or underscore.
To preserve the case of the name you enter, click Preserve Case.
b. Query - Specify a query to define the view.
Tip:
To access Query Builder or SQL Commands, click the appropriate
button at the bottom of the page. The selected tool displays in a pop-
up window. Once you create the appropriate SQL, click Return to
automatically close the popup window and return to the wizard with
the SQL.
c. Click Next.
A confirmation page appears, which displays the SQL used to create the
materialized view.
5. Click Create Materialized View.
Chapter 3
Managing Materialized Views
3-46

See Also:
• Using Query Builder
• Using SQL Commands
3.13.2 Browsing a Materialized View
Select a materialized view from the Object Selection pane and view different reports about
the materialized view.
To view a materialized view:
1. On the Workspace home page, click SQL Workshop and then Object Browser.
Object Browser appears.
2. From the Object list, select Materialized Views.
3. From the Object Selection pane, select a view.
The Materialized View appears.
4. Click the tabs at the top of the page to view different reports about the materialized view.
3.13.3 Reports for Materialized Views
Alternative views available when viewing a materialized view in Object Browser.
Table 3-12 describes all available reports for materialized views.
Table 3-12 Available Reports for Materialized Views
View Description
Materialized View (Default) Displays details about the columns in the materialized view,
including:
•
Column Name
•
Data type
•
Nullable flag
•
Default value
•
Primary key
Click Drop to delete the current materialized view.
Data Displays a report of the data in the columns. Actions you can perform
include:
•
Query - Enables you to sort by column. To restrict specific rows,
enter a condition in the Column Condition field. Use the percent
sign (%) for wildcards. From Order by, select the columns you
want to review and click Query.
•
Count Rows - Displays a report of the data in the current table.
•
Download - Click this link to export the data as a comma-
delimited file (.csv) file.
Details Displays object details stored in
DBA_SNAPSHOTS
such as updatable
and status.
Chapter 3
Managing Materialized Views
3-47

Table 3-12 (Cont.) Available Reports for Materialized Views
View Description
Grants Displays a list of grants on the current view, including grantee,
privilege, and grant options. You can perform Grant and Revoke in
this view.
Dependencies Displays a list of objects that use (or depend) upon this materialized
view.
SQL Displays the SQL necessary to re-create this materialized view.
3.13.4 Dropping a Materialized View
Select a materialized view from the Object Selection pane and click Drop.
To drop a materialized view in Object Browser:
1. On the Workspace home page, click SQL Workshop and then Object Browser.
Object Browser appears.
2. From the Object list, select Materialized Views.
3. From the Object Selection pane, select a view.
The Materialized View appears.
4. Click Drop.
5. To confirm, click Finish.
3.14 Managing Synonyms
A synonym is an alias for a schema object. You can create, view and drop a synonym.
Synonyms can provide a level of security by masking the name and owner of an object
and by providing location transparency for remote objects of a distributed database.
Also, they are convenient to use and reduce the complexity of SQL statements for
database users.
• Creating Synonyms
Create synonyms using Object Browser.
• Viewing a Synonym
Select a synonym from the Object Selection pane.
• Dropping a Synonym
Select a synonym from the Object Selection pane and click Drop.
See Also:
Managing Views_ Sequences_ and Synonyms in Oracle Database
Administrator’s Guide for information about synonyms
Chapter 3
Managing Synonyms
3-48

3.14.1 Creating Synonyms
Create synonyms using Object Browser.
To create a synonym:
1. On the Workspace home page, click SQL Workshop and then Object Browser.
Object Browser appears.
2. Click the Create icon.
3. From the list of object types, select Synonym.
4. For Define:
a. Synonym Name - Enter a name.
b. Public or Private - Specify whether the synonym should be public or private.
c. Schema - Select the database schema (or user name) which owns the object upon
which you want to create your synonym.
d. Object - Enter the name of the object upon which you want to create a synonym.
e. Database Link - Enter the name of the database link to use if the synonym is to be
created on a remote object.
f. Click Next.
A confirmation page appears, which displays the SQL used to create the synonym.
5. Click Create Synonym.
3.14.2 Viewing a Synonym
Select a synonym from the Object Selection pane.
To view a synonym:
1. On the Workspace home page, click SQL Workshop and then Object Browser.
Object Browser appears.
2. From the Object list, select Synonyms.
3. From the Object Selection pane, select a synonym.
The Object Details view appears displaying the following:
• Synonym Owner
• Synonym Name
• Object Owner
• Object Name
• Object Type
• Status
Chapter 3
Managing Synonyms
3-49

3.14.3 Dropping a Synonym
Select a synonym from the Object Selection pane and click Drop.
To drop a synonym in Object Browser:
1. On the Workspace home page, click SQL Workshop and then Object Browser.
Object Browser appears.
2. From the Object list, select Synonyms.
3. From the Object Selection pane, select a synonym and click Drop.
4. To confirm, click Finish.
3.15 Managing SODA Collections
Simple Oracle Document Access (SODA) is a set of NoSQL-style APIs that let you
create and store collections of documents in Oracle Database, retrieve them, and
query them, without needing to know Structured Query Language (SQL) or how the
documents are stored in the database.
• About SODA Collections
You can load data to a SODA collection as JSON, TXT, or ZIP files.
• Creating a SODA Collection
Use SQL Workshop to load documents to a new SODA collection.
• Viewing a SODA Collection
Access existing SODA collections in Object Browser.
• Editing or Dropping a SODA Collection
View a SODA collection in Object Browser, then use the Load Data to upload a
new version of the data or click the Drop button to remove the SODA collection
from the workspace.
3.15.1 About SODA Collections
You can load data to a SODA collection as JSON, TXT, or ZIP files.
SODA collections are an Object Type in Object Browser. You use Object Browser to
view or edit existing SODA collections, including drop them from the workspace.
Requirements
• Database 18.3 or higher.
• The workspace user must have the SODA_APP role.
Supported Filetypes
You can upload the following filetypes to a SODA collection:
• JSON files - APEX supports JSON files containing an array with multiple JSON
objects. APEX extracts each JSON object from the array and loads it as a single
JSON document to the SODA collection. The array selector is auto-detected by
default.
Chapter 3
Managing SODA Collections
3-50

• JSON lists - JSON lists are files containing multiple JSON documents, one per line,
separated by line feeds.
• ZIP files - ZIP files are automatically extracted and each file can be uploaded to a SODA
collection. Depending on data load settings, non-JSON files within the ZIP archive are
either skipped or also loaded to the collection. XML files can be converted to JSON
before loading to the SODA collection.
3.15.2 Creating a SODA Collection
Use SQL Workshop to load documents to a new SODA collection.
To load documents to a new SODA collection:
1. In Object Browser, click the Create icon ( + ) (top-right).
2. Select SODA Collection.
The Load Data into SODA Collection dialog displays.
Tip:
You can also access the Load Data wizard dialog with the SODA Collection
shortcut in the Create Object column on various SQL Workshop pages.
3. Do one of the following
• Drag and drop the desired JSON, TXT, or ZIP file into the dialog.
• Click Choose File, browse your local system to the file location, and upload.
The wizard prepares the next screen based on filetype.
4. Configure the options. For all filetypes, choose an upload option:
• To create a new collection (default), select New Collection.
• To upload to an existing collection, select Existing Collection.
5. For SODA Collection Name, enter the name of the collection.
Tip:
If Create Relational View is enabled, Relational View Name populates
automatically based on SODA Collection Name. You can change the Relational
View Name if desired.
6. Click Load Data.
The data loads. This may take some time.
7. When the upload completes, you can proceed in the following ways:
• To view the SODA collection in Object Browser, click View Collection.
• To jump to the Create App wizard (App Builder), click Create Application.
• To return to Object Browser, click the X icon (top-right) or press Esc to close the
dialog.
Chapter 3
Managing SODA Collections
3-51

3.15.3 Viewing a SODA Collection
Access existing SODA collections in Object Browser.
To access existing SODA collections:
1. On the Workspace home page, click SQL Workshop.
2. Click Object Browser.
3. In the Object Selection Pane (left), click the Object Type dropdown menu
(Tables is selected by default).
4. Select SODA Collections.
A list of existing SODA collections displays.
5. Click a collection to view it.
There are three tabs to view:
• Collection Contents - View the general contents of the collection. Contains
the Load Data and Drop buttons for the collection.
• Data Guide - View the Relational Views and full JSON Data Guide associated
with the collection. Contains the Drop Search Index and Create Relational
View buttons for the relational view. (Clicking a view under View Name
navigates to Views in Object Browser.)
• Collection Meta Data - View the SODA REST Endpoint URL and full
Collection Meta Data.
3.15.4 Editing or Dropping a SODA Collection
View a SODA collection in Object Browser, then use the Load Data to upload a new
version of the data or click the Drop button to remove the SODA collection from the
workspace.
To view a SODA collection in Object Browser:
1. In Object Browser, click the Object Type dropdown menu and select SODA
Collections.
2. Select the SODA collection to update.
To change a SODA collection:
3. Click the Load Data button.
The Data Upload wizard opens.
4. Proceed through the wizard, ensuring to select Existing Collection for Load To.
To drop a SODA collection:
5. Click the Drop button.
The confirmation screen displays.
6. Click the Drop button to confirm.
Chapter 3
Managing SODA Collections
3-52

4
Using SQL Commands
Using SQL commands you can create, edit, view, run, and delete database objects.
• About SQL Commands
You can use SQL Commands to create, edit, view, run, and delete database objects.
• Accessing SQL Commands
Learn how to access SQL Commands.
• About the SQL Commands Home Page
Learn about the SQL Commands home page.
• Using the Command Editor
You use the command editor in SQL Commands to execute SQL commands within
Oracle APEX.
• Saving an SQL Command
You can save commands you enter in SQL Commands.
• Copying a Command
Click Saved SQL from the SQL Commands page, click the name of the command to load
into command editor, enter a name, and click Save.
• Viewing Results
When you execute a SQL command, the results display in the display pane at the bottom
of the SQL Commands home page.
• Using Explain Plan
Explain plan parses a query and records the plan that Oracle devises to execute it.
• Using Saved Commands
You can access the commands you save and commands saved by other users in the
same workspace.
• Using SQL Command History
You use SQL Command History to access commands you have executed in SQL
Commands.
See Also:
• Oracle Database SQL Language Reference for detailed information about SQL
statements and other parts of SQL, such as operators, functions, and format
models.
• Oracle Database Concepts for conceptual information about SQL.
• SQL*Plus User's Guide and Reference for information about SQL*Plus,
Oracle's version of SQL.
• Oracle Database Sample Schemas for information about the
HR
sample schema
that is used for examples in this chapter.
4-1

4.1 About SQL Commands
You can use SQL Commands to create, edit, view, run, and delete database objects.
A SQL command can contain SQL statements or PL/SQL blocks.
When using SQL Commands, remember the following:
• SQL commands created in the Query Builder can be accessed from SQL
Commands.
• Saved SQL commands must have unique names within a given workspace.
• There is no interaction between SQL Commands and SQL Scripts.
• You can cut and paste an SQL command from SQL Commands to run in the SQL
Script Editor.
Tip:
SQL commands created in the Query Builder can be accessed from SQL
Commands.
See Also:
• Using SQL Scripts
• Using Query Builder
4.2 Accessing SQL Commands
Learn how to access SQL Commands.
To access SQL Commands:
1. On the Workspace home page, click SQL Workshop.
2. Click SQL Commands.
Chapter 4
About SQL Commands
4-2

The SQL Commands home page appears.
Note:
If the instance administrator has disabled RESTful Services for this APEX
instance, RESTful Services are not available for this instance and the RESTful
Services icon does not display.
See Also:
Configuring SQL Workshop in Oracle APEX Administration Guide
4.3 About the SQL Commands Home Page
Learn about the SQL Commands home page.
The SQL Commands home page is divided into two sections: a Command Editor and a
Display pane. You use the Command Editor to execute SQL commands and the display pane
to view output, saved command lists, and history lists.
Chapter 4
About the SQL Commands Home Page
4-3
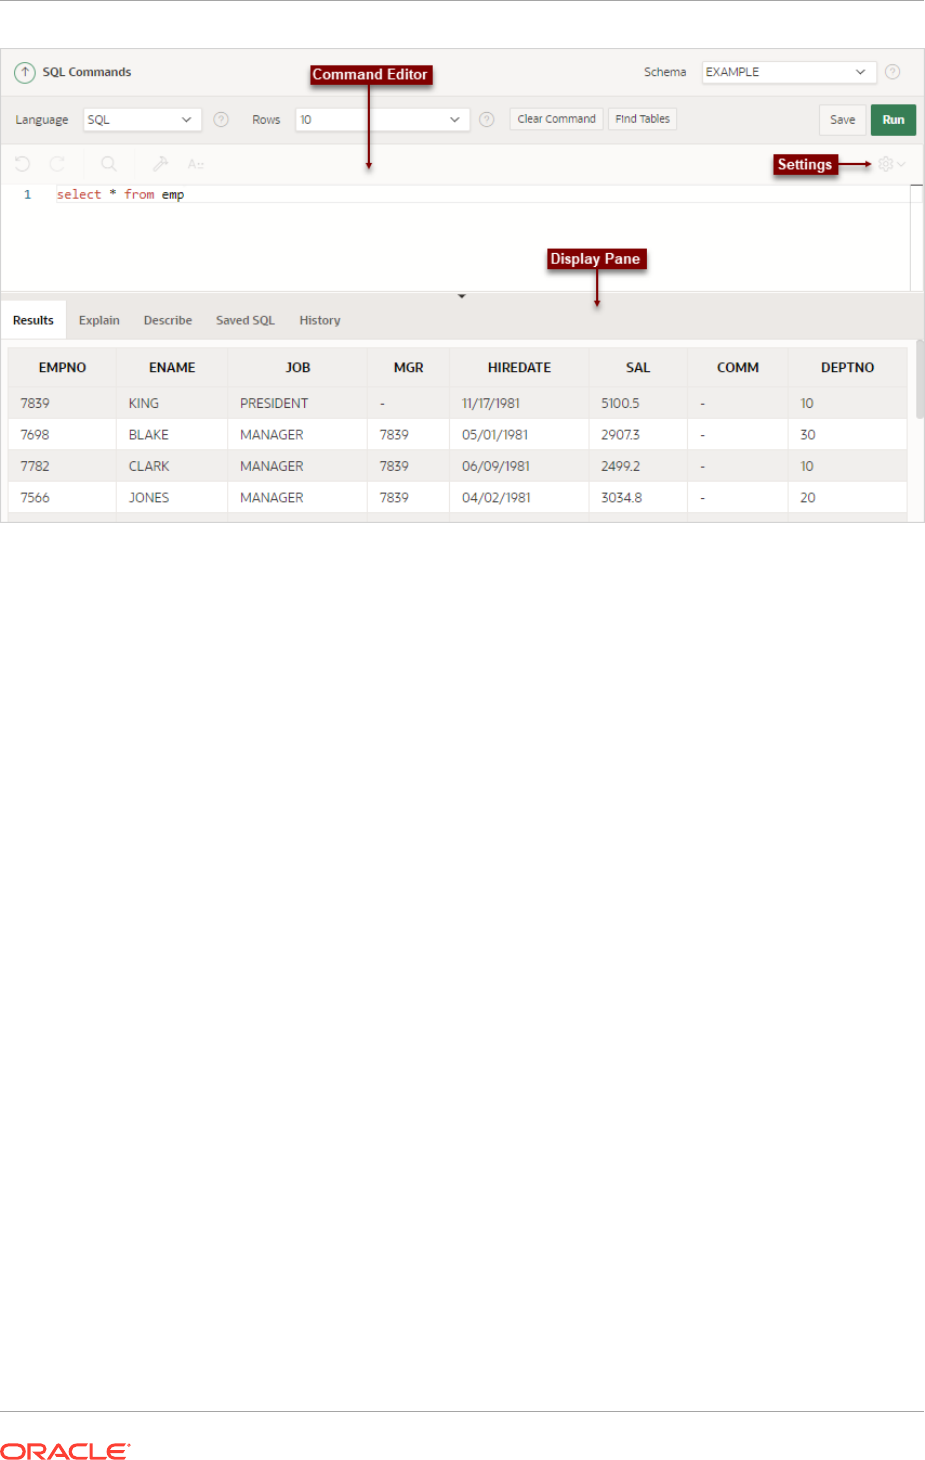
Command Editor
The top of the SQL Commands home page features a Command Editor with the
following controls:
• Language. Determines the language which should be used to execute the entered
statement.
• Rows. Select the number of rows of output to display simultaneously up to a
maximum of 100,000. All rows of DBMS Output are displayed regardless of the
Display list setting.
• Clear Command. Use the Clear Command button to clear the text in the
command editor.
• Find Tables. Use the Find Tables button to view tables within the currently
selected schema.
• Save. Click the Save button to save the contents of the command editor, or the
currently highlighted content to a file. You are prompted to enter a name and an
optional description. The command appears in the Saved SQL list.
• Run. Click the Run button (Ctrl+Enter) to run the command in the command
editor, or the currently highlighted command in the command editor.
The text editor features the following controls:
• Undo (Ctrl+Z)
• Redo (Ctrl+Shift+Z)
• Find (Ctrl+F)
• Query Builder
• Auto Complete (Ctrl+Space)
• Context Menu - Right-click and select one of the following:
Chapter 4
About the SQL Commands Home Page
4-4

– Change All Occurrences (Ctrl+F2) - Right click and select Change All Occurrences
from the context menu.
– Cut
– Copy
– Command Palette (F1) - The Command Palette includes over 80 commands
including: Replace (Ctrl+H), Replace with Next Value (Ctrl+Shift+.), and Replace with
Previous Value (Ctrl+Shift+,).
• Multi Cursor Selection:
– Add cursors at arbitrary positions - Select a position with your mouse and press
Shift+Alt+click (Shift+Option+click on macOS).
– Set cursors above the current position - Select a position with your mouse and press
Ctrl+Alt+Up (Option+Command+Up on macOS).
– Set cursors below the current position - Select a position with your mouse and press
Ctrl+Alt+Down (Option+Command+Down on macOS).
• Settings Menu - Displays on the right side and includes the following options:
– Indentation - Options include: Tab Inserts Spaces, Tab Size, and Indent Size
– Themes - Options include: Automatic, Light, Dark, and High Contrast Dark
– Show Ruler
Display Pane
The display pane is at the bottom of the SQL Commands home page and features the
following five tabs:
• Results. Click the Results tab to see the results from the last successfully executed SQL
command. Click DBMS Output at the bottom of the displayed results to display lines of
DBMS output. This control only appears when there is DBMS output to display. Click
Download to export results to a comma-delimited file on your local file system.
• Explain. Click the Explain tab to examine the execution plan used by the optimizer for
statements that make changes to the database. Objects in the output are linked to the
Object Browser. Click the linked object to view its properties in the Object Browser.
• Describe. Enter Describe object_name and click Run to display column definitions for a
table or view, or specifications for a function or procedure in the Describe tab. Select
links in the Describe results to write that information into the command editor. For
example, click a table name to add owner.table, click a column name to add the column
name, click a procedure or function name to add the object call with parameters, or click
a package name to add the package call.
• Saved SQL. Click the Saved SQL tab to display a list of all SQL commands saved in the
current workspace. Click the command title to load it into the command editor.
• History. Click the History tab to list your recently executed commands. Your last 200
executed commands are saved.
Chapter 4
About the SQL Commands Home Page
4-5

See Also:
• Using the Command Editor
• Selecting a Schema
4.4 Using the Command Editor
You use the command editor in SQL Commands to execute SQL commands within
Oracle APEX.
• Running a SQL Command
Enter the SQL command you want to run in the command editor and click Run.
• About Transactions in SQL Commands
Transactional mode is a stateful transaction mode where you can, for example,
perform an update, select data for review, and
COMMIT
or
ROLLBACK
changes. It is
implemented using
DBMS_JOBS
.
• About Unsupported SQL*Plus Commands
SQL Commands does not support SQL*Plus commands.
• Terminating a Command
You can terminate a command in SQL Commands using a semicolon (;), a slash
(/), or with nothing.
• Using Bind Variables
Enter values for bind variables during command execution.
• Using the Find Tables Button
Use the Find Tables button to view tables within the currently selected schema.
See Also:
About the SQL Commands Home Page
4.4.1 Running a SQL Command
Enter the SQL command you want to run in the command editor and click Run.
To execute a SQL Command:
1. On the Workspace home page, click SQL Workshop and then SQL Commands.
The SQL Commands page appears.
2. Enter the SQL command you want to run in the command editor.
3. Click Run (Ctrl+Enter) to execute the command.
Chapter 4
Using the Command Editor
4-6

Tip:
To execute a specific statement, select the statement you want to run and click
Run.
The results appear in the Results pane.
4. To export the resulting report as a comma-delimited file (.csv), click the Download link.
4.4.2 About Transactions in SQL Commands
Transactional mode is a stateful transaction mode where you can, for example, perform an
update, select data for review, and
COMMIT
or
ROLLBACK
changes. It is implemented using
DBMS_JOBS
.
Consider the following behavior in transactional mode:
• Actions are not committed to the database until you enter an explicit
COMMIT
command.
• Exiting SQL Commands terminates and rolls back the current transaction.
• A session timeout terminates and rolls back the current transaction.
Note that the Environment Setting,
SQL Commands Maximum Inactivity in minutes
,
sets the time before an inactive session times out. The default timeout is 60 minutes.
• The CSV Export option is not available.
See Also:
Configuring SQL Workshop in Oracle APEX Administration Guide
4.4.3 About Unsupported SQL*Plus Commands
SQL Commands does not support SQL*Plus commands.
If you attempt to enter an SQL Command Line command such as
SET ECHO
or
DEFINE
in SQL
Commands, an error message displays.
4.4.4 Terminating a Command
You can terminate a command in SQL Commands using a semicolon (;), a slash (/), or with
nothing.
Consider the following valid alternatives:
SELECT * from emp;
SELECT * from emp
/
SELECT * from emp
Chapter 4
Using the Command Editor
4-7

The first example demonstrates the use of a semicolon (;), the second example
demonstrates using a slash (/), and the final example demonstrates a command with
no termination.
4.4.5 Using Bind Variables
Enter values for bind variables during command execution.
Bind variables are supported. You are prompted to enter values for bind variables
during command execution. Bind variables are prefixed with a colon.
For example
SELECT * FROM emp WHERE deptno = :dept
4.4.6 Using the Find Tables Button
Use the Find Tables button to view tables within the currently selected schema.
To view tables within the current schema:
1. Navigate to SQL Commands.
2. From the Schema list, select a schema (optional).
3. Click Find Tables.
The Table Finder appears. A search bar displaying the selected schema displays
at the top of the page and contains the following controls:
• Search. Search for a table name. Enter case insensitive keywords in the
Search field and click Go. To view all tables, leave the Search field blank and
click Go.
• Views. Select the Views check box and click Go to include views in the
resulting report.
• Rows. Determine how many rows display in the resulting report. To change
the number of rows that display, make a selection from the list and click Go.
The Table Finder report appears displaying the table name, the number of rows,
last analyzed date, and the object type.
4. Select a table name.
The Table Finder report appears.
This report displays the column names, data type, length, precision, scale and the
SQL necessary to re-create the table that appears at the bottom of the page.
5. Click Append to append SQL from the page to the existing command in the
command editor.
6. Click Replace to replace existing command in the command editor with the SQL
from the page.
4.5 Saving an SQL Command
You can save commands you enter in SQL Commands.
To save an SQL command:
Chapter 4
Saving an SQL Command
4-8

1. On the Workspace home page, click SQL Workshop and then SQL Commands.
The SQL Commands page appears.
2. Enter the command in the command editor.
3. Click Save to save the command.
You are prompted to enter a name and description for the command.
4. Click Save, or click Cancel to return to the command editor without saving.
The saved command is listed in the display area.
4.6 Copying a Command
Click Saved SQL from the SQL Commands page, click the name of the command to load into
command editor, enter a name, and click Save.
To copy a SQL command:
1. On the Workspace home page, click SQL Workshop and then SQL Commands.
The SQL Commands page appears.
2. Click Saved SQL.
The Saved SQL list of commands appears in the display pane.
3. Click the name of the command to load it into the command editor
4. Click Save to save the command.
5. Enter a name for the command in the Name field and click Save.
The command is copied to the new name.
4.7 Viewing Results
When you execute a SQL command, the results display in the display pane at the bottom of
the SQL Commands home page.
The results of the last executed command are available until you execute another SQL
command, or leave SQL Commands.
• Accessing the Results Pane
From the SQL Commands page, click the Results tab.
• About the Results Pane
The Results pane displays SQL command results as HTML formatted table. The number
of rows returned appears after the output, and the time taken. DBMS output appears as
plain text after the HTML formatted results.
4.7.1 Accessing the Results Pane
From the SQL Commands page, click the Results tab.
To display SQL command results:
1. On the Workspace home page, click SQL Workshop and then SQL Commands.
The SQL Commands page appears.
Chapter 4
Copying a Command
4-9

2. Click the Results tab.
The HTML formatted results appear in the display pane.
3. Click DBMS Output to display plain text DBMS output results.
The DBMS Output control only appears if there are DBMS output results.
4.7.2 About the Results Pane
The Results pane displays SQL command results as HTML formatted table. The
number of rows returned appears after the output, and the time taken. DBMS output
appears as plain text after the HTML formatted results.
On the Results pane you can:
• Display DBMS output. Automatically displays HTML output or DBMS output
depending on type of SQL command entered, SQL or PL/SQL block with DBMS
output.
• Download results. Click Download to export results to a comma-delimited file on
your local file system. You are prompted to enter a name and directory for the file.
Only available for HTML output.
See Also:
Accessing the Results Pane
4.8 Using Explain Plan
Explain plan parses a query and records the plan that Oracle devises to execute it.
By examining this plan, you can find out if Oracle is picking the right indexes and
joining your tables in the most efficient manner. It is not necessary to execute the
command to view the explain plan.
• Viewing an Explain Plan
From the SQL Commands page, enter or load the command whose plan you want
to view and click the Explain tab.
4.8.1 Viewing an Explain Plan
From the SQL Commands page, enter or load the command whose plan you want to
view and click the Explain tab.
To view the Explain Plan:
1. On the Workspace home page, click SQL Workshop and then SQL Commands.
The SQL Commands page appears.
2. Enter or load the command whose plan you want to view.
3. Click the Explain tab.
The explain plan used by the optimizer appears in the display pane.
Chapter 4
Using Explain Plan
4-10

The Explain Plan pane shows the plan used by the Oracle Optimizer to run your SQL
command. It typically displays the Query Plan, Index Columns and Table Columns used.
On the Explain Plan pane you can:
• View object definitions. Click the object name in Query Plan to display the object
definition in the Object Browser.
• View index definitions. Click the index name in Table Columns to display the index
definition in the Object Browser.
4.9 Using Saved Commands
You can access the commands you save and commands saved by other users in the same
workspace.
You can also access SQL commands you and other users of the same workspace saved
from the Query Builder.
• Accessing Saved Commands
From the SQL Commands page, click the Saved SQL tab, click the title of the command
to load it into the command editor, and click Run.
• About the Saved SQL Pane
The Saved SQL pane displays a list of all commands saved under the current workspace.
4.9.1 Accessing Saved Commands
From the SQL Commands page, click the Saved SQL tab, click the title of the command to
load it into the command editor, and click Run.
To access saved SQL commands:
1. On the Workspace home page, click SQL Workshop and then SQL Commands.
The SQL Commands page appears.
2. Click the Saved SQL tab.
The Saved SQL list of commands appears in the display pane.
3. Click the title of the command to load it into the command editor.
The command appears in the editor.
4. Click Run to execute the command.
See Also:
About the Saved SQL Pane
4.9.2 About the Saved SQL Pane
The Saved SQL pane displays a list of all commands saved under the current workspace.
Chapter 4
Using Saved Commands
4-11

The list displays commands saved from SQL Commands and SQL commands saved
from Query Builder. Saved SQL commands must have unique names in the current
workspace. The same name cannot be used in the Query Builder and SQL
Commands.
Each command entry shows the owner name, the command name, a description if it
exists, the first characters of the SQL command, who last updated the command and
when.
On the Saved SQL pane you can:
• Show commands by owner - Make a selection from the Owner list to specify the
user whose commands you want to display. To view all scripts select -All Users-.
• Search for a command - Enter a command name or partial name, or enter a code
snippet in the Find field and click Go. To view all scripts, leave the Find field blank
and click Go. You control how many rows display by making a selection from the
Rows list.
• Set the Number of Output Rows - Make a selection from the Display list to
specify the number of Saved SQL commands to display simultaneously.
• Delete a command - Click the check box associated with a command and click
Delete Checked.
4.10 Using SQL Command History
You use SQL Command History to access commands you have executed in SQL
Commands.
Commands you have executed are stored in the command history regardless of
whether you explicitly save them.
• Accessing a Command from Command History
From the SQL Commands page, click the History tab.
• About the History Pane
The History pane displays a list of commands you have executed.
4.10.1 Accessing a Command from Command History
From the SQL Commands page, click the History tab.
To access history commands:
1. On the Workspace home page, click SQL Workshop and then SQL Commands.
The SQL Commands page appears.
2. Click the History tab.
The list of commands in History appears in the display pane.
3. Click the partial command displayed in the SQL column.
The command appears in the editor.
4.10.2 About the History Pane
The History pane displays a list of commands you have executed.
Chapter 4
Using SQL Command History
4-12

Each history entry shows the time the command was last executed, the first characters of the
command, and the schema in which it was executed.
On the History pane you can:
• Load a command - Click the partial command displayed in the SQL column to load the
command into the command editor. When the command loads, it also sets the schema in
which it was last executed.
Chapter 4
Using SQL Command History
4-13

5
Using Oracle APEX Utilities
APEX provides utilities to build SQL queries, load and unload data from an Oracle database,
generate DDL, view object reports, manage User Interface Defaults, restore dropped
database objects, compare schemas, monitor the database, and view database details.
• Using Data Workshop
Use Data Workshop to load and unload data to the database.
• Using Data Generator
Use the Data Generator utility to create Blueprints and then generate sample data.
• Using Query Builder
Using Query Builder, you can search and filter database objects, select objects and
columns, create relationships between objects, view formatted query results, and save
queries with little or no SQL knowledge.
• Using Quick SQL
Rapidly design and prototype data models using a markdown-like shorthand syntax that
expands to standards-based Oracle SQL.
• Using Sample Datasets
Use Sample datasets to build sample applications.
• Generating DDL
Generate data definition language (DDL) statements from the Oracle data dictionary.
• Managing User Interface Defaults
Managing user interface defaults enables you to assign default interface properties,
create default wizard, modify the table user interface defaults, add new attributes, and
export the user interface defaults.
• Comparing Schemas
You can run a report that compares database objects in two schemas, displaying
differences between them. You can compare all objects in the schemas or limit your
report to specific objects.
• Managing Methods on Tables
The Managing Methods on Tables utility enables you to create an application
programming interface, or package, based on a specified table.
• Using the Recycle Bin
You can use the Recycle Bin to view and restore dropped database objects.
• Viewing Object Reports
SQL Workshop Utilities includes a variety of object reports to help you better manage the
objects in your database.
• Viewing Database Details
If you have an account that has been granted a database administrator role, you can
view details about your database on the About Database page.
• Monitoring the Database
The reports available on the Database Monitor page provide a database-wide view of the
database sessions, system statistics, SQL statements, and longer operations.
5-1

5.1 Using Data Workshop
Use Data Workshop to load and unload data to the database.
• About the Load Data and Unload Data Wizards
Use the Load Data and Unload Data wizards to load and unload data to and from
the database.
• About Importing, Exporting, Loading, and Unloading Data
You have several options when copying data between Oracle databases or
between an Oracle database and external files. Data copying is accomplished by
exporting and importing data, and by unloading and loading data.
• Import, Export, Load, and Unload Options
The Oracle Database and Oracle APEX provide several powerful options for
importing, exporting, loading, and unloading data.
• Accessing the Load Data and Unload Data Wizards
Access the Load Data or Unload Data wizards in SQL Workshop by clicking
Utilities and then Data Workshop.
• Loading Data
Use the Load Data Wizard to copy and paste or upload data.
• Unloading Data
Use the Unload Data page to export the contents of a table to a text file or XML
document.
• Loading Data From the Oracle Cloud (Autonomous Database Only)
Load data from the Oracle Cloud using Object Store References. (This function is
only available for Autonomous Database users.)
5.1.1 About the Load Data and Unload Data Wizards
Use the Load Data and Unload Data wizards to load and unload data to and from the
database.
These step-by-step wizards include the following features:
• Drag and drop delimited files (CSV, tab-delimited), XLSX files (Excel workbooks),
JSON or XML files to load data into a new table.
• Copy and paste delimited data (CSV, tab-delimited), or select a sample data set to
load data into a new table.
• Data load parser detects almost everything automatically so there is no need to
manually pick data types, or provide format masks or decimal characters.
• Data Loading runs in the background which offers a number of advantages. If a
larger file is being uploaded, the dialog can be dismissed. If bad rows cannot be
inserted into the target table, the whole load is not lost. All failed rows are saved in
error table and can be post-processed manually.
• With Oracle Database 12c or later, you can choose whether the Primary Key
column will be generated using the Identity Column feature or whether a globally
unique identifier (
SYS_GUID
) shall be used. The difference is values and space
requirements. Identity Column values are like sequences in that they start with 1
and increase.
SYS_GUID
values are globally unique, hard to predict, but require
more space than the compact Identity Column numbers.
Chapter 5
Using Data Workshop
5-2

• The main dialog displays up to 10 columns and 5 rows in the preview. You can configure
load settings such as column headers, file encoding, column delimiter / enclosed by (for
CSV or TXT), and Select Sheet (for XLSX with multiple worksheets).
• You can view a full preview and change more settings by clicking the Configure button.
The Configure dialog displays a maximum of 100 columns and 100 rows. Users can
configure the same setting as settings in the main dialog plus maximum Rows to Sample
and columns to load/unload.
• Settings changes will change the preview both in main and configure dialogs. They also
affect data load result.
Note:
If file size is greater than (>) or equal (=) to 2097152 bytes and you select to
sample All Rows, the following confirmation message displays:
Sampling all
rows can take a while for larger files. Do you really want to sample
the whole file?
• Select table owner, enter table name and error table name.
Note:
By default, all table names are converted to upper case. If data load succeeds
without any error, the error table is dropped automatically.
• The wizards load and unload table data only. They do not load or unload other kinds of
schema objects.
• You can load and unload to and from your own schema only. This is also true for users
with administrator privileges.
• You can load or unload only a single table at a time.
Supported unload formats include:
• Text such as comma-delimited or tab-delimited data in dialog page.
• XML documents
See Also:
Import, Export, Load, and Unload Options
5.1.2 About Importing, Exporting, Loading, and Unloading Data
You have several options when copying data between Oracle databases or between an
Oracle database and external files. Data copying is accomplished by exporting and importing
data, and by unloading and loading data.
The following table defines these terms.
Chapter 5
Using Data Workshop
5-3

Term Definition
Exporting Copying database data to external files for import into another Oracle database
only. The files are in a proprietary binary format.
Importing Copying data into the database from external files that were created by
exporting from another Oracle database.
Unloading Copying database data to external text files for consumption by another Oracle
database or another application (such as a spreadsheet application). The text
files are in an industry-standard format such as tab-delimited or comma-
delimited (
CSV
).
Loading Copying data into the database from external text files that are in either a
standard delimited format or in any of the formats that are supported by the
Oracle SQL*Loader utility.
You can export data from any Oracle Database edition (Express Edition, Standard
Edition, and Enterprise Edition) into any other edition.
5.1.3 Import, Export, Load, and Unload Options
The Oracle Database and Oracle APEX provide several powerful options for importing,
exporting, loading, and unloading data.
Table 5-1 provides a summary of these options.
Table 5-1 Summary of Oracle APEX Import/Export Options
Feature or Utility Description
Load Data /Unload Data wizards in
Oracle APEX
• Easy to use graphical interface
• Supports CSV, XLSX, TXT, XML or JSON files)
or Copy and Paste (supports ONLY comma or
tab delimited data)
• Loads/unloads tables only, one table at a time
• Access only to schema of logged-in user
• No data filtering on upload
SQL*Loader utility • Command-line interface, invoked with
sqlldr
command
• Bulk-loads data into the database from external
files
• Supports numerous input formats, including
delimited, fixed record, variable record, and
stream
• Loads multiple tables simultaneously
• Powerful data filtering capabilities
Chapter 5
Using Data Workshop
5-4

Table 5-1 (Cont.) Summary of Oracle APEX Import/Export Options
Feature or Utility Description
Data Pump Export and Data Pump
Import utilities
• Command-line interface, invoked with
expdp
and
impdp
commands
• Exports and imports from one Oracle database
to another (proprietary binary format)
• Imports/exports all schema object types
• Imports/exports entire database, entire schema,
multiple schemas, multiple tablespaces, or
multiple tables
• Powerful data filtering capabilities
• High speed
Export and Import utilities • Command-line interface, invoked with
exp
and
imp
commands
• Exports and imports from one Oracle database
to another (proprietary binary format)
• Supports XMLType data
• Does not support the
FLOAT
and
DOUBLE
data
types
• Capabilities similar to Data Pump; Data Pump is
preferred
Table 5-2 provides several load, unload, import, and export scenarios and suggests the
appropriate option to use for each.
Table 5-2 Import/Export Scenarios and Recommended Options
Import/Export Scenario Recommended Option
You have fewer than 10 tables to load, the data is in spreadsheets or
tab-delimited or comma-delimited text files, and there are no complex
data types (such as objects or multivalued fields).
Load Data /Unload Data
wizards in Oracle APEX
You have to load data that is not delimited. The records are fixed
length, and field definitions depend on column positions.
SQL*Loader
You have tab-delimited text data to load, and there are more than 10
tables.
SQL*Loader
You have text data to load, and you want to load only records that
meet certain selection criteria (for example, only records for
employees in department number 3001).
SQL*Loader
You want to import or export an entire schema from or to another
Oracle database.
Data Pump Export and Data
Pump Import
You want to import or export data from or to another Oracle database.
The data contains XMLType data and contains no
FLOAT
or
DOUBLE
data types.
Import (
imp
) and Export (
exp
)
Chapter 5
Using Data Workshop
5-5

See Also:
Oracle Database Utilities for more information on Data Pump, the Import and
Export utilities, and SQL*Loader
5.1.4 Accessing the Load Data and Unload Data Wizards
Access the Load Data or Unload Data wizards in SQL Workshop by clicking Utilities
and then Data Workshop.
Use Data Workshop page to load data from various file formats such as XLSX, CSV,
XML, and JSON into your workspace. You can also use the Unload Data wizard to
export your data in text or XML format.
To access Load Data or Unload Data wizards:
1. On the Workspace home page, click the SQL Workshop icon.
2. Click Utilities.
3. Click Data Workshop.
The Data Workshop page appears.
4. Click the appropriate icon to load data and unload data:
• Load Data
• Unload Data
5.1.5 Loading Data
Use the Load Data Wizard to copy and paste or upload data.
• About Loading Data
Load data into the Oracle APEX by copying and pasting CSV data, selecting a
sample data set, or uploading a file.
• Copying and Pasting CSV data or Selecting a Sample Data Set
You can copy and paste CSV data, or select a sample data set sample into the
Load Data Wizard.
• Loading an XML Document
Load an XML document using Load Data Wizard.
• Loading a JSON File
Load a JSON file using Load Data Wizard.
• Loading a XLSX File
Load a XLSX file using Load Data Wizard.
See Also:
Import, Export, Load, and Unload Options
Chapter 5
Using Data Workshop
5-6

5.1.5.1 About Loading Data
Load data into the Oracle APEX by copying and pasting CSV data, selecting a sample data
set, or uploading a file.
Key capabilities when loading data into the APEX include:
• Copy and paste CSV data, or select a sample data set.
• Upload a file (supports CSV, XLSX, TXT, XML or JSON files).
Note:
Configure load settings such as column headers, file encoding, column
delimiter / enclosed by (for CSV or TXT), and Select Sheet (for XLSX with
multiple worksheets).
• View full preview and change more settings by clicking Configure button. Configure
dialog displays maximum of 100 columns and 100 rows. You can configure same setting
as settings in the main dialog plus maximum Rows to Sample and columns to load/
unload.
• In Configure dialog, under Columns to Load tab, you can enter case insensitive value
that will be treated as
NULL
. For example,
"tbd"
,
"n/a"
,
"unknown"
,
"-"
.
• Post loading, if any rows fail, up to 10 rejected rows display. To view more rows which
have error, click Open in Object Browser button. You can optionally click Drop Table
and Reload button to try the data load again.
• Settings change will change preview both in main and configure dialogs. They also affect
data load result.
• Select table owner, enter table name and error table name
Note:
By default, all table names are converted to upper case. If data load succeeds
without any error, the error table is dropped automatically.
• Post loading, a View Table button and Continue to Create Application Wizard button
display if there are no failed rows. The load is successful if ta table is created and
displayed.
5.1.5.2 Copying and Pasting CSV data or Selecting a Sample Data Set
You can copy and paste CSV data, or select a sample data set sample into the Load Data
Wizard.
To load data by copying and pasting CSV data or selecting a sample data set:
1. On the Workspace home page, click the SQL Workshop icon.
2. Click Utilities.
3. Click Data Workshop.
Chapter 5
Using Data Workshop
5-7

4. Under Get Started, click Load Data.
The Load Data Wizard appears.
5. Click Copy and Paste.
Under Copy and Paste, you can either copy and paste CSV data or select a
sample data set from the drop down menu.
6. Click Next.
7. Under Load to Table, edit the following:
a. Table Owner - Select the database schema you would like to create and load
data into.
b. Table Name - Identify the table name you would like to create. By default, all
table names are converted to upper case.
c. Error Table Name - Identify the error table name you would like to save errors
during data load.
Note:
By default, all table names are converted to upper case. If data load
succeeds without any error, this error table is dropped automatically.
d. Primary Keys - Select how to set the primary key (Oracle Database 12c or
later). Primary keys can be set using SYS_GUID or Identity Column.
SYS_GUID generates and returns a globally unique identifier. On most
platforms, this generated identifier is based on a host identifier, a process or
thread identifier of the process or thread invoking the function, and a non-
repeating value (sequence of bytes). SYS_GUID consumes more space, but is
unpredictable. Identity Column is compact, but can be predictable
e. Use Column Data Types - Select to use the column types parsed from the
file. If not selected, the table columns will be created as
VARCHAR2(4000)
.
8. To view the full preview, configure data load settings, and set which columns to
load, Click Configure.
Make the appropriate changes and click Save Changes.
9. Click Load Data.
5.1.5.3 Loading an XML Document
Load an XML document using Load Data Wizard.
XML files can also be uploaded to Oracle APEX. However, APEX only supports flat
XML structures which can easily be mapped to a table and columns. XML structures
with multiple levels of nesting cannot be loaded by the Data Loading wizard.
To load an XML document:
1. On the Workspace home page, click the SQL Workshop icon.
2. Click Utilities.
3. Click Data Workshop.
4. Click Load Data.
Chapter 5
Using Data Workshop
5-8

5. Under Upload a File, Click Choose File.
6. Select the appropriate
xml
file.
Note:
There are no delimiter or enclosing characters to choose for XML file load. Also
the column names are derived from the XML tag names, so there is no First
lines contains headers checkbox. XML files are limited to 10MB each.
7. Under Load to Table, do the following:
a. Table Owner - Select the table owner.
b. Table Name - Enter the table name.
c. Error Table Name - Enter the error table name to save errors during data load.
Note:
By default, all table names are converted to upper case. If data load succeeds
without any error, the error table is dropped automatically.
8. (Optional) To view the full preview, configure data load settings, and set which columns to
load, click Configure.
9. (Optional) Make appropriate changes and click Save Changes.
10. Click Load Data.
Once Data Loading is finished, a success message is displayed. If some rows cannot be
loaded to the target table, they will be stored to the error table and error table is displayed.
5.1.5.4 Loading a JSON File
Load a JSON file using Load Data Wizard.
Loading JSON files works similar to loading XML files.
Note:
Only flat structures are supported - deeply nested JSON structures cannot be
loaded.
To load a JSON file:
1. On the Workspace home page, click the SQL Workshop icon.
2. Click Utilities.
3. Click Data Workshop.
4. Click Load Data.
5. Under Upload a File, Click Choose File.
Chapter 5
Using Data Workshop
5-9

6. Select the appropriate
JSON
file .
Note:
JSON files are limited to 20MB on 11g and 12.1 databases. For Oracle
Database 12.2 or higher, there is no size limit for JSON files.
7. Under Load to Table, edit the following:
a. Table Owner - Select the database schema you would like to create and load
data into.
b. Table Name - Identify the table name you would like to create. By default, all
table names are converted to upper case.
c. Error Table Name - Identify the error table name you would like to save errors
during data load.
Note:
By default, all table names are converted to upper case. If data load
succeeds without any error, this error table is dropped automatically.
d. Primary Keys - Select how to set the primary key (Oracle Database 12c or
later). Primary keys can be set using SYS_GUID or Identity Column.
SYS_GUID generates and returns a globally unique identifier. On most
platforms, this generated identifier is based on a host identifier, a process or
thread identifier of the process or thread invoking the function, and a non-
repeating value (sequence of bytes). SYS_GUID consumes more space, but is
unpredictable. Identity Column is compact, but can be predictable
e. Use Column Data Types - Select to use the column types parsed from the
file. If not selected, the table columns will be created as
VARCHAR2(4000)
.
8. To view the full preview, configure data load settings, and set which columns to
load, Click Configure.
Make the appropriate changes and click Save Changes.
9. Click Load Data.
Once Data Loading is finished, a success message displays. If some rows cannot
be loaded to the target table, they will be stored to the error table and error table is
displayed.
5.1.5.5 Loading a XLSX File
Load a XLSX file using Load Data Wizard.
Loading XLSX files is similar to loading CSV files. There is no need to detect or to
choose delimiter or enclosing characters.
To load a XLSX file:
1. On the Workspace home page, click the SQL Workshop icon.
2. Click Utilities.
Chapter 5
Using Data Workshop
5-10

3. Click Data Workshop.
4. Click Load Data.
5. Under Upload a File, Click Choose File.
6. Select the appropriate
XLSX
file .
Note:
If the uploaded XLSX file contains multiple worksheets, Load Data wizard picks
the first sheet by default. To load another sheet, pick it from the Select Sheet
select list. The First lines contains headers checkbox works similar to CSV
files. The same is true for the Configure dialog, the behavior is the same as it
is for CSV files. Uploading XLSX files is limited to 20MB for each file.
7. Under Load to Table, edit the following:
a. Table Owner - Select the database schema you would like to create and load data
into.
b. Table Name - Identify the table name you would like to create. By default, all table
names are converted to upper case.
c. Error Table Name - Identify the error table name you would like to save errors during
data load.
Note:
By default, all table names are converted to upper case. If data load
succeeds without any error, this error table is dropped automatically.
d. Primary Keys - Select how to set the primary key (Oracle Database 12c or later).
Primary keys can be set using SYS_GUID or Identity Column.
SYS_GUID generates and returns a globally unique identifier. On most platforms, this
generated identifier is based on a host identifier, a process or thread identifier of the
process or thread invoking the function, and a non-repeating value (sequence of
bytes). SYS_GUID consumes more space, but is unpredictable. Identity Column is
compact, but can be predictable
e. Use Column Data Types - Select to use the column types parsed from the file. If not
selected, the table columns will be created as
VARCHAR2(4000)
.
8. To view the full preview, configure data load settings, and set which columns to load,
Click Configure.
Make appropriate changes and click Save Changes.
9. Click Load Data.
Once Data Loading is finished, a success message is displayed. If some rows cannot be
loaded to the target table, they will be stored to the error table and error table is
displayed.
5.1.6 Unloading Data
Use the Unload Data page to export the contents of a table to a text file or XML document.
Chapter 5
Using Data Workshop
5-11

• Unloading a Text File
Use the Unload Data wizard to export the contents of a table to a text file. For
example, you could export an entire table to a comma-delimited file (.csv).
• Unloading to an XML Document
Use the Unload Data wizard to export the contents of a table to an XML document
adhering to the Canonical XML specification.
See Also:
Import, Export, Load, and Unload Options
5.1.6.1 Unloading a Text File
Use the Unload Data wizard to export the contents of a table to a text file. For
example, you could export an entire table to a comma-delimited file (.csv).
To unload a table to a text file:
1. On the Workspace home page, click the SQL Workshop icon.
2. Click Utilities.
3. Click Data Workshop.
4. Under Get Started, click Unload Data.
The Unload Data Wizard appears.
5. Select Text Format and click Next.
The Unload to Text - Columns appears.
6. On Unload Text - Columns, edit the following:
a. Schema - Select the database schema that owns the object you would like to
export.
b. Table - Select the database table you would like export to a plain text format.
c. Columns - Highlight the columns you would like to be part of this plain text file.
Only Oracle built in data types except BLOB and BFILE are supported to
unload.
d. Where Clause - Enter SQL
WHERE
clause to limit the rows that are selected.
For example:
DEPTNO = 10
e. Click Next.
7. For Options, enter the following:
a. Separator - Specify the type of separator used to separate the column values
on each line. The default value is a comma (,). To use a tab as a column
separator, enter a backslash followed by the letter "t" ().
b. Optionally Enclosed By - Use this option to specify how to identify text strings
in a column. You can specify single or double quotation marks.
c. Include Column Names - Check this box to include the name of each column
in the text file.
Chapter 5
Using Data Workshop
5-12

d. File Format - Select DOS to have the lines in the resulting file terminated by carriage
returns and line feeds. Select UNIX to have the lines in the resulting file contain
terminated by line feeds.
e. File Character Set - Select the character set to encode the export file.
8. Click Unload Data.
The file is downloaded.
5.1.6.2 Unloading to an XML Document
Use the Unload Data wizard to export the contents of a table to an XML document adhering
to the Canonical XML specification.
To unload a table to an XML document:
1. On the Workspace home page, click the Utilities icon.
2. Click Data Workshop.
3. Under data Unload, click to XML.
The Unload to XML Wizard appears.
4. Under Get Started, click Unload Data.
The Unload Data Wizard appears.
5. Select XML Format and click Next.
The Unload to XML - Columns appears.
6. Select the appropriate schema.
7. Select the table to unload.
8. Highlight the columns to include.
9. (Optional) Enter a Where clause to limit the records unloaded, and click Unload Data.
The File Download window appears.
10. Click Save to download the file.
5.1.7 Loading Data From the Oracle Cloud (Autonomous Database Only)
Load data from the Oracle Cloud using Object Store References. (This function is only
available for Autonomous Database users.)
• Granting Privileges to the Workspace Schema
Before you can load data from the cloud, you must grant privileges to the workspace
schema.
• User Interface Differences for Oracle Cloud Users
For Oracle Cloud users, Data Workshop includes an additional Load from Cloud button
on the Data Workshop home page.
• About Object Store References
Data Workshop uses Object Store References to reference cloud-based URLs for loading
data. Use Object Store References to create External Tables from the Cloud, which you
can then import into your workspace or connect to your applications.
• Creating an Object Store Reference
Create a new Object Store Reference.
Chapter 5
Using Data Workshop
5-13

• Creating an External Table from Cloud
Create a table from an external source with an Object Store Reference.
• Loading Avro or Parquet Files into Object Browser from Cloud
For Avro and Parquet files, first prepare an external table then load it into your
workspace for local use.
• Loading Other Files into Object Browser from Cloud
For non-Avro and non-Parquet files, view the Object Store Reference in Data
Workshop then import the file into your workspace for local use.
5.1.7.1 Granting Privileges to the Workspace Schema
Before you can load data from the cloud, you must grant privileges to the workspace
schema.
Grant the following privileges to the workspace schema:
•
EXECUTE ON DBMS_CLOUD
•
READ,WRITE ON DIRECTORY DATA_PUMP_DIR
For example, run the following as ADMIN:
GRANT EXECUTE ON DBMS_CLOUD TO {schema};
GRANT READ,WRITE ON DIRECTORY DATA_PUMP_DIR TO {schema};
Where:
•
schema
is the workspace schema
See Also:
• DBMS_CLOUD Subprograms and REST APIs in Using Oracle
Autonomous Database on Shared Exadata Infrastructure
• GRANT in Oracle Database SQL Language Reference
5.1.7.2 User Interface Differences for Oracle Cloud Users
For Oracle Cloud users, Data Workshop includes an additional Load from Cloud
button on the Data Workshop home page.
APEX On-premise users only see Load Data and Unload Data buttons on the Data
Workshop home page.
Oracle Cloud users also see the Load from Cloud button.
Chapter 5
Using Data Workshop
5-14

5.1.7.3 About Object Store References
Data Workshop uses Object Store References to reference cloud-based URLs for loading
data. Use Object Store References to create External Tables from the Cloud, which you can
then import into your workspace or connect to your applications.
Creating an Object Store Reference is the first step to creating external tables in the cloud.
Essentially, the Object Store Reference preserves the necessary credentials to authorize your
APEX workspace to access external data, and therefore enable your apps to access external
data.
You can store the following types of credentials in an Object Store Reference:
• Username/Password - Basic two-field username and password.
• OCI Native - Use the Oracle Cloud Infrastructure (OCI) protocol: User OCID, Private Key,
Tenancy OCID, and Fingerprint.
• Web Credential - Reuse a web credential already stored in the workspace.
• DBMS_CLOUD Credential - Reuse a DBMS_CLOUD credential already stored in the
workspace.
For Parquet and Avro files, Data Workshop asks for an external table name and where to
derive the schema. Other file types can be up to 50MB.
When using an Object Store Reference to create an external table, APEX calls the data using
the
DBMS_CLOUD.CREATE_EXTERNAL_TABLE
procedure.
See Also:
DBMS_CLOUD CREATE_EXTERNAL_TABLE Procedure in Using Oracle
Autonomous Database on Shared Exadata Infrastructure
5.1.7.4 Creating an Object Store Reference
Create a new Object Store Reference.
Required
Chapter 5
Using Data Workshop
5-15

Before you begin, ensure you know the URL of the Object Store Bucket you want to
call from Autonomous Data Warehouse.
Procedure
To create a new Object Store Reference:
1. Click the Create New button.
The Object Store Reference dialog displays.
2. Enter the following information:
a. URL - The URL is the URI of the Object Store bucket excluding the filename.
Note:
To learn more about the DBMS_CLOUD Package File URI format,
see DBMS_CLOUD Package File URI Formats in Using Oracle
Autonomous Database on Shared Exadata Infrastructure
b. Reference Name - Copied from the URL field. You can change the Reference
Name to something easier, such as
Project Bucket
.
c. Credential Type - Select the authentication scheme used to access the
Object Store bucket.
Tip:
For Amazon Web Services (AWS):
• Username - Access Key ID
• Password - Secret access key
d. Enter the requested credentials for the selected Credential Type (options vary
between credential type).
Note:
Enable Create a Web Credential to create a reusable authorization
stored in the workspace. Web Credentials are useful for granting
access to a data source without providing the full username and
password, for example.
e. Click Apply Changes.
The Object Store References page reloads with the success message
Object Store
Reference saved
.
5.1.7.5 Creating an External Table from Cloud
Create a table from an external source with an Object Store Reference.
To view an Object Store Reference:
Chapter 5
Using Data Workshop
5-16

1. In Data Workshop, click Load from Cloud.
2. Select the Object Store Reference from the drop-down menu.
The associated Object Store Bucket loads. A list of object names populates below.
To create an external table:
3. Click the filename of an object. Click more than one name to select multiple files to
externalize.
The Load File from Object Store dialog displays below. The selected filename appears in
the File Name Pattern field.
If selecting multiple files, the names appear in the order selected, separated by commas.
Tip:
Click the X icon to clear the File Name Pattern field of all selections.
4. Configure the Load File from Object Store section:
a. File Type - Select whether the object file type is Avro, Parquet, or Other.
b. Derive Data Definition - Choose First File to apply the schema to the rest of the
batch. Choose All Files to preserve multiple schemas.
c. External Table Name - Enter a name for the table.
d. Click Create External Table.
APEX loads the data (depending on size, this may take some time).
5. When loading is complete, do one of the following:
• To review the table, click View Table. The Review External Table page displays.
• To launch the Create App wizard, click Create Application.
5.1.7.6 Loading Avro or Parquet Files into Object Browser from Cloud
For Avro and Parquet files, first prepare an external table then load it into your workspace for
local use.
To create an external table:
1. In Data Workshop, click Load from Cloud.
2. Select an Object Store Reference from the drop-down menu.
The associated Object Store Bucket loads. A list of object names populates below.
3. Click the object names you wish to import.
If selecting multiple files, the names appear in the order selected, separated by commas.
Tip:
Click the X icon to clear the File Name Pattern field of all selections.
4. For File Type, select Avro or Parquet.
Chapter 5
Using Data Workshop
5-17

5. Click Create External Table.
The Review External Table page displays.
To load the data to a local table:
6. On the Review External Table page under Load Data, configure how APEX
imports the external table into the workspace:
a. Load Into - Choose whether to create a New Table or overwrite an Existing
Table.
b. New Table Name - Enter a name for the table. Click the Configure button to
choose which columns to load.
c. Monitor Progress - Toggle whether to view a progress bar during import.
(Useful for large tables.)
d. Commit Interval - Choose the rate of row inserations at which a
COMMIT
operation is executed.
e. Drop External Table after Load - Enable to retain the external table afterward.
Disable to drop the selected external table.
A preview of the final import version displays at the bottom.
7. Click Load Data to Local Table.
5.1.7.7 Loading Other Files into Object Browser from Cloud
For non-Avro and non-Parquet files, view the Object Store Reference in Data
Workshop then import the file into your workspace for local use.
To import the file to your workspace from Cloud:
1. In Data Workshop, click Load from Cloud.
2. Select an Object Store Reference from the drop-down menu.
The associated Object Store Bucket loads. A list of object names populates below.
3. Click the name of the object you wish to import.
4. For File Type, select Other.
5. Click Import.
APEX loads the data.
The Load Data dialog displays.
6. Configure how APEX imports the resulting table:
a. Load To - Choose whether to create a New Table or overwrite an Existing
Table.
b. Table Owner - Choose a table owner.
c. Table Name - Name the table. Note: For new tables, the name must be unique
to the workspace.
A preview of the first few rows displays at the bottom of the dialog.
7. Click Load Data.
Chapter 5
Using Data Workshop
5-18

5.2 Using Data Generator
Use the Data Generator utility to create Blueprints and then generate sample data.
Use the sample data to iterate your app and blueprints.
Tip:
If you are new to Blueprints, follow the Create a Blueprint from Scratch procedure
with the Starter Table option enabled.
See Creating a Blueprint from Scratch.
• About Blueprints
Blueprints are JSON files that define the tables and columns that store generated data.
You can use existing tables in your schema, import valid blueprints, or create a blueprint
from scratch using Blueprint Designer.
• Accessing Data Generator
Learn how to access Data Generator.
• Creating Blueprints
Create Blueprints using the Create Tables Blueprint wizard by clicking the Create
Blueprint button.
• Running Blueprints
Quickly run a blueprint on the Data Generator home page or generate data in Blueprint
Designer.
• Modifying Blueprints
Use Blueprint Designer to modify the columns in a blueprint.
• Previewing Blueprints
Preview data for the tables and columns.
• Exporting Blueprints
View the JSON of the blueprint for export.
• Deleting Blueprints
Delete blueprints in Blueprint Designer.
5.2.1 About Blueprints
Blueprints are JSON files that define the tables and columns that store generated data. You
can use existing tables in your schema, import valid blueprints, or create a blueprint from
scratch using Blueprint Designer.
Blueprints are the primary object you use in Data Generator. Blueprints enable you to transfer
entire apps and data sets between workspaces or populate a new workspace with custom
apps.
Each Blueprint can contain one or more tables, columns, and custom data sources. Each
column has a Data Source type with many customization options available. When generating
data, a number of rows per table are produced and a downloadable file can be obtained.
Download options are:
Chapter 5
Using Data Generator
5-19

• JSON or comma-separated values (CSV) files
• A SQL script with inserts ready to run against a workspace with matching tables
and columns
Quick Table Inserts with Data Generator
If there are tables in your schema that match the table and column names in the
Blueprint, you have the option to run inserts of generated data against these tables.
Note:
Currently the Data Generator does not consider the table constrains when
inserting data. You must adjust the Blueprint column data sources
configuration so that generated data can be inserted successfully into the
schema tables.
The fastest option to quickly generate data is to create a Blueprint from Scratch that
includes a sample table, several columns with different data source types, and a
custom data source. From there you can Preview its data, make any adjustments
necessary, and Generate Data.
Generate Data is the process of using the Data Generator API to quickly populate
rows of data based on the Blueprint customizations. It can be used to quickly insert
thousands of rows into existing tables in your schema or produce JSON, CSV or SQL
insert files that can be used against other apps, tables or for quick report prototyping.
For instance, you might have an APEX application with reports, graphs, and other
page items and regions linked to tables existing in your schema. Using Data Generator
to insert thousands of rows of data into these tables enables you to more realistically
test your application in a safe environment so that you can identify the necessary
adjustments for your tables or reports, rather than having these issues appear when
dealing with real-world information in a production environment.
See Also:
About Blueprint Designer
5.2.2 Accessing Data Generator
Learn how to access Data Generator.
To access Data Generator:
1. On the Workspace home page, click SQL Workshop.
2. Click Utilities.
3. Click Data Generator.
The Data Generator home page appears.
Chapter 5
Using Data Generator
5-20

5.2.3 Creating Blueprints
Create Blueprints using the Create Tables Blueprint wizard by clicking the Create Blueprint
button.
• Creating a Blueprint from Existing Tables
Select existing tables from your schema to quickly build a blueprint that enables fast
inserts of generated data into them.
• Creating a Blueprint from Scratch
Create a new blueprint from scratch based on a sample table with provided columns that
enables you to quickly generate sample data. Use Blueprint Designer to add tables to the
blueprint after creation.
• Importing a Blueprint
Upload a valid blueprint from a JSON file or copy-paste your JSON data into the required
fields.
5.2.3.1 Creating a Blueprint from Existing Tables
Select existing tables from your schema to quickly build a blueprint that enables fast inserts
of generated data into them.
1. On the Data Generator home page, click the Create Blueprint button.
The Create Tables Blueprint wizard appears.
2. Click Use Existing Tables.
3. Do one of the following:
• Select from list - (Default) Choose an existing table in your workspace schema to
base the blueprint on.
a. Blueprint Name - Name the blueprint.
b. List of tables - Click the checkboxes of the tables to include in the blueprint. Use
the search bar to filter the list of tables by name. Use the Reset button to remove
all search filters applied to the list of tables.
c. (Optional) Rows Column - Double-click a cell in the Rows column or toggle the
Edit button to change the number of rows to include from the table (default
50
).
d. (Optional) Excluded Columns - Input a list of column names to exclude from the
auto column generation in the format
column1,column2,column3
. The Excluded
Columns parameter applies to all selected tables.
• Copy and Paste - Use copy and paste to insert a large amount of tables more easily
than selecting from the Select from list option.
a. Blueprint Name - Name the blueprint.
b. Tables - Input a comma-separated list of tables and the number of records to
generate by default. The format for each table is
TABLE_NAME:ROWS_TO_GENERATE
(for example:
PRODUCTS:10,CUSTOMERS:50,SALES:1000
).
c. (Optional) Excluded Columns - Input a list of column names to exclude from the
auto column generation in the format
column1,column2,column3
. The Excluded
Columns parameter applies to all selected tables.
4. Click Create Blueprint.
Chapter 5
Using Data Generator
5-21

The wizard generates the blueprint. Oracle APEX navigates to the blueprint in
Blueprint Designer.
5.2.3.2 Creating a Blueprint from Scratch
Create a new blueprint from scratch based on a sample table with provided columns
that enables you to quickly generate sample data. Use Blueprint Designer to add
tables to the blueprint after creation.
1. On the Data Generator home page, click the Create Blueprint button.
The Create Tables Blueprint wizard appears.
2. Click From Scratch.
3. Name - Name the blueprint.
4. (Optional) Description - Enter a description for the blueprint.
5. Add Starter Table - (Enabled by default) Enable to add both a sample table
populated with sample data and a Custom Data Source object. You can view these
in Blueprint Designer.
6. Click Create Blueprint.
The wizard generates the blueprint. Oracle APEX navigates to the blueprint in
Blueprint Designer.
5.2.3.3 Importing a Blueprint
Upload a valid blueprint from a JSON file or copy-paste your JSON data into the
required fields.
1. On the Data Generator home page, click the Create Blueprint button.
The Create Tables Blueprint wizard appears.
2. Click Import JSON File.
3. Do one of the following:
• Upload a File - (Default) Upload a valid JSON blueprint file.
a. Drag and drop your blueprint (must be a valid JSON file) into the field, or
click Choose File to browse your system for the file.
b. (Optional) Override Name - Enter a blueprint name to override the value
set in the JSON. You must also enable the Replace switch to override the
name.
• Copy and Paste - Input a valid JSON object that you want to generate into a
blueprint. This option is useful for iterating between blueprints where you
adjust some values in the JSON before creating a blueprint from it.
a. Enter the Blueprint JSON text.
b. (Optional) Override Name - Enter a blueprint name to override the value
set in the JSON. You must also enable the Replace switch to override the
name.
4. Click Import Blueprint.
The wizard generates the blueprint. Oracle APEX navigates to the blueprint in
Blueprint Designer.
Chapter 5
Using Data Generator
5-22

5.2.4 Running Blueprints
Quickly run a blueprint on the Data Generator home page or generate data in Blueprint
Designer.
• Selecting Data Generation Schema
On the Data Generator home page, click the drop-down list under Data Generation
Schema to select the database schema to be used for data generation. The Data
Generator home page reloads.
• Generating Data from a Blueprint
Click the corresponding Generate Data button for the blueprint you want to populate with
sample data. For valid tables, you can generate an exportable file or insert the data into
corresponding tables in the workspace.
5.2.4.1 Selecting Data Generation Schema
On the Data Generator home page, click the drop-down list under Data Generation Schema
to select the database schema to be used for data generation. The Data Generator home
page reloads.
The Data Generator home page only shows blueprints created for a specific schema. If you
change the schema, the list of available blueprints also changes.
5.2.4.2 Generating Data from a Blueprint
Click the corresponding Generate Data button for the blueprint you want to populate with
sample data. For valid tables, you can generate an exportable file or insert the data into
corresponding tables in the workspace.
Note:
The Insert Into Database option overwrites existing data.
1. Do one of the following:
• On the Data Generator home page, click Generate Data for the chosen blueprint.
• Open a blueprint in Blueprint Designer and click Generate Data.
The Generate Blueprint Data dialog displays.
2. For Action, select one of the following:
• a. File Export - Generates an object to download onto your local system.
b. Output Format - Choose whether to export a JSON, CSV, or SQL file.
Note:
For CSV, if there is only one table in the blueprint, this process
generates one CSV file. If multiple tables exists, this process generates
one ZIP file containing one CSV file per table inside.
Chapter 5
Using Data Generator
5-23

c. (Optional) Row Scaling - (Default 1x) Change this value to change the
amount of generated data. For example, .25x generates a quarter of the
provided rows; 100x generates one hundred times the number of provided
rows.
d. Click Generate Data.
• a. Insert Into Database - Inserts all generated data into matching tables in
the schema.
Note:
The Insert Into Database option overwrites existing data. Ensure
you know table constraints and triggers that may prevent
successful insert operations before inserting.
b. Insert Method - Insert Into inserts one row at a time (if there are errors on
this action, the row is discarded and the next insert attempts to run). Fast
Insert Into inserts all rows at once (if the insert fails on a table, adds no
records).
c. (Optional) Row Scaling - (Default 1x) Change this value to change the
amount of generated data. For example, .25x generates a quarter of the
provided rows; 100x generates one hundred times the number of provided
rows.
d. Click Insert Data.
5.2.5 Modifying Blueprints
Use Blueprint Designer to modify the columns in a blueprint.
• About Blueprint Designer
You can access Blueprint Designer by clicking the name of a blueprint on the Data
Generator home page.
• Modifying Blueprint Table and Column Attributes
Select a table or column in Blueprint Designer to view and update its attributes.
• Adding and Deleting Tables and Columns
Use the context menu in the file tree of Blueprint Designer to add or remove tables
and columns.
• Saving Blueprints
You must save your changes in Blueprint Designer before exiting. Changes do not
save automatically.
5.2.5.1 About Blueprint Designer
You can access Blueprint Designer by clicking the name of a blueprint on the Data
Generator home page.
Use the tree view on the left to select a blueprint, table, column or custom data source
object and modify its attributes.
Create new tables, columns, and custom data sources using the context menu.
Chapter 5
Using Data Generator
5-24

Using the Generate Data and Preview Data buttons, you can preview data for the tables and
columns, and export the data to a JSON, CSV, or SQL file. If a table exists in the schema with
the same name, data can be inserted into the corresponding columns.
Click the Options icon (wrench) for shortcuts for exporting and deleting blueprints.
5.2.5.2 Modifying Blueprint Table and Column Attributes
Select a table or column in Blueprint Designer to view and update its attributes.
Important:
Ensure you save your changes before exiting Blueprint Designer.
1. In Blueprint Designer, click a table or column in the tree.
The attributes for the object appear in the central pane.
2. Update the desired attribute. Use the arrow icons to expand or collapse the attribute
categories.
3. Click Save (top-right).
A Blueprint Saved message displays.
5.2.5.3 Adding and Deleting Tables and Columns
Use the context menu in the file tree of Blueprint Designer to add or remove tables and
columns.
Tables and columns in the blueprint appear in a parent-child hierarchy in the file tree.
Tip:
For the following procedures, you can also click the name of an object and then
click the Rendering Menu icon at the top-right of the tree to display the same
options.
Important:
Ensure you save your changes before exiting Blueprint Designer.
To add a table:
1. In Blueprint Designer, right-click Tables near the top of the tree, below the name of the
blueprint.
2. Click Add Table.
A new table object appears at the bottom of the tree.
To delete a table:
3. Right-click the table.
Chapter 5
Using Data Generator
5-25

4. Select Delete Table.
To add a column:
5. Right-click the table.
6. Select Add Column.
A new column appears at the bottom of the list of columns within the table.
To delete a column:
7. Right-click the column.
8. Select Delete Column.
Important:
Ensure you save your changes before exiting Blueprint Designer.
To save your changes:
9. Click Save (top-right).
A Blueprint Saved message displays.
5.2.5.4 Saving Blueprints
You must save your changes in Blueprint Designer before exiting. Changes do not
save automatically.
Tip:
While the Save button quickly saves your changes to the blueprint, the
Generate button also saves the blueprint and inserts the data into the
matching table according to the updated attributes.
1. Complete your changes to the blueprint.
2. Click Save (top-right).
A Blueprint Saved message displays.
5.2.6 Previewing Blueprints
Preview data for the tables and columns.
Previewing enables you to quickly review a few rows of data rather than generating a
full JSON, CSV, or SQL script file to learn what adjustments you must make to the
configuration.
1. On the Data Generator home page, click the name of the blueprint you want to
preview.
The blueprint opens in Blueprint Designer.
2. Click the Preview Data button.
The Preview Blueprint Data dialog displays.
Chapter 5
Using Data Generator
5-26

Note:
The preview data may take several seconds to populate.
3. Use the Table List and Preview Size menus to expand what you want to preview.
4. Do one of the following:
• To proceed to the Generate Blueprint Data wizard, click the Generate Data button.
• To cancel, press
Esc
or click the Cancel button.
5.2.7 Exporting Blueprints
View the JSON of the blueprint for export.
Because blueprints are stored as JSON files, you can quickly export (and import) blueprints
with copy and paste or download them as a JSON file.
1. On the Data Generator home page, locate the blueprint you want to export.
2. Click the corresponding Export button.
The JSON for the blueprint displays in a dialog.
Tip:
If you are in Blueprint Designer, click the Options icon (wrench) and select
Export.
3. Click Export Blueprint.
The blueprint JSON file downloads to your local system.
5.2.8 Deleting Blueprints
Delete blueprints in Blueprint Designer.
1. On the Data Generator home page, click the name of the blueprint you want to delete.
The blueprint displays in Blueprint Designer.
2. Click the Options icon (wrench).
3. Click Delete.
4. On the confirmation dialog, click Delete.
The Data Generator home page reloads.
5.3 Using Query Builder
Using Query Builder, you can search and filter database objects, select objects and columns,
create relationships between objects, view formatted query results, and save queries with
little or no SQL knowledge.
Query Builder's graphical user interface enables database developers to build SQL queries
without the need for manual SQL coding.
Chapter 5
Using Query Builder
5-27

Tip:
SQL commands created in the Query Builder can be accessed from SQL
Commands.
• Query Builder Home Page
Learn about Query Builder home page.
• Accessing Query Builder
Learn how to access Query Builder.
• Understanding the Query Building Process
Learn how to build a query in Query Builder.
• Using the Object Selection Pane
Use the Object Selection pane to search for and view tables, views, and
materialized views within the current schema as well as select objects.
• Using the Design Pane
Learn about how to use the Design pane.
• Specifying Query Conditions
As you select columns within an object, you can specify conditions on the
Conditions tab.
• Creating Relationships Between Objects
You can create relationships between objects by creating a join.
• Working with Saved Queries
You can create queries and save the query for later use.
• Viewing Generated SQL
The SQL view presents a read-only, formatted representation of the SQL
generated by Query Builder. You can copy the SQL code that appears in the SQL
View for use in other tools such as SQL Command Processor or App Builder.
• Viewing Query Results
Execute a query, once you select objects and determine what columns to include
in your query.
See Also:
Using SQL Commands
5.3.1 Query Builder Home Page
Learn about Query Builder home page.
The Query Builder page is divided into three sections:
• Object Selection pane displays on the left side of the page and contains a list
objects from which you can build queries. Only objects in the current schema
display.
Chapter 5
Using Query Builder
5-28

• Design pane displays to the right of the Object Selection pane and above the Conditions,
SQL, Results, and Saved SQL tabs. When you select an object from the Object Selection
pane, it appears in the Design pane.
• Output pane displays below the Design pane. Once you select objects and columns, you
can create conditions, view the generated SQL, or view query results.
See Also:
Selecting a Schema
5.3.2 Accessing Query Builder
Learn how to access Query Builder.
To access Query Builder:
1. On the Workspace home page, click SQL Workshop.
2. Click Utilities.
3. Click Query Builder.
The Query Builder home page appears.
Chapter 5
Using Query Builder
5-29

Tip:
You can also access Query Builder from a code editor in many part of Oracle
APEX by clicking the Query Builder button when editing a SQL attribute.
5.3.3 Understanding the Query Building Process
Learn how to build a query in Query Builder.
To build a query in Query Builder, you perform the following steps:
1. Select objects from the Object Selection pane. See Using the Object Selection
Pane.
2. Add objects to the Design pane and select columns. See Selecting Objects.
3. Optional: Establish relationships between objects. See Creating Relationships
Between Objects.
4. Optional: Create query conditions. See Specifying Query Conditions.
5. Execute the query and view results. See Viewing Query Results.
See Also:
• Viewing Generated SQL
• Working with Saved Queries
5.3.4 Using the Object Selection Pane
Use the Object Selection pane to search for and view tables, views, and materialized
views within the current schema as well as select objects.
• Searching and Filtering Objects
Use the Object Selection pane to search for and view tables, views, and
materialized views within the current schema.
• Hiding and Restoring the Object Selection Pane
You can hide the Object Selection pane by selecting the Collapse control.
• Selecting Objects
Use the Object Selection pane to select objects.
5.3.4.1 Searching and Filtering Objects
Use the Object Selection pane to search for and view tables, views, and materialized
views within the current schema.
To search or filter objects:
1. On the Workspace home page, click SQL Workshop and then Query Builder.
Query Builder appears.
Chapter 5
Using Query Builder
5-30

2. In the search field at the top of the Object Selection pane, enter a case insensitive query.
3. To view all tables or views within the currently selected schema, leave the search field
blank.
5.3.4.2 Hiding and Restoring the Object Selection Pane
You can hide the Object Selection pane by selecting the Collapse control.
The Collapse control displays on the right side of the Object Selection pane. If the Object
Selection pane displays, selecting this control hides it. Similarly, if the Object Selection pane
is hidden, selecting this control causes the pane restores it. Select the Left Splitter (click
above or below the Collapse control to manually resize the Object Selection pane.
5.3.4.3 Selecting Objects
Use the Object Selection pane to select objects.
The Design pane displays to the right of the Object Selection pane. When you select an
object from the Object Selection pane, it appears in the Design pane. You use the Object
Selection pane to select objects (that is, tables, views, and materialized views) and the
Design pane to identify how those selected objects are used in a query.
5.3.5 Using the Design Pane
Learn about how to use the Design pane.
Information on how to use how to use the Design pane includes the following topics:
• About Supported Column Types
Columns of all types available in Oracle Database 10g Release (10.2) or later display as
objects in the Design pane.
• Adding an Object to the Design Pane
You add an object to the Design pane by selecting it from the Object Selection pane.
Chapter 5
Using Query Builder
5-31

• Resizing the Design and Results Panes
As you select objects, you can resize Design and Results panes by selecting the
Bottom Splitter in the center of the page.
• Removing or Hiding Objects in the Design Pane
You remove or hide objects in the Design pane by selecting controls at the top of
the object.
5.3.5.1 About Supported Column Types
Columns of all types available in Oracle Database 10g Release (10.2) or later display
as objects in the Design pane.
Note the following column restrictions:
• You may only select a maximum of 60 columns for each query.
• The following column types are not selectable and cannot be included in a
generated query:
–
BLOB
–
NCLOB
–
RAW
–
LONG
–
LONG RAW
–
XMLType
– Any other nonscalar column types
5.3.5.2 Adding an Object to the Design Pane
You add an object to the Design pane by selecting it from the Object Selection pane.
To add an object to the Design pane:
1. On the Workspace home page, click SQL Workshop and then Query Builder.
Query Builder appears.
2. Select an object from the Object Selection pane.
Chapter 5
Using Query Builder
5-32

The selected object appears in the Design Pane. The icon next to the column name
represents the type of the column.
3. Select the columns to be included in your query by clicking the check box to the left of the
column name.
When you select a column you are indicating it is included in the query. As you select a
column, it appears on the Conditions tab. Note that the Show check box on the
Conditions tab controls whether a column is included in query results. By default, this
check box is selected.
To select the first twenty columns, click the Table Actions icon in the upper left corner of
the object. The Actions window appears. Select Check All.
4. To execute the query and view results, click Run (Ctrl+Enter).
The Results pane displays the query results.
See Also:
Specifying Query Conditions
5.3.5.3 Resizing the Design and Results Panes
As you select objects, you can resize Design and Results panes by selecting the Bottom
Splitter in the center of the page.
The Bottom Splitter resembles a gray horizontal rule in the center of the page. Move the
Bottom Splitter up and down to shrink and expand the Design pane.
Chapter 5
Using Query Builder
5-33

5.3.5.4 Removing or Hiding Objects in the Design Pane
You remove or hide objects in the Design pane by selecting controls at the top of the
object.
To remove an object, select the Remove icon in the upper right corner. To temporarily
hide the columns within an object, click the Show/Hide Columns icon.
5.3.6 Specifying Query Conditions
As you select columns within an object, you can specify conditions on the Conditions
tab.
Conditions enable you to filter and identify the data you want to work with. You can use
these attributes to modify the column alias, apply column conditions, sort columns, or
apply functions.
To specify query conditions:
1. On the Workspace home page, click SQL Workshop and then Query Builder.
Query Builder appears.
2. Select an object from the Object Selection pane.
The selected object appears in the Design Pane.
3. Select the columns to be included in your query by clicking the box to the left of
the column name.
When you select a column, you are indicating you want to include it in your query.
As you select each column, it appears as a separate row in the Conditions view.
Table 5-3 describes the attributes available on the Conditions tab.
Chapter 5
Using Query Builder
5-34

Table 5-3 Conditions Tab
Condition Attribute Description
Up and Down Arrows Controls the order that the columns to be displayed in the resulting
query. Click the arrow buttons to move columns up and down.
Column Displays the column name.
Alias Specify an optional column alias. An alias is an alternative column
name. Aliases make a column name more descriptive, shorten the
column name, or prevent possible ambiguous references.
Object Specifies table or view name.
Condition Specify a condition for the column.
The condition you enter modifies the query's
WHERE
clause. When
specifying a column condition, you must include the appropriate
operator and operand. Consider the following examples:
>=10
='VA'
IN (SELECT dept_no FROM dept)
BETWEEN SYSDATE AND SYSDATE + 15
Sort Type Select a sort type. Options include:
• Ascending (
Asc
)
• Descending (
Desc
)
Sort Order Enter a number (1, 2, 3, and so on) to specify the order in which
selected columns should display.
Show Select this check box to include the column in your query results. It
is not necessary to select Show to add a column to the query for
filtering only.
For example, suppose you want to create following query:
SELECT ename FROM emp WHERE deptno = 10
To create this query in Query Builder:
a. From the Object list, select emp.
b. In the Design Pane, select
ename
and
deptno
.
c. For the deptno column, in Condition enter
=10
and deselect
the Show check box.
Function Select an argument function. Available functions are dependent on
the column type and include:
• NUMBER columns -
COUNT
,
COUNT
DISTINCT
,
AVG
,
MAX
,
MIN
,
SUM
• VARCHAR2, CHAR columns -
COUNT
,
COUNT
DISTINCT
,
INITCAP
,
LENGTH
,
LOWER
,
LTRIM
,
RTRIM
,
TRIM
,
UPPER
• DATE, TIMESTAMP columns -
COUNT
,
COUNT
DISTINCT
,
TO_CHAR
YEAR
,
TO_CHAR
QUARTER
,
TO_CHAR
MONTH
,
TO_CHAR
DAY
,
TO_CHAR
DAY OF YEAR
,
TO_CHAR
WEEK
Group By Specify columns to be used for grouping when an aggregate
function is used. Only applicable for columns included in output.
Delete Deselect the column, excluding it from the query.
As you select columns and define conditions, Query Builder writes the SQL for you.
Chapter 5
Using Query Builder
5-35

4. To view the underlying SQL, click the SQL tab.
See Also:
Viewing Query Results
5.3.7 Creating Relationships Between Objects
You can create relationships between objects by creating a join.
A join identifies a relationship between two or more tables, views, or materialized
views.
• About Join Conditions
A join condition determines how the rows from one object combine with the rows
from another object.
• Joining Objects Manually
You can create a join manually by selecting the Join column in the Design pane.
• Joining Objects Automatically
Learn how to join objects automatically.
5.3.7.1 About Join Conditions
A join condition determines how the rows from one object combine with the rows from
another object.
When you write a join query, you specify a condition that conveys a relationship
between two objects. This condition is called a join condition.
Query Builder supports inner, outer, left, and right joins. An inner join (also called a
simple join) returns the rows that satisfy the join condition. An outer join extends the
result of a simple join. An outer join returns all rows that satisfy the join condition and
returns some or all of those rows from one table for which no rows from the other
satisfy the join condition.
See Also:
Oracle Database SQL Language Reference for information about join
conditions
5.3.7.2 Joining Objects Manually
You can create a join manually by selecting the Join column in the Design pane.
To join two objects manually:
1. On the Workspace home page, click SQL Workshop and then Query Builder.
Query Builder appears.
Chapter 5
Using Query Builder
5-36

2. From the Object Selection pane, select the objects you want to join.
The objects display in the Design pane.
3. Identify the columns you want to join.
You create a join by selecting the Join column adjacent to the column name. The Join
column displays to the right of the datatype, beneath the Remove icon. When your cursor
is in the appropriate position, the following tooltip displays:
Click here to select column for join
4. Select the appropriate Join column for the first object.
When selected, the Join column displays as a dark gray. To deselect a Join column,
simply select it again or press ESC.
5. Select the appropriate Join column for the second object.
Tip:
You can also join two objects by dragging and dropping. Select a column in the
first table and then drag and drop it onto a column in another table.
When joined, a line connects the two columns.
6. Select the columns to be included in your query. You can view the SQL statement
resulting from the join by positioning the cursor over the line.
7. Click Run to execute the query.
The Results pane displays the query results.
5.3.7.3 Joining Objects Automatically
Learn how to join objects automatically.
When you join objects automatically, the Query Builder suggests logical, existing parent and
child relationships between existing columns.
To join objects automatically:
1. On the Workspace home page, click SQL Workshop and then Query Builder.
Query Builder appears.
2. From the Object Selection pane, select an object.
The object displays in the Design pane.
3. Click the small icon in the upper left corner of the object. Depending upon the selected
object, the icon label displays as Table Actions or View Actions.
The Actions window appears. Use the Actions window to select all columns within the
current object or objects related to the current object.
4. In the Actions window, select the appropriate options:
• Check All - Select this option to select the first twenty columns in the current object.
• Add Parent - Displays tables that are referenced as a foreign key to the current
object.
Chapter 5
Using Query Builder
5-37

• Add Child - Displays tables that reference the current object in a foreign key.
If using Add Parent or Add child, the selected object appears and a line connects
the foreign key columns.
5. Select additional columns to be included in your query.
You can view the SQL statement resulting from the join by positioning the cursor
over the green line.
6. Click Run to execute the query.
The Results pane displays the query results.
5.3.8 Working with Saved Queries
You can create queries and save the query for later use.
As you create queries, you can save them by clicking the Save button in the Design
pane. Once you save a query, you can access it later in the Saved SQL view.
Tip:
The Saved SQL view only displays queries saved in Query Builder. In SQL
Commands you can view queries saved in both SQL Commands and Query
Builder.
• Saving a Query
Learn how to save a query.
• Editing a Saved Query
Once you save a query, you can access it in the Saved SQL view and edit.
• Deleting a Saved Query
Learn how to delete a saved SQL query.
5.3.8.1 Saving a Query
Learn how to save a query.
To save a query:
1. Build a query:
a. On the Workspace home page, click SQL Workshop and then Query
Builder.
Query Builder appears.
b. Select objects from the Object Selection pane.
c. Add objects to the Design pane and select columns.
d. Execute the query.
2. Click Save.
3. Enter a name and description and click Save.
The saved query displays in the Saved SQL view.
Chapter 5
Using Query Builder
5-38

Note that Query Builder does not support duplicate query names. If you open an existing
query, keep the existing name, and save it again, Query Builder over-writes the existing
query. If you change the name of an existing query and save it again, Query Builder saves
the query again under the new name.
5.3.8.2 Editing a Saved Query
Once you save a query, you can access it in the Saved SQL view and edit.
To edit a Saved SQL query:
1. On the Workspace home page, click SQL Workshop and then Query Builder.
Query Builder appears.
2. Select the Saved SQL tab.
3. To filter the display, you can:
• Make a selection from the Owner list and click Go.
• Enter a search query in the Name field and click Go.
4. To edit a query, select the appropriate name.
The saved query appears. The selected objects display in the Design pane and the
Conditions view appears.
5.3.8.3 Deleting a Saved Query
Learn how to delete a saved SQL query.
To delete a Saved SQL query:
1. On the Workspace home page, click SQL Workshop and then Query Builder.
Query Builder appears.
2. Select the Saved SQL tab.
3. Select the queries to be deleted and click Delete Checked.
5.3.9 Viewing Generated SQL
The SQL view presents a read-only, formatted representation of the SQL generated by Query
Builder. You can copy the SQL code that appears in the SQL View for use in other tools such
as SQL Command Processor or App Builder.
To access the SQL view:
1. On the Workspace home page, click SQL Workshop and then Query Builder.
Query Builder appears.
2. Select an object from the Object Selection pane.
The selected object appears in the Design Pane.
3. Select the columns to be included in your query.
4. Click the SQL tab.
The SQL code generated by Query Builder appears.
Chapter 5
Using Query Builder
5-39

See Also:
Using SQL Commands
5.3.10 Viewing Query Results
Execute a query, once you select objects and determine what columns to include in
your query.
Execute a query by:
• Clicking the Run button (or pressing Ctrl+Enter)
• Selecting the Results tab
The Results view appears, displaying formatted query results. To export the report as
a comma-delimited file (.csv) file, click the Download link at the bottom of the page.
5.4 Using Quick SQL
Rapidly design and prototype data models using a markdown-like shorthand syntax
that expands to standards-based Oracle SQL.
• Getting Started with Quick SQL
Learn about common Quick SQL use cases and the basic rules of Quick SQL
shorthand syntax.
• Accessing Quick SQL
Access Quick SQL by clicking SQL Workshop, Utilities, and then Quick SQL.
• Using Quick SQL Help
Review Quick SQL Help to learn more about using Quick SQL.
• Generating Quick SQL with SQL Shorthand Syntax
Quickly develop a script for simple tables and views by entering SQL shorthand
syntax in the the left pane and clicking Generate SQL.
• Managing Quick SQL Models and Scripts
Save entered Quick SQL shorthand syntax as model for future use, or save the
generated SQL as a SQL script.
• Loading Quick SQL Samples
Load and view Quick SQL samples to learn about about SQL shorthand syntax.
• Creating an Application from a Generated SQL Script
Create an application from a saved script in SQL Scripts.
• Configuring Quick SQL Settings
Configure settings inline to explicitly set SQL syntax generation options, or click
the Settings button at the top of the right pane to declaratively set the generation
options.
• Recommendations When Using Quick SQL
Learn about recommended approaches to creating effective data models.
• Database Terminology Used in Quick SQL
Learn about common database terms used in Quick SQL.
Chapter 5
Using Quick SQL
5-40

• About Supported Data Types
Learn about supported data types.
5.4.1 Getting Started with Quick SQL
Learn about common Quick SQL use cases and the basic rules of Quick SQL shorthand
syntax.
• About Quick SQL
Quickly develop a script for simple tables and views.
• About Quick SQL Shorthand Syntax
Quick SQL shorthand syntax enables you to generate the SQL from an indented text
document.
5.4.1.1 About Quick SQL
Quickly develop a script for simple tables and views.
Quick SQL provides a quick way to generate the SQL required to create a relational data
model from an indented text document.
Quick SQL is designed to reduce the time and effort required to create SQL tables, triggers,
and index structures. This tool is not designed to be a replacement for data modeling.
Instead, Quick SQL is simply a quick way to develop a script for simple tables and views.
Once you have generate the SQL, you can then tweak and expand it.
Quick SQL Use Cases include:
• Quickly create robust data models
• Easily generate random data
• View syntax using provided examples and learn syntax for create table, select, insert,
index, trigger, and PL/SQL package
5.4.1.2 About Quick SQL Shorthand Syntax
Quick SQL shorthand syntax enables you to generate the SQL from an indented text
document.
Rules for using Quick SQL shorthand syntax include:
• Parent table names - Enter parent table names without any indention.
• Table column names - Enter table columns with a uniform indention of two or more
spaces.
• Parent/child relationships - Create parent child relationships by indenting child tables
under parent tables. Indent the child tables to the same level as the columns in the parent
table.
Note:
As a best practice, do not specify primary keys, the system generates them for you.
Chapter 5
Using Quick SQL
5-41

Tip:
To learn more about Quick SQL shorthand syntax, click Help at the top of the
Quick SQL Shorthand pane.
About Settings
To view and configure generation options, click the Settings button. You can
automatically add Who columns which indicate who created or last updated a given
row and when. You can add a row sequence column that automatically increments by
one on each row update. A row sequence can be useful to simplify lost update
detection. You can also generate a PL/SQL API which provides a package per table
and provides procedures to query, insert, update, and delete rows. Some applications
benefit by having each change captured in a history table, logging of old and new
values, which is also an option.
See Also:
Configuring Quick SQL Settings
5.4.2 Accessing Quick SQL
Access Quick SQL by clicking SQL Workshop, Utilities, and then Quick SQL.
To access the Quick SQL page:
1. On the Workspace home page, click the SQL Workshop icon.
2. Click Utilities.
3. Click Quick SQL.
The Quick SQL page appears.
Note:
You can also access Quick SQL on the SQL Scripts page by clicking the
Quick SQL button. See Using SQL Scripts .
5.4.3 Using Quick SQL Help
Review Quick SQL Help to learn more about using Quick SQL.
• Accessing Quick SQL Help
Access Quick SQL Help by clicking Help at the top of the Quick SQL Shorthand
pane.
• About Quick SQL Help Tabs
Learn about the tabs available in Quick SQL Help.
Chapter 5
Using Quick SQL
5-42

5.4.3.1 Accessing Quick SQL Help
Access Quick SQL Help by clicking Help at the top of the Quick SQL Shorthand pane.
To access the Quick SQL Help:
1. Navigate to the Quick SQL page:
a. On the Workspace home page, click the SQL Workshop icon.
b. Click Utilities.
c. Click Quick SQL.
2. Click Help at the top of the Quick SQL Shorthand pane.
The Quick SQL Help window appears.
3. Click one of the following tabs: About, Data Types, Table Directives, Column
Directives, Views, Settings, or Samples.
See Also:
About Quick SQL Help Tabs
5.4.3.2 About Quick SQL Help Tabs
Learn about the tabs available in Quick SQL Help.
Quick SQL Help includes the following topics:
• About - Overview of Quick SQL together with tips on getting started and steps needed to
create the database objects.
Chapter 5
Using Quick SQL
5-43

• Data Types - List of data types that can applied to each column.
• Table Directives - Commands used to modify tables.
• Column Directives - Commands used to extend column definitions.
• Views - Syntax for defining a view.
• Settings - Inline settings to explicitly set SQL syntax generation options.
• Samples - Samples of data models that can be used to populate the Quick SQL
Shorthand.
See Also:
Loading Quick SQL Samples
5.4.4 Generating Quick SQL with SQL Shorthand Syntax
Quickly develop a script for simple tables and views by entering SQL shorthand syntax
in the the left pane and clicking Generate SQL.
Tip:
Viewing samples is a great way to learn about Quick SQL shorthand syntax.
To view samples, click Help and then Samples. Select a sample by clicking
Load Model.
To generate the Quick SQL with SQL shorthand syntax:
1. Navigate to the Quick SQL page:
a. On the Workspace home page, click the SQL Workshop icon.
b. Click Utilities.
c. Click Quick SQL.
2. In the Quick SQL Shorthand pane (the left pane), enter SQL shorthand syntax.
Chapter 5
Using Quick SQL
5-44

3. Click Generate SQL.
The generated SQL appears in Oracle SQL Output pane.
Note:
You can save the generated script or review and run the script.
4. To save the SQL script:
a. Click Save SQL Script.
The Save Script dialog appears.
Chapter 5
Using Quick SQL
5-45

b. In the Save Script dialog:
• Script Name - Enter a name.
• Click Save Script.
The script is saved in SQL Scripts.
Note:
• Saving a SQL Script
• Configuring Quick SQL Settings
5.4.5 Managing Quick SQL Models and Scripts
Save entered Quick SQL shorthand syntax as model for future use, or save the
generated SQL as a SQL script.
• Saving a Quick SQL Model
Reuse Quick SQL shorthand syntax by saving a model.
• Loading a Saved Quick SQL Model
Access Quick SQL models from the Load window.
• Saving a SQL Script
Save generated SQL as a script.
• Downloading SQL Scripts
Download a generated SQL script locally.
5.4.5.1 Saving a Quick SQL Model
Reuse Quick SQL shorthand syntax by saving a model.
To save a model:
1. On the Quick SQL page, enter Quick SQL shorthand syntax in the left pane and
click Generate SQL.
The generated SQL appears on the Oracle SQL output pane.
2. Click Save Model.
The Save Model dialog appears.
3. In the Save Model dialog:
a. Model Name - Enter a name.
b. Description - Enter a description for the model.
c. Click Save Model.
The model is saved.
Chapter 5
Using Quick SQL
5-46

5.4.5.2 Loading a Saved Quick SQL Model
Access Quick SQL models from the Load window.
Developers can view and load their own saved models under My Models or all workspace
developer models under Workspace Models.
To load a saved Quick SQL model:
1. Navigate to the Quick SQL page:
a. On the Workspace home page, click the SQL Workshop icon.
b. Click Utilities.
c. Click Quick SQL.
2. Click the Load button on the left Quick SQL Shorthand pane.
3. To load a saved model:
a. Under either My Models or Workspace Models, choose a model.
b. Click Load Model.
The selected model appears.
4. To edit the model name or description, or delete a saved model:
a. Load the saved model as described in the previous step.
b. Click model name.
The Edit Model dialog appears.
c. To edit the model name or description, edit the appropriate fields and click Save.
d. To delete the model, click Delete.
5.4.5.3 Saving a SQL Script
Save generated SQL as a script.
To save a SQL script:
1. On the Quick SQL page, enter Quick SQL shorthand syntax in the left pane and click
Generate SQL.
The generated SQL appears on the Oracle SQL output pane.
2. Click Save SQL Script.
The Save Script dialog appears.
3. In the Save Script dialog:
a. Script Name - Enter a name.
b. Click Save Script.
• Script Name - Enter a name.
• Click Save Script.
The script is saved in SQL Scripts.
Chapter 5
Using Quick SQL
5-47

See Also:
Using SQL Scripts
5.4.5.4 Downloading SQL Scripts
Download a generated SQL script locally.
To download.generated SQL script:
1. On the Quick SQL page, enter Quick SQL shorthand syntax in the left pane and
click Generate SQL.
2. Scroll through generated SQL in the SQL Output pane.
The generated SQL appears on the Oracle SQL Output pane.
At the bottom, the line starting with
-- Generated by Quick SQL
is the SQL
shorthand syntax. If you specified any settings they display after the line starting
with
# settings =
. The following is the Quick SQL syntax and Settings in the
previous example:
-- Generated by Quick SQL Wednesday May 01, 2019 10:04:45
/*
departments /insert 4
name /nn
location
country
employees /insert 14
name /nn vc50
email /lower
cost center num
date hired
job vc255
view emp_v departments employees
# settings = { PK: "IDENTITY", semantics: "CHAR", language: "EN",
APEX: true }
*/
3. Click Download to save both the Quick SQL shorthand and the generated SQL
locally.
Chapter 5
Using Quick SQL
5-48

5.4.6 Loading Quick SQL Samples
Load and view Quick SQL samples to learn about about SQL shorthand syntax.
• About Quick SQL Samples
Quick SQL includes the following samples.
• Loading a Quick SQL Sample
Access Quick SQL samples from either the Load or Help windows.
5.4.6.1 About Quick SQL Samples
Quick SQL includes the following samples.
You can load these samples by clicking either the Help or Load buttons above the Quick
SQL Shorthand pane. Available Quick SQL samples include:
• Departments and Employees - Shorthand SQL syntax creates a
DEPARTMENTS
and
EMPLOYEES
table with a SQL join
VIEW
. Random data is also generated using
/INSERT
syntax. The
/NN
adds a
NOT NULL SQL
column constraint. Indented lists are used to define
tables, columns and child tables. Primary and foreign key columns are automatically
added. You do not need to supply any primary or foreign key columns.
• Employee Skills - Creates a
DEPARTMENTS
,
EMPLOYEES
, and
SKILLS
table using
indentation to identify parent and child tables. Shorthand syntax
VC255
is used to specify
a SQL datatype. The
/INSERT
syntax is used to generate random data.
• Product Sales - Short hand syntax that creates a star schema with
PRODUCTS
,
CUSTOMERS
,
CHANNELS
,
PROMOTIONS
, and
SALES
tables. The
SALES
table contains foreign
key references to the other tables. A
SQL VIEW
is also created which joins all five tables.
Random sample data is also generated. Numeric column are identified with
NUM
syntax.
• ToDos - Creates
ASSIGNEES
and
TODOS
tables. This sample is designed as a starting point
to enable the creation of a customized ToDo system within minutes.
Chapter 5
Using Quick SQL
5-49

5.4.6.2 Loading a Quick SQL Sample
Access Quick SQL samples from either the Load or Help windows.
To access the Quick SQL samples:
1. Navigate to the Quick SQL page:
a. On the Workspace home page, click the SQL Workshop icon.
b. Click Utilities.
c. Click Quick SQL.
2. Access samples by clicking either the Load or Help button on the left Quick SQL
Shorthand pane:
3. To access samples from the Load window:
a. Click Load on the Quick SQL Shorthand pane.
b. Under Samples, choose a sample and click Load Model.
The Sample loads on Quick SQL Shorthand pane and generated SQL is displayed
in Oracle SQL Output pane.
4. To access samples from the Help window:
a. Click Help on the Quick SQL Shorthand pane.
b. Click Samples in the Help window.
c. Choose a sample and click Load Model.
The Sample loads on Quick SQL Shorthand pane and generated SQL is displayed
in Oracle SQL Output pane.
5.4.7 Creating an Application from a Generated SQL Script
Create an application from a saved script in SQL Scripts.
When you save a script, you can view, run, and modify the script in SQL Scripts. After
you run the saved script, you can run the Create Application Wizard from SQL Scripts
page. The wizard recognizes any tables and adds report and form pages for each
table.
To create an application from saved SQL script:
1. On the Workspace home page, click the SQL Workshop icon.
2. Click SQL Scripts.
The SQL Script page appears.
3. Run the saved script:
a. Locate the script and click Run.
Chapter 5
Using Quick SQL
5-50

b. On Run Script, click Run Now.
The Results page appears.
4. To create an application, click Create App.
The Create Application Wizard appears.
Note:
Creating a database application is a multiple step process. Once you specify
the application name and appearance, you add pages, select features, and
configure application settings.
5. In the Create Application Wizard:
a. Enter the application name, select an appearance, add pages, select features, and
configure application settings.
b. Click Create Application.
See Also:
Understanding Page Types, Features, and Settings
5.4.8 Configuring Quick SQL Settings
Configure settings inline to explicitly set SQL syntax generation options, or click the Settings
button at the top of the right pane to declaratively set the generation options.
• Configuring Settings Declaratively
Configure settings declaratively by clicking the Settings button at the top of the right
pane.
• Configuring Settings Inline
Configure settings inline to explicitly set SQL syntax generation options.
Chapter 5
Using Quick SQL
5-51

5.4.8.1 Configuring Settings Declaratively
Configure settings declaratively by clicking the Settings button at the top of the right
pane.
To configure settings declaratively:
1. Navigate to the Quick SQL page:
a. On the Workspace home page, click the SQL Workshop icon.
b. Click Utilities.
c. Click Quick SQL.
2. Click Settings on the Oracle SQL Output pane.
The Settings page appears. Configure the appropriate attributes.
3. Under Table:
• Object Prefix - Database object prefix. Prefixes all object names with the
provided value .
• Schema - Prefix object names with a schema name. The default is no schema
prefix for object names.
• On Delete - Defines how foreign keys behavebehave on delete of the parent
row. Options include:
– Cascade - A foreigh key with "on delete cascade" automatically deletes
the child row when the correponding parent is deleted.
– Restrict - A foreign key with "on delete restrict" prevents deletion of the
parent row if a child row exists.
– Set Null - A foreign key with "set null on delete" means that if a record in
the parent table is deleted, then the corresponding records in the child
table will have the foreign key fields set to null.
• Compression - Determines if you want your tables to be compressed or not.
Table compression saves disk space and reduces memory use in the buffer
cache. Table compression can also speed up query execution during reads.
There is, however, a cost in CPU overhead for data loading and DML. Table
compression is completely transparent to applications. It is especially useful in
online analytical processing (OLAP) systems, where there are lengthy read-
only operations, but can also be used in online transaction processing (OLTP)
systems.
• Generate Inserts - Generating inserts can be time consuming and impact
usability. Consider turning off the generation of inserts as you refine your data
model, then turning on when you are ready to generate data.
4. Under Column:
• Primary Keys - Defines how table primary keys are to be populated. Options
include:
– SYS_GUID - Populates the primary key with a globally unique identifier. It
generates a numeric random number that is non sequential and non
uniform in length. This method is useful in that it can be more secure, it
can also allow data to be merged from different databases with out fear of
primary key conflict.
Chapter 5
Using Quick SQL
5-52

– Identity Column - Sets the primary key by default to an ever increasing number.
– Sequence - Increments the primary key using number sequence. This primary
key population is implemented via a database trigger.
• Date Data Type - Defines what type of date to use to store columns identified as
dates. Options include: Date, Timestamp, and Timestamp with local time zone.
• Semantics- Options include:
– Default - Default to the database setting. If you are unsure what this is, select
Default.
– BYTE - Indicates that the column will have byte length semantics.
– CHAR - Indicates that the column will have character semantics.
5. Under Additional Columns:
• Include - Additional columns to automatically add to your table. Options include:
Audit Columns, Row Key, Row Version Number, and Security Group ID.
6. Under Options:
• Data Language - Controls the language used for generating the data using the
/
INSERT
flag.
• PL/SQL API - Select On to generate a PL/SQL APIs with one package per table on
all tables. Select Off to only generate PL/SQL APIs for tables that include an /api at
the end of the name. For example:
employees /api
name
email
phone num
• Include Drops - Include drop object commands in the output. When set to On, a drop
command is generated for each database object created. For example:
drop table X including contents;
drop table Y including contents;
• Auto Primary Key - Select On to have primary key columns automatically generated
for tables. The primary key column name will be ID and it will be of type number.
Tip:
To see an example, see field-level Help.
• Longer Varchars - Available in Oracle Database 12.1 or later, Longer Varchars allow
for columns to be up to 32K bytes. Ensure your database is configured to support
longer varchars if you wish to use this feature.
• Editionable - When generating PL/SQL objects including triggers and packages make
these editionable.
• APEX Enabled - Controls the syntax generated to support audit columns.
• Tags Framework - Choose On or Off.
Chapter 5
Using Quick SQL
5-53

• Compatibility - Select an Oracle Database release. Ensures generated SQL is
compatible with the database release selected.
7. Under Preferences:
• Prefix primary keys with table name - Prefix primary key database table
columns with name of table. Choose On or Off.
• Created Column Name - When generating audit columns, controls the name of
this audit column.
• Created By Column Name - When generating audit columns, controls the
name of this audit column.
• Updated Column Name - When generating audit columns, controls the name
of this audit column.
• Updated By Column Name - When generating audit columns, controls the
name of this audit column.
8. To save your configuration, click Save Changes
9. To reset to the default settings, click Reset
5.4.8.2 Configuring Settings Inline
Configure settings inline to explicitly set SQL syntax generation options.
You can configure settings inline to explicitly set SQL syntax generation options. When
configuring setting inline:
• Settings must start on a new line. To enter multiple settings, begin with
# settings
=
. To enter a single setting per line, use
#
.
• All values are case insensitive.
• Brackets, spaces, and commas can be added for clarity but are ignored.
• To have all settings generated use
# verbose: true
Entering settings directly into the Quick SQL Shorthand pane ensures the same SQL
generation options are utilized even if you download the script and later paste it back.
For example, enter the following to prefix all table names with TEST and generate for
schema OBE:
# settings = { prefix: "test", schema: "OBE" }.
Alternatively, enter each setting on a separate line for the same
result:
# prefix: "test"
# schema: "OBE"
Tip:
To view a listing of settings, by clicking Help and then Settings.
5.4.9 Recommendations When Using Quick SQL
Learn about recommended approaches to creating effective data models.
Chapter 5
Using Quick SQL
5-54

Although there are many valid approaches to creating an effective data model, Oracle
recommends the following:
• Table Naming – Define your tables as plural and columns as singular. Since tables are
designed to store many rows it makes sense to have them plural. For example
Employees
.
• Column Naming – Define your column names as singular. For example
First Name
.
• Primary Keys – Every table should have a primary key, primary keys are used to
uniquely identify each row and can be used to associate child table data.
• Primary Key Column Naming – Every table will have a primary key and it should be
called
ID
and it should be numeric.
• Table Constraints – The best way to ensure data integrity is to have the database only
allow proper data. For example, if a column is required ensure you have a
not null
constraint. If a column is unique ensure you have a unique constraint.
• Referential Integrity – Most relational database models have parent child, also known
as one too many relationships. They frequently also have many to many relationships.
Using declarative primary key and foreign key syntax you can have the database enforce
these relationships to ensure the integrity of your data. By defining the referential integrity
you ensure all child tables do in fact relate to parent tables.
5.4.10 Database Terminology Used in Quick SQL
Learn about common database terms used in Quick SQL.
Quick SQL includes references to the following database terms:
• BLOB – A binary large object or
CLOB
. BLOBs store binary data and do not impose any
character set encoding.
BLOB
size can store 4GB or more depending on system
configuration.
• Check Constraint – A check constraint is a declarative way to limit the values a given
column may contain.
create table projects (
id number primary key,
name varchar2(50),
status varchar2(30) check (status in ('OPEN','CLOSED'))
);
• CLOB – A character large object or
CLOB
. The maximum size of a
VARCHAR2
datatype is
32,767 bytes, however a
CLOB
size can be store up to 4GB of character data.
• Column – RDBMS tables store data in tables that are comprised of rows and columns.
Each column is named. For example,
first_name
.
• Database – A structured set of data held in a computer, especially one that is accessible
in various ways.
• Data Model – A Data Model is a method of organizing elements of data and defining how
they relate to one another. A model typically organizes data into entities that when they
are transformed into a physical database model are converted into tables and columns.
This tool is a very rudimentary tool that creates physical data models from indented text.
For serious data modeling it is recommended that you use a proper data modeling tool
Chapter 5
Using Quick SQL
5-55

Oracle SQL Data Modeler. It is a free graphical tool that enhances productivity and
simplifies data modeling tasks.
• Data Type – Each column in a table has a data type. Data types are frequently
character
(VARCHAR2)
,
number
, or
dates
.
• DML – Data Manipulation Language. SQL commands that include the following:
–
INSERT
- SQL statement used to add new rows to a table.
–
UPDATE
- SQL statement used to update one or more rows of data within a
table.
–
DELETE
- SQL statement used to remove one or more rows of data from a
table.
• Foreign Key – A column(s) in a table that references another table. For example,
if employees are organized by departments, a
department_id
in the employees
table could be a foreign key to the primary key of the
employee
table. By defining
foreign keys you are declaratively defining a relationship between tables.
• Join – A join is a SQL query that combines rows from two or more tables or views.
A query is a join query whenever multiple tables appear in the
FROM
clause. A
major benefit of the relational database model is that you can store data that
repeats in one location. For example, assume we have two table departments, and
employees. Here is a query that selects data from both tables.
select d.name, d.location, e.name, e.job
from departments d, employees e
where e.department_id = e.id
Note if the department name or location changes it is changed in only one place.
• Relational Database – A database model that organizes data in a relational
model. The relational model organizes data into one or more tables, also known as
relations, of columns and rows. The standard language to access data within a
relational database and to define database objects is SQL.
• RDBMS – Relational Database Management System.
• Object – A database object is a named widget used to store or manage data. For
example
tables
,
views
,
triggers
, and
synonyms
are all considered database
objects.
• PL/SQL – Oracle procedural extension to the SQL language. PL/SQL stands for
Procedural Language SQL. PL/SQL is a server-side, stored procedural language
that can be used to perform procedural operations on Oracle database data.
• Query – To access / query data in your relational database you use a SQL
SELECT
statement. In SQL a
SELECT
statement can query data from one or more tables or
views.
– Query of 3 columns from a table called projects
select id, name, status
from projects
where status = 'OPEN';
Chapter 5
Using Quick SQL
5-56

– Aggregate Query
select count(*) count_of_projects,
sum(case when status = 'OPEN' then 1 else 0)
open_projects,
sum(case when status = 'CLOSED' then 1 else 0)
closed_projects
from projects;
• Reserved Word – A name that cannot be used as an object identifier. For example
SELECT
cannot be used as a table name.
• Row – RDBMS tables store data in tables that are comprised of rows and columns. Each
row is made up of one or more columns.
• Sequence – Sequences are database objects from which multiple users can generate
unique integers. The sequence generator generates sequential numbers, which can help
to generate unique primary keys automatically, and to coordinate keys across multiple
rows or tables. A sequence can be created with the following Syntax:
create sequence project_seq;
The sequence values can be referenced using
project_seq.currval
(current value) or
project_seq.nextval
(next value). Each time the
nextval
is access the sequence
increments. The default increment is
1
.
• Schemas – A schema is a namespace for creating database objects such as tables. You
do not create database tables in databases you create them within schemas within a
database. Each database can store any number of schemas. Schemas are also
sometimes called users. When you have a new database you first create a schema (or
user, they are the same thing) then create your tables within the schema or user. You can
create schemas using the SQL
create schema
or
create user
command. Schemas are
a way of organizing database objects within a database.
• SQL – Structure Query Language. The language used to define database tables, and to
manipulate the data within the tables.
• Structured Data – Relational database data is frequently referred to as structured
because data is organized cleanly into rows and columns. Unstructured typically refers to
data that has no structure imposed on it.
• Table – A database object that stores related data organized into rows and columns.
– Creating a table
create table projects (
id number primary key,
name varchar2(50),
status varchar2(30)
);
– Inserting rows into a table
insert into projects (id, name, status)
values (1, 'My Project','OPEN');
Chapter 5
Using Quick SQL
5-57

– Querying the data with the table
select id, name, status
from projects
where status = 'OPEN';
• Trigger – A database trigger is procedural code that is automatically executed in
response to certain events on a particular table. For example before or after insert
of a row. The following trigger forces a column to lower case.
create or replace trigger PROJECTS_BIU
before insert or update
on PROJECTS
for each row
begin
:new.OWENER_EMAIL := LOWER(:new.OWENER_EMAIL);
end;
/
• View – A database view is a virtual table based on the result-set of an SQL
statement. A view is also known as a stored query. You can create a view that
joins multiple tables. Once the view is created you can query it as if it was a table.
Following is an example of the SQL to create a view:
create view department_employees as
select d.name, d.location, e.name, e.job
from departments d, employees e
where e.department_id = e.id;
5.4.11 About Supported Data Types
Learn about supported data types.
Quick SQL supports the following data types:
•
VARCHAR2
•
NUMBER
•
INTEGER
•
DATE
•
TIMESTAMP
•
TIMESTAMP WITH TIME ZONE
•
TIMESTAMP WITH LOCAL TIME ZONE
•
CLOB
•
BLOB
Chapter 5
Using Quick SQL
5-58

Tip:
To learn more about Quick SQL shorthand syntax for supported data types, click
Help and select Data Types.
5.5 Using Sample Datasets
Use Sample datasets to build sample applications.
• About Sample Datasets
Sample datasets enable you to easily build sample applications. Each dataset includes
sufficient data to build pages with various different components.
• Accessing Sample Datasets
Access the Sample Dataset page by clicking Utilities and then Sample Datasets.
• Installing a Sample Dataset
You can install sample dataset to your workspace.
• Removing a Sample Dataset
You can remove the installed dataset.
• Refreshing a Sample Dataset
You can refresh the installed dataset.
• Changing the Schema for a Sample Dataset
You can change the schema for a installed dataset.
5.5.1 About Sample Datasets
Sample datasets enable you to easily build sample applications. Each dataset includes
sufficient data to build pages with various different components.
Install, refresh, or replace sample datasets within one of the schemas associated with your
workspace. The database objects can also be easily removed.Each dataset includes various
database objects and sample data. The sample data is available in one or more languages.
Note:
Only a single language can be loaded into the sample database objects. If you
select a different language, the currently loaded data is replaced.
5.5.2 Accessing Sample Datasets
Access the Sample Dataset page by clicking Utilities and then Sample Datasets.
To access the Sample Datasets page:
1. On the Workspace home page, click the SQL Workshop icon.
2. Click Utilities.
3. Click Sample Datasets.
Chapter 5
Using Sample Datasets
5-59

The Sample Datasets page appears with a list of datasets.
5.5.3 Installing a Sample Dataset
You can install sample dataset to your workspace.
To install the Sample Datasets:
1. On the Workspace home page, click the SQL Workshop icon.
2. Click Utilities.
3. Click Sample Datasets.
The Sample Datasets page appears with a list of datasets.
4. Select the sample dataset and click Install under Action.
The Manage Sample Dataset page appears.
Chapter 5
Using Sample Datasets
5-60

5. Click Next.
The Load Sample Dataset page appears with details of database objects.
6. Click Install Dataset.
The Load Sample Dataset - Result page appears with the list of installed database
objects.
7. On Load Sample Dataset:
• Click Create Application to launch the Create Application Wizard and pre-populates
it with components built on the sample dataset.
• Click Exit to exit the wizard.
See Also:
Running the Create Application Wizard
5.5.4 Removing a Sample Dataset
You can remove the installed dataset.
To remove installed dataset:
1. On the Workspace home page, click the SQL Workshop icon.
2. Click Utilities.
3. Click Sample Datasets.
Chapter 5
Using Sample Datasets
5-61

The Sample Datasets page appears with a list of datasets. Installed Datasets
displays details of Schema and Date Installed.
4. Click Update under Action.
The Manage Sample Dataset page appears.
5. Click Remove Dataset.
5.5.5 Refreshing a Sample Dataset
You can refresh the installed dataset.
To install the Sample Datasets:
1. On the Workspace home page, click the SQL Workshop icon.
2. Click Utilities.
3. Click Sample Datasets.
The Sample Datasets page appears with a list of datasets. Installed Datasets
displays details of Schema and Date Installed.
4. Click Update under Action.
The Manage Sample Dataset page appears.
5. Click Next.
6. Select Refresh Existing Dataset.
5.5.6 Changing the Schema for a Sample Dataset
You can change the schema for a installed dataset.
To change the schema for a Sample Datasets:
1. On the Workspace home page, click the SQL Workshop icon.
2. Click Utilities.
3. Click Sample Datasets.
The Sample Datasets page appears with a list of datasets. Installed Datasets
displays details of Schema and Date Installed.
4. Click Update under Action.
The Manage Sample Dataset page appears.
5. Select Schema.
Note:
This option is displayed if you have more than one schema associated
with your workspace.
6. Click Next.
Chapter 5
Using Sample Datasets
5-62

5.6 Generating DDL
Generate data definition language (DDL) statements from the Oracle data dictionary.
You can use these scripts to create or re-create database schema objects. The scripts can be
generated to display inline or saved as a script file. You can generate the create scripts for all
objects for a specific schema, specific object types, or specific objects.
To generate a DDL statement:
1. On the Workspace home page, click the SQL Workshop.
2. Click Utilities.
3. Click Generate DDL.
The Generate DDL page appears.
4. Click Create Script.
The Generate DDL Wizard appears.
5. Select a database schema and click Next.
6. Define the object type:
a. Output - Specify an output format. Select either Display Inline or Save As Script
File.
b. Check All - Select this option to include all object types for which to generate DDL.
c. Object Type - Select the object types for which to generate DDL.
d. To select object names for the selected object types, click Next and follow the on-
screen instructions.
7. Click Generate DDL.
See Also:
• Oracle Database SQL Language Reference for information about DDL
statements
• Data Dictionary and Dynamic Performance Views in Oracle Database Concepts
for information about the data dictionary
5.7 Managing User Interface Defaults
Managing user interface defaults enables you to assign default interface properties, create
default wizard, modify the table user interface defaults, add new attributes, and export the
user interface defaults.
• About User Interface Defaults
User Interface Defaults enable you to assign default user interface properties for regions
and items.
Chapter 5
Generating DDL
5-63

• Creating User Interface Defaults for a Table
If no defaults have been created for a table, use the Table Dictionary Create
Defaults wizard to automatically generate defaults based on the database table
and column definitions. After the initial defaults are created, you can modify the
individual default values.
• Modifying Table User Interface Defaults
Learn how to modify existing table user interface defaults.
• Creating User Interface Attributes
Use the Attribute Dictionary to define and add new attributes.
• Modifying User Interface Attributes
Modify existing user interface attributes on the Grid Edit page or by selecting a
specific column.
• Exporting and Importing User Interface Defaults
You export user interface defaults in the same way you export any related
application file.
5.7.1 About User Interface Defaults
User Interface Defaults enable you to assign default user interface properties for
regions and items.
This wizard enables you to specify whether you want to use User Interface Defaults if
they exist. When you create a form or report using a wizard, the wizard uses this
information to create default values for region and item properties. Utilizing user
interface defaults can save valuable development time and has the added benefit of
providing consistency across multiple pages in an application. User Interface Defaults
are divided into two categories, the Table Dictionary and the Attribute Dictionary.
• The Table Dictionary enables you to specify defaults for tables and columns that
are initialized from the database definition.
• The Attribute Dictionary enables you to create defaults based on attribute or
column names, thus being usable across all tables. Attribute definitions can also
have synonyms, allowing more than one attribute to share a common definition.
When you use User Interface Defaults during creation of pages and regions, the Table
Dictionary takes priority over the Attribute Dictionary. If a table and column
combination exists, that is used rather than an attribute definition of the same name.
This can be useful, for example, when you want to have a specific label or Help text for
the
CREATED_BY
column in the
emp
table but then use more generic defaults for
CREATED_BY
in another table.
5.7.2 Creating User Interface Defaults for a Table
If no defaults have been created for a table, use the Table Dictionary Create Defaults
wizard to automatically generate defaults based on the database table and column
definitions. After the initial defaults are created, you can modify the individual default
values.
To create the initial user interface defaults for tables:
1. On the Workspace home page, click the SQL Workshop.
2. Click Utilities.
Chapter 5
Managing User Interface Defaults
5-64

3. Click User Interface Defaults.
The Dashboard page for User Interface Defaults appears.
4. Click Table Dictionary.
The Table Dictionary page displays a report of all objects in your workspace that includes
a Defaults Exist column indicating whether defaults have been created for each object.
5. Click the object name for which you want to create defaults.
The Create Table Dictionary Defaults page appears.
6. Click Create Defaults.
The Table Dictionary page displays a report showing that defaults exist for the object you
selected.
Note:
Synchronizing defaults with the database data dictionary creates table based
defaults for any tables in the current schema that do not have defaults yet and
adjusts those of tables that do to match the database definition.
See Also:
Modifying Table User Interface Defaults
5.7.3 Modifying Table User Interface Defaults
Learn how to modify existing table user interface defaults.
To modify existing table defaults:
1. On the Workspace home page, click the SQL Workshop.
2. Click Utilities.
3. Click User Interface Defaults.
The Dashboard page for User Interface Defaults appears.
4. Click Table Dictionary.
The Table Dictionary page displays a report of all objects in your workspace. The
Defaults Exist column indicates whether defaults have been created for an object.
5. Click the object name you want to modify.
The Table and Column Properties page displays a report of column defaults.
6. Click the column name you want to modify.
The Column Defaults page displays.
7. Make modifications and click Apply Changes.
See field-level help for a description of the individual settings on this page.
Chapter 5
Managing User Interface Defaults
5-65

Note:
A column can be removed from the Table Dictionary, thus allowing the
Attribute Dictionary defaults to be used during the creation process. For
example, when you have auditing columns where you may want the
exact same labels and help across every instance of
CREATED_BY
and
CREATED_ON
, regardless of which table they come from, you could simply
remove the column defaults from each table for those columns.
5.7.4 Creating User Interface Attributes
Use the Attribute Dictionary to define and add new attributes.
To create an attribute:
1. On the Workspace home page, click the SQL Workshop.
2. Click Utilities.
3. Click User Interface Defaults.
The Dashboard page for User Interface Defaults appears.
4. Click Attribute Dictionary.
The Attribute Dictionary page displays a report of all attributes in your workspace.
5. Click Create.
The Column Details page appears.
6. Enter attribute specifications and click Create.
See field-level help for a description of the individual settings on this page.
5.7.5 Modifying User Interface Attributes
Modify existing user interface attributes on the Grid Edit page or by selecting a specific
column.
To modify an existing attribute:
1. On the Workspace home page, click the SQL Workshop.
2. Click Utilities.
3. Click User Interface Defaults.
The Dashboard page for User Interface Defaults appears.
The current schema displays to the right of the breadcrumb menu.
4. Click Attribute Dictionary.
The Attribute Dictionary page displays a report of all attributes in your workspace.
5. To edit select attributes for all displayed columns:
a. Click Grid Edit.
b. Edit the appropriate attributes and click Apply Changes.
6. To edit a specific column, click the edit icon for the attribute you want to modify.
Chapter 5
Managing User Interface Defaults
5-66

The Column Details page displays.
Note:
If you select to edit a synonym, identified by having the
Synonym of
column
populated, you are taken to the definition for the base column, because the
base column and all synonyms share one definition. To delete the synonym,
select the synonym within the Synonyms region. Deleting the base column
deletes the column and all synonyms.
7. Make modifications and click Apply Changes.
See field-level help for a description of the individual settings on this page.
5.7.6 Exporting and Importing User Interface Defaults
You export user interface defaults in the same way you export any related application file.
Exporting user interface defaults from one development instance to another involves the
following steps:
1. Export the user interface defaults using the Export User Interface Defaults utility.
2. Import the exported file into the target Oracle APEX instance.
3. Install the exported file from Export Repository.
When you export user interface defaults, all user interface defaults for the selected schema
are exported to a single script. The file contains an API call to create table hints by making
calls to the application PL/SQL API. You can use this file to import user interface defaults to
another database and Oracle APEX instance.
See Also:
In Oracle APEX App Builder User’s Guide
• Exporting User Interface Defaults
• Importing User Interface Defaults
• Installing Export Files
5.8 Comparing Schemas
You can run a report that compares database objects in two schemas, displaying differences
between them. You can compare all objects in the schemas or limit your report to specific
objects.
To compare two schemas, both must be available to your workspace.
Examples:
• Compare
DEMO_ objects
by searching for that naming convention. The report indicates if
the object exists in each of the two schemas.
Chapter 5
Comparing Schemas
5-67

• Analyze the object details in the two schemas to determine why one
implementation is different. For example, the report might show that an index in
one schema has an additional column or a column with a different data type.
To compare schemas:
1. On the Workspace home page, click SQL Workshop.
2. Click Utilities.
3. Click Schema Comparison.
4. On the Schema Comparison page, make the appropriate selections to run the
comparison:
a. Schema 1 and Schema 2 - Select the schemas to compare.
b. Compare - Restrict the report to show one object type or select All to show all
database objects.
c. Search - Enter a case insensitive query for the object name.
d. Rows - To change the number of rows that appear in the report, make a
selection from the Display list.
e. Compare - Click Go to find the results matching your selections.
f. Show Differences Only or Show Details - Select the type of information you
want to review.
g. Click Compare.
5.9 Managing Methods on Tables
The Managing Methods on Tables utility enables you to create an application
programming interface, or package, based on a specified table.
To create a package:
1. On the Workspace home page, click the SQL Workshop.
2. Click Utilities.
3. Click Methods on Tables.
The Create Table API page appears.
4. Enter a Package name. To have the final package name match the case entered
in the Package Name field, click Preserve Case and click Next.
5. Select the table(s) for which you want to generate the PL/SQL package-based
application program interface (API) and click Next.
6. A confirmation page appears, which displays the subprogram(s) and their
description. You have the option to show or download the specification or body. To
confirm, click Create Package.
5.10 Using the Recycle Bin
You can use the Recycle Bin to view and restore dropped database objects.
Chapter 5
Managing Methods on Tables
5-68

When you drop a table, the space associated with the table is not immediately removed. The
Oracle database renames the table and places it and any associated objects in the Recycle
Bin. You can recover objects in the Recycle Bin at a later time.
Note:
The Recycle Bin feature is only available if you run with an Oracle 10g or later
database.
• Managing Objects in the Recycle Bin
Once you select an object and view the Object Details page, you can choose to purge the
object or restore the object by clicking the appropriate button.
• Emptying the Recycle Bin Without Viewing the Objects
You can empty the Recycle Bin without viewing the objects by using Purge Recycle Bin
option.
5.10.1 Managing Objects in the Recycle Bin
Once you select an object and view the Object Details page, you can choose to purge the
object or restore the object by clicking the appropriate button.
You can view objects in the Recycle Bin on the Dropped Objects page.
To view objects in the Recycle Bin:
1. On the Workspace home page, click the SQL Workshop.
2. Click Utilities.
3. Click Recycle Bin.
4. Click Dropped Objects.
The Dropped Objects page appears.
5. To filter the report, select an object type, enter the object name in the Original Name field,
and click Go.
6. To view object details, click the object name.
The Object Details page appears.
7. To restore the current object, click Restore Object.
8. To permanently delete the current object, click Purge Object.
5.10.2 Emptying the Recycle Bin Without Viewing the Objects
You can empty the Recycle Bin without viewing the objects by using Purge Recycle Bin
option.
To empty the Recycle Bin without viewing the objects:
1. On the Workspace home page, click SQL Workshop.
2. Click Utilities.
3. Click Recycle Bin.
Chapter 5
Using the Recycle Bin
5-69

4. Click Purge Recycle Bin.
The Purge Recycle Bin page appears.
5. Confirm your request by clicking Purge Recycle Bin again.
5.11 Viewing Object Reports
SQL Workshop Utilities includes a variety of object reports to help you better manage
the objects in your database.
• Viewing Table Reports
Use the Table reports to view specific details about the tables within your
database.
• Viewing PL/SQL Reports
Use the PL/SQL reports to view program unit arguments or unit line counts and
also to search PL/SQL source code.
• Viewing Exception Reports
Use the Exception Reports to view unindexed foreign keys and tables without
primary keys, indexes, or triggers.
• Viewing Security Reports
Use the Security reports to view object or column privileges granted on database
objects owned by other schemas.
• Viewing All Object Reports
Use the All Object reports to view objects for the selected schema.
5.11.1 Viewing Table Reports
Use the Table reports to view specific details about the tables within your database.
To view the Table reports:
1. On the Workspace home page, click the SQL Workshop.
2. Click Utilities.
3. Click Object Reports.
The Object Reports page appears.
4. Under Table Reports, select a report to view:
• Table Columns
• Table Comments
• Table Constraints
• Table Statistics
• Table Storage Sizes
5. To filter a report, enter search criteria in the field provided and click Go.
6. To view reports for a different schema, select another schema from the Schema
list.
Chapter 5
Viewing Object Reports
5-70

See Also:
Customizing an Interactive Report Using the Actions Menuin Oracle APEX End
User’s Guide
5.11.2 Viewing PL/SQL Reports
Use the PL/SQL reports to view program unit arguments or unit line counts and also to
search PL/SQL source code.
• Viewing Package Input and Output Parameters
Use the Program Unit Arguments report to view package input and output parameters.
• Viewing the Number of Lines of Code for an Object
Use the Unit Line Counts report to view the number of lines of code for each object.
• Searching PL/SQL Source Code
Use the Search PL/SQL Source code page to search the text within your PL/SQL code.
See Also:
Customizing an Interactive Report Using the Actions Menu in Oracle APEX End
User’s Guide
5.11.2.1 Viewing Package Input and Output Parameters
Use the Program Unit Arguments report to view package input and output parameters.
To view the PL/SQL Unit Arguments report:
1. On the Workspace home page, click the SQL Workshop.
2. Click Utilities.
3. Click Object Reports.
The Object Reports page appears.
4. Under PL/SQL Reports, click Program Unit Arguments.
5. To filter a report, enter search criteria in the field provided and click Go.
6. To view reports for a different schema, select another schema from the Schema list.
5.11.2.2 Viewing the Number of Lines of Code for an Object
Use the Unit Line Counts report to view the number of lines of code for each object.
Use this report to identify larger PL/SQL program units.
To view the Unit Line Counts report:
1. On the Workspace home page, click the SQL Workshop.
2. Click Utilities.
3. Click Object Reports.
Chapter 5
Viewing Object Reports
5-71

The Object Reports page appears.
4. Under PL/SQL Reports, click Unit Line Counts.
The PL/SQL Unit Line Counts report appears.
5. To view reports for a different schema, select another schema from the Schema
list.
5.11.2.3 Searching PL/SQL Source Code
Use the Search PL/SQL Source code page to search the text within your PL/SQL
code.
Use this report to find references to tables or functions you might be thinking of
deleting. You can also use this page to locate code when you can only recall a code
snippet.
To search for PL/SQL source code:
1. On the Workspace home page, click the Utilities icon.
2. Click Object Reports.
The Object Reports page appears.
3. Under PL/SQL Reports, click Search PL/SQL Source Code.
4. To filter the report:
a. In From Line and To Line, enter the range of lines you want to search.
b. Click Set.
c. To filter the report, enter an object name and click Go.
5. To view reports for a different schema, select another schema from the Schema
list.
5.11.3 Viewing Exception Reports
Use the Exception Reports to view unindexed foreign keys and tables without primary
keys, indexes, or triggers.
To view Exception reports:
1. On the Workspace home page, click the SQL Workshop.
2. Click Utilities.
3. Click Object Reports.
The Object Reports page appears.
4. In the Exception Reports section, click the report you want to view.
• Tables without Primary Keys
• Tables without Indexes
• Unindexed Foreign Keys
• Tables without Triggers
5. To filter the report, enter a table name and click Go.
Chapter 5
Viewing Object Reports
5-72

6. To view reports for a different schema, select another schema from the Schema list.
See Also:
Customizing an Interactive Report Using the Actions Menu in Oracle APEX End
User’s Guide
5.11.4 Viewing Security Reports
Use the Security reports to view object or column privileges granted on database objects
owned by other schemas.
You can also use these reports to view database role and system privileges.
To view the Security reports:
1. On the Workspace home page, click the SQL Workshop.
2. Click Utilities.
3. Click Object Reports.
The Object Reports page appears.
4. Under Security Reports, click the report you want to view:
• Object Grants - View the privileges for an existing schema and also understand
what privileges have been granted from the selected schema to other schemas.
• Column Privileges - View the privileges for columns within your schema and also
understand what privileges have been granted from the selected schema to other
schemas.
• Role Privileges - View the database roles that have been granted to a selected
schema. Roles are collections of various privileges.
• System Privileges - View the database privileges that have been granted to a
selected schema.
5. To filter a report, enter search criteria in the field provided and click Go.
6. To view reports for a different schema, select another schema from the Schema list.
See Also:
Customizing an Interactive Report Using the Actions Menu in Oracle APEX End
User’s Guide
5.11.5 Viewing All Object Reports
Use the All Object reports to view objects for the selected schema.
To view the All Object reports:
Chapter 5
Viewing Object Reports
5-73

1. On the Workspace home page, click the SQL Workshop.
2. Click Utilities.
3. Click Object Reports.
The Object Reports page appears.
4. Under All Object Reports, select a report to view:
• All Objects - List all objects in the current schema. Displays creation date and
when the last DDL (data definition language) was performed.
• Invalid Objects - View all invalid objects in the database by object type.
• Object Creation Calendar - View all objects in a calendar format based on
the date each database object was created.
• Object Counts by Type - View the number of database objects by type for the
selected schema.
• Data Dictionary - View the data dictionary for this database.
An Oracle data dictionary is a set of tables and views used as a read-only
reference about the database. For example, a data dictionary stores
information about both the logical and physical structure of the database.
A data dictionary also stores information about valid Oracle database users,
integrity constraints for tables in the database, and the amount of space
allocated for a schema object and the amount being used.
5. To filter a report, enter search criteria in the field provided and click Go.
6. To view reports for a different schema, select another schema from the Schema
list.
See Also:
• Customizing an Interactive Report Using the Actions Menu in Oracle
APEX End User’s Guide
• Data Dictionary and Dynamic Performance Views in Oracle Database
Conceptsfor information about the data dictionary
5.12 Viewing Database Details
If you have an account that has been granted a database administrator role, you can
view details about your database on the About Database page.
To access details about your database:
1. On the Workspace home page, click SQL Workshop.
2. Click Utilities.
3. Click About Database.
4. If prompted, enter the appropriate administrator user name and password and
click Login.
Chapter 5
Viewing Database Details
5-74

The About Database page appears.
Tip:
See About Database Monitor Access Requirements to learn more about the
requirements for accessing this page.
5. To view additional information about installed options, currently used features, or National
Language Support:
• Select one of the following options:
– Version
– Settings
– Options
– National Language Support
– CGI Environment
– Parameters
• Click Go.
5.13 Monitoring the Database
The reports available on the Database Monitor page provide a database-wide view of the
database sessions, system statistics, SQL statements, and longer operations.
You can use these reports to identify poorly performing SQL and to better understand the
workload of the database.
Tip:
To access any of the icons on the Database Monitor page, you must have a
database account that has been granted a database administrator (DBA) role.
• About Database Monitor Access Requirements
Ensure that your account has the database administrator (DBA) role, Database
Monitoring is enabled in the instance, and your user name is uppercase at sign-in.
• Accessing Session Page Reports
A session is the connection of a user to an Oracle database instance.
• System Statistics
Displays the System Statistics page statistics.
• Viewing System Statistics
Learn how to view the System Statistics page.
• About Top SQL Page
The top SQL statements represent the SQL statements that are executed most often,
that use more system resources than other SQL statements, or that use system
resources more frequently than other SQL statements.
Chapter 5
Monitoring the Database
5-75
• Viewing Top SQL Page
Use the Top SQL page to identify poorly performing SQL.
• About Long Operations Page
The Long Operations page displays the status of various operations that run for
longer than 6 seconds (in absolute time).
• Viewing the Long Operations Page
Learn how to view the Long Operations page.
5.13.1 About Database Monitor Access Requirements
Ensure that your account has the database administrator (DBA) role, Database
Monitoring is enabled in the instance, and your user name is uppercase at sign-in.
To access the Database Monitor page, you meet the following requirements:
• Your database account that has been granted a database administrator (DBA)
role.
• Database Monitoring is enabled for the instance. Your intance administrator can
enable this from Instance Administration or use
APEX_INSTANCE_ADMIN.SET_PARAMETER
to set the
ALLOW_DB_MONITOR
parameter
value.
When all requirements are met, sign in using the database account with DBA role with
an UPPERCASE user name.
See Also:
• Configuring Database Monitoring in Oracle APEX Administration Guide
• SET_PARAMETER Procedure in Oracle APEX App Builder User’s Guide
5.13.2 Accessing Session Page Reports
A session is the connection of a user to an Oracle database instance.
A session lasts from the time the user connects until the time the user disconnects or
exits the database application.
• Accessing Reports on the Session Page
You must have database administrator privileges to access the Sessions page.
• Creating Sessions Reports
The Sessions Report displays information about the current sessions in the
database.
• Controlling the Number of Rows for Locks Reports
The Locks report displays a report of sessions which have locks that are blocking
other session(s).
• Creating Waits Reports
The Waits report displays the wait events for each session.
Chapter 5
Monitoring the Database
5-76

• Creating I/O Reports
The I/0 report displays details about the I/O for each session.
• Creating SQL Reports
The SQL report displays details about the current or last SQL statement executed for
each session.
• Creating Open Cursors Report
The Open Cursors report displays details about the number of open cursors for each
session.
5.13.2.1 Accessing Reports on the Session Page
You must have database administrator privileges to access the Sessions page.
A session is the connection of a user to an Oracle database instance. A session lasts from
the time the user connects until the time the user disconnects or exits the database
application.
To access reports on the Sessions page:
1. On the Workspace home page, click SQL Workshop.
2. Click Utilities.
3. Click Database Monitor.
4. Click Sessions.
5. If prompted, enter the appropriate database administrator user name and password and
click Login.
The Sessions page appears.
6. To view a report, select one of the following tabs at the top of the page:
• Sessions
• Locks
• Waits
• I/O
• SQL
• Open Cursors
5.13.2.2 Creating Sessions Reports
The Sessions Report displays information about the current sessions in the database.
Use the controls at the top of page to narrow the view:
• Search. Enter search criteria and click Go. For search details, click the Search label.
• Status. Select a status and click Go.
• Show. Select how many columns to display and click Go.
• Rows. Select the number of rows to appear in the report and click Go.
To view session details, click the Session ID (SID). The Session Details page appears. To
remove the current session, navigate to the Session Details page and click Kill Session.
Chapter 5
Monitoring the Database
5-77

5.13.2.3 Controlling the Number of Rows for Locks Reports
The Locks report displays a report of sessions which have locks that are blocking
other session(s).
To control the number of rows that appear, make a selection from the Rows list and
click Go.
5.13.2.4 Creating Waits Reports
The Waits report displays the wait events for each session.
Use the controls at the top of page to narrow the view:
• Search. Enter search criteria and click Go. For search details, click the Search
label.
• Status. Select a status and click Go.
• Show. Select how many columns to display and click Go.
• Rows. Select the number of rows to appear in the report and click Go.
To view session details, click the Session ID (SID). The Session Details page appears.
To remove the current session, click Kill Session.
5.13.2.5 Creating I/O Reports
The I/0 report displays details about the I/O for each session.
Use the controls at the top of page to narrow the view:
• Search. Enter search criteria and click Go. For search details, click the Search
label.
• Rows. Select the number of rows to appear in the report and click Go.
To view session details, click the Session ID (SID). The Session Details page appears.
To remove the current session, click Kill Session.
5.13.2.6 Creating SQL Reports
The SQL report displays details about the current or last SQL statement executed for
each session.
Use the controls at the top of page to narrow the view:
• Search. Enter search criteria and click Go. For search details, click the Search
label.
• Status. Select a status and click Go.
• Show. Select how many columns to display and click Go.
• Rows. Select the number of rows to appear in the report and click Go.
To view session details, click the Session ID (SID). The Session Details page appears.
To remove the current session, click Kill Session.
Chapter 5
Monitoring the Database
5-78

5.13.2.7 Creating Open Cursors Report
The Open Cursors report displays details about the number of open cursors for each session.
Use the controls at the top of page to narrow the view:
• Search. Enter search criteria and click Go. For search details, click the Search label.
• Status. Select a status and click Go.
• Rows. Select the number of rows to appear in the report and click Go.
To view details about a specific open cursor count, click the numeric link under the Open
Cursor Count column.
To view session details, click the Session ID (SID). The Session Details page appears. To
remove the current session, click Kill Session.
5.13.3 System Statistics
Displays the System Statistics page statistics.
The System Statistics page displays statistics for:
• Physical I/O. A physical I/O is an I/O that requires disk access. This report displays disk
access statistics for physical reads and writes.
• Logical I/O. A logical I/O is an I/O that is satisfied in memory or disk. Displays the sum of
buffer reads which might be consistent gets or current mode gets. Redo is the buffer in
the SGA that contains information about changes.
• Memory Statistics. Displays memory consumption of the database.
• Time Statistics. Shows various times consumed by the database.
• SQL Cursor Statistics. Displays statistics about the cursors in the Oracle database.
• Transaction Statistics. Shows the number of transactions performed.
5.13.4 Viewing System Statistics
Learn how to view the System Statistics page.
To view the System Statistics page:
1. On the Workspace home page, click SQL Workshop.
2. Click Utilities.
3. Click Database Monitor.
4. Click System Statistics.
5. If prompted, enter the appropriate administrator user name and password and click
Login.
The System Statistics page appears.
Additional controls on the System Statistics page include:
• Refresh Report - Refreshes the System Statistics report.
• Save Statistics - Saves the current report.
Chapter 5
Monitoring the Database
5-79

• Show delta between current and saved values - Click this check box to display
actual statistic values, or display deltas between a saved value and the current
value.
See Also:
Oracle Database Performance Tuning Guide
5.13.5 About Top SQL Page
The top SQL statements represent the SQL statements that are executed most often,
that use more system resources than other SQL statements, or that use system
resources more frequently than other SQL statements.
Use the Top SQL page to identify poorly performing SQL.
5.13.6 Viewing Top SQL Page
Use the Top SQL page to identify poorly performing SQL.
To view the Top SQL page:
1. On the Workspace home page, click the SQL Workshop.
2. Click Utilities.
3. Click Database Monitor.
4. Click Top SQL.
5. If prompted, enter the appropriate administrator user name and password and
click Login.
The Top SQL page appears. Use the search fields and lists and the top of the
page and click Go to narrow the display. For details on each field or list, click the
label.
6. To access the SQL Plan page, click the View icon.
The SQL Plan page appears, containing the following sections:
• Query Plan - Contains a color coded explain plan. Note that unindexed
columns display in red.
• SQL Text - Displays the full text of the SQL statement.
• Indexes - Displays all indexes on the table in the query. There is a checkmark
when that index is used in the query.
• Table Columns - Shows all columns on all tables or views in the query.
5.13.7 About Long Operations Page
The Long Operations page displays the status of various operations that run for longer
than 6 seconds (in absolute time).
Chapter 5
Monitoring the Database
5-80

These operations currently include many backup and recovery functions, statistics gathering,
and query execution, and more operations are added for every Oracle release.
5.13.8 Viewing the Long Operations Page
Learn how to view the Long Operations page.
To view the Long Operations page:
1. On the Workspace home page, click the SQL Workshop.
2. Click Utilities.
3. Click Database Monitor.
4. Click Long Operations.
5. If prompted, enter the appropriate administrator user name and password and click
Login.
See Also:
V_SESSION_LONGOPS in Oracle Database Reference
Chapter 5
Monitoring the Database
5-81

6
Using SQL Scripts
Use SQL scripts to create, edit, view, run, and delete script files.
• About SQL Scripts
A SQL script is a set of SQL commands saved as a file in SQL Scripts.
• Accessing SQL Scripts
Learn how to access SQL Scripts.
• About the SQL Scripts Page
The SQL Scripts page displays an interactive report of all SQL scripts created by the
current user.
• About the Tasks List
A Tasks list displays on the right side of the SQL Scripts page.
• Creating a SQL Script
Learn about different ways of creating a SQL script.
• Using the Script Editor
You use the Script Editor to add content to a new script, to edit existing scripts, and to run
and delete scripts in the script repository.
• Creating an Application from a Script
Launch the Create Application Wizard loaded with pages based on the tables used by the
script.
• Deleting a SQL Script
You can delete scripts from the Script Repository by deleting selected scripts from the
SQL Scripts page, or deleting the current script in the Script Editor.
• Copying a SQL Script
You can copy a script in the Script Repository by saving it with a new name.
• Executing a SQL Script
You can execute scripts stored in the Script Repository. You can submit a script for
execution either from the Script Editor or from the SQL Scripts page.
• Viewing SQL Script Results
You use the Manage Script Results page to view and delete script results.
• Exporting and Importing SQL Scripts
Move scripts from your current Script Repository by exporting them and then importing
SQL Script Export into a Script Repository in a different workspace.
• Viewing Script and Result Quotas
You can view the script limits in the current workspace on the Script Quotas page.
6.1 About SQL Scripts
A SQL script is a set of SQL commands saved as a file in SQL Scripts.
A SQL script can contain one or more SQL statements or PL/SQL blocks. You can use SQL
scripts to create, edit, view, run, and delete database objects.
6-1

When using SQL Scripts, remember the following:
• SQL*Plus commands in a SQL script are ignored at runtime.
• There is no interaction between SQL Commands and SQL scripts.
• You can cut and paste a SQL command from the SQL Script editor to run it in SQL
Commands.
• SQL scripts does not support bind variables.
See Also:
• Using SQL Scripts
• Using SQL Commands
• About Long Operations Page
6.2 Accessing SQL Scripts
Learn how to access SQL Scripts.
To access SQL Scripts:
• On the Workspace home page, click SQL Workshop and then SQL Scripts.
The SQL Scripts page appears.
Chapter 6
Accessing SQL Scripts
6-2

Note:
If the instance administrator has disabled RESTful Services for this APEX
instance, RESTful Services are not available for this instance and the RESTful
Services icon does not display.
See Also:
• Configuring SQL Workshop in Oracle APEX Administration Guide
• About the SQL Scripts Page
• Using SQL Commands
• About Long Operations Page
6.3 About the SQL Scripts Page
The SQL Scripts page displays an interactive report of all SQL scripts created by the current
user.
If you are a workspace administrator, this page displays all SQL scripts created by workspace
users. You can alter the layout of report data by choosing the columns you are interested in,
applying filters, highlighting, and sorting. You can also define breaks, aggregations, different
charts, group bys, and add your own computations.
A search bar displays at the top of every interactive report and includes the following
features:
• Select Columns to Search - This button resembles a magnifying glass. Click Select
Columns to Search to narrow your search to specific columns. To search all columns,
select All Columns.
Chapter 6
About the SQL Scripts Page
6-3

• View Icons - Displays each script as an icon identified by the script name.
• View Report - Displays each script as a line in a report. Each line includes a
check box to enable the selection of scripts for deletion, an edit icon to enable the
script to be loaded into the script editor, the script name, the script owner, when
the script was last updated and by who, the size in bytes, the number of times the
script has been run linked to the run results, and an icon to enable the script to be
run.
Reports view offers the following additional controls:
– Delete Checked - In Reports view, select the check box associated with the
script you want to delete and click Delete Checked.
– Sort - In Reports view, click a column heading to sort the listed scripts by that
column.
• Upload - Click Upload to upload a script from your local file system into SQL
Scripts.
• Create - Click Create to create a script in the Script Editor.
See Also:
• Deleting a SQL Script
• Uploading a SQL Script
• Creating a SQL Script
• Selecting a Schema
• Customizing Interactive Reports in a Running Application in Oracle
APEX App Builder User’s Guide
6.4 About the Tasks List
A Tasks list displays on the right side of the SQL Scripts page.
The Task list contains the following links:
• Manage Results - enables you to view, search, and display results.
• Show Quotas - displays the Script Quotas page. The Script Quotas page shows
the maximum size of a single result, the maximum size of all results, the quota
used and the quota free. It also shows the maximum size of a SQL Script.
• Export - enables you to export multiple scripts from the current SQL Script
Repository for import into SQL Scripts in a different workspace. The scripts you
select to export are encoded in a single export script written to your local file
system. The export script is named workspace_name_script.sql by default.
• Import - enables you to import a script exported by this workspace, or a different
workspace. Import only imports scripts encoded in an export script created using
Export. The export script to import must be accessible on your local file system.
Chapter 6
About the Tasks List
6-4

See Also:
• Viewing SQL Script Results
• Exporting and Importing SQL Scripts
• Accessing SQL Scripts
6.5 Creating a SQL Script
Learn about different ways of creating a SQL script.
You can create a script in the Script Repository by:
• Creating a SQL Script in the Script Editor
Learn how to create SQL script in the Script Editor.
• Uploading a SQL Script
Learn how to upload a SQL script from your local file system.
6.5.1 Creating a SQL Script in the Script Editor
Learn how to create SQL script in the Script Editor.
To create an SQL script in the Script Editor:
1. On the Workspace home page, click SQL Workshop and then SQL Scripts.
The SQL Scripts page appears.
2. Click the Create button.
The Script Editor appears.
3. In Script Name, enter a name for the script. Script name extensions are optional.
4. Enter the SQL statements, PL/SQL blocks you want to include in your script.
Remember that SQL*Plus commands are ignored at runtime.
5. Click Create.
The SQL Scripts page appears listing your newly saved script.
6.5.2 Uploading a SQL Script
Learn how to upload a SQL script from your local file system.
To upload a script from your local file system:
1. On the Workspace home page, click SQL Workshop and then SQL Scripts.
The SQL Scripts page appears.
2. Click the Upload button.
The Upload Script dialog appears.
3. For Upload Script:
a. File - Browse to locate the script you want to upload.
Chapter 6
Creating a SQL Script
6-5

b. Script Name - Optionally enter a new name in the Script Name field. This
name displays in the Script Repository.
c. File Character Set - Select the character set in which the script is encoded.
d. Click Upload.
The SQL Scripts page appears listing your newly uploaded script.
Tip:
The script is parsed during runtime. When parsed, ignored statements such
as SQL*PLUS commands are listed. Any invalid SQL is identified only in
results. If a script of the same name exists, you are prompted to rename it.
See Also:
Creating a SQL Script in the Script Editor
6.6 Using the Script Editor
You use the Script Editor to add content to a new script, to edit existing scripts, and to
run and delete scripts in the script repository.
• Editing an Existing Script
Learn how to edit an existing SQL script.
• Script Editor Controls
Controls and buttons available within the Script Editor.
6.6.1 Editing an Existing Script
Learn how to edit an existing SQL script.
To edit a SQL script:
1. On the Workspace home page, click SQL Workshop and then SQL Scripts.
The SQL Scripts page appears.
2. You can load a script into the editor as follows:
• In Icons view, click the script icon.
• In Report view, click the Edit icon.
The Script Editor appears.
3. Edit the script.
Note that new lines are automatically indented to the previous line start column.
Other features of the Script Editor include:
Chapter 6
Using the Script Editor
6-6

• Undo - Use to undo the last edit.
• Redo - Use to reapply the last undone edit.
• Find - Click the Find icon (which resembles a magnifying glass) to perform a basic
search.
• Replace - Click the Replace icon (which resembles a two-sided arrow) to replace
existing code.
• Cut, Copy, and Paste - Use standard edit controls to cut, copy and paste content in
the Script Editor.
• Auto Complete - Click the Auto Complete icon to complete the command.
4. Click Apply Changes to save your script.
The SQL Scripts page appears.
You can test your script during editing by running the script to reveal errors.
See Also:
• Executing a SQL Script
• Viewing SQL Script Results
6.6.2 Script Editor Controls
Controls and buttons available within the Script Editor.
Table 6-1 describes the buttons and controls available within the Script Editor
Table 6-1 Buttons and Controls within the Script Editor
Button Descriptions
Cancel Cancel the editing session and exit the Script Editor without saving
changes made since the last save.
Download Saves a copy of the current script to your local file system. Enter a
name for the script on your local file system and a directory path.
Delete Removes the current script from the Script Repository.
Save Saves the currently script. Save is disabled if you edit the Script
Name. Instead use Apply Changes.
Create App Launches the Create App Wizard based on the table. Only works
with scripts that add tables to the schema.
Tip: You must run the script that adds tables to the schema first.
Apply Changes Saves the script and returns to the SQL Scripts report.
Run Submits the script for execution.
Undo (Ctrl+Z) Removes, or undoes, the most recent line edit made in the Script
Editor.
Redo (Ctrl+Shift+Z) Repeats the most recent line edit made in the Script Editor.
Chapter 6
Using the Script Editor
6-7

Table 6-1 (Cont.) Buttons and Controls within the Script Editor
Button Descriptions
Find (Ctrl+F)
Click the Find icon (which resembles a magnifying glass) to perform
a basic search.
Auto Complete (Ctrl+Space)
Click the Auto Complete icon (which resembles upper case letter
A) view possible auto complete suggestions.
Context Menu Right-click and select one of the following:
• Change All Occurrences (Ctrl+F2) - Right click and select
Change All Occurrences from the context menu.
• Cut
• Copy
• Command Palette (F1) - Displays the Command Palette.
Command Palette (F1)
Right click to display a context menu and select Command Palette.
The Command Palette includes over 80 commands including:
• Replace (Ctrl+H)
• Replace with Next Value (Ctrl+Shift+.)
• Replace with Previous Value (Ctrl+Shift+,)
Multi Cursor Selection • Add cursors at arbitrary positions - Select a position with your
mouse and press Shift+Alt+click (Shift+Option+click on
macOS).
• Set cursors above the current position - Select a position with
your mouse and press Ctrl+Alt+Up (Option+Command+Up on
macOS).
• Set cursors below the current position - Select a position with
your mouse and press Ctrl+Alt+Down
(Option+Command+Down on macOS).
Settings menu
The Settings menu displays on the right side and includes the
following options:
• Indentation - Options include: Tab Inserts Spaces, Tab Size,
and Indent Size.
• Themes - Options include: Automatic, Light, Dark, and High
Contrast Dark.
• Show Ruler.
See Also:
• Deleting a SQL Script
• Executing a SQL Script
6.7 Creating an Application from a Script
Launch the Create Application Wizard loaded with pages based on the tables used by
the script.
Required
Chapter 6
Creating an Application from a Script
6-8

The tables specified in the script must exist in your workspace to use the Create App button.
Run the script or load the tables first.
Procedure
To create an application based on the script:
1. In SQL Workshop, click SQL Scripts.
2. If necessary, upload the script.
3. Click the Edit icon (pencil) for the script.
4. Do one of the following:
• Click Create App.
• Run the script and click Create App.
5. Click Create Application on the confirmation dialog.
The Create Application Wizard launches in App Builder loaded with the tables used in the
script.
Complete the wizard to create your application.
See Also:
Running the Create Application Wizard in Oracle APEX App Builder User’s Guide
6.8 Deleting a SQL Script
You can delete scripts from the Script Repository by deleting selected scripts from the SQL
Scripts page, or deleting the current script in the Script Editor.
• Deleting Scripts from the SQL Scripts Page
Learn how to delete scripts from the SQL Scripts page.
• Deleting a Script in the Script Editor
Learn how to delete a script in the Script Editor.
6.8.1 Deleting Scripts from the SQL Scripts Page
Learn how to delete scripts from the SQL Scripts page.
To delete scripts from the SQL Scripts page:
1. On the Workspace home page, click SQL Workshop and then SQL Scripts.
The SQL Scripts page appears.
2. Click the View Report icon.
Reports view appears.
3. Select the scripts to be deleted.
To select individual scripts, click the check box to the left of the script name. To select all
scripts visible in the current page, click the check box in the column heading.
4. Click Delete Checked to permanently remove the selected scripts from the Script
Repository.
Chapter 6
Deleting a SQL Script
6-9

5. When prompted to confirm the delete action, click OK.
6.8.2 Deleting a Script in the Script Editor
Learn how to delete a script in the Script Editor.
To delete a script in the Script Editor:
1. On the Workspace home page, click SQL Workshop and then SQL Scripts.
The SQL Scripts page appears.
2. Open the script you want to delete in the Script Editor.
3. Click Delete to permanently remove the script from the Script Repository.
4. When prompted to confirm the delete action, click OK.
6.9 Copying a SQL Script
You can copy a script in the Script Repository by saving it with a new name.
To copy a script:
1. On the Workspace home page, click SQL Workshop and then SQL Scripts.
The SQL Scripts page appears.
2. Open the script into the Script Editor.
3. In Script Name, enter a new script name.
4. Click Apply Changes.
The SQL Scripts page appears listing the new script.
6.10 Executing a SQL Script
You can execute scripts stored in the Script Repository. You can submit a script for
execution either from the Script Editor or from the SQL Scripts page.
When you submit a script for execution, the Run Script page appears. It displays the
script name, when it was created and by whom, when it was last updated and by
whom, the number of statements it contains, and its size in bytes. It also lists unknown
statements such as SQL*Plus commands that are ignored during execution.
If a script does not contain any runnable statements, the Run control does not display.
• Executing a SQL Script in the Script Editor
Learn how to execute a script in the Script Editor.
• Executing a SQL Script from the SQL Scripts Page
Learn how to execute a script from the SQL Scripts page.
Chapter 6
Copying a SQL Script
6-10

See Also:
About Long Operations Page
6.10.1 Executing a SQL Script in the Script Editor
Learn how to execute a script in the Script Editor.
To execute a script in the Script Editor:
1. Open the script you want to execute in the Script Editor.
2. Click Run in the Script Editor.
The Run Script page appears. This page displays information about the script and lists
statements in error preventing execution, or statements such as SQL*Plus commands
that are ignored when the script is executed.
Available options on the Run Script page include:
• Cancel - returns you to the SQL Scripts page without executing the script.
• Run Now - to submit the script for execution.
3. Click Run Now to submit the script for execution.
The Manage Script Results page appears listing script results.
4. To view script results, click View Results.
See Also:
• Using the Script Editor
• Viewing SQL Script Results
6.10.2 Executing a SQL Script from the SQL Scripts Page
Learn how to execute a script from the SQL Scripts page.
To execute a script from the SQL Scripts page:
1. On the Workspace home page, click SQL Workshop and then SQL Scripts.
The SQL Scripts page appears.
2. Click the View Report icon.
Reports view appears.
3. In the far right column, click the Run icon for the script you want to execute.
Chapter 6
Executing a SQL Script
6-11

Tip:
If the script does not contain any runnable statements, an error icon
displays.
The Run Script page appears. This page displays information about the script and
lists statements in error preventing execution, or statements such as SQL*Plus
commands that are ignored when the script is executed.
Available options on the Run Script page include:
• Cancel - returns you to the SQL Scripts page without executing the script.
• Run Now - to submit the script for execution.
4. Click Run Now to submit the script for execution.
The Manage Script Results page appears listing available results for the script.
5. Click the View Results icon in the far right column.
See Also:
Viewing SQL Script Results
6.11 Viewing SQL Script Results
You use the Manage Script Results page to view and delete script results.
To view script results:
1. On the Workspace home page, click SQL Workshop and then SQL Scripts.
The SQL Scripts page appears.
2. On the Tasks list, click Manage Results.
The Manage Script Results page appears, listing available results for the script.
3. Click the View Results icon in the far right column.
The Results page appears.
The Results page displays the script name and status (Complete, Canceled,
Executing or Submitted), and lists the statements executed.
To launch the Create Application Wizard based on the script:
4. Click Create App.
To view the detailed results for a previously run script:
5. On the Results page, select a View option and click Go:
• Detail - Displays the Results in a report.
Chapter 6
Viewing SQL Script Results
6-12

• Summary - Displays a Summary page. From the Rows list, select the number of
Rows to display. Select a column heading to sort the listed values by that column.
6. Click Edit Script to load the script into the Script Editor.
See Also:
Using the Script Editor
6.12 Exporting and Importing SQL Scripts
Move scripts from your current Script Repository by exporting them and then importing SQL
Script Export into a Script Repository in a different workspace.
• Exporting SQL Scripts
Move scripts from your current Script Repository by exporting them.
• Importing Scripts
Import a Script Export into the Script Repository.
6.12.1 Exporting SQL Scripts
Move scripts from your current Script Repository by exporting them.
By default, the Export SQL Scripts page lists all scripts in the Script Repository created by the
current user. Export SQL Scripts features two regions: Scripts and Scripts to Export. Use
Scripts to select the scripts to export. Then, review Scripts to Export to finalize the scripts
to export and choose a name for the Script Export.
To export script files:
1. On the Workspace home page, click SQL Workshop and then SQL Scripts.
The SQL Scripts page appears.
2. On the Tasks list, click Export.
The Export SQL Scripts page appears.
3. Under Scripts:
a. Select the scripts you want to export. To select all displayed scripts, click the column
head check box.
b. Click Add to Export.
Chapter 6
Exporting and Importing SQL Scripts
6-13

The selected scripts display under Scripts to Export.
4. Under Scripts to Export:
a. File Name - Enter a name for the export script. The default script name is
workspace_name_script.sql
.
b. To remove a script, deselect it and click Remove Checked.
c. Click Export All.
5. Import the Script Export.
6.12.2 Importing Scripts
Import a Script Export into the Script Repository.
To import scripts:
1. Sign in to the target workspace.
2. On the Workspace home page, click SQL Workshop and then SQL Scripts.
The SQL Scripts page appears.
3. On the Tasks list, click Import.
The Export SQL Scripts page appears.
4. On Import Scripts:
a. Import file - Browse to the Script Export you want to import.
b. File Character Set - Indicate the character set encoding of the file to be
imported.
c. Click Next.
The Import Scripts page appears. The Action column indicates whether the
imported script is new, or whether it replaces an existing script of the same name.
5. Click Import Script(s) to import the listed scripts into the current Script Repository.
Chapter 6
Exporting and Importing SQL Scripts
6-14

The SQL Scripts page appears listing the imported scripts.
6.13 Viewing Script and Result Quotas
You can view the script limits in the current workspace on the Script Quotas page.
To view the Script Quotas page:
1. On the Workspace home page, click SQL Workshop and then SQL Scripts.
The SQL Scripts page appears.
2. On the Tasks list, click Show Quotas.
The Script Quotas page appears and displays the following limits:
• Result Quota in Bytes:
– Maximum Script Result Size - The maximum size in bytes of a single script
result. This size is set by an Oracle APEX instance administrator and cannot be
changed from within the workspace.
– Quota for All Script Results - The maximum size in bytes of all results in this
workspace. This size is set by an Oracle APEX instance administrator and
cannot be changed from within the workspace.
– Used - The number of bytes currently used in this workspace.
– Free - The number of bytes currently free in this workspace.
– Quota - A usage bar illustrating the percentage of quota currently used.
• Script Quota in Bytes:
– Maximum Script Size - The maximum size in bytes of a single script. The size is
set by the Oracle APEX instance administrator and cannot be changed within the
Workspace.
3. Click Cancel to return to the SQL Scripts page.
Chapter 6
Viewing Script and Result Quotas
6-15

7
Enabling Data Exchange with RESTful
Services
RESTful Services enable the declarative specification of RESTful services used to access the
database.
RESTful Services enable the creation of a set of standards-based APIs on top of database
objects available for a workspace. Without connecting directly to the underlying data source,
these APIs enable external systems to interact securely with the data by querying, inserting,
updating, or deleting.
The definitions of RESTful services created within Oracle APEX are stored in the Oracle
REST Data Services (ORDS) repository, and are referred to as ORDS-based REST Services.
Note:
Prior to release 18.1, the definitions of RESTful services created within Oracle
APEX were stored within the metadata tables of the core APEX schema. They were
referred to as APEX-based REST Services. APEX-based REST Services are
desupported in this release.
ORDS release 21.4.2 and later includes migration scripts that enable you to
upgrade any remaining APEX-based REST Services to ORDS-based Services. To
learn more, see Migration of Oracle APEX Restful Service Modules in Oracle REST
Data Services Release Notes.
This section introduces you to the concepts of RESTful services and describes how to create,
edit, and delete RESTful Services using APEX.
Note:
Your workspace administrator controls whether RESTful services are enabled. If
disabled, the RESTful Services icon does not display.
• About Oracle RESTful Services in Oracle APEX
This section introduces RESTful Services as implemented by Oracle REST Data
Services (ORDS) and provides clarification on the terminology used within APEX and
other Oracle tools to reference the different components that make up a RESTful Service.
• Enabling REST Objects from the Object Browser
• Enabling Authorization for REST Enabled Objects
Restrict access for REST-enabled objects on the REST tab in Object Browser. Use the
resulting Authorization Role information to configure user roles in ORDS.
7-1

• How to Access RESTful Services
Access RESTful Services from SQL Workshop.
• How to Create the ORDS Based RESTful Services Module Example
Learn how to create the ORDS Based RESTful Services module example.
• Managing RESTful Service Modules
Learn how to install sample RESTful service module, You can create ,edit, and
delete an ORDS RESTful service module.
• Managing Resource Templates
Resource templates are a means of grouping URIs and associating them with a
particular RESTful Service Module.
• Managing Resource Handlers
A resource handler is a query or an anonymous PL/SQL block responsible for
handling a particular HTTP method.
See Also:
Enabling RESTful Services and Defining a Path Prefix for a Workspace in
Oracle APEX Administration Guide
7.1 About Oracle RESTful Services in Oracle APEX
This section introduces RESTful Services as implemented by Oracle REST Data
Services (ORDS) and provides clarification on the terminology used within APEX and
other Oracle tools to reference the different components that make up a RESTful
Service.
You use Resource Modules, Resource Templates, and Resource Handlers, to
configure RESTful Services as implemented by Oracle REST Data Services (ORDS).
• RESTful Service Configuration Requirements
Configuration requirements for exposing RESTful Services to external systems.
• REST and RESTful Services
Representational State Transfer (REST) is a way of providing interoperability
between computer systems over the Internet. You can define the RESTful services
to enable the querying and manipulation of data without the need for direct access
to the underlying data store.
• Resource Modules
A Resource Module is a container that groups a set of related RESTful Services
together.
• Resource Templates
A Resource Template defines an individual service that can be called. Resource
Templates are contained in Resource Modules.
• Resource Handlers
Each Resource Handler implements one (and only one) HTTP operation. It is
important to understand how Resource Handler implementations are mapped to
traditional Create, Read, Update, Delete (CRUD) operations.
Chapter 7
About Oracle RESTful Services in Oracle APEX
7-2

• Example RESTful Service
Use Resource Modules, Resource Templates, and Resource Handlers, to configure
RESTful Services as implemented by Oracle REST Data Services (ORDS).
• RESTful Services Terminology
Terminology used in Oracle APEX and other Oracle tools to reference the different
components that make up a RESTful Service.
7.1.1 RESTful Service Configuration Requirements
Configuration requirements for exposing RESTful Services to external systems.
You must meet the following requirements for the RESTful Service utility to be available and
function:
• Your Oracle APEX configuration includes Oracle REST Data Services (ORDS) 20.x or
later.
Note:
The Oracle XML DB HTTP Server with the embedded PL/SQL gateway and
Oracle HTTP Server with
mod_plsql
do NOT support RESTful Services.
• An administrator has enabled RESTful Services either at the workspace or instance-level
as described in Controlling RESTful Services for a Workspace and Enabling RESTful
Services for an Instance in Oracle APEX Administration Guide
Support for Existing RESTful Services from Earlier Releases
Prior to APEX release 18.1, the metadata for APEX-based RESTful Services were defined in
the core APEX metadata repository. APEX-based REST Services are desupported in this
release. ORDS release 21.4.2 and later includes migration scripts that enable you to upgrade
any remaining APEX-based REST Services to ORDS-based Services. To learn more, see
Migration of Oracle APEX Restful Service Modules in Oracle REST Data Services Release
Notes.
See Also:
Downloading, Configuring and Installing Oracle REST Data Services in Oracle
REST Data Services Installation and Configuration Guide
7.1.2 REST and RESTful Services
Representational State Transfer (REST) is a way of providing interoperability between
computer systems over the Internet. You can define the RESTful services to enable the
querying and manipulation of data without the need for direct access to the underlying data
store.
A service is described as RESTful when it conforms to the tenets of REST. Although a full
discussion of REST is outside the scope of this document, a RESTful Service has the
following characteristics:
Chapter 7
About Oracle RESTful Services in Oracle APEX
7-3

• A RESTful Service is modeled as a set of resources. Those resources are
identified by URLs and accessed over the
http
or
https
web protocols.
• A small set of operations are used to manipulate resources (such as
PUT
,
POST
,
GET
,
DELETE
).
• RESTful Services are stateless. They maintain no connection between the client
and serving computer systems, and no client context is stored between requests.
• Requests to a RESTful Service always elicit a response. This response is in the
form of XML, JSON, HTML, or some other defined format.
• Responses provide details of some sort of alteration to the underlying data, error
messages, and hypertext links to other related resources depending upon the
operation.
REST resources use a stateless protocol with standard operations, so you can create
reusable, underlying components that can be managed and updated without affecting
the system, even while REST is running.
While consuming RESTful Services uses the standard HTTP operations, processing
the data returned through a RESTful service is different. Oracle Application Express
19.2 provides a comprehensive set of components to make consuming RESTful
services easier.
7.1.3 Resource Modules
A Resource Module is a container that groups a set of related RESTful Services
together.
A Resource Module not only provides a way to identify the group uniquely, but also
defines the unique Base Path used on a URL to access the set of services defined
within the module.
In most cases, you must configure a Resource Module and a child Resource Template
for each RESTful Service that you want your application to provide. You must also
define a Resource Handler for each method associated with the same Resource
Template. For example, to provide a method to return data and another to store data,
you must define a Resource Handler for each operation.
Example 7-1 Resource Module
A Resource Module that enables you to access information about employees is named
oracle.example.hr
and the base path value for the service is
/hr/
.
7.1.4 Resource Templates
A Resource Template defines an individual service that can be called. Resource
Templates are contained in Resource Modules.
Each Resource Template defines a URI Pattern where it can be reached and
implements at least one Resource Handler. A Resource Template may only implement
one of each type of Resource Handler (GET, POST, PUT, DELETE) but can be
configured not to implement all of them.
Chapter 7
About Oracle RESTful Services in Oracle APEX
7-4

7.1.5 Resource Handlers
Each Resource Handler implements one (and only one) HTTP operation. It is important to
understand how Resource Handler implementations are mapped to traditional Create, Read,
Update, Delete (CRUD) operations.
GET
Retrieves a representation of a resource, equivalent to a SQL SELECT statement.
POST
Creates a new resource or adds a resource to a collection, equivalent to a SQL INSERT
statement.
PUT
Updates the values an existing resource, equivalent to a SQL UPDATE statement.
DELETE
Deletes an existing resource, equivalent to a SQL DELETE statement.
7.1.6 Example RESTful Service
Use Resource Modules, Resource Templates, and Resource Handlers, to configure RESTful
Services as implemented by Oracle REST Data Services (ORDS).
Example 7-2 Complete Resource Template
http://server.com/ords/anyco/hr/employees/7978
Where:
http://server_URL/ords_alias/schema_alias/base_path/module_base_path/
URI_template/:bind_variable
A functionally complete Resource Template implements the ability to retrieve a specific
employee's details by passing in the employee id. The Resource Template's URI Pattern is
employees/:id
. A Resource Handler is implemented using the GET operation and the
following logic:
select empno, ename, dept from emp where empno = :id
When calling the RESTful Service, access the service using the server path, base path and
URI Template and providing a static value for the employee id as:
http://server.com/ords/anyco/hr/employees/7978
Server Path
http://server.com/
ORDS Alias
/ords/
Chapter 7
About Oracle RESTful Services in Oracle APEX
7-5

Schema Alias
/anyco/
Base Path
/hr/
URI Template
employees/7978
When this particular URL is called using an HTTP GET, the service returns the result
of the SQL Statement listed above. The format in which the data is returned depends
upon the full definition of the Resource Handler.
Note:
A Resource Template is considered functionally incomplete if it does not
implement at least one Resource Handler.
See Also:
• How to Create the ORDS Based RESTful Services Module Example
• Implementing Web Services in Oracle APEX App Builder User’s Guide
7.1.7 RESTful Services Terminology
Terminology used in Oracle APEX and other Oracle tools to reference the different
components that make up a RESTful Service.
Base Path
A case sensitive base path that is used to access a RESTful Service. This base path
for the module is appended to the server path and the Schema Alias for the
underlying Oracle schema. The base path must be unique within the schema.
HTTP Operation
HyperText Transport Protocol (HTTP) defines standard methods that can be
performed on resources: GET, POST, PUT, and DELETE.
Resource Handler
Provides the logic required to service a specific HTTP operation for a specific
resource template.
Resource Module
A container that is used to group related RESTful Services together.
Resource Template
An individual RESTful Service that is able to service requests for some set of
Universal Resource Identifiers (URIs ). The URI Pattern of the Resource Template
defines the set of URIs.
Chapter 7
About Oracle RESTful Services in Oracle APEX
7-6

RESTful Service
An HTTP web service that conforms to the tenets of the RESTful architectural style.
Schema Alias
When enabling an Oracle schema for use with RESTful services, an alias is required. The
case sensitive Schema Alias is used to form the URL and appended to the server path prior
to the Base Path and URI pattern.
URI pattern
A case sensitive path used to access the specific resource and can be either a Route
Pattern or a URI Template. The URI Pattern for the resource is appended to the server path
and Resource Module Base Path. The URI Pattern may also include a bind variable
appended after a forward slash. This allows a value to be passed to the service as part of
the URI. The bind variable syntax prefixes the variable name with a colon (:).
• Route Pattern - a pattern that focuses on decomposing the path portion of a URI into its
component parts. For example, a pattern of
/:object/:id?
will
match
/emp/101
(matches a request for the item in the
emp
resource with id of
101
) and
also match
/emp/
(matches a request for the
emp
resource, because the
:id
parameter
is annotated with the
?
modifier, which indicates that the id parameter is optional).
• URI Template - a simple grammar that defines the specific patterns of URIs that a given
resource template can handle. For example, the pattern
employees/:id
matches any
URI whose path begins with
employees/
, such as
employees/2560
.
7.2 Enabling REST Objects from the Object Browser
Enable REST objects from Object Browser with the REST tab.A new REST tab appears in
Object Browser when selecting a
TABLE
,
VIEW
,
PACKAGE
,
PROCEDURE
, or
FUNCTION
. The tab
exposes a form that provides the ability to REST Enable a database object using ORDS.
Note:
Oracle APEX 19.2 installations that utilize Oracle REST Data Services (ORDS)
release 19.1 or later support the ability to REST enable database objects using the
AutoREST feature of ORDS. While AutoREST is the most straight forward way to
create RESTful Services based on database objects, it does have some drawbacks
and limitations.
To learn more about AutoREST, see Automatic Enabling of Schema Objects for
REST Access (AutoREST) in the Oracle REST Data Services Developer's Guide.
Required
To perform this procedure, you must meet the following requirements:
• Your schema must be registered in ORDS.
To register your schema, see Registering Schema with ORDS.
• The REST objects you wish to enable must exist and comply with AutoREST.
To REST Enable an object:
1. On the Workspace home page, click SQL Workshop.
Chapter 7
Enabling REST Objects from the Object Browser
7-7

2. Select Object Browser.
3. From the list of object types, select the object type (such as Tables).
4. Select the object.
5. Click the REST tab.
The object details display the ORDS Version and the form to AutoREST enable
the object is displayed.
6. In the REST tab:
a. REST Enable Object - click Yes to enable.
b. Authorization Required - click No to disable.
Note:
Disabling the Authorization Required setting renders the object
publicly accessible. Enabling this setting requires further
configuration of user roles to grant access to users.
c. Click Apply.
A success message displays and a RESTful URI field appears. RESTful URI
provides the case sensitive URI that is used to access the REST enabled
object.
Chapter 7
Enabling REST Objects from the Object Browser
7-8

Optional
Once the object is REST Enabled, you can access the data through the supplied URI. The
URI is formatted in JSON.
To view the plain text contents of the RESTful URI using a browser:
7. Copy the RESTful URI.
Tip:
You can click the Copy to Clipboard icon ( ) to quickly copy the RESTful
URI.
8. Open a new browser tab, paste the copied URI into the URL field, and press Enter.
The browser displays a JSON document exposing the table data for the table you
selected.
See Also:
• Enabling Authorization for REST Enabled Objects
• Registering Schema with ORDS
• Automatic Enabling of Schema Objects for REST Access (AutoREST) in the
Oracle REST Data Services Installation, Configuration, and Development Guide
7.3 Enabling Authorization for REST Enabled Objects
Restrict access for REST-enabled objects on the REST tab in Object Browser. Use the
resulting Authorization Role information to configure user roles in ORDS.
When authorization is disabled for REST-enabled objects, they are fully exposed to normal
internet traffic and publicly accessible. After you enable authorization for the object in Object
Browser, you must use the resulting Authorization Role to configure your authorized user
roles in ORDS.
To enable authorization on a REST enabled object:
1. On the Workspace home page, click SQL Workshop.
2. Select Object Browser.
3. From the list of object types, select the object type (such as Tables).
4. Select the REST enabled object.
5. Select the REST tab of the REST enabled object.
6. For Authorization Required, click to Yes.
7. Click Apply.
A new Authorization Role field appears showing the ORDS created role associated with the
AutoREST Enabled object.
Chapter 7
Enabling Authorization for REST Enabled Objects
7-9

Attempting to access the RESTful URI for the object now displays a "401 -
Unauthorized" error message.
7.4 How to Access RESTful Services
Access RESTful Services from SQL Workshop.
• Accessing RESTful Services
Access RESTful Services from the Workspace home page by clicking SQL
Workshop and then RESTful Services.
• Registering Schema with ORDS
If you are accessing ORDS Restful Services in a new workspace, you must
register the schema with ORDS RESTful Data Services.
• About ORDS RESTful Services Dashboard
Learn about ORDS RESTful Services dashboard.
7.4.1 Accessing RESTful Services
Access RESTful Services from the Workspace home page by clicking SQL Workshop
and then RESTful Services.
To access RESTful Services:
1. On the Workspace home page, click SQL Workshop.
2. Click RESTful Services.
Chapter 7
How to Access RESTful Services
7-10

The RESTful Services home page appears.
See Also:
Creating an ORDS RESTful Service Module
7.4.2 Registering Schema with ORDS
If you are accessing ORDS Restful Services in a new workspace, you must register the
schema with ORDS RESTful Data Services.
To register a schema with ORDS RESTful Data Services:
1. On the Workspace home page, click SQL Workshop.
2. Click RESTful Services.
The RESTful Services home page appears.
3. Click ORDS Based RESTful Services.
ORDS RESTful Services page appears. If your schema is not registered with ORDS
RESTful Data Services, the following message appears: "Schema not registered with
ORDS"
4. Click Register Schema with ORDS.
ORDS Schema Attributes dialog appears.
Chapter 7
How to Access RESTful Services
7-11

Note:
ORDS enabling a schema that is assigned to more than one workspace
as the default schema causes issues with workspace related static files.
Oracle recommends that you do not ORDS enable schemas shared
amongst multiple workpaces until you are running ORDS 18.3 or higher.
5. Enter the attribute details:
a. Enable RESTful Access - Select On to enable or Off to disable access to any
REST services defined in the schema.
b. Schema Alias - Enter the name of the schema alias to be used in the
formation of the URL referencing any RESTful service within the schema.
c. Install Sample Service - Select On or Off. Selecting On installs sample
oracle.example.hr
RESTful service.
d. Authorization Required for Metadata Access - Select On or Off. Selecting
On requires Oracle REST Data Services user authorization before allowing
access to the ORDS metadata catalog of the schema.
6. Click Save Schema Attributes.
ORDS RESTful page appears with a message Schema enabled for use with
ORDS RESTful Services and sample RESTful Service successfully installed.
7.4.3 About ORDS RESTful Services Dashboard
Learn about ORDS RESTful Services dashboard.
Upon registering the schema with ORDS, the ORDS RESTful Services dashboard
page appears displaying the ORDS version.
Chapter 7
How to Access RESTful Services
7-12

The following table details the information available in the ORDS RESTful Services
Dashboard:
Table 7-1 ORDS RESTful Services Dashboard Parameters
Name Description
ORDS Version Version of ORDS.
De- Register Schema from ORDS Click to de-register schema.
Reset Sample Service Click to reset the installed sample service.
Note: Reset Sample Service Verification dialog
appears warning the user that the service will be
completely deleted and re-created.
Import Click to import ORDS based RESTful service
definitions from a SQL script generated by SQL
Developer or Oracle APEX.
Export Click to export ORDS based RESTful Service
metadata to SQL script file format.
Note: If you are running ORDS 18.3 or later ,
dipalys the Include Enable Schema and Include
Privilages fields.
Include Enable Schema - (Default: Enabled) This
dictates whether the resulting export script
contains
ORDS.ENABLE_SCHEMA
statement
Include Privileges - (Default: Enabled) This
dictates whether the resulting export script
contains the privilege definitions associated with
the chosen module(s). (includes protected module,
roles, and resource patterns)
Chapter 7
How to Access RESTful Services
7-13

Table 7-1 (Cont.) ORDS RESTful Services Dashboard Parameters
Name Description
Configure Click to configure ORDS schema attributes.
Note: ORDS Enabling a schema that is assigned
to more than one workspace as the default
schema causes issues with workspace related
static files. Oracle recommends that you do not
ORDS enable schemas shared amongst multiple
workpaces until you are running ORDS 18.3 or
higher.
Schema Access Displays whether access to the RESTful services
defined within the schema is enabled or disabled.
Metadata Access Displays whether Oracle REST Data Services
should require user authorization before allowing
access to the ORDS metadata catalog of this
schema.
Schema Aliased Displays alias name for the current schema.
Modules Displays total number of modules defined within
the schema. Click to view list of defined modules.
Privileges Displays total number of privileges defined. Click
to view list of defined privileges.
Roles Displays total number of roles associated. Click to
view the associated roles.
Enabled Objects Displays the total number of REST enabled
database objects in the schema. Click to view list
of REST enabled objects.
Module Status Displays the status of published and unpublished
modules.
Module Security Displays the status of protected and unprotected
modules.
Object Aliases Displays the status of Aliased and Unaliased
objects.
7.5 How to Create the ORDS Based RESTful Services
Module Example
Learn how to create the ORDS Based RESTful Services module example.
Oracle APEX workspace by default has an example RESTful Service Module,
oracle.example.hr
. You can install the sample service while registering the schema
with ORDS.
• About the Example RESTful Service Module (oracle.example.hr)
In ORDS Based RESTful Services, you can choose to install the sample service
oracle.example.hr
, when registering schema with ORDS.
• Returning the Result Set Based on a PL/SQL Block (empsecformat/:empname)
You can add and test your own resource template that uses a PL/SQL block to
format results.
Chapter 7
How to Create the ORDS Based RESTful Services Module Example
7-14

• Returning the Result Set in JSON Format with Pagination Set (employees/)
You can add and test your own resource template that retrieves data in JSON format and
demonstrates pagination.
• Retrieving Data Based on a Parameter (employees/:id)
You can add and test your own resource template that retrieves employee data based on
a parameter.
• Returning the Result Set in CSV Format (empinfo/)
You can build and test your own example RESTful Service Module that retrieves data in
CSV format.
• Returning the Result Set as a Feed (employeesfeed/)
You can add and test your own resource template that displays return data as a feed.
7.5.1 About the Example RESTful Service Module (oracle.example.hr)
In ORDS Based RESTful Services, you can choose to install the sample service
oracle.example.hr
, when registering schema with ORDS.
This module provides example resource templates and resource handlers that implement
several different methods to retrieve and display employee information from the
emp
table. To
access the
oracle.example.hr
module, see Accessing RESTful Services.
The
oracle.example.hr
module consists of several resource templates. Each resource
template demonstrates a different way of retrieving information and formatting the returned
results.
Chapter 7
How to Create the ORDS Based RESTful Services Module Example
7-15

The following results are expected for each
oracle.example.hr
resource template
when the respective GET resource handler is invoked:
•
empsec/:empname
- Employee information for a specified employee name,
empname
, is returned and displayed in JSON.
•
empsecformat/:empname
- Employee information for a specified employee name,
empname
, is returned and formatted based on the execution of a PL/SQL block.
•
employees/
- Employee information from the employees
emp
table is displayed in
JSON format with Pagination Size set to 7. A first, previous and next link is
provided to page through the results.
•
version/
- Returns the version of the RESTful service module.
•
employees/:id
- Employee information from the employees
emp
table for a
specified
id
is returned.
•
empinfo/
- Employee information from the employees
emp
table is returned in CSV
format.
Chapter 7
How to Create the ORDS Based RESTful Services Module Example
7-16

•
employeesfeed
/ - Employee information from the employees
emp
table is returned as a
JSON Feed.
•
employeesfeed/:id
- Employee information from the employees
emp
table for a specified
id
is displayed in JSON format.
The following result is expected for the
employees/:id
resource template when the PUT
resource handler is invoked:
•
employees/:id
- Employee information from the employees
emp
table for a specified id is
updated.
See Also:
Accessing RESTful Services
7.5.2 Returning the Result Set Based on a PL/SQL Block
(
empsecformat/:empname
)
You can add and test your own resource template that uses a PL/SQL block to format results.
The
oracle.example.hr
module includes the
empsecformat/:empname
resource template to
demonstrate a RESTful Service that returns the results of an SQL Query formatted by a
PL/SQL block.
To add and test your own resource template that uses a PL/SQL block to format results:
1. On the Workspace home page, click SQL Workshop and then RESTful Services.
The RESTful Services home page appears.
2. Click ORDS Based RESTful Services.
The ORDS RESTful services page appears.
3. Click the RESTful Service Module you want to add the resource template to.
The Module Definition page appears.
4. Under Resource Templates block on the left panel, click Create Template.
The ORDS Template Definition page appears.
5. For URI Template, enter
empsecformat/:empname
.
6. Click Create Template.
7. Under the
empsecformat/:empname
resource template, click Create Handler.
The ORDS Handler Definition page appears.
8. Make the following selections and entries:
• Method - Select GET.
• Source Type - Select PL/SQL.
• Source - enter the following:
DECLARE
prevdeptno number;
Chapter 7
How to Create the ORDS Based RESTful Services Module Example
7-17

total_rows number;
deptloc varchar2(20);
deptname varchar2(20);
CURSOR getemps is select * from emp
start with ename = :empname
connect by prior empno = mgr
order siblings by deptno, ename;
BEGIN
sys.htp.htmlopen;
sys.htp.headopen;
sys.htp.title('Hierarchical Department Report for Employee
'||:empname);
sys.htp.headclose;
sys.htp.bodyopen;
for emprecs in getemps
loop
if l_employee.deptno != prevdeptno or prevdeptno is null then
select dname, loc
into deptname, deptloc
from dept
where deptno = l_employee.deptno;
if prevdeptno is not null then
sys.htp.print('</ul>');
end if;
sys.htp.print('Department ' || apex_escape.html(deptname) || '
located in ' || apex_escape.html(deptloc) || '<p/>');
sys.htp.print('<ul>');
end if;
sys.htp.print('<li>' || apex_escape.html(l_employee.ename) || ',
' || apex_escape.html(l_employee.empno) || ', ' ||
apex_escape.html(l_employee.job) || ', ' ||
apex_escape.html(l_employee.sal) || '</li>');
prevdeptno := l_employee.deptno;
total_rows := getemps%ROWCOUNT;
end loop;
if total_rows > 0 then
sys.htp.print('</ul>');
end if;
sys.htp.bodyclose;
sys.htp.htmlclose;
END;
9. Click Create Handler.
The GET resource handler appears under the
empsecformat/:empname
resource
template on the left panel.
Chapter 7
How to Create the ORDS Based RESTful Services Module Example
7-18

7.5.3 Returning the Result Set in JSON Format with Pagination Set
(
employees/
)
You can add and test your own resource template that retrieves data in JSON format and
demonstrates pagination.
The
oracle.example.hr
module includes the
employees/
resource template to demonstrate
a RESTful Service that returns data in JSON format. This example is returning the Result Set
in JSON Format with Pagination Set Using Pagination Bind Variables. The Pagination bind
variables are
:row_offset
and
:row_count
.
For other example resource templates that return results in JSON format see the
empsec/
{empname}
resource template for the
oracle.example.hr
Service Module.
To add and test your own resource template that retrieves data in JSON format and
demonstrates pagination:
1. On the Workspace home page, click SQL Workshop and then RESTful Services.
The RESTful Services home page appears.
2. Click ORDS Based RESTful Services.
The ORDS RESTful services page appears.
3. Click the RESTful Service Module you want to add the resource template to.
The Module Definition page appears.
4. Under Resource Templates block on the left panel, click Create Template.
The ORDS Template Definition page appear.
5. For URI Template, enter
employees/
.
6. Click Create Template.
The
employees/
resource template displays on the left panel.
7. Under the
employees/
resource template, click Create Handler.
The ORDS Handler Definition page appear.
8. Make the following selections and entries:
• Method - Select GET.
• Source Type - Select Query.
• Format - Select JSON.
• Source - Enter the following:
select empno "$uri", rn, empno, ename, job, hiredate, mgr, sal, comm,
deptno
from (
select emp.*
, row_number() over (order by empno) rn
from emp
) tmp
9. Click Create Handler.
Chapter 7
How to Create the ORDS Based RESTful Services Module Example
7-19

The GET Handler appears under the
employees/
resource template on the left
panel.
7.5.4 Retrieving Data Based on a Parameter (
employees/:id
)
You can add and test your own resource template that retrieves employee data based
on a parameter.
The
oracle.example.hr
module includes the
employees/:id
resource template to
demonstrate a RESTful Service that returns one row of data in JSON format based on
the specified
id
.
For other example resource templates that return results based on a specified
parameter see the
employeesfeed/:id
,
empsec/:empname
and
empsecformat/:empname
resource templates for the
oracle.example.hr
Service
Module.
To add and test your own resource template that retrieves employee data based on a
parameter:
1. On the Workspace home page, click SQL Workshop and then RESTful Services.
The RESTful Services home page appears.
2. Click ORDS Based RESTful Services.
The ORDS RESTful services page appear.
3. Click the RESTful Service Module you want to add the resource template to.
The Module Definition page appears.
4. Under Resource Templates block on the left panel, click Create Template.
The ORDS Template Definition page appear.
5. For URI Template, enter
employees/:id
.
6. Click Create Template.
The
employees/:id
resource template displays on the left panel.
7. Under the
employees/:id
resource template, click Create Handler.
The ORDS Handler Definition page appear.
8. Make the following selections and entries:
• Method - select GET.
• Source Type - select Query One Row. Executes a SQL Query returning one
row of data into a JSON representation. This option is only available when the
HTTP method GET has been selected
• Pagination Size - Leave blank. In this case, there's no need to set pagination
since only one record is retrieved.
• Source - enter the following:
select * from emp where empno = :id
9. Click Create Handler.
Chapter 7
How to Create the ORDS Based RESTful Services Module Example
7-20

7.5.5 Returning the Result Set in CSV Format (
empinfo/
)
You can build and test your own example RESTful Service Module that retrieves data in CSV
format.
The
oracle.example.hr
module includes the
empinfo/
resource template to demonstrate a
RESTful Service that returns data in CSV format. In this example, all the employee data from
the
emp
table is returned by using a SQL Query.
To build and test your own example RESTful Service Module that retrieves data in CSV
format:
1. On the Workspace home page, click SQL Workshop and then RESTful Services.
The RESTful Services home page appears.
2. Click ORDS Based RESTful services.
The ORDS RESTful services page appear.
3. Click the RESTful Service Module you want to add the resource template to.
The Module Definition page appears.
4. Under Resource Templates block on the left panel, Click Create Template.
The ORDS Template Definition page appear.
5. For URI Template, enter
empinfo/
.
6. Click Create Template.
The
empinfo/
resource template displays on the left panel.
7. Under the empinfo/ resource template, click Create Handler.
8. Make the following selections and entries:
• Method - select GET.
• Source Type - Select Query. Executes a SQL Query and transforms the result set
into either a JavaScript Object Notation (JSON) or CSV representation, depending on
the format selected. This option is only available when the HTTP method GET has
been selected
• Format - Select CSV.
• Source - Enter the following:
select * from emp
9. Click Create Handler.
7.5.6 Returning the Result Set as a Feed (
employeesfeed
/)
You can add and test your own resource template that displays return data as a feed.
The
oracle.example.hr
module includes the
employeesfeed/
resource template to
demonstrate a RESTful Service that returns
empno
and
ename
values from the
emp
table and
displays them as a feed.
A feed resource handler executes a SQL query and transforms the results into a JSON Feed
representation. Each item in the feed contains a summary of a resource and a hyperlink to a
Chapter 7
How to Create the ORDS Based RESTful Services Module Example
7-21

full representation of the resource. The first column in each row in the result set must
be a unique identifier for the row and is used to form a hyperlink of the form: path/to/
feed/{id}, with the value of the first column being used as the value for {id}. The other
columns in the row are assumed to summarize the resource and are included in the
feed. A separate resource template for the full representation of the resource should
also be defined.
To add and test your own resource template that displays return data as a feed:
1. On the Workspace home page, click SQL Workshop and then RESTful Services.
The RESTful Services home page appears.
2. Click ORDS Based RESTful services.
The ORDS RESTful services page appear.
3. Click the RESTful Service Module you want to add the resource template to.
The Module Definition page appears.
4. Under Resource Templates block on the left panel, click Create Template.
The ORDS Template Definition page appear.
5. For URI Template, enter
employeesfeed/
.
6. Click Create Template.
7. Under the
employeesfeed/
resource template, click Create Handler.
The ORDS Handler Definition page appear.
8. Make the following selections and entries:
• Method - select GET.
• Source Type - select Feed.
• Pagination Size - enter
25
.
• Source - enter the following:
select empno, ename from emp order by deptno, ename
9. Click Create Handler.
7.6 Managing RESTful Service Modules
Learn how to install sample RESTful service module, You can create ,edit, and delete
an ORDS RESTful service module.
A RESTful Service Module is a grouping of common templates, known as resource
templates, under a common Uniform Resource Identifier (URI) prefix.
The specification of a URI prefix is optional. If defined for the RESTful Service Module,
it is prepended to all resource templates. A priority value is used to choose between
resource templates when their patterns both match a single request URI. In such
cases, the resource template with the highest priority value is chosen.
• Installing a Sample RESTful Service Module with Schema ORDS not Enabled
Learn how to create a Sample RESTful Service Module with Schema ORDS not
Enabled.
Chapter 7
Managing RESTful Service Modules
7-22

• Installing a Sample RESTful Service Module with Schema ORDS Enabled
Learn how to create a Sample RESTful Service Module with Schema ORDS Enabled.
• Creating an ORDS RESTful Service Module
Learn how to create an ORDS RESTful Service Module.
• Editing an ORDS RESTful Service Module
An ORDS RESTful Service Module can have associated resource templates and
resource handlers. During the edit process for a particular RESTful Service Module, you
can make changes to any of the associated resource templates and resource handlers.
• Deleting an ORDS RESTful Service Module
Deleting an ORDS RESTful service module removes the module along with all resource
templates and resource handlers associated with this module.
• Managing an ORDS RESTful Service Privileges
Privileges to access RESTful Service Modules can be restricted in APEX.
• Assigning Privileges to an ORDS RESTful Service Modules
Learn how to assign privileges to an ORDS RESTful Service Modules.
• Creating an ORDS RESTful Service Privilege
You can create an ORDS RESTful Service Privilege to restrict access to specified users
for one or more RESTful Service Modules.
• Editing an RESTful Service Privilege
You can modify an ORDS RESTful Service Privilege. Changes to the specified Protected
Modules will be reflected in the Required Privilege setting on the RESTful Service Module
page for affected modules.
• Deleting an ORDS RESTful Service Privilege
You can remove an ORDS RESTful Service Privilege. After deleting the privilege, any
RESTful Service Modules that were protected by this privilege will be unprotected until
reassigned another privilege.
• Exporting an ORDS RESTful Service Module
An ORDS RESTful Service Module metadata can be exported to a file in SQL script
format. The exported file can be imported on the same instance or another compatible
Oracle APEX instance.
• Importing an ORDS RESTful Service Module
An ORDS RESTful Service Module metadata that has been exported to a file in SQL
script format can be imported. The imported module must have been exported on the
same instance or another compatible Oracle APEX instance.
• Generating a Swagger Document
Learn how to generate a Swagger document.
7.6.1 Installing a Sample RESTful Service Module with Schema ORDS not
Enabled
Learn how to create a Sample RESTful Service Module with Schema ORDS not Enabled.
Note:
You can install a sample RESTful service only when you create new workspace.
Chapter 7
Managing RESTful Service Modules
7-23

To create a Sample RESTful Service Module:
1. On the Workspace home page, click SQL Workshop and then RESTful Services.
The RESTful Services home page appears.
2. Click ORDS Based RESTful Services.
The ORDS RESTful Services page appear.
3. Click Register Schema with ORDS.
The ORDS Schema Attributes page appears.
Note:
ORDS enabling a schema that is assigned to more than one workspace
as the default schema causes issues with workspace related static files.
Oracle recommends that you do not ORDS enable schemas shared
amongst multiple workpaces until you are running ORDS 18.3 or higher.
4. Enter the attribute details:
a. Enable RESTful Access - Select On to enable or Off to disable access to any
REST services defined in the schema.
b. Schema Alias - Enter the name of the schema alias to be used in the
formation of the URL referencing any RESTful service within the schema.
c. Install Sample Service - Select On. Selecting On installs sample
oracle.example.hr
RESTful service.
d. Authorization Required for Metadata Access - Select On. Selecting On
requires Oracle REST Data Services user authorization before allowing
access to the ORDS metadata catalog of the schema.
5. Click Save Schema Attributes.
The ORDS RESTful page appears. Sample RESTful Services appears under
Modules.
7.6.2 Installing a Sample RESTful Service Module with Schema ORDS
Enabled
Learn how to create a Sample RESTful Service Module with Schema ORDS Enabled.
Note:
You can install a sample RESTful service only when you create new
workspace.
To create a Sample RESTful Service Module:
1. On the Workspace home page, click SQL Workshop and then RESTful Services.
The RESTful Services home page appears.
Chapter 7
Managing RESTful Service Modules
7-24

2. Click ORDS Based RESTful Services.
The ORDS RESTful Services page appear.
3. Click Install Sample Service on the right pane.
The Sample service is installed and appears under RESTful Services Modules.
Note:
Click Reset Sample Service button to reset the sample service. Reset Sample
Service Verification dialog appears warning the user that the service will be
completely deleted and re-created.
7.6.3 Creating an ORDS RESTful Service Module
Learn how to create an ORDS RESTful Service Module.
To create an ORDS RESTful Service Module:
1. On the Workspace home page, click SQL Workshop and then RESTful Services.
The RESTful Services home page appears.
2. Click ORDS Based RESTful Services.
The ORDS RESTful Services page appears.
3. Click Modules under RESTful Data Services tree.
4. Click Create Module on the right pane.
The ORDS Module Definition page appears.
5. Specify the following RESTful Service Module settings:
• Module Name - Enter the name of the RESTful Service Module.
• Base Path - Enter module base path.
• Is Published - Select On to make this service available for use, otherwise select Off.
• Pagination Size - Specify the size of the pagination window. For database queries,
this is the number of rows to return.
• Origins Allowed(optional) - Specify a comma-separated list of origins that are
permitted to access the resource template.
• Comments(optional) - Enter comments.
6. Click Create Module.
The ORDS Module Definition page appears.
7.6.4 Editing an ORDS RESTful Service Module
An ORDS RESTful Service Module can have associated resource templates and resource
handlers. During the edit process for a particular RESTful Service Module, you can make
changes to any of the associated resource templates and resource handlers.
To edit an ORDS RESTful Service Module:
Chapter 7
Managing RESTful Service Modules
7-25

1. On the Workspace home page, click SQL Workshop and then RESTful Services.
The RESTful Services home page appears.
2. Click the name of the module you want to edit.
The ORDS Module Definition page appears.
Note:
Use the RESTful Service tree on the left pane to view, edit and create
resource templates and resource handlers.
3. To edit RESTful Service Module settings, make changes to the fields on the right
pane under ORDS Module Definition page.
• To edit a resource template:
a. Select the resource template you want to edit on the RESTful Service tree
on the left panel. The resource template options appear on the right panel.
b. Make your changes.
c. Click Apply Changes.
• To edit a resource handler:
a. Select the resource handler you want to edit on the RESTful Service tree
on the left panel. The resource handler options appear on the right panel.
b. Make your changes.
c. Click Apply Changes.
4. Click Apply Changes.
See Also:
• Creating an ORDS RESTful Service Module
• Adding a Resource Template
• Adding a Resource Handler
7.6.5 Deleting an ORDS RESTful Service Module
Deleting an ORDS RESTful service module removes the module along with all
resource templates and resource handlers associated with this module.
To delete an ORDS RESTful Service Module:
1. On the Workspace home page, click SQL Workshop and then RESTful Services.
The RESTful Services home page appears.
2. Click the name of the module you want to delete.
The ORDS Module Definition page appears.
Chapter 7
Managing RESTful Service Modules
7-26

3. Click Delete.
4. Click OK to confirm.
The RESTful Services home page appears.
7.6.6 Managing an ORDS RESTful Service Privileges
Privileges to access RESTful Service Modules can be restricted in APEX.
To protect an ORDS RESTful Service Modules by assigning privileges:
1. Create a RESTful Service Privilege.
2. Specify which RESTful Service Modules are protected by this privilege.
See Also:
• Managing Users in a Workspace in Oracle APEX Administration Guide
• Creating an ORDS RESTful Service Privilege
• Assigning Privileges to an ORDS RESTful Service Modules
• Editing an RESTful Service Privilege
• Deleting an ORDS RESTful Service Privilege
7.6.7 Assigning Privileges to an ORDS RESTful Service Modules
Learn how to assign privileges to an ORDS RESTful Service Modules.
You can assign privileges to an ORDS RESTful Service Modules during the creation or
editing of an ORDS RESTful Service Privilege, you can specify the module or modules
protected by this privilege.
Note:
After a RESTful Service Privilege is deleted, all RESTful Service Modules protected
by that privilege are unprotected.
Chapter 7
Managing RESTful Service Modules
7-27

See Also:
• Creating an ORDS RESTful Service Module
• Editing an ORDS RESTful Service Module
• Creating an ORDS RESTful Service Privilege
• Editing an RESTful Service Privilege
• Deleting an ORDS RESTful Service Privilege
7.6.8 Creating an ORDS RESTful Service Privilege
You can create an ORDS RESTful Service Privilege to restrict access to specified
users for one or more RESTful Service Modules.
A RESTful Service Privilege can include users belonging to one or more user groups.
RESTful Service Modules protected by this privilege display the privilege name for
Required Privilege on the RESTful Service Module page.
To create an ORDS RESTful Service Privilege:
1. On the Workspace home page, click SQL Workshop and then RESTful Services.
The RESTful Services home page appears.
2. Click ORDS Based RESTful Services.
The ORDS RESTful Services page appears.
3. Under RESTful Data Services tree on the left pane, click Privileges.
4. Click Create Privilege on the right pane.
The ORDS Privileges Definition page appears.
5. Specify the following in the ORDS Privileges Definition page:
• Name- Enter the name of the RESTful Service Privilege.
• Title- Enter the name of the RESTful Service Privilege title.
• Description- Enter the description of the RESTful Service Privilege.
• Comments- Enter comments.
• Roles- Select roles assigned to the privilege.
• Protected Modules- Use the arrows to select the modules this privilege is
assigned to.
• Protected Resources- Adding a list of protection patterns to the Interactive
Grid.
6. Click Create Privilege.
Chapter 7
Managing RESTful Service Modules
7-28

7.6.9 Editing an RESTful Service Privilege
You can modify an ORDS RESTful Service Privilege. Changes to the specified Protected
Modules will be reflected in the Required Privilege setting on the RESTful Service Module
page for affected modules.
To edit a ORDS RESTful Service Privilege:
1. On the Workspace home page, click SQL Workshop and then RESTful Services.
The RESTful Services home page appears.
2. Click ORDS Based RESTful Services.
The ORDS RESTful Services page appears.
3. Under RESTful Data Services tree on the left pane, click Privileges.
The ORDS Privileges Definition page appears.
4. Make modifications.
5. Click Apply Changes.
7.6.10 Deleting an ORDS RESTful Service Privilege
You can remove an ORDS RESTful Service Privilege. After deleting the privilege, any
RESTful Service Modules that were protected by this privilege will be unprotected until
reassigned another privilege.
To delete an ORDS RESTful Service Privilege:
1. On the Workspace home page, click SQL Workshop and then RESTful Services.
The RESTful Services home page appears.
2. Click ORDS Based RESTful Services.
The ORDS RESTful Services page appears.
3. Under RESTful Data Services tree on the left pane, click Privileges.
The ORDS Privileges Definition page appears.
4. Click Delete.
7.6.11 Exporting an ORDS RESTful Service Module
An ORDS RESTful Service Module metadata can be exported to a file in SQL script format.
The exported file can be imported on the same instance or another compatible Oracle APEX
instance.
To export an ORDS RESTful Service module:
1. On the Workspace home page, click SQL Workshop and then RESTful Services.
The RESTful Services home page appears.
2. Click ORDS Based RESTful Services.
The ORDS RESTful services page appear.
Chapter 7
Managing RESTful Service Modules
7-29

3. Click Export on the right pane.
The Export ORDS RESTful Services page appears.
4. For RESTful Service, perform one of the following:
• To export one module, select the module name.
• To export all modules, select All Services.
5. Click Export.
The Opening dialog appears.
6. Select export options.
7. Click OK.
See Also:
Importing an ORDS RESTful Service Module
7.6.12 Importing an ORDS RESTful Service Module
An ORDS RESTful Service Module metadata that has been exported to a file in SQL
script format can be imported. The imported module must have been exported on the
same instance or another compatible Oracle APEX instance.
Note:
If the imported module contains a ORDS RESTful Service name that exists
in this workspace, the existing ORDS RESTful Service is deleted and
replaced with the definition from the imported module.
To import an ORDS RESTful Service module:
1. On the Workspace home page, click SQL Workshop and then RESTful Services.
The RESTful Services home page appears.
2. Click ORDS Based RESTful Services.
The ORDS RESTful services page appears.
3. Click Import on the right pane.
The Import ORDS RESTful Services page appears.
4. For Import File, browse to and select the import file.
5. For File Character Set, select the character set used by the import file.
6. Click Import.
The ORDS RESTful Services page appears with the imported data.
Chapter 7
Managing RESTful Service Modules
7-30

WARNING:
An error message appears that the file is of the wrong type, when you export an
APEX Based RESTful Services and try to import it into the Import ORDS
RESTful Services page.
See Also:
Exporting an ORDS RESTful Service Module
7.6.13 Generating a Swagger Document
Learn how to generate a Swagger document.
Generate a swagger document by setting up the URL at the Oracle APEX instance level. This
allows you to define the URL for a Swagger server. Oracle APEX sends generated swagger
document to the server for rendering when the URL is setup at the instance level. Oracle
APEX just displays the JSON generated for Swagger when the URL is not specified.
To generate a Swagger a document:
1. On the Workspace home page, click SQL Workshop and then RESTful Services.
The RESTful Services home page appears.
2. Click ORDS Based RESTful Services.
The ORDS RESTful services page appears.
3. Select the module for which you want to generate Swagger document.
4. Click Generate Swagger Doc on the left pane.
• If a Swagger UI URL is defined at the instance level, then Oracle APEX calls the URL
and pass the ORDS Swagger Doc URL to it. Opens in a new browser tab and the
swagger documentation appears .
• If the Swagger UI is not defined, Oracle APEX simply calls ORDS to produce the
Swagger documentation JSON file and present that in a new tab.
7.7 Managing Resource Templates
Resource templates are a means of grouping URIs and associating them with a particular
RESTful Service Module.
Resource templates can have one or more resource handlers. Only one resource handler per
HTTP method is permitted. For example, a resource template can have only one GET
method, only one DELETE method and so on.
• Adding a Resource Template
Learn how to add a resource template to a ORDS RESTful Service Module.
• Editing a Resource Template
Learn how to edit a resource template.
Chapter 7
Managing Resource Templates
7-31

• Deleting a Resource Template
Deleting a resource template removes the template along with all resource
handlers associated with this template.
7.7.1 Adding a Resource Template
Learn how to add a resource template to a ORDS RESTful Service Module.
To add a resource template to a ORDS RESTful Service Module:
1. On the Workspace home page, click SQL Workshop and then RESTful Services.
The RESTful Services home page appears.
2. Click ORDS Based RESTful Services.
The ORDS RESTful services page appears.
3. Click the ORDS RESTful Service module you want to ad the resource template to.
The Module Definition Page appears.
4. Under Resource Templates block on the left panel, click Create Template.
The ORDS Template Definition page appears.
5. Fill in the appropriate fields and select the appropriate options. Mandatory fields
are marked with a red asterisk (*). To learn more about a specific option, see the
field-level help.
6. Specify the following:
• URI Template - Enter the URI template to identify your Uniform Resource
Identifiers. A URI template is simple syntax for describing URIs, for example:
example/:id
• Priority - Specify the template's evaluation order. Higher numbers are
evaluated first.
• HTTP Entity Tag - Specify the type of Entity Tag to use to uniquely identify the
resource version
7. Click Create Template.
7.7.2 Editing a Resource Template
Learn how to edit a resource template.
To edit a resource template:
1. On the Workspace home page, click SQL Workshop and then RESTful Services.
The RESTful Services home page appears.
2. Click ORDS RESTful Service template you want to edit.
The ORDS Template Definition page appears.
The ORDS RESTful services page appears.
3. Make the changes you want.
4. Click Apply Changes.
Chapter 7
Managing Resource Templates
7-32

See Also:
Adding a Resource Template
7.7.3 Deleting a Resource Template
Deleting a resource template removes the template along with all resource handlers
associated with this template.
To delete a resource template:
1. On the Workspace home page, click SQL Workshop and then RESTful Services.
The RESTful Services home page appears.
2. Click ORDS Based RESTful Services.
The ORDS RESTful services page appears.
3. Click ORDS RESTful Service template you want to delete.
The ORDS Template Definition page appears.
4. Click Delete.
5. Click OK to confirm.
6. Click Apply Changes.
7.8 Managing Resource Handlers
A resource handler is a query or an anonymous PL/SQL block responsible for handling a
particular HTTP method.
Multiple resource handlers can be defined for a resource template, however only one
resource handler can be defined for a HTTP method.
Parameters to a resource handler can be manually defined to bind HTTP headers to the
resource handler, or to cast a URI template parameter to a specific data type. Parameters
declared in the URI template are implicitly passed to the resource handler. For example, a
resource handler might need to know the value of the HTTP Accept-Language header in
order to localize the generated representation.
• Adding a Resource Handler
Learn how to add a resource handler to a resource template.
• Editing a Resource Handler
Learn how to edit a resource handler.
• Deleting a Resource Handler
Learn how to delete a resource handler.
7.8.1 Adding a Resource Handler
Learn how to add a resource handler to a resource template.
To add a resource handler to a resource template:
Chapter 7
Managing Resource Handlers
7-33

1. On the Workspace home page, click SQL Workshop and then RESTful Services.
The RESTful Services home page appears.
2. Click ORDS Based RESTful Services.
The ORDS RESTful services page appears.
3. Click the ORDS RESTful Service template you want to add the resource template
to.
The ORDS Template Definition page appears.
4. Under Resource Handlers on the right pane, click Create Handler.
The ORDS Handler Definition page appears.
5. Fill in the appropriate fields and select the appropriate options. Mandatory fields
are marked with a red asterisk (*). To learn more about a specific option, see the
field-level help.
6. Under Resource Handler, specify the following:
• Method - Specify the HTTP method to be used for the resource handler. See
field-level help.
• Source Type - Identify the strategy type used to generate the resource. See
field-level help.
• Format - Select the format to utilize for the result set.
• Pagination Size - Identify the size of the pagination window. For database
queries, this is the number of rows to return.
7. Under Source, enter the SQL query or PL/SQL block responsible for handling the
selected HTTP method.
8. Click Create Handler.
7.8.2 Editing a Resource Handler
Learn how to edit a resource handler.
To edit a resource handler:
1. On the Workspace home page, click SQL Workshop and then RESTful Services.
The RESTful Services home page appears.
2. Click ORDS Based RESTful Services.
The ORDS RESTful services page appears.
3. Click the ORDS RESTful Service Handler you want to edit.
The ORDS Handler Definition page appears.
4. Make the changes you want.
5. Click Apply Changes.
Chapter 7
Managing Resource Handlers
7-34

See Also:
Adding a Resource Handler
7.8.3 Deleting a Resource Handler
Learn how to delete a resource handler.
To delete a resource handler:
1. On the Workspace home page, click SQL Workshop and then RESTful Services.
The RESTful Services home page appears.
2. Click ORDS Based RESTful Services.
The ORDS RESTful services page appears.
3. Click the ORDS RESTful Service Handler you want to delete.
The ORDS Handler Definition page appears.
4. Make the changes you want.
5. Click Delete.
6. Click OK to confirm.
7. Click Apply Changes.
Chapter 7
Managing Resource Handlers
7-35

Index
A
Autonomous database
loading data, 5-13
B
Blueprint Designer, 5-19
Data Generator, 5-24
blueprints
Data Generator, 5-19
C
Column Statistics, 3-14
copy and paste CSV data, loading, 5-7
create
generate, 5-40
Create Lookup Table, 3-13
D
data
exporting from database, 5-11
loading, 5-2, 5-3
loading into database, 5-6
unloading, 5-2, 5-3, 5-11
data dictionary, browsing, 5-74
Data Generation Schema
Data Generator, 5-23
Data Generator
accessing, 5-20
Blueprint Designer, 5-19
import blueprint, 5-22
Data Workshop, 5-2, 5-3
load data, 5-2
loading data from Cloud, 5-13
unload data, 5-2
database
loading data into, 5-2, 5-3
monitoring, 5-75
unloading data from, 5-2, 5-3
database definition language, generating DDL
statements, 5-63
database link
browsing, 3-44
creating, 3-44
testing, 3-45
Database Monitor
I/O, 5-78
Locks, 5-78
Long Operations, 5-80
Open Cursors, 5-79
required, 5-76
Sessions, 5-77
SQL, 5-78
Top SQL, 5-80
Waits, 5-78
database objects
purging, 5-68
restoring, 5-68
database security
Column Privileges report, 5-73
Role Privileges report, 5-73
System Privileges report, 5-73
DDL
about, 5-63
generating, 5-63
E
Explain Plan
about, 4-10
using, 4-10
Export XML Wizard, 5-13
exporting data
summary of available methods, 5-4
F
function
browsing, 3-36
compiling, 3-38
creating, 3-36
downloading, 3-38
dropping, 3-39
editing, 3-38
Index-1

I
I/O report, 5-78
import blueprint
Data Generator, 5-22
importing data, summary of methods, 5-4
index
browsing, 3-21
creating, 3-20
disabling, 3-21
dropping, 3-22
rebuilding, 3-21
statistics about, 3-21
J
JSON file
loading, 5-9
L
Locks report, 5-78
M
materialized view
browsing, 3-47
creating, 3-46
dependent objects, 3-48
dropping, 3-48
list of grants, 3-48
report of data, 3-47
sort by column, 3-47
viewing object details, 3-47
O
Object Browser
accessing, 3-2
creating objects, 3-6
filtering objects, 3-4
Hide Objects control, 3-6
hiding Object Selection pane, 3-6
managing database links, 3-43
managing functions, 3-35
managing indexes, 3-20
managing materialized views, 3-45
managing packages, 3-26
managing procedures, 3-31
managing sequences, 3-22
managing tables, 3-6
managing triggers, 3-39
managing types, 3-24
managing views, 3-15
Object Browser (continued)
Statistics, 3-14
synonyms, 3-48
Object Reports
All Objects, 5-74
All Objects report, 5-73
Column Privileges report, 5-73
Data Dictionary, 5-74
Exception Reports, 5-72
Invalid Objects, 5-73
Object Calendar, 5-74
Object Counts by Type, 5-73
PL/SQL Source Code report, 5-72
Role Privileges report, 5-73
System Privileges report, 5-73
objects
purging, 5-68
restoring, 5-68
Open Cursors report, 5-79
Oracle Cloud
granting privileges to workspace schema,
5-14
UI differences, 5-14
Oracle Optimizer, Explain Plan, 4-10
Oracle REST Data Services
enabling, 7-7
registering, 7-11
ORDS RESTful services
about dashboard, 7-12
creating, 7-25
deleting, 7-26
editing, 7-25
exporting, 7-29
importing, 7-30
managing privileges, 7-27
managing resource templates, 7-31
P
package
Auto Complete, 3-29
compiling, 3-30
creating, 3-27
downloading, 3-28, 3-30
dropping, 3-30, 3-31
editing, 3-29
Find, 3-29
grants for, 3-29
object dependencies, 3-29
package body, 3-29
related errors, 3-29
Replace, 3-29
viewing, 3-28
procedure
browsing, 3-32
Index
Index-2

procedure (continued)
compiling, 3-34
creating, 3-32
downloading, 3-34
dropping, 3-35
editing, 3-33
editing manually, 3-34
finding, 3-33
replacing, 3-33
Q
Query Builder
about, 5-28
accessing, 5-29
creating joins automatically, 5-37
creating joins manually, 5-36
filtering objects, 5-30
hiding objects in Design Pane, 5-34
Object Selection pane, 5-31
removing objects in Design Pane, 5-34
resizing panes, 5-33
Saved SQL tab, 5-39
searching for objects, 5-30
supported column types, 5-32
Table Actions, 5-37
View Actions, 5-37
Quick SQL, 5-40
getting started, 5-41
loading samples, 5-49
saving as model, 5-46
saving as script, 5-46
Quick SQL model:, 5-46
accessing, 5-47
delete, 5-47
edit, 5-47
Quick SQL samples:
load, 5-50
Quick SQL:
load samples, 5-50
saving a model, 5-46
saving a script, 5-47
R
Recycle Bin
purging, 5-68
searching, 5-68
using, 5-68
viewing objects, 5-68
reports
Data Dictionary, 5-74
database objects, 5-73
exception reports, 5-72
PL/SQL Source Code, 5-72
Representational State Transfer (REST), 7-3
resource handler
adding, 7-33
deleting, 7-35
editing, 7-34
resource template
adding, 7-32
deleting, 7-33
editing, 7-32
managing, 7-31
REST, 7-3
RESTful services
about oracle.example.hr, 7-15
accessing, 7-10
creating, 7-23, 7-24
example, 7-15
managing, 7-22
managing resource handlers, 7-33
requirements, 7-3
Schema ORDS Enabled, 7-24
Schema ORDS not Enabled, 7-23
using, 7-1
RESTful Services
example, 7-5
resource handler, 7-5
resource module, 7-4
REST, 7-3
terminology, 7-6
results, 6-4
S
sample data set
loading, 5-7
schema
selecting, 2-2
scripts
creating in editor, 6-5
deleting from editor, 6-10
deleting from SQL Scripts page, 6-9
executing, 6-10
executing from SQL Scripts page, 6-11
executing in editor, 6-11
export, 6-4
exporting, 6-13
results, 6-4
SQL Script editor, 6-6
uploading to another account, 6-4
uploading to SQL Scripts, 6-5
viewing repository quotas, 6-15
Security reports
Column Privileges report, 5-73
Object Grants, 5-73
Role Privileges, 5-73
System Privileges, 5-73
Index
Index-3

sequence
altering, 3-23
browsing, 3-23
creating, 3-22
dependent objects, 3-24
dropping, 3-24
grants associated with, 3-23
sequence, 3-24
Session report, 5-77
session, killing, 5-77
SQL Commands
home page, 4-3
running Explain Plan, 4-10
transaction support, 4-7
SQL report, 5-78
SQL Scripts
accessing, 6-2
creating script in editor, 6-5
deleting script from editor, 6-10
deleting script from SQL Scripts home page,
6-9
executing script from SQL Scripts page, 6-11
executing script in editor, 6-11
exporting scripts, 6-13
importing, 6-13
importing scripts, 6-13
script editor, 6-6
SQL Scripts page, 6-3
uploading script, 6-5
viewing quotas, 6-15
SQL Scripts page
accessing Manage Script Results, 6-4
Show Quotas, 6-4
Task list, 6-4
SQL Scripts page Task list
export scripts, 6-4
uploading scripts, 6-4
SQL Workshop
about, 2-1
Create App button, 6-8
icons, 2-1
overview, 2-1
selecting a scheme, 2-2
SQL Workshop home page
icons, 2-1
selecting a schema, 2-2
SQL:
shorthand syntax, 5-40
SQL*Plus command support, 4-7
SQL*Plus commands, unsupported, 4-7
Swagger
document, 7-31
synonym
creating, 3-49
dropping, 3-50
synonym (continued)
viewing, 3-49
T
Table Statistics, 3-14
tables
add column, 3-12
browsing, 3-10
constraints, 3-11
copy, 3-13
creating, 3-7
drop column, 3-13
dropping, 3-13
editing, 3-12
exporting user interface defaults, 5-67
exports data to spreadsheet, 3-11
grants on, 3-11
indexes associated, 3-11
insert row, 3-10
modify column, 3-12
remove all rows, 3-13
rename, 3-13
rename column, 3-13
report of number of rows, 3-11
sort by column, 3-10
statistics about, 3-11
user interface defaults, 3-11
viewing data, 3-11
transaction support, 4-7
trigger
browsing, 3-40
compiling, 3-42
creating, 3-40
disabling, enabling, 3-43
downloading, 3-42
dropping, 3-43
editing, 3-41
type
browsing, 3-25
creating, 3-25
dropping, 3-26
grants associated with, 3-26
list of synonyms, 3-26
U
Unload data Wizard, 5-12
Unload to XML Wizard, 5-13
utilities
about, 5-1
comparing schemas, 5-1
generating DDL, 5-1
loading data, 5-1
monitoring the database, 5-1
Index
Index-4

utilities (continued)
restoring dropped objects, 5-1
unloading data, 5-1
viewing database details, 5-1
viewing object reports, 5-1
Utilities, Data Dictionary, 5-74
V
view
browsing, 3-17
compiling, 3-19
creating, 3-16
dropping, 3-20
editing, 3-18
grants associated with, 3-18
objects referenced by, 3-18
report of data, 3-17
view (continued)
user interface defaults, 3-18
W
Waits report, 5-78
wizards
exporting contents of table, 5-12
exporting text file, 5-12
exporting XML, 5-13
X
XLSX file
loading, 5-10
XML document
exporting to, 5-13
loading, 5-8
Index
Index-5
