
Step-By-Step Checklists, Documentation, Video Tutorials
& Templates To Help You Confidently Create, Test, Prepare & Submit
Your BuddyBoss Native Mobile App in 30 Days or Less
Your App Launch
Roadmap
1
2
43

1
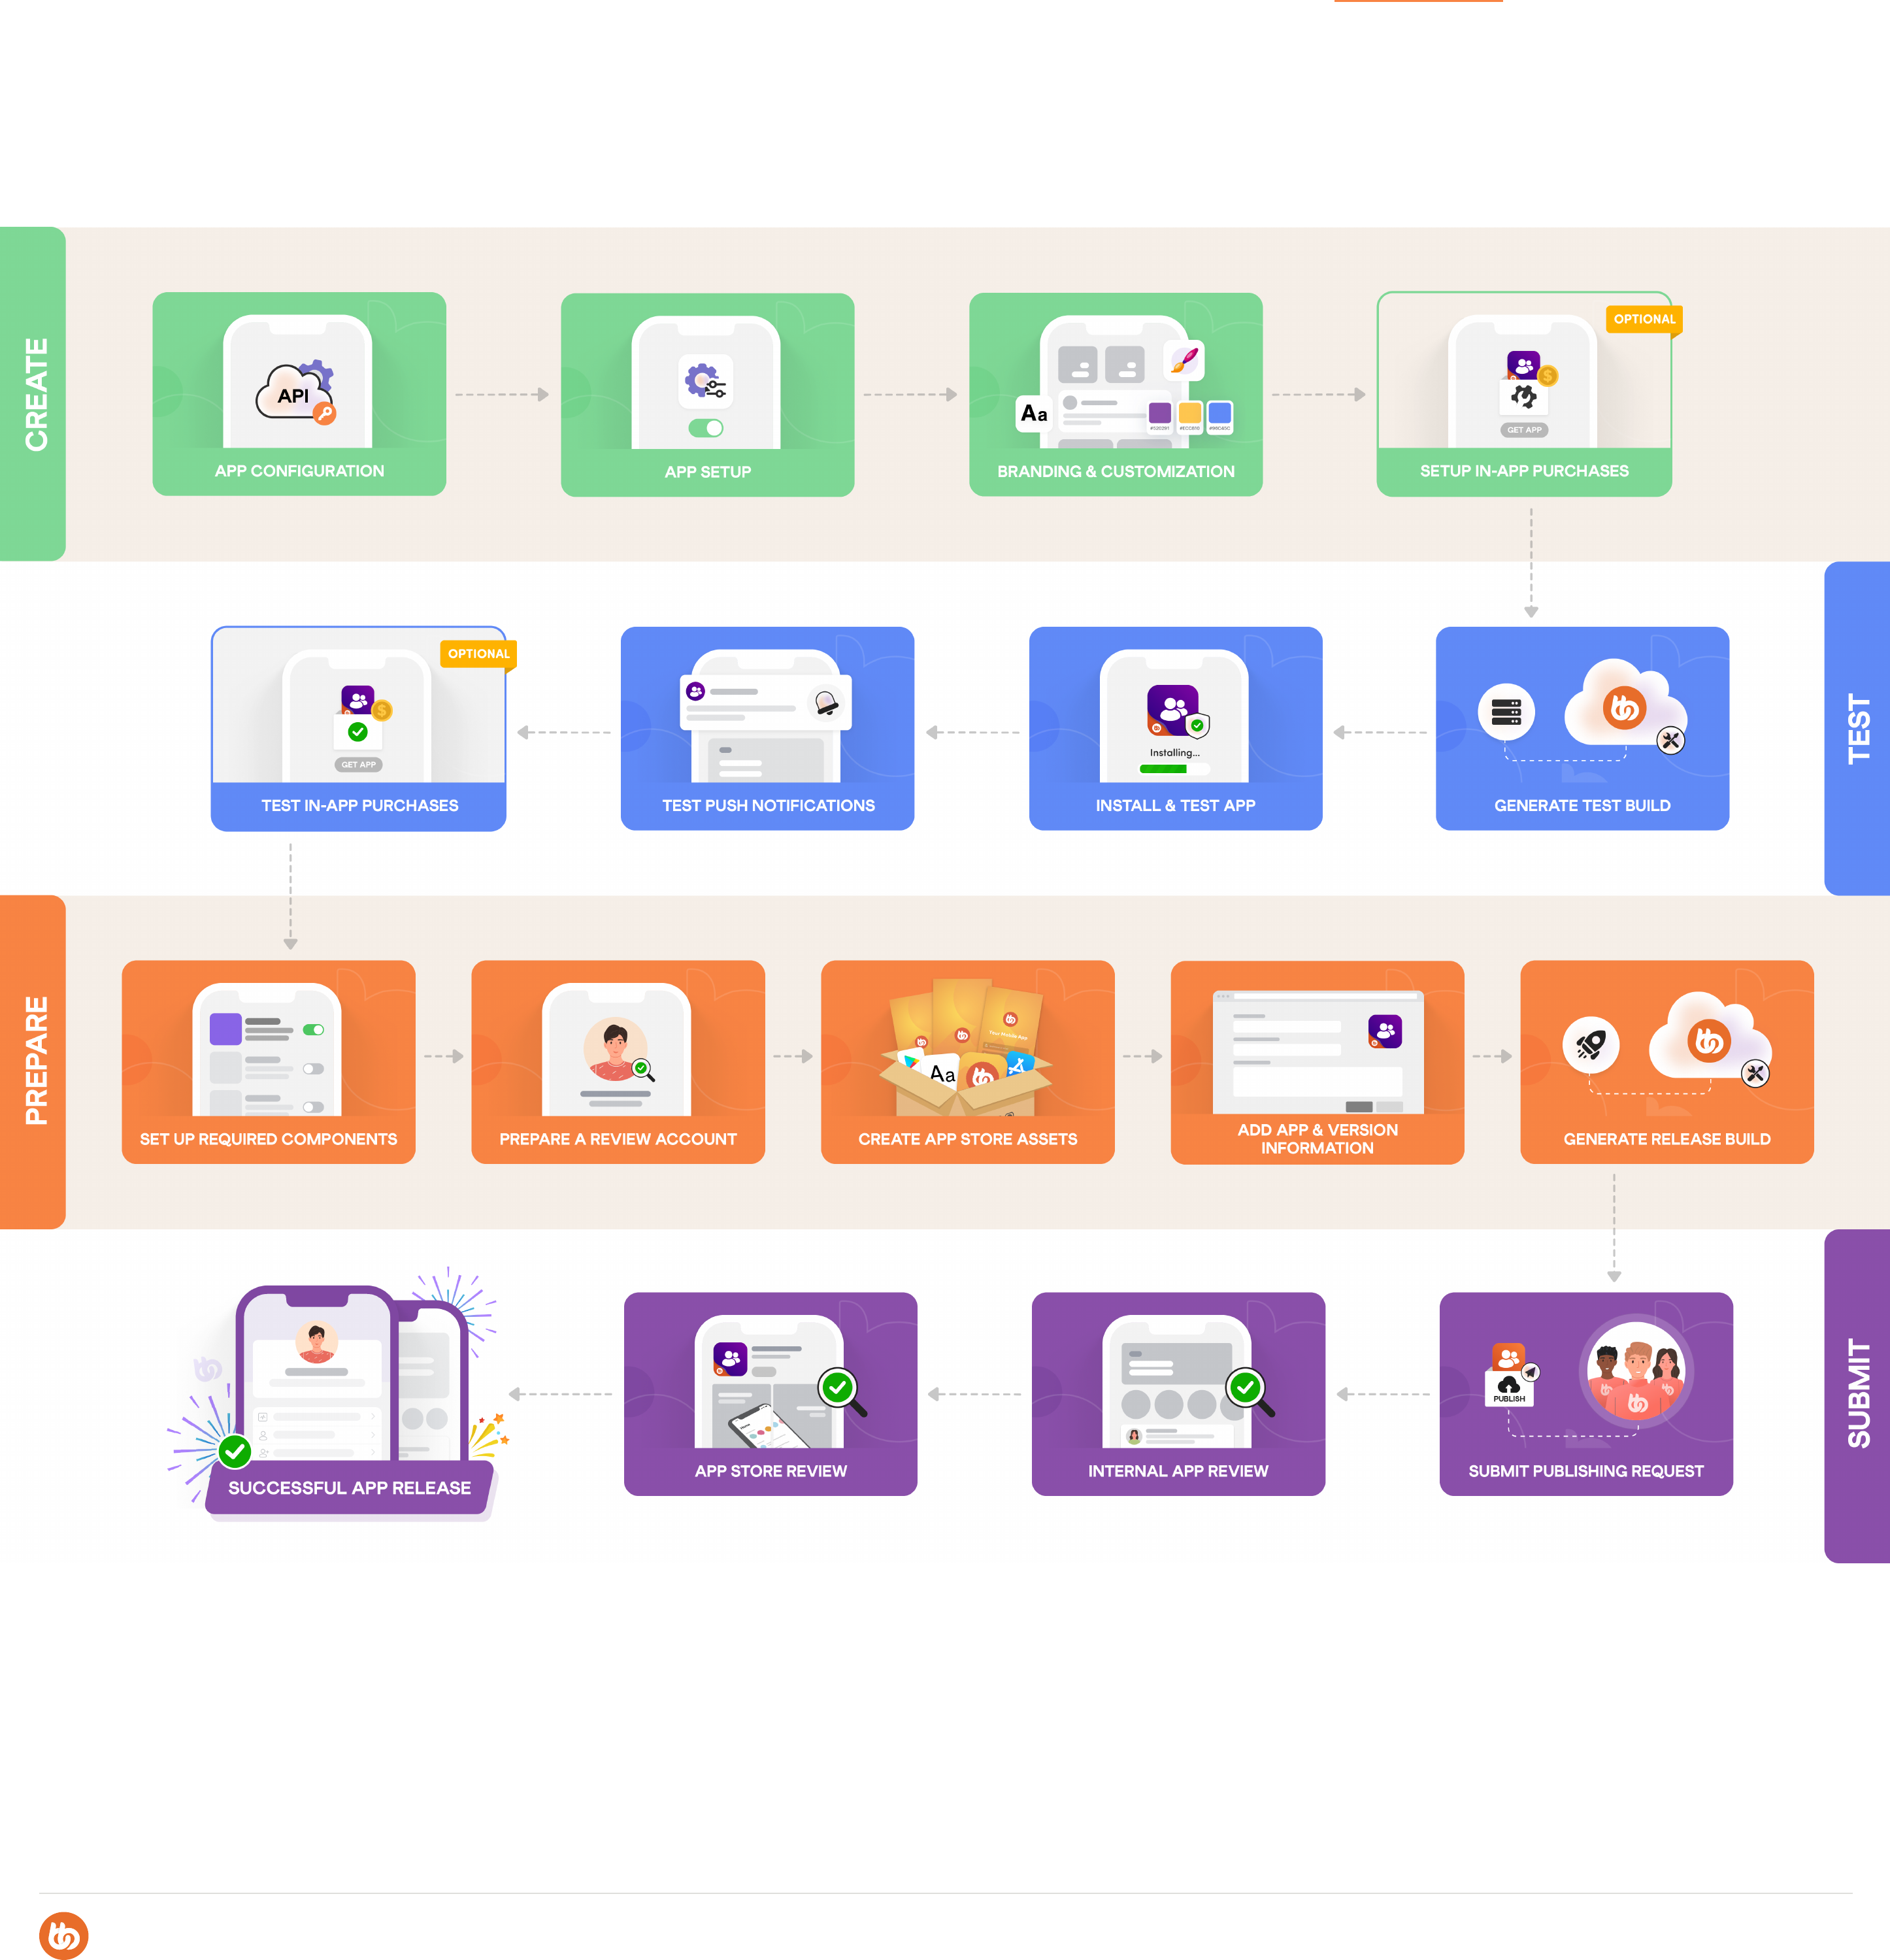
Your BuddyBoss App Launch Roadmap
Your BuddyBoss App Launch Roadmap gives you everything you need to help
you along your App Launch Journey. For each of the four phases, you have a step-by-step
checklist with links to documentation, video walkthroughs, and accompanying
notes or important information.
In addition to your checklist, your App Launch Roadmap also includes an
Assets List detailing every resource you are going to need to create or gather for your
app and where to get it.
Lastly, for each of your required app and app store graphics, we have included a folder
of Graphic Templates for you to use when designing your own.
App Launch Journey Visualization
Phase 1: Create - Checklist
Phase 2: Test - Checklist
Phase 3: Prepare - Checklist
Phase 4: Submit - Checklist
Assets List:
Graphic Templates
2
3
6
8
11
14
17
2
Your BuddyBoss App Launch Journey
This is a visual overview of each of the steps within each of the four phases of
your app launch journey. Each step has its own checklist on the following pages.
To view and download a full-size version of this graphic Click Here

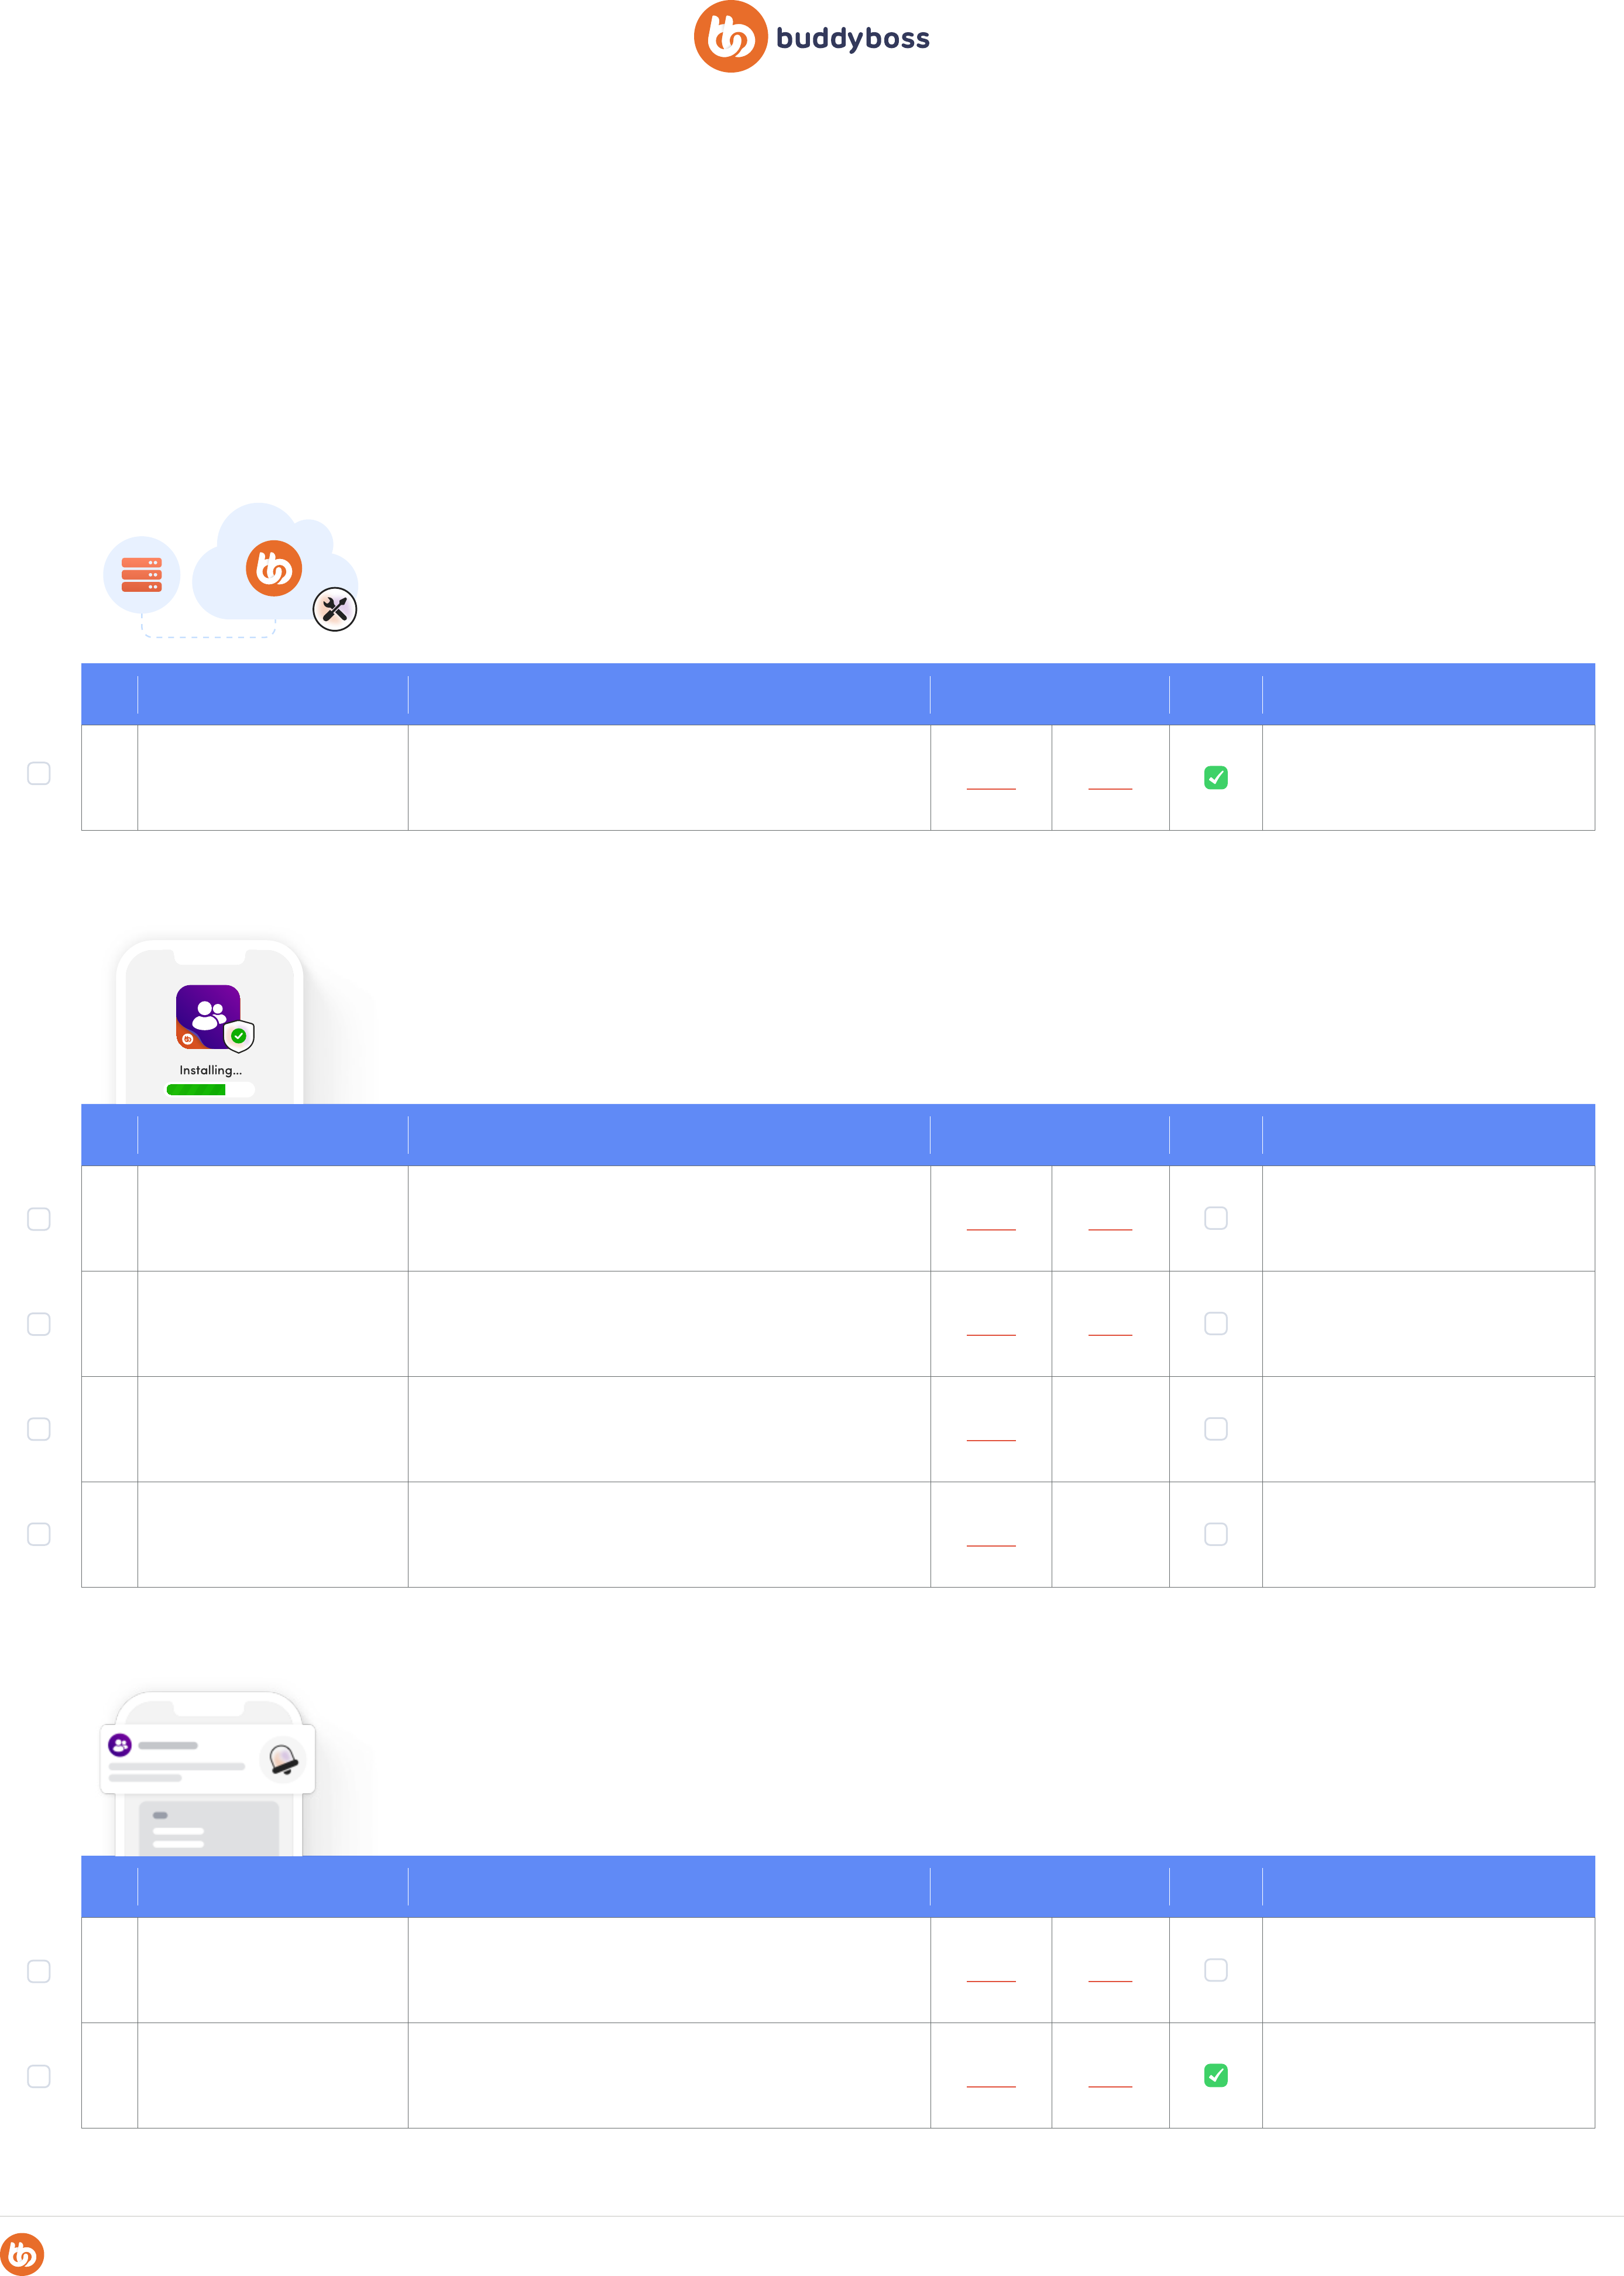
3
# STEP NAME ACTION RESOURCES DFY IMPORTANT INFO
1 Install & Activate the Plugin
Download and install the BuddyBoss App plugin from
your BuddyBoss account dashboard to your WordPress.
Article Video
2 Connect to BuddyBoss
Copy your BuddyBoss App ID & Key from your
BuddyBoss account.
Article Video
3
Configure Your Apple
Developer Account
Connect various elements of your Apple developer
account to your BuddyBoss App plugin.
Article Video
a App Store Connect API Key
Create & upload your API Key, P8 File, Issuer ID & Key ID
from App Store Connect to your BuddyBoss App plugin.
Article Video
P8 file for you to download and upload
to the plugin.
b
Bundle IDs, Signing Certificates
& Provisioning Profiles
Create two app identifiers from your developer account,
then automatically generate certificates & profiles
from the plugin tool.
Article Video
com.yourdomain.apple
com.yourdomain.apple.test
Remember: Enable push notifications
c App ID & Shared Secret
Create a draft release app in App Store Connect. Copy the
App ID to the BuddyBoss plugin. Generate a Shared Secret
from “In-App Purchases > Manage”, copy it to the
BuddyBoss plugin.
Article Video
d Adding iOS Test Devices
Add an iOS device by scanning a QR code on your iPhone
camera and following the on-screen instructions to install a
secure configuration profile to your device.
Article Video
4
Configure Your Google
Developer Account
Connect various elements of your Google developer
account to your BuddyBoss App plugin.
Article Video
a Create a Draft App
In Google Play Console create an app in draft mode to
allow you to set up and configure the following elements.
Article Video
b
Setup Google Cloud
API Access & Key
Create a Google Cloud project or link your app to an
existing Google Cloud project, create a Service Account,
and create an API key (JSON file) for that account.
Article Video
JSON file for you to download and
upload to the plugin.
c Application ID, KeyStore
Add an application ID to the plugin using the recommended
naming convention and then use the automatic KeyStore
generator tool in the plugin.
Article Video
com.yourdomain.android
KeyStore Zip file to download and
upload to the plugin.
5 Configure Firebase
Connect various elements of your Google developer
account to your BuddyBoss App plugin.
Article Video
a
Create a Firebase Project &
Configure the Server Key
Create a free project from console.firebase.google.com and
copy your server key from your “Projects Settings > Cloud
Messaging” into the plugin.
Article Video
b Create 2 iOS Apps
From your Firebase account add two iOS apps; one for your
test app and one for your release app using the exact
bundle IDs previously created and download two .plist files.
Article Video
Download and store the two .plist files,
renaming them to “iOS Release” & “iOS
Test” for easy reference.
API
APP LAUNCH ROADMAP
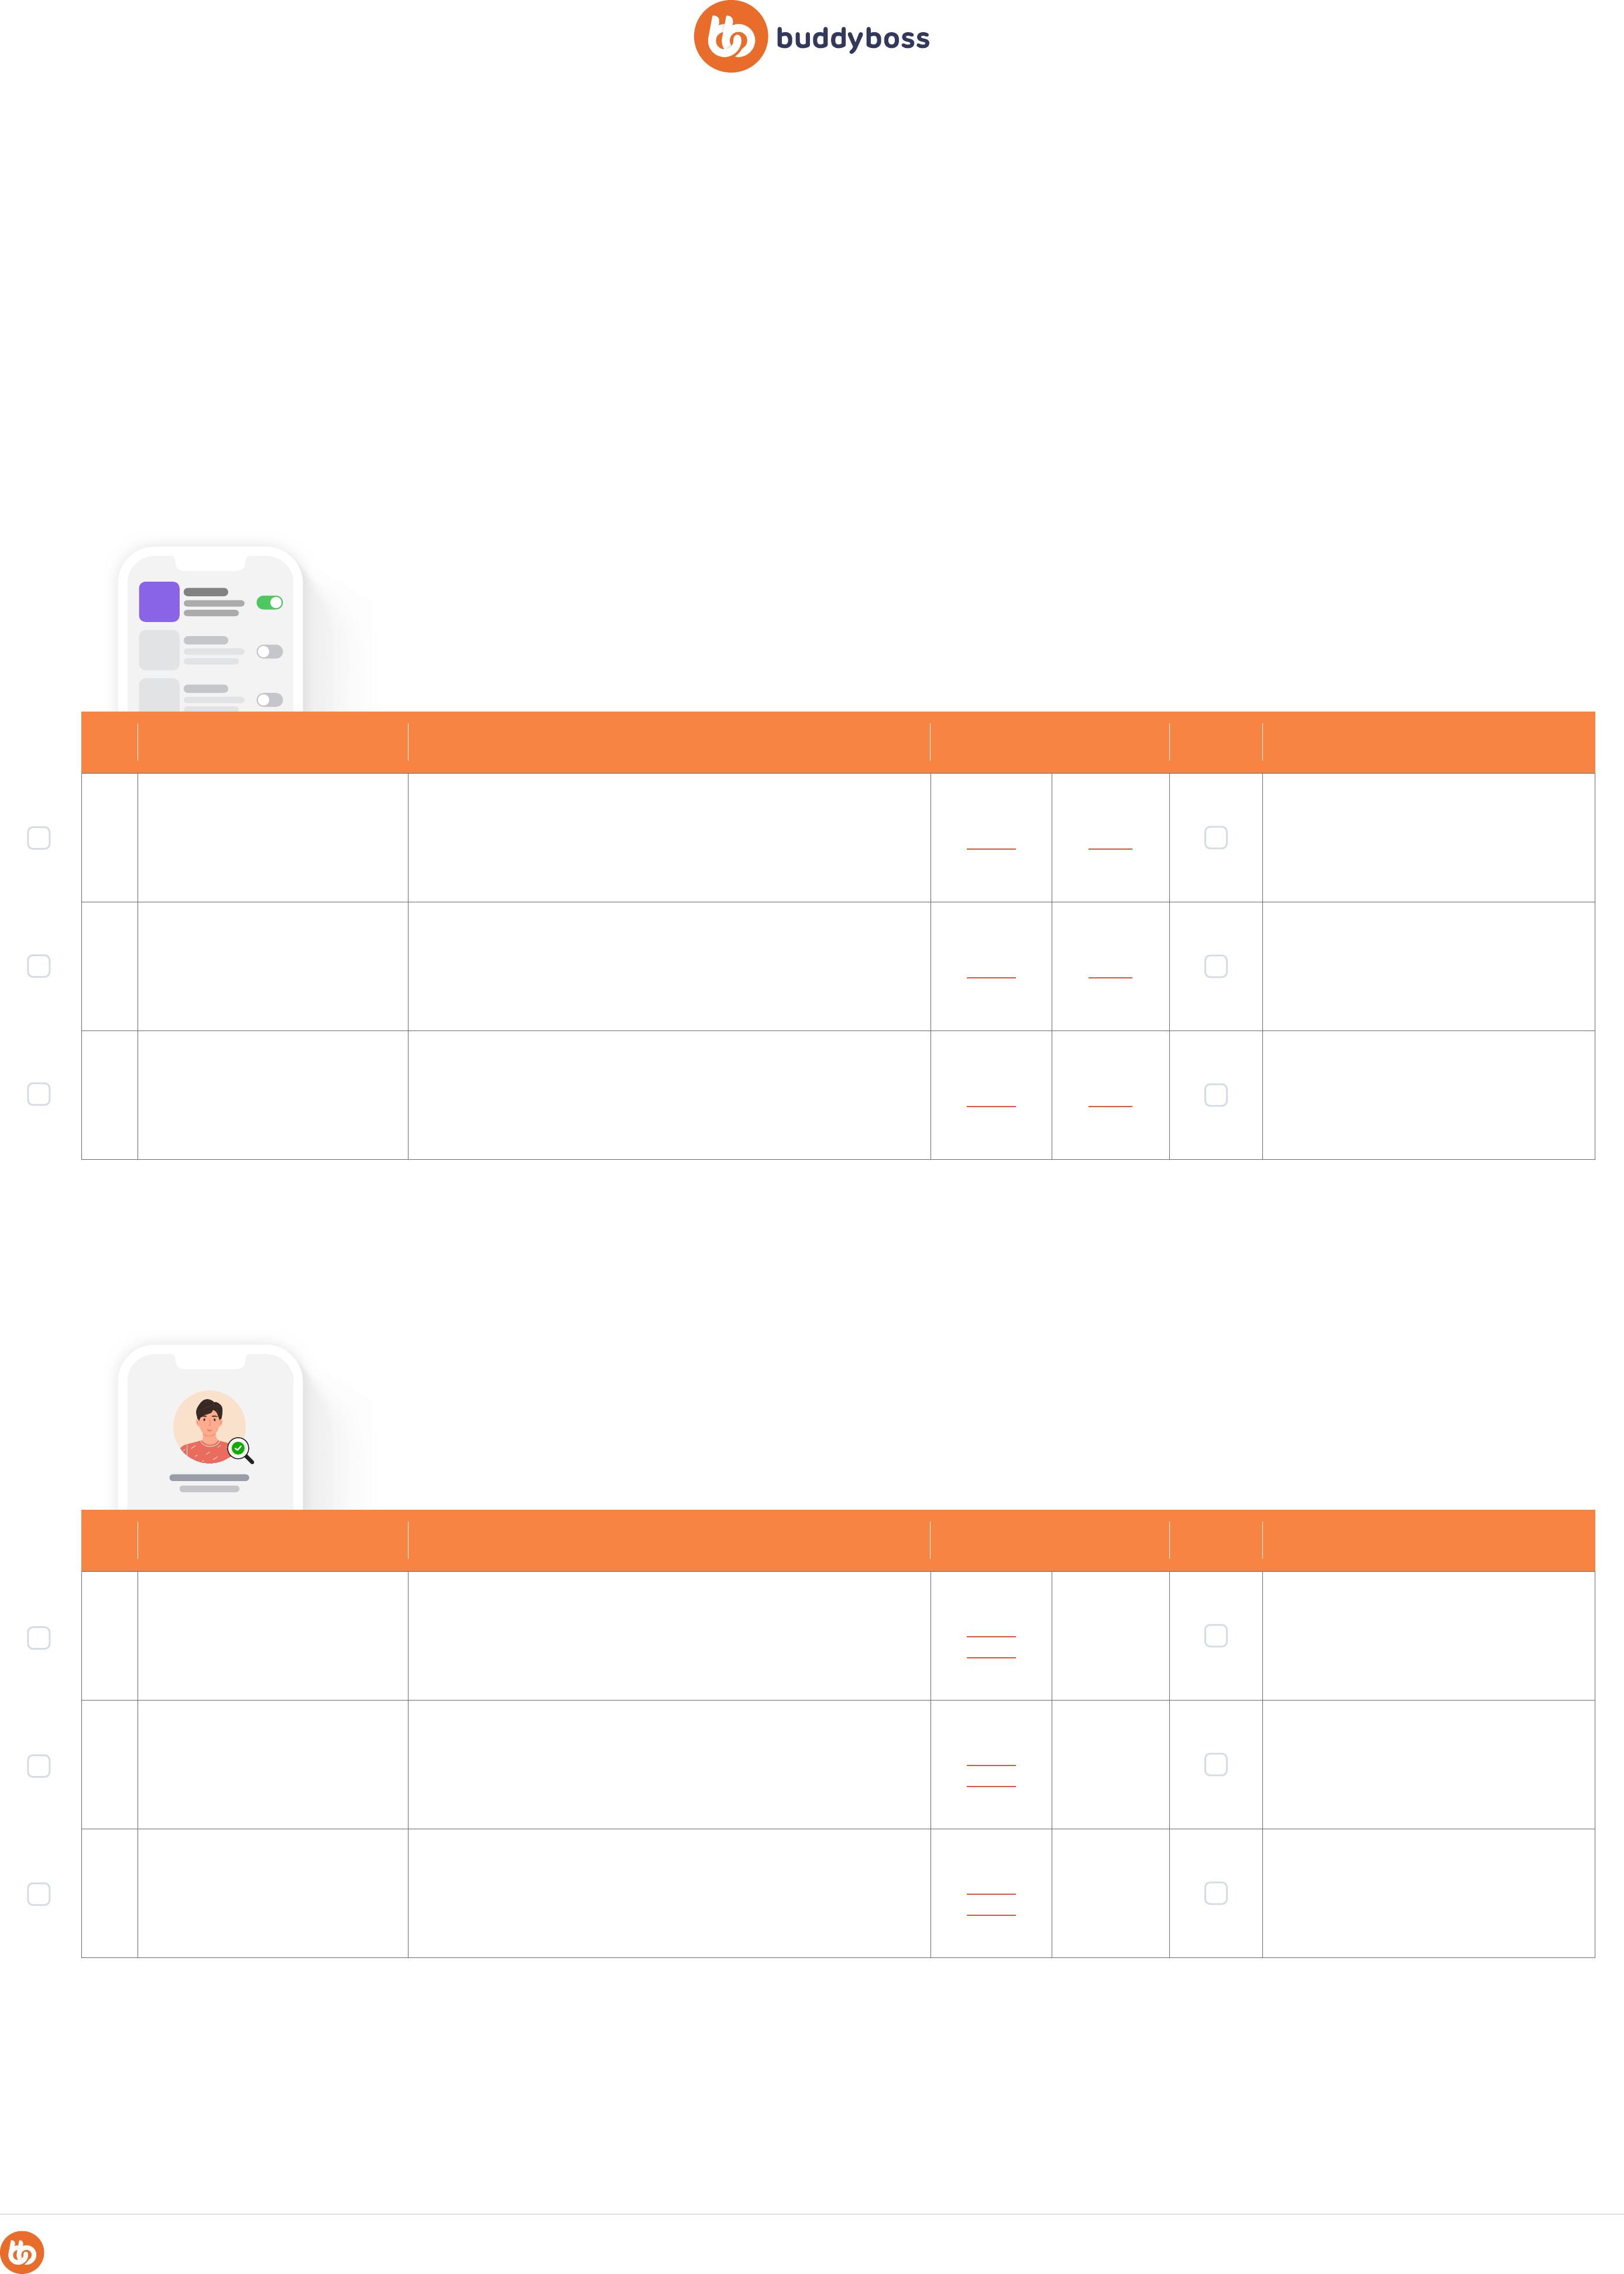
Phase 1: Creating Your App
In Phase 1 of your App Launch Roadmap, you will go through three steps. First, you will set up the basic app plugin on your WordPress
installation as well as configure your Apple and Google developer accounts along with Google Firebase to manage push notifications. Second,
you will configure the basic settings and components of your app including in-app purchases if applicable, and integrations like LearnDash.
Lastly, you will brand and customize your app with whatever pages and elements you want.
Step 1:
App Setup

4
# STEP NAME ACTION RESOURCES DFY IMPORTANT INFO
1 Activating Components
From the BuddyBoss plugin, activate the app
components you want in your app including the
registration, browser authentication, caching, feedback,
ratings, and notifications.
Article Video
a Registration & Privacy
Check to allow users to register an account in the app or
force them to create an account on your website only.
Also, restrict access to only logged-in users if necessary.
Article
Article
Video
b
Feedback, Ratings
& Smart Banner
Check to enable app store reviews and ratings for
your app and also to show a banner on your site
to encourage users to download your app from the
app store.
Article
Article
Article
Video
c
Select Automatic Push
Notifications
Select & enable whichever automatic events you want to
trigger notifications for users, for example mentions,
direct messages, admin notices.
Article Video
2 API Caching & CDN
Enable or disable API caching to dramatically increase
the performance of the app. Configure the CDN URL if
loading assets from a contentdelivery network.
Article Video
Can be disabled for testing, if needed, to
identify caching or API issues.
3 Native Integrations
Enable app native integratons with other plugins or
services such as LearnDash or Vimeo.
Article Video
4 Configuring In-App Purchases
Configure the basic settings for how In-App Purchases
are handled in your app. Setting up and configuring IAPs
is covered more thoroughly in another resource.
Article Video
Terms Of Service & Privacy Policy are
required by both app stores.
Step 2:
App Configuration
c
Create 2 Android Apps &
Activate Plugin
From your firebase account add two Android apps; one for your test
app & one for your release app using the exact bundle ID’s previously
created & download two JSON files.
Article Video
Download and store the two plist files,
renaming them to “Android Release” &
“Android Test” for easy reference.
d
Cloud Messaging iOS APN
Authentication Key
Create a new API key from your Apple Developer
Account > Certificates, Identifiers & Profiles, ticking
Enable APNs. Upload p8 file to Google Cloud Messaging
for each iOS app.
Article Video
Download and store p8 file, renaming
to “APN” for easy reference. Copy Key
ID & Team ID from Apple Account
e
Upload 4 Configuration Files
To BuddyBoss Plugin
Upload the four firebase app files you downloaded in
the previous steps to your app plugin saving each time
to confirm.
Article Video
2x iOS Plist Files
2x Android JSON Files

5
# STEP NAME ACTION RESOURCES DFY IMPORTANT INFO
1 App Images & Icons
Design and upload the various images and icons with
your own branding that are required to be displayed
in your app.
Article Video
DFY can design and implement all of these
for you.
a Home Screen Logo
A logo to display on the home screen of your app, visible
in the navigation bar when scrolling up.
Article Video
1200px by 180px and can include
transparency
b Login Logo
A logo that displays on the login and registration screens
of your app.
Article Video 1200px by 744px
c Login Background
The background graphic of your login and registration
screen shown behind the forms.
Article Video 2732px by 2732px
d Launch Screen Background
The background image that is shown immediately
when your app is launched while your login screen is loading.
Can optionally also enable a spinner animated overlay.
Apple
Guideline
Video 2732px by 2732px
e iOS Login App Icon
The app icon shown on your users iOS home screen to
load your app.
Apple
Guideline
Video 1024px by 1024px
f Android App Icon
The legacy version of your app icon shown on your users
Android home screen to load your app. This is a single
layer graphic for Android devices released before 2017.
Android
Guideline
Video
1024px by 1024px, can include
transparency.
g
Android Adaptive Icon
Foreground
App icon foreground for newer Android devices.
Typically this is your logo with transparency.
Android
Guideline
Video
1024 x 1024, transparency, 683px
safe zone.
h
Android Adaptive Icon
Background
App icon background for newer Android devices.
An opaque graphic that the foreground logo or icon is
overlayed and parallaxed on top of.
Android
Guideline
Video 1024 x 1024, opaque.
i Android Notification Icon
A separate icon that is used in Android notifications to
identify your app. (Not required for iOS as it’s generated
from your app icon automatically)
Article Video 256px by 256px
2 App Colors
Edit the color options to match your brand identity
throughout your app including buttons, text,
icons, banners, course elements, and in-app
purchase elements.
Article Video
3 App Typography
Customize the typography used throughout your app,
defaulting to the device’s own typeface or you can select
custom fonts from Google Fonts or upload your own.
Article Video
4 App Tab Bar
Select which elements you want to display in your app
tab bar for quick navigation. You can have 5 items
including the home and more screen.
Article Video
DFY delivers your test app with
templates that can easily be edited
with your own content.
a Menu Items & Icons
Select which menu items you want to display in your
tab bar as well as customise what icons are used to
display those menu items.
Article Video
b
More Screen Contents
& Structure
Add a “More” screen tab item that allows you to list any
number of custom navigation elements and pages as well as
display required elements such as bug reporting.
Article Video
5 App Pages
Create custom app pages which use supported
Gutenberg blocks to render react-native elements
in the app
Article Video
Step 3:
Branding & Customization
#520291 #ECC810 #96C45C
6
APP LAUNCH ROADMAP
Phase 2: Testing Your App
Phase 2 of your App Launch Roadmap has four steps, one of which (Testing In-App Purchases) is entirely optional depending on the needs of
your app. First, you will generate a test build of your configuration using our cloud build servers, then you will set up your test devices and install
your test app to make sure everything works well. Next, you will test some automatic and manual push notifications to make sure your Firebase
configuration is set up correctly, and finally, if it’s relevant to you you will make some test purchases to check your premium content and access
are configured correctly.
# STEP NAME ACTION RESOURCES DFY IMPORTANT INFO
1 Requesting A Test Build
From the plugin “Build” page, select iOS or Android (or both),
and then the “Test App” build type. Continue to confirm the build
details and submit your request to our cloud servers.
Article Video
A request takes up to 10 minutes to be
received. A build takes up to one hour to be
compiled & complete.
# STEP NAME ACTION RESOURCES DFY IMPORTANT INFO
1 Installing the iOS Test App
Scan the QR code to install your completed test build on
an iOS device that you previously added during your app
setup in step 1 of the previous phase.
Article Video
You must have set up the test devices
previously, see Phase 1, Step 1
2
Installing the Android
Test App
Scan the QR code to install your completed test build on
any Android device you would like to test it on.
Article Video
You must have set up the test devices
previously, see Phase 1, Step 1
3 Testing the iOS Release App
To test specific elements, like the full experience for
in-app purchases, you may want to test your release
app using Test Flight. In most cases, this is not necessary, though.
Article
4
Testing the Android
Release App
To test specific elements, like the full experience for
in-app purchases, you may want to test your release
app using Test Flight. In most cases, this is not necessary, though.
Article
# STEP NAME ACTION RESOURCES DFY IMPORTANT INFO
1
Testing Automatic
Notifications
Using a test account on your website, send yourself
direct messages, friend requests, @mentions, etc. to test
that your automatic push notifications are working as expected.
Article Video
2
Testing Manual
Notifications
Using your admin website account and a test account logged
into your app, send yourself manual push notifications
from the plugin to test they are working as expected.
Article Video
Step 1:
Generate A Test Build
Step 2:
Install & Test App
Step 3:
Testing Push Notifications
Sign up below to request an invite
to the BuddyBoss App

7
# STEP NAME ACTION RESOURCES DFY IMPORTANT INFO
1 Testing iOS Test App Products
Test most functionality of your iOS IAP products in your
test app such as course enrollment, content access rules,
automations, etc. without testing the real purchase flow.
Article
No live product information will be
visible such as price or duration.
2
Testing Android Test App
Products
Test most functionality of your Android IAP products in
your test app such as course enrollment, content
access rules, automations, etc. without testing the real
purchase flow
Article
No live product information will be
visible such as price or duration.
3
Testing iOS Release App
Products
Test a simulated iOS purchase flow showing true live
product information and a simulated transaction as the
customer will see it.
Article Video
Live product information is visible such as
price and duration. Transactions are
simulated by Apple.
4
Testing Android Release
App Products
Test a simulated Android purchase flow showing true live
product information and a simulated transaction as the
customer will see it.
Article Video
Live product information is visible such as
price and duration. Transactions are
simulated by Google.
Step 4:
Testing In-App Purchases
GET APP
8
APP LAUNCH ROADMAP
Phase 3: Preparing the Release App
In Phase 3 of your App Launch Roadmap, you will go through five steps to prepare the release version of your app with the necessary elements to get
it approved in the app stores. First, you will activate the required components like moderation & bug reporting. Next, you will create a user account
for the review teams and set up the correct content, access, and permissions. Then you will set up the app version information and prepare your app
store graphics. Lastly, you will generate a release build using our cloud servers in preparation for the publishing submission.
# STEP NAME ACTION RESOURCES DFY IMPORTANT INFO
1 Moderation
Enable the moderation component which is required by
apple and google for any apps that have social features
or allow the uploading of user generated content.
Article Video
All social apps must have the ability for
users to report and block content, and
report & block other members.
2
Report A Bug & Support
Contact
Enable and configure the “report a bug” screen as well
as the support contact screen which are requirements
for any apps on the app store.
Article Video
3 Privacy Policy
Configure the required links to your privacy policy,
visible to both logged in users to view in the app
and logged out users to see from the
login/registration screen.
Article Video
Complete the privacy URLs in the plugin
but also the privacy screen in the “More”
app menu tab.
# STEP NAME ACTION RESOURCES DFY IMPORTANT INFO
1
Create Account &
Credentials
Create a brand new account on your site for Apple,
Google, and our review team to use to review your app
for submission.
Article
Article
2
Grant Access
To All Content
Without giving this account admin permissions, grant
this user access to all courses, content, pages,
products, and anything that might be visible in the app
to any real user.
Article
Article
3
Remove All Demo &
Test Content
Delete any test content, direct messages, beta screens,
activity posts, test notifications, dummy users. Ensure
the test user sees only real, live content.
Article
Article
Step 1:
Set Up Required Components
Step 2:
Prepare a Review Account

9
# STEP NAME ACTION RESOURCES DFY IMPORTANT INFO
1 Apple App Store Assets
Create the following assets in preparation for uploading to
the Apple App Store for review in the next step.
Apple
Documentation
a
Apple App Store
Screenshots 6.5” Devices
Create 1-10 screenshots of the main functionality of
your app to upload to App Store Connect in the next step.
JPEG / PNG, 1242px x 2688px
Apple
Documentation
Screenshots cannot contain any real user
data, pictures, names, messages, etc. Use
demo data, then delete them.
b
Apple App Store
Screenshots 5.5” Devices
Create 1-10 screenshots of the main functionality of
your app to upload to App Store Connect in the next step. J
PEG / PNG, 1125px x 2436px
Screenshots cannot contain any real user
data, pictures, names, messages, etc. Use
demo data, then delete them.
c Review the Screenshots
Create some screenshots showing where to find
premium content, in-app purchases, moderation
features, key items from the “More” screen, privacy
policy & bug report screen.
Not a requirement but it helps to get your
app approved more easily by pointing the
reviewer to key areas.
2 Google Play Store Assets
Create the following assets in preparation for uploading
to the Google Play Store for review in the next step.
Google
Documentation
a App Icon
Create an app icon that will be used in various places
throughout the app store.
PNG / JPEG, 512px x 512px
Google
Documentation
b Feature Graphic
Create a feature graphic that will be used in the header of
your app’s store page and in any areas the app store may
feature your app.
PNG / JPEG 1024px x 500px
Google
Documentation
c
Google Play Store
Screenshots
Create 2-8 screenshots of the main functionality of your app.
In PNG / JPEG, 916 Ratio,
max 2160px x 3840px
Google
Documentation
Step 3:
Prepare App Store Assets
Step 4:
Add App & Version Information
# STEP NAME ACTION RESOURCES DFY IMPORTANT INFO
1
Apple App Store
Information
In App Store Connect, add your app name, subtitle,
category, content rights, age rating, pricing, and
privacy information.
Article Video
a Add a Custom EULA
Using Apple’s default End User License Agreement
(EULA) increases the likelihood of your app being
rejected. Upload a custom EULA that can be
generated online.
Article Video
2
Google Play Store
Information
In Play Console, add your access instructions, ads,
content rating, audience info, app name, and short and
long description.
Article Video
a Add a Custom EULA
Create a new production release of your app inside the
Play Console including your release name (1.0.0) and
release notes describing the key features and functionality.
Article Video

10
Step 5:
Generate A Release Build
# STEP NAME ACTION RESOURCES DFY IMPORTANT INFO
1 Requesting A Release Build
From the plugin “Build” page, select iOS or Android
(or both) and then the “Release App” build type. Continue to
confirm the build details and submit your request to our
cloud servers.
Article Video
A request takes up to 10 minutes to be
received. A build takes up to one hour to be
compiled & complete.

11
APP LAUNCH ROADMAP
Phase 4: Submit For Review
In Phase 4, the final stage of your App Launch Roadmap, you will go through four steps to get your app successfully published on the app stores.
First, you will submit a publishing request from your plugin dashboard attaching your release build from the previous step. Next, our internal
publishing team will comb through your app and go back and forth with you suggesting any changes they recommend. Once your app has passed
our internal quality control, we will submit it to the app stores for review, and our internal review team will liaise with the external app store review team
to answer any questions or recommend any changes. Once your app passes the external review process, it will be published to the app store and
will be ready for your users to download. Hurrah!
# STEP NAME ACTION RESOURCES DFY IMPORTANT INFO
1
Apple App Store
Publishing Submission
Use our app store publishing checklist to verify
that you have taken all of the required actions in previous
steps and submit your iOS build for review and
submission by us.
Article
There are seperate checklists for iOS
and Android.
a
Apple App Store
Publishing Checklist
Review our iOS Publishing Checklist and verify
that you have completed the steps in your plugin,
under “Publish > Apple App Store.”
Article
b
Select Your Release Version
& Verify the Information
Select the release build version you want to publish and
review the information shown to confirm everything
matches correctly with your App Store Connect
Article
c
Submit Your iOS App
For Review
Choose how you want our review team to
communicate with Apple on your behalf and click
“Submit For Review. “
Article
Choosing to allow our team to respond on
your behalf is best in almost all cases.
2
Google Play Store
Publishing Submission
Use our Play Store publishing checklist to verify that you
have taken all of the required actions in previous steps
and submit your Android build for review and submission
by us.
Article
a
Google Play Store
Publishing Checklist
Review our Android Publishing Checklist and verify that
you have completed the steps in your plugin, under
“Publish > Google Play Store.”
Article
b
Select Your Release
Version & Verify the Developer
Information
Select the release build version you want to publish
and review the information. Enter your Developer
Account ID from the Play Console and confirm the
Release Name & Notes.
Article
c
Submit Your Android
App For Review
Choose how you want our review team to
communicate with Google on your behalf and click
“Submit For Review.”
Article
Choosing to allow our team to respond on
your behalf is best in almost all cases.
Step 1:
Submit A Publishing Request

12
# STEP NAME ACTION RESOURCES DFY IMPORTANT INFO
1
Our Internal
Review Process
Once we have received your publishing request, our
internal app review team thoroughly tests your app to
ensure your app meets the app store requirements.
Article
Our internal review process typically
takes less than 48 hours from your
submission.
a Changes Recommended
If our internal team finds something that will not meet
the app store requirements, we flag the item,
recommend what needs to be changed, and send you
an email notification.
Article
Our publishing team only checks the app
store requirements. If they spot a bug,
it must be submitted to support to
have it fixed.
b
You Perform The
Changes & Confirm
Once you receive this email notification, you must
review the details in your plugin “Publishing” section,
make the changes to your app, and confirm the
changes with us.
Article
Each revision can take up to 48 hours
to review. There is no limit to the number
of revisions we will help with.
c Review Screenshots
Once your app has passed our internal checks
with no required changes, we submit the app
to the appropriate app store on your behalf for
their review.
Article
Step 2:
Internal App Review
# STEP NAME ACTION RESOURCES DFY IMPORTANT INFO
1
App Store
Review Process
Use our app store publishing checklist to verify
that you have taken all of the required actions in previous
steps and submit your iOS build for review and
submission by us.
Each store review process is different
and each app is reviewed by a
completely different individual.
a Apple App Store Review
Apple is the most strict with its review process, often
providing vague guidelines that are interpreted differently
by different reviewers.
Apple
Documentation
b
Google Play
Store Review
Google is more straightforward in its review with
clearer, more lenient guidelines that are easier to
comply with.
Google
Documentation
2
App Rejection
& Resubmission
Your app may be rejected by either app store for various
reasons, and they will often require you to change
something about your app before resubmitting.
Apple
Documentation
Rejections are not unusual & are
nothing to worry about.
a Rejection Notification
You will receive an app rejection notification from the app
store detailing the reasons your app was rejected.
Article
Article
b Publising Team Response
If you have chosen to allow us to respond, then in most
cases, we will respond to the review team on your behalf
to clarify, add, or change anything they require.
Article
Article
Often no action is required by you and the
app store is simply seeking
clarification on some information.
c
Submit Your Android
App For Review
If we identify something that does require a change
to your app, we will notify you by email in the same way
as in the previous step so you can take action and
confirm with us.
Article
Step 3:
App Store Review

13
# STEP NAME ACTION RESOURCES DFY IMPORTANT INFO
1 Your App Is Approved
Use our app store publishing checklist to verify
that you have taken all of the required actions in previous
steps, and submit your iOS build for review and
submission by us.
a Immediate Release
Depending on your selection previously, your app may
be immediately released to the app store publicly
available for download.
Apple
Documentation
b Google Play Store Review
You may instead have decided to hold your app release
until a specific “not before” date, maybe to align with a
marketing or launch campaign.
A “not before” date does not guarantee
release on that date, it is still dependant on
being approved.
2 Launch to Your Users
Congratulations! Your app has been successfully
approved and released into the app store. It’s now time
to launch your app to your users.
Step 4:
Successful App Release
SUCCESSFUL APP RELEASE
14
APP LAUNCH ROADMAP
Asset Index
A complete list of every asset you will need at each step of each phase of your app launch journey, from images and graphics, certificates and
configuration files from your developer accounts, with details on where to access them, or notes on what is required to create them.
# STEP NAME ASSETS NAME LOCATION IMPORTANT INFO
1.1 Connect BuddyBoss Plugin File BuddyBoss Account
1.2 Connect BuddyBoss App ID & Key BuddyBoss Account
1.3 Configure Apple API Key P8 File App Store Connect > Users & Access
1.4 Configure Apple Issuer ID App Store Connect > Users & Access
1.5 Configure Apple Key ID App Store Connect > Users & Access
1.6 Configure Apple Bundle ID: Test & Release
Apple Developer >
Certificates, Identifiers & Profiles
1.7 Configure Apple Apple App ID
App Store Connect > My Apps > Your App >
App Information
1.8 Configure Apple App Specific Shared Secret
App Store Connect > My Apps > Your App >
In-App Purchases > Manage > Generate
1.9 Configure Google Draft App Google Play Console
1.10 Configure Google Service Account Key JSON File
Google Cloud Project > Service Account >
Actions > Manage Keys
1.11 Configure Google Application ID
BuddyBoss Plugin > Configure >
Android Settings
1.12 Configure Google KeyStore Zip File
BuddyBoss App Plugin > Tools > Generate
KeyStore
1.13 Configure Firebase Server Key
Firebase Console > Project Settings >
Cloud Messaging
1.14 Configure Firebase iOS Configuration plist File x2 Firebase > General > Your Apps > Add App
1.15 Configure Firebase Android Configuration JSON File x2 Firebase > General > Your Apps > Add App
1.16 Configure Firebase
Apple Push Notifications Key p8 File &
Key ID & Team ID
Apple Developer > Certificates, Identifiers &
Profiles > Keys > +
1.17 App Configuration Vimeo Authentication Code
Vimeo Developer > Create An App >
Authentication
1.18 Branding & Customisation Home Screen Logo Template JPEG / PNG - 1200 x 800 px
1.19 Branding & Customisation Login Logo Template JPEG / PNG - 1200 x 744 px
1.20 Branding & Customisation Login Background Template JPEG / PNG - 2732 x 2732 px
1.21 Branding & Customisation Launch Screen Background Template JPEG / PNG - 2732 x 2732 px
1.22 Branding & Customisation App Icon iOS Template JPEG / PNG - 1024 x 1024 px
Phase 1: Create

15
# STEP NAME ASSETS NAME LOCATION IMPORTANT INFO
2.1 - None - -
Phase 2: Te st
# STEP NAME ASSETS NAME LOCATION IMPORTANT INFO
3.1 Apple App Store Assets
Custom End User License Agreement
(EULA)
Online EULA Generator
3.2 Apple App Store Assets Privacy Policy (URL) Online Privacy Policy Generator
3.3 Apple App Store Assets
1-10 6.5” (No Button) App Store
Screenshots
Template JPEG / PNG, 1242px x 2688px
3.4 Apple App Store Assets
1-10 5.5” (With Button) App Store
Screenshots
Template JPEG / PNG, 1125px x 2436px
3.5 Apple App Store Assets 1-10 12.9” Tablet Screenshots Template JPEG / PNG, 2048px x 2732px
3.6 Apple App Store Assets App Description Describe your app features & functionality.
3.7 Apple App Store Assets App Keywords To increase discoverability.
3.8 Apple App Store Assets Review Account Username & Password
3.9 Apple App Store Assets Review Notes Where to access key content areas.
3.10 Apple App Store Assets Review Screenshots
Not required but helpful to include any IAP
Content, Moderation Features, More Screen
3.11 Google Play Store Assets App Access Information
Play Console > Dashboard > Set Up Your
App > View Tasks
Access Name, Username, Password, Other
Instructions
3.12 Google Play Store Assets Store Settings
Play Console > Dashboard > Set Up Your
App > View Tasks
Category & Tags, Store Listing
Contact Details
3.13 Google Play Store Assets App Name
Play Console > Dashboard > Grow >
Main Store Listing
3.14 Google Play Store Assets Short Description
Play Console > Dashboard > Grow >
Main Store Listing
3.15 Google Play Store Assets Full Description
Play Console > Dashboard > Grow >
Main Store Listing
3.16 Google Play Store Assets App Icon Template
3.17 Google Play Store Assets Short Description
Play Console > Dashboard > Grow >
Main Store Listing
3.18 Google Play Store Assets Full Description
Play Console > Dashboard > Grow >
Main Store Listing
Phase 3: Prepare
1.23 Branding & Customisation App Icon Android Template JPEG / PNG - 1024 x 1024 px
1.24 Branding & Customisation Android Adaptive Icon Background Template
JPEG / PNG - 1024 x 1024 px - 683px visible,
remaining 170px border reserved for paralax.
1.25 Branding & Customisation Android Adaptive Icon Foreground Template
JPEG / PNG - 1024 x 1024 px - 683px visible,
remaining 170px border reserved for paralax
1.26 Branding & Customisation Android Notification Icon Template JPEG / PNG - 256 x 256 px

16
3.19 Google Play Store Assets App Icon Template PNG / JPEG, 512px x 512px
3.20 Google Play Store Assets Feature Graphic Template PNG / JPEG 1024px x 500px
3.21 Google Play Store Assets 2-8 Mobile Screenshots Template PNG / JPG, 916 Ratio, 2160px x 3840px
3.22 Google Play Store Assets Tablet Screenshots Template JPEG / PNG, 2048px x 2732px
3.23 Google Play Store Assets Release Name
Play Console > Dashboard > Release >
Production
Build Version (e.g 1.0.0)
3.24 Google Play Store Assets Release Notes
Play Console > Dashboard > Release >
Production
Describe Features & Functionality
# STEP NAME ASSETS NAME LOCATION IMPORTANT INFO
2.1 - None - -
Phase 4: Submit

17
App & App Store Graphic Templates
Along with this document, you will find a folder of graphic templates that we’ve
created to show you examples of various graphics you will need within your app, as well
as examples of the various graphics you will need to upload into each of the app stores.
Each store’s requirements differ slightly in how many graphics they require, varying from
6 to 10 so we have given just 6 examples for each where appropriate.
These graphics are included in the Assets Index outlined previously but here is a
list of each group of graphics for reference. This is helpful if, for example, you
have a graphic designer who wants a list of just the graphic assets required.
Each of the files in the templates folders is named with a corresponding
number in the Assets Index previously outlined for each reference.
App Rebranding Graphic Templates
App Store Graphic Templates
Apple App Store
iOS Mobile 5.5” Screenshot Graphics
iOS Mobile 6.5” Screenshot Graphics
iOS Tablet 12.9” Screenshot Graphics
Google Play Store
Play Store App Icon
Play Store Featured Graphic
Android Mobile Screenshot Graphics
Android 12.9” Tablet Screenshot Graphics
5
9
9
9
9
9
9
9
# REQUIRED
