
Configuration Database (ConfigDB) Guide
2020.4
Service Manager

Copyright Notice
This document contains the confidential information and/or proprietary property of Ivanti, Inc. and its
affiliates (referred to collectively as “Ivanti”), and may not be disclosed or copied without prior written
consent of Ivanti.
Ivanti retains the right to make changes to this document or related product specifications and
descriptions, at any time, without notice. Ivanti makes no warranty for the use of this document and
assumes no responsibility for any errors that can appear in the document nor does it make a
commitment to update the information contained herein. For the most current product information,
please visit www.ivanti.com.
Copyright © 2021, Ivanti. All rights reserved.
Ivanti and its logos are registered trademarks or trademarks of Ivanti, Inc. and its affiliates in the
United States and/or other countries. Other brands and names may be claimed as the property of
others.
Protected by patents, see https://www.ivanti.com/patents.
Last updated: 3/5/2021
Copyright © 2021 , Ivanti. All Rights Reserved. Privacy and Legal.
Page 2 of 43
Configuration Database (ConfigDB) Guide 2020.4

Contents
About this Guide 4
Using the Service and Asset Manager Configuration Database (ConfigDB) 4
Intended Audience 4
Document Organization 4
Related Documentation 5
How to ContactUs 5
About Logging into the Configuration Database 6
Workspaces thatAlreadyExist 7
Internal Use Only Workspaces 8
Workspaces Populated by the System ConfigurationWizard 9
Central Config API Authentication 10
Install/upgrade Ivanti Service Manager System Configuration Wizard 10
Disabling the Centralconfig API Key Feature 11
Impacted webconfig file list: 12
Setting up the Teams Bot Integration 14
What the Powershell Script does? 14
Setting up the Central Config API Key 14
Executing the PowerShell Script 14
Troubleshooting 15
Workspaces thatCan Be Used 17
Configuring the Message Queue 17
Configuring the Message Queue Handler 17
Configuring Email 19
Viewing AllLogs 19
Working With Customer Contacts 20
Working With Tenants 22
Configuring ManualLoad Partitioning 26
Firebase Configuration for Mobile Push Notification 30
Creating a new Project in Firebase 30
Configure iOS and Android app in Firebase. 31
Apply iOS Certificate for iOS app 37
Configure Firebase in Config Database of ISM 39
Copyright © 2021 , Ivanti. All Rights Reserved. Privacy and Legal.
Page 3 of 43
Configuration Database (ConfigDB) Guide 2020.4
About this Guide
• "Using the Service and Asset Manager Configuration Database (ConfigDB)" below
• "Intended Audience" below
• "Document Organization" below
• "Related Documentation" on the next page
• "How to ContactUs" on the next page
Using the Service and Asset Manager Configuration
Database (ConfigDB)
Use the Service and Asset Manager configurationdatabase (ConfigDB) for the following:
• To manage different instances (such as production, staging, and UAT)of tenants.
• To update your environment. The information in the ConfigDB is originally populated by the
SystemConfiguration Wizard, which is used when installing Service and Asset Manager.
This is the master configuration database for your Service and Asset Manager system. Do not
make any changes here, except in the few areas described in the 'Workspaces that Can Be
Used' section. Making unauthorized changes to the ConfigDB can lead to disastrous results
and may be unrecoverable. Use the ConfigDBwith extreme caution.
Intended Audience
The ConfigurationDatabase Guide for Service and Asset Manager Version 2020.4 is intended for advanced
on-premise Service and Asset Manager administrators and IvantiSoftware personnel.
Document Organization
This guide lists the workspaces in the ConfigDB and what, if any, tasks can be performed. This
document contains the following sections:
• Information about logging in. See "About Logging into the Configuration Database" on
page6.
• Workspaces that are also available in the Service and Asset Manager Service Desk Console or
the Service and Asset Manager ConfigurationConsole. See "Workspaces thatAlreadyExist"
on page7.
• Workspaces that are for internal use only. See "Internal Use Only Workspaces" on page8.
Copyright © 2021 , Ivanti. All Rights Reserved. Privacy and Legal.
Page 4 of 43
Configuration Database (ConfigDB) Guide 2020.4

• Workspaces that are populated by the System ConfigurationWizard. Do not make any
changes to these workspaces. See "Workspaces Populated by the System
ConfigurationWizard" on page9.
• Workspaces where you may make changes. See "Workspaces thatCan Be Used" on page17.
Related Documentation
Ivanti Service Manager has online help available within the application.
Additional documentation is available through
• The Ivanti community website. You may need to request user access if you cannot log in.
Or through
• The Ivanti Product Documentation website. Click the Service Manager tile to see a list of the
documents available.
How to ContactUs
To contact us about the documentation, or if you have any other questions or issues about Service
and Asset Manager, contact Ivanti Global Support services by logging an incident via Self Service at:
https://www.ivanti.com/support/ivanti-support.
Copyright © 2021 , Ivanti. All Rights Reserved. Privacy and Legal.
Page 5 of 43
Configuration Database (ConfigDB) Guide 2020.4

About Logging into the Configuration
Database
To use the Service and Asset Manager configuration database (called ConfigDB), you must log in first.
Only administrators can log into the ConfigDB.
By default, the system displays a drop-down menu allowing you to choose either ConfigDB (the
Service and Asset Manager configurationdatabase) or ISM (the Service and Asset Manager
applicationdatabase).
Logging in to the ConfigDB
If you do not see the Application drop-down menu, you must configure Service and Asset Manager to
show it. For instructions on doing this, see the "Logging into Service and Asset Manager" section of
the Installation and Deployment Guide for Service and Asset Manager .
Copyright © 2021 , Ivanti. All Rights Reserved. Privacy and Legal.
Page 6 of 43
Configuration Database (ConfigDB) Guide 2020.4

Workspaces thatAlreadyExist
The following workspaces found in the ConfigDB also exist in the Service and Asset Manager Console
or the Service and Asset Manager ConfigurationConsole. Therefore, they are not described in this
document. For information about these workspaces, see the Service and Asset Manager online help
within the application as well as at the Ivanti Product Documentation website. Click the "Service
Manager" tile to see a list of the documents available.
• Employee
• All Logs
• Logging Configuration
• Notification
• PatchLog
• EncryptionKey
• FRSApplication Update Notes
• IvantiRelease Package
• IvantiRelease Project
• IvantiTransactionDetail
• IvantiTransaction Set
• LogonHistory
• Public Key
• Schedule Entry
• WSMapping
• WSProxy
Copyright © 2021 , Ivanti. All Rights Reserved. Privacy and Legal.
Page 7 of 43
Configuration Database (ConfigDB) Guide 2020.4
Internal Use Only Workspaces
The following workspaces in the ConfigDB contain information that you can view, but that you should
never change.These workspaces are only used by Ivanti for internal system use.
Do not change the values in any of these workspaces! Changing any values can lead to system
degradation.
• CMDBImport History
• Feature Management
• IMClient Agent Version
• Installer Types
• Logging Server Configuration
• Modules
• Remote Host Blocked List
• Service Names
• User Feature Settings
Copyright © 2021 , Ivanti. All Rights Reserved. Privacy and Legal.
Page 8 of 43
Configuration Database (ConfigDB) Guide 2020.4

Workspaces Populated by the System
ConfigurationWizard
The following workspaces found in the ConfigDB contain information that was populated based on
information entered in the System ConfigurationWizard when Service and Asset Manager was
installed.
We recommend that you do not change any of the values in these workspaces.
For complete information about the SystemConfigurationWizard and the Service and Asset Manager
installation, see the Installation and Deployment Guide for Service and Asset Manager Version 2020.4
• Database Servers
• Log Operations Locations
• Integration Services Configuration
• Metrics Server
• Report Server
• Survey Information
• Trusted IPAddresses
• Web Servers
Copyright © 2021 , Ivanti. All Rights Reserved. Privacy and Legal.
Page 9 of 43
Configuration Database (ConfigDB) Guide 2020.4

Central Config API Authentication
APIs in the Central Config can be accessed only by known users by authenticating the API call. The API
Header will pass the API Key which will be authenticated and passed by the Central Config server. This
prevents un-authorised users from accessing the APIs.
Install/upgrade Ivanti Service Manager System
Configuration Wizard
On installing or upgrading the Service Manager System Configuration Wizard, the API Key is auto-
generated in the Central Config DB. This key is used to to authenticate the API calls to the Central
Config Server. However, the following should be monitored while installing/upgrading.
Verify the webconfig file
Once the installation/upgradation is complete, verify the webconfig file has the following:
• In the config section:
<section name="CentralConfigApiKey"
type="System.Configuration.NameValueSectionHandler" />
• In the new protected section:
<CentralConfigApiKey> <add key="CentralConfigApiKey" value="" />
</CentralConfigApiKey>
Update for Teams Bot Service
If you have installed Teams Bot Service, update the CentralConfigApiKey value in appsetting file. from
C:\inetpub\TeamBotService/appsettings.json. Get the CentralConfigApiKey from the Central Config DB
table (Frs_data_api_key).
Updates if Service Manager System Configuration Wizard and Service Manager
Reporting Wizard are installed on different machines
If the Service Manager System Configuration Wizard and Service Manager Reporting Wizard are
installed on different machines, update the Centralconfig api key when installing the Reporting Wizard
as shown in the below image. Get the CentralConfigApiKey from the Central Config DB table (Frs_
data_api_key).
Copyright © 2021 , Ivanti. All Rights Reserved. Privacy and Legal.
Page 10 of 43
Configuration Database (ConfigDB) Guide 2020.4

Updating the CentralConfigAPIKey
In case you wish to update/change the CentralConfigAPIKey, do so by following the below steps:
1. Stop all services that are referencing the centralconfig.
2. Log in to Service Manager with Admin credentials and open the Configuration console.
3. Select Security Controls > CentralCofigAPIKeyGroup and note down the description .
4. Delete the existing CentralConfigAPIKey and recreate a new key inside the
CentralConfigAPiKeyGroup as shown in the below image.
5. Once the Key is created in the CentralConfig tenants, re-run the System Configuration Wizard
to update the webconfig and appconfig files.
6. Restart your machine.
The CentralConfigAPIKey should be unique, duplicate/multiple keys will break the feature.
Disabling the Centralconfig API Key Feature
1. Log in to the application with Admin credentials and open the Configuration console.
Copyright © 2021 , Ivanti. All Rights Reserved. Privacy and Legal.
Page 11 of 43
Configuration Database (ConfigDB) Guide 2020.4

2. Select Security Controls > API Key and delete the CentralConfigAPIKey.
Ensure you Delete and not De-activate to disable.
Impacted webconfig file list:
AppDomains Configiration Files
AppServer Web.config
WorkFlow WorkflowService.exe.config
Excalation EscalationService.exe.config
email EmailWindowsServiceapp.exe.config
bulkupload KMBulkUploadTool.exe.config
integrationserver IntegrationServiceHost.exe.config
systemconfigwizard ServerConfigurationWizard.exe.config
release tool ReleaseTool.exe.config
Frsloggingservice FRSLoggingService.exe.config
metric HEAT.MetricsServer.exe.config
message queue MessageQueueServiceHost.exe.config
License service LicenseServerWindowsService.exe.config
report provinising reportserver\ReportProvisioning.exe.config
Neurons appsettings
Teams Bot Service appsettings
DynamicWebServices web.config
OpsConsole web.config
FrsSurvey web.config
FrsSurveyProxy web.config
IM IMServer\IMServices\AssetProcessor\Web.config
IM IMServer\IMServices\DiscoProcessor\Web.config
IM IMServer\IMServices\DiscoUtils\Web.config
IM IMServer\IMServices\IMReadOnlyDataService\Web.config
IM IMServer\IMServices\TaskProcessor\Web.config
Copyright © 2021 , Ivanti. All Rights Reserved. Privacy and Legal.
Page 12 of 43
Configuration Database (ConfigDB) Guide 2020.4

IM IMServer\WebServices\ClientTransportProcessor\Web.config
reports C:\Program Files\Microsoft SQL Server\MSRS12.MSSQLSERVER\Reporting
Services \ReportServer\Web.config
Copyright © 2021 , Ivanti. All Rights Reserved. Privacy and Legal.
Page 13 of 43
Configuration Database (ConfigDB) Guide 2020.4

Setting up the Teams Bot Integration
For integrating Microsoft Teams with Ivanti Service Manager, on-premise users should first setup the
environment by downloading the package and executing PowerShell script.
What the Powershell Script does?
• Creates the directory in the inetpub folder.
• Creates a new application pool and sets item property for it.
• Creates a new web application and sets item property for it.
• Silently installs the required application, as in you might not get any prompts to proceed with
the installation.
• Copies the required binaries to the destination folder.
• Creates the appsetting.json once the ipaddress/machine name/local host name is provided.
Setting up the Central Config API Key
1. Log in to the CentralConfig > Configure Application > Security Controls > ApiKeys.
2. Find the CentralConfigApiKey as shown below and copy the value.
3. Paste the copied value in the appsettings.json file for the CentralConfigApiKey. For example,
CentralConfigApiKey"=”xxxxxxxxxxxxxxxxxxxxxxxxxxxxxx”
Executing the PowerShell Script
1. Download the zip file to a relevant folder in your machine.
2. Extract the zip file.
Copyright © 2021 , Ivanti. All Rights Reserved. Privacy and Legal.
Page 14 of 43
Configuration Database (ConfigDB) Guide 2020.4

3. Open PowerShell as Administrator.
4. Go to the location where the PowerShell script is located, that is, the location where you
extracted the zip file.
5. Run the script - .\TeamsBot.ps1.
6. You will be prompted for the Appserver as well as the Central Config ipaddress/ Machine
name/ localhost name. name/ localhost. Enter the appropriate Address/Machine
name/localhost.
The configuration is done.
Troubleshooting
Incorrect ipaddress/machine name/local host name
If you provide incorrect IP address/machine name/local host name, open the Appsetting.json file from
the folder intepub >Teams Bot Service and replace the AppserverIPAddress with the correct one.
Example of the AppSetting.json file:
{"MicrosoftAppId"="";"MicrosoftAppPassword"="";"IPCMURL"=
"http://$AppserverIPAddress/HEAT/ServiceApi/IPCMService.asmx"; "WorkflowURL"=
"http://$AppserverIPAddress/HEAT/ServiceApi/WorkflowService.asmx"; "ConfigURL"=
"http://$CentralConfigIPAddress/CentralConfig/ConfigServiceAPI.asmx"; "RetrieveTenantLogLevel_ws_
url"= "http=//$CentralConfigIPAddress/CentralConfig/RetrieveTenantLogLevel.ashx";
"EnableCentralLogging"= false; "LoggingService_ws_url"=
"http://$AppserverIPAddress/Heat.Logging.Service/api/LoggingService/HeatServiceManagementLogging";
"ElapsedSecondsToFlushLog"= 60; "ItemSizeToFlushLog"= 1000; "LogSettingCacheTimeoutInMinutes"= 5;
"SendLogFileLocation"= "C:\logs"; "WriteLogFileLocation"= "C:\logs"; "SendLogWaitInterval"= 300;
"WriteLogWaitInterval"= 300; "EnableLogging"= true; "CacheTimeout"= "30"; "isOnPremise": false;
”CentralConfigApiKey”=”” }
Make sure that Boolean values (true/false) don't not have double quotes.
To know the execution policy list
Run the command - PS C: \Users\Administrator>Get-ExecutionPolicy - List
Sample image of the policy list
Copyright © 2021 , Ivanti. All Rights Reserved. Privacy and Legal.
Page 15 of 43
Configuration Database (ConfigDB) Guide 2020.4

To set the execution policy
Once the PowerShell script is executed successfully, execute the command - Set-ExecutionPolicy
-ExecutionPolicy “PROVIDE PREVIOUS VALUE” -Scope LocalMachine to set the
execution policy.
Sample image of setting execution policy
Copyright © 2021 , Ivanti. All Rights Reserved. Privacy and Legal.
Page 16 of 43
Configuration Database (ConfigDB) Guide 2020.4

Workspaces thatCan Be Used
There are very few workspaces in the ConfigDB that can be used by administrators. See the following
topics for information:
• "Configuring the Message Queue" below
• "Configuring the Message Queue Handler" below
• "Configuring Email" on page19
• "Viewing AllLogs" on page19
• "Working With Customer Contacts" on page20
• "Working With Tenants" on page22
• "Configuring ManualLoad Partitioning" on page26
Configuring the Message Queue
Use the Message Queue Configuration workspace to create and configure a message queue.
Follow these steps:
1. Log in to the ConfigDB.
2. From the workspace selector bar, select Message Queue Configuration. The system displays
the Message Queue Configuration workspace.
3. Enter information into the fields.
Parameter Description
Polling Interval
(sec)
Specifies how often to check the message queue. The default value is 120.
Processor
Threads
Specifies the number of threads. The value depends on the specifications
(such as memory and CPU) of your system. The default value is 250.
Metadata
Refresh Interval
(min)
Specifies the interval for which to refresh the metadata pertaining to the tenant,
which is the amount of time for which to retain the cache. After this amount of
time, the system purges the cache and reloads it. The default value is 10.
4. Click Save.
Configuring the Message Queue Handler
Use the Message Queue Handler workspace to configure the message queue handler.
Copyright © 2021 , Ivanti. All Rights Reserved. Privacy and Legal.
Page 17 of 43
Configuration Database (ConfigDB) Guide 2020.4
Follow these steps:
1. Log in to the ConfigDB.
2. From the workspace selector bar, select Message Queue Handler. The system displays the
Message Queue Handler workspace.
3. Enter information into the fields.
Parameter Description
Name Name of the message queue handler web service.
Endpoint The URL of the message queue handler web service to which queued tasks
are dispatched. An example is http://IP_address/IntegrationService.svc.
Dispatch Method The name of the web method that is implemented as part of the handler web
service (which the message queue invokes to dispatch tasks). For example,
the Service and Asset Manager XSLT email handler implements a web
method called HandleMessage.
NOTE: The name of the dispatch web method is case sensitive.
Batch Size The maximum number of tasks that the message queue can dispatch to a
message queue handler.
Active Specifies if the message queue handler is on or off.
Priority Specifies the order of this handler, in relation to any other handlers that are
defined.
Process Timeout
Interval (minutes)
Amount of time to wait for a response from the message queue handler before
logging an error or before retrying, if you have not exceeded the number of
attempts specified by the Max number of attempts parameter.
Include Data with
Dispatch
Specifies whether to include the data when this dispatch web method is called.
If you do not check this option, the message queue handler must call the
dispatch web method to get the data.
Max number of
Attempts
The maximum number of times to resend the data before logging an error.
Archive
on Completion
Specifies whether to archive the message queue journal, which contains the
tasks that the message queue handler has processed. Use this information for
troubleshooting purposes. Enabled by default.
Purge Archive after
(days)
Set to 30 days by default. The amount of days after which the archive is
purged.
Description A description of the message queue handler.
4. Click Save.
Copyright © 2021 , Ivanti. All Rights Reserved. Privacy and Legal.
Page 18 of 43
Configuration Database (ConfigDB) Guide 2020.4

Configuring Email
Use the Email Configuration workspace to configure the inboxes for email.
Follow these steps:
1. Log in to the ConfigDB.
2. From the workspace selector bar, select EmailConfiguration. The system displays the Service
Provider Email Configuration workspace.
3. Enter information into the fields.
Field Description
Message
Queue
Handler
Name
The name of the message queue handler to use. This must be the same name entered in the
Name field in the Message Queue Handler workspace. See "Configuring the Message
Queue Handler" on page 17.
Mailbox Poll
Interval
The amount of time, in seconds, after which email configuration changes take affect.
4. Click Save.
Viewing AllLogs
If there are any problems with the ConfigDB, such as email issues or workflow errors, they are
reported in the logs. Review the logs to determine the underlying issue and to help resolve it.
• "Setting the LogLevel" below
• "Viewing the Logs" below
Setting the LogLevel
You can set the amount and detail of information in the logs by adjusting the Log Level. You can do
this by going to the Logging Configuration workspace. See the Service and Asset Manager Online
Help.
Viewing the Logs
Follow these steps to view all of the logs associated with the ConfigDB:
1. Log in to the ConfigDB.
2. From the workspace selector bar, select All Logs. The system displays the LogsAll workspace
with the following information:
Copyright © 2021 , Ivanti. All Rights Reserved. Privacy and Legal.
Page 19 of 43
Configuration Database (ConfigDB) Guide 2020.4

Field Description
Log Entry Id A unique ID for this log entry.
Log Time The time at which the log entry was originally created on the server.
Log DB Time The time when the log was uploaded into the database.
Client
IP Address
The IP address of the service that generated the log, such as the workflow server.
SubSystem
Id
The subsystem of the service that generated the log. (Each module has predefined
subsystems. For example, for the email server, polling is a subsystem.)
Login Id The login ID for the user who experienced the log event.
Tenant Id The tenant instance that is experiencing the log event.
Error Code The category of the error. An example is "trigger not found".
Current Role The role assigned to the user if the error is generated by a user. If the error is generated by
the system, this field is empty.
Host Name The machine that is reporting the error.
Thread
Name
Internal thread ID. Not applicable.
3. Double-click any log entry to view the log details.
4. To refresh the data, click Refresh.
Working With Customer Contacts
This section contains the following topics:
• "About this Workspace" below
• "Viewing Customer Contacts" on the next page
• "Adding a Customer Contact" on the next page
• "Editing a Customer Contact" on the next page
• "Deleting a Customer Contact" on page22
About this Workspace
This workspace is for deployments with multi-tenant configurations.
Copyright © 2021 , Ivanti. All Rights Reserved. Privacy and Legal.
Page 20 of 43
Configuration Database (ConfigDB) Guide 2020.4

You can add, edit, or delete a primary contact for a particular tenant. This is the person you contact for
all communications regarding the particular tenant.
This information is also listed in the Account Information workspace in the Service and Asset
Manager ConfigurationConsole.
Viewing Customer Contacts
Follow these steps to view information associated with customer contacts:
1. Log in to the ConfigDB.
2. From the workspace selector bar, select Customer Contacts. The system displays the Contacts
workspace with the following information:
Field Description
Login ID The login ID for the customer contact.
Full Name The full name of the customer contact.
Primary Email The primary email address for the customer contact.
Primary Phone The primary phone number for the customer contact.
3. Double-click any entry to view the details.
4. To refresh the data, click the refresh icon.
Adding a Customer Contact
1. Log in to the ConfigDB.
2. From the workspace selector bar, select Customer Contacts. The system displays the Contacts
workspace.
3. Click New Contacts. The system displays the Contacts page.
4. Enter information into the fields.
5. Click Save.
Editing a Customer Contact
1. Log in to the ConfigDB.
2. From the workspace selector bar, select Customer Contacts. The system displays the Contacts
workspace.
3. Double-click the entry to edit.
4. Change the entry.
5. Click Save.
Copyright © 2021 , Ivanti. All Rights Reserved. Privacy and Legal.
Page 21 of 43
Configuration Database (ConfigDB) Guide 2020.4

Deleting a Customer Contact
1. Log in to the ConfigDB.
2. From the workspace selector bar, select Customer Contacts. The system displays the Contacts
workspace.
3. Highlight the entry to delete.
4. If there are dependencies on other items, the system display a confirmation message. Click
Continue.
Working With Tenants
• "About the Tenants Workspace" below
• "Resetting the Cache for a Tenant" on the next page
• "Adding a Certificate to a Tenant" on the next page
• "Capturing Discovery Messages for Debugging" on page24
• "Configuring Attachment Options" on page24
• "Setting Production Metadata to Read-Only" on page24
• "Setting the LoginURL" on page25
• "Setting the Alternate LoginURL (Vanity URL) for an MSP" on page25
• "Working With Tenants" above
About the Tenants Workspace
The information on this page is populated by the SystemConfigurationWizard.
Although there is a lot of information in this workspace, you should only do the following
tasks from within this workspace:
• Reset the cache for a tenant. See "Resetting the Cache for a Tenant" on the next page.
• Add a certificate. If you want to use SAML authentication, you must upload a certificate and
password so that end users can download it. See "Adding a Certificate to a Tenant" on the
next page.
Copyright © 2021 , Ivanti. All Rights Reserved. Privacy and Legal.
Page 22 of 43
Configuration Database (ConfigDB) Guide 2020.4

• Capture audit files from ISM Discovery, to help with troubleshooting. See "Capturing
Discovery Messages for Debugging" on page24.
• Configure how users attach files. See "Configuring Attachment Options" on the next page.
• Set metadata to read-only. See "Setting Production Metadata to Read-Only" on the next page.
• Set the login URL. See "Setting the LoginURL" on page25.
Resetting the Cache for a Tenant
Service and Asset Manager caches information about each tenant in the ConfigDB. Because of this,
changes to the tenant, such as updating the status, database information, and so on, are not
immediately reflected in the corresponding tenant. This can lead to situations where Service and Asset
Manager allows a user to log into a tenant, even though the status of the corresponding tenant in
the ConfigDB is set to closed.
To manually reset the cache for a specific tenant, do the following:
1. Log in to the ConfigDB.
2. From the workspace selector bar, select Tenants. The system displays the Tenants workspace.
3. Highlight the tenant to reset the cache for.
4. Click Reset Tenant Cache.
Adding a Certificate to a Tenant
If your implementation includes multiple tenants, the certificate should be for the domain and
not the specific tenant. For example, the certificate for Cloud tenants is for *.saasit.com, not
for a specific tenant such as mytenant.saasit.com.
1. Log in to the ConfigDB.
2. From the workspace selector bar, select Tenants. The system displays the Tenants workspace.
3. Double-click the tenant for which to add a certificate.
4. ClickAdd Certificate.
5. Navigate to the certificate location. Highlight it and clickOpen.
6. Enter the password for the certificate in the Certificate Password field.
7. Click Save.
Copyright © 2021 , Ivanti. All Rights Reserved. Privacy and Legal.
Page 23 of 43
Configuration Database (ConfigDB) Guide 2020.4

Capturing Discovery Messages for Debugging
Perform the following procedure if you are using Discovery and you need to capture the audit files
sent to the server from the Discovery client agents. After you capture the audit files, you can review
them in a debug environment to find out more details about the problem. The logging can be very
long, so be careful about using this feature. For more information, see the Service and Asset Manager
online help.
1. Log in to the ConfigDB.
2. From the workspace selector bar, select Tenants. The system displays the Tenants workspace.
3. Double-click the tenant to configure logging for.
4. CheckLog Failed IMMessage.
5. Click Save.
Configuring Attachment Options
Perform the following procedure to configure how attachments are saved. You may need to change
the format for storing files if users regularly store very large files, such as system log files. After you
configure this, when a user saves an attachment to a record, the attachment is stored in the location
that you specified here. For information about saving attachments as a file stream, see
https://msdn.microsoft.com/en-us/library/gg471497.aspx.
We recommend that for system data, such as icons and images, you select Database for the
Attachment Save Type field.
1. Log in to the ConfigDB.
2. From the workspace selector bar, select Tenants. The system displays the Tenants workspace.
3. Double-click the tenant for which to configure attachment options.
4. For the Attachment Save Type field, select a type:Database,FILESTREAM, or File system.
5. For the Attachment Path field, enter the default path where attachments are saved.
6. Click Save.
Setting Production Metadata to Read-Only
If a user makes a change to the metadata in the production instance of the tenant, such as when
configuring a workflow for a request offering, but does not make the same change in the UAT or
staging instance of the tenant and then pushes the data from the UAT or Staging instance of the
tenant to the production instance of the tenant, the data becomes corrupt and the workflow fails.
Copyright © 2021 , Ivanti. All Rights Reserved. Privacy and Legal.
Page 24 of 43
Configuration Database (ConfigDB) Guide 2020.4

To avoid this, set the metadata on the production instance of the tenant to read-only. Follow these
steps:
1. Log in to the ConfigDB.
2. From the workspace selector bar, select Tenants. The system displays the Tenants workspace.
3. Double-click the tenant for which to set the production metadata to read-only.
4. Check Is ProductionMetadata Read-only.
5. Click Save.
If a user tries to edit the workflow for a request offering, the system displays a message stating that
the production metadata is read only and cannot be edited. See "Working with Request Offerings" in
the Service and Asset Manager online help for more information.
Setting the LoginURL
Set the login URL in the following scenarios:
• When configuring Service and Asset Manager Active Directory authentication using Windows
Integrated Security (WIS). This feature allows users to access Service and Asset Manager
without entering their user name and password. This procedure is only valid for the on-
premises version of Service and Asset Manager.
• When configuring the Service and Asset Manageron-premises URL for mobile users.
Follow these steps:
1. Log in to the ConfigDB.
2. From the workspace selector bar, select Tenants. The system displays the Tenants workspace.
3. Double-click the tenant for which to set the login URL.
4. In the Login Url field, enter the URL where users go to log in.
5. ClickSave.
Setting the Alternate LoginURL (Vanity URL) for an MSP
Besides setting the loginURL as described above, you can also specify an alternate login URL, also
known as a vanity URL, for a Managed Service Provider (MSP).
Follow these steps:
1. Log in to the ConfigDB.
2. From the workspace selector bar, select Tenants. The system displays the Tenants workspace.
3. Double-click the tenant for which to set the alternate login URL (vanity URL).
Copyright © 2021 , Ivanti. All Rights Reserved. Privacy and Legal.
Page 25 of 43
Configuration Database (ConfigDB) Guide 2020.4

4. At the bottom, click the Alternate Login URL tab.
5. Click New TenantUrlAlias. The system displays the New TenantUrlAlias dialog box.
6. In the Url field, enter the alternate login URL (vanity URL).
7. ClickSave.
Configuring ManualLoad Partitioning
• "About Manual Load Partitioning" below
• "Configuring the Workflow Service Configuration File" on the next page
• "Assigning Tenants to the Workflow or Email Service" on the next page
• "Viewing the Results of the Manual Load Partitioning" on page28
About Manual Load Partitioning
Use the Service Server workspace to configure the manual load partitioning feature. The manual load
partitioning feature allows you to allocate the load between workflow or email service instances based
on your knowledge of the tenant load and server capacity.
If you do not use the manual load partitioning feature, the workflow or email service load balancing
automatically balances the tenants among the participating workflow or email service instances. This
guarantees that the tenants are balanced evenly among the servers. However, this creates race
conditions among the service instances when starting up and subscribing to events, which can lead to
workflow or email subscription failure and deadlock issues.
When you start up the services, the workflow and email services retrieve the list of assigned tenants.
The services only process the tasks for the assigned tenants. The system updates the list of assigned
tenants in predefined time intervals. If the list of tenants is empty, the system falls back to the default
behavior of processing all of the tenants.
Workflow Load Balancing Flowchart
Copyright © 2021 , Ivanti. All Rights Reserved. Privacy and Legal.
Page 26 of 43
Configuration Database (ConfigDB) Guide 2020.4

Email Load Balancing Flowchart
Configuring the Workflow Service Configuration File
For the email service, all load partitioning is done manually.
For the workflow service, you can select either manual or automatic (default). To select manual load
partitioning for the workflow service, do the following:
1. Navigate to the workflow binary folder and open the file called WorkflowApp.config with a
text editor.
2. Find the key called EnableLoadPartitioning and set it to false.
3. Save the file.
Assigning Tenants to the Workflow or Email Service
When you configure workflow or email service servers, ensure that at least one server is defined as the
"catch all" server. A "catch all" server manages all of the live tenants, even if it does not have any
tenants associated with it. Each host should have at least one "catch all" server. This server processes
workflow and email events for all tenants.
For each server, you must enable either the email service, the workflow service, or both. If you do not
enable a service on the server but the service is running, the service gets an empty tenant list and it
runs as a "catch all" server.
If a service instance crashes or stops, the system deletes the partition details from the database and
no other instance will pick these tenants except for the "catch all" server.
1. Log in to the ConfigDB.
2. From the workspace selector bar, click More....
3. Select Service Server. The system displays the Service Server workspace.
Copyright © 2021 , Ivanti. All Rights Reserved. Privacy and Legal.
Page 27 of 43
Configuration Database (ConfigDB) Guide 2020.4

4. Click New Service Server.
5. Enter the host name in the Host Name field.
6. If the email service will run on this server, check Is Email Service Enabled.
7. If the workflow service will run on this server, check Is Workflow Service Enabled.
8. If the server is a catch all server, check Is CatchAll.
9. If the server is not a catch all server, do the following:
a. Click the Tenants tab.
b. Click Link.
c. Highlight a tenant from the list and clickSelect.
10. Click Save.
Viewing the Results of the Manual Load Partitioning
You can view the results of the manual load partitioning in one of two ways:
l Viewing the INFO log for a service. See "Setting the Log Level for the Workflow or Email Service"
below and "Viewing the Workflow or Email Manual Load Partitioning" below.
l Viewing a report of the load partitioning throughMicrosoft SQL. See "Viewing a Report of the
Manual Load Partitioning" on the next page.
Setting the Log Level for the Workflow or Email Service
To configure the logs, do the following:
1. Log in to the ConfigDB.
2. Open the Logging Configuration workspace.
3. Open the WorkflowService service.
4. Change the value of the Log Level field to INFO.
5. Open the EmailService service.
6. Change the value of the Log Level field to INFO.
7. ClickSave.
Viewing the Workflow or Email Manual Load Partitioning
After you configure the logs, to view the results, do the following:
1. Log into the ConfigDB.
2. Open the Logs workspace.
3. Use a saved search to show all logs with a service name of WorkflowService or a service name
of EmailService.
Copyright © 2021 , Ivanti. All Rights Reserved. Privacy and Legal.
Page 28 of 43
Configuration Database (ConfigDB) Guide 2020.4

Logs Saved Search
4. Verify that the tenants listed under the current assigned tenant list match the linked tenants
for this server.
Viewing a Report of the Manual Load Partitioning
The workflow or email service retrieves the assigned tenants and updates the Frs_ops_workflow_
heart_beat and Frs_ops_workflow_partition tables in the ConfigDB.
Before you begin, start the workflow or email service. Keep the current session.
Run the following query in Microsoft SQL on the ConfigDB to see the details of the services that are
assigned to each tenant:
SELECT ServiceType, HostName, InstanceNumber, TenantId
FROM Frs_ops_workflow_heart_beat heartbeat
JOIN Frs_ops_workflow_partition partition
ON heartbeat.ServiceId = partition.ServiceId
The following is an example of the partitioning details:
Service Type Host Name Instance Number Tenant ID
Workflow Engine CA-L02552 1 ConfigDB, ITSM_7_Daily_Build
Email Engine CA-L02552 1 ConfigDB, ITSM_7_Daily_Build
Copyright © 2021 , Ivanti. All Rights Reserved. Privacy and Legal.
Page 29 of 43
Configuration Database (ConfigDB) Guide 2020.4

Firebase Configuration for Mobile Push
Notification
A new workspace - FCM Configuration is added to ConfigDB. The following are its sections:
• Project Id: Project Id of the firebase which we going to configure in future step. This Id is used
by the server to send the push notification.
• Server Key: Unique key that is present inside the firebase project. This key is used by the
Server to send the push notification.
• Client configuration for Android: json configuration which is used by android mobile to
generate FCM token. This configuration will be present in Firebase project we need to add in
config Database
• Client configuration for iOS: Configuration which used by iOS device to generate FCM token.
The following steps should be performed for Mobile Push Notification to work:
• Creating a new Project in Firebase console
• Configure iOS and Android app in Firebase
• Apply iOS Certificate for iOS app
• Configure Firebase in config Database of ISM
Creating a new Project in Firebase
1. Navigate to https://firebase.google.com/ to create a new project. Since Firebase is from
google, you need to sign into your Gmail account so the Firebase project is associated with
your Gmail account.
2. Navigate to firebase.com and click Go to console on the top right corner of the page.
3. Click the Create a project tile (for new Users) or Add Project (for existing users) in the firebase.
4. Enter the project name, select the I accept the firebase terms check box and click Continue.
5. Disable Google Analytics and click Create Project.
Copyright © 2021 , Ivanti. All Rights Reserved. Privacy and Legal.
Page 30 of 43
Configuration Database (ConfigDB) Guide 2020.4

Configure iOS and Android app in Firebase.
In this step, you will create iOS and Android app in the firebase project.
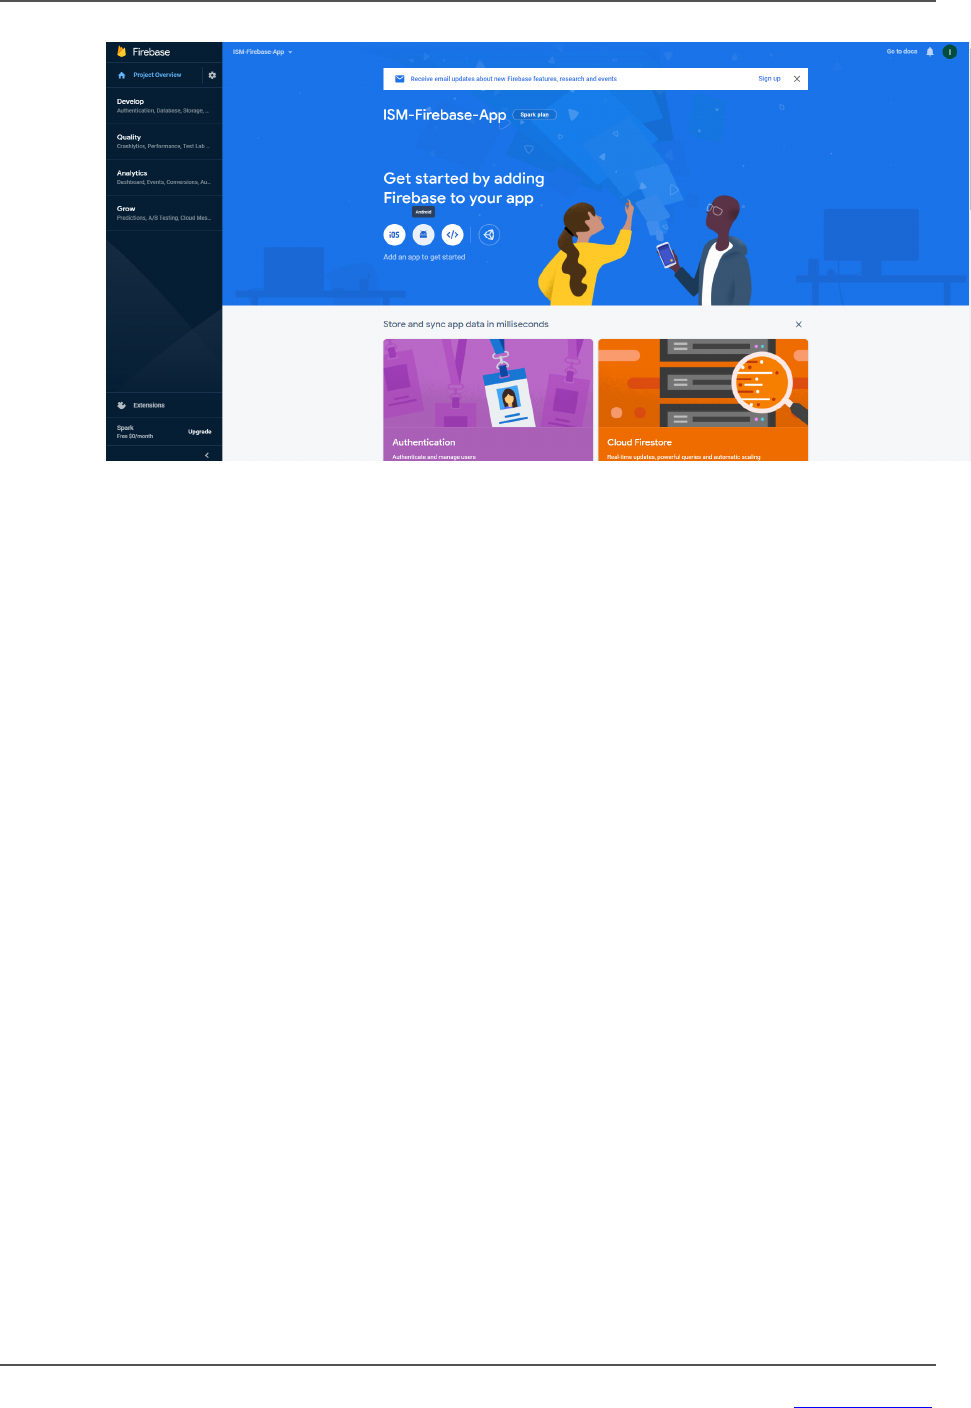
1. Navigate to the newly created project.
2. Click on the Android icon to create new Android app.
Copyright © 2021 , Ivanti. All Rights Reserved. Privacy and Legal.
Page 31 of 43
Configuration Database (ConfigDB) Guide 2020.4
3. Enter the name of the package - it should always be com.ivanti.sm” in the Android Package
name and enter any name in App Nickname. Ensure the package name is right and click on
Register app.
Copyright © 2021 , Ivanti. All Rights Reserved. Privacy and Legal.
Page 32 of 43
Configuration Database (ConfigDB) Guide 2020.4


4. Skip Step 3 by clicking on Next – (Add Firebase SDK)
5. Click Continue to the console.
If you see “Run your app to verify installation” step then you can click on “Skip this step”
and then click Continue to console.
Copyright © 2021 , Ivanti. All Rights Reserved. Privacy and Legal.
Page 34 of 43
Configuration Database (ConfigDB) Guide 2020.4

6. Once all these steps are completed, you have the Android app ready in the firebase project.
7. Now, do the same for iOS.
8. Click on Add app again in the firebase project and select iOS.
9. Specify the same package name com.ivanti.sm in the iOS bundle ID, enter the App nickname
and click on Register app.
Copyright © 2021 , Ivanti. All Rights Reserved. Privacy and Legal.
Page 35 of 43
Configuration Database (ConfigDB) Guide 2020.4

10. Click on Download GoogleServiceInfo.plist which contains the configuration for iOS device.
and click Next.
11. Skip Step 3 by clicking on Next – (Add Firebase SDK).
12. Skip Step 4 by clicking on Next – (Add Initialisation code).
Copyright © 2021 , Ivanti. All Rights Reserved. Privacy and Legal.
Page 36 of 43
Configuration Database (ConfigDB) Guide 2020.4

13. Click Continue to Console in step 5.
If you see Run your app to verify installation step, click Skip this step and then click Continue
to console.
Once these steps are completed, you have iOS and Android app configuration is ready in the firebase.
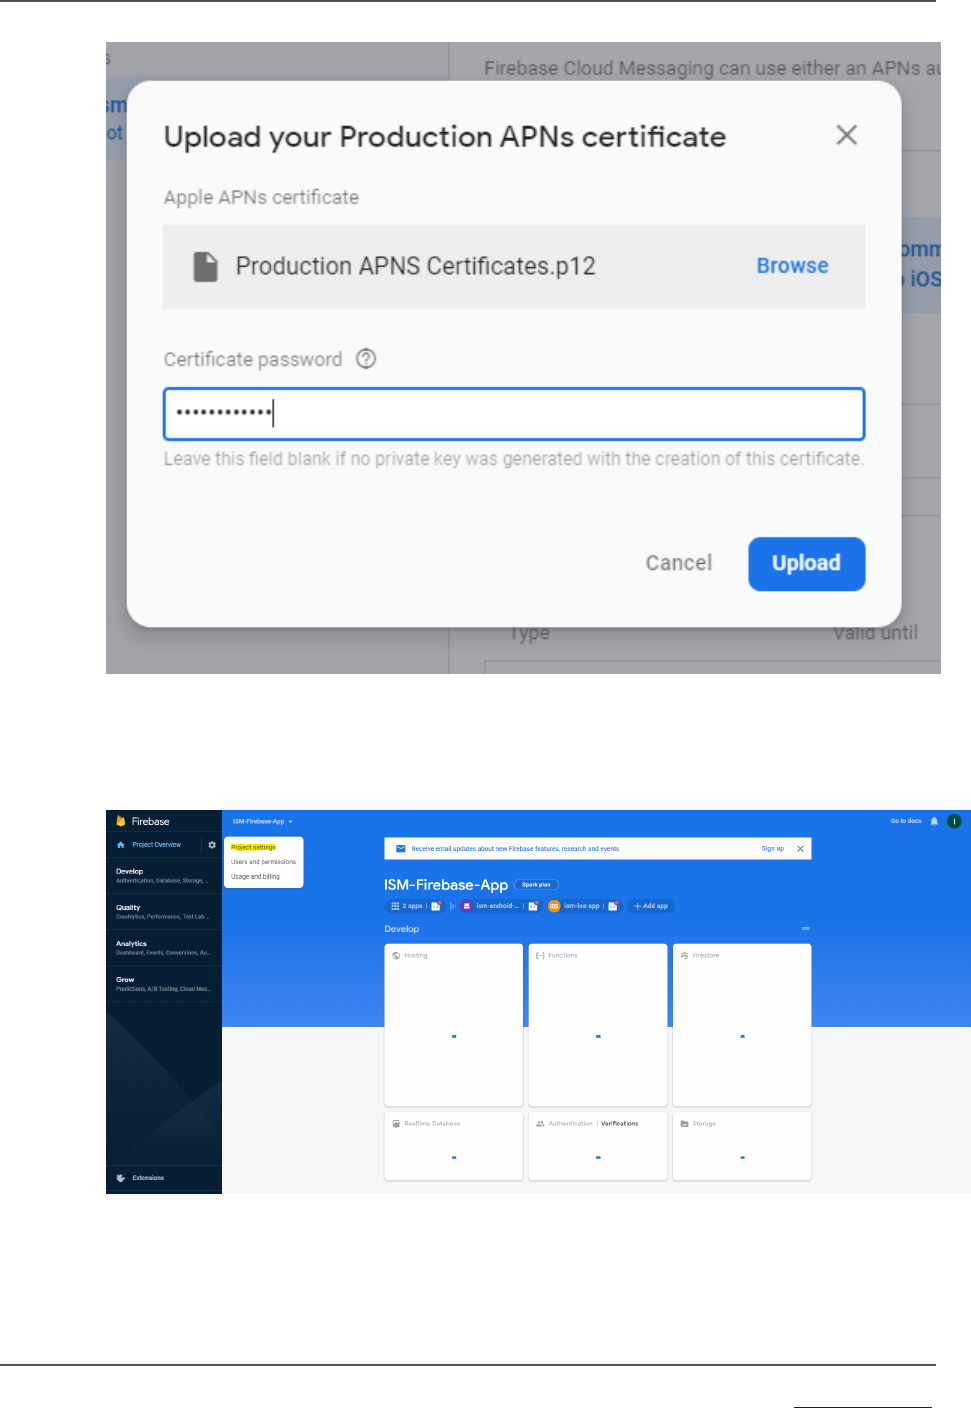
Apply iOS Certificate for iOS app
Ivanti will provide the APNs Certificate for iOS app. You can find the certificate at Ivanti Market Place.
1. Click the Setting button from top left and click on Project settings.
2. Click the Cloud Messaging tab.
Copyright © 2021 , Ivanti. All Rights Reserved. Privacy and Legal.
Page 37 of 43
Configuration Database (ConfigDB) Guide 2020.4


3. Go to ISM CentralConfig, open FCM Configuration workspace and paste Sender ID which is
copied to the Project ID in workspace.
4. Copy the Server Key from Cloud Messaging tab.
Copyright © 2021 , Ivanti. All Rights Reserved. Privacy and Legal.
Page 40 of 43
Configuration Database (ConfigDB) Guide 2020.4


6. Copy the entire content from google-service.json which is downloaded from Step – 3 and
paste in the Client Configuration for Android.
7. Finally, you need to add the iOS FCM configuration in config DB. Copy the entire content
from GoogleService-Info.plist which is downloaded in step-3 and paste it in the Client
Configuration for iOS and Save.
Copyright © 2021 , Ivanti. All Rights Reserved. Privacy and Legal.
Page 42 of 43
Configuration Database (ConfigDB) Guide 2020.4

