
INTEGRATIONS
with Eclipse, NetBeans, IntelliJ IDEA, CaliberRM,
ProActivity, CVS, AndroMDA, and oAW
version 17.0.1
user guide
No Magic, Inc.
2011
All material contained herein is considered proprietary information owned by No Magic, Inc. and is not to be
shared, copied, or reproduced by any means. All information copyright 1998-2011 by No Magic, Inc. All Rights
Reserved.

Copyright © 1998-2011 No Magic, Inc.
3
CONTENTS
2
INTEGRATION WITH ECLIPSE/WSAD/RAD 6
Installation 6
System requirements 6
Automatic MagicDraw installation into Eclipse 6
Manual MagicDraw Installation into Eclipse 8
Manual installation for IBM Rational Application Developer 8
MagicDraw and Eclipse integration functionality 9
Opening MagicDraw project from Eclipse 9
Integration options 9
Creating not integrated MagicDraw project from Eclipse 12
Creating MagicDraw project from template 12
Opening MagicDraw project 14
Integrating MagicDraw project with Eclipse project 15
Unintegrate MagicDraw and Eclipse projects 15
Defining MagicDraw activity in Eclipse 15
Customizing MagicDraw environment 16
Working with integrated Eclipse and MagicDraw project 19
Menu system for UML modeling in Eclipse 23
MagicDraw shortcut keys in Eclipse 25
Eclipse integration and Teamwork 25
Libraries visualization 26
Known Eclipse problems 26
INTEGRATION WITH NETBEANS 27
MagicDraw Integration Process with NetBeans 27
Integrating on MagicDraw first startup 27
Integrating from MagicDraw application 28
Changing paths to home directories 29
Integrating from command line 29
Manual integration into NetBeans 29
Working with MagicDraw in NetBeans 30
Opening MagicDraw project 30
Updating UML model 30
Selecting a class in the MagicDraw browser 31
Creating new class diagram using Java source code files 31
Updating UML Data using Java source 32
Selecting created class in UML Modeling browser 33
Saving UML Data 33
Adding a class to the NetBeans project 33
Going to class source 34
Menu system for UML modeling in NetBeans 34
MagicDraw Toolbar Configuration 35
Known NetBeans integration problems 35
Integration Tool Error Messages 35
Wrong NetBeans Home Directory 36

CONTENTS
4
Copyright © 1998-2011 No Magic, Inc..
Wrong MagicDraw UML Home Directory 36
Unknown OS 36
MagicDraw UML module not found 37
INTEGRATION WITH INTELLIJ IDEA 38
Installation 38
System Requirements 38
Automatic MagicDraw installation into IntelliJ IDEA 38
Manual MagicDraw Installation into IntelliJ IDEA 4.0, 5.0, 5.1, 5.1.2 39
Manual MagicDraw Installation into IntelliJ IDEA 4.5 40
IntelliJ IDEA and MagicDraw Integration Functionality 40
Updating UML Model 40
Selecting a Class in the MagicDraw Browser 42
Adding a Class to the IntelliJ IDEA Project 43
Going to Class Source 43
Integration Properties 44
INTEGRATION WITH CALIBER RM 46
System Requirements 46
Automatic CaliberRM installation into MagicDraw 46
CaliberRM and MagicDraw Integration Functionality 46
Login to CaliberRM server 46
Logout from CaliberRM server 47
Adding requirement to MagicDraw element 47
Reviewing requirements added to elements 48
Launching CaliberRM Client 48
INTEGRATION WITH CVS 51
Getting Started 51
CVS properties 51
Checkout module 52
Add a Project to CVS 53
Commit project to CVS 54
Update project 55
MAGICDRAW - PROACTIVITY UML INTEGRATION 56
Product Features 56
Access ProActivity plug-in 57
Export MagicDraw project to ProActivity 58
Question Messages 60
Question messages on module import 60
Information messages on module import 60
Question messages on module export 61
Warning messages on module export 62
ProActivity Model to MagicDraw UML mapping 62
General ProActivity Artifacts Properties Mapping Table 62
PA-MD elements mapping samples 62
PA artifact to MD UML Activity Diagram elements 70

CONTENTS
5
Copyright © 1998-2011 No Magic, Inc..
PA artifacts properties to Activity diagram elements properties 72
Diagram Properties 74
PA artifact to MD UML Class Diagram elements 74
PA artifacts properties to Class diagram elements properties 74
PA artifact to MD UML Use Case Diagram elements 77
UDA fields to MD tags in Use Case Description Profile 78
INTEGRATION WITH ANDROMDA 79
Integration instructions 79
System Requirements 79
Automatic MagicDraw installation into AndroMDA 79
Working with profiles 80
Global modules paths 81
UML_Standard_Profile-3.2.xml 81
EMF export 81
How and when EMF export is used 82
Synchronization options 82
EMF Export Location 82
Command line converter 82
Maven 2 plugin 83
External tools 84
Customization of AndroMDA profiles/cartridges 85
AndroMDA Diagram 85
Predefined semantics 85
Converting Class Diagrams to AndroMDA Diagrams 86
INTEGRATION WITH OAW 87
Introduction 87
Installation 87
System Requirements 88
Installation Process 88
Uninstall 89
Features 90
oAW Metamodeling Diagram 90
Workflow Component for MagicDraw EMF Export 90
Copyright © 1998-2011 No Magic, Inc.
6
INTEGRATION WITH
ECLIPSE/WSAD/RAD
NOTE
Since MagicDraw 16.5 version MagicDraw Professional and Architect editions can be integrated
with Eclipse Workbench. As of version 16.8, MagicDraw Reader edition can be integrated with
Eclipse Workbench as well.
Integrating with Eclipse Java IDE (JDT) is available only in Standard, Professional Java and
Enterprise editions as was the case before.
MagicDraw is integrated into Eclipse environment as a module, which provides UML modeling using a current
Eclipse project. Additionally, common MagicDraw functionality is added. This intengration enables automatic
synchronization of your model in MagicDraw with your code in Eclipse in the same environment. MagicDraw
uses the same windowing style as eclipse. The integration provides all of the MagicDraw functionality along
with UML data update according to source code.
Installation
System requirements
Integration requiremets are the following:
• Eclipse 3.7. or later.
• IBM Rational Application Developer v7.0, 7.5.
Does not work with motif library on Unix, but works fine with gtk.
Automatic MagicDraw installation into Eclipse
The MagicDraw UML Integration Tool is used to add MagicDraw module into Eclipse. You can find this tool:

INTEGRATION WITH ECLIPSE/WSAD/RAD
Installation
7
Copyright © 1998-2011 No Magic, Inc..
• First time launching MagicDraw, click the Integrate button in the MagicDraw Startup dialog
box or from the Tools main menu, select the Integrations command. The Integration dialog
box opens. Select Eclipse and click the Integrate/Unintegrate button.
Figure 1 -- Integrations dialog
• Double click the install.exe for Windows or install for Unix based OS file in <MagicDraw
installation directory>/integrations/eclipse directory.
The MagicDraw UML Integration Tool dialog box appears.
Figure 2 -- MagicDraw UML Integration Tool
If you do not wish to change directories, click the Integrate button in the MagicDraw UML Integration Tool
dialog box.
To change the Eclipse or MagicDraw home directories
1. In the MagicDraw UML Integration Tool dialog box, click the corresponding Browse “…” but-
ton.
2. The Eclipse Home Directory or MagicDraw Home Directory dialog box appears.

INTEGRATION WITH ECLIPSE/WSAD/RAD
Installation
8
Copyright © 1998-2011 No Magic, Inc..
3. Select the install directories and click OK. Then, click Integrate in the MagicDraw UML Inte-
gration Tool dialog box.
4. The Message box appears. If the integration process was successful, then only the Exit button
is active. Click Exit.
To unintegrate MagicDraw from Eclipse
In the MagicDraw UML Integration Tool dialog box, click the corresponding Unintegrate
button.
Manual MagicDraw Installation into Eclipse
1. Create file com.nomagic.magicdraw.integration.link in the <eclipse home>\links folder.
2. Edit file com.nomagic.magicdraw.integration.link and add path property to the <MagicDraw
home>\plugins\com.nomagic.magicdraw.eclipseintegrator.
Example:
path=C\:\\Program Files\\MagicDraw UML\\plugins\\com.nomagic.magicdraw.eclipseintegrator
or
path=C:/Program Files/MagicDraw UML/plugins/com.comagic.magicdraw.eclipseintegrator
3. Create file com.nomagic.magicdraw.plugins.integration.link in the <eclipse home>\links folder.
4. Edit file com.nomagic.magicdraw.plugins.integration.link and add path property to the
<MagicDraw home>\plugins.
Example:
path=C\:\\Program Files\\MagicDraw UML\\plugins
or
path=C:/Program Files/MagicDraw UML/plugins
Manual installation for IBM Rational Application Developer
1. Copy directories com.nomagic.magicdraw.rcp and com.nomagic.magicdraw.jdt from the
<MagicDraw home>\plugins\com.nomagic.magicdraw.eclipseintegrator directory to the <RAD
home>\plugins folder.
2. Copy all jar files from the <MagicDraw home>\lib folder into the <RAD home>\plu-
gins\com.nomagic.magicdraw.rcp plugin.
3. Copy all directories from the <MagicDraw home>\plugins\eclipse\plugins directory to the <RAD
home>\plugins folder.
4. Enter MagicDraw home path property at the file md.properties located in <RAD home>\plu-
gins\com.nomagic.magicdraw.rcp
Example:
install.root=C\:\\Program Files\\MagicDraw UML
or
NOTE
If integration was successful, the MagicDraw main menu appears in
Eclipse environment and integrated MagicDraw menu commands are
added.
If automatic installation fails, please use Manual installation.
NOTE
Be sure that older MagicDraw integration was uninstalled.
If integration was successful, the MagicDraw main menu appears in
Eclipse environment and integrated MagicDraw menu commands are
added.

INTEGRATION WITH ECLIPSE/WSAD/RAD
MagicDraw and Eclipse integration functionality
9
Copyright © 1998-2011 No Magic, Inc..
install.root=C:/Program Files/MagicDraw UML
5. Edit plugin.xml file library property and specify relative path to the jars.
Example:
<library name="graphics/freehep-base.jar">
<export name="*"/>
</library>
MagicDraw and Eclipse integration functionality
Eclipse contains the UML modeling workspace.
Opening MagicDraw project from Eclipse
For the newly created Eclipse project, MagicDraw local or Teamwork project can be created:
1. From the Eclipse project shortcut menu, choose Open MagicDraw Project.
2. MagicDraw is started. The New Project Wizard dialog box opens.
Figure 3 -- New Project Wizard
3. Specify project name and the location of the project.
4. Choose project type: local one or Teamwork. For the Teamwork mode you may select a project
from already created models in the Teamwork server.
5. Choose which profile you want to import - JDK 1.5 profile, full JDK 1.4 profile, or only JDK 1.4
java and javax packages.
6. Go to the next step, to define integration properties. The detailed description of integration
properties you may find in “Integration options” on page 10.
NOTE
Be sure that older MagicDraw integration was uninstalled.

INTEGRATION WITH ECLIPSE/WSAD/RAD
MagicDraw and Eclipse integration functionality
1 0
Copyright © 1998-2011 No Magic, Inc..
Integration options
Specify the MagicDraw and Eclipse integration properties in the Integration Options dialog box.
To open the Integration Options dialog box
• In the Eclipse perspective, select project and from the shortcut menu, choose Properties.
Select MagicDraw in the opened properties tree and click the Integration Options button.
• In the Eclipse perspective, from the Project main menu, choose Properties. Select
MagicDraw in the opened properties tree and click the Integration Options button.
Figure 4 -- Integration Properties dialog box
Command Option Function
Integration
Working
Package
Click the “...” button and in the opened dialog box, specify working pack-
age where source code will be reversed during update.
Paths for
References
To define a path where to search for references (model libraries), click the
“...” button. The Paths for References dialog box opens.
Generate
imports
Full Class Name
The import statement with full class name is
added during source generation from
MagicDraw.
Package Name
The import statement with package name and *
is added during source generation from
MagicDraw.
Do Not Generate
The import statement is not added during source
generation from MagicDraw.

INTEGRATION WITH ECLIPSE/WSAD/RAD
MagicDraw and Eclipse integration functionality
1 1
Copyright © 1998-2011 No Magic, Inc..
Unnamed
Element Name
Enter a name of the model element to generate in the source code in
instances when a model element within your model does not yet have a
name attached to it.
Unnamed Type
Name
Enter a name of the type to generate in the source code in instances
when attributes, operations, or parameters do not yet have a type in your
model. If an attribute without a type exists in a model, then, after adding
the class of this attribute into the Eclipse project, an attribute with int type
will be generated in the source code.
Update
MagicDraw
UML Model
Update Model by
Code
Removes all methods/attributes/associations
from the model if they do not exist in the code at
the time Update UML Model is executed.
Merge Model by
Code
Leaves all methods/attributes/associations in
the model if they do not exist in the code at the
time Update UML Model is executed.
For New IDE
Attributes
Create
Attributes
Creates attributes in MagicDraw for new attri-
butes created in Eclipse.
Association
Creates associations in MagicDraw for new attri-
butes created in Eclipse.
Create
Properties by
Rules
Rules defined for the attributes or association
creation on reverse. Select this combo box and
press the “...” button. The Class Field Creation
Rules dialog box appears. For more information,
see MagicDraw Code&DatabaseEngineering
UserGuide.pdf, “Rules of the association or attri-
bute creation on reverse” section.
Documentation
Processor
JavaDoc
When selected, various javadoc tags (@param,
@return) are generated in the comments of the
code.
<none>
Documentation from UML model is placed
directly into java code with no processing.
Synchronizatio
n Mode
Manual
Synchronization between model and code is
made manually (by selecting a command).
Automatic (default)
Every time model is changed, code is updated.
Every time code is changed, model is updated
(after saving).
NOTE: New classes in Eclipse are not added to
MagicDraw and vice versa. The user must add
them manually.
Code-to-model
automatic
Every time code is changed, model is updated.
Changes are not made in code after changing
the model.
NOTE: New classes in Eclipse are not added to
MagicDraw and vice versa. The user must add
them manually.
Create class
members for
libraries
If selected, library classes in model will be created with attributes and
methods.
Default source
path
Choose available source paths for all linked projects. You may define
source paths in Eclipse.
Command Option Function

INTEGRATION WITH ECLIPSE/WSAD/RAD
MagicDraw and Eclipse integration functionality
1 2
Copyright © 1998-2011 No Magic, Inc..
Creating not integrated MagicDraw project from Eclipse
It is possible to create MagicDraw project, which is not binded with Eclipse and can be modeled separately from
code.
To create not integrated MagicDraw project
1. From the File menu or eclipse Java project shortcut menu, choose New and then Other.
2. In the New wizard, expand MagicDraw group and select MagicDraw Project. Click Next.
Figure 5 -- New Project wizard, MagicDraw Project
3. Type MagicDraw project name and choose MagicDraw project location. Click Finish.
Creating MagicDraw project from template
1. From the File menu or Eclipse Java project shortcut menu, choose New and then Other.
TIP
If MagicDraw perspective is set, you may quickly create new
MagicDraw project from the File main menu by choosing New and
then MagicDraw Project.

INTEGRATION WITH ECLIPSE/WSAD/RAD
MagicDraw and Eclipse integration functionality
1 3
Copyright © 1998-2011 No Magic, Inc..
2. In the New wizard, expand MagicDraw group and select MagicDraw Project from Template.
Click Next.
Figure 6 -- New Project wizard, Project from Template

INTEGRATION WITH ECLIPSE/WSAD/RAD
MagicDraw and Eclipse integration functionality
1 4
Copyright © 1998-2011 No Magic, Inc..
3. In the New File wizard, select template.
Figure 7 -- New Project wizard, Select Template
4.
Click Next button to define MagicDraw project title and click Finish.
Opening MagicDraw project
To open already created MagicDraw project, from the MagicDraw menu, choose the Open Project command.
If Eclipse project is already integrated with MagicDraw project, you may quickly open it:
1. Select eclipse Java project in the Package Explorer tree.
2. From the Eclipse Java project shortcut menu, choose the Open MagicDraw Project com-
mand. Integrated MagicDraw project is opened.
To close MagicDraw project, from the MagicDraw menu, choose the Close Project command.
NOTE
MagicDraw project is opened as integrated with Eclipse project, if it
already was integrated before closing it.
NOTE
If Eclipse project does not have integrated MagicDraw project, after
selecting the Open MagicDraw Project command, the New Project
Wizard is opened.

INTEGRATION WITH ECLIPSE/WSAD/RAD
MagicDraw and Eclipse integration functionality
1 5
Copyright © 1998-2011 No Magic, Inc..
Integrating MagicDraw project with Eclipse project
To integrate opened MagicDraw project with Eclipse project:
1. From the MagicDraw menu, choose the Integrate with Eclipse command. The Select
Eclipse Project dialog box is opened.
2. In the Select Eclipse Project dialog box, Java project combo box, there are listed all opened
eclipse Java projects with which you may integrate current MagicDraw project.
3. Select eclipse project and click OK. The New Project Wizard appears with the Select Integra-
tion Properties step. For more information about integration properties, See “Integration
options” on page 10.
4. Set the integration properties for the current MagicDraw and eclipse projects. Click Finish.
Unintegrate MagicDraw and Eclipse projects
If you want to unintegrate MagicDraw project from Eclipse project:
1. Open integrated MagicDraw project.
2. From the MagicDraw menu, choose the Unintegrate from Eclipse command. Projects are
unintegrated.
Defining MagicDraw activity in Eclipse
Activities are Eclipse mechanism to enable/disable large swaths of functionalities. You may enable/disable
activities using the workbench preferences.
MagicDraw defines a separate activity for modeling in Eclipse. All the MagicDraw views, editors, perspective,
preference and property pages, menus and toolbars, new project wizards are bound to this activity. If this activ-
ity is disabled, all the MagicDraw specific plugin contributions are disabled also.
To enable/disable MagicDraw activity
1. From the Windows main menu, choose Preferences. The Preferences dialog box is opened.
2. Expand General group tree and select Capabilities section.
NOTE
Eclipse project may have only one integrated MagicDraw project.

INTEGRATION WITH ECLIPSE/WSAD/RAD
MagicDraw and Eclipse integration functionality
1 6
Copyright © 1998-2011 No Magic, Inc..
3. Select/clear the Modeling check box to enable/disable all specific MagicDraw functionalities.
Click OK.
Figure 8 -- Preferences dialog box, Capabilities section
Customizing MagicDraw environment
There is a possibility to customize separate MagicDraw perspective in Eclipse.
To open MagicDraw perspective
• From the Window main menu, choose Open Perspective and then Other. Select the
MagicDraw item in the opened Select Perspective dialog box.
• Click the Open Perspective button in the right top Eclipse Window near Java
perspective icon and then choose Other. Select the MagicDraw item in the opened Select
Perspective dialog box. MagicDraw perspective icon will be added in toolbar for quick switch
between persectives.
To customize menus for MagicDraw commands
1. From the Window main menu, choose Customize Perspective.

INTEGRATION WITH ECLIPSE/WSAD/RAD
MagicDraw and Eclipse integration functionality
1 7
Copyright © 1998-2011 No Magic, Inc..
• Click on the empty space in toolbar and from the shortcut menu, choose Customize
Perspective. The Customize Perspective dialog box opens.
2. If the MagicDraw check box is selected in the New Submenus group, the MagicDraw Project
and MagicDraw Project from Template commands will be added to the File main menu, New
submenu.
Figure 9 -- Customize Perspective dialog box, New submenu
INTEGRATION WITH ECLIPSE/WSAD/RAD
MagicDraw and Eclipse integration functionality
1 8
Copyright © 1998-2011 No Magic, Inc..
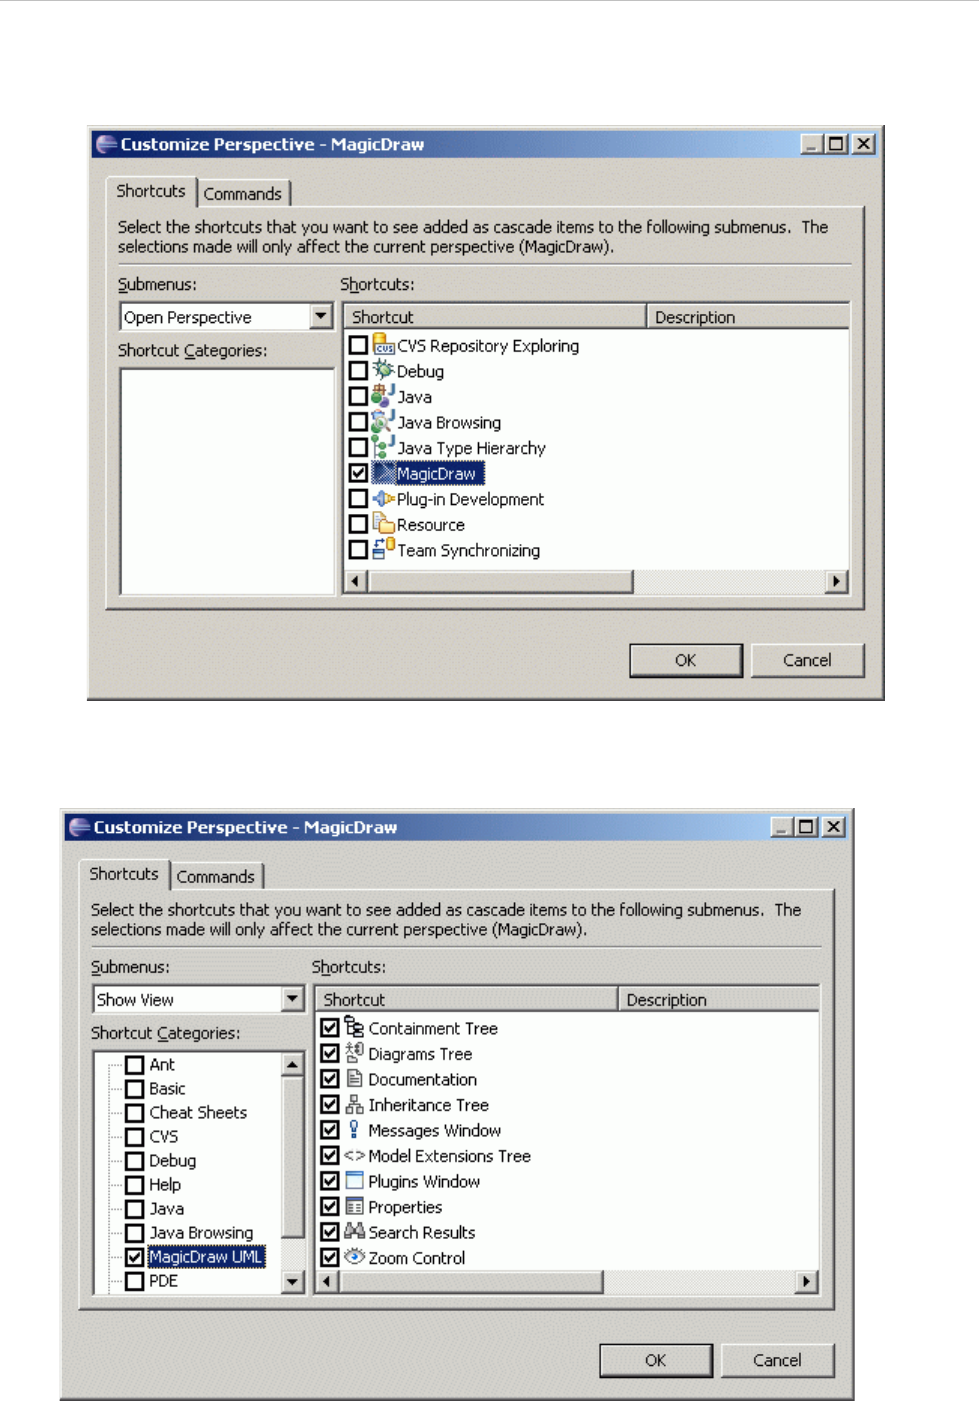
3. If the MagicDraw check box is selected in the Open Perspective Submenus group, the
MagicDraw perspective choise will be added to the Window main menu, Open Perspective
submenu.
Figure 10 -- Customize Perspective dialog box, Open Perspective submenu
4.
If the MagicDraw UML check box is selected in the Show View Submenus group, listed com-
mands will be added to the Window main menu, Show View submenu.
Figure 11 -- Customize Perspective dialog box, Show View submenu

INTEGRATION WITH ECLIPSE/WSAD/RAD
MagicDraw and Eclipse integration functionality
1 9
Copyright © 1998-2011 No Magic, Inc..
To customize MagicDraw perspective toolbars
1. From the Window main menu, choose Customize Perspective.
• Click on the empty space in toolbar and from the shortcut menu, choose Customize
Perspective. The Customize Perspective dialog box opens.
2. Select the Commands tab and select the check boxes to add appropriate buttons to toolbar.
Figure 12 -- Customize Perspective dialog box, Commands tab
To reset perspective to default
From the Window main menu, choose Reset Perspective. All previously opened tabs or windows will be
closed and configuration set to default.
Working with integrated Eclipse and MagicDraw project
Main actions will be described how to update data between Eclipse and MagicDraw projects.
Updating the UML model
There are several ways to represent classes created in Eclipse in the MagicDraw project:

INTEGRATION WITH ECLIPSE/WSAD/RAD
MagicDraw and Eclipse integration functionality
2 0
Copyright © 1998-2011 No Magic, Inc..
• Select a java source file (or several files) in the Eclipse project browser. Open the shortcut
menu and select Update UML Model:
Figure 13 -- Select in MagicDraw and Update UML Model command

INTEGRATION WITH ECLIPSE/WSAD/RAD
MagicDraw and Eclipse integration functionality
2 1
Copyright © 1998-2011 No Magic, Inc..
• Open the java source in the Eclipse editor window. From the MagicDraw menu, select Update
UML Model:
Figure 14 -- Update UML Model command
There are several commands to perform model update from the Integration submenu:
• Update Whole Model by Code - command will update model by all entire java code, created
in this project.
• Update Model Part by Selection - command will update only selected code part (for example,
class) in model.
• Synchronize Code and Model - command will merge all changes - update code according to
model and will add model elements, created in code.
Changes made in the java source file are automatically reflected in the MagicDraw project once you have
selected Synchronization mode as Automatic or Code to model automatic in the Integration Options dialog
box (See “Integration options” on page 10).
When updating UML model, you may choose one of the following option in the integration Properties dialog
box:
Beginning with version 9.5, you may choose attributes or associations you want to create in MagicDraw for
attributes created in Eclipse. This option you may also define in the Integration Options dialog box.
Update Model by
Code
Removes all methods/attributes/associations from the model if
they do not exist in the code at the time Update UML Model is
executed.
Merge Model and
Code
Leaves all methods/attributes/associations in the model if they do
not exist in the code at the time Update UML Model is executed.

INTEGRATION WITH ECLIPSE/WSAD/RAD
MagicDraw and Eclipse integration functionality
2 2
Copyright © 1998-2011 No Magic, Inc..
Adding/updating a class to the Eclipse project
There are several ways to add/update a class to an Eclipse project from integrated MagicDraw project:
• From the class in the MagicDraw browser shortcut menu, select Update Eclipse. The class
source will be generated and added to the Eclipse project.
• From the package in the MagicDraw browser shortcut menu, select Update Eclipse. All
classes from this package will be added to the Eclipse project.
• From the selected class or package in any MagicDraw diagram shortcut menu, select Update
Eclipse.
• Open the MagicDraw main menu, Integration submenu and select Update Whole Code by
Model. Code to all created model elements will be generated in Eclipse.
• Select a class in any MagicDraw diagram. Open the MagicDraw main menu, Integration
submenu and select Update Code Part by Model. The class source will be generated and
added to the Eclipse project.
Synchronization between MagicDraw and Eclipse
Beginning with version 9.5 three synchronization modes are presented:
You may define synchronization mode in the Integration Properties dialog box or from the Integration sub-
menu in the MagicDraw menu.
Selecting a class in the MagicDraw browser
From the Eclipse project browser, choose Select in MagicDraw. The class will be selected in the Containment
Tree tab in Eclipse perspective. If you switch to MagicDraw prespective, the same class will be selected in
MagicDraw browser.
Going to class source from MagicDraw environment
• To open the class/operation/attribute source code in Eclipse, from the Navigate menu, Go to
and then Open Source command. This command is enabled just after the class has been
added into the Eclipse project.
• From the element in the MagicDraw browser shortcut menu, select Go to Source in Eclipse.
• On the MagicDraw diagram pane, select element and from the shortcut menu, choose Go to
Source in Eclipse.
Synchronizatio
n mode
Description
Automatic
Every time model is changed, code is updated. Every time code is
changed, model is updated (after saving).
NOTE: New classes in Eclipse are not added to MagicDraw and vice
versa. The user must add them manually.
Manual
Synchronization between model and code is made manually (by
selecting correspondingly Update Eclipse or Update UML Model).
Code to model
automatic
Every time code is changed, model is updated. Changes are not
made in code after changing the model.
NOTE: New classes in Eclipse are not added to MagicDraw and vice
versa. The user must add them manually.

INTEGRATION WITH ECLIPSE/WSAD/RAD
MagicDraw and Eclipse integration functionality
2 3
Copyright © 1998-2011 No Magic, Inc..
Menu system for UML modeling in Eclipse
For a detailed description of the menu system, see the MagicDraw UML User’s Manual. You may find it at
<MagicDraw installation directory>/Manual folder.
Most MagicDraw menu commands retain the same position as it was in standalone MagicDraw version. If not,
you may find them under the MagicDraw main menu.
The Tools, Analyze, Teamwork with all submenus, Shared Packages, Resources, Project Properties, Proj-
ect Information commands can be found under MagicDraw main menu.
MagicDraw toolbar
In the MagicDraw perspective, toolbar is the same as in standalone MagicDraw version. Just some buttons are
merged with actions, performed in Eclipse:
This toolbar contains common actions used while working with MagicDraw.
Default MagicDraw perspective toolbar contains buttons for quick UML diagrams creation:
Button Function
New
Create new Eclipse or MagicDraw project.
Save
Save Eclipse as well as MagicDraw project on the same action.
Print
Print MagicDraw diagram or Eclipse source code.
Print Preview
Show MagicDraw diagram printing view.

INTEGRATION WITH ECLIPSE/WSAD/RAD
MagicDraw and Eclipse integration functionality
2 4
Copyright © 1998-2011 No Magic, Inc..
Use default toolbar buttons to work with symbols and diagram zooming:
To change path style, use the Paths Edit toolbar:
To switch between last edited location, last visited window or forward diagram, use arrows from this toolbar:
To change the toolbar configuration for the MagicDraw perspective, See “To customize MagicDraw perspective
toolbars” on page 19.
For more information about MagicDraw toolbars, see MagicDraw User Manual, User Reference chapter, Tool-
bars section.
Printing
MagicDraw diagrams printing is merged with Eclipse printing functionality. Active window (java source code or
UML diagram) will be printed on the Print action from the File main menu, clicking on the Print button from
main toolbar, or pressing CTRL+P shortcut key.
From the File main menu, the Print Preview and Print Options dialog boxes have the same functionality as it
is in standalone MagicDraw version.
For more information about the Print Options dialog box, see MagicDraw User Manual, Diagram Basics chap-
ter, Printing section.
Searching
MagicDraw search can be performed only when MagicDraw perspective is switched. Otherwise, Eclipse finding
mechanism will be opened.
To open Find dialog box in MagicDraw
• From the Edit menu, choose the Find/Replace command. The Find dialog box opens.
• Press CTRL+F shortcut key to open Find dialog.
For more information about MagicDraw searching functionality, see MagicDraw User Manual, Working with
Projects chapter, Searching section.

INTEGRATION WITH ECLIPSE/WSAD/RAD
MagicDraw and Eclipse integration functionality
2 5
Copyright © 1998-2011 No Magic, Inc..
MagicDraw shortcut keys in Eclipse
Shortcut keys for merged MagicDraw and Eclipse actions are taken from Eclipse. For MagicDraw specific
actions, shortcut keys are defined In MagicDraw context.
To change shortcut keys
1. From the Windows main menu, choose Preferences. The Preferences dialog box is opened.
2. Expand General group tree and select Keys section. Shortcut keys for MagicDraw commands
are marked in the In MagicDraw context.
Figure 15 -- Preferences dialog box, Keys section
3.
Select a category and click Edit for changing/adding new shortcut key.
Eclipse integration and Teamwork
When opening project, created in Eclipse, you may choose to open it in a local MagicDraw project or in a Team-
work project.
To map Eclipse project to a MagicDraw Teamwork project
1. Choose a command to open MagicDraw from Eclipse.
2. MagicDraw starts up and New Project Wizard appears.
3. Choose the Teamwork Model option button and then click ... button.
4. Log in to the Teamwork server and choose the desired project.

INTEGRATION WITH ECLIPSE/WSAD/RAD
Known Eclipse problems
2 6
Copyright © 1998-2011 No Magic, Inc..
5. From Eclipse, update UML model.
To change the mapping from local model to teamwork model
1. Connect to the MagicDraw Teamwork server.
2. Choose the Add Project To Teamwork command.
Libraries visualization
Beginning with version 9.5, libraries that are used in Eclipse can be referenced in MagicDraw models. On lib, in
Eclipse, choose Update UML Model. Created model package in MagicDraw will be marked with stereotype
<<topLevel>>.
In the Integration Properties dialog box, you may choose what you want to create - just classes in model with-
out attributes and methods (default), or together with attributes and methods (option Create class members
for libraries).
Known Eclipse problems
• Sometimes change in class source does not update opened editor.
• No way to remove all extended classes or implemented interfaces for some class or interface.
• Class fields defined using ',' are updated incorrectly.
• After unintegration, Eclipse cannot be started with new integrated MagicDraw at once. Old
directory is still remembered by Eclipse. As a workaround - unintegrate Eclipse from
MagicDraw, then start Eclipse, close it, and only then integrate with new MagicDraw version
and launch again.
• Shortcut menu in the Browser does not dissapear if without closing it any main menu command
selection is performed.
• Select All, Copy/Paste and Delete commands are not available in MagicDraw specification
dialog boxes.
• Focus in dialog box is lost when going through text boxes using Tab key.
• Sometimes diagrams or Browser tabs are frozen because of modal dialog appearance. The
solution is to close and reopen diagram view or Browser tabs in all Eclipse perspectives.

Copyright © 1998-2011 No Magic, Inc.
27
INTEGRATION WITH
NETBEANS
NOTE
This functionality is available in Standard, Professional Java, and Enterprise editions only.
MagicDraw is integrated into the NetBeans environment as an ordinary module. This module provides UML
modeling using a current NetBeans project. Additionally, common MagicDraw functionality is added, such as
diagrams creation, printing, and updating using current project files. UML data are automatically updated
according to the source code. MagicDraw’s module uses the NetBeans Look and Feel, and windowing style.
MagicDraw integrates with NetBeans 6.0 or later.
MagicDraw Integration Process with NetBeans
MagicDraw UML and NetBeans are integrated using the MagicDraw UML Integration Tool. To integrate
MagicDraw with NetBeans use one of the following integration way.
Integrating on MagicDraw first startup
• First time launching MagicDraw, click the Integrate button in the MagicDraw Startup dialog
box.
Figure 1 -- MagicDraw Startup dialog box
INTEGRATION WITH NETBEANS
MagicDraw Integration Process with NetBeans
2 8
Copyright © 1998-2011 No Magic, Inc..
Integrating from MagicDraw application
1. Start MagicDraw UML.
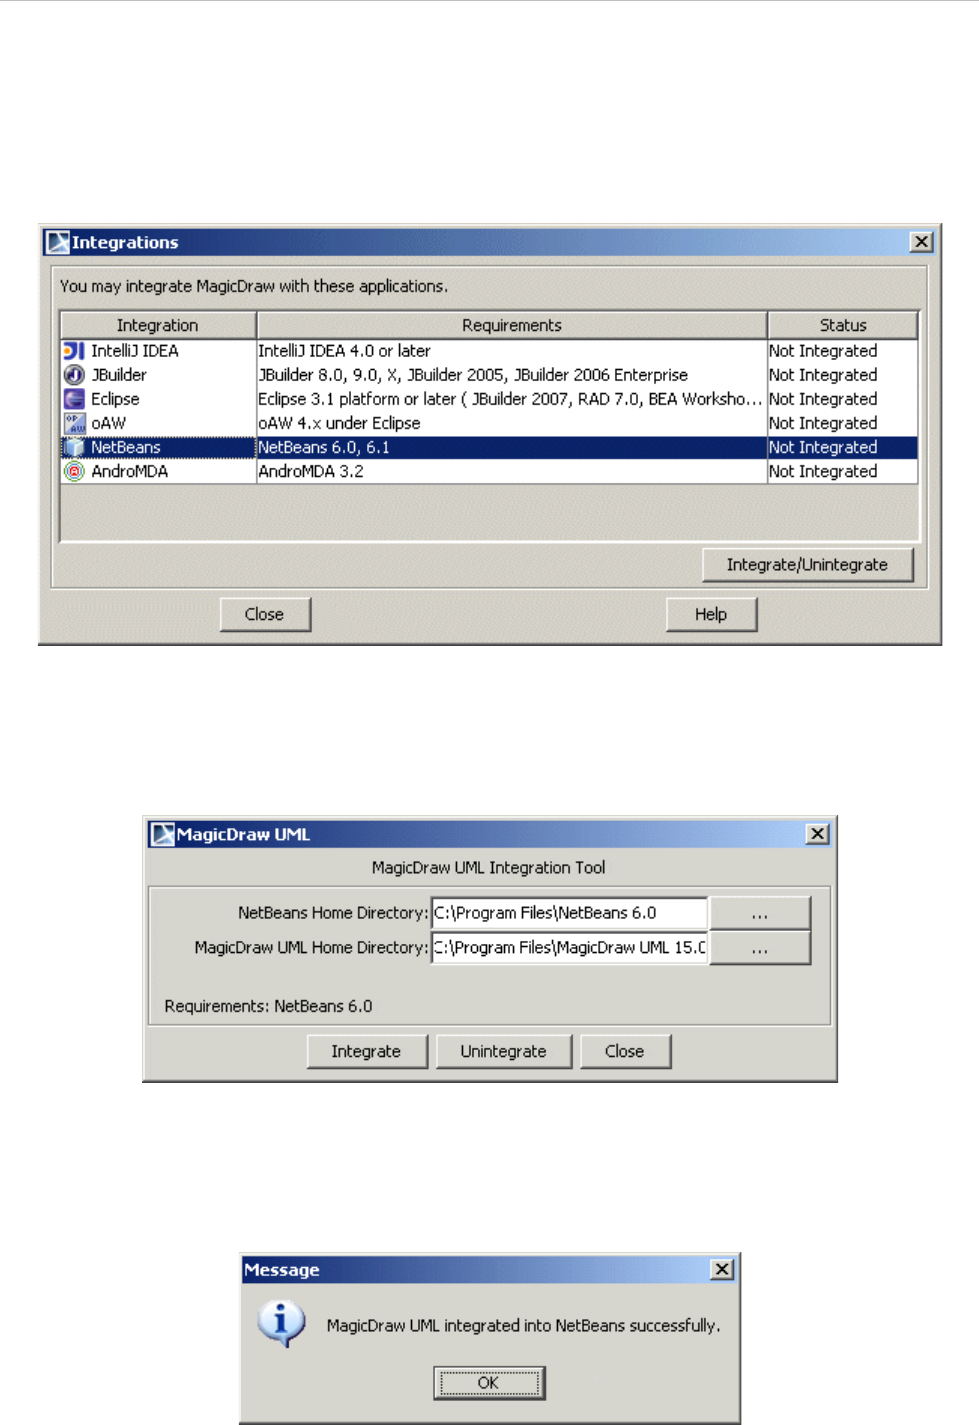
2. From the main Tools menu, select the Integrations command. The Integrations dialog box
appears.
Figure 2 -- Integrations dialog box
3. Select NetBeans or NetBeans and click the Integrate/Unintegrate button. The MagicDraw
UML Integration Tool dialog box appears.
Figure 3 -- MagicDraw UML Integration Tool
4. If you do not wish to change directories, click the Integrate button in the MagicDraw UML Inte-
gration Tool dialog box. Message about successful integration appears.
Figure 4 -- MagicDraw UML Integration Status dialog box

INTEGRATION WITH NETBEANS
MagicDraw Integration Process with NetBeans
2 9
Copyright © 1998-2011 No Magic, Inc..
If the integration process was successful, in the Integrations dialog box only the Close and Unintegrate but-
tons are active. Click Close. When NetBeans is launched, integration process is accomplished.
Changing paths to home directories
To change the NetBeans or MagicDraw home directories
1. Click the corresponding Browse button in the MagicDraw UML Integration Tool dialog box.
2. The Select Directory dialog box appears.
3. Select the install directories and click Open. Then, continue integration process - click Inte-
grate in the MagicDraw UML Integration Tool dialog box.
Integrating from command line
To integrate MagicDraw with NetBeans double click the install.exe for Windows or install for Unix based OS file
in <MagicDraw installation directory>/integrations/netbeans(sun java studio) directory. The Integrations dialog
box appears. How to continue integration see “Integrating from MagicDraw application” on page 28.
Manual integration into NetBeans
If the MagicDraw UML integration process with NetBeans was successful but the integration still isn’t working,
please try the manual integration:
1. Copy file com-nomagic-magicdraw-integration.xml from <MagicDraw installation directory>\plu-
gins\com.nomagic.magicdraw.netbeansintegrator\netbeans directory into <NetBeans
home>\ide8\config\Modules.
2. Copy file com-nomagic-magicdraw-integrations-netbeans_api.jar from <MagicDraw installation
directory>\plugins\com.nomagic.magicdraw.netbeansintegrator\netbeans directory into <Net-
Beans home>\ide8\modules.
3. Create md directory in <NetBeans home>\ide8\config\modules\ext.
4. Copy all .jar files from <MagicDraw home>\lib directory to <NetBeans home>\ide8\config\mod-
ules\ext\md.
5. Copy file md.properties from <MagicDraw installation directory>\plu-
gins\com.nomagic.magicdraw.netbeansintegrator\netbeans directory into <NetBeans
home>\etc.
6. Edit file md.properties and change <MagicDraw Install Root> to directory where MagicDraw
UML was installed. For example:
install.root=C:/MagicDrawUML or
install.root=C\:\MagicDrawUML
7. Launch NetBeans.
NOTES:
• For information on changing paths for MagicDraw and NetBeans,
see “Working with MagicDraw in NetBeans” on page 30.
• For information on working with MagicDraw in NetBeans, see
“Working with MagicDraw in NetBeans” on page 30.

INTEGRATION WITH NETBEANS
Working with MagicDraw in NetBeans
3 0
Copyright © 1998-2011 No Magic, Inc..
Working with MagicDraw in NetBeans
NetBeans contains the UML modeling workspace. It is a workspace created in the NetBeans environment, and
contains UML-related components such as MD Toolbar and Browser windows. This Workspace has its own
toolbar configuration: UML Modeling. Working with MagicDraw diagrams in NetBeans is the same as working
with diagrams in MagicDraw UML.
Opening MagicDraw project
1. Select the JavaApplication1 branch in the NetBeans in the Projects tab.
Figure 5 -- Projects tab in the NetBeans application
2.
From the Tools main menu, select the Open MagicDraw project command. MagicDraw proj-
ect is opened.
Figure 6 -- The main Tools menu with the Open MagicDraw project command
MagicDraw UML Data Browser window (in MagicDraw Containment Tree) is opened. To open all MagicDraw
browser windows, from the Window main menu, select the UML Modeling and then Browser.
For more information about MagicDraw Browser windows, see MagicDraw User Manual.pdf, Using Browser
section.
Updating UML model
There are two ways to add classes created in NetBeans project into MagicDraw project:
• Select Java source file (or several files) in the NetBeans project browser. Open shortcut menu
and select the Update MagicDraw UML Model.

INTEGRATION WITH NETBEANS
Working with MagicDraw in NetBeans
3 1
Copyright © 1998-2011 No Magic, Inc..
Figure 7 -- Updating MagicDraw UML Model
• In the NetBeans browser, select the Java source file (or several files) and from the NetBeans
Tools main menu, select Update MagicDraw UML Model.
Selecting a class in the MagicDraw browser
• Select java source file in the NetBeans project browser. Open shortcut menu and select Tools,
Select in MagicDraw.
• From the NetBeans Tools main menu, select Select in MagicDraw.
Creating new class diagram using Java source code files
1. In the NetBeans Browser window open the Filesystems tab. Right-click the Java source file
(files) or entire package.

INTEGRATION WITH NETBEANS
Working with MagicDraw in NetBeans
3 2
Copyright © 1998-2011 No Magic, Inc..
2. Select the Tools command, then Create New Class Diagram.
Figure 8 -- Creating New Class Diagram
3.
A new class diagram is created and opened. This diagram contains all data (classes, opera-
tions, etc.) from the selected files.
Updating UML Data using Java source
1. In the NetBeans Browser window open the Filesystems tab. Right-click the Java source file
(files) or the entire package.
2. Select the Tools menu, then Update UML Model.
Figure 9 -- Updating MagicDraw UML Model
3.
All data (classes, operations, etc.) from the selected files will be added to the UML Data.

INTEGRATION WITH NETBEANS
Working with MagicDraw in NetBeans
3 3
Copyright © 1998-2011 No Magic, Inc..
Selecting created class in UML Modeling browser
1. In the Filesystems browser, select the class.
2. Invoke element shortcut menu and select the Select in MagicDraw command.
3. Open the UML Modeling tab, the class is selected in the Browser.
Saving UML Data
If you have modified your UML Data, the Save dialog box appears once you close the current NetBeans
Project.
Figure 10 -- Save dialog box
Buttons available in the Save dialog box:
Adding a class to the NetBeans project
There are three ways to add a class to an NetBeans project from a MagicDraw project:
• From the class in the MagicDraw browser shortcut menu, select Update NetBeans. The class
source will be generated into the java source file, which will then be added to the NetBeans
project.
• From the package in the MagicDraw browser shortcut menu, select Update NetBeans. All
classes from this package will be added to the NetBeans project.
• Select a class (or package) in any MagicDraw diagram. In the shortcut menu select Update
NetBeans.
Any changes made or added into the NetBeans class are automatically reflected in the java source file. You do
not need to update the source file manually.
Save
Saves the selected item.
Save All
Saves all changes.
Discard All
Discards changes and exits the project.
Help
NetBeans Help is displayed.
Cancel
Cancel the Save dialog box.

INTEGRATION WITH NETBEANS
Menu system for UML modeling in NetBeans
3 4
Copyright © 1998-2011 No Magic, Inc..
Going to class source
To open the class, operation, or attribute source code in NetBeans, select Go to Source in NetBeans. This
command is available just after the class has been added into the NetBeans project.
Menu system for UML modeling in NetBeans
For a detailed description of the MagicDraw menu system, see MagicDraw UML User’s Manual. You may find it
at <MagicDraw installation directory>/manual folder.
Only note that in NetBeans integration most of the MagicDraw main menu commands are under the UML Mod-
eling command.
Figure 11 -- NetBeans main menu system - the UML Modeling command

INTEGRATION WITH NETBEANS
MagicDraw Toolbar Configuration
3 5
Copyright © 1998-2011 No Magic, Inc..
MagicDraw Toolbar Configuration
To change the toolbar configuration for the MagicDraw UML Workspace, right-click the toolbar and select
MagicDraw. The UML Modeling toolbar is added or removed.
Figure 12 -- Toolbar shortcut menu
The MagicDraw toolbar includes MagicDraw diagrams. For a detailed description of the MagicDraw toolbar, see
MagicDraw UML User’s Manual. You may find it at <MagicDraw installation directory>/manual folder.
Known NetBeans integration problems
• Java documentation is not collected from the source file
• Java documentation is not written to the source file from the model update
• Editing/removing enumeration literals, breaks enumeration source code by removing
semicolon separating enumeration constants from enumeration type body
• Editing annotation type, breaks annotation type code by removing “@” symbol
• Varargs (...) are not supported
• Moving method in model, method moves in source as well, however method body comments
are lost
• There are no automatic update from the source files to the model
Integration Tool Error Messages
When installing the MagicDraw module, certain errors may occasionally occur. Common errors are listed
below.

INTEGRATION WITH NETBEANS
Integration Tool Error Messages
3 6
Copyright © 1998-2011 No Magic, Inc..
Wrong NetBeans Home Directory
Figure 13 -- Wrong NetBeans Home Directory error message box
Reason: NetBeans installation directory is specified incorrectly.
Solution: In the MagicDraw UML Integration Tool dialog, near the NetBeans Home Directory field, click ... and
choose the correct directory.
Wrong MagicDraw UML Home Directory
Figure 14 -- Wrong MagicDraw UML Home Directory error message box
Reason: The MagicDraw installation directory is specified incorrectly.
Solution: In the MagicDraw UML Integration Tool dialog, near the MagicDraw UML Home Directory field, click
... and choose the correct directory.
Unknown OS
Figure 15 -- Unknown OS error message box
Reason: The Integration Tool does not support your Operating System.
Solution: please report the issue to https://support.nomagic.com

INTEGRATION WITH NETBEANS
Integration Tool Error Messages
3 7
Copyright © 1998-2011 No Magic, Inc..
MagicDraw UML module not found
Figure 16 -- MagicDraw UML Module not found error message box
Reason: Wrong MagicDraw Home Directory, or file some files in the MagicDraw installation directory was not
found.
Solution: Specify the correct MagicDraw installation directory. If this does not solve the problem, check your
MagicDraw version.

Copyright © 1998-2011 No Magic, Inc.
38
INTEGRATION WITH
INTELLIJ IDEA
NOTE
This functionality is available in Standard, Professional Java, and Enterprise editions only.
MagicDraw enables automatic synchronization of your model in MagicDraw with your code in IntelliJ IDEA.
MagicDraw UML is installed into IntelliJ IDEA environment as an additional module, but runs in separate win-
dow. The integration provides all MagicDraw functionality and UML data update according to source code.
Installation
System Requirements
IntelliJ IDEA 4.0 or later.
NOTE
When Java constructions are being used, there might be several problems when using IntelliJ
4.5 integration with MagicDraw 8.0.
Automatic MagicDraw installation into IntelliJ IDEA
The MagicDraw UML Integration Tool is used to add MagicDraw module IntelliJ IDEA. You can find this tool:
• First time launching MagicDraw, click the Integrate button in the MagicDraw Startup dialog
box or from the Tools main menu, choose the Integrations command. The Integration dialog
box opens. Select IntelliJ IDEA and click the Integrate/Unintegrate button.
Figure 1 -- Integrations dialog box
• Double click the install.exe for Windows or install for Unix based OS file in <MagicDraw
installation directory>/integrations/intellij directory.

INTEGRATION WITH INTELLIJ IDEA
Installation
3 9
Copyright © 1998-2011 No Magic, Inc..
The MagicDraw UML Integration Tool dialog box appears.
Figure 2 -- MagicDraw UML Integration Tool
In the IntelliJ IDEA Settings Directory field, specify the directory where the IntelliJ IDEA config file is located.
For example: C:\Documents and Settings\<user name>\.IntelliJIdea
If you do not wish to change directories, click the Integrate button in the MagicDraw UML Integration Tool
dialog box.
To change the IntelliJ IDEA or MagicDraw home directories
1. In the MagicDraw UML Integration Tool dialog box, click the corresponding Browse “…” but-
ton.
2. The Select Directory dialog box appears.
3. Select the install directories and click OK. Then, click Integrate in the MagicDraw UML Inte-
gration Tool dialog box.
4. The Message box appears. If the integration process was successful, then only the Exit button
is active. Click Exit.
Manual MagicDraw Installation into IntelliJ IDEA 4.0, 5.0, 5.1, 5.1.2
1. Create directory com.nomagic.magicdraw.integration in the <IntelliJ home>\plugins folder.
2. Create directory lib in the < IntelliJ home>\plugins\com.nomagic.magicdraw.integration
3. Copy file md_intellij.jar from <MagicDraw home>/integrations/intellij directory into
< IntelliJ home>\plugins\com.nomagic.magicdraw.
integration\lib.
4. Copy file md.properties from <MagicDraw home>/integrations/intellij directory into
<IntelliJ home>\plugins\com.nomagic.magicdraw.
integration.
5. Edit file md.properties and change install.root property to directory where MagicDraw UML was
installed. Example:
install.root=C\:\\Program Files\\MagicDraw UML
or
install.root=C:/Program Files/MagicDraw UML
6. Copy all jars from <MagicDraw home>\lib folder into < IntelliJ settings>\config\plu-
gins\com.nomagic.magicdraw.integration\lib excluding xml-apis.jar, xercesImpl.jar, and
CaliberRMSDK65.jar
NOTE
If automatic installation fails, please use Manual installation.

INTEGRATION WITH INTELLIJ IDEA
IntelliJ IDEA and MagicDraw Integration Functionality
4 0
Copyright © 1998-2011 No Magic, Inc..
7. If MagicDraw version is patched (contains non empty patch.jar file in <MagicDraw home>\lib
folder), apply all patch.jar content into md.jar (located at IntelliJ home>\plu-
gins\com.nomagic.magicdraw.integration\lib), overriding encountered files in archive.
8. Launch IntelliJ IDEA
Manual MagicDraw Installation into IntelliJ IDEA 4.5
1. Create directory com.nomagic.magicdraw.integration in the <IntelliJ settings>\config\plugins
folder.
2. Create directory lib in the < IntelliJ settings>\config\plugins\com.nomagic.magicdraw.integration
3. Copy file md_intellij.jar from integrations/intellij directory into
< IntelliJ settings>\config\plugins\com.nomagic.magicdraw.
integration\lib.
4. Copy file md.properties from integrations/intellij directory into
<IntelliJ settings>\config\plugins\com.nomagic.magicdraw.
integration.
5. Edit file md.properties and change install.root property to directory where MagicDraw UML was
installed. Example:
install.root=C\:\\Program Files\\MagicDraw UML
or
install.root=C:/Program Files/MagicDraw UML
6. Copy all jars from <MagicDraw home>\lib folder into < IntelliJ settings>\config\plu-
gins\com.nomagic.magicdraw.integration\lib excluding xml-apis.jar, xercesImpl.jar.
7. If MagicDraw version is patched (contains non empty patch.jar file in <MagicDraw home>\lib
folder), apply all patch.jar content into md.jar (located at IntelliJ home>\plu-
gins\com.nomagic.magicdraw.integration\lib), overriding encountered files in archive.
8. Launch IntelliJ IDEA.
IntelliJ IDEA and MagicDraw Integration
Functionality
Updating UML Model
There are several ways to add classes created in IntelliJ IDEA project into MagicDraw project:

INTEGRATION WITH INTELLIJ IDEA
IntelliJ IDEA and MagicDraw Integration Functionality
4 1
Copyright © 1998-2011 No Magic, Inc..
• Select java source file (or several files ) in the IntelliJ IDEA project browser. Open shortcut
menu and select Update UML Model:

INTEGRATION WITH INTELLIJ IDEA
IntelliJ IDEA and MagicDraw Integration Functionality
4 2
Copyright © 1998-2011 No Magic, Inc..
• Open the java source in the IntelliJ IDEA editor window. Open shortcut menu and select
Update UML Model:
• From the MagicDraw menu, select Update UML Model. Will be added selected source files in
browser or opened file in IntelliJ IDEA editor, regarding where focus is located:
Selecting a Class in the MagicDraw Browser
• Select java source file in the IntelliJ IDEA project browser. Open shortcut menu and select
Select in MagicDraw.
• Open the java source in the IntelliJ IDEA editor window. Open shortcut menu and select Select
in MagicDraw.
• From the MagicDraw menu, select Select in MagicDraw. Will be selected class file from
browser or file opened in IntelliJ IDEA editor, regarding there focus is located.

INTEGRATION WITH INTELLIJ IDEA
IntelliJ IDEA and MagicDraw Integration Functionality
4 3
Copyright © 1998-2011 No Magic, Inc..
Adding a Class to the IntelliJ IDEA Project
There are four ways to add a class to an IntelliJ IDEA project from a MagicDraw project:
• From the class in the MagicDraw browser shortcut menu, select Update IntelliJ IDEA. The
class source will be generated into the java source file, which will then be added to the IntelliJ
IDEA project.
• From the package in the MagicDraw browser shortcut menu, select Update IntelliJ IDEA. All
classes from this package will be added to the IntelliJ IDEA project.
• From the selected class or package in any MagicDraw diagram shortcut menu, select Update
IntelliJ IDEA.
• Select a class (or package) in any MagicDraw diagram. Open the Tools menu and select
Update IntelliJ IDEA.
Any changes made or added into the integrated class are automatically reflected in the java source file. You do
not need to update the source file manually.
Before adding model class to the IntelliJ IDEA, Select Source Directory dialog appears:
Dialog contains listed available source directories in IntelliJ IDEA project. Classes from model will be placed in
to the selected directory. If Show this dialog next time is deselected, all classes will be created in to previ-
ously selected directory. Show this dialog next time can be enabled in Integration Properties dialog with
property Show Select Source Directory Dialog.
Going to Class Source
To open the class/operation/attribute source code in IntelliJ IDEA, from the Tools menu, select Go to Source
in IntelliJ IDEA. This command is available just after the class has been added into the IntelliJ IDEA project.
Select this command in element shortcut menu also.

INTEGRATION WITH INTELLIJ IDEA
IntelliJ IDEA and MagicDraw Integration Functionality
4 4
Copyright © 1998-2011 No Magic, Inc..
Integration Properties
Integration options dialog can be opened from MagicDraw Options menu, selecting Integration Properties
Command Option Function
Integratio
n Working
Package
Click the “...” button and in the opened dialog box, specify working package
where source code will be reversed during update.
Paths for
Reference
s
To define a path where to search for references (model
libraries), click the “...” button. The Paths for References dialog box opens.
Generate
Imports
Full Class
Name
The import statement with full class name is added during
source generation from MagicDraw.
Package Name
The import statement with package name and * is added
during source generation from MagicDraw.
Do Not
Generate
The import statement is not added during source genera-
tion from MagicDraw.
Unnamed
Element
Name
Enter a name of the model element to generate in the source code in
instances when a model element within your model does not yet have a
name attached to it.
Unnamed
Type
Name
Enter a name of the type to generate in the source code in instances when
attributes, operations, or parameters do not yet have a type in your model. If
an attribute without a type exists in a model, then, after adding the class of
this attribute into the IntelliJ IDEA project, an attribute with int type will be
generated in the source code.
Update
MagicDra
w UML
Model
Update Model
by Code
Removes all methods/attributes/associations from the
model if they do not exist in the code at the time Update
UML Model is executed.
Merge Model
by Code
Leaves all methods/attributes/associations in the model if
they do not exist in the code at the time Update UML
Model is executed.

INTEGRATION WITH INTELLIJ IDEA
IntelliJ IDEA and MagicDraw Integration Functionality
4 5
Copyright © 1998-2011 No Magic, Inc..
Show
Select
Source
Directory
Dialog
Enable to appear Select Source Directory dialog before adding new class
into IntelliJ IDEA project.
Synchroni
ze Model
Saving
with IDE
Enables to save MagicDraw project, on every IntelliJ IDEA workspace saving
(on focus lost, according to IntelliJ IDEA save options,… ). If option is dese-
lected, MagicDraw project is saved on MagicDraw save action and on closing
IntelliJ IDEA project.
Update
Model on
…
Saving Source
File
Updates model on IntelliJ IDEA source file save
Manual
Update
Updates model on manual user action Update UML
Model
For New
IDE
Attributes
Create
Attributes
Creates attributes in MagicDraw for new attributes created
in IntelliJ.
Association
Creates associations in MagicDraw for new attributes cre-
ated in IntelliJ.
Create
Properties
by Rules
Rules defined for the attributes or association creation on
reverse. Select this combo box and press the “...” button.
The Class Field Creation Rules dialog box appears. For
more information, see MagicDraw Code&DatabaseEngi-
neering UserGuide.pdf, “Rules of the association or attri-
bute creation on reverse” section.

Copyright © 1998-2011 No Magic, Inc.
46
INTEGRATION WITH
CALIBER RM
NOTE
This functionality is available in Architect and Enterprise editions only, when MagicDraw is
running on 32-bit Java.
This integration functionality allows you to create logical relations from requirements in CaliberRM to model
elements in MD.
CaliberRM integration is implemented as a plug-in in MagicDraw UML.
System Requirements
CaliberRM 6.5 or later.
IMPORTANT!
Caliber integration works only with MagicDraw standalone. If MagicDraw is run from any IDE,
integration won’t work.
Automatic CaliberRM installation into MagicDraw
CaliberRM integration is implemented as a plug-in in MagicDraw UML, so no additional actions for performing
integration are required.
For making sure that CaliberRM integration is started, from the MagicDraw main menu, choose Options, then
Environment Options. Select the Plugins section. Check the Calber Integration plugin - Loaded and
Enabled values should be set to true.
CaliberRM and MagicDraw Integration
Functionality
Login to CaliberRM server
There are several ways to login to CaliberRM server:
• Open element Specification dialog. Go to Documentation/Hyperlinks tab, click the Add
button. The Insert Hyperlinks dialog appears. Select the Caliber Requirement tab and click
the ‘...’ button. If no previous login was performed to server, the Login dialog appears:

INTEGRATION WITH CALIBER RM
CaliberRM and MagicDraw Integration Functionality
4 7
Copyright © 1998-2011 No Magic, Inc..
• From the Tools main menu, choose CaliberRM, and then Login.
Logout from CaliberRM server
From the Tools main menu, choose CaliberRM and then Logout.
Adding requirement to MagicDraw element
When login to CaliberRM server is performed, follow the steps to add requirement to element:
1. Open element Specification dialog box.
2. Go to Documentation/Hyperlinks tab, click the Add button. The Insert Hyperlinks dialog box
appears.
3. Select the Caliber Requirement tab and click the ‘...’ button. The Select Requirement dialog
box appears.
4. Choose a project from the Project drop-down list and after selecting the requirement from the
requirements tree, click OK.
5. Requirement is added to the element as hyperlink.
NOTE
In the Server text box, type the name of your computer in net, and to login to
the server as administrator, in the Login and Password text box, type
admin.

INTEGRATION WITH CALIBER RM
CaliberRM and MagicDraw Integration Functionality
4 8
Copyright © 1998-2011 No Magic, Inc..
Reviewing requirements added to elements
From the Tools main menu, choose CaliberRM and then CaliberRM Requirements or press
CTRL+SHIFT+R. The CaliberRM Requirements window appears:
Information about element, requirement project and requirement name, and also description of requirement is
displayed in this window.
Buttons available in the CaliberRM Requirement window:
Select in Containment Tree - selects element in MagicDraw Browser, Containment Tree.
Select In CaliberRM - launches CaliberRM client and selects requirement, added to element.
Refresh - updates the list of elements, if new requirement was added to element in the model.
Launching CaliberRM Client
To view requirements on the CaliberRM side, the CaliberRM Web View application should be launched:
1. From the Tools main menu, choose CaliberRM and then Launch CaliberRM Client. The
Question window appears:

INTEGRATION WITH CALIBER RM
CaliberRM and MagicDraw Integration Functionality
4 9
Copyright © 1998-2011 No Magic, Inc..
2. Click Yes. The Integration with CaliberRM Web Viewer dialog box appears:
3. Select the viewer home directory and click OK. The Logon dialog box appears. Type Host,
User name and Password for login to Caliber Viewer. Click Logon.

INTEGRATION WITH CALIBER RM
CaliberRM and MagicDraw Integration Functionality
5 0
Copyright © 1998-2011 No Magic, Inc..
4. CaliberRM client application workspace with projects and requirements will be opened:
Copyright © 1998-2011 No Magic, Inc.
51
INTEGRATION WITH CVS
NOTE
This functionality is available in Standard, Professional, Architect, and Enterprise editions only.
MagicDraw
TM
integration with CVS is used only for the storage of MagicDraw files in the CVS repository. Since
MagicDraw
TM
has a built-in CVS client, no other application is needed to integrate MagicDraw with CVS.
Getting Started
1. Define CVS properties in the CVS pane of the Environment Options dialog box.
2. Make sure that the module you are working with is checked out through MagicDraw or using
some other program. For detailed instructions on how to check out a module in MagicDraw, see
“Checkout module” on page 52.
NOTES:
You can add, update, or commit projects to CVS only if they are saved in a checked out
directory or subdirectory.
The Command line runs in a local folder, which is specified in the Environment Options dialog
box. In order for the Command Line to find CVSROOT, the Local Folder must be checked out
and must have a CVS subdirectory.
CVS properties
Define CVS Properties in the CVS pane of the Environment Options dialog box:
1. From the Options menu, choose Environment. The Environment Options dialog box
appears.
2. Open the CVS pane.

INTEGRATION WITH CVS
Checkout module
5 2
Copyright © 1998-2011 No Magic, Inc..
Figure 1 -- Environment Options dialog box. CVS pane
Checkout module
Use this option to checkout a new module on your disk.
Command Function
Add Project to
CVS After
Saving
In every instance where you save, a newly created project is added
to CVS in the checked out directory to CVS. The Add Project to
CVS dialog box appears.
Commit Project
to CVS After
Saving
Commits the project to CVS after saving it. The Commit Project to
CVS dialog box appears.
Update Project
from CVS
Before Loading
Updates the project that is added to CVS while loading. The Update
Project dialog box appears.
Location of
.cvspass
The path where the .cvspass is located. You may enter it here, or
choose the path from the Open dialog box.
Local Folder
The path where the module will be saved during the checkout
action. You may enter it here, or choose the path from the Open dia-
log box.

INTEGRATION WITH CVS
Add a Project to CVS
5 3
Copyright © 1998-2011 No Magic, Inc..
From the Tools menu, select CVS. Then select Checkout Module. The Checkout Module dialog box
appears.
Figure 2 -- Checkout Module dialog box
Add a Project to CVS
1. Create a new MagicDraw project.
2. Save it into the currently checked out directory.
3. From the Tools menu, select CVS and then select Add. The Add Project to CVS dialog box
appears.
NOTE:
Command Function
CVS Root
Shows CVSROOT variable and provides all previously typed
CVS Root variables. You must enter the complete path of the
module on the server: It should be something like: :pserver:mar-
[email protected]:/projects/CVS
Module name
Enter the module name and path on the server.
Local Folder
The path indicating where the CVS files will be saved locally in
the disk. Enter the path, or select any directory by clicking the
“…” button.
Prune Empty
directories [-P]
Automatically removes empty folders when you update a module.
NOTE: The sign for the options is listed in the brackets at the end
of the check box name.
Reset sticky tags [-
A]
Checks out only the last project version.
Non-recursive [-I]
Does not check out subdirectories.

INTEGRATION WITH CVS
Commit project to CVS
5 4
Copyright © 1998-2011 No Magic, Inc..
If the Add Project to CVS After Saving command in the Environment Options dialog box,
CVS pane is selected. The Add Project to CVS dialog box appears every time when new to
CVS projects are saved.
Figure 3 -- Add to CVS Options dialog box
1.
Enter a check in the Add as binary data [-kb] check box if the project is saved as XML.ZIP for-
mat.
2. Type the Log message if needed.
3. Click OK.
Commit project to CVS
Commit your project to CVS after making changes to the project.
NOTE:
If Commit Project to CVS After Saving is selected (in the CVS pane located in the
Environment Options dialog box), the project is committed to the CVS server every time it is
saved.
1. Open your MagicDraw project.
2. From the Tools menu, select CVS. Then select Commit Project to CVS. The Commit Proj-
ect to CVS dialog box appears.
Figure 4 -- Commit Project to CVS dialog box
3. Type the log message if needed.
4. Click OK.

INTEGRATION WITH CVS
Update project
5 5
Copyright © 1998-2011 No Magic, Inc..
Update project
Update your project when you receive a message indicating a new project version exists on the server.
From the Tools menu, choose CVS. Then choose Update CVS Project. The Update CVS Project dialog box
appears.
Figure 5 -- Update CVS Project dialog box
You may click the “…” button and choose the desired project version from the Revisions dialog box.
Figure 6 -- Revisions dialog box
Option Function
Reset sticky
tags [-A]
Update to the last version of the project located on the server.
Retrieve rev./
tag/branch
Type the tag or version number you want to change. (Enabled,
when Reset sticky tags check box is cleared)

Copyright © 1998-2011 No Magic, Inc.
56
MAGICDRAW -
PROACTIVITY UML
INTEGRATION
NOTE:
Integration with ProActivity functionality is included only in the Enterprice MagicDraw edition.
MagicDraw-ProActivity plug-in is a plug-in that allows exchanging models between MD and PA. It can be con-
sidered as two modules, import and export modules.
The import module allows business users to convert business models created by PA to UML models, Class
Diagram, Use Case Diagram, and Activity Diagram, in MD that are more understandable to technical persons.
The export module allows MD users to export MD model to *.mdpx file that can be import into PA.
Product Features
MagicDraw-ProActivity plug-in addresses the following features:
Import Module
• Import base artifacts from ProActivity business model to MagicDraw UML model. Base
artifacts include:
• Business Objects
• Data Objects
• Activities (with inner elements and diagram layout information)
• Resources (Actors)
• Analyze data from ProActivity business model and create three types of UML diagrams, which
are:
• Class Diagram
• Use Case Diagram
• Activity Diagram
• Import attached files of ProActivity artifacts to Hyperlinks in UML elements.
Export Module
• Export selected class elements and Activity diagrams into MDPX file. The MDPX file can be
consumed by PA.
NOTE
Integration with ProActivity functionality is included only in the Enter-
price MagicDraw edition.

MAGICDRAW - PROACTIVITY UML INTEGRATION
Access ProActivity plug-in
5 7
Copyright © 1998-2011 No Magic, Inc..
Access ProActivity plug-in
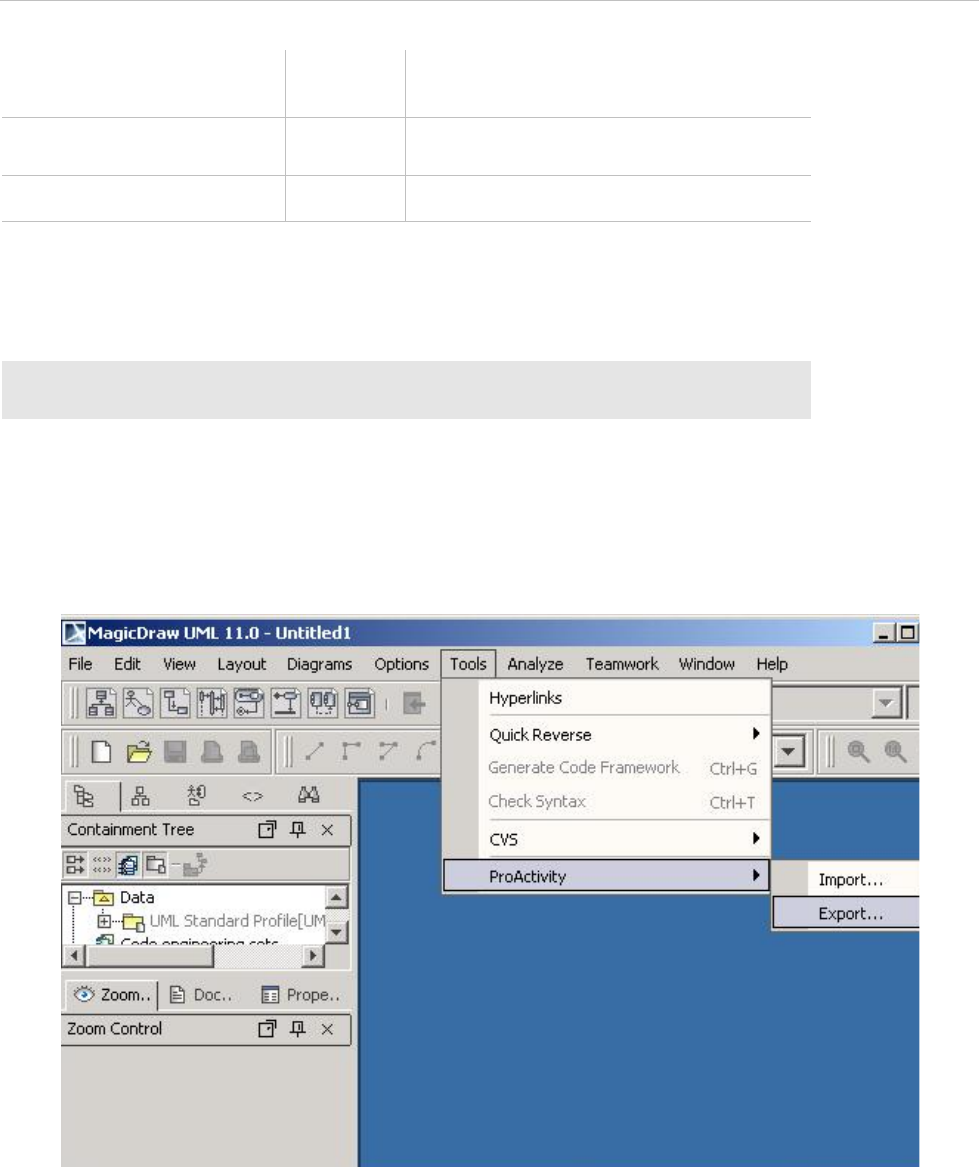
1. MagicDraw's ProActivity functionality, which is implemented as a plug-in can be accessed using
Tools main menu, then ProActivity, and then Importl.
Figure 1 -- Import ProActivity menu
2.
The Import ProActivity Files dialog box is opened.
NOTE:
The Import button is disabled until the text box is filled.
Figure 2 -- Import ProActivity Files dialog box
Element Name Element
Type
Function
Select the Business Object
file
Text Box Type the name of the Business Object file or
select the file using "…" button.
“...”
Button Open the file selection dialog box for choos-
ing a Business Object file.
Select the PAPX file
Text Box Type the name of the PAPX file or select the
file using "…" button.
“...”
Button Open the file selection dialog box for select-
ing a PAPX file.
MAGICDRAW - PROACTIVITY UML INTEGRATION
Export MagicDraw project to ProActivity
5 8
Copyright © 1998-2011 No Magic, Inc..
The user can choose to input only one file, Business Object file or PAPX file, or both files to import. The “... “but-
ton next to the text boxes allows you to browse for files.
3. Click the Import button to start the importing process. The UML diagrams will be generated
depending on the input files.
Export MagicDraw project to ProActivity
1. The export functionality can be accessed using Tools main menu, then ProActivity, and then
Exportl.
Figure 3 -- Export ProActivity menu
Import
Button Start validating the input files and importing
process if the input files are valid.
Cancel
Button Close the dialog box.
NOTE
Business object file holds business object information while PAPX file
holds process, sub-process, and activity information.
Element Name Element
Type
Function

MAGICDRAW - PROACTIVITY UML INTEGRATION
Export MagicDraw project to ProActivity
5 9
Copyright © 1998-2011 No Magic, Inc..
2. The Export to ProActivity wizard is opened.The Export to ProActivity wizard, exports busi-
ness object data and activity diagram form MD model. The exported file will be in .mdpx format.
Figure 4 -- The Export to ProActivity Wizard
The Export to ProActivity wizard contains three steps:
Step 1 - Select class elements. In this step select the classes, which will be exported to ProActivity.
Step 2 - Select activity diagrams. In this step select the activity diagrams, which will be exported to ProActivity.
Step 3 - Enter export file name. In this step select the location and enter the file name to export to. In the Look
in box, list of physical drive to save the export file. In the File name text box, type the name for the export file.
Element Name Element
Type
Function
All
Tree Contains all classes/activity diagrams, which
exist in the current project.
Selected
Tree Contains classes/activity diagrams that will be
exported.
Add
Button Adds the selected classes/activity diagrams
from the All list to the Selected list.
Add All
Button Adds all inner classes/activity diagrams of the
selected package to the Selected list.
Add Recursively
Button Adds all classes/activity diagrams from the
selected package and all classes from nested
packages to the Selected list.
Remove
Button Removes the selected classes/activity diagrams
from the Selected list.
Remove All
Button Removes all classes/activity diagrams from the
Selected list.

MAGICDRAW - PROACTIVITY UML INTEGRATION
Question Messages
6 0
Copyright © 1998-2011 No Magic, Inc..
Question Messages
The following is a list of message dialogs that may appear according to the specific conditions.
Question messages on module import
The PAPX file was not selected
This dialog will be displayed if the PAPX file text box is empty.
Click Yes to close this question message and go back to the Import ProActivity Files dialog to select the
PAPX file.
Click No to close this question message and start the importing process.
The Business Object file was not selected
This dialog will be displayed if the Business Object file text box is empty.
Click Yes to close this question message and go back to the Import ProActivity files dialog box to select the
Business Object file.
Click No to close this question message and start the importing process.
Information messages on module import
Information Messages informes about the problems during import process.

MAGICDRAW - PROACTIVITY UML INTEGRATION
Question Messages
6 1
Copyright © 1998-2011 No Magic, Inc..
The input BO file is invalid
This message will be displayed if the input Business Object file in the Import ProActivity dialog is invalid.
The input PAPX file is invalid
This message will be displayed if the input PAPX file is invalid.
Question messages on module export
No selected element
This message will be displayed if in the Export to ProActivity wizard, the user selects the Next button to go to
the Step 3 without selecting element to be exported..

MAGICDRAW - PROACTIVITY UML INTEGRATION
ProActivity Model to MagicDraw UML mapping
6 2
Copyright © 1998-2011 No Magic, Inc..
Warning messages on module export
File already exists
This dialog will be displayed if the export file name that user selects to save already exists..
Click Yes to replace the existing file.
Click No to close this dialog box and go back to Export to ProActivity wizard.
ProActivity Model to MagicDraw UML mapping
General ProActivity Artifacts Properties Mapping Table
PA-MD elements mapping samples
Resources of activity and swimlanes
PA activity "Prepare Letter to Customer on Expected Processing Time for Mortgage" has assigned resources
"Loan Underwriting Specialist" and "MS Word"
Property name
in PA
Property Owner
in PA
Realization in UML 2
Name
All Element Name
Owner / Owner
Name
All Stereotype <<paArtifact>> property.
Property name - Owner.
Property type - string.
Property multiplicity - [0..1].
SME
All Stereotype <<paArtifact>> property.
Property name - SME.
Property type - string.
Property multiplicity - [0..1].
Note
All Element documentation
Attachment
All Element hyperlink.
If one is assigned, then this hyperlink should
be added as active.

MAGICDRAW - PROACTIVITY UML INTEGRATION
ProActivity Model to MagicDraw UML mapping
6 3
Copyright © 1998-2011 No Magic, Inc..
The PA model:
Figure 5 -- PA Model of Resources of activity and swimlanes
Below is the corresponding example of MD activity diagram with swimlane where swimlane name is con-
structed from all assigned resources and Action State specification where we see the list of resources as
tagged values.
The MD model:
Figure 6 -- MD Model of Resources of activity and swimlanes
In PA a resource can be a Role or a System. Roles represent people doing activities. Systems are usually auto-
mated IT applications. In PA they are called "User Defined Resources" or just UDR's. An example of a UDR is
SAP. UDR's allow you to create systems in types. Thus, you might create "Legacy Systems" and "Package
Applications" and "Desktop Tools" as UDR Types. SAP would be of type "Package Applications."

MAGICDRAW - PROACTIVITY UML INTEGRATION
ProActivity Model to MagicDraw UML mapping
6 4
Copyright © 1998-2011 No Magic, Inc..
Process Family Creation
The PA model:
Figure 7 -- PA Model - Show Data: None
Figure 8 -- PA Model - Show Data: Input/Output
The MD model:
Figure 9 -- MagicDraw model

MAGICDRAW - PROACTIVITY UML INTEGRATION
ProActivity Model to MagicDraw UML mapping
6 5
Copyright © 1998-2011 No Magic, Inc..
UDA Import
PA Process with UDA assigned:
Figure 10 -- PA Process with UDA
MD Use Case with specified tagged values:
Figure 11 -- MD UseCase Specification Dialog

MAGICDRAW - PROACTIVITY UML INTEGRATION
ProActivity Model to MagicDraw UML mapping
6 6
Copyright © 1998-2011 No Magic, Inc..
Business Objects Import Example
The first image shows ProActivity Business Objects Definitions dialog box. The second image shows how Busi-
ness Objects, Data Objects and Business Object Fields are mapped and represented in the MagicDraw Class
diagram.
PA Business Object Definition:
Figure 12 -- PA Business Object Definition Dialog
MD Business Objects Definitions Classes:
Figure 13 -- MD Business Objects Definition Dialog

MAGICDRAW - PROACTIVITY UML INTEGRATION
ProActivity Model to MagicDraw UML mapping
6 7
Copyright © 1998-2011 No Magic, Inc..
UDR Import Example
PA User Defined Resources Definitions:
Figure 14 -- PA User Defined Resources Definitions Dialog
MD Classes for UDR Type and UDRs:
Figure 15 -- MD Classes for UDR Type and UDR
Use Cases Import Example
PA Process with Activities:
Figure 16 -- PA Process with Activities

MAGICDRAW - PROACTIVITY UML INTEGRATION
ProActivity Model to MagicDraw UML mapping
6 8
Copyright © 1998-2011 No Magic, Inc..
MD UseCases:
Figure 17 -- MD UseCase Diagram
UseCase Specification Example with Assigned Activity Diagram
Figure 18 -- UseCase Specification
Decision Importing Example
PA model:
Figure 19 -- PA Model Decision Importing

MAGICDRAW - PROACTIVITY UML INTEGRATION
ProActivity Model to MagicDraw UML mapping
6 9
Copyright © 1998-2011 No Magic, Inc..
MD model:
Figure 20 -- MD Model Decision Importing
PA Attachment Import
Attachment in PA model:
Figure 21 -- PA Attachment Import
Hyperlink on MD model:
Figure 22 -- Hyperlink of MD Model

MAGICDRAW - PROACTIVITY UML INTEGRATION
PA artifact to MD UML Activity Diagram elements
7 0
Copyright © 1998-2011 No Magic, Inc..
PA artifact to MD UML Activity Diagram elements
ProActivity Artifact Realization in UML 2 Remarks
Process
A separate activity for
every separate process.
Stereotype <<process>>
will be assigned.
Activity will be placed in
Process Family package.
Individual processes are the main sub-
jects of imported business activities
information. Import does not pay atten-
tion to process hierarchies. (The struc-
ture of Process Families and
Deliverables are not the subject of
import.)
Sub-Process
Activity in process activity.
Nested sub-processes will
be mapped to inner activi-
ties.
Stereotype
<<sub-process>> will be
assigned.
The stereotype will not be displayed in
diagram.
Activity
Call Behavior Action
Control flow will be drawn
from initial node to the first
activity.
Control flow will be drawn
from the last activity to final
node - in Activity diagram
without I/Os.
Stereotype <<paActivity>>
will be assigned.
If there is an activity, which is not con-
nected to the flow, it will be left as it is
and draw in the diagram.
Control flow from initial node to the first
activity in the list will be drawn.
Relationship to final node from every
output pin with no destination will be
drawn.
The stereotype will not be displayed in
diagram.
Activity with non
empty property
"ActivityCondition"
Call Behavior Action with
Stereotype <<paActivity>>
connected with Decision
Node.
The stereotype will not be displayed in
diagram.
Text on outgoing
relationships from
Activity with
Condition.
Guard property of Control
Flow relationships
Input/Output
Object Node connected
with Call Behavior Action
through object flow relation-
ship.
Stereotype <<input/out-
put>> for Object Node will
be assigned.
All properties will be mapped into the
ObjectNode pecification.
Input to the first
Activity
Activity Parameter Node
with Direction property "in".
All properties will be mapped into the
Activity Parameter Node specification.
Output from the
last activity(ies)
Activity Parameter Node
with Direction property
"out".
All properties will be mapped into the
Activity Parameter Node specification.

MAGICDRAW - PROACTIVITY UML INTEGRATION
PA artifact to MD UML Activity Diagram elements
7 1
Copyright © 1998-2011 No Magic, Inc..
Activity contains 2
outgoing or
incoming
relationships to/
from another
activities through
the same I/O.
Vertical synchronization
bar will be added.
XOR
Merge Node To see the example of decision, see
“Decision Importing Example” on
page 68.
Relationship
between activities
in different (sub-)
processes.
Control Flow, which will not
be displayed on the dia-
gram.
ProActivity Artifact Realization in UML 2 Remarks

MAGICDRAW - PROACTIVITY UML INTEGRATION
PA artifacts properties to Activity diagram elements properties
7 2
Copyright © 1998-2011 No Magic, Inc..
PA artifacts properties to Activity diagram elements
properties
ProActivity Artifact Property name
in PA
Realization in UML 2
Activity
Resource Tagged Value.
Tag Name - resources
Tag Type - Class
Multiplicity - [0..*]
Tag Owner - <<paActivity>> stereotype.
Activity
SME Tagged Value.
Tag Name - S M E
Tag Type - Actor
Multiplicity - [1]
Tag Owner - <<paActivity>> stereotype.
Activity
Touch Time Tagged Value.
Tag Name - touchTime
Tag Type - String
Multiplicity - [1]
Tag Owner - <<paActivity>> stereotype.
Activity
Touch Time Mea-
sure
Tagged Value.
Tag Name - touchTimeMeasure
Tag Type - String
Multiplicity - [1]
Tag Owner - <<paActivity>> stereotype.
Activity
Total Time Tagged Value.
Tag Name - totalTime
Tag Type - String
Multiplicity - [1]
Tag Owner - <<paActivity>> stereotype.
Activity
Total Time Mea-
sure
Tagged Value.
Tag Name - totalTimeMeasure
Tag Type - StringMultiplicity - [1]
Tag Owner - <<paActivity>> stereotype.
Activity
Activity branches
according to the
condition
Tagged Value.
Tag Name - activityCondition
Tag Type - String
Multiplicity - [1]
Tag Owner - <<paActivity>> stereotype.
Note: This stereotype will be assigned to Decision
Node.

MAGICDRAW - PROACTIVITY UML INTEGRATION
PA artifacts properties to Activity diagram elements properties
7 3
Copyright © 1998-2011 No Magic, Inc..
Input/Output
Assigned Busi-
ness Object Field
Tagged Value of Output Pin.
Tag is the property of <<input/Output>> stereo-
type.
Tag Name - businessObjectField
Tag Type - Slot (MetaClass).
Tag Multiplicity [1..*].
If the Input/Output has at least one Business
Object Field assigned the following steps will be
performed:
The package "Assigned Business Objects" will be
created in Business Objects package.
Instance for assigned Data Object will be created.
Name of instance will be the same as Input/Output
name.
Classifier of instance will be the Business Object
Class.
Documentation of each Slot will be taken from
assigned business object field Note property.
Value of each Slot will be taken from assigned
business object field Value property.
Note: if the Business Object Field is not assigned
to the slot, the value for slot will not be created.
Activity
<Input>
<InputName>
Object Node Name.
Activity
<Output>
<OutputName>
Object Node Name.
Activity
<Input>
<BOUsage>
<BusinessObject-
Name>
Object Node Type, which must be the class from
Business Objects package, which represents this
Business Object.
Activity
<Output>
<BOUsage>
<BusinessObject-
Name>
Object Node Type, which must be the class from
Business Objects package, which represents this
Business Object.
ProActivity Artifact Property name
in PA
Realization in UML 2

MAGICDRAW - PROACTIVITY UML INTEGRATION
Diagram Properties
7 4
Copyright © 1998-2011 No Magic, Inc..
Diagram Properties
PA artifact to MD UML Class Diagram elements
PA artifacts properties to Class diagram elements
properties
Diagram Property Realization in UML 2
Grid by property
Activity diagram shall contain horizontal swimlanes if pro-
cesses were exported with a Grid By:" option. Create as
many swimlanes, as there are different variants of assigned
resources to activities.
ProActivity Artifact Realization in UML 2
Business Object
Class with stereotype <<businessObject>>
Data Object
Class with stereotype <<dataObject>>
Business Object Field
Attribute with stereotype <<businessObjectField>>
User Defined Resource
Class with Stereotype <<userDefinedResource>>
User Defined Resource Type
Class with Stereotype <<userDefinedResourceType>>
ProActivity Artifact Property name
in PA
Realization in UML 2
Data Object
Public Stereotype <<dataObject>> property.
Property name - isPublic.
Property type - Boolean.
Property multiplicity - [1]
Property default value - False.
Data Object
Type Stereotype <<dataObject>> property.
Property name - type.
Property type - String.
Property multiplicity - [1]
Property default value - "Unknown Type".
Data Object
Original System Stereotype <<dataObject>> property.
Property name - originalSystem.
Property type - String.
Property multiplicity - [1]

MAGICDRAW - PROACTIVITY UML INTEGRATION
PA artifacts properties to Class diagram elements properties
7 5
Copyright © 1998-2011 No Magic, Inc..
Data Object
Original Data-
base
Stereotype <<dataObject>> property.
Property name - originalDatabase.
Property type - String.
Property multiplicity - [1]
Data Object
Original Entity Stereotype <<dataObject>> property.
Property name - originalEntity.
Property type - String.
Property multiplicity - [1]
Business Object
Field
Logical Name Stereotype <<businessObjectField>> property.
Property name - logicalName.
Property type - String.
Property multiplicity - [1]
Business Object
Field
Type Attribute Type
Business Object
Field
Length Attribute Type Modifier - [<Length>]
Business Object
Field
Initial Value Attribute Initial Value
Business Object
Field
Original System Stereotype <<businessObjectField>> property.
Property name - originalSystem.
Property type - String.
Property multiplicity - [1]
Business Object
Field
Original DB Stereotype <<businessObjectField>> property.
Property name - originalDB.
Property type - String.
Property multiplicity - [1]
Business Object
Field
Original Entity Stereotype <<businessObjectField>> property.
Property name - originalEntity.
Property type - String.
Property multiplicity - [1]
Business Object
Field
Original Field Stereotype <<businessObjectField>> property.
Property name - originalField.
Property type - String.
Property multiplicity - [1]
Business Object
Field
Edit Format Stereotype <<businessObjectField>> property.
Property name - originalFormat.
Property type - String.
Property multiplicity - [1]
ProActivity Artifact Property name
in PA
Realization in UML 2

MAGICDRAW - PROACTIVITY UML INTEGRATION
PA artifacts properties to Class diagram elements properties
7 6
Copyright © 1998-2011 No Magic, Inc..
User Defined
Resource
Unit Stereotype <<userDefinedResource>> property.
Property name - unit.
Property type - Enumeration "UDR Units" with lit-
erals: sq.mm, sq.cm, sq.dm, sq.m, sq.km.
Property multiplicity - [1]
Property Default Value - sq.mm.
ProActivity Artifact Property name
in PA
Realization in UML 2

MAGICDRAW - PROACTIVITY UML INTEGRATION
PA artifact to MD UML Use Case Diagram elements
7 7
Copyright © 1998-2011 No Magic, Inc..
PA artifact to MD UML Use Case Diagram elements
ProActivity
Element
UML 2 Element Remarks
Process
Use Case with stereotype <<pro-
cess>>
Sub-process
Use Case with stereotype <<sub-pro-
cess>>
The Sub-processes tree may
have unlimited number of deep.
Sub-process and
it's owner Process
<<Include>> relationship from Pro-
cess use case to Sub-Process Use
Case
Sub-process and
it's owner Sub-
process
<<Include>> relationship from Sub
Process use case to inner Sub-Pro-
cess Use Case
Activity
Use Case with stereotype <<paActiv-
ity>>
Process or Sub-
process and it's
inner Activity
<<Include>> relationship from owner
to inner element.
Role (Role Type -
Both)
This will not be import as role.
Role (Role Type -
Analyst)
This will not be import as role.
Role (Role Type -
SME)
This will not be import as role.
Activity, Sub-
Process, Process
Property "Owner".
Use Case tagged value.
Tag Name "Owner".
Tag Type - String.
Tag Owner is stereotype <<paArti-
fact>>.
The "owner" refers to the con-
sultant or IT person who models
the process using PA + MD.
Sub-Process,
Process Property
"SME".
Use Case tagged value.
Tag Name "SME".
Tag Type - String.
Owner is stereotype <<paArtifact>>.
Resource,
ResourceTypeNam
e = 'Role',
RoleTypeText =
'Both'
Actor with stereotype <<role>>.
Resource,
ResourceTypeNam
e = 'Role',
RoleTypeText =
'Analyst'
Actor with stereotype <<analyst>>

MAGICDRAW - PROACTIVITY UML INTEGRATION
UDA fields to MD tags in Use Case Description Profile
7 8
Copyright © 1998-2011 No Magic, Inc..
UDA fields to MD tags in Use Case Description
Profile
Resource,
ResourceTypeNam
e = 'Role',
RoleTypeText =
'SME'
Actor with stereotype <<sME>>
ProActivity
Element
UML 2 Element Remarks
(Sub-)Process, Activity) property "UDA" with name "Use Case Profile" may contain the
listed fields, which will be mapped to use case tagged values.
Use Case Author
Author
Actors
Actors
Tag Type: actors
Tag Multiplicity [0..*]
The tag belongs to another ste-
reotype from PA Profile with
name <<process>>
Basic Flow of
Events
Basic Flow of Events
Pre-Condition
PreCondition
Post-Condition
PostCondition
Goal Goal
Implementation
Issues
Implementation Issues
Non Functional
Requirements
Non Functional Requirements
Alternative Flow of
Events
Alternative Flow of Events
Exceptional Flow
of Events
Exceptional Flow of Events
Date
Date
Priority
Priority
Assumption
Assumption
Outstanding Issues
Out-standing Issues
Use Case Notes
Notes
ProActivity
Element
UML 2 Element Remarks

Copyright © 1998-2011 No Magic, Inc.
79
INTEGRATION WITH
ANDROMDA
NOTE
This functionality is available in Standard, Professional, Architect, and Enterprise editions only.
The purpose of this document is to describe MagicDraw and AndroMDA integration features, specific usability
improvements and usage scenarios.
Please read http://galaxy.andromda.org/docs/ for more details about usage of AndroMDA tool itself.
Integration instructions
System Requirements
AndroMDA 3.2, Maven.
Automatic MagicDraw installation into AndroMDA
The MagicDraw UML Integration Tool is used to add MagicDraw module into AndroMDA. You can find this
tool:
1. First time launching MagicDraw, click the Integrate button in the MagicDraw Startup dialog
box or from the Tools main menu, choose the Integrations command. The Integration dialog
box opens. Select AndroMDA and click the Integrate/Unintegrate button.
Figure 1 -- Integrations dialog box

INTEGRATION WITH ANDROMDA
Working with profiles
8 0
Copyright © 1998-2011 No Magic, Inc..
2. The MagicDraw UML Integration Tool dialog box appears.
Figure 2 -- MagicDraw UML Integration Tool
In the AndroMDA Home Directory field, specify the directory where the AndroMDA home files are located. For
example: D:\andromda\andromda-bin-3.2\andromda\org\andromda
If you do not wish to change directories, click the Integrate button in the MagicDraw UML Integration Tool
dialog box.
To change the AndroMDA or MagicDraw home directories
1. In the MagicDraw UML Integration Tool dialog box, click the corresponding Browse “…” but-
ton.
2. The Select Directory dialog box appears.
3. Select the install directories and click OK. Then, click Integrate in the MagicDraw UML Inte-
gration Tool dialog box.
4. The Message box appears. If the integration process was successful, then only the Exit button
is active. Click Exit.
Automatic integration process performs these steps:
• Sets <andromda.home> variable to MagicDraw Environment Options.
• Adds paths to all AndroMDA profiles as "Global Modules Paths" in the Environment Options
dialog box, so all customer projects will be able to find AndroMDA profiles.
• Adds new custom AndroMDA Diagram.
• Adds Maven 2 plugin for MagicDraw project conversion to EMF.
• Adds predefined command lines to start AndroMDA maven tasks as "External Tools".
Working with profiles
AndroMDA models uses a lot of profiles that are distributed together with AndroMDA, so customers need
sophisticated path variables mechanism to handle multiple tool-related paths.
More about path variables, see MagicDraw User Manual, Getting Started section, Setting Personal Preferences
subsection, Environment Options chapter, Path Variables Pane.

INTEGRATION WITH ANDROMDA
EMF export
8 1
Copyright © 1998-2011 No Magic, Inc..
Global modules paths
MagicDraw modules mechanism is improved to fulfill AndroMDA customer needs by adding ability to specify
predefined paths for modules into Environment Options, not only Project Options.
Now paths to common modules/profiles can be specified once and they will be used in all projects automati-
cally. Load process will look at project modules paths at first and if module/profile is not found, it will use global
modules paths.
Path variables can be used to specify paths also.
Below are listed AndroMDA related paths to profiles added by automatic integration process:
<andromda.home>\profiles
<andromda.home>\profiles\uml2\andromda-profile\3.2
<andromda.home>\profiles\uml2\andromda-profile-datatype\3.2
<andromda.home>\profiles\uml2\andromda-profile-meta\3.2
<andromda.home>\profiles\uml2\andromda-profile-persistence\3.2
<andromda.home>\profiles\uml2\andromda-profile-presentation\3.2
<andromda.home>\profiles\uml2\andromda-profile-process\3.2
<andromda.home>\profiles\uml2\andromda-profile-service\3.2
<andromda.home>\profiles\uml2\andromda-profile-webservice\3.2
<andromda.home>\profiles\uml2\andromda-profile-xml\3.2
<andromda.home>\profiles\uml2\andromda-profiles-uml2\3.2
UML_Standard_Profile-3.2.xml
Some AndroMDA profiles use UML_Standard_Profile-3.2.xml, but such profile does not exist. Copy
UML_Standard_Profile.xml from MagicDraw profiles folder to AndroMDA profiles folder and rename it to
UML_Standard_Profile-3.2.xml to solve this problem.
EMF export
MagicDraw UML native file format is UML 2 XMI 2.1.
Eclipse UML 2 (v1.x) XMI, Eclipse UML 2 (v2.x) XMI, and Eclipse UML2 (v3.x) XMI file format support is added
as plugins with import/export functions.
EMF export is available with free Community or Personal editions also.
Users are able to change EMF export options in the MagicDraw Options main menu, Environment Options,
Eclipse UML 2 (v1.x) XMI, Eclipse UML 2 (v2.x) XMI, or Eclipse UML 2 (v3.x) XMI options groups.

INTEGRATION WITH ANDROMDA
EMF export
8 2
Copyright © 1998-2011 No Magic, Inc..
How and when EMF export is used
There are two major cases of AndroMDA usage:
1. Inside MagicDraw
In this case command line exporter or maven plugin should not be used, because it starts new
MD application to convert model to EMF.
MD save/export synchronization option should be used or EMF export should be performed
before external tool is used (see External Tools chapter)
2. Outside MagicDraw
In cases like nightly builds, when EMF conversion of model files is needed outside MagicDraw
application, Maven plugin or command line EMF exporter should be used. For better
performance new option for file date checking
Synchronization options
Special options are added into EMF export options, to synchronize MagicDraw native save and EMF export
actions:
The Export Model to Eclipse UML2 XMI on project save has following options:
• Do not export - synchronization is turned off.
• Ask Before export - asks to export into EMF on every "Save" action.
• Always export - uses silent mode and exports model to EMF on every Save.
The Ask to overwrite exported files - ability to turn on/off warning when existing files are overwriting.
EMF Export Location
Every project has predefined the Eclipse UML2 XMI output location property. It could be modified in
MagicDraw Options main menu, the Project Options dialog box, General project options pane.
Path variables could be used to specify location, so <andromda.home> variable or other may be used and mul-
tiple users could work on the same project without changing export location.
This location is changed every time when user uses EMF export manually. Last used export location is saved.
Command line converter
EMF plugin provides ability to use EMF export function using batch mode.
Special executables for Windows and Unix are available in plugin folder:
• \plugins\com.nomagic.magicdraw.emfuml2xmi_v1\ (for Eclipse v1.x)
• \plugins\com.nomagic.magicdraw.emfuml2xmi_v2\ (for Eclipse v2.x)
NOTE
EMF exporting on every saving increases time twice, so use this option
only if you always need these files synchronized.
If EMF is needed just on launching some build process, External Tools
with included EMF export could be used (see “External tools” on
page 84).

INTEGRATION WITH ANDROMDA
EMF export
8 3
Copyright © 1998-2011 No Magic, Inc..
• \plugins\com.nomagic.magicdraw.emfuml2xmi_v3\ (for Eclipse v3.x)
To start EMF XMI export from command line
Use exportEMFXMI project_file=<path to project file> destination_dir=<path to destination directory>
load_all_modules=<true | false>
Parameters:
• “project_file”- absolute file name. If relative file name is used, it should be in the same folder
as converter launcher.
• “destination_dir”- folder where converted EMF files should be saved. It can be multiple EMF
files after conversion of one MD XMI file, because every Profile element is separate file in EMF.
• “project_descriptor” - special URI for project identification. It can be used for both local or
teamwork projects. Teamwork project descriptor includes encrypted login information, so it is
enough information to log into remote Teamwork Server and get newest version of some
project. For more information, see Project Descriptor on page -92.
MagicDraw project descriptor is visible and selectable in the MagicDraw Project Properties
dialog box, General tab (File->Project Properties).
Descriptor for the local file contains just absolute file name, so there is no difference which
parameter is used - "project_file" or "project_descriptor".
Project descriptor OR project file name could be used, but not both at the same time.
• “load_all_modules=<true | false>” - if this option is "true", converter loads all used modules
even if they are in "auto load" or "manual load" mode.
• “check_time=<true | false>” - if this option is "true", converter shall be started only if EMF file
is older than native XMI file or EMF file doesn't exist. "false" by default - means that file is
always converted if this property is not specified.
All parameters from environment options are reused during conversion, so, for example, leave "Preserve
exported IDs" turned on in MagicDraw.
Maven 2 plugin
Batch mode EMF exporter is presented in form of Maven2 plugin.
AndroMDA users are able to include MagicDraw project file to EMF conversion task into other Maven scripts.
Integration process set "md_home" variable and moves Maven plugin to Maven repository, but only if it is in
user home directory.
In other case user should move this plugin manually from AndroMDA integrator plugin folder (\plu-
gins\com.nomagic.magicdraw.andromdaintegrator\maven_plugin) to Maven repository.
There is one sample in this folder that illustrates how converter should be used and what parameters it
requires. Look to sample pom.xml file for details.
Maven plugin uses the same parameters as command line EMF exporter and few additional:
NOTE
All used modules and profiles will be converted every time, so it could
take a while to convert even a small project if all andromda profiles are
used. It is recommended to use command line converter for nightly
builds on server where time has not the highest priority.

INTEGRATION WITH ANDROMDA
External tools
8 4
Copyright © 1998-2011 No Magic, Inc..
• md_home - MagicDraw install folder. Normally integration process should set this variable and
customer does not need to specify it manually and should use it only when path is changed or
not found.
• properties_file_path - path to EMF exporter property file. Ability to use different EMF exporters.
• com.nomagic.magicdraw.emfuml2xmi_v1\exportEMFXMI.properties (used by
default)
• com.nomagic.magicdraw.emfuml2xmi_v2\exportEMFXMI.properties
• com.nomagic.magicdraw.emfuml2xmi_v3\exportEMFXMI.properties
External tools
Any command line could be started directly from MagicDraw.
In the MagicDraw Options main menu, go to Environment Options, select External tools group and set any
command lines (e.g. to open external XML viewer, commit to CVS, compile generated Java source code or any
other).
Path variables could be used in these commands (syntax the same as in modules paths), also new additional
variable - "$f" to indicate absolute file name of current project file.
There is ability to use automatic Save/Export function before command line is launched, so AndroMDA users
can use EMF export only before Maven is started.
Multiple command lines to start, build, install or deploy project (commands to launch Maven with different
parameters) could be added and used directly from MagicDraw main toolbar as in all major IDE interfaces.
External Tools toolbar is not visible by default, so user should right click on main toolbar and select External
Tools to be visible (Switch to other Perspective if such toolbar doesn't exist).
More about external tools, see MagicDraw User Manual, Getting Started section, Setting Personal Preferences
subsection, Environment Options chapter, External Tools Pane.
Command line examples:
cmd /c start <install.root>/readme.html
Starts default Windows browser and displays readme.html from MagicDraw install folder.
In order to successfully build your project using Maven, you will need to know how to invoke the build process
for the existing modules. Here is a list of examples:
NOTE
<md_home> parameter should contain absolute path to MagicDraw
install folder if this sample is running from Maven related folder.
$MD_HOME$ and $ANDRO_MDA_HOME$ path variables could be
used everywhere in paths.
"project_file" or "destination_dir" are relative to MD home if relative file
names are used.
Command Option
mvn install
simply builds all modules

INTEGRATION WITH ANDROMDA
Customization of AndroMDA profiles/cartridges
8 5
Copyright © 1998-2011 No Magic, Inc..
Customization of AndroMDA profiles/cartridges
MagicDraw provides special set of customizations that helps to use AndroMDA cartridges more comfortable
and saves a lot of time on modeling.
See more information about usage of concrete cartridges:
http://team.andromda.org/docs/andromda-cartridges/index.html
Customizations include:
• Custom AndroMDA Diagram with predefined stereotypes in toolbar;
• Predefined style of most often used stereotypes;
• Customized specification dialogs - all tags appear as regular properties;
• Predefined basic semantics.
AndroMDA Diagram
AndroMDA Diagram uses all AndroMDA profiles and suggests most often used stereotypes to create from tool-
bar.
Diagram Toolbar includes:
• Entity
• Service
• Web Service
• Enumeration
• Embedded Value
• Value Object
• Exception
• Application Exception
• Unexpected Exception
Predefined semantics
• <<FrontEndUseCase>> could be applied to any UseCase and is available in shortcut menu for
regular UseCases.
• <<FrontEndView>> could be applied to any State and is available in shortcut menu for regular
States as checkbox.
• "Unique" checkbox will be available in shortcut menu of regular Property.
• Identifier, FinderMethod and CreateMethod are suggested as "New Elements" for Entity.
mvn -f web/pom.xml -Ddeploy
collects all artifacts and builds a deployable .war
which is then deployed
mvn clean
cleans all generated files from each target direc-
tory
mvn install -Ddeploy
rebuilds the entire application and deploys

INTEGRATION WITH ANDROMDA
Customization of AndroMDA profiles/cartridges
8 6
Copyright © 1998-2011 No Magic, Inc..
• ServiceElement is suggested to create for Service.
Some stereotypes are used only as "holders" of tags, so user will be able to specify these tags even if stereo-
type is not applied. Stereotype will be applied automatically.
Such behavior is added for these stereotypes:
• <<PersistentAssociation>>
• <<PersistentAssociationEnd>>
• <<PersistentAttribute>>
• <<PersistentClass>>
• <<PersistentElement>>
• <<PersistenceProperty>>
Converting Class Diagrams to AndroMDA Diagrams
Legacy projects may contain multiple Class diagrams that would be nice to migrate to AndroMDA diagrams.
Follow the steps below:
1. Open project and make sure you are using all required andromda profiles (if not, simply create
new empty AndroMDA diagram).
2. Save project into plain XML format.
3. Open it in XML Editor.
4. Replace all occurrences of "<type>Class Diagram</type>" into "<type>AndroMDA Diagram</
type>".
5. Save XML.
6. Open project in MagicDraw - all Class Diagrams become AndroMDA diagrams.

Copyright © 1998-2011 No Magic, Inc.
87
INTEGRATION WITH
OAW
Introduction
OpenArchitectureWare (henceforth oAW) is a popular model driven development & architecture framework
based on Eclipse. This framework consists of various components which allow user to manipulate models in
various ways.
oAW supports model checking against a defined set of validation rules:
• model-to-model transformations (e.g. deriving new models from existing models, enriching
existing model with additional derived information)
• model-to-text/text-to-model (e.g. code generation from models or parsing of structured texts
into the model form), and more.
In general, oAW is modeling-tool agnostic. Modeling tools serve as initial source of the models to be manipu-
lated. Native model format, used by oAW, is EMF but other formats (MagicDraw native format among others)
are also accessible using org.openarchitectureware.classic.* plugins (read Use of oAW Classic with
MagicDraw documentation chapter on oAW documentation page).
Due to this modeling tool agnosticism, big swaths of oAW functionality can be used without any integration or
additional support from MagicDraw side. Hence this MagicDraw integration for oAW only adds two features in
the model handling domain. The two added features are:
• "oAW Metamodeling Diagram", on page 90 - to be used together with oAW's uml2ecore
transformer - simplifying metamodel preparation.
• "Workflow Component for MagicDraw EMF Export", on page 90 - allowing triggering of
MagicDraw's Eclipse UML2 XMI export feature directly from oAW workflow scripts.
Installation
Integration with oAW is installed in a similar manner as all other integrations.
oAW has two specific features:
• The custom oAW metamodeling diagram, which operates under MagicDraw.
• The oAW workflow component task, which has to be packaged as Eclipse plugin.
There are several cases of installing the integration: you can install either only one feature or both of them.
NOTES
• This functionality is available in Standard, Professional, Architect,
and Enterprise editions only.
• In oAW 5, the uml2ecore features is deprecated. If you want to
create model in MagicDraw and generate ecore file. Please use
Export to EMF Ecore File feature or oAW 4.x instead.

INTEGRATION WITH OAW
Installation
8 8
Copyright © 1998-2011 No Magic, Inc..
System Requirements
oAW version 4.1 or higner installed on Eclipse version 3.7 or higher.
Required Eclipse version may depend on the oAW version used. Read the installation instructions of your oAW
version. MagicDraw does not place additional constraints on Eclipse version beyond v3.6 or higher constraint.
Recommended configuration (which received most of the testing) is oAW v4.1.2 on Eclipse v3.7.
To install oAW into Eclipse, follow oAW’s documentation:
http://www.openarchitectureware.org/staticpages/index.php/documentation
http://www.eclipse.org/gmt/oaw/doc/
oAW is installed into Eclipse as a set of plugins. This plugin set can be installed as a whole or some selective
subset of plugins can be installed (obeying interdependence between plugins - Eclipse plugin install mecha-
nism automatically tracks these dependencies).
For MagicDraw’s workflow component plugin org.openarchitectureware.workflow plugin is required (plus all
the plugins it depends on).
For metamodeling diagram, org.openarchitectureware.util.uml2ecore plugin is relevant (plus all the plugins
it depends on).
Installation Process
Workflow component Eclipse plugin is always installed into Eclipse when MagicDraw is integrated with Eclipse
(using Eclipse integrator). A special oAW integrator installs only the metamodeling diagram part and then
invokes the Eclipse installer to install the workflow component part.
NOTE
To use oAW5, you need to download and install 3 eclipse plug-in
below:
• (M2T) - http://download.eclipse.org/modeling/m2t/updates/releases/
• (EMFT) - http://download.eclipse.org/modeling/emft/updates/
releases/
• (TMF) - http://download.eclipse.org/modeling/tmf/updates/releases/

INTEGRATION WITH OAW
Installation
8 9
Copyright © 1998-2011 No Magic, Inc..
To install oAW
1. From the open the MagicDraw Tools main menu, choose Integrations). The Integrations dia-
log box opens.
Figure 1 -- Integrations dialog box
2.
Select the oAW item and click the Integrate/Unintegrate button. If oAW feature is not inte-
grated (Status column shows Not Integrated), it will be integrated; otherwise if oAW feature is
integrated it will be unintegrated.
After oAW integrator finishes integration (that is - brings in the custom metamodeling diagram), it checks if
MagicDraw is already integrated with Eclipse and if not, you will be prompted if you want to continue and inte-
grate MagicDraw with Eclipse (to install the workflow component part).
After successful install or uninstall you will need to restart MagicDraw for changes to be applied (for custom dia-
gram to appear/disappear).
To install oAW using command line
1. From MagicDraw installation directory, go to integrations, and then oaw directory.
2. Run the supplied install script (depending on your system this will be install.exe - for Win-
dows, install.sh for Unix systems, install.bat/install.sh for no-install MagicDraw distribution).
Uninstall
Uninstall is triggered in the same way as install (from Integrations dialog or from command line installer). oAW
uninstall only removes the oAW metamodeling diagram. It does not uninstall MagicDraw integration with
Eclipse - if you need this, you can trigger Eclipse uninstaller separately.

INTEGRATION WITH OAW
Features
9 0
Copyright © 1998-2011 No Magic, Inc..
Features
oAW Metamodeling Diagram
oAW uses metamodels extensively. They are used for defining model transformation and check rules. But
building metamodels with EMF’s internal tools is tedious. Using the tree view based editors does not scale.
Once you are at more than, say, 30 metaclasses, things become hard to work with.
One way to solve this problem is to use UML modeling tools (e.g. MagicDraw) to draw the metamodel as a sim-
ple UML model and then transform the UML model into an Ecore instance. For this purpose, oAW has a special
transformation -uml2ecore. The oAW uml2ecore utility transforms a suitably structured Eclipse UML2 model
into an Ecore file. Read more about this transformation in the Transforming UML2 models into Ecore
part of
oAW documentation.
When integrated with oAW, MagicDraw has a custom oAW Metamodeling Diagram for preparation of meta-
models. This diagram is a simplified class diagram. All the concepts, irrelevant and not present in Ecore meta-
models. This leaves only packages, classes, enumerations, associations and generalizations - hence greatly
simplifying the diagram.
To prepare a metamodel, you should:
1. Create a blank MagicDraw project. You can do this in usual MagicDraw IDE or when working in
Eclipse IDE with MagicDraw integrated into Eclipse.
2. Create one or more oAW metamodeling diagrams in this model and create your metamodel
using these diagrams.
3. Export created metamodel to Eclipse UML2 format. MagicDraw has an utility to save the
MagicDraw model files into this format. You can use any of the several ways to trigger this. You
can trigger export manually, from the MagicDraw menu (File->Export, Eclipse UML 2 (v1/2/
3.x) XMI File menu item in standalone MagicDraw IDE or MagicDraw->Tools-> >EMF UML 2
(v2.x) XMI menu item in Eclipse IDE with MagicDraw integrated). You can add invocation of
EMF export into the oAW workflow (combine this step with the next step) and run the workflow.
4. Create and run the oAW workflow with the properly defined uml2ecore transformation, which
takes the export result (Eclipse UML2 file) and transforms it into the real metamodel (EMF
Ecore file)
NOTE:
A special note about interface support. A current (v4.1.2) uml2ecore transformation does not
transform UML interfaces into Ecore constructs (there is no “interface” concept in Ecore, but
UML interfaces could theoretically be transformed into Ecore classes with isInterface() set to
true). Because of this, interface element is removed from MagicDraw’s oAW Metamodeling
Diagram. This could change in future versions of uml2ecore transformer.
Ths feature is obsoleted from oAW5.
Workflow Component for MagicDraw EMF Export
Introduction
Native model format, used by oAW, is EMF XMI (EMF of UML2 models, EMF of custom metamodels etc.).
Models, created with non EMF-based UML tools, are generally accessible through the org.openarchitecture-
ware.classic.* adapter plugins but for full functionality, EMF format should be used (e.g. uml2ecore transfor-
mation needs EMF based models).

INTEGRATION WITH OAW
Features
9 1
Copyright © 1998-2011 No Magic, Inc..
MagicDraw has functionality to export its models into Eclipse UML2 XMI format (v1.x, v2.x, and v3.x implemen-
tation of Eclipse UML2) for some time now (for more information, see MagicDraw User Manual, Working With
Projects section, Exporting project as an Eclipse UML2 (v1.x, v2.x) XMI file).
There is an an oAW workflow component for MagicDraw’s EMF export directly from the oAW workflow.
oAW workflow is a concept similar to the Ant script - it is an XML-based script, where each item in a script
describes some task. Each task can have parameters, configuring task behavior. Tasks can be composite.
Users can use tasks, defined in oAW distribution, or create and use their own tasks.
Here is a sample workflow definition, consisting of one task call - MagicDraw’s EMF exporter task:
<workflow>
<component
class="com.nomagic.magicdraw.oaw.eclipse.plugins.oaw.ExportWorkflowComponent"
projectFile="source projects/Metamodeling example.mdzip"
exportDirectory="converted to EMF"
skipUpToDate="true"
requiredVersion="2.x"/>
</workflow>
Tasks in workflow can be chained into a complex multistep operation, to achieve the necessary goal.
Component Definition
To call EMF exporter you should simply use <component> tag with parameter
class=”com.nomagic.magicdraw.oaw.eclipse.plugins.oaw.ExportWorkflowComponent” in the workflow. Since
this is not a composite task, this tag should not have any internal XML tags. It is a simple tag with these attri-
butes, describing task parameters:
• class. This tag tells oAW what task to call. For MagicDraw EMF exporter task, this tag should
be set to com.nomagic.magicdraw.oaw.eclipse.plugins.oaw.ExportWorkflowComponent.
For oAW5, the tag should be set to:
com.nomagic.magicdraw.oaw.eclipse.plugins.mwe.ExportWorkflowComponent.
• projectFile. This is a mandatory parameter, it specifies a project file for EMF exporter to export
- transformation source. Here, a simple path to file (relative or absolute) or an URL (file:// type
URLs) can be used. Also, MagicDraw project on Teamwork server can be specified here (using
teamwork:// URLs). Teamworked project URL can be determined this way: open the necessary
project in MagicDraw, then open Project Properties dialog (menu File, Project Properties).

INTEGRATION WITH OAW
Features
9 2
Copyright © 1998-2011 No Magic, Inc..
There is a Project Descriptor field in this dialog. Copy contents of this field verbatim into the
projectFile parameter.
Figure 2 -- Project Descriptor URL
• exportDirectory. This is a mandatory parameter, specifying destination directory, where the
export results will be written.
• skipUpToDate. This is an optional boolean parameter (defaults to false), which specifies
wherever exporter should check file modification dates on the export target and source. If set to
true, exporting will be skipped if export target is newer than the source.
• requiredVersion. This is an optional field, specifying the necessary Eclipse UML2 XMI
implementation version (defaults to 2.x). Possible values are 1, 1.x(synonims), 2,
2.x(synonims). Note that this is not UML1 vs. UML2 export formats; both options give UML2
formats - just different implementation versions. 1.x implementation is based on UML2 (even a
bit earlier, pre final UML2 version). 2.x is based on UML2.1 (where several issues of the
standard were fixed).
• magicdrawHome. This is a text field, specifying directory on disk where MagicDraw is installed.
This field is never needed in normal usage. Only when export component is used in
nonstandard ways (see the section below about running from command line), this field might be
necessary.
Running
oAW workflow is normally run from Eclipse IDE.
1. You have to create oAW project (choose File, then New, Project, openArchitectureWare,
openArchitectureWare Project) if you haven’t already done so.
2. Then create the workflow file (File->New->Other->openArchitectureWare->Workflow File).
3. Fill in the workflow file - add the calls to the tasks you want to perform.
4. Run the workflow (rightclick, Run As, oAW Workflow).
Depending on what tasks you use in your workflow you will have to add the necessary jars where classes,
implementing the tasks, reside to the classpath. This is done leveraging Eclipse plugin mechanism (since oAW
project is a kind of plugin project). Open manifest of the plugin project and add the necessary plugins in the
dependencies tab. Depending on the called tasks, different plugins need to be added. For workflows, calling

INTEGRATION WITH OAW
Features
9 3
Copyright © 1998-2011 No Magic, Inc..
MagicDraw EMF export task, com.nomagic.magicdraw.oaw and com.nomagic.magicdraw.eclipse.rcp plu-
gins need to be added (see the screenshot below). For workflows, calling e.g. uml2ecore transformation,
org.openarchitectureware.util.stdlib and org.openarchitectureware.util.uml2ecore plugins should be
added etc.
Figure 3 -- Adding necessary plugins for workflow, calling MagicDraw EMF export
oAW workflow can also be started from command line, using WorkflowRunner class (see oAW documentation
on workflows). Note that in this case you are on your own - you have to build the necessary classpath for the
workflow yourself. You will need oAW core jars and jars for all the components, invoked by the workflow.
MagicDraw EMF export component needs the following jars to run correctly:
• <install.root>/lib/launcher.jar
• <install.root>/plugins/eclipse/plugins/com.nomagic.magicdraw.oaw/oawplugin.jar
NOTE
In order to run workflow with oAW5, com.nomagic.magicdraw.mwe and
com.nomagic.magicdraw.eclipse.rcp are required.
NOTE
For oAW5, the two jar files below are required.
• <install.root>/lib/launcher.jar
• <install.root>/plugins/eclipse/plugins/com.nomagic.magicdraw.mwe/
mweplugin_api.jar
All dependencies of oAW need to be set to
org.eclipse.emf.mwe.core.*.

INTEGRATION WITH OAW
Features
9 4
Copyright © 1998-2011 No Magic, Inc..
The best way to create the classpath is first to properly configure the workflow in Eclipse and then glance at
Plug-in Dependencies of Eclipse project to see what jars are needed.
Be advised, that MagicDraw EMF exporter workflow task determines MagicDraw installation directory (neces-
sary for export) on runtime, from the location of launcher.jar. Hence the two above-mentioned jars should nor-
mally be used directly from the MagicDraw installation directory. If you copy them into another place and use
them from there, you will have to specify an additional parameter for the workflow task -
magicdrawHome=”path_to_the_magicdraw_installation_directory”.
NOTE:
EMF export task is rather slow, since it always starts a separate GUI-less MagicDraw instance,
which performs all the work - even if MagicDraw is already started (inside Eclipse or as
standalone IDE). This process may take a minute. Since it is slow, in some usage scenarios it is
more convenient to trigger the EMF export by hand, than to integrate it into the workflow.
