
MOBILE THERMAL PRINTER
MODEL CMP-20, CMP-20II series
User’s Manual

2
WEEE MARK
En
If you want to dispose of this product, do not mix it with general
household waste. There is a separate collection systems for used
electronics products in accordance with legislation under the
WEEE Directive (Directive 2002/96/EC) and is effective only within
European Union.
DE
Wenn Sie dieses Produkt entsorgen wollen, dann tun Sie dies
bitte nicht zusammen mit dem Haushaltsmüll. Es gibt im Rahmen
der WEEE-Direktive innerhalb der Europäischen Union (Direktive
2002/96/EC) gesetzliche Bestimmungen für separate Sammelsysteme für
gebrauchte elektronische Geräte und Produkte.
FR
Si vous souhaitez vous débarrasser de cet appareil, ne le mettez pas à la poubelle
avec vos ordures ménagères. Il existe un système de récupération distinct pour les
vieux appareils électroniques conformément à la législation WEEE sur le recyclage
des déchets des équipements électriques et électroniques (Directive 2002/96/EC)
qui est uniquement valable dans les pays de l’Union européenne.
RU
Если вы хотите избавиться от этого продукта, не смешивайте его с
обычными бытовыми отходами. Существуют отдельные системы сбора
использованных электронных изделий в соответствии с законодательством
в соответствии с Директивой WEEE (Директива 2002/96 / EC) и эффективны
только в рамках Европейского Союза.
FCC Compliance Statement for American Users
This equipment has been tested and found to comply with the limits for a Class B digital
device, pursuant to Part 15 of the FCC Rules. These limits are designed to provide
reasonable protection against harmful interference in a residential installation. This
equipment generates, uses, and can radiate radio frequency energy and, if not installed
and used in accordance with the instructions, may cause harmful interference to radio
communications. However, there is no guarantee that interference will not occur in a
particular installation. If this equipment does cause interference to radio or television
reception, which can be determined by turning the equipment off and on, the user is
encouraged to try to correct the interference by one or more of the following measures:
• Reorient or relocate the receiving antenna.
• Increase the separation between the equipment and receiver.
• Connect the equipment into an outlet on a circuit different from that to which receiver is
connected.
• Consult the dealer or an experienced radio/TV technician for help.
CAUTION: Use shielded cables to connect this device to computers. Any changes or
modifi cations not expressly approved by the grantee of this device could void the user’s
authority to operate the equipment.

3
Declaration of Conformity
The CMP-20 series conforms to the following Standards:
The Low Voltage Directive 2006/95/EC, the EC/R&TTE Directive, the RoHS
Directive 2002/95/EC, and the WEEE Directive 2002/96/EC.
LVD : EN60950-1
EC/R&TTE: EN55022 Class B
EN301 489-1
EN301 489-17
EN300 328
EN55024
The CMP-20II series conforms to the following Standards:
The Low Voltage Directive 2014/35/EU, the EMC Directive 2014/30/EC, the
R&TTE Directive 1999/5/EC (till 2017/6/12), the RE Directive 2014/53/EU (on/after
2017/6/13) and the RoHS Directive 2002/95/EC.
LVD : EN60950-1 R&TTE/RE: EN300 328
EMC: EN55032 Class B EN301 489-1
EN55024 EN301 489-17
EN 61000-3-2 EN301 893
EN 61000-3-3 EN300 440-1
EN300 440-2
EMI Compliance Statement for Canadian Users
• This Class B digital apparatus complies with Canadian ICES-003.
• Cet appareil numérique de la classe B est conforme
à la norme NMB-003 du Canada.

4
• Before using this product, be sure to read through this manual. After having read
this manual, keep it in a safe, readily accessible place for future reference.
• The information contained herein is subject to change without prior notice.
• Reproduction or transfer of part or all of this document in any means is prohibited
without permission from CITIZEN SYSTEMS.
• Note that CITIZEN SYSTEMS is not responsible for any operation results
regardless of missing, error, or misprinting in this manual.
• Note that CITIZEN SYSTEMS is not responsible for any trouble caused as a result of
using options or consumables that are not specifi ed in this manual.
• Except explained elsewhere in this manual, do not attempt to service,
disassemble or repair this product.
• Note that CITIZEN SYSTEMS is not responsible for any damage attributable to
incorrect operation/handling or improper operating environments which are not
specifi ed in this manual.
• Due to the nature of thermal paper, printed data should be considered for temporary
use, not stored for a long period or permanently. Please note that CITIZEN
SYSTEMS is not responsible for damage or lost profi t resulting from the loss of data
caused by accidents, repairs, tests or other occurrence.
• If you fi nd loss of information, error, or uncertain matter, please contact your
CITIZEN SYSTEMS dealer.
• If you fi nd any disordered or missing page (s), contact you CITIZEN SYSTEMS
dealer for replacement.
GENERAL PRECAUTIONS
• iPad, iPhone, iPod, iPod touch, and Mac OS are trademarks of Apple Inc., registered in the U.S.
and other countries.
• “Made for iPod,” “Made for iPhone,” and “Made for iPad” mean that an electronic accessory
has been designed to connect specifi cally to iPod, iPhone, or iPad, respectively, and has been
certifi ed by the developer to meet Apple performance standards.
Apple is not responsible for the operation of this device or its compliance with safety and
regulatory standards. Please note that the use of this accessory with iPod, iPhone or iPad may
affect wireless performance.
• ESC/POS is a registered trademark of Seiko Epson Corporation.
• Bluetooth is a registered trademark of Bluetooth SIG, Inc.
• Windows is a trade mark of Microsoft Corporation in the United States and/or other countries.
• Android is a registered trademark of Google Inc.
• Company names and product names in this manual are trademarks or registered trademarks of
relevant companies
• CITIZEN is a registered trademark of Citizen Watch Co., Japan
• Copyright © 2016 by CITIZEN SYSTEMS JAPAN CO., LTD.

5
SAFETY PRECAUTIONS
What the Icons Mean
Precautions and notices necessary to follow for preventing hazards to the user or
other person or their properties are defi ned as shown below. Hazards and degrees
of damage that may be caused by ignoring the instructions are categorized as shown
below. Please be familiar with the content of these defi nitions before reading this
manual.
DANGER
Indicates the case that may result in
death or serious injury.
WARNING
This symbol indicates that using the
product improperly in defiance of this
symbol may result in death or serious
injury.
CAUTION
This symbol indicates that using the
product improperly in defiance of this
symbol may result in injury or damage
to properties.
Defi nition of the icons
This symbol indicates the hazard that needs precautions.
This symbol indicates prohibited actions.
This symbol indicates mandatory actions.

6
Precautions in Handling Printer
WARNING
z
If the product continues to be used when heat or smoke is
generated or an abnormal odor is produced, a fi re may occur.
Immediately turn the printer power off, and carefully but quickly
remove the battery, then contact our service agent.
z
If any foreign matter (metal tip, water, liquid) enters the product,
immediately turn the printer power OFF, and carefully but quickly
remove the battery, then contact our service agent. Ignoring this
instruction may result in a fi re.
CAUTION
z
This equipment is not suitable for use in locations where children
are likely to be present.
z
Do not place the printer on a shaky table or other unbalanced
place. The printer may drop or fall resulting in injury.
z
Avoid using or storing in the following place. Damage to printer
may be caused.
• In a car parked in a sunny place, a place exposed to direct sunlight,
near heat generating equipment, or the like.
• A place where temperature or humidity is excessively high or low, or
its change is radical.
• A dusty place.
• A place likely to get a splash of water or liquid.
z
Avoid dropping, impacting or vibrating the printer otherwise
damage may be caused.
z
Avoid entry of foreign material. Otherwise, fault may occur.
z
Do not use volatile liquid (thinner, benzine, etc.) or wet cloth when
cleaning the printer. Deterioration or discoloration may occur. Use
a dry, soft cloth for cleaning.
z
Do not move the printer or give any shock or vibration to it while
the printer is in operation or in standby operation. The printer
power may be disconnected and the print data may be lost.

7
Precautions on Using Printer
WARNING
z
Do not touch the print head or paper cutter while replacing print
paper. Heated print head may cause burn. The cutter may cause
injury to the hand.
CAUTION
z
Use of print paper other than specifi ed may result in not only
deteriorated print quality but shortened life of print head (printing
portion).
z
Do not tap or rub the print head with edged or hard material.
z
When condensation is present on the print head, dry it completely
before printing. Printing with condensation may damage the print
head.
Precaution on Overheating
CAUTION
z
To prevent the motor from overheating, continuous printing (or
feeding) of the printer should be 1.5 m or less in print length. After
printing for this distance we recommend a pause of at least 30
seconds for cooling.

8
Precautions on Using Battery
DANGER
z
Leaked liquid from the battery may result in loss of eyesight if it
enters the eye. Immediately wash eyes with fresh water and get
medical care.
z
If liquid from the battery is ingested, immediately seek medical
attention.
z
Keep the following in mind when handling battery.
Otherwise, liquid leakage, heat generation, and explosion may
result.
• Do not throw battery into fi re or do not apply heat.
• Do not peel or scratch the external battery casing.
• Soldering is prohibited.
• Do not give strong shock to battery or throw it away.
• Do not short-circuit the positive and negative terminals with a metal
such as metal wire.
z
Never disassemble or modify battery. Otherwise, liquid leakage,
heat generation, or explosion may occur.
WARNING
z
If battery liquid attaches to skin or cloth, immediately wash it out
with fresh water. Otherwise, skin disorder may be caused.
CAUTION
z
Risk of explosion if battery is replaced by an incorrect type.
z
Dispose of used batteries according to the instructions.
z
Use only the approved external charger or charge the battery
within the printer.
z
Never use another charger or one that looks to be similar.

9
CAUTION
z
Do not dip battery in water or sea water. Wet battery may generate
heat or may be subject to corrosion.
z
Do not use or leave battery at high temperature. Using or leaving
battery in a place of high temperature may result in liquid leakage,
deteriorated performance, or shortened lifetime.
z
Keep battery beyond the reach of a baby or child. Pay attention not
to let a child take out the battery.
z
If the battery is used for the fi rst time, be sure to charge it completely
before use.
z
If any abnormality is found while the battery is in use, stop the
operation and carry the battery in local sales agent.
z
The battery in the printer is shipped partially charged. Please fully
charge the battery prior to using the printer.
Precautions on Installing New Paper
CAUTION
z
Before printing, confi rm that print paper is set straight forward at the
exit from the print (thermal) head. Skewed setting may result in paper
jamming.
z
To prevent skewed insertion of paper, use the following form for
the end of paper.
NGOK
NG
NG

10
Precautions on Using Thermal Paper
CAUTION
z
Print density may change with different kind of paper and
atmosphere temperature.
z
Observe the following when using thermal paper. Thermal paper
is not resistant to discoloration, deterioration in quality, and thin
printing.
• Do not leave printed thermal paper exposed to light for a long time.
• Avoid exposure to high temperature, humidity, liquid, or sunlight.
• When keeping the printer thermal paper on a board, do not use
paste, adhesive, or adhesive tape containing volatile organic
solvent.
• For long-time storage, use thermal paper of high storage type or
copy it with plain paper copier.
• Avoid contact with a fi lm of vinyl chloride for a long time.
• Avoid using ammonia. Do not put thermal paper near the paper
copied by use of ammonia.
• Avoid putting sweat or grease from your hands on the surface
(printed or to be printed) of thermal paper.
• Store thermal paper in a dark place with average temperature below
25°C and relative humidity below 65% .
z
Using print paper with a thickness outside the recommended range
may cause improper print quality.

11
Precautions on Using Special Serial Cable
WARNING
z
With one side of the connector connected to this product, do not
touch the metal part of the other connector.
CAUTION
z
Static electricity may cause breakdown of internal circuit of this
product.
z
Do not leave this product with a cable wound around it for a long
time. Disconnection or discoloration may result.
z
Plugging and unplugging the contactor shall be done securely in
the correct direction.
Precautions on Using Charger
CAUTION
z
Do not use the product at a voltage and frequency other than
specifi ed.
z
Do not use Charger other than specifi ed.
z
Before use, confi rm that the power receptacle has suffi cient
capacity.
z
Do not connect to the power receptacle where multiple connections
are used.
z
Do not step on, tap, or put any object, on the cable of the Charger.
z
Before connecting or disconnecting Charger, turn the printer power
OFF. Do the operation securely.

12
THE TABLE OF CONTENTS
1. GENERAL OUTLINE ...........................................13
1.1 Features ..........................................................................13
1.2 Unpacking ......................................................................14
1.3 Model Classifi cations .....................................................16
1.4 Basic Specifi cations .......................................................17
2.
EXPLANATION OF PRINTER PARTS ..................................... 19
2.1 Printer Appearance ........................................................19
2.2 Operation Panel .............................................................21
3. OPERATION ........................................................23
3.1 Setting/Replacing the paper roll .....................................23
3.2 Installing Belt Clip ...........................................................24
3.3 Installing & Using Battery ...............................................25
3.4 Charging the Battery ......................................................26
3.5
Removing Battery (with Belt Clip) ....................................... 27
3.6 Wireless Communication ...............................................28
3.7 Interface Cable Connection ...........................................31
3.8 Self Test .........................................................................32
3.9
Optimizing the Media Detection Level (Sensor Calibration)
.............33
3.10
Power Save Mode, Auto Power Off ......................................... 34
4. Utility, Drivers and SDK .....................................35
4.1 Utility ...............................................................................35

13
1. GENERAL OUTLINE
The CMP-20 series of printers are compact, full featured portable line thermal printer,
which can be used in a large variety of job environments.
Bluetooth/WiFi communication with a PDA or similar device is useful for business
activities at the point of sale or service.
1.1 Features
z
Compact and Robust
z
High speed and low noise emission of the line thermal printing
z
Long-life printing head with high reliability
z
Easy paper-handling, owing to the paper-drop-in style
z
Lithium-ion rechargeable battery
z
3 LED to indicate battery status
z
Equipped with USB and serial port as standard
z
Built-in Bluetooth
z
Built-in WiFi (Wireless LAN)
z
Auto power save, Auto power off mode
z
Emulation of ESC/POS and CPCL / ZPLII available for CMP-20II
z
Automatic response to Bluetooth for iOS devices and other devices on CMP-20
II
z
SoftAP function enables Wi-Fi communication without Access Point on CMP-20II
z
Linked with host power-on via USB connection

14
1.2 Unpacking
Standard
Printer Battery
(CMP-BA20)
Belt Clip
Charger
(CMP-AD21US)
EC Plug
(CMP-21EPLUG)
Paper Roll CD-ROM Quick Start Guide

15
Option
Battery Cradle
(CMP-BC20)
Car Charger
(CMP-CC21)
Serial Cable
(CA20-S01)
Leather Case
(SC20-01)
Strap
(STP20-01)
USB Cable
(CA20-U01)

16
1.3 Model Classifi cations
Classifi ed by the following designation.
CMP-20 II BTi U
Destination
U : Americas / Europe
Interface
None
: USB and Serial
BT : USB, Serial and Bluetooth
BTi : USB, Serial and Bluetooth (MFi)
WF : USB, Serial and WiFi
Generation
None : Type 1
II : Type 2

17
1.4 Basic Specifi cations
Printing Method Direct Thernal
Printing Speed 80 mm/sec
Print Width Max. 48 mm (384 dots)
Resolution 203 DPI x 203 DPI
Character ESC/POS FontA(12x24), FontB(9x17), Asian Font(KOR,
JPN,CHN_GB2312,CHN_BIG5), Codepages x 24,
International Characters x14
CPCL
(CMP-20II)
Resident Font Type 0/1/2/4/5/6/7, Size 0-7
Asian Font (24 x 24)
Resident TTF, Downloadable TTF
ZPL
(CMP-20II)
FontA~H, FontGS,Resident TTF(Font0), Downloadable TTF
Barcode ESC/POS 1D: EAN-8, EAN-13, Code39, ITF, UPC-A, UPC-E,
Codabar, Code93, Code128
2D: QR, PDF417
CPCL
(CMP-20II)
1D: LUPC-A(+2,+5), UPC-E(+2, +5), EAN13(+2, +5),
EAN8(+2,+5), Code39 etc. (CPCL)
2D: QR, PDF417, MicroPDF417, Maxicode, Datamatrix, Aztec,
TLC39, RSS14
ZPL
(CMP-20II)
1D : Code11, ITF, Code39, Planet, EAN-8, UPC-E,
Code93, Code128 etc. (ZPLII)
2D: QR, PDF417, MicroPDF417, Maxicode,
Datamatrix, Aztec, TLC39, RSS14
Emulation ESC/POS (CMP-20, CMP-20II)
CPCL, ZPLII (CMP-20II)
Input buffer 8K bytes (USB), 32K bytes (Others)
Sensor Refl ective sensor (Paper end / Black mark)
Paper Paper type Thermal Paper
Width Max. 58 mm
Thickness 0.065 mm ~ 0.09 mm
Outside
Diameter
Max. 48 mm
Core Diameter 12.5 mm +/-0.5 mm

18
Reliability Thermal Printer
Head
50 km or 100,000,000 pulses
Battery Continuous Printing 80 min (350 m)
Standby for 30 hours
IP Rating IP42
Drop 1.5 m (to company standard)
Interface Standard Serial (RS-232C), USB
Optional Bluetooth or Wi-Fi
Battery
Charger
Input AC 100 ~ 240 V, 50/60 Hz
Output 8.4 V , 800 ~ 1400 mA
Battery Battery Type Li-ion
Output 7.4 V 1800 - 2000 mAh
Charging Time Approximately 150 min
External dimensions 93(W) x 138(D) x 62(H) mm
Weight 340 g (Without Battery) 440 g (With Battery)
Temperature Operation -10 to +50 °C
*1
Storage -20 to +60 °C
Humidity Operation 30 to 80 %
Storage 10 to 85 %
Safety Standard. EMC UL, FCC Class B, CE mark
*1 This does not guarantee printing quality at low temperature.

19
2.
EXPLANATION OF PRINTER PARTS
2.1 Printer Appearance
(1) Paper Cover
Set paper roll inside this cover.
(2) Manual Cutter (Tear Bar)
To cut the printed paper, gently pull the paper from the edge of the
paper at the angle so that paper fi rmly contacts the serrated cutter.
(3) Power Button
Press and hold the Power button for approximately 3 seconds to turn
the printer power ON.
To turn OFF the printer, press and hold the Power button until the
Power LED gets off.
(4) Paper Cover Open Button (blue colour)
Press down to open the paper cover for replacing the paper roll.
(5) Paper Feed Button
Press once for 1 line paper feed.
Press down and hold for continuous paper feed to any required length.
(6) Control Panel

20
Refer to section 2.2 Operation Panel.
(7) DC jack
Connect Charger for recharging battery.
(8) Battery
Refer to section 3.3 Installing & Using Battery to 3.5 Removing Battery
(with Belt Clip).
(9) Belt Clip Hole
Refer to section 3.2 Installing Belt Clip.
(10) USB Port (Mini B connector)
For USB cable connection to host.
(11) Serial por t
For serial cable connection to host.

21
2.2 Operation Panel
Button/LED Name Function
Power
Button and
Power LED
When the printer is off, press this button for approximately 3 seconds
and it will turn on the power. When on, pressing the button will switch
off the printer.The power of the printer will turn on when the power of
a host connected via USB is turned on.
The "Power" LED lights when the power turns on and fl ashes slowly
when a Bluetooth or wireless LAN connection is established.If
SoftAP is selected, Power LED always blinks.
It fl ashes quickly while data is being received via Bluetooth or
wireless LAN.
Paper Feed
Button
Paper can be fed manually by pressing this button.
Additionally, a self-test can be produced - refer to “3.8” for self test
information.
Battery
Status LED
1. If all three of the “Batt“ LEDs are lit, the battery is fully charged.
2. If you can hear beeping sound and all lights are turned off, it
means that the battery is at the lowest level.
3. If the battery is not charged at all, the printer turns off
automatically.
Error LED
If the red light is turned on, it means no paper, paper cover open or
media detection error.

22
NOTE
1. The battery status LEDs give an indication of power remaining.
Actual run-time remaining will depend on many factors such as the contents of
the output, distance to the computer, etc.
2. When the battery level is very low, high density printing can result in the printer
switching off during printing resulting in possible loss of data.

23
3. OPERATION
3.1 Setting/Replacing the paper roll
(1) Press the Blue Paper Cover
Open button and lift the paper
cover.
(2) Place the paper roll as shown.
Make sure the paper is placed in
right direction.
(3) Pull a short length of paper out of
the printer and then press center
of the paper cover to close the
cover.
24
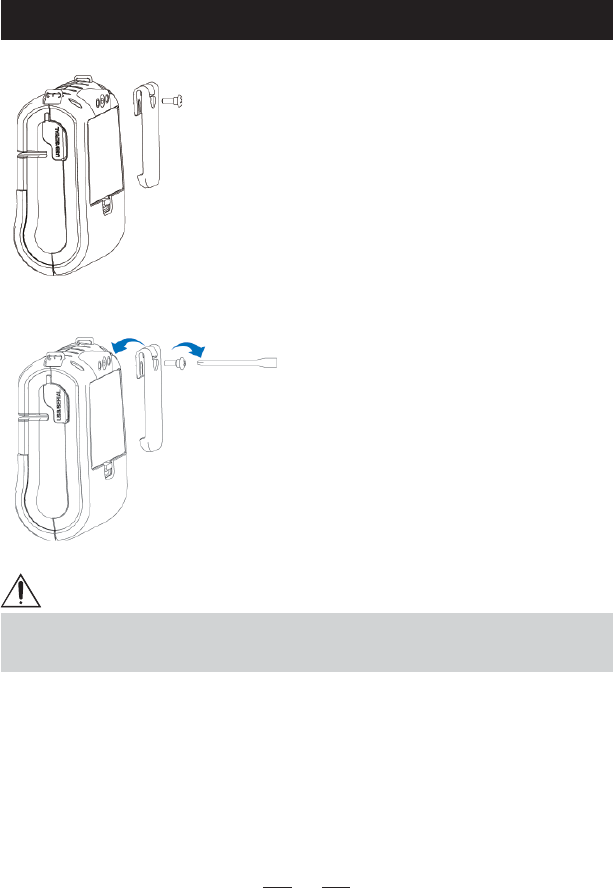
3.2 Installing Belt Clip
(1) Insert screw into belt clip.
(2) Tighten the screw with driver as
shown.
NOTE
The belt clip is included in the pack as a standard item but does not need to be
used or installed!

25
3.3 Installing & Using Battery
(1) Align battery hook as shown in the picture.
(2) Push the battery into the printer until it locks in place.
(3) To release or remove the battery, gently pull the release catch towards
the battery module and rotate the battery from the printer.
Hook
NOTE
1. As the battery is not charged at the time of your purchase, charge the battery
fully prior to using the printer.
(Batteries can be charged in the printer or optional external cradle.)
2. When used in low temperatures, the battery's operation time may decrease.
3. The full charge level for the battery will decrease with each discharge,
gradually decreasing the operation time of the battery as it is repeatedly used.
4. Even when the power is turned off, the printer battery will very gradually be
consumed.
5. If you will not be using the printer for a long period of time, remove the battery
from the printer.
6. Storing a battery with remaining charge for a long period of time may cause it
to degrade. Please drain the power from the battery completely before storing
it for long periods.

26
3.4 Charging the Battery
(1) Be sure that the printer is turned off and AC plug is correct one.
If AC plug is wrong, change the plug to correct one.
(2) Open the DC Jack cover by pulling on the rubber cover and insert DC
JACK into the printer.
(3) Plug the power code to electrical outlet.
(4) The Charge Indicator LED is on the AC Charger itself (not the printer)
and shows red or green according to the status.
NOTE
In case of a trouble while charging the battery, the charge is suspended with
charge LED blinking Red. Try unplugging and reconnecting charger, then charge
should resume. The charging is completed when the LED changes to solid
(continuous) green.
NOTE
1. Unless the exclusive charger is used provided by the manufacturer, the printer
can be damaged, and the manufacturer is not liable for the consequential
damage.
2. Before removing the battery, make sure that power is turned off.
3. A battery must be installed for printing. The printer will not operate from the
charger alone.
4. It is not recommended to use or operate the printer whilst charging as it can
reduce the battery's overall lifetime.

27
3.5
Removing Battery (with Belt Clip)
(1) Rotate the belt clip as shown.
(2) Remove the battery as shown.
NOTE
Turn off the power before removing the battery.
Removing the battery with the power turned on may damage the printer due to
static electricity etc.

28
3.6 Wireless Communication
Bluetooth Connection
(1) The Printer can be connected to devices equipped with a Bluetooth
interface such as PDAs, PCs or mobile telephones and handheld
scanners.
(2) Use the Bluetooth connection function supported by the device to
connect to the printer.
(3) The default PIN code for pairing is "0000" but this can be changed
with the Utilities supplied on the CD-ROM.Furthermore, enable/disable
of Bluetooth Name/Discoverability/iOS auto connection can also be
changed with the Utilities.
(4) A printer found via Bluetooth is discovered with a Bluetooth name
like CMP_xxxx. By default, xxxx is the last four digits of the Bluetooth
address.
(5) The pairing procedure differs depending on the communication partner.
NOTE
Bluetooth communication is slow so if a large data is printed, printing may stop
intermittently and white streaks may appear in the part where printing stopped.
Bluetooth communication with iOS devices is even slower. If Bluetooth
communication is not successful on Non-iOS devices, please try disabling iOS
Auto Connection.

29
Wireless LAN Connection
(1) The Printer can be connected to devices equipped with Wireless LAN
connection according to the WiFi standards of 802.11a, 802.11b and
.11g.
(2) Use the WiFi(802.11a/b/g) connection function supported by the device
to connect to the printer.
About Changing the Settings
Settings related to the wireless LAN can be changed with the Utilities
supplied on the CD-ROM or in the settings screen that can be
displayed by specifying the IP address of the printer in a browser.
The default SSID is CMP_xxxx with the xxxx part being the last four
digits of the MAC address.
About the SoftAP Function
When this function is enabled, the printer functions as a simple access
point. So it becomes possible to print directly from the host to the
printer without an external access point.
When the SoftAP function is enabled, the Power LED always fl ashes.

30
NOTE
1. Refer to Confi guration Tool in the CD-ROM for the WiFi setting.
2. Interference with wireless LAN communication from other signals etc.
In regard to the use of wireless LAN in an environment that might experience
interference from other signals, the following steps can be taken in order to
restrict the chances of interference occurring.
• Use an access point that is resistant to interference.
• Change the placement of the devices, such as moving the wireless LAN
device further away.
• Use a different channel from the wireless LAN device.
• Turn off the source of the interference.
3. Connecting to Wireless LAN Devices
There is a limit to the number of wireless LAN devices with which connection
could be checked. There is no guarantee that connection will be possible with
all wireless LAN devices.
Evaluate and check thoroughly prior to set up.
4. Security for Wireless Communication
Wireless communication carries with it certain risks, including interception of
signals, leaking of communicated content and unauthorized access to your
network.
Please give due consideration to security during its use.
Even if security issues such as leaks or unauthorized access do occur, our
company shall bear no liability for any damages incurred as a result.
NOTE
When there is an attempt to communicate with multiple interfaces, the interface
that received data fi rst is used. If the printer receives no data for 20 seconds,
communication from another interface becomes possible.

31
3.7 Interface Cable Connection
(1) Connect USB or Serial cable into the cable connector on the printer.
USB
Serial
NOTE
Use the cable offered by the manufacturer (Serial).
(2) Connect the interface cable into the USB or Serial port of the device
(PDA, PC, etc.).
NOTE
If a host that is powered on is connected with a USB cable, the power of the
printer turns on automatically.
NOTE
When there is an attempt to communicate with multiple interfaces, the interface
that received data fi rst is used. If the printer receives no data for 20 seconds,
communication from another interface becomes possible.

32
3.8 Self Test
(1) Turn off the power pressing the
Power Button for approximately 3
seconds.
(2) Whilst pressing and holding the
Paper FEED button, press the
Power Button.
Press and hold both buttons until
the buzzer sounds.
(3) The printout, similar to the
example shown, is produced.

33
NOTE
1. If the FEED button is pressed again within 3 seconds after printing ends, the
mode switches to the hexadecimal dump print mode. If the FEED button is not
pressed within 3 seconds, the self test ends automatically.
2. In the hexadecimal dump print mode, the received data is printed in
hexadecimal format. To end the hexadecimal dump print mode, turn off the
power.
3.9
Sensor Calibration
If media loading detection is unstable, try performing sensor calibration. The
procedure for sensor calibration is as follows.
(1) Check that the emulation and sensor settings are appropriate.
(2) Turn off the power.
(3) Press the Power button while holding down the FEED button.
(4) Continue pressing both buttons and then release the Power button
when the Error LED goes out.
(5) Keep holding down the FEED button till sensor optimization starts.

34
3.10
Power Save Mode, Auto Power Off
In order to extend the operating time of the battery, a mode is provided in which
the printer will automatically switch to Power Save Mode or turn itself off if a certain
amount of time passes without printing, communication or controls being performed.
Selecting which mode to use and the length of time after which it is activated is
performed from the utility.
Auto Power Off will turn off the power entirely, therefore requiring the power to the
turned back on before the printer can be used.
Power Save Mode will place certain printer functions into sleep mode.
Normal mode can be restored either by pressing the FEED button or by sending data
to the printer.
The initial part of any data sent will be ignored, so start by sending a code of 2 bytes
or more, such as a NULL that does not print anything or operate any function.
4. Utility, Drivers and SDK
4.1 Utility
Printer settings can be changed using the Windows software utility called "Printer
Utility."
The latest version of the utility can be downloaded from Citizen's website:
www.citizen-systems.com
See the utility manual for more details.

35
CMP-20I+II
CSE-MB-1708
6-1-12, Tanashi-cho, Nishi-Tokyo-shi Tokyo, 188-8511, Japan
Tel: +81 (0) 42 468 4608 Fax: +81 (0) 42 468 4687
http://www.citizen-systems.co.jp
