
The Non-Invasive Caries
Therapy Guide
SUGGESTED CITATION:
CareQuest Institute for Oral Health. The Non-Invasive Caries Therapy Guide. Boston, MA: April 2023. © 2023 CareQuest Institute for Oral Health, Inc. All rights reserved.
Content and clinical validation expertise by

3carequest.org | The Non-Invasive Caries Therapy Guide
The Non-Invasive Caries
Therapy Guide
TIPS ON HOW TO . . . . . . . . . . . . . . . . . . . . . . . . . . . . . . . . . . . . . . . . . . . . . . . . . . . . Page
The Non-Invasive Caries Therapy Guide is an illustrated manual on
diagnostics, preventives, and therapeutics to fight dental caries.
Goals of the Guide
1. Increase access to care by decreasing reliance on invasive dentistry.
2. Transform the oral health workforce by empowering non-dentists
to manage dental caries.
3. Improve clinical outcomes by optimizing clinical technique.
4. Lower barriers to adopting evidence-based techniques.
Table of Contents
Dierentiate Active vs. Arrested Caries Lesions . . . . . . . . . . . . . 4
Assess Lesion Activity with a Protein-Linked Dye Caries
Visualization Aid. . . . . . . . . . . . . . . . . . . . . . . . . . . . . . . . . . . . . . . . . . . . . . . . .5
Apply Fluoride Varnish ......................................... 6
Apply 10% Povidone-Iodine . . . . . . . . . . . . . . . . . . . . . . . . . . . . . . . . . . 7
Apply Self-Assembling Peptide P
11
-4 ......................... 8
Apply Silver Diamine Fluoride (SDF) ........................... 9
Apply Glass Ionomer Cement Sealants or Fillings . . . . . . . . . . . 10
Perform Two-Visit Silver-Modified Atraumatic Restorative
Treatment (2-Visit SMART) ....................................11
Perform the Hall Technique for Placing
Stainless Steel Crowns .....................................12

4 | carequest.orgThe Non-Invasive Caries Therapy Guide
ACTIVE non-cavitated lesions (
initial
)
ACTIVE cavitated lesion (
moderate,
advanced
)
ARRESTED cavitated lesion (
moderate,
advanced
)
ARRESTED non-cavitated lesions
(
initial
)
•
No surface breakdown, yet. Lesions as deep as the outer
1/3 of dentin are not infected and can be remineralized.
•
Usually plaque-covered.
•
The lesion can be opaque white, yellow, orange, or brown.
•
Chalky, no shine upon drying.
•
Active lesions typically reach the gumline (facial or
buccal) and extend out of pits and fissures.
•
Feels bumpy and soft when gently dragging the end of a
blunt instrument across the lesion.
•
Radiographs may show demineralization in the outer third
of dentin. Without cavitation, dentin is not infected.
•
No surface breakdown.
•
Usually plaque-free.
•
Lesion can be white, amber, brown, or black.
•
Shiny upon drying, not chalky.
•
Arrested lesions typically do not reach the gumline (facial
or buccal) and do not extend out of pits and fissures. May
have dark staining.
•
Feels smooth and hard when gently dragging the end of a
blunt instrument across the lesion.
l Dentin may be aected, but is not infected.
•
Visible cavitation. The hole breaches the dentin. Usually the
demineralization reaches the middle or inner 1/3 of dentin.
•
Usually plaque-covered.
•
White, yellow, orange, or light brown and usually dull =
bacterial growth.
•
Feels soft or leathery when gently dragging the end of a
blunt instrument across the lesion.
•
Easily visible cavitation. The hole breaches the dentin.
•
Usually plaque-free.
•
Amber to dark brown or black and usually shiny = no
bacteria.
•
Feels smooth and hard when gently dragging the end of a
blunt instrument across the lesion.
•
Cleansable lesions are much more likely to arrest than lesions
with plaque traps.
Dierentiate Active vs. Arrested Caries Lesions
(Tooth Decay/Cavity) by Visual-Tactile Assessment of Surface Texture and Topography
TIPS ON HOW TO
Note: Assess
before
cleaning, and assure adequate lighting.
4
Developed from: Nyvad
Caries Res
33:252

5carequest.org | The Non-Invasive Caries Therapy Guide
TIPS ON HOW TO
Assess Lesion Activity with a Protein-Linked Dye Caries Visualization Aid
5
Active lesion Arrested lesion
6
Document & review
7
Remove
8
Manage
1
Active lesion Arrested lesion
2
Apply
3
Absorb
4
Rinse
Apply to all teeth. Keep open for 1 minute while it absorbs. Rinse well with water, then spit.
Color indicates active caries lesions. Take a picture of the colored areas. Assess for cavitation
and cleansability.
Show the patient or caregiver. Help them choose
self-management goals and non-invasive interventions.
Remove color by cleaning with detergent-containing
toothpaste.
A brush, gauze, or prophy cup may be used.
Active caries lesions should be managed per the clinical
team’s judgement. The American Dental Association
recommends to “prioritize the use of non-restorative
interventions,” including relevant non-invasive therapies
in this Guide.
Use at future recare visits to monitor dental caries.
Clean carefully, rinse, and dry with air.
For no aerosols, thoroughly dry with cotton.
60 s
Developed from Jablonski-Momeni Caries Res, 2023

6 | carequest.orgThe Non-Invasive Caries Therapy Guide
or
Mix for 5 seconds.
Note: Mix, regardless of package
instructions.
1
Mix
2
Dry (moist)
3
Apply
4
Cover
5
Spit in trash
6
Protect
Apply a thin layer across all teeth.
A gloved finger may be used instead
of a brush.
Be sure to apply to all high risk
surfaces, such as: pits, fissures,
exposed roots, and contact points.
Do not spit into the sink
(it may clog the plumbing).
Any spit should end up in the trash.
Help the patient remove excess
saliva. For example, ask the patient
to swallow, use cotton, or use a
saliva ejector.
Keep the teeth moist.
Shellac-Type Varnish
Help the patient avoid brushing,
flossing, alcohol, hot drinks, and
foods that are crunchy or sticky,
for 30 minutes.
30
min
Invert
2–3 x
Rosin-Type Varnish
Invert the bottle 2–3 times, and
then dispense for application.
Starting from the back of each
quadrant, apply a thin swipe across
buccal/facial surfaces in one
sweeping motion.
A gloved finger may be used instead
of a brush.
Shellac varnishes spread unaided. Ask the patient to inhale forcefully
through their teeth 3 times to set
the varnish.
Help the patient remove excess
saliva. For example, ask the patient
to swallow, use cotton, or use a
saliva ejector.
Keep the teeth moist.
Help the patient avoid alcohol and
brushing for 4 hours.
3 X
4
hrs
A
Mix
B
Dry (moist)
C
Apply
D
Let spread
E
Inhale through teeth
F
Protect
Apply Fluoride Varnish
for Caries Prevention or Treatment of Initial Caries Lesions
Developed from: Marinho Cochrane Database Syst Rev CD002279
TIPS ON HOW TO
7carequest.org | The Non-Invasive Caries Therapy Guide
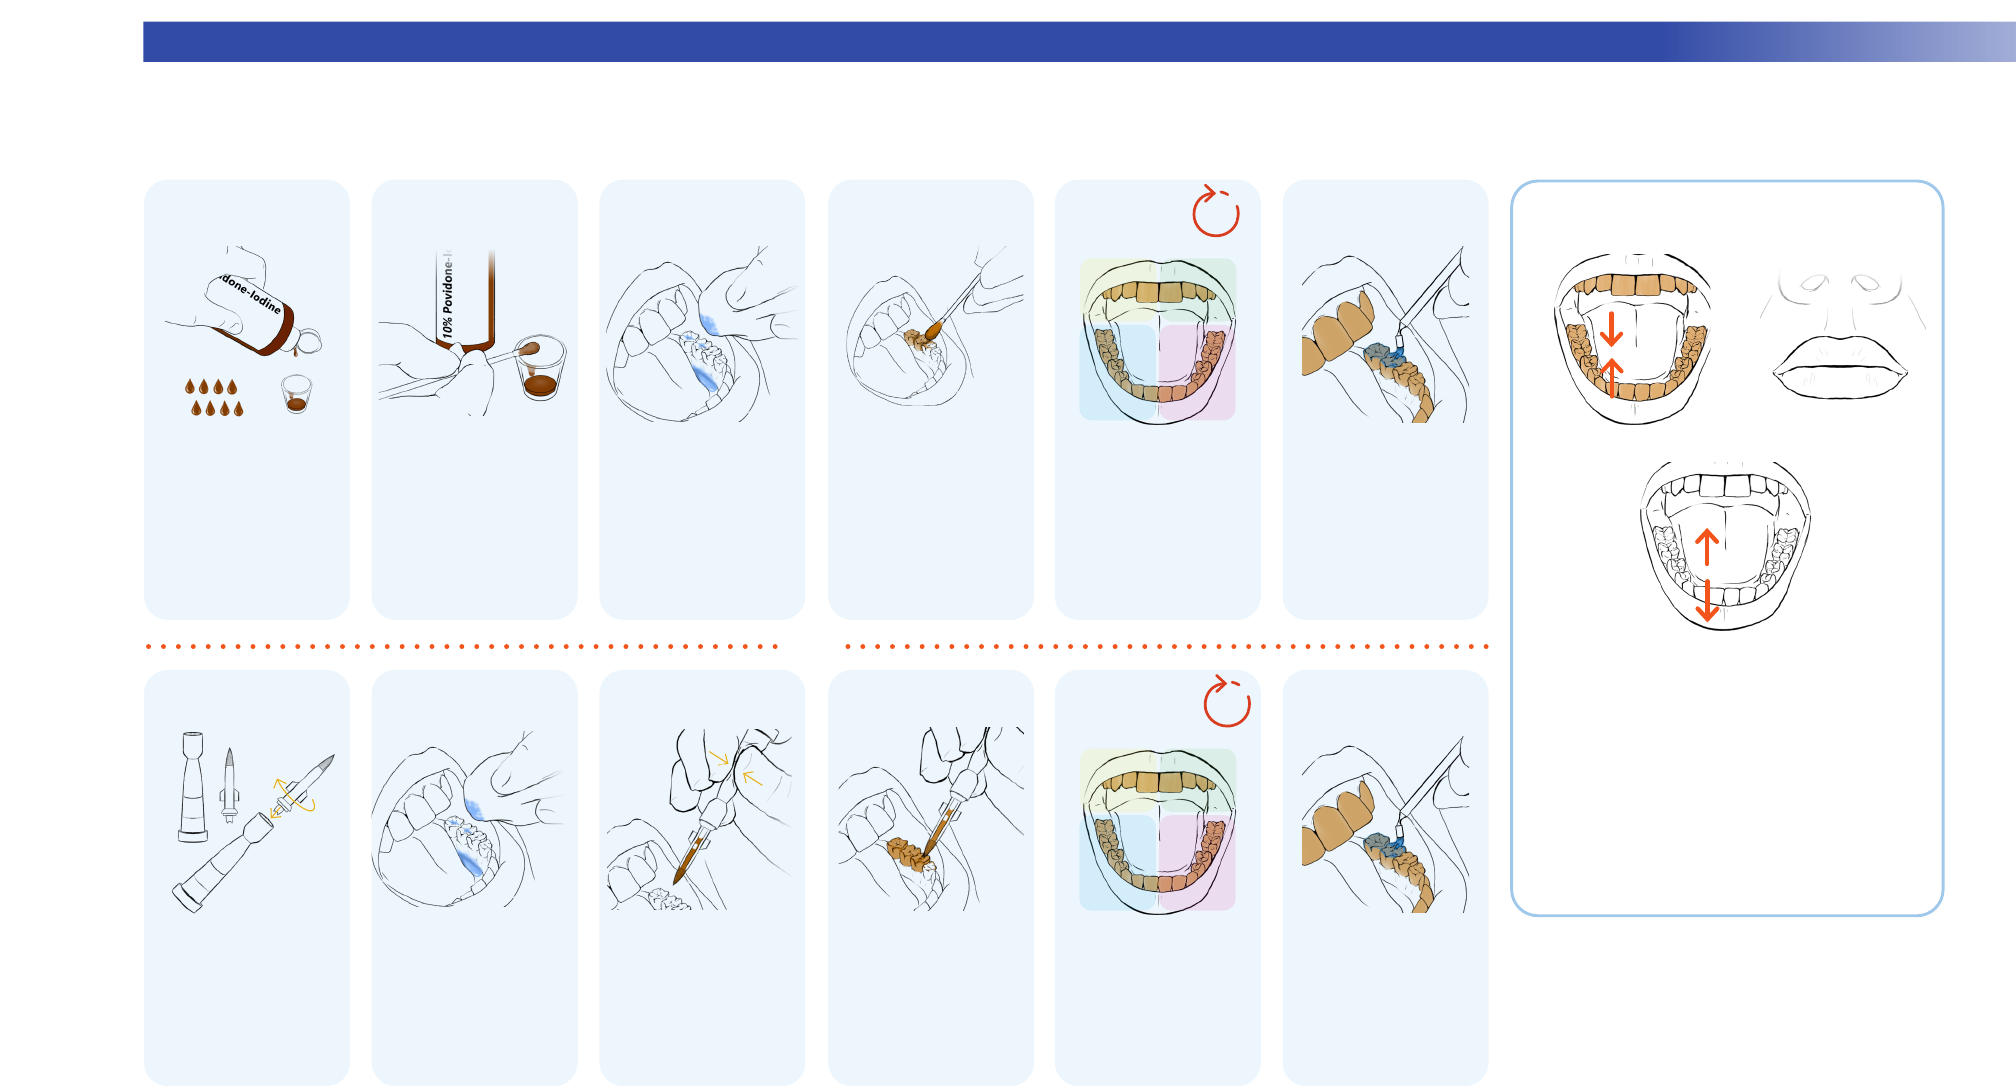
TIPS ON HOW TO
Apply 10% Povidone-Iodine
for Caries Prevention
Dispense 8 drops of 10%
povidone-iodine.
Help the patient remove
excess saliva. Keep moist.
For example ask the
patient to swallow, use
cotton, or use a saliva
ejector.
Roll the swab and push
to release more iodine
into high risk areas,
like contact points and
exposed roots.
Note: To avoid too much
iodine, do not re-dip after
applying to teeth.
Continue across all teeth.
Keep mouth open for
10 seconds.
Help the patient remove
any pooled saliva by
swallowing or spitting,
or using cotton or a
saliva ejector.
Saturate one end of a
cotton swab.
Fluoride varnish may be
applied immediately.
Help the patient avoid
eating or drinking for
30 minutes.
1
Dispense
2
Saturate
3
Dry
4
Apply
5
Cover
6
Optional
fluoride varnish
open
10 s
Screw the brush together.
Squeeze to move the
iodine into the brush.
Brush on, focusing
on high risk areas like
contact points and
exposed roots.
Continue across all teeth.
Keep mouth open for
10 seconds.
Ask the patient to
swallow. Use gauze
or suction to remove
excess saliva.
Fluoride varnish may be
applied after 10 seconds.
Wait 30 minutes to eat
or drink.
A
Dispense
B
Dry
C
Squeeze
D
Apply
E
Cover
F
Optional
fluoride varnish
open
10 s
Myth: It stains teeth.
No! The temporary color will disappear after closing.
However, it can stain cloth.
Myth: Shellfish allergy = iodine allergy
No! There is no cross-reactivity between shellfish
and iodine.
Myth: Bad taste
No! A little bit of iodine does not taste bad.
Myths about Povidone-Iodine
I
III
II
or
Developed from: Milgrom J Dent Child 78:143
8 | carequest.orgThe Non-Invasive Caries Therapy Guide8 | carequest.orgThe Non-Invasive Caries Therapy Guide
TIPS ON HOW TOTIPS ON HOW TO
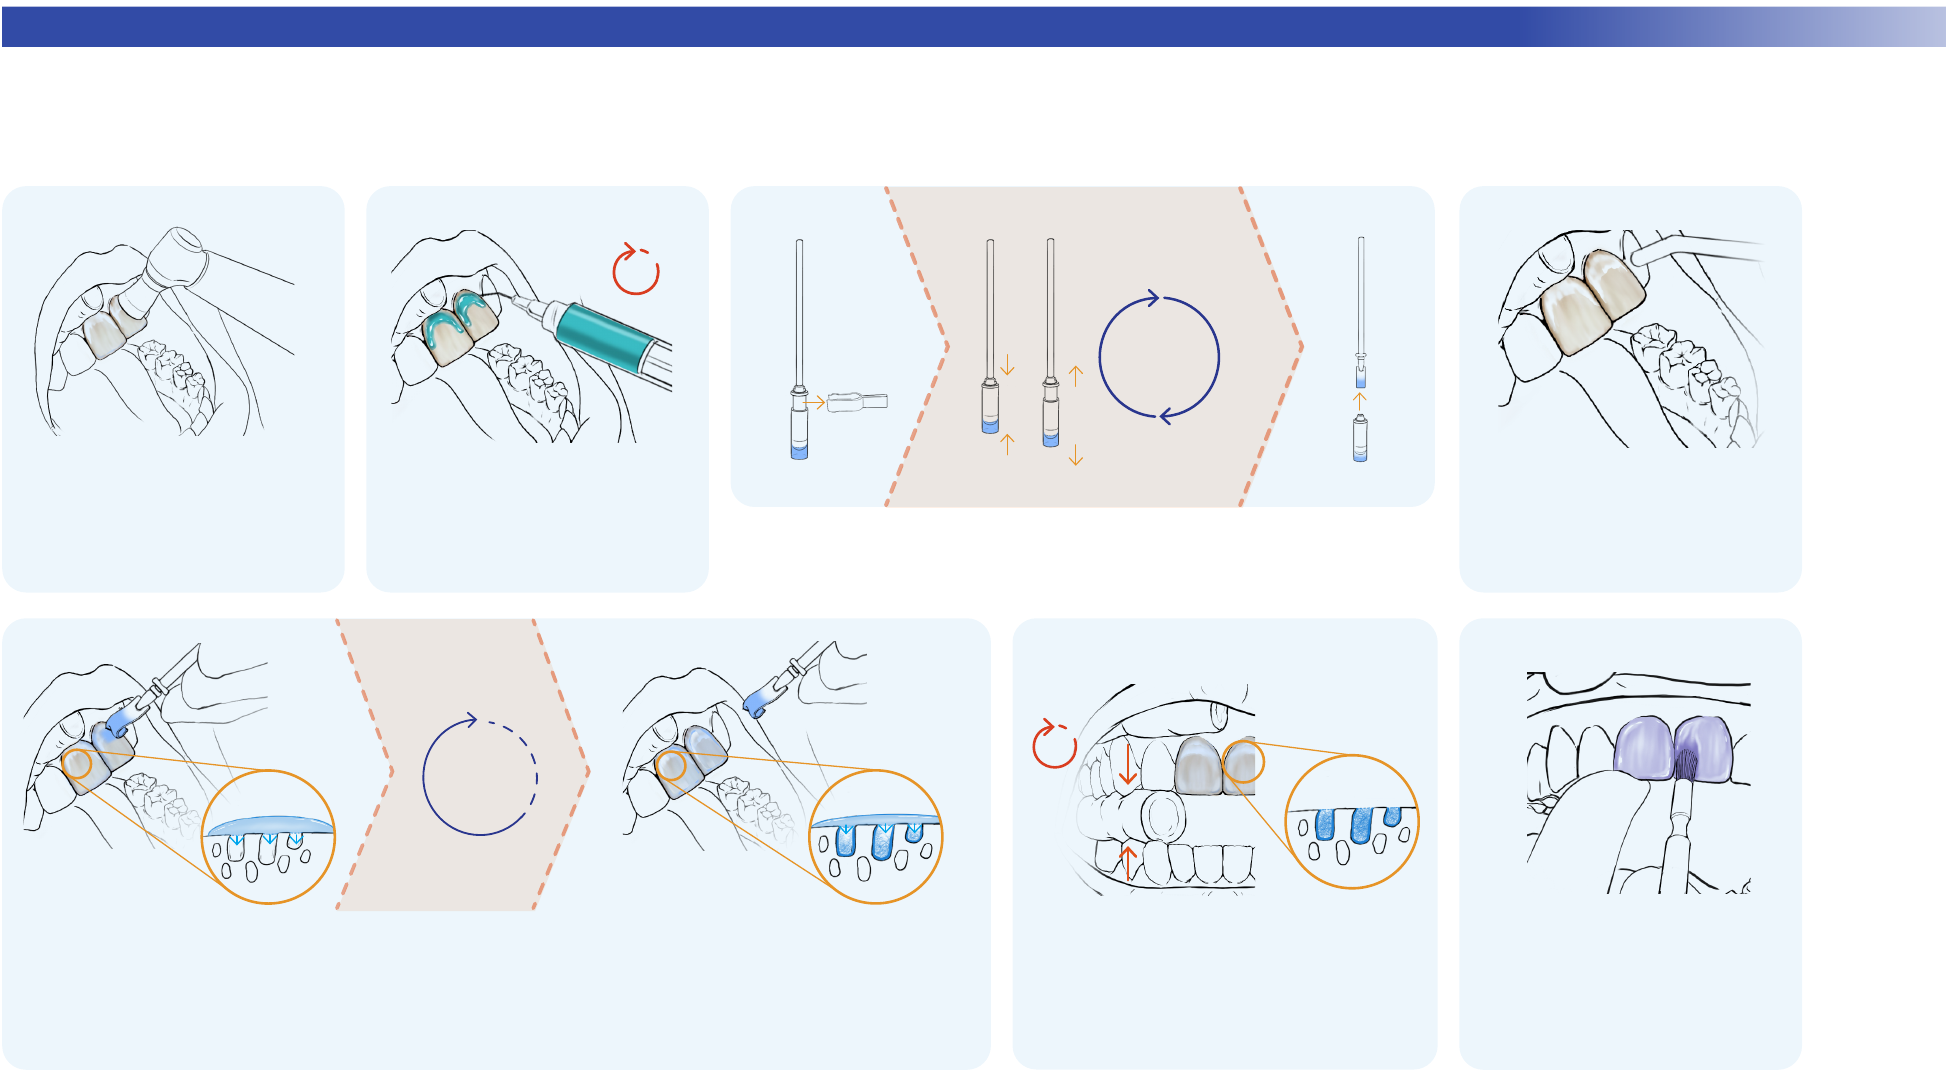
1
Clean
2
Ensure lesion porosity
3
Activate
4 5 6
Dry
Apply Self-Assembling Peptide P
11
-4
to Initial Caries Lesions (Non-Cavitated)
Clean the teeth with pumice. Rinse or
wipe clean. Isolate with cotton.
Thoroughly dry the aected areas
(desiccate if feasible).
Plunge together
and pull apart
If the lesion is not already porous, etch
the white spot lesion(s) for 3–5 seconds.
Rinse thoroughly.
Removal of decay is not indicated.
IMPORTANT: The P
11
-4 peptide is on the sponge applicator.
It is activated by contact with the liquid at the bottom.
3–5 s
Note: The manufacturer’s instructions state to bleach and etch for 20 seconds each.
7
Apply
8 9 10
Protect
11
Fluoride
3 -5
min
Reapply
until
saturated
Apply P
11
-4 to dried white spots. Allow
to soak in. Re-apply every 5–10 seconds
until the area stays wet.
IMPORTANT:
The sponge applicator
must be used.
If treating approximal surfaces, simply apply to the
embrasures; the liquid will wrap around the contact point
and flow by capillary action into the lesion.
Or, use the
Flori technique
: cut the sponge into 2–3 pieces
and push one into each aected proximal space.
Keep saturated teeth isolated with cotton for 3–5
minutes. Remove excess with cotton. Do not rinse.
For optimal results, apply
fluoride varnish.
Help the patient promote a healthy oral
environment for the next 3–6 months
to optimize enamel regeneration.
Developed from: Splieth A Dent Res 29:42

9carequest.org | The Non-Invasive Caries Therapy Guide
TIPS ON HOW TO
Apply Silver Diamine Fluoride (SDF)
to Initial, Moderate, or Advanced Caries Lesions
1
Isolate
2
Dry
3 4
Apply
5
6
Wait
7 8
Remove excess
9
Protect
Dispense 1–4 drops in a dappen dish.
Isolate the teeth with cotton.
Protect the patient’s eyes.
Thoroughly dry with cotton. Compressed air helps dessicate.
Help the patient keep their mouth open.
Removal of decay is not indicated.
Apply to dry caries lesions. Re-apply every 5–10 seconds until the entire lesion stays wet.
Be careful of dripping, SDF stains.
If treating approximal surfaces, simply apply to the embrasures. The liquid/gel will wrap
around the contact point and flow by capillary action into the lesion.
Allow at least 10 seconds for SDF to absorb. During this time, the SDF will seep deeper into
the caries lesion through capillary action.
Do not rinse. Do not blow compressed air.
Option 1: cover the treated areas
with fluoride varnish or petroleum jelly
(e.g. Vaseline), then remove cotton.
Option 2: continue to isolate from
saliva for 1 minute.
Remove excess with cotton.
Leave surfaces moist.
Reapply
until
saturated
10 s
Developed from: Young Compend Contin Educ Dent 42:e5

10 | carequest.orgThe Non-Invasive Caries Therapy Guide
9
Apply – at least
10
Use finger
11
Lubricate
12
Push
13
Contour
14
Work fast
15
Bite down
16
Remove excess
1 quadrant at a time
TIPS ON HOW TO
Developed from: Frencken Br Dent J 223:183
Apply Glass Ionomer Cement Sealants or Fillings
to Carious or Healthy Fissures with a Sound Enamel Perimeter
1
Clean & keep moist
2
Condition
3
Rinse
4
Isolate
5
Activate
6
Plunge
7
Mix
8
Insert
Clean out debris. Do not dry.
Tap hard
3–5 times
Apply poly-acrylic acid
conditioner (10 to 20%) to
the fissures, extend onto
sound enamel.
Wait 10 seconds.
Alternatively, traditional etchant
can be used if thoroughly rinsed.
Rinse gently. Keep moist.
For example, dab with
damp gauze.
Isolate with cotton, not
a rubber dam. Keep the
teeth moist.
Removal of decay is not
indicated.
Firmly tap the capsule on
a hard surface.
Experienced hand-mixers
may reduce material costs
with powder & liquid kits.
Compress the plunger
completely and hold it
down for 2 seconds.
Mix for a full 10 seconds
at 4,000 rpm.
Insert the capsule into
the applicator.
Immediately squeeze into
the deepest part. To avoid air
bubbles,
kiss
the tip to the
moist surface and backfill
while slowly withdrawing.
Release pressure on the
applicator and progress to
the next tooth.
Use a gloved finger to
rapidly push and shape
the glass ionomer into the
desired areas.
The gloved finger
should be moist with the
patient’s saliva or a thin
layer of petroleum jelly
(e.g. Vaseline).
Push down firmly for about
1 second to make excess
flow out.
With continued downward
pressure, slide the fingertip
across the occlusal surface.
Slide the finger up and o
without lifting up. Immediately
continue to the next tooth,
using a wave-like motion.
Do not over manipulate.
Remove the cotton. Help
the patient bite down hard
and grind. Hold the chin
and click the jaws together
until you feel and hear
enamel-to-enamel contact.
Then help the patient open.
Mix
10 s
60 s
≤60 s
10 s
end
60 s
Note: This option may reference quicker times than manufacturer’s instructions.
Working time
after mix
Use a cotton swab, explorer, or
dental floss to remove excess
from surfaces where the glass
ionomer is not meant to stay
(e.g. approximal).
Do not agitate glass ionomer
that is meant to stay until after
set time. Fluoride varnish can
be applied after 3 minutes.

11carequest.org | The Non-Invasive Caries Therapy Guide
TIPS ON HOW TO
Perform Two-Visit Silver-Modified Atraumatic Restorative Treatment (2-Visit SMART)
for Cavitated Caries Lesions
6
Apply
7
Use lubricated finger
8
Push and contour
9
Bite down
10
Remove excess
Clean out debris. Do not dry.
Removal of arrested decay is not indicated for
treatment success.
Usually, no tooth structure is removed.
Removal of SDF-stained enamel improves
final aesthetics.
Apply poly-acrylic acid conditioner (10 to 20%)
to the fissures, extend onto sound enamel.
After 10 seconds, rinse gently. Keep moist.
For example, dab with damp gauze.
Isolate with cotton, not a rubber dam.
Keep the teeth moist.
Mix, and immediately squeeze into the
deepest part. To avoid air bubbles,
kiss
the tip to the moist surface and backfill
while slowly withdrawing.
Use a gloved finger to rapidly push and shape
the glass ionomer into the desired areas.
The gloved finger should be moistened with
the patient’s saliva or a thin layer of petroleum
jelly e.g. Vaseline.
Push down firmly for about 1 second to make
excess flow out. With continued downward
pressure, slide the fingertip across the
occlusal surface.
Work fast, do not overmanipulate
Remove the cotton. Help the patient bite
down hard and grind. Hold the chin and click
the jaws together until you feel and hear
enamel-to-enamel contact. Then help the
patient open.
Apply SDF and re-apply until the area stays wet. Either:
• wait 10 seconds, remove excess, and apply a varnish,
or
• wait 1 minute and remove excess.
Usually: return in 3 days to 6 weeks.
Some clinicians proceed immediately
(if so, skip the varnish).
Isolate and dry thoroughly with cotton.
Protect the patient’s eyes.
Help the patient keep their mouth open.
Use a cotton swab, explorer, or dental floss to
remove excess from surfaces where the glass
ionomer is not meant to stay (e.g. approximal).
Do not agitate glass ionomer that is meant to
stay until after set time. Fluoride varnish can be
applied after 3 minutes.
10 s
60 s
end
60 s
1
Dry
2
Apply
3
Clean
4
Condition
5
Isolate, keep moist
1st Visit (for more details, see HOW TO: SDF page)
2nd Visit (for more details, see HOW TO: Glass Ionomer page)
Working time after mix
Developed from: Mohamed Aly J Dent 128:104379

12 | carequest.orgThe Non-Invasive Caries Therapy Guide
TIPS ON HOW TO
Developed from: Innes BMC Oral Health 7:18
Perform the Hall Technique for Placing Stainless Steel Crowns
for Cavitated Caries Lesions, usually in Primary Teeth
1
Assess
2
Place spacer
3
Comfort
4
Remove
5
Clean
6
Fit
7
Check fit
If an explorer tip cannot pass
through the contact or if
floss catches, create space
with orthodontic separators
for 2–9 days.
Some clinicians proceed
after just 1–3 hours.
To place an orthodontic
separator (spacer), stretch
it with orthodontic pliers
or two pieces of floss. Slide
diagonally into the contact.
This may feel tight, sore, or
painful. Analgesics or simply
sipping cold water can
provide relief.
Remove the spacer at the
next visit using floss or a
dental instrument.
Remove debris and plaque. Protect the airway with
unfolded gauze. Try crowns
starting with size 5.
Do not push the stainless steel
crown past the middle third of
the tooth crown. A stout spoon
excavator is used to remove
fully seated crowns.
The correct size will fit over
the occlusal surface. It will
give slight springback from
the heights of contour around
the tooth.
Contouring/crimping pliers can
be used to adjust the
shape to the tooth.
7a
7b
7c
Mix a glass ionomer-based luting cement. Hand-mixed
luting cement should be the consistency of Greek yogurt
or hand lotion.
If using a spatula, avoid air bubbles by sliding the spatula
against the crown margin. If using an auto-mix tip, backfill
while slowly withdrawing.
Completely fill the crown.
Place the glass ionomer-filled
crown on the tooth and steadily
push past the heights of contour.
Excess cement should extrude
from all sides.
Do not completely seat.
First, help the patient
practice clenching as
hard as they can, to later
seat the crown.
Removal of decay is not
indicated.
With your fingers, align the
crown to the long axis of
the tooth again for seating.
Consider anything that
might get in the way of
complete seating, such
as the interference of
an approximal gingival
margin of a cavitation in
an adjacent tooth.
To seat the crown, help the patient
clench hard against the opposing
teeth, either directly or through a
cotton roll or wooden bite stick.
If the crown does not seat
properly, remove and try again
once. If unsuccessful again,
immediately clean cement o the
tooth. Return to step 6 to re-size,
re-fit, etc.
Once seated, quickly
remove excess cement
with moist cotton.
Help the patient avoid
moving the crown until at
least 3 minutes after mix
(cement set time). For
example, gently bite on a
cotton roll with other teeth.
Clean excess cement with
knotted floss. Pull floss
through laterally.
Help the patient avoid
eating for 30 minutes, and
avoid sticky or hard foods
for 24 hours.
1st Visit Create space
2nd Visit Crown placement
8
Prepare the patient,
9
Load
10
Fill completely
11
Position
12
Align
13
Seat by clenching
14
Wipe & clench
15
Final cleaning
then mix and again
load cement
3 min

13carequest.org | The Non-Invasive Caries Therapy Guide
Disclaimer/Disclosure
This guide is designed to provide general dental information. All content including: text, images, audio, or other formats were created for informational and educational purposes only. This material is presented for dental
professionals or health care professionals with oral health training and is not intended to educate or train professionals on how to diagnose conditions or disease states. The content is not intended to constitute nor be a
substitute for professional dental experience, advice, diagnosis, or treatment.
CareQuest Institute and CareQuest Innovation Partners do not recommend or endorse any specific tests, dentists, products, procedures, opinions, or other information that may be mentioned in these materials. Reliance on any
information provided by CareQuest Institute, CareQuest Innovation Partners, its employees, contracted writers, or dental professionals presenting content for publication to CareQuest Institute is solely at your own risk.
No guarantees or warranties are made regarding any of the information contained within this guide.
In support of its mission, CareQuest Innovation Partners may have financial and/or investment relationships with companies that commercially market minimally invasive care related solutions. For more information, please
contact us or visit carequestinnovation.com. This provision of the guide is not conditioned upon, or intended to induce, any referral by any party or its employees or agents to any other party. The provision of the guide does not
reflect the volume or value of any business generated between us or any of our ailiates and your practice. No aspect of your participation in any CareQuest Innovation Partners-ailiated provider network will be impacted by
your acceptance or rejection of this guide or the content of the guide including your use of any dental or oral health products or techniques referenced in the guide.
About the Content Contributors
Joined by the mission to improve the oral health of all, CareQuest Innovation Partners is a for-profit subsidiary
company of the nonprofit, CareQuest Institute for Oral Health. The role of CareQuest Innovation Partners within
the CareQuest Institute portfolio is to validate and scale transformative solutions that improve overall health
through oral health.
CareQuest Innovation Partners creates a carefully curated portfolio of new ideas and convenes a network of
change agents to reshape oral health and health care. Together with investors, innovators, entrepreneurs, and
community partners, CareQuest Innovation Partners scales validated solutions that redefine the way people
experience health and oral health.
Learn more at carequestinnovation.com
Direct contributors
Zhongyang Li M.Des., Laura Kibbe B.S.D.H. M.B.A., John Frachella D.D.S., Courtney Desrosiers M.P.H.,
and Jeremy Horst Keeper D.D.S. Ph.D.
For more information about this guide
Non-Invasive Solutions for Your Practice
Visit: carequestinnovation.com/GetStarted

CareQuest Institute for Oral Health® is a national nonprofit championing a more equitable future where every
person can reach their full potential through excellent health. We do this through our work in philanthropy, analytics
and data insights, health transformation, policy and advocacy, and education as well as our leadership in dental
benefits and innovation advancements.
We collaborate with thought leaders, health care providers, patients, and local, state, and federal stakeholders, to
accelerate oral health care transformation and create a system designed for everyone.
To learn more, visit carequest.org.
