
Chapter 1: The Fire Service
Matching
Answer Key
1. B (page 27)
2. D (page 8)
3. J (page 25)
4. H (page 19)
5. F (page 27)
6. G (page 8)
7. I (page 9)
8. A (page 19)
9. E (page 9)
10. C (page 20)
Multiple Choice
1. C (page 16)
2. D (page 16)
3. D (page 29)
4. C (page 19)
5. A (page 19)
6. C (page 11)
7. A (page 29)
8. B (page 19)
9. D (page 27)
10. A (page 20)
11. C (page 21)
12. B (page 21)
13. C (page 13)
14. C (page 28)
15. C (page 27)
16. D (page 18)
17. A (page 13)
18. A (page 13)
19. A (page 22)
20. C (page 20)
Vocabulary
1. Safety officer: The safety officer watches the overall operation for unsafe practices. He or she has the authority to
halt any firefighting activity. (page 9)
2. Paramedic: A paramedic has completed the highest level of training in EMS. These personnel have extensive
training in advanced life support, including IV therapy, administering drugs, cardiac monitoring, inserting
advanced airways, manual defibrillation, and other advanced assessment and treatment skills. (page 10)
3. Incident commander (IC): The incident commander is the individual responsible for the management of all
incident operations. This position focuses on the overall strategy of the incident and is often assumed by the
battalion/district chief. (page 9)
4. Company officer: The company officer is usually a lieutenant or captain in charge of a team of fire fighters, both
on the scene and at the station. The company officer is responsible for firefighting strategy, safety of personnel, and
the overall activities of the fire fighters or their apparatus. (page 9)
5. Training officer: The training officer is responsible for updating the training of current fire fighters and for
training new fire fighters. He or she must be aware of the most current techniques of firefighting and EMS. (page 9)
Fill-In
1. Vision 20/20 (page 11)
2. incident command system (page 16)
3. Standard operating procedures (SOPs) (page 16)
4. thatched roofs, wood chimneys (page 22)
5. Emergency Medical Services (page 10)
6. Benjamin Franklin (page 22)
7. fire hydrants (page 27)
8. Romans (page 27)
9. public call boxes (page 25)
10. NFPA (page20)
True/False
1. T (page 19)
2. T (page 22)
3. F (page 22)
4. F (pages 9)
5. T (page 22)
6. F (page 20)
7. F (page 19)
8. F (page 10)
9. T (page 29)
10. F (page 14)

A NSWER KEY
2
Short Answer
1. Companies common to most fire departments include (Students should include five of the following): (1) Engine company:
An engine company is responsible for securing a water source, deploying handlines, conducting search-and-rescue
operations, and putting water on the fire. (2) Truck company: A truck company specializes in forcible entry, ventilation,
roof operations, search-and-rescue operations above the fire, and deployment of ground ladders. They are also called
ladder companies. (3) Rescue company: A rescue company usually is responsible for rescuing victims from fires,
confined spaces, trenches, and high-angle situations. (4) Wildland/Brush company: A brush company is dispatched to
vegetation fires that larger engines cannot reach. (5) Hazardous materials company: A hazardous materials company
responds to and controls scenes involving spilled or leaking hazardous materials. (6) Emergency Medical Services (EMS)
company: An EMS company responds to and assists in transporting medical and trauma patients to medical facilities
for further treatment. EMS personnel often have medications, defibrillators, and other equipment that can stabilize a
critical patient during transport. (page 18)
2. The 5 E’s of fire prevention are: (1) education, (2) engineering, (3) enforcement, (4) economic incentives, and
(5)emergency response. (page 11)
3. The four basic management principles utilized in most fire departments are: (1) unity of command; (2) span of
control; (3) division of labor; (4) discipline. (pages 20–21)
4. The six basic steps of the Community Risk Reduction process include: (1) Identify risks, (2) Prioritize risks,
(3)Develop strategies and tactics to mitigate risks, (4) Prepare the CRR plan, (5) Implement the CRR plan, and
(6)Monitor, evaluate, and modify the plan. (page 11)
5. The roles and responsibilities of a Fire Fighter II include: (1) Perform scene size-up. (2) Determine the need for
the Incident Command System. (3) Arrange and coordinate ICS until command is transferred. (4) Prepare reports.
(5) Communicate the need for assistance. (6) Coordinate an interior attack line team. (7) Extinguish an ignitable
liquid fire. (8) Control a flammable gas cylinder fire. (9) Protect evidence of fire cause and origin. (10) Assess and
disentangle victims from motor vehicle accidents. (11) Assist special rescue team operations. 12) Perform a fire safety
survey. (13) Present fire safety information. (14) Maintain fire equipment. (15) Perform annual service tests on fire
hoses. (page 8)
Fire Alarms
1. During this course of study, you will need to practice and work hard. Do your best. Five guidelines will help to
keep you on target to become a proud and accomplished fire fighter: (1) Be safe. Safety should always be uppermost
in your mind. Keep yourself safe. Keep your teammates safe. Keep the public you serve safe. (2) Follow orders. Your
supervisors have more training and experience than you do. If you can be counted on to follow orders, you will
become a dependable member of the team. (3) Work as a team. Fighting fires requires the coordinated efforts of each
department member. Teamwork is essential to success. (4) Think! Lives will depend on the choices you make. Put your
brain in gear. Think about what you are studying. (5) Follow the Golden Rule. Treat each person, patient, or victim as
an important person or as a member of your family. Everyone is an important person or family member to someone
and deserves your best efforts. (pages 4–5)
2. Every member of the fire service will interact with the public. People may visit the fire station, requesting a tour or
asking questions on specific fire safety issues. Fire fighters should be prepared to assist these visitors and use these
opportunities to provide them with additional fire safety information. Use every contact with the public to deliver
positive public relations and an educational message. Inform and encourage the use of wearing a helmet and explain
the benefits. (pages 8–9)
Chapter 2: Fire Fighter Health and Safety
Matching
1. F (page 57)
2. H (page 47)
3. E (page 48)
4. B (page 57)
5. A (page 42)
6. D (page 41)
7. C (page 57)
8. G (page 62)

Chapter 2: Fire Fighter Health and Safety
3
Multiple Choice
1. F (page 52)
2. T (page 48)
3. F (page 42)
4. T (page 40)
5. T (page 57)
6. F (page 57)
7. T (page 53)
8. T (page 53)
9. T (page 59)
10. F (page 59)
1. B (page 62)
2. D (page 57)
3. B (page 39)
4. C (page 39)
5. B (page 57)
6. D (page 44)
7. D (page 42)
8. B (page 41)
9. B (page 44)
10. B (page 40)
11. A (page 40)
12. C (page 43)
13. A (page 47)
14. B (page 52)
15. C (page 55)
Vocabulary
1. Personnel accountability system: A method of tracking the identity, assignment, and location of fire fighters
operating at an incident scene. (page 57)
2. Standard operating procedures (SOPs): Written documents that provide specific information on the actions that
should be taken to accomplish a certain task. (page 36)
3. Employee assistance program (EAP): Fire service programs that provide confidential help to fire fighters with
personal issues. (page 48)
4. The 16 Firefighter Life Safety Initiatives: In an effort to do more to prevent line-of-duty deaths and injuries, the
National Fallen Firefighters Foundation has developed a fire fighter safety initiative called Everyone Goes Home. The
goal of this program is to raise awareness of life safety issues, improve safety practices, and allow everyone to return
home at the end of their shift. In particular, the Everyone Goes Home program has developed “The 16 Firefighter Life
Safety Initiatives,” which describe steps that need to be taken to change the current culture of the fire service to help
make it a safer place for all. (pages 40–41)
5. Safety officer: A designated individual who oversees safety practices at an emergency scene and during training.
Safety officers have the authority to stop any activity that is deemed unsafe. (page 42)
Fill-In
1. Vehicle (page 39)
2. National Fallen Fire fighters Foundation (page 40)
3. 20 (page 45)
4. safety (page 42)
5. Proper working habits (page 48)
6. Near-Miss Reporting System (page 40)
7. an hour (page 43)
8. Heart disease (page 44)
9. freelancing (page 42)
10. traffic regulations (page 53)
True/False
Short Answer
1. The nine Guidelines for Safe Emergency Vehicle Response are (Students should include five of the following): (1) Drive
defensively. (2) Follow agency policies in regard to posted speed limits. (3) Always maintain a safe distance. Use the
“four-second rule”: Stay at least four seconds behind another vehicle in the same lane. (4) Maintain an open space
or cushion in the lane next to you as an escape route in case the vehicle in front of you stops suddenly. (5)Always
assume that other drivers will not hear your siren or see your emergency lights. (6) Select the shortest and least
congested route to the scene at the time of dispatch. (7) Visually clear all directions of an intersection before
proceeding. (8) Go with the flow of traffic. (9) Watch carefully for bystanders and pedestrians. They may not move
out of your way or could move the wrong way. (page 56)
2. The purpose of a critical incident stress debriefing (CISD) is to provide a forum for firefighting and EMS personnel to
discuss the anxieties, stress, and emotions triggered by a difficult call. (page 47)
3. Guidelines to stay safe, both on and off the job are: (1) You are personally responsible for safety. Keep yourself
safe. Keep your teammates safe. Keep citizens—your customers—safe. (2) Work as a team. The safety of the entire
firefighting unit depends on the efforts of each unit. Become a dependable member of the team. (3) Follow orders.
Freelancing can endanger other fire fighters, as well as yourself. (4) Think! Before you act, think about what you are
doing. Many people are depending on you. (page 63)

A NSWER KEY
4
4. The four major components of a successful safety program are: (1) standards and procedures; (2) personnel;
(3) training; (4) equipment (page 40)
5. Three groups that fire fighters must always consider when ensuring safety at the scene are: (1) their personal safety;
(2) the safety of other team members; (3) the safety of everyone present at an emergency scene (page 40)
Fire Alarms
1. The National Fire Protection Association (NFPA) reports that in 2016, 69 fire fighters were killed in the line of duty
in the United States. These deaths occurred at emergency incident scenes, in fire stations, during training, and while
responding to or returning from emergency situations. The largest share of deaths occurred from stress, overexertion,
and medical issues. The second leading cause of death is vehicle crashes. The NFPA estimates that 62,085 fire fighters
were injured in the line of duty in 2016. Fewer than half of these injuries occurred while fighting fires. The leading
cause of fire ground injuries was overexertion or strain. (pages 39–40)
2. An increase in the use of synthetic products has led to an increase in the toxicity of today’s modern fires. Cancer, now
considered to be the leading cause of death among fire fighters, can be caused by a wide variety of cancer-causing
substances (carcinogens) entering the body. These include exhaust from diesel engines, poisonous gases in smoke,
and a wide variety of chemical particles. The dirt and soot that attaches itself to a fire fighter’s turnout gear and
uniform contains large quantities of substances known to cause cancer. Fire fighters’ hoods and gloves are thought
to contain especially high concentrations of carcinogens. Carcinogens can be ingested through the mouth, injected
into the body, absorbed through the respiratory system, or absorbed through the skin. Fire fighters are most likely to
absorb carcinogens through their skin and through their respiratory systems.
The Firefighter Cancer Support Network estimates that fire fighters have a 9 percent higher risk of being diagnosed
with cancer than the general U.S. population. Some cancers do not present for 20 years or more after exposure to a
carcinogen. Therefore, it is important to reduce your exposure to cancer-causing substances starting on your first day of
service as a fire fighter.
Skill Drills
Skill Drill 2-1: Mounting Apparatus Fire Fighter I, NFPA 1001: 4.3.2
Test your knowledge of this skill drill by filling in the correct words in the photo captions.
1.
When mounting (climbing aboard) fire apparatus, always have at least one hand firmly grasping a handhold, at
least one foot firmly placed on a foot surface. Maintain the one-hand-and-one-foot placement until you are seated.
2. Fasten your seat belt, and leave it fastened until the apparatus is stopped at its destination. Don any other required
safety equipment for the response, such as hearing protection and intercom systems. (page 50)
Skill Drill 2-2: Dismounting a Stopped Apparatus Fire Fighter I, NFPA 1001: 4.3.2
Test your knowledge of this skill drill by filling in the correct words in the photo captions.
1.
Become familiar with your riding position and the safest way to dismount.
2. Maintain the one-hand-and-one-foot placement when leaving the apparatus, especially on wet or potentially icy
roadway surfaces. (page 51)
Chapter 3: Personal Protective Equipment
Matching
1. F (page 74)
2. D (page 122)
3. I (page 70)
4. A (page 71)
5. J (page 82)
6. B (page 76)
7. C (page 76)
8. E (page 122)
9. G (page 86)
10. H (page 91)

Chapter 3: Personal Protective Equipment
5
Multiple Choice
1. C (page 92)
2. A (page 72)
3. A (page 88)
4. C (page 86)
5. B (page 89)
6. C (page 103)
7. D (page 76)
8. C (page 72)
9. B (page 92)
10. A (page 83)
11. C (page 94)
12. A (page 84)
13. A (page 91)
14. B (page 112)
15. A (page 86)
16. D (page 82)
17. B (page 72)
18. D (page 89)
19. B (page 90)
20. D (page 83)
Vocabulary
1. Smoke particles: Smoke particles consist of unburned, partially burned, and completely burned substances. These
particles are lifted in the thermal column produced by the fire and are usually readily visible. The completely burned
particles are primarily ash; the unburned and partially burned smoke particles can include a variety of substances. The
concentration of unburned or partially burned particles depends on the amount of oxygen available to fuel the fire.
Many smoke particles are so small they can pass through the natural protective mechanisms of the respiratory system
and enter the lungs. Some are toxic to the body and can result in severe injuries or death if they are inhaled. These
particles also can prove extremely irritating to the eyes and digestive system. (pages 82–83)
2. Oxygen deficiency: Normal outside or room air contains approximately 21 percent oxygen. A decrease in the amount
of oxygen in the air, however, may drastically affect an individual’s ability to function. An atmosphere with an oxygen
concentration of 19.5 percent or less is considered oxygen deficient. If the oxygen level drops below 17 percent,
people can experience disorientation, an inability to control their muscles, and irrational thinking, which can make
escaping a fire much more difficult.
During compartment fires, oxygen deficiency occurs in two ways. First, the fire consumes large quantities of the avail-
able oxygen, thereby decreasing the concentration of oxygen in the atmosphere. Second, the fire produces large quanti-
ties of other gases, which decrease the oxygen concentration by displacing the oxygen that would otherwise be present
inside the compartment. (page 83)
3. National Institute for Occupational Safety and Health (NIOSH): In the United States, the National Institute for
Occupational Safety and Health (NIOSH) sets the design, testing, and certification requirements for SCBA. NIOSH
is a federal agency that researches, develops, and implements occupational safety and health programs. It also
investigates fire fighter fatalities and serious injuries and makes recommendations on how to prevent accidents from
recurring. (page 85)
4. PASS device: A PASS device is designed to help fire fighters locate a downed fire fighter by sending out a loud audible
signal. The device combines an electronic motion sensor with an alarm system. If the user remains motionless for 30
seconds, it will produce a low warning tone before sounding a full alarm. The user can reset the device by moving
during this warning period. A fire fighter in distress also can manually activate this device. (page 92)
5. Supplied-air respirator: A supplied-air respirator (SAR) uses an external source for the breathing air. In this type
of device, a hose line is connected to a breathing-air compressor or to compressed air cylinders located outside
the hazardous area. The user breathes air through the line and exhales through a one-way valve, just as with an
open-circuit SCBA. Although SARs are commonly used in industrial settings, they are not used by fire fighters
for structural firefighting. Hazardous materials teams and confined-space rescue teams sometimes use SARs for
specialized operations. Some fire service SCBA units can be adapted for use as SARs. (page 84)
6. End-of-service-time indicator (EOSTI): NFPA standards require that SCBA include an end-of-service-time indicator
(EOSTI), or low-air alarm. This warning device tells the user that the end of the breathing air supply is approaching.
NFPA 1500 requires that an exit strategy be practiced when the SCBA cylinder pressure is down to 35 percent of its
capacity. This alarm may take the form of a bell or whistle, a vibration, or a flashing LED. SCBAs are required to have
two types of low-air alarms that operate independently of each other and activate different senses. (page 92)
7. Hydrostatic testing: The U.S. Department of Transportation requires hydrostatic testing for SCBA cylinders on a
periodic basis and limits the number of years a cylinder can be used; for example, composite-fiber overwrapped
cylinders must be replaced after 15 years. Hydrostatic testing seeks to identify any defects or damage that might
render the cylinder unsafe. Any cylinder that fails a hydrostatic test should be immediately taken out of service and
cannot be used. (page 112)
8. Cascade system: Cascade systems have several large storage cylinders of compressed breathing air connected by a
high-pressure manifold system. The empty SCBA cylinder is connected to the cascade system, and compressed air is
transferred from the storage tanks to the cylinder. (page 122)

A NSWER KEY
6
Fill-In
1. supplied air respirator (SAR) (page 84)
2. full turnout gear (page 82)
3. open-circuit (page 86)
4. carcinogens (page 76)
5. Donning (page 76)
6. distance traveled (page 83)
7. hand light (page 75)
8. oxygen deficient (page 83)
9. personal protective equipment (PPE) (page 69)
10. 15 years (page 112)
True/False
1. T (page 76)
2. F (page 69)
3. T (page 110)
4. T (page 83)
5. T (page 82)
6. T (page 82)
7. T (page 83)
8. T (page 83)
9. F (page 83)
10. F (page 81)
Short Answer
1. The six types of protection provided by PPE are: (1) provides thermal protection; (2) repels water; (3) provides impact
protection; (4) protects against cuts and abrasions; (5) furnishes padding against injury; (6) provides respiratory
protection. (page 70)
2. Three types of flame-resistant material commonly used in the construction of firefighting PPE are: (1) Nomex
®
;
(2) PBI
®
; (3) Kevlar
®
. (page 72)
3. Reasons why fire fighters need respiratory protection during fire incidents include: (1) products of combustion;
(2)oxygen deficiency; (3) increased temperature. (pages 82–83)
4. The physiological effects of reduced oxygen concentrations are: (1) 21 percent: normal breathing air; (2) 17 percent:
judgment and coordination impaired, lack of muscle control; (3) 12 percent: headache, dizziness, nausea, fatigue;
(4)9 percent: unconsciousness; (5) 6 percent: respiratory arrest, cardiac arrest, death. (page 83)
5. Five limitations of PPE are: (1) not easy to don; (2) heavy; (3) difficult for the body to cool itself; (4) limits mobility;
(5)decreases normal sensory ability. (pages 75–76)
Fire Alarms
1. A fire fighter that experiences a problem with their SCBA must try to exit the IDLH area to a safe environment. If the
cylinder contains air, but no air comes out of the regulator, the regulator purge/bypass valve can be opened slightly
to release a constant supply of air. This will rapidly empty the cylinder, however. In this circumstance, the fire fighter
must immediately exit from the hazardous environment. If in danger, the fire fighter should follow the steps for
self-survival and calling a “MAYDAY.” (pages 103–106)
2. PPE that has been badly soiled by exposure to smoke, other products of combustion, melted tar, petroleum products,
or other contaminants needs to be cleaned as soon as possible. Cleaning instructions are listed on the tag attached
to the garment. Follow the manufacturer’s cleaning instructions. Failure to do so may reduce the effectiveness of the
garment and create an unsafe situation for the wearer. Some fire departments have special washing machines that are
approved for cleaning PPE. Other departments contract with an outside firm to clean and repair PPE. In either case,
the manufacturer’s instructions for cleaning and maintaining the garment must be followed. (pages 80–81)

Chapter 3: Personal Protective Equipment
7
Skill Drills
Skill Drill 3-1: Donning Personal Protective Clothing Fire Fighter I, NFPA 1001: 4.1.2
Test your knowledge of this skill drill by placing the photos below in the correct order. Number the first step with a “1,” the second
step with a “2,” and so on.
1. Place your equipment in a logical order for donning.
2. Place your protective hood over your head
and down around yourneck.
3. Put on your boots, and pull up your protective
pants. Place the suspenders over your
shoulders, and secure the front of the pants.
4 . Put on your protective coat, and close the
front of the coat.
5. Place your helmet on your head and
adjust the chin strap securely. Turn up
your coat collar, and secure it in front.
© Jones & Bartlett Learning. Photographed by Glen E. Ellman.© Jones & Bartlett Learning. Photographed by Glen E. Ellman.
© Jones & Bartlett Learning. Photographed by Glen E. Ellman.© Jones & Bartlett Learning. Photographed by Glen E. Ellman. © Jones & Bartlett Learning. Photographed by Glen E. Ellman.

A NSWER KEY
8
6. Put on your gloves.
7. Have your partner check your clothing.
(pages 77–78)
Skill Drill 3-2: Doffing Personal Protective Clothing Fire Fighter I, NFPA 1001: 4.1.2
Test your knowledge of this skill drill by placing the photos below in the correct order. Number the first step with a “1,” the second
step with a “2,” and so on.
1. Remove your gloves.
2. Open the collar of your protective
coat.
3. Release the helmet chin strap, and
remove your helmet.
4. Remove your protective coat. 5. Remove your protective pants and
boots.
6. Remove your protective hood.
(pages 79–80)
© Jones & Bartlett Learning. Photographed by Glen E. Ellman.
© Jones & Bartlett Learning. Photographed
by Glen E. Ellman.
© Jones & Bartlett Learning. Photographed
by Glen E. Ellman.
© Jones & Bartlett Learning. Photographed
by Glen E. Ellman.
© Jones & Bartlett Learning. Photographed
by Glen E. Ellman.
© Jones & Bartlett Learning. Photographed
by glen e. ellman.
© Jones & Bartlett Learning. Photographed
by Glen E. Ellman.
© Jones & Bartlett Learning. Photographed by Glen E. Ellman.

Chapter 3: Personal Protective Equipment
9
Skill Drill 3-3: Donning an SCBA from an Apparatus Seat Mount Fire Fighter I, NFPA 1001: 4.3.1
Test your knowledge of this skill drill by placing the photos below in the correct order. Number the first step with a “1,” the second
step with a “2,” and so on.
1. Don your protective hood, pants,
boots, and coat. Safely mount the
apparatus, and sit on the seat. Place
your arms through the SCBAshoulder
straps. Partially tighten the shoulder
straps; do not fully tighten them.
2. Fasten your SCBA waist belt.
3. Fasten your seat belt. When the
apparatus stops at the emergency
scene, release the seat belt, and
release the SCBA from its brackets.
If the apparatus has an SCBA
locking device, detach the SCBA
from the locking device.
4. Carefully exit the apparatus.
Maintain three points of contact
with the vehicle while exiting.
5. Cinch down the SCBA waist belt. 6. Adjust shoulder straps until they
aresnug.
© Jones & Bartlett Learning. Photographed by Glen E. Ellman.
© Jones & Bartlett Learning. Photographed by Glen E. Ellman.
© Jones & Bartlett Learning. Photographed by Glen E. Ellman.
© Jones & Bartlett Learning. Photographed by Glen E. Ellman.
© Jones & Bartlett Learning. Photographed by Glen E. Ellman.
© Jones & Bartlett Learning. Photographed by Glen E. Ellman.

A NSWER KEY
10
7. Open the main cylinder valve.
Activate the air saver/donning
switch to prevent the flow of air,
ifneeded.
8. Don the face piece, and check for
leaks. Pull the protective hood up
over your head, put the helmet on,
and secure the chin strap.
9. If necessary, connect the regulator
to the face piece or attach the
low-pressure air supply hose to the
regulator. Activate the air flow and
ensure that the PASS device alarm is
operating. (pages 95–97)
Skill Drill 3-5: Donning an SCBA Using the Over-the-Head Method Fire Fighter I, NFPA 1001: 4.3.1
Test your knowledge of this skill drill by filling in the correct words in the photo captions.
1.
Lay out the SCBA so that the cylinder is resting on the floor or ground, the backplate is facing up, and the air
cylinder valve is facing away from you. Move the shoulder straps to the sides.
2. Fully open the main air cylinder valve. Activate the air saver/donning switch to prevent the flow of air, if needed.
3. Bend down and grasp the SCBA backplate with both hands. Using your knees to support and lift the extra weight,
lift the SCBA up and over your head. Once the SCBA clears your head, rotate it 180 degrees so that the waist belt
straps are pointed toward the ground.
4. Slowly slide the pack down your back. Make sure that your arms slide into the shoulder straps. Once the SCBA is
in place, tighten the shoulder straps, and secure the waist belt.
5. Don the face piece, and check for an adequate seal. Pull your protective hood into position on your head, don
your helmet, and secure the chin strap.
6. If necessary, connect the regulator to the face piece, or attach the low-pressure air supply hose to the regulator.
Activate the air flow, and ensure that the PASS device alarm is operating. (pages 99–100)
Skill Drill 3-7: Donning a Face Piece Fire Fighter I, NFPA 1001: 4.3.1
Test your knowledge of the skill drill by filling in the correct words in the photo captions.
1.
Fully extend the straps on the face piece.
2. Rest your chin in the chin pocket at the bottom of the face mask. Fit the face piece to your face, bringing the
straps or webbing over your head.
3. Tighten the lowest two straps. To tighten them, pull the straps straight back, rather than out and away from your
head. Check the head harness net to make sure it is lying flat against the back of your head. Tighten the pair of
straps at your temple, if these straps are present. If your model has additional straps, tighten the top strap(s) last.
4. Check for a proper seal. This process depends on the model and type of face piece you use. Confirm that your
nose fits in the nose cup.
© Jones & Bartlett Learning. Photographed by Glen E. Ellman.
© Jones & Bartlett Learning. Photographed by Glen E. Ellman.
© Jones & Bartlett Learning. Photographed by Glen E. Ellman.

Chapter 3: Personal Protective Equipment
11
5. Pull the protective hood into position on your head. Make sure it does not get under your face piece or obscure
your vision.
6. Don your helmet, and secure the chin strap.
7. If needed, attach the regulator to your face piece, or attach the low-pressure air supply hose to the regulator.
(pages 104–105)
Skill Drill 3-8: Doffing an SCBA Fire Fighter I, NFPA 1001: 4.3.1
Test your knowledge of this skill drill by placing the photos below in the correct order. Number the first step with a “1,” the second
step with a “2,” and so on.
4. Loosen the shoulder straps, and
remove the SCBA harness. If you
have not already done so, close
the air cylinder valve.
5. Bleed the air pressure from
the regulator by opening the
regulator purge/bypass valve.
6. Ensure that the PASS device is
turned off. Place the SCBA in a
safe location. Clean your SCBA
as soon as possible, following the
manufacturer’s instructions.
1. Remove the regulator from your
face piece, or disconnect the
low-pressure air supply hose
from the regulator.
2. Close the air cylinder valve, or
fully depress the air saver/donning
switch to stop the flow of air.
3. Release your waist belt.
© Jones & Bartlett Learning. Photographed by Glen E. Ellman.
© Jones & Bartlett Learning. Photographed by Glen E. Ellman.
© Jones & Bartlett Learning. Photographed by Glen E. Ellman.© Jones & Bartlett Learning. Photographed by Glen E. Ellman.
© Jones & Bartlett Learning. Photographed by Glen E. Ellman.
© Jones & Bartlett Learning. Photographed by Glen E. Ellman.

A NSWER KEY
12
Skill Drill 3-9: Visible SCBA Inspection Fire Fighter I, NFPA 1001: 4.5.1
Test your knowledge of this skill drill by placing the photos below in the correct order. Number the first step with a “1,” the second
step with a “2,” and so on.
7. Remove your gloves. Remove
your helmet, and pull your
protective hood down around
your neck. Loosen the straps on
your face piece.
8. Remove your face piece.
(pages 107–109)
1. Visually inspect the air cylinder and valve
assembly for dents and gouges. Look for black or
discolored areas that indicate exposure to flame.
2. Check the cylinder for the current hydrostatic
test date and date of manufacture. Check the air-
cylinder pressure gauge to be sure it is full.
© Jones & Bartlett Learning. Photographed by Glen E. Ellman.
© Jones & Bartlett Learning. Photographed by Glen E. Ellman.
© Jones & Bartlett Learning. Photographed by Glen E. Ellman.
© Jones & Bartlett Learning. Photographed by Glen E. Ellman.

Chapter 3: Personal Protective Equipment
13
3. Inspect hose and rubber parts for damage or
deterioration.
4. Inspect the SCBA harness, webbing, buckles,
fasteners, and cylinder retention system for
damage.
5. Verify that the SCBA has been cleaned
according to the manufacturer’s and
department’s recommendations. Inspect the
regulator for intact gaskets and visible damage.
6. Inspect the face piece for damage and worn
components. Look for damage to the lenses
and check for the presence of a nose cup.
7. Inspect the head harness to confirm that all
parts are present and working properly.
8. Check the quick disconnects and the RIC
UAC to make sure they are not damaged, that
they are operating properly, and that the dust
cap is in place. (pages 110–112)
© Jones & Bartlett Learning. Photographed by Glen E. Ellman.
© Jones & Bartlett Learning. Photographed by Glen E. Ellman.
© Jones & Bartlett Learning. Photographed by Glen E. Ellman.
© Jones & Bartlett Learning. Photographed by Glen E. Ellman.© Jones & Bartlett Learning. Photographed by Glen E. Ellman.
© Jones & Bartlett Learning. Photographed by Glen E. Ellman.

A NSWER KEY
14
Skill Drill 3-10: SCBA Operational Inspection Piece Fire Fighter I, NFPA 1001: 4.5.1
Test your knowledge of this skill drill by filling in the correct words in the photo captions.
1.
Check the regulator purge/bypass valve to be sure it is closed.
2. Depress the air saver/donning switch, if present, to start the flow of air.
3. Slowly open the air cylinder valve. Check for proper operation of the heads-up display and of the low-battery
indicator. Confirm that the low-air alarm and PASS devices are working.
4. Check the remote pressure gauge for proper operation.
5. Don the face piece. Adjust it to obtain a good seal. Inhale sharply to start the flow of air. Breathe normally to check
for proper operation.
6. Remove the regulator or face piece; air should flowfreely.
7. Depress the air saver/donning switch to stop the flow of air.
8. Open the regulator purge / bypass valve to check for air flow.
9. Close the regulator purge / bypass valve to stop the flow of air.
10. Rotate the air cylinder valve to close it.
11. Open the regulator purge / bypass valve slightly to vent residual air pressure from the system. Watch the
heads-up display to verify its proper operation as the air pressure is exhausted.
12. Once the air flow stops, close the regulator purge / bypass valve. Complete any reporting that is required.
(pages 113–115)
Skill Drill 3-11: Replacing an SCBA Cylinder Fire Fighter I, NFPA 1001: 4.5.1
Test your knowledge of this skill drill by filling in the correct words in the photo captions.
1.
Place the SCBA on the floor or a bench.
2. Close the air cylinder valve.
3. Open the regulator purge/bypass valve to bleed off the pressure.
4. Disconnect the high-pressure supply hose. Keep the ends clean.
5. Release the air cylinder from the SCBA harness, and remove the depleted air cylinder.
6. Slide a full air cylinder into the SCBA harness. Align the outlet to the supply hose. Lock the air cylinder inplace.
7. Check that the “O” ring is present and in good shape.
8. Connect the high-pressure hose to the air cylinder. Hand-tighten only.
9. Open the air cylinder valve. Check the air-cylinder pressure gauge and the remote pressure gauge.
(pages 116–118)
Skill Drill 3-14: Cleaning an SCBA Fire Fighter I, NFPA 1001: 4.5.1
Test your knowledge of this skill drill by filling in the correct words in the photo captions.
1.
Rinse the entire unit using a hose with clean water. Inspect the SCBA for any damage that might have occurred
before cleaning.
2. On some models, the regulator also can be removed from the SCBA harness. Detach the SCBA air cylinder from
the harness.
3. Using a stiff brush, along with a mild detergent/soap-and-water solution, scrub the SCBA air cylinder and harness.
Rinse and set these pieces aside to dry.
4. In a 5-gal (19 L) bucket, make a mixture of mild detergent/soap-and-water solution; alternatively, use the
manufacturer’s recommended cleaning and disinfecting solution and water. Submerge the SCBA face piece in the
soapy water or cleaning solution. For heavier cleaning, allow the face piece to soak.

Chapter 4: Fire Service Communications
15
Chapter 4: Fire Service Communications
Matching
1. B (page 151)
2. F (page 135)
3. C (page 135)
4. A (page 146)
5. G (page 148)
6. J (page 140)
7. E (page 148)
8. I (page 148)
9. H (page 147)
10. D (page 151)
Multiple Choice
1. A (page 141)
2. A (page 141)
3. D (page 146)
4. B (page 138)
5. D (page144)
6. B (page 133)
7. C (page 150)
8. D (page 141)
9. C (page 135)
10. A (page138)
11. B (page 142)
12. D (page 139)
13. D (page 150)
14. C (page 149)
15. B (page 150)
16. A (page 149)
17. D (page141)
18. C (page 151)
19. A (page 151)
20. C (page 137)
Vocabulary
1. Automatic location identification: A system that queries a database to show the location of the telephone, the caller’s
name, and other details. (page 140)
2. Run cards: Documentation that lists units in the proper order of response, based on response distance or estimated
response time. (page 141)
3. TDD/TTY/text phone: Special devices that display text rather than transmitting audio. (page 139)
4. Ten-codes: A system of coded messages that begin with the number 10. (page 149)
5. Time marks: Set intervals at which the communications center prompts the incident commander (IC) to report.
(page145)
6. Activity logging system: A system that keeps a detailed record of every incident and activity that occurs. (page 130)
7. Computer-aided dispatch (CAD): A system designed to assist a telecommunicator by performing specific functions
more quickly and efficiently than they can be done manually. (page 135)
8. Evacuation signal: A sequence of blasts or a siren that warns personnel to pull back to a safe location. (page 151)
Fill-In
1. dispatch (page 142)
2. simplex (pages 147–148)
3. duplex (page 148)
4. mobile (page 146)
5. trunking (page 149)
6. communications center (page 133)
7. telecommunicator (page 134)
8. Time marks (page 151)
9. Mayday (page 151)
10. evacuation (page 151)
5. Clean the regulator with the soapy water or cleaning solution, following the manufacturer’s instructions. Use a soft
brush, if necessary, to scrub contaminants from the face piece and regulator.
6. Completely rinse the face piece and the regulator with clean water. Do not submerge the regulator. Set them aside
and allow them to dry. Reassemble and inspect the entire SCBA before placing it back in service. (pages 124–125)
True/False
1. F (page 150)
2. T (page 138)
3. T (page 137)
4. T (page 138)
5. F (page 138)
6. T (page 150)
7. T (page 149)
8. F (page 140)
9. F (page 133)
10. T (page 139)

A NSWER KEY
16
Short Answer
1. The basic functions performed in a communications center are (Students should include five of the following):
(1)receiving calls for emergency incidents and dispatching fire department units; (2) supporting the operations of
fire department units delivering emergency services; (3) coordinating fire department operations with other agencies;
(4) keeping track of the status of each fire department unit at all times; (5) monitoring the level of coverage and
managing the deployment of available units; (6) notifying designated individuals and agencies of particular events
and situations; (7) maintaining records of all emergency-related activities; (8) maintaining information required for
dispatch purposes. (page 137)
2. LUNAR is an acronym used by some fire departments when reporting a MAYDAY. LUNAR stands for: Location, your
location in the building/incident; Unit, the unit you are assigned to; Name, who you are; Air, the amount of air you
have in your cylinder or Assignment, where you were last assigned; Resources, what you need to get you out of the
MAYDAY situation. (page 151)
3. The five major steps in processing an emergency incident are: (1) call receipt; (2) location validation; (3)classification
and prioritization; (4) unit selection; (5) dispatch. (page 137)
4. In recent years, many communities have eliminated their municipal fire alarm systems due to the inability to
determine the nature of the call, an increasing number of false alarms, high maintenance costs, and the development
of alternative notification systems. (page 139)
5. Emergency traffic is an urgent message that takes priority over all other communications, such as a call for help or
evacuation. (page 151)
6. An evacuation signal is a distinctive signal intended to be recognized by the occupants as requiring evacuation of
the building. The evacuation signal that is commonly used is a sequence of three blasts on an apparatus air horn,
repeated several times, or sirens sounded on “high-low” for 15 seconds. An evacuation warning should be announced
at least three times to ensure that everyone hears it; the warning should also be announced on the radio by the IC.
(pages151–152)
7. A mayday is a code indicating that a fire fighter is lost, missing, or trapped, and requires immediate assistance. The
fire fighter making the mayday call should describe the situation, location, and help needed. Fire fighters should
study and practice the procedure for responding to a mayday call. (page 151)
Fire Alarms
1. Your department’s standard operating procedures (SOPs) should outline exactly which steps you should take
in this situation, such as whether you should take the information yourself or connect the caller directly to the
communications center. If you take the information from the caller, be sure to get as much information as possible,
including type of incident/situation, location of the incident, cross streets or identifying landmarks, indication of
scene safety, caller’s name, caller’s location (if different from the incident location), and caller’s callback number. If
your station or your unit will be responding to the call, always advise the communications center immediately before
responding. (pages 144 –145)
2. The most important emergency traffic is a fire fighter’s call for help. Most departments use “mayday” to indicate
that a fire fighter is lost, missing, or requires immediate assistance. If a mayday call is heard on the radio, all
other radio traffic should stop immediately. The fire fighter making the mayday call should describe the situation,
location, and help needed. Fire fighters should study and practice the procedure for responding to a mayday call.
(pages 151–152)

Chapter 5: Fire Behavior
17
Skill Drills
Skill Drill 4-1: Receiving a Call and Initiating a Response to an Emergency Fire Fighter I, NFPA 1001: 4.2.1 and 4.2.2
Test your knowledge of this skill drill by filling in the correct words in the photo captions.
1.
Answer promptly and professionally. Identify yourself, your agency, and your location. Determine immediately
whether there is an emergency. If the call involves an emergency, follow your department SOPs. Organize your
questions to get the following information:
t Incident location (including cross streets and identifying landmarks)
t Type of incident/situation
t Scene safety information
t When the incident occurred
t Caller’s name
t Location of the caller, if different from the incident location
t Caller’s callback number
2. Record the information needed, including the date and time of the call. Initiate a response following the protocols
of your communications center. The protocols in your department may vary from the steps listed here. Follow the
protocols of the agency having jurisdiction for your department’s communications. (page 145)
Skill Drill 4-2: Touring the Communications Center
Test your knowledge of this skill drill by filling in the correct words in the photo captions.
1.
Arrange for a tour. Conduct yourself in a professional manner. Observe the use of equipment.
2. Observe the receipt of a reported emergency. Differentiate the needs of fire, police, and emergency medical services
(EMS) personnel. Understand the telecommunicator’s job. (page 145)
Chapter 5: Fire Behavior
Matching
1. G (page 160)
2. C (page 159)
3. F (page 176)
4. E (page 162)
5. A (page 164)
6. D (page 165)
7. B (page 165)
8. H (page 165)
9. J (page 161)
10. I (page 163)
11. N (page 180)
12. L (page 164)
13. O (page 172)
14. M (page 177)
15. K (page 175)
Multiple Choice
1. D (page 171)
2. A (page 168)
3. D (page 183)
4. B (page 162)
5. B (page 168)
6. D (page 172)
7. A (page 165)
8. C (page 173)
9. D (page 180)
10. B (page 172)
11. D (page 169)
12. C (page 182)
13. B (page 180)
14. C (page 160)
15. A (page 165)
16. A (page 161)
17. C (page 162)
18. C (page 181)
19. A (page 159)
20. A (page 180)

A NSWER KEY
18
Label the following diagram with the correct terms.
1. The fire tetrahedron
A. Fuel
B. Oxygen
C. Heat
*Instructor Note: Answers for this image can appear in any order
Vocabulary
1. Lower explosive limit: The minimum amount of gaseous fuel that must be present in a gas–air mixture for the
mixture to be flammable. (page 180)
2. Ignition temperature: The minimum temperature at which a fuel, when heated, will ignite in the presence of air and
continue to burn. (page 160)
3. Flash point: The lowest temperature at which a liquid produces a flammable vapor. (page 180)
4. BLEVE: Boiling liquid, expanding vapor explosion; a deadly set of circumstances involving liquid and gaseous fuels.
(page 181)
5. Thermal layering: A property of gases such that gases rise as they are heated and form layers within a room.
(page173)
6. Fire triangle: The three basic conditions needed for a fire to occur: fuel, oxygen, and heat. (page 161)
7. Flashover: An event in which the temperature in a room reaches a point where the combustible contents of the room
ignite all at once. (page 173)
8. Fully developed stage: The stage of a fire where the fire is consuming the maximum amount of fuel possible, and it is
achieving the maximum heat release rate possible for the fuel supply and oxygen present. (page 176)
9. Rollover: This spontaneous ignition of hot gases in the upper levels of a room or compartment. (page 173)
10. Smoke explosion: A smoke explosion occurs when a mixture of flammable gases and oxygen comes in contact with a
source of ignition and the flammable mixture ignites, often in a violent manner. (page 177)
Fill-In
1. supply; foam (page 169)
2. monoxide (page 163)
3. ventilation limited (page 177)
4. vapor (page 170)
5. fuel (page 163)
6. ignition temperature (page 176)
7. solid; liquid; gas (page 159)
8. Black fire (page 183)
9. volatility (page 180)
10. exothermic (page 160)
© Jones & Bartlett Learning.

Chapter 6: Building Construction
19
True/False
1. T (page 170)
2. F (page 173)
3. F (page 173)
4. T (page 163)
5. F (page 180)
6. T (page 174)
7. F (page 161)
8. T (page 159)
9. T (page 177)
10. T (page 160)
Short Answer
1. The four key attributes of smoke are: (1) smoke volume; (2) smoke velocity; (3) smoke density; (4) smoke color.
(page182)
2. As smoke travels, its heat evaporates moisture from some of the materials it passes through. This added moisture
tends to change black smoke to lighter smoke the farther it travels from the fire. Also, the black carbon suspended in
the black smoke settles out and is filtered by the material it passes through. This will also cause the smoke to become
lighter the farther away from the fire it travels. (page 183)
3. The widespread use of plastics and petroleum-based products results in materials that catch fire easily, reach high
temperatures quickly, and have a high heat release rate. (page 177)
4. The four basic methods of extinguishing fires are: (1) cool the burning material; (2) exclude oxygen from the fire; (3)
remove fuel from the fire; (4) interrupt the chemical reaction with a flame inhibitor. (page 166)
Fire Alarms
1. Two actions are important. First, actions among fire fighters should be coordinated so that, whenever possible, the
superheated gases are being vented from the fire room as you are attacking the fire. Second, it is important to use the
proper fire stream for the situation. Opening a fog stream into a heated enclosed area will produce much more steam
than a straight stream. Selecting a straight stream will allow more of the water to reach the seat of the fire, where it
can have the greatest effect. Use proper fire suppression techniques to avoid thermal imbalance. (pages 172–176)
2. First, recognize that there may be a backdraft condition present. Do not open any openings. The best way to prevent
a backdraft is to make a ventilation opening at a high level so that hot gases can escape from the interior without
allowing fresh air to enter. (pages 174–175)
Chapter 6: Building Construction
Matching
1. I (page 194)
2. G (page 194)
3. H (page 218)
4. B (page 215)
5. A (page 197)
6. F (page 193)
7. E (page 209)
8. D (page 215)
9. J (page 195)
10. C (page 194)
Multiple Choice
1. C (page 200)
2. D (page 204)
3. C (page 213)
4. B (page 194)
5. B (page 212)
6. A (page 195)
7. D (page 218)
8. C (page 208)
9. C (page 196)
10. D (page 215)
11. A (page 218)
12. D (page 194)
13. B (page 210)
14. B (page 199)
15. A (page 213)
16. D (page 200)
17. C (page 209)
18. B (page 203)
19. A (page 200)
20. B (page 202)
Vocabulary
1. Hybrid building: A building that does not fit entirely into any of the five construction types because it incorporates
building materials of more than one type. (page 207)
2. Platform frame: Construction technique for building the frame of the structure one floor at a time. Each floor has a
top and bottom plate that acts as a firestop. (page 205)
3. Balloon-frame construction: A method of construction in which the exterior walls are assembled with wood studs
that run continuously from the basement to the roof. (page 205)

A NSWER KEY
20
4. Bowstring truss: A truss in the shape of an archery bow, where the top chord represents the curved bow and the
bottom chord represents the straight bow string. (pages 213–214)
5. Thermoplastic materials: Materials that melt and drip when exposed to high temperatures, even those as low as
500ºF. (page 200)
6. Heavy timber construction: The type of construction that has exterior walls of masonry construction and interior
walls, columns, beams, floor assemblies, and roof structure made of wood. (page 203)
Fill-In
1. bowstring truss (page 214)
2. pyrolysis (page 199)
3. IV (page 204)
4. pitched (page 213)
5. fire wall (page 215)
6. occupancy (page 193)
7. I (page 200)
8. contents of the building (page 202)
9. Platform (page 205)
10. live load (page 208)
True/False
1. F (page 200)
2. T (page 196)
3. T (page 217)
4. T (page 212)
5. T (page 218)
6. F (page 217)
7. T (page 195)
8. F (page 209)
9. T (page 200)
10. F (page 212)
Short Answer
1. The five factors that affect how fast wood ignites, burns, and decomposes are: (1) ignition source, (2) moisture
content, (3) density, (4) preheating, and (5) size and form. (page 198)
2. The five types of building construction are: (1) Type I construction: Buildings with structural members made of
noncombustible materials that have a specified fire resistance. (2) Type II construction: Buildings with structural
members made of noncombustible materials without fire resistance. (3) Type III construction: Buildings with the
exterior walls made of noncombustible or limited-combustible materials, but interior floors and walls made of
combustible materials. (4) Type IV construction: Buildings constructed with noncombustible or limited combustible
exterior walls, and interior walls and floors made of large-dimension combustible materials. (5) Type V construction:
Buildings with exterior walls, interior walls, floors, and roof structures made of wood. (pages 200–207)
3. Many fires at construction and demolition sites are inadvertently caused by workers using torches to weld, cut, or
take apart pieces of the structure. Tanks of flammable gases and piles of highly combustible construction materials
might be left in locations where they could add even more fuel to a fire. Buildings under construction or demolition
are often left unoccupied for many hours, resulting in delayed discovery and reporting of fires. In some cases, it might
prove difficult for fire apparatus to approach the structure or for fire fighters to access working hydrants. All of these
problems must be anticipated when considering the fire risks associated. (page 220)
4. The four key factors that affect building materials under fire are: (1) combustibility, (2) thermal conductivity,
(3)decrease in strength with increase in temperature, and (4) rate of thermal expansion. (page 194)
5. A gusset is a metal plate used to tie chords and members of a truss together. They are embedded into the truss a depth
of 3/8 inch (9.5 mm). Heating causes quick failure of the truss. (page 214)
6. The best way to gather information about a building is to conduct preincident planning. During preincident planning,
you can document the characteristics of a building before a fire starts. Some of the questions you should ask include:
(1) Which type of building construction is present? (2) Which type of occupancy is this building? (3) What type of
contents does it contain? (4) Which type of support do the floors have? (5) Does the building contain roof trusses,
floor trusses, or manufactured I-joists? (6) Which types of fire protection and fire detection systems are installed in
the building? (pages 222–223)

Chapter 7: Portable Fire Extinguishers
21
Fire Alarms
1. Nursing homes are occupied 24 hours a day by persons who will probably need assistance to evacuate. A building
of Type III construction has two separate fire loads: the contents and the combustible building materials used. A
nursing home will have a lot of mattresses and curtains that will burn readily. A fire involving both the contents and
the structural components can quickly destroy the building. Type III construction presents several problems for fire
fighters. For example, an electrical fire can begin inside the void spaces within the walls, floors, and roof assemblies
and extend to the contents. The void spaces also allow a fire to extend vertically and horizontally, spreading from
room to room and from floor to floor. Fire fighters will have to open the void spaces to fight the fire. An uncontrolled
fire within the void spaces is likely to destroy the building. (pages 202–203)
2. Stay out of the structure. Exterior walls also could collapse if a fire causes significant damage to the interior structure.
Because the exterior walls, the floors, and the roof are all connected in a stable building, the collapse of the interior
structure could make the freestanding masonry walls unstable and likely to collapse. (pages 212–214)
Chapter 7: Portable Fire Extinguishers
Matching
1. H (page 230)
2. C (page 247)
3. F (page 231)
4. A (page 259)
5. J (page 240)
6. G (page 245)
7. I (page 247)
8. B (pages 245–246)
9. E (page 240)
10. D (page 237)
Multiple Choice
1. D (page 249)
2. B (page 237)
3. B (page 250)
4. A (page 232)
5. D (page 235)
6. A (page 234)
7. C (page 234)
8. C (page 239)
9. C (page 245)
10. D (page 238)
11. B (page 231)
12. C (page 243)
13. A (page 235)
14. A (page 237)
15. B (page 233)
16. C (page 259)
17. B (page 246)
18. A (page 240)
19. D (page 234)
20. A (page 235)
21. C (page 246)
22. D (page 239)
Labeling
Label the following diagram with the correct terms.
1. Basic parts of a portable fire extinguisher.
A. Locking mechanism
B. Trigger
C. Handle
D. Cylinder
E. Nozzle
F. Pressure indicator (page 239)

A NSWER KEY
22
Vocabulary
1. Polar solvent: A water-soluble flammable liquid, such as an alcohol, acetone, ester, or ketone. (page 247)
2. Extra hazard locations: Locations that contain more Class A combustibles and/or Class B flammables than do
ordinary hazard locations. (page 238)
3. Extinguishing agent: Material used to stop the combustion process. (page 230)
4. Cartridge/cylinder fire extinguisher: An extinguisher that relies on an external cartridge of pressurized gas, which
is released only when the extinguisher is to be used. (page 240)
5. Underwriters Laboratories, Inc. (UL): The organization that developed the standards, classification, and rating
system for portable fire extinguishers. (page 234)
6. Class K fires: Fires involving combustible cooking oils and fats. (page 234)
7. Oxidation: The scientific terminology for burning. (page 232)
8. Multipurpose dry chemical extinguisher: An extinguisher rated for Class A, B, and C fires. The chemicals in these
extinguishers form a crust over Class A combustible fuels to prevent rekindling. (page 245)
Fill-In
A. Locking
mechanism
F. Pressure
indicator
E. Nozzle
B. Trigger
C. Handle
D. Cylinder
1. Carbon dioxide (page 246)
2. nozzle (page 240)
3. basic (page 230)
4. Halogenated agent (page 248)
5. Backpack (page 242)
6. C (page 235)
7. A (page 233)
8. Carbon dioxide (page 246)
9. recharged (page 259)
10. temperature (page 232)
Courtesy of Amerex Corporation.

Chapter 7: Portable Fire Extinguishers
23
True/False
1. F (page 235)
2. T (page 248)
3. F (page 250)
4. T (page 237)
5. F (page 235)
6. T (page 237)
7. F (page 231)
8. F (page 259)
9. T (page 259)
10. T (page 230)
Short Answer
1. The six basic steps in extinguishing a fire with a portable fire extinguisher are: (1) Locate the fire extinguisher.
(2)Select the proper classification of extinguisher. (3) Transport the extinguisher to the location of the fire.
(4)Activate the extinguisher to release the extinguishing agent. (5) Apply the extinguishing agent to the fire for
maximum effect. (6) Ensure your personal safety by having an exit route. (page 249)
2. (1) Pull the safety pin. (2) Aim the nozzle at the base of the flames. (3) Squeeze the trigger to discharge the agent.
(4)Sweep the nozzle across the base of the flames. (page 250)
3. Examples of moderate hazards include: (1) retail stores, (2) light manufacturing facilities, (3) auto showrooms,
(4)parking garages, (5) research facilities, (6) workshops. (page 237)
4. The seven types of fire extinguishers are: (1) water, (2) dry chemical, (3) carbon dioxide, (4) foam, (5) wet chemical;
(6) halogenated agent, and (7) dry powder. (page 239)
Fire Alarms
1. Ensure the damper on the fireplace is open. Use a Class A type extinguisher, preferably a stored-pressure water type.
Open the fireplace door and spray a small amount of water on the fire until it is extinguished.
2. When inspecting fire extinguishers, you should be looking for some common indications that an extinguisher needs
maintenance. Common indications include: (1) The pressure gauge reading is outside the normal range. (2)The
inspection tag is out-of-date. (3) The tamper seal is broken. (4) Any indication that the extinguisher is not full of
extinguishing agent. (5) The hose and/or nozzle assembly is obstructed. (6) There are signs of physical damage,
corrosion, or rust. (7) Signs of leakage around the discharge valve or nozzle assembly can be seen. (page 259)
Skill Drills
Skill Drill 7-1: Transporting a Fire Extinguisher Fire Fighter I, NFPA 1001: 4.3.16
Test your knowledge of this skill drill by filling in the correct words in the photo captions.
1.
Locate the closest fire extinguisher.
2. Assess that the fire extinguisher is safe and effective for the type of fire being attacked. Release the mounting
bracket straps.
3. Lift the fire extinguisher using good body mechanics. Lift small fire extinguishers with one hand and large
extinguishers with two hands.
4. Walk briskly—do not run—toward the fire. If the fire extinguisher has a hose and nozzle, carry the extinguisher
with one hand, and grasp the nozzle with the other hand. (pages 251–252)
Skill Drill 7-2: Extinguishing a Class A Fire with a Stored-Pressure Water-Type Fire Extinguisher Fire Fighter I, NFPA 1001: 4.3.16
Test your knowledge of this skill drill by filling in the correct words in the photo captions.
1.
Size up the fire to determine whether a stored-pressure water-type fire extinguisher is safe and effective for the fire.
Ensure the fire extinguisher is large enough to be safe and effective. Ensure your safety. Make sure you have an exit
route from the fire. Do not turn your back on a fire.
2. Remove the hose and nozzle. Quickly check the pressure gauge to verify that the fire extinguisher is adequately
charged.
3. Pull the pin to release the fire extinguisher control valve. You must be within 35 to 40 ft (11 to 12 m) of the fire to
be effective.

A NSWER KEY
24
4. Aim the nozzle, and sweep the water stream at the base of the flames.
5. Overhaul the fire; take steps to prevent rekindling, break apart tightly packed fuel, and summon additional help if
needed. (page 253)
Skill Drill 7-3: Extinguishing a Class A Fire with a Multipurpose Dry-Chemical Fire Extinguisher Fire Fighter I, NFPA 1001: 4.3.16
Test your knowledge of this skill drill by placing the photos below in the correct order. Number the first step with a “1,” the second
step with a “2,” and so on.
1. Size up the fire to determine whether a multipurpose dry-chemical fire extinguisher is safe and effective for this fire.
Ensure the fire extinguisher is large enough to be safe and effective. Ensure your safety. Make sure you have an exit
route from the fire. Do not turn your back on a fire.
2. Remove the hose and nozzle. Quickly check the pressure gauge to verify that the fire extinguisher is adequately
charged.
3. Pull the pin to release the fire extinguisher control valve. Depending on the size of the fire and fire extinguisher, you
must be within 5 to 45 ft (2 to 14 m) of the fire to be effective.
4. Aim the nozzle, and sweep the dry-chemical discharge at the base of the flames. Coat the burning fuel with dry
chemical.
5. Overhaul the fire; take steps to prevent rekindling, break apart tightly packed fuel, and summon additional help if
needed. (page 253)
Skill Drill 7-4: Extinguishing a Class B Flammable Liquid Fire with a Dry-Chemical Fire Extinguisher Fire Fighter I, NFPA 1001: 4.3.16
Test your knowledge of this skill drill by placing the photos below in the correct order. Number the first step with a “1,” the second
step with a “2,” and so on.
1. Size up the fire, and ensure your safety. Check
the pressure gauge.
2. Pull the pin to release the fire extinguisher
valve. Depending on the size of the fire and fire
extinguisher, you must be within 5 to 45 ft of
the fire to be effective.
© Jones & Bartlett Learning. Photographed by Glen E. Ellman.
© Jones & Bartlett Learning. Photographed by Glen E. Ellman.

Chapter 7: Portable Fire Extinguishers
25
Skill Drill 7-5: Extinguishing a Class B Flammable Liquid Fire with a Stored-Pressure Foam Fire Extinguisher (AFFF or FFFP) Fire Fighter I,
NFPA 1001: 4.3.16
Test your knowledge of this skill drill by filling in the correct words in the photo captions.
1.
Size up the fire, and ensure your safety. Remove the hose and nozzle. Quickly check the pressure gauge to verify
that the fire extinguisher is adequately charged. Pull the pin to release the fire extinguisher control valve. You must
be within 20 to 25 ft (6 to 8m) of the fire to be effective.
2. Aim the nozzle, and discharge the stream of foam so the foam drops gently onto the surface of the burning liquid
at the front or the back of the container. Let the foam blanket flow across the surface of the burning liquid. Avoid
splashing foam on the burning liquid, because it can cause the burning fuel to splatter.
3. Overhaul the fire; keep a thick blanket of foam intact over the hot liquid, reapply foam over any hot spots, and
summon additional help if needed. (page 255)
Skill Drill 7-6: Operating a Carbon Dioxide Fire Extinguisher Fire Fighter I, NFPA 1001: 4.3.16
Test your knowledge of this skill drill by filling in the correct words in the photo captions.
1.
Size up the fire to determine whether CO
2
is a safe and effective agent for this fire. Ensure the fire extinguisher is
large enough to be safe and effective. Ensure your safety. Make sure you have an exit route from the fire. Do not
turn your back on a fire. Remove the horn or nozzle. Pull the pin to release the fire extinguisher control valve.
2. Quickly squeeze to verify that the fire extinguisher is charged; CO
2
fire extinguishers do not have pressure gauges.
You must be within 3 to 8 ft (1 to 2.5 m) of the fire to be effective.
3. Aim the horn or nozzle, and sweep at the base of the flames.
4. Overhaul the fire; take steps to prevent rekindling and summon additional help if needed. (page 256)
3. Aim the nozzle, and sweep the dry-chemical
discharge across the surface of the burning
liquid. Start at the near edge of the fire, and
work toward the back.
4. Overhaul the fire; take steps to prevent
rekindling, keep a blanket of dry chemical over
the fuel, and summon additional help if needed.
(pages 253–254)
© Jones & Bartlett Learning. Photographed by Glen E. Ellman.
© Jones & Bartlett Learning. Photographed by Glen E. Ellman.

A NSWER KEY
26
Skill Drill 7-7: Operating a Halogenated Stored-Pressure Fire Extinguisher Fire Fighter I, NFPA 1001: 4.3.16
Test your knowledge of this skill drill by placing the photos below in the correct order. Number the first step with a “1,” the second
step with a “2,” and so on.
1. Size up the fire to determine whether a halogenated stored-pressure fire extinguisher is safe and effective for this fire.
Ensure the fire extinguisher is large enough to be safe and effective.
2. Ensure your safety. Turn off electricity if possible. Make sure you have an exit route from the fire. Do not turn your
back on a fire.
3. Remove the hose and nozzle. Quickly check the pressure gauge to verify that the fire extinguisher is adequately
charged.
4. Pull the pin to release the fire extinguisher control valve. Depending on the size of the fire and fire extinguisher, you
must be within 3 to 35 ft (1 to 11 m) of the fire to be effective.
5. Aim the nozzle at the base of the flames to sweep the flames off the surface starting at the near edge of the flames.
6. Overhaul the fire; take steps to prevent rekindling, continue to apply the extinguishing agent to cool the fuel, and
summon additional help if needed. (page 257)
Skill Drill 7-8: Operating a Dry-Powder Fire Extinguisher Fire Fighter I, NFPA 1001: 4.3.16
Test your knowledge of this skill drill by placing the photos below in the correct order. Number the first step with a “1,” the second
step with a “2,” and so on.
1. Size up the fire to determine whether a dry-powder fire extinguisher is safe and effective for this fire. Ensure the fire
extinguisher is large enough to be safe and effective. Avoid water or other extinguishing agents that might react with
the combustible metals.
2. Ensure your safety. Make sure you have an exit route from the fire. Do not turn your back on a fire.
3. Remove the hose and nozzle. Quickly check the pressure gauge to ensure the fire extinguisher is charged.
4. Pull the pin to release the control valve. You must be within 6 to 8 ft (2 to 2.5 m) of the fire to be effective.
5. Aim the nozzle, and fully open the valve to provide a maximum range, and then reduce the valve to produce a soft,
heavy flow down to completely cover the burning metal. The method of application may vary depending on the type
of metal burning and the extinguishing agent.
6. Overhaul the fire; take steps to prevent rekindling, continue to place a thick layer of the extinguishing agent over the
hot metal to form an airtight blanket, allow the hot metal to cool, and summon additional help if needed. (page 257)
Skill Drill 7-9: Operating a Wet-Chemical Fire Extinguisher Fire Fighter I, NFPA 1001: 4.3.16
Test your knowledge of this skill drill by filling in the correct words in the photo captions.
1.
Size up the fire, and ensure your safety.
2. Remove the hose and nozzle. Quickly check the pressure gauge to verify that the fire extinguisher is adequately charged.
3. Pull the pin to release the fire extinguisher control valve. You must be within 8 to 12 ft (2.5 to 4 m) of the fire to
be effective.
4. Aim the nozzle, and discharge so the stream of wet chemical drops gently into the surface of the burning liquid at
the front or the back of the deep-fat fryer.
5. Let the deep foam blanket flow across the surface of the burning liquid. Avoid splashing foam on the burning liquid.
6. Continue to apply the agent until the foam blanket has extinguished all of the flames.
7. Do not disturb the foam blanket even after all of the flames have been suppressed. If reignition occurs, repeat these steps.
(page 258)

Chapter 8: Fire Fighter Tools and Equipment
27
Chapter 8: Fire Fighter Tools and Equipment
Matching
1. E (page 273)
2. A (page 273)
3. I (page 281)
4. B (page 284)
5. C (page 284)
6. G (page 269)
7. D (page 276)
8. H (page 274)
9. F (page 276)
10. J (page 284)
Multiple Choice
1. C (page 272)
2. D (page 280)
3. D (page 268)
4. B (page 284)
5. C (page 268)
6. B (page 274)
7. A (page 272)
8. A (page 277)
9. B (page 286)
10. D (page 277)
11. D (page 272)
12. C (page287)
13. A (page 284)
14. A (page 277)
15. D (page 277)
16. C (page 275)
17. D (page 284)
18. B (page 281)
19. D (page 284)
20. D (page 286)
Vocabulary
1. Claw bar: A tool with a pointed claw-hook on one end and a forked- or flat-chisel pry on the other end that can be
used for forcible entry. (page 274)
2. Reciprocating saw: A saw powered by either an electric motor or a battery motor that rapidly pulls the saw blade
back and forth. (page 278)
3. Overhaul: The phase in which you examine the fire scene carefully and ensure that all hidden fires are extinguished.
(page 285)
4. Gripping pliers: A hand tool with a pincer-like working end that can also be used to bend wire or hold smaller
objects. (page 269)
5. Crowbar: A straight bar made of steel or iron with a forked-like chisel on the working end. (page 274)
6. Seat belt cutter: A specialized cutting device that cuts through seat belts. (page 277)
7. Spanner wrench: A special wrench used to tighten or loosen hose couplings. (page 272)
8. Kelly tool: A steel bar with two main features—a large pick and a large chisel or fork. (page 274)
9. Cutting torch: A torch that produces an extremely high-temperature flame and is capable of heating steel until it
melts, thereby cutting through the object. (page 280)
10. Hydrant wrench: A tool used to open or close a hydrant by rotating the valve stem and to remove the caps from the
hydrant outlets. (page 271)
11. Ceiling hook: A tool consisting of a long wood or fiberglass pole and a metal point with a spur at right angles that
can be used to probe ceilings and pull down plaster lath material. (page 273)
12. Pike pole: A wood or fiberglass pole with a metal head attached to one end. (page 272)
Fill-In
1. effectively (page 268)
2. Response/size-up (page 282)
3. Safety (page 268)
4. maul (page 276)
5. Pushing; pulling (page 272)
6. pick-head axe (page 275)
7. multiple-function (page 280)
8. Cutting torches (page 280)
9. floor runner (page 285)
10. Irons (page 282)
True/False
1. T (page 273)
2. F (page 278)
3. T (page 269)
4. T (page 281)
5. F (page 284)
6. T (page 282)
7. F (page 283)
8. T (page 277)
9. T (page 269)
10. T (page 284)

A NSWER KEY
28
Short Answer
1. Pushing/pulling tools can extend the reach of the fire fighter as well as increase the power the fire fighter can exert
upon an object. Students should include five of the following: (1) ceiling hook; (2) multipurpose hook; (3) roofman’s hook;
(4) clemens hook; (5) pike pole; (6) San Francisco hook; (7) drywall hook; (8) plaster hook. (page 272)
2. If you know which tools and equipment are needed for each phase of firefighting, you will be able to achieve the
desired objective quickly and have the energy needed to complete the remaining tasks. (page 269)
3. Tools used for salvage and overhaul include the following: (1) pushing tools (pike poles of varying lengths); (2) prying
tools (Halligan tool); (3) striking tools (sledgehammer, flat-head axe, hammer, mallet); (4) cutting tools (axes, power
saws); (5) debris-removal tools (shovels, brooms, rakes, buckets, carryalls); (6) water-removal equipment (water vacuums);
(7)ventilation equipment (electric, gas, or water-powered fans); (8) portable lighting; (9) thermal imaging device. (page 285)
4. The basic set of tools for interior firefighting includes: (1) a prying tool, such as a Halligan tool; (2) a striking tool,
such as a flat-head axe or a sledgehammer; (3) a cutting tool, such as an axe; (4) a pushing/pulling tool, such as a pike
pole; (5) a hand light or portable light. (page 284)
5. Tools used for search and rescue include: (1) hand light or flashlight, (2) portable radio, (3) hose lines, (4) ladders,
(5)search rope(s), (6) tubular webbing or short rope, (7) chalk, crayons, felt tip markers, spray paint, or masking tape
(for marking the doors of rooms that have been searched). (page 284)
Fire Alarms
1. The special equipment that a rapid intervention crew should carry includes thermal imaging device, additional
portable lighting, lifelines, prying tools, striking tools, cutting tools (including a power saw), SCBA, and spare air
cylinders. (page 284)
2. All debris should be removed, and the tool should be clean and dry. All fuel tanks should be filled completely with
fresh fuel. Any dull or damaged blades/chains should be replaced. Belts should be inspected to ensure they are tight
and undamaged. All guards should be securely in place. All hydraulic hoses should be cleaned and inspected. All
power cords should be inspected for damage. All hose fittings should be cleaned, inspected, and tested to ensure tight
fit. The tools should be started to ensure that they operate properly. Tanks on water vacuums should be emptied,
washed, cleaned, and dried. Hoses and nozzles on water vacuums should be cleaned and dried. (page 286)
Skill Drills
Skill Drill 8-1: Cleaning and Inspecting Hand Tools Fire Fighter I, NFPA 1001: 4.5.1
Test your knowledge of the skill drill by filling in the correct words in the photo captions.
1.
Clean and dry all metal parts. Metal tools must be dried completely, either by hand or by air, before being
returned to the apparatus. Remove rust with steel wool. Coat unpainted metal surfaces with a light film of
lubricant to help prevent rusting. Do not oil the striking surface of metal tools, as this treatment may cause them
to slip.
2. Inspect wood handles for damage such as cracks and splinters. Repair or replace any damaged handles. Sand the
handle if necessary. Do not paint or varnish a wood handle; instead, apply a coat of boiled linseed oil. Check that
the tool head is tightly fixed to the handle.
3. Clean fiberglass handles with soap and water. Inspect for damage. Repair or replace any damaged handles. Check
that the tool head is tightly fixed to the handle.
4. Inspect cutting edges for nicks or other damage. Cutting tools should be sharpened after each use. File and
sharpen as needed. Power grinding may weaken some tools, so hand sharpening may be required. (page 287)
Chapter 9: Ropes and Knots
Matching
1. E (page 307)
2. G (page 298)
3. A (page 305)
4. I (page 307)
5. B (page 299)
6. J (page 299)
7. H (page 296)
8. D (page 306)
9. F (page 299)
10. C (page 307)

Chapter 9: Ropes and Knots
29
Multiple Choice
1. D (page 305)
2. C (page 295)
3. D (page 305)
4. D (page 307)
5. D (page 297)
6. B (page 320)
7. B (page 295)
8. C (page 298)
9. C (page 301)
10. A (page 299)
11. A (page 303)
12. B (page 305)
13. D (page 296)
14. C (page 306)
15. A (page 319)
16. B (page 295)
Labeling
Label the following diagram with the correct terms.
1. Sections of a rope used in tying knots.
A. Working end
B. Standing part
C. Running end (page 306)
C. running end
B. standing part
A. working end
Vocabulary
1. Running end: The part of the rope used for lifting or hoisting. (page 305)
2. Knot: A prescribed way of fastening lengths of rope or webbing to objects or to each other. (page 305)
3. Braided rope: Ropes constructed by weaving or intertwining strands—typically synthetic fibers—together in the
same way that hair is braided. (page 299)
4. Rope bag: A bag used to protect and store ropes. (page 304)
5. Depressions: Flat spots or lumps on the inside of the rope. (page 302)
6. Shock load: A shock load can occur when a rope is suddenly placed under unusual tension—for example, when
someone attached to a life safety rope falls until the length of the rope or another rescuer stops the drop. (page 300)
7. Kernmantle rope: A rope that consists of two parts—the kern (interior component) and the mantle. (outside sheath).
(page 299)
8. Working end: The part of the rope used for forming the knot. (page 305)
9. Round turn: A turn formed by making a loop and then bringing the two ends of the rope parallel to each other. (page 306)
10. Bight: A bend in a rope that is formed by reversing the direction of the rope to form a U bend with two parallel ends.
(page 306)
Fill-In
1. Knots (page 305)
2. bight (page 306)
3. Hitches (page 307)
4. reduce (page 305)
5. safety knot (page 307)
6. secure loop (page 313)
7. round turn (page 306)
8. rope record (pages 303-304)
9. bowline (page 315)
10. water knot (page 315)
© Jones & Bartlett Learning. Photographed by Glen E. Ellman.

A NSWER KEY
30
True/False
1. T (page 296)
2. T (page 307)
3. F (page 300)
4. T (page 307)
5. T (page 301)
6. F (page 297)
7. T (page 305)
8. T (page 299)
9. F (page 307)
10. T (page 315)
Short Answer
1. The four parts of the rope maintenance formula are: (1) care; (2) clean; (3) inspect; (4) store. (page 300)
2. The three types of rope construction are: (1) Twisted: Also called laid rope; made of individual fibers twisted into
strands; strands are twisted together to make the rope. (2) Braided: Made by weaving or intertwining strands
together, like braiding hair; all strands outside the rope are subject to abrasion; will stretch under a load, not prone
to twisting; double-braided rope has an inner core covered by a protective braided sleeve, the inner core is protected
from abrasion. (3) Kernmantle: Consists of two parts, the kern and the mantle; kern is the center core of the rope and
provides about 70 percent of the rope’s strength; mantle or sheath is the braided covering that protects the core; both
parts are made with synthetic fibers, but fibers can be different for the kern and the mantle; each fiber in the kern
extends the entire length of the rope without knots or splices, so that the inner core is protected from abrasion. (pages
298-300)
3. The most common synthetic fiber ropes used for fire department operations are: (1) Nylon: has a high melting
temperature, has good abrasion resistance, strong and lightweight; (2) Polyester: second most common synthetic fiber
used for life safety ropes; (3) Polypropylene: lightest of the synthetic fibers, does not absorb water, often used for water
rescue. (page 298)
4. Some of the drawbacks of using natural fiber ropes are that they: (1) lose their load-carrying ability over time; (2) are
subject to mildew; (3) absorb 50 percent of their weight in water; (4) degrade quickly. (pages 297-298)
5. The principles to preserve the strength and integrity of rope are: (1) Protect the rope from sharp, abrasive surfaces.
(2) Protect the rope from heat, chemicals, and flames. (3) Protect the rope from rubbing against another rope.
Protect the rope from prolonged exposure to sunlight. (5) Never step on a rope. (6) Follow the manufacturer’s recom-
mendations. (page 300)
Fire Alarms
1. Tie a figure eight knot in the rope about 3 ft (1 m) from the working end of the rope. Loop the working endofthe
rope around the fan handle and back to the figure eight knot. Secure the rope by tying a figure eight with a follow-
through. Thread the working end back through the first figure eight in the opposite direction. Tie a safety knot in
the working end of the rope. Attach a tag line to the fan for better control. Prepare to hoist the fan. (page 324)
2. Many ropes made from synthetic fibers can be washed with a mild soap and water. A special rope washer can be
attached to a garden hose. Some manufacturers recommend placing the rope in a mesh bag and washing it in a
frontloading washing machine. Air-drying is usually recommended, but rope should not be dried in direct sunlight.
The use of mechanical drying devices is not usually recommended. Life safety ropes must be inspected after each
use, whether the rope was used for an emergency incident or in a training exercise. Inspect the rope visually, looking
for cuts, frays, or other damage, as you run it through your fingers. Because you cannot see the inner core of a
kernmantle rope, feel for any depressions. Examine the sheath for any discolorations, abrasions, or flat spots. If you
have any doubt about whether the rope has been damaged, consult with your company officer. (pages 300-302)
Skill Drills
Skill Drill 9-1: Caring for Life Safety Ropes Fire Fighter I, NFPA 1001: 4.5.1
Test your knowledge of the skill drill by filling in the correct words in the photo captions.
1.
Protect the rope from sharp and abrasive edges; use edge protectors.
2. Protect the rope from rubbing against other ropes.
3. Protect the rope from heat, chemicals, flames, and sunlight.
4. Avoid stepping on the rope. (page 301)

Chapter 9: Ropes and Knots
31
Skill Drill 9-7: Tying a Clove Hitch in the Open Fire Fighter I, NFPA 1001: 4.1.2, 4.3.20
Test your knowledge of this skill drill by placing the photos below in the correct order. Number the first step with a “1,” the second
step with a “2,” and so on.
1. Starting from left to right on
the rope, grab the rope with
crossed hands with the left
positioned higher than the
right.
2. Holding on to the rope, uncross your
hands. This will create a loop in each
hand.
3. Slide the right-hand loop behind the
left-hand loop.
4. Slide both loops over the object. 5. Pull in opposite directions to tighten the clove hitch. Tie
a safety knot in the working end of therope. (page 310)
© Jones & Bartlett Learning. Photographed by Glen E. Ellman.© Jones & Bartlett Learning. Photographed by Glen E. Ellman.
© Jones & Bartlett Learning. Photographed by Glen E. Ellman.
© Jones & Bartlett Learning. Photographed by Glen E. Ellman.
© Jones & Bartlett Learning. Photographed by Glen E. Ellman.

A NSWER KEY
32
Skill Drill 9-8: Tying a Clove Hitch Around an Object Fire Fighter I, NFPA 1001: 4.1.2, 4.3.20
Test your knowledge of this skill drill by placing the photos below in the correct order. Number the first step with a “1,” the second
step with a “2,” and so on.
1. Place the working end of the rope
over the object.
2. Make a complete loop around the
object, working end down.
3. Make a second loop around the
object a short distance above the
first loop. Pass the working end of
the rope under the second loop,
above the point where the second
loop crosses over the first loop.
4. Tighten the knot, and secure it
by pulling on both ends.
5. Tie a safety knot in the working
end of the rope. (page 311)
© Jones & Bartlett Learning. Photographed by Glen E. Ellman.
© Jones & Bartlett Learning. Photographed by Glen E. Ellman.
© Jones & Bartlett Learning. Photographed by Glen E. Ellman.
© Jones & Bartlett Learning. Photographed by Glen E. Ellman.
© Jones & Bartlett Learning. Photographed by Glen E. Ellman.

Chapter 9: Ropes and Knots
33
Skill Drill 9-12: Tying a Figure Eight Bend Fire Fighter 1, NFPA 1001: 4.1.2, 4.3.20
Test your knowledge of the skill drill by filling in the correct words in the photo captions.
1.
Tie a figure eight near the end of one rope.
2. Thread the end of the second rope completely through the knot from the opposite end. Pull the knot tight.
3. Tie a safety knot on the loose end of each rope to the standing part of the other. (page 315)
Skill Drill 9-13: Tying a Bowline Fire Fighter I, NFPA 1001: 4.1.2, 4.3.20
Test your knowledge of this skill drill by placing the photos below in the correct order. Number the first step with a “1,” the second
step with a “2,” and so on.
1. Make the desired sized loop, and
bring the working end back to
the standing part.
2. Form another small loop in the
standing part of the rope with the
section close to the working end
on top. Thread the working end up
through this loop from the bottom.
3. Pass the working end over the
loop and around and under the
standing part.
4. Pass the working end back down
through the same opening.
5. Tighten the knot by holding the
working end and pulling the
standing part of the rope backward.
6. Tie a safety knot in the working
end of the rope. (page 316)
© Jones & Bartlett Learning. Photographed by Glen E. Ellman.© Jones & Bartlett Learning. Photographed by Glen E. Ellman.
© Jones & Bartlett Learning. Photographed by Glen E. Ellman.
© Jones & Bartlett Learning. Photographed by Glen E. Ellman.
© Jones & Bartlett Learning. Photographed by Glen E. Ellman.
© Jones & Bartlett Learning. Photographed by Glen E. Ellman.

A NSWER KEY
34
Skill Drill 9-14: Tying a Sheet or Becket Bend Fire Fighter I, NFPA 1001: 4.1.2, 4.3.20
Test your knowledge of the skill drill by filling in the correct words in the photo captions.
1.
Using your left hand, form a bight at the working end of one rope. If the ropes are of unequal size, the bight
should be made in the larger rope.
2. Thread the working end of the second rope up through the opening of the bight, between two parallel sections of
the first rope.
3. Loop the second rope completely around both sides of the bight. Pass the working end of the second rope between
the original bight and under the secondrope.
4. Tighten the knot by holding the first rope firmly while pulling back on the second rope.
5. Tie a safety knot in the working end of each rope. (page 317)
Skill Drill 9-16: Hoisting an Axe Fire Fighter I, NFPA 1001: 4.1.2, 4.3.20
Test your knowledge of this skill drill by placing the photos below in the correct order. Number the first step with a “1,” the second
step with a “2,” and so on.
1. Tie the end of the hoisting rope
around the handle of the axe near
the head using either a figure eight
on a bight or a clove hitch. Slip the
knot down the handle from the end
to the head.
2. Loop the standing part of the rope
under the head.
3. Place the standing part of the rope
parallel to the axe handle.
4. Use one or two half hitches along the
axe handle to keep the handle parallel
to the rope.
5. Communicate with the fire fighter
above that the axe is ready to raise.
(page 319)
© Jones & Bartlett Learning. Photographed
by Glen E. Ellman.
© Jones & Bartlett Learning. Photographed
by Glen E. Ellman.
© Jones & Bartlett Learning. Photographed
by Glen E. Ellman.
© Jones & Bartlett Learning. Photographed
by Glen E. Ellman.
© Jones & Bartlett Learning. Photographed
by Glen E. Ellman.
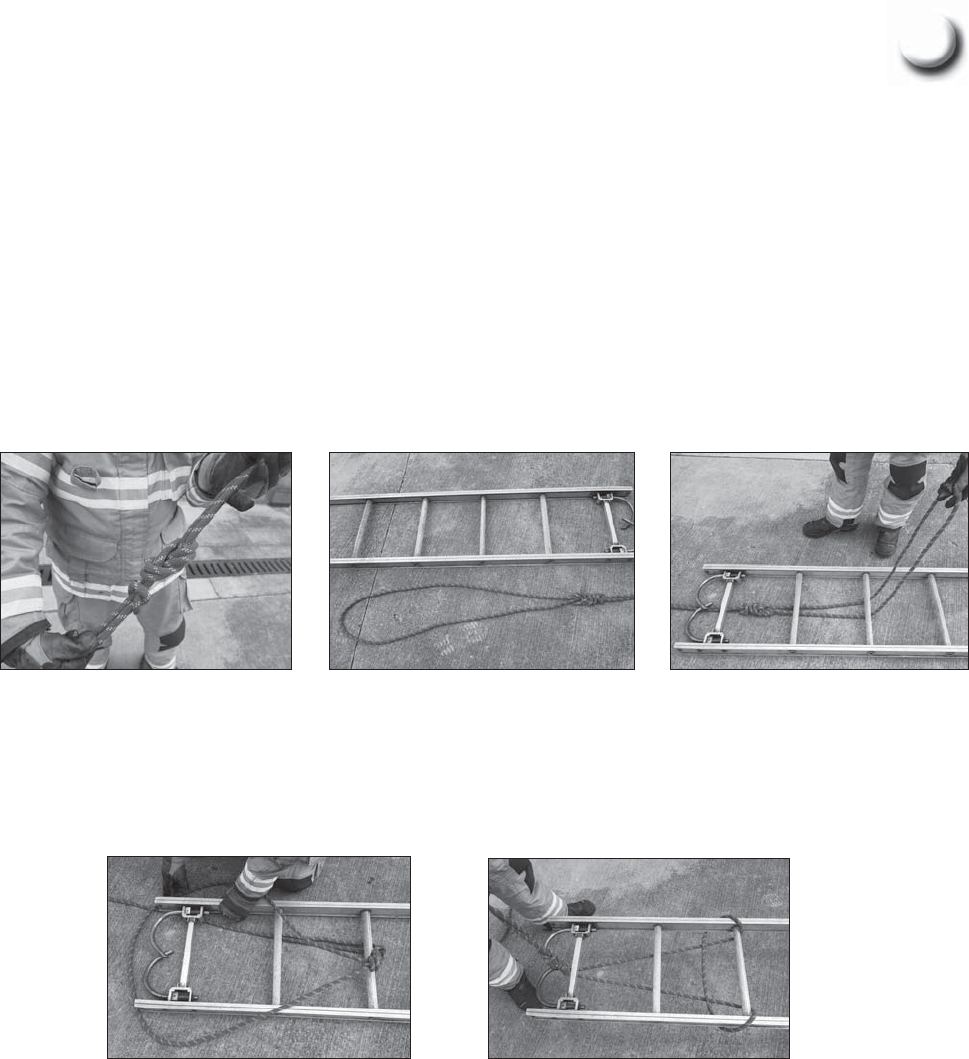
Chapter 9: Ropes and Knots
35
Skill Drill 9-17: Hoisting a Pike Pole Fire Fighter I, NFPA 1001: 4.1.2, 4.3.20
Test your knowledge of the skill drill by filling in the correct words in the photo captions.
1.
Place a clove hitch over the bottom of the handle, and secure it close to the bottom of the handle. Leave enough
length of rope below the clove hitch for a tag line while raising the pike pole.
2. Place a half hitch around the handle above the clove hitch to keep the rope parallel to the handle.
3. Slip a second half hitch over the handle, and secure it near the head of the pike pole.
4. Communicate with the fire fighter above that the pike pole is ready to raise. (page 320)
Skill Drill 9-18: Hoisting a Ladder Fire Fighter I, NFPA 1001: 4.1.2, 4.3.20
Test your knowledge of this skill drill by placing the photos below in the correct order. Number the first step with a “1,” the second
step with a “2,” and so on.
1. Tie a figure eight on a bight to
create a loop.
2. The loop should be approximately
3 or 4ft (1–1.3 m) in diameter and
large enough to fit around both
ladder beams.
3. Pass the rope between two beams
of the ladder, three or four rungs
from the top. Pull the end of the
loop under the rungs and toward
the tip at the top of the ladder.
4. Place the loop around the top tip of
the ladder.
5. Pull on the running end of the rope
to remove the slack from the rope.
Attach a tag line to the bottom rung
of the ladder to stabilize it as it is
being hoisted. Communicate with
the fire fighter above that the ladder
is ready to be raised. Hold on to
the tag line to stabilize the bottom
of the ladder as it is being hoisted.
(page 321)
© Jones & Bartlett Learning. Photographed
by Glen E. Ellman.
© Jones & Bartlett Learning. Photographed
by Glen E. Ellman.
© Jones & Bartlett Learning. Photographed
by Glen E. Ellman.
© Jones & Bartlett Learning. Photographed
by Glen E. Ellman.
© Jones & Bartlett Learning. Photographed
by Glen E. Ellman.

A NSWER KEY
36
Skill Drill 9-21: Hoisting an Exhaust Fan or Power Tool Fire Fighter I, NFPA 1001: 4.1.2, 4.3.20
Test your knowledge of the skill drill by filling in the correct words in the photo captions.
1.
Tie a figure eight knot in the rope about 3 ft (1 m) from the working end of the rope.
2. Loop the working end of the rope around the fan handle and back to the figure eight knot.
3. Secure the rope by tying a figure eight follow-through by threading the working end back through the first figure
eight in the opposite direction.
4. Attach a tag line to the fan for better control. Communicate with the fire fighter above that the exhaust fan is
ready to hoist. (page 324)
Chapter 10: Forcible Entry
Matching
1. J (page 365)
2. F (page 331)
3. C (page 334)
4. I (page 357)
5. E (page 335)
6. A (page 341)
7. H (page 341)
8. G (page 337)
9. D (page 358)
10. B (page 340)
Multiple Choice
1. A (page 337)
2. C (page 364)
3. A (page 358)
4. A (page 345)
5. D (page 360)
6. B (page 331)
7. B (page 350)
8. C (page 359)
9. C (page 342)
10. A (page 357)
11. C (page 334)
12. C (page 331)
13. B (page 341)
14. B (page 358)
15. A (page 334)
16. D (page 350)
17. B (page 334)
18. C (page 353)
19. C (page 341)
20. D (page 337)
Labeling
Label the following diagram with the correct terms.
1. Parts of a double-hung window
A. Window frame
B. Upper sash
C. Locking mechanism
D. Glass
E. Lower sash
F. Track (page 351)
A. Window frame
C. Locking mechanism
B. Upper sash
E. Lower sash
F. Track
D. Glass
© Jones & Bartlett Learning.

Chapter 10: Forcible Entry
37
Fill-In
1. Bolt cutters (pages 336)
2. rabbet tool (page 335)
3. critical (page 331)
4. Double-hung (page 351)
5. security (page347)
6. Awning (page 353)
7. ready (page 333)
8. Windows (page 347)
9. Battery (page 347)
10. Revolving (page 336)
11. carbide (page 337)
2. Parts of a door lock
A. Operator lever
B. Deadbolt
C. Latching device
True/False
1. T (page 340)
2. T (page 365)
3. F (page 331)
4. T (page 335)
5. F (page 335)
6. F (page 366)
7. F (page 342)
8. T (page 350)
9. F (page 338)
10. F (page 349)
11. T (page 346)
Latching device
Deadbolt
Operator
lever
Vocabulary
1. Casement windows: Windows in a steel or wood frame that open away from the building via a crank mechanism.
(page 355)
2. Projected windows: Also called factory windows, usually found in older warehouse or commercial buildings. They
project inward or outward on an upper hinge. (page 356)
3. Lock box: Boxes attached to a building usually close to the main entrance, that contain keys for a specific building.
(page 368)
4. Mortise locks: Door locks with both a latch and a bolt built into the same mechanism; the two locking mechanisms
operate independently of each other. Mortise locks are often found in hotel rooms. (page 360)
5. Tempered glass: A type of glass that is heat treated, making it four times stronger than regular glass. (page 350)
6. K tool: A tool that is designed to cut into a lock cylinder. (page 337)
7. Jalousie windows: Made of adjustable sections of tempered glass that overlap each other, encased in a metal frame.
Commonly found in mobile homes, these are operated by a hand crank. (page 352)
8. Jamb: The upright or vertical parts of a door frame onto which a door is secured. (page 340)
© Maxal Tamor/Shutterstock, Inc.

A NSWER KEY
38
Short Answer
1. The four general carrying tips are: (1) Do not carry a tool or piece of equipment that is too heavy or designed to be
used by more than one person. (2) Always use your legs—not your back—when lifting heavy tools. (3) Keep all sharp
edges and points away from your body at all times. Cover or shield them with a gloved hand to protect those around
you. (4) Carry long tools with the head down toward the ground. Be aware of overhead obstructions and wires,
especially when using pike poles. (page 333)
2. The four categories of forcible entry tools are: (1) striking tools; (2) cutting tools; (3) prying tools; (4) lock tools.
(page333)
3. The four general safety tips are: (1) Always wear the appropriate protective equipment. (2) Learn to recognize the
materials used in building and lock construction and the appropriate tools and techniques for each. (3) Keep all tools
clean, properly serviced according to the manufacturer’s guidelines, and ready to use. (4) Do not leave tools lying on
the ground or floor. (pages 332-333)
4. The four basic components of a door are: (1) door (the entryway); (2) jamb (the frame); (3) hardware (the handles,
hinges, etc.); (4) locking mechanism. (page 340)
Fire Alarms
1. A quick way to gain entry to a standard residential overhead garage door is the use of a triangle cut. Wearing full
protective clothing and eye protection gather a set of irons and a power saw with a metal-cutting blade. Check for
any safety hazards, start the saw and make sure it is in proper working order. Check the outside of the door for heat.
Try to lift the door to assume it is not unlocked. Starting at a center high point in the door make a diagonal cut to the
right, down to the bottom of the door. Next to the same starting point, make a second diagonal cut to the left, down
to the bottom of the door. Fold the door down to form a large triangle. IF necessary, pad or protect the cut edges of
the triangle and bottom panel to prevent injuries. (pages 347-348)
2. First try before you pry. Then, break one of the glass doors and clear the glass from the steel frame. Simply unlock the
door by turning the lock. Block the door open by using a wedge. Enter the classroom and overhaul the fire.
Skill Drills
Skill Drill 10-1: Forcing Entry into an Inward-Opening Door Fire Fighter I, NFPA 1001: 4.3.4
Test your knowledge of this skill drill by placing the photos below in the correct order. Number the first step with a “1,” the second
step with a “2,” and so on.
1. Look for any safety hazards as you evaluate the door.
Inspect the door for the location and number of locks and
their mechanisms.
Courtesy of Jessica Holmes.

Chapter 10: Forcible Entry
39
2. Insert the adze end of a prying tool
(such as a Halligan tool) into the
space between the door and the door
jamb about 6 in. (15 cm) above or
below the door lock. Push up or
down on the tool to rotate the adze
and to create a gap (or crease) in the
door. To capture your progress, insert
a wedge or tool before removing the
adze end of the tool from the door.
3. Insert the fork end of the tool
into the gap between the door
and the door frame.
4. Instruct a second fire fighter to
drive the fork in forcefully with
a flat-head axe. Keep constant
pressure on the tool and move
the tool away from the door as
it is being driven in. The tool
is set when the arch of the fork
is even with the inside edge
of the door/doorstop and is
perpendicular to the door.
5. When the Halligan tool is set, push the
tool sharply inward toward the center
of the door to create maximum force.
6. Maintain control of the door when
it opens by hooking the door with
the adze end of the Halligan or by
attaching a strap to the knob. Limit
ventilation of the fire. (pages 343–344)
Courtesy of Jessica Holmes.
Courtesy of Jessica Holmes.
Courtesy of Jessica Holmes.
Courtesy of Jessica Holmes.
Courtesy of Jessica Holmes.

A NSWER KEY
40
Skill Drill 10-2: Forcing Entry into an Outward-Opening Door Fire Fighter I, NFPA 1001: 4.3.4
Test your knowledge of the skill drill by filling in the correct words in the photo captions.
1.
Size up the door, looking for any safety hazards. Determine the number and location of locks and the locking
mechanism. Place the adze end of the Halligan tool in the space between the door and the door jamb. Gap the
door by rocking the tool up and down to spread the door from the door jamb.
2. Set the tool, and pry the door out by pulling onthe Halligan tool so the adze can be driven in past the door jamb. Be
careful not to bury the tool in the door jamb. Strike the Halligan tool to drive the adze end of the tool past the door jamb.
3. Force the door by pulling the Halligan tool away from the door. Control the door to limit ventilation of the fire
and to prevent it from closing behind you. (page 345)
Skill Drill 10-3: Opening an Overhead Garage Door Using the Triangle Method Fire Fighter I, NFPA 1001: 4.3.4
Test your knowledge of this skill drill by placing the photos below in the correct order. Number the first step with a “1,” the second
step with a “2,” and so on.
1. Before cutting, check for any safety
hazards during the size-up of the
garage door. Select the appropriate
tool to make the cut. (The best choice
is a power saw with a metal-cutting
blade.) Wearing full protective gear
and eye protection, start the saw, and
ensure it is in proper working order.
2. Be aware of the environment
behind the door. Check the
outside of the door for heat. Try to
lift the door to assure that it is not
unlocked. If necessary, cut a small
inspection hole, large enough to
insert a hose nozzle.
3. Starting at a center high point in the
door, make a diagonal cut to the right,
down to the bottom of the door.
4. Next to the same starting point, make
a second diagonal cut to the left, down
to the bottom of the door. Fold the
door down to form a large triangle.
5. If necessary, pad or protect the cut edges
of the triangle and the bottom panel to
prevent injuries as fire fighters enter or
leave the premises. If you have time,
you can remove the cut portion of the
door and the bottom rail by raising the
bottom rail with a prying tool and then
cutting the bottom rail in twoplaces.
(page 348)
© Jones & Bartlett Learning. Photographed by Glen E. Ellman.
© Jones & Bartlett Learning. Photographed by Glen E. Ellman.
© Jones & Bartlett Learning. Photographed by Glen E. Ellman.
© Jones & Bartlett Learning. Photographed by Glen E. Ellman.
© Jones & Bartlett Learning. Photographed by Glen E. Ellman.

Chapter 10: Forcible Entry
41
Skill Drill 10-4: Opening an Overhead Garage Door Using the Hinge Method Fire Fighter I, NFPA 1001: 4.3.4
Test your knowledge of the skill drill by filling in the correct words in the photo captions.
1.
Before cutting, check for any safety hazards during the size-up of the garage door. Select the appropriate tool to
make the cut. (The best choice is a power saw with a metal-cutting blade.) Wearing full protective gear and eye
protection, start the saw, and ensure it is in proper working order.
2. Be aware of the environment behind the door. Check the outside of the door for heat. Try to lift the doorto assure
that it is not unlocked. If necessary, cut a small inspection hole, large enough to insert a hose nozzle.
3. Make a vertical cut down the left side of the door starting as high as you can comfortably reach.
4. Make a diagonal cut about 18 in. (45 cm) from the bottom of the door starting at the first cut. Make a cutto the
bottom of the door. This will make a small triangle. Kick or push in the triangle formed by thesetwo cuts.
5. Insert the saw blade into the opening made by the triangle cuts at the bottom of the door. Cut through the angle
iron, or L-shaped steel, at the bottom of the door.
6. Resting the saw on your shoulder, make a horizontal cut the width of the door, starting at the top of the first cut.
Continue cutting to the right side of the door. The uncut side of the door will act as the hinge.
7. Open the door flap outward. This will produce a large opening that can be opened and closed to control the flow
of air to the fire. Secure the door in an open position anytime fire fighters are inside the building. (page 349)
Skill Drill 10-6: Forcing Entry Through a Casement Window Fire Fighter I, NFPA 1001: 4.3.4
Test your knowledge of the skill drill by filling in the correct words in the photo captions.
1.
Size up the window to check for any safety hazards, and locate the locking mechanism. Select an appropriate
tool to break out a windowpane. Stand to the windward side of the window, and break out the pane closest to the
locking mechanism.
2. Remove all of the broken glass in the pane to prevent injuries.
3. Reach in and unlock the window, then manually operate the window crank to open the window. (pages 355–356)
Skill Drill 10-8: Forcing Entry Using a K Tool Fire Fighter I, NFPA 1001: 4.3.4
Test your knowledge of this skill drill by placing the photos below in the correct order. Number the first step with a “1,” the second
step with a “2,” and so on.
1. Size up the door and lock area,
checking for any safety hazards.
Determine which type of lock is
used, whether it is regular or heavy-
duty construction, and whether the
lock cylinder has a case-hardened
collar, which may hamper proper
cutting. Place the K tool over the
face of the lock cylinder, noting the
location of the keyway.
2. Place the adze end of the Halligan
tool or similar prying tool into the
slot on the face of the K tool. Using
a flat-head axe or similar striking
tool, strike the end of the prying
tool to drive the K tool farther
onto the lock cylinder.
3. Pry up on the tool to remove the
lock cylinder and expose the locking
mechanism. Using the small tools
that come with the K tool, turn
the locking mechanism to open
the lock. The lock should release,
allowing you to open the door.
(page 362)
© Jones & Bartlett Learning. Photographed
by Glen E. Ellman.
© Jones & Bartlett Learning. Photographed
by Glen E. Ellman.
© Jones & Bartlett Learning. Photographed
by Glen E. Ellman.

A NSWER KEY
42
Skill Drill 10-9: Forcing Entry Using an A Tool Fire Fighter I, NFPA 1001: 4.3.4
Test your knowledge of the skill drill by filling in the correct words in the photo captions.
1.
Size up the door and lock area, checking for any safety hazards. Determine which type of lock is used, whether
it is regular or heavy-duty construction, and whether the lock cylinder has a case-hardened collar, which may
hamper proper cutting. Place the cutting edges of the A tool over the lock cylinder, between the lock cylinder and
the doorframe.
2. Using a flat-head axe or similar striking tool, drive the A tool onto the lock cylinder. Pry up on the A tool to
remove the lock cylinder from the door. Insert a key tool into the hole to manipulate the locking mechanism and
open the door. (page 363)
Skill Drill 10-11: Breaching a Wall Frame Fire Fighter I, NFPA 1001: 4.3.4
Test your knowledge of the skill drill by filling in the correct words in the photo captions.
1.
Size up the wall, checking for safety hazards such as electrical outlets, wall switches, or any signs of plumbing.
Inspect the overall scene to ensure that the wall is not load bearing. Using a tool, sound the wall to locate any
studs. Make a hole between the studs.
2. Cut the sheetrock as close to the studs as possible. (page 365)
3. Enlarge the hole by extending it from stud to stud and as high asnecessary.
Skill Drill 10-12: Breaching a Masonry Wall Fire Fighter I, NFPA 1001: 4.3.4
Test your knowledge of this skill drill by placing the photos below in the correct order. Number the first step with a “1,” the second
step with a “2,” and so on.
1. Size up the wall, checking for any safety hazards
such as electrical outlets, wall switches, and
plumbing. Inspect the overall area to ensure that
the wall is not load bearing. Select a row of five
masonry blocks at 2 to 3 ft (61 to 91 cm) above
the floor. Using a sledgehammer, knock two holes
in each masonry block. Each hole should pierce
into the hollow core of the masonry blocks.
2. Repeat the process on four masonry blocks
above the first row. Repeat the process on three
masonry blocks above the second row, on two
masonry blocksabove the third row, and on one
masonry block above the fourth row. An inverted
V-cut has now been created.
© Jones & Bartlett Learning. Photographed by Glen E. Ellman.
© Jones & Bartlett Learning. Photographed by Glen E. Ellman.

Chapter 10: Forcible Entry
43
Skill Drill 10-14: Breaching a Floor Fire Fighter I, NFPA 1001: 4.3.4
Test your knowledge of this skill drill by placing the photos below in the correct order. Number the first step with a “1,” the second
step with a “2,” and so on.
3. Knock out the remaining portion of the masonry
blocks by hitting the masonry blocks parallel to
the wall rather than perpendicular to it.
4. Clear any reinforcing wire using bolt cutters, and
enlarge the hole as needed. (page 366)
1. Size up the floor area, checking for hazards in
the area to be cut. Sound the floor with an axe or
similar tool to locate the floor joists.
2. Use an appropriate cutting tool to cut one side
of the hole. Cut the opposite side. Make two
additional cuts at right angles to the first cuts.
Thiswill form a rectangle. Avoid cutting into the
floor joists.
© Jones & Bartlett Learning. Photographed by Glen E. Ellman.
© Jones & Bartlett Learning. Photographed by Glen E. Ellman.
© Jones & Bartlett Learning. Photographed by Glen E. Ellman.
© Jones & Bartlett Learning. Photographed by Glen E. Ellman.

A NSWER KEY
44
3. Remove any flooring, such as carpet, tile, or
floorboards that have been loosened. Cut a
similar-size opening into the subfloor, until the
proper-size hole is achieved. (pages 368–369)
4. Secure the area around the hole to prevent others
working in the area from falling through the hole.
Chapter 11: Ladders
Matching
1. A (page 380)
2. B (page 378)
3. H (page 379)
4. E (page 380)
5. J (page 379)
6. D (page 378)
7. F (page 378)
8. I (page 379)
9. G (page 378)
10. C (page 378)
Multiple Choice
1. C (page 379)
2. A (page 382)
3. C (page 418)
4. B (page 388)
5. D (page 390)
6. C (page 383)
7. A (page 377)
8. A (page 419)
9. A (page 380)
10. B (page 378)
11. D (page 380)
12. C (page 394)
13. B (page 387)
14. B (page 406)
15. D (page 378)
16. C (page 382)
17. C (page 391)
18. D (page 406)
19. D (page 404)
20. A (page 381)
21. A (page 394)
22. B (page 389)
23. C (page 378)
24. B (page 379)
25. B (page 381)
26. A (page 382)
27. D (page 379)
28. A (page 378)
© Jones & Bartlett Learning. Photographed by Glen E. Ellman.
© Jones & Bartlett Learning. Photographed by Glen E. Ellman.
