
1
Quick Start Guide
V2.0

2
THANK YOU
Thank you for purchasing the Monster V ision® 360 camera. This quick start guide will get you
using your new camera in no time. You will be able to take awesome videos and amazing
photos to share with your friends and family . Feel free to share them with us and we might
post them on our website, YouTube™ channel, Facebook or Instagram.
If you ever have any issues or want to learn more, please reach out to us through any number
of means all listed on our website. We will get your question answered or problem solved
right away. Also be sure to register your camera at www.MonsterDigital.com
Please be safe and have fun!
The Monster Digital Team

3
FEATURES AND BUTTONS
1. Status Screen
2. Shutter Button
3. Power Button
4. WiFi Button
5. Charging Indicator (blue)
6. Activity Indicator (red)
7. WiFi Indicator (red)
8. 220° Lens
9. Tripod mount (¼-20)
10. USB/HDMI/Memory access
11. Speaker

4
GET STARTED
1. MEMORY INSTALLATION – CONTACTS FACING UP!
Install the microSD memory card as shown. Do not exceed 32GB card capacity. The camera’s
WiFi will not work unless a memory card is installed.
Note the HDMI and USB connectors are in the same location.
Be sure the camera is off before a memory card is installed or removed.

5
2. BATTERY INSTALLATION
Open the cover by pushing down on the arrow and sliding in the direction of the arrow.
(The camera’s serial number is located in this compartment.)
Make sure the battery contacts are aligned properly, and then put the cover back on.

6
3. CHARGING
With the power turned off connect the camera with the included cable to a USB power
source. We recommend 1 amp (1A) or higher. The charging indicator will be in blue when
charging and will turn off when charging is complete. It can take up to 4 hours to fully charge.
4. POWER ON/OFF
To turn the camera on or off press and hold the Power button for about 3 seconds.
When turned on, the status screen and activity indictor will illuminate.
5. POWER SAVING
To save power the status screen light will turn off after one minute of inactivity.
Press any button to turn the light back on.
After 3 minutes of inactivity, the camera will turn off automatically. In the settings menu, the
power saving mode can be adjusted to OFF, 1, 3 or 5 minutes.
7
6. MODE SELECTION
Monster V ision 360 has three modes, V ideo, Dash-Cam and Photo.
Modes are switched by pressing Power/Mode button or via app.
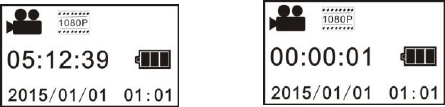
VIDEO MODE
The movie camera icon in the display’s upper left corner indicates status.
Press the Shutter button to start and stop recording.
When a recording is in progress the activity indicator will flash and the counter will advance.
Status Screen in V ideo Mode Status Screen in V ideo
Mode while recording

8
DASH-CAM MODE
The car icon in the display’s upper left corner indicates status.
When powered on, press the power/mode button to select dash-cam mode.
In dash-cam mode the camera continuously creates files three minutes long. When the
memory card is full, the oldest file will be overwritten, then the next etc. in a continuous loop.
DASH-CAM AUTO ON
After choosing dash-cam mode, turn the camera off. Connect a USB cable to the camera
and a switched power outlet that is on when the car is on. The camera will automatically
start recording when the ignition is turned on and stop when the ignition is off.
Status Screen in Dash-cam Mode Status Screen in Dash-cam
Mode while recording

9
PHOTO MODE
After switching to Photo mode, press the Shutter button to take a picture. The number of
available photos will decrease by one after each photo is taken.
Status Screen in Photo Mode

10
7. SETTINGS
When the power is on, hold the WIFI button for 2 seconds to enter the settings menu.
Video Menu Settings Menu
Press Power button to switch between menus.
Press WIFI button to move the cursor down.
Press Shutter to select.
Hold WIFI to cancel or exit.

11
8. THE APP
1. DOWNLOAD AND INSTALL THE APP
Search for “Monster Vision 360” in Google Play™ or the App Store
SM
Or Scan the QR code below.

12
2. TURN ON WiFi
Turn on the camera and press the Wi-Fi button.
MAKE SURE AN SD CARD IS IN THE CAMERA
OR THE WIFI WILL NOT WORK!
3. CONNECT THE PHONE OR TABLET TO THE CAMERA
In the device settings turn on the WiFi, select the MV360 signal.
WiFi: MV360
Password: monsterdigital
4. OPEN THE APP
Tap the app icon on the mobile phone or tablet.
Tap the camera/WiFi image in the upper right corner of the screen.
The camera can now be controlled from the app.

13
9. COMPUTER PLAYBACK
First - Download and install the “Monster Vision VR Viewer”.
https://monsterdigital.com/pages/applications
Note: If you are on a Mac you may need to enter SYSTEM PREFERENCES, SECURITY
& PRIVACY to allow the app to open.
Next – Access photos and videos
The memory card can be connected to the computer several different ways.
- USB cable from the camera to computer
“MSDC” will appear on the camera screen
- USB card reader
- SD card adapter
There will be three folders containing files created in each mode.
CAR - contains videos filmed in Dash-Cam mode
JPG - contains photos
VIDEO - contains (you guessed it) videos

14
Next – Open the viewer, then load a video or photo.
Click the icon in the lower right corner to choose a file.

15
Playback will start in the spherical view setting.
Left click on the image and move the cursor to look around.
The blue globe highlighted in the upper right of the screen indicates the playback
setting.

16
Click the icon to its LEFT (a dome with a double arrow) to flatten out the image as
shown.

17
10. TRIMMING, CONVERTING and UPLOADING
Clipping points can be selected at either the front or back of the video, or both.
Slide the white dot up and down the video timeline to select the trim point. You
can preview the clip by clicking on the “preview” button to the right.

18
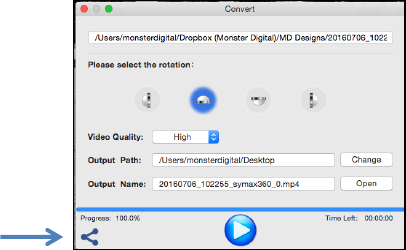
11. CONVERTING
Press the CONFIRM button in the bottom right corner.
A window will open with several options to choose from.
Be sure to select “HIGH” under Video
Quality.
Confirm or change the Output Path.
Note: the “Output” or file name will
be automatically generated, but like
any other file, you can rename it
after the file is created.
Press the big blue button in the lower
center section of the window to start
the conversion.
Progress is displayed on the bar above the button.
19
12. UPLOADING
Click the share button in the
bottom left corner of the
window.

20
Facebook
Click the Facebook icon and Facebook will open in your browser.
Click “Photo/Video” and select the file you just created.
Select the appropriate share setting
Say something about the video if you like
Finally click POST.
Facebook will notify you when the post is available.
It will take a few minutes for Facebook to process the VR video.

21
YouTube
Click the YouTube icon and the YouTube upload page will open.
Click on the white arrow
in the center of the
window.
Select the file you just
created.
Like any other upload,
add tags, a description
and determine the
sharing criteria then
click “publish”.

22
NOTE: It may take 10-15 minutes for YouTube to process the video after it has been
published. This is not a visible process like the uploading procedure. Just wait a
few minutes, refresh the page and be patient. The final 360 video will have a
directional button in the upper left corner as shown below.
23
13. ALTERNATE METHODS OF UPLOADING
You can also go to Facebook or YouTube and upload the file like any other video.
We found video websites compress files differently so playback quality varies.
Be sure to set YouTube playback setting to “Auto1080”.
Click on the gear icon with red HD in the lower right corner of the YouTube
window to adjust this setting.

24
14. Accessories
1. Silicon Suction Cup Mount
2. Open Frame
3. Waterproof Case (sold separately)

25
4. Adhesive Mounts
5. Selfie Stick (sold separately)

26
6. Wrist Remote (sold separately)
1. Power button
2. Record button
3. Photo button
4. Button indicator (red)
5. Band
6. Buckle
The remote can be used to power on/off, record videos and take pictures. Its range is
about 30m or 100 feet. The two red indicators illuminate when a button is pressed.

27
15. Specifications (subject to change without notice)
Image sensor
8.0 million pixels (CMOS)
Modes
Video recording and photography
Lens
NEW 220-degree wide-angle lens, F2.0 f=1.1mm
Video resolution
NEW 1440x1080/60FPS
1920x1440P (30FPS), 1440x1080P (30FPS)
Photo resolution
8MP, 5MP, 3MP (3840x2160, 3072x1728, 2560x1440)
File format
Video
H.264(MOV)
Picture
JPG
Memory
microSD card (maximum capacity 32GB) 16GB = about 1hr. 25 min
USB interface
High-speed USB 2.0
Battery
Removable Lithium Ion, 1000mAh (approx. 1 hour record time)
28
FCC STATEMENT
This device complies with Part 15 of the FCC Rules. Operation is subject to the following two
conditions:
(1) This device may not cause harmful interference, and
(2) This device must accept any interference received, including interference that may cause
undesired operation.
Note: This equipment has been tested and found to comply with the limits for Class B digital
devices, pursuant to Part 15 of the FCC rules. These limits are designed to provide reasonable
protection against harmful interference in a residential installation. This equipment generates,
uses and can radiate radio frequency energy and, if not installed and used in accordance
with the instructions, may cause harmful interference to radio communications.
However, there is no guarantee that interference will not occur in a particular installation. If this
equipment does cause harmful interference to radio or television reception, which can be
determined by turning the equipment off and on, the user is encouraged to try to correct the
interference by one or more of the following measures:
- Reorient or relocate the receiving antenna.
- Increase the separation between the equipment and receiver.
- Connect the equipment into an outlet on a circuit different from that to which the
receiver is connected.
- Consult the dealer or an experienced radio/TV technician for help.
29
Use of shielded cable is required to comply with Class B limits in Subpart B of Part 15 of the FCC
rules. Do not make any changes or modifications to the equipment unless otherwise
specified in the manual. If such changes or modifications should be made, you could be
required to stop operation of the equipment.
INDUSTRY CANADA (IC) STATEMENT
IC Notice to Users English/French in accordance with RSS GEN Issue 4:
This device complies with Industry Canada license exempt RSSs. Operation is subject to the
following two conditions:
(1) This device may not cause interference; and
(2) This device must accept any interference, including interference that may cause
undesired operation of the device.
Cet appareil est conforme avec Industrie Canada RSS standard exempts de licence (s). Son
utilisation est soumise à les deux conditions suivantes:
(1) Cet appareil ne peut pas provoquer d’interférences; et
(2) Cet appareil doit accepter toute interfe ́rence, y compris les interfe ́rences qui peuvent
causer un mauvais fonctionnement du dispositive
This Class B digital apparatus complies with Canadian ICES-003. Cet appareil numérique de
la classe B est conforme à la norme NMB-003 du Canada.

30
REGULATORY INFORMATION
To see the complete list of country certifications, visit
www.monsterdigital.com
Monster, the MC logo, the Monster logo, and Monster Digital, are trademarks or registered
trademarks of Monster Products, Inc., or its subsidiaries in the U.S. and other countries. V illain is
a trademark of Monster Digital. iPhone and iPad are trademarks of A pple Inc., registered in
the U.S. and other countries. A pp Store is a service mark of Apple I nc. Windows and Vista are
registered trademark of Microsoft Corporation in the United States and other countries.
Android and Google Play are trademarks of Google Inc. Trademarks and registered
trademarks are property of their respective owners.
1-year Limited Warranty – See website for details
www.MonsterDigital.com/warranty
©2016 Monster Digital
P.O. Box 941774 Simi Valley,
CA 93094
