
Editing Presentations with the Mediasite Web Editor: Quick-Start Guide for Users
For support, please contact [email protected]
September, 2012
Mediasite Editor allows you to quickly and easily update slides and remove unwanted
sections in your presentation. As a nondestructive editor, you have the option of saving
your edits as projects before committing your changes.
Open a presentation for editing
Once logged into MyMediasite, click on the Edit Video icon to open a presentation for
editing. This will open the presentation in the Mediasite web editor.
Update Slides
Addnewslides
1. Click on the project timeline where you want to insert a slide and click .
2. Browse to the image file you want to use and click Open. The selected slide’s
image is replaced with the one in the image file.
Note: To add images from Microsoft PowerPoint slides to your presentation, save the
Power Point presentation as .jpg files.
Replaceslides
1.
Right-click on a slide in the project timeline and select Replace.
2.
Browse to the image file you want to use and click Open. The selected slide’s
image is replaced with the one in the image file.
Moveslides
1. Select one or more slides in the project timeline.
2. Drag the selected slide(s) to their new location in the timeline.
Note: To select multiple slides do one of the following: Press the Shift key and click
two slides successively to select a range of slides that includes the two slides
selected and the ones in between or press the Ctrl key and click individual slides
successively to select multiple slides individually.
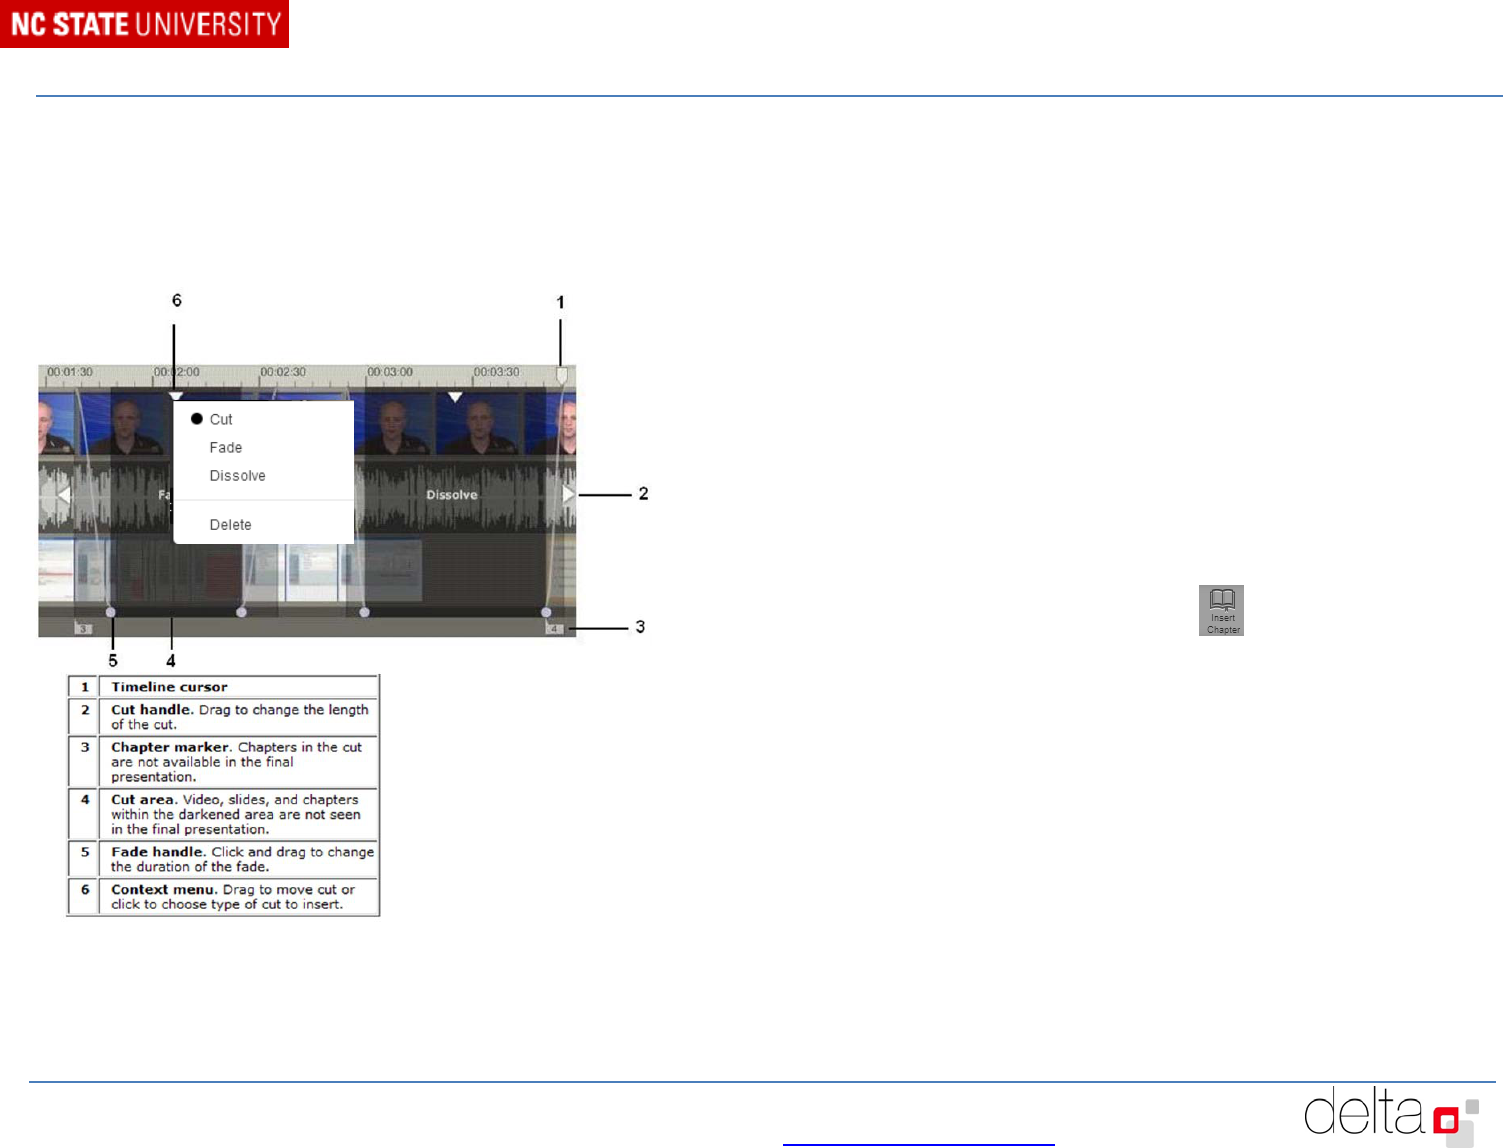
Cut and crop presentations
Mediasite Editor lets you easily cut unwanted material from within a presentation or
crop the beginning or end of a presentation. When you cut or crop material from a
presentation, you may need to adjust the timing for slides that fall within the removed
segment. (See graphic on next page)
Crop(TrimmingBeginningandEnds)
To crop the beginning or end of a presentation, select and drag the handles at the ends
of the timeline. Adjust the fade lengths as needed.
Note: If you have slides in the beginning or end of a presentation, make sure to drag out
of the cropping area.
Cut
1. In the project timeline select a portion to cut by clicking and dragging the
timeline cursor.
2. Click the above the timeline or use one of the commands below to insert
the cut.
Press C to insert a cut. At a cut, the presentation simply skips to the end of
the cut and continues the presentation.
Press F to insert a cut with fades. Fades gradually darken video to black and
mute the audio level.
Press D to insert a cut with dissolve. Dissolves smoothly fade in and out
from one end of the cut to the other.
Edit Video
Icon
Project
timeline
Editing Presentations with the Mediasite Web Editor: Quick-Start Guide for Users
For support, please contact [email protected]
September, 2012
3. Adjust the lengths of the cut and fade/dissolve using the cut and fade handles,
respectively. To remove the cut, click Delete.
Note: To add production values to your edit, use a fade or dissolve instead of a cut
(shorter fades and dissolves are recommended). Only use dissolve when editing
two different video images together, otherwise, fade works better. Also, slides in
the dissolve, fade or cut areas will not be displayed and will need to be dragged out
of these areas.
Save edited presentations
When you open a presentation for editing, it is saved as a project. Each change you
make to a project is automatically saved and listed in the project's revision history.
Once you are finished editing, you will need to commit your changes to a new
presentation.
Saveproject
Click Save Project to save your changes to a project that you can return to at any time
to continue editing and eventually commit changes.
Commitchangestonew(recommended)
Click Commit Changes to New to save your edited presentation as a new presentation
without overwriting the original. Enter a name for the new presentation and click OK.
Note: The new edited presentation will be in the same folder as the original
presentation. You will need to change the status of one of the presentations to offline.
View commit job status
A job can have three possible states: completed, working, and failed. Click Commit
Jobs in the upper right hand corner to see each job executed and its status.
Adding a Chapter
Chapters are markers within a presentation that allow your viewers to navigate to
relevant or interesting points of a presentation. You can add new chapters, update
existing chapters, and use the chapters to navigate around the presentation. Chapters
appear in the Player's slide area and include a title and the time the chapter appears in
the presentation.
Add a chapter
1. Click a spot in the timeline and either click above the timeline or select
the Chapter:insert link above the video window.
2. In the Insert Chapter dialog, enter a title for the chapter and click OK.
Update a chapter
Once you add a chapter, you can move it to a different location in the presentation by
clicking and dragging it in the timeline.
Right-click the chapter icon on the timeline to rename or delete the chapter.
Alternatively, click the chapter name above the video and rename the chapter there.
Best practices when using the Web Editor
Make sure when a presentation is loading in the editor, the audio file has completely rendered
before making any edits.
Each project has media files associated with it. To conserve disk space, delete projects that are
no longer in use since this allows the Mediasite system to clean up associated media files.
You can drag and drop slides from Windows Explorer or the Mac Finder to the timeline to
insert them into the presentation. This feature DOES NOT work in Internet Explorer.
Select a region of the timeline before inserting multiple slides to spread them evenly through
the selected period of time. This feature DOES NOT work in Internet Explorer.
