
2020
Report Designer
User Guide

i
Table of Contents
ABOUT REPORT DESIGNER 1
HINTS AND PROCEDURES 1
GETTING STARTED 2
SCREEN COMPONENTS 2
Menu bar 3
Toolbars 4
Show or hide a toolbar 5
Move a toolbar 5
Custom toolbars 6
Standard toolbar 8
Report toolbar 9
Explorer Pane 11
Move the Explorer pane 13
Show or hide Explorer pane tabs 15
View tabs 15
Status bar 17
Context menus 17
PREFERENCES 17
Design View Tab 18
Report View Tab 20

ii
CREATE A BLANK REPORT DESIGN 22
OPEN A REPORT DESIGN 22
CREATE A REPORT DESIGN BASED ON AN EXISTING ONE 23
SAVE THE REPORT DESIGN 24
DESIGN A REPORT 25
Sections 26
Show or hide a section 27
Resize a section 28
Section Properties 29
Fields 40
Add a data field 41
Add a product image field 43
Field properties 44
Add a column header field 45
Add a rich text field 46
Add an image 48
Select a field 49
Delete a field 50
Filter data that will appear on a report 50
Group data and show subtotals 51
Exercise - Group and Subtotal by Category 54
Sort data 57
Undo an action 58
Redo an action 59
GENERATE (PREVIEW) A REPORT 60
Zoom the preview 62
Go to a page in the preview 63
PRINT A REPORT 63
Page Setup 64


1
About Report Designer
2020 Report Designer is 2020 Worksheet's powerful reporting tool. With 2020 Report Designer, you can
build customized internal or external reports, and modify an existing report from a template to build a
personalized report.
To get started quickly, see Getting Started
.
Hints and procedures
As in other Windows applications, there are many ways to do specific tasks in 2020 Report Designer.
You can:
Use the menu bar
to select the command
Click on an icon on the toolbar
Right-click to access the context menu
Instead of showing different ways of performing the same task, procedures in this help file show you
only one way so that you can quickly learn how to use the application.
Note: Make sure all Report Designer toolbars are displayed for procedures directing you to click icons.

2
Getting Started
To get started quickly, follow the steps below:
1. Create a report design based on an existing one or Create a blank report design
.
2. Add sections to your report design.
3. Add fields to each section in the design.
4. Save the report design.
5. Generate (preview) the report.
6. Print the report or Export the report to a PDF file.
Screen components
The 2020 Report Designer screen contains:
Menu bar
Toolbars
Explorer Pane with two tabs
View tabs
Status Bar

3
See also: Context menus
Menu bar
Located on top of the 2020 Report Designer screen are menu names (from File to Help). They list the
tasks you can do in 2020 Report Designer.
Click a menu to open it.
Underlined letters in menu and command names indicate they can be accessed through a shortcut.

4
For example, to quickly open the File menu:
1. Press ALT+F to open the File menu.
2. Type in a letter corresponding to the underlined letter of the command you need.
For instance, type the letter "S" to save.
Some commands have even quicker shortcuts. Instead of opening menus, you can
directly access a command by pressing CTRL plus a letter. For example, CTRL + letter
“O” displays the Open dialog.
To quickly find the help topics and shortcuts that correspond to each menu item, see the following
under Command reference
:
File menu
Edit menu
View menu
Report menu
Help menu
Note: You can hide the menu bar by choosing View, Menu Bar.
Toolbars
As in standard Windows applications, toolbars in 2020 Report Designer allow you to perform frequent
operations quickly with icons (images representing an action or a command).
You can easily customize toolbars. See the topics below:
Show or hide a toolbar
Move a toolbar
Custom toolbars

5
There are two built-in toolbars in 2020 Report Designer, each representing a category of
commands. See the topics below:
Standard toolbar
Report toolbar
Show or hide a toolbar
1. From the View menu, select Toolbars.
2. Select the toolbar name to toggle the toolbar on and off.
If it is off (no next to the name), click it and the toolbar will appear on your
screen (a will also appear next to its name). Selecting it again will turn it off.
Move a toolbar
A toolbar can be docked or floating. It is docked when no title bar appears and a move handle is
available on the left side or on top of the toolbar.
Example of a docked toolbar:
Example of a floating toolbar:
To undock a toolbar and leave it floating, click and hold the left mouse button on the move
handle on the left side of the toolbar , then move the toolbar anywhere you want and release the
mouse button.

6
To dock a floating toolbar, click and hold the left mouse button on the title bar, then move the
toolbar to the desired spot and release the mouse button.
To remove a floating toolbar from the screen, click the x in the title bar; to remove a docked
one, use View, Toolbars.
Custom toolbars
Creating a toolbar consists of using buttons from existing 2020 toolbars to make up a custom toolbar.
1. Click View, Toolbars, Customize.
2. From the Customize dialog, click the Toolbars tab.
3. Click the New button to create a toolbar.
4. Type in a toolbar name and click OK.
A blank toolbar appears. This toolbar will expand as you add buttons to it.
5. From the Customize dialog, click the Commands tab.
6. Under Categories, highlight the toolbar you want to choose buttons from.
Click on a button to see its description at the bottom of the dialog.
7. Drag the required buttons to the empty toolbar you just named.
8. Click Close to end.
See also: Delete a Custom Toolbar

7
Delete a custom toolbar
1. Choose View, Toolbars, Customize.
2. From the Customize dialog, click the Toolbars tab.
3. Select the custom toolbar from the list.
4. Click the Delete button.
5. Click Close.

8
Standard toolbar
Icon
Name
Shortcut
Description
New Ctrl+N Create a new report design
Open Ctrl+O Open a report design
Save Ctrl+S Save the report design
Save as Save the report design under a different name
Undo
Ctrl+Z
or
Alt+Backspace
Undo an action
. Click on the dropdown arrow beside it to
undo more than one action at a time.
Redo Ctrl+Y
Redo an action you just undid. Click on the dropdown arrow
beside it to redo more than one action at a time.
Field
Properties
Alt+Enter Modify the selected field's properties
Delete Delete Delete the selected field
Print
Ctrl+P
Print a report
Help
Topics
F1 View the 2020 Report Designer online help

9
Report toolbar
Icon
Name
Shortcut
Description
Page
Setup
Set up the page paper size, watermark, margins and
orientation
Filtering
Select the criteria used to filter the data in a worksheet
when it is applied to a report design
Sorting
Select the fields used to sort the data in a worksheet
when it is applied to a report design
Grouping
Add group header/footers containing subtotals to the
Item Detail section of the report
Section
Properties
Ctrl+Enter Modify report section properties
Toggle
Report
Header
Show or hide the Report Header section of the report
Toggle
Page
Header
Show or hide the Page Header section of the report
Toggle
Product
Detail
Show or hide the Product Detail section of the report

10
Icon
Name
Shortcut
Description
Toggle
Option
Detail
Show or hide the Option Detail section of the report
Toggle
Attribute
Detail
Show or hide the Attribute Detail section of the report
Toggle
Grand
Total
Show or hide the Grand Total section of the report
Toggle
Page
Footer
Show or hide the Page Footer section of the report
Toggle
Report
Footer
Show or hide the Report Footer section of the report
Report
Preview
Generate (preview) a report

11
Explorer Pane
The Explorer Pane has two tabs:
Use the Field Explorer tab to view all the fields that can be added to a report design. From here you can
drag and drop fields to the report design.

12
Use the Report Explorer tab to view fields that are placed in the report design. From here you can
customize each field property: font, size, alignment, justification, border and background color.

13
See also:
Move the Explorer pane
Show or hide Explorer pane tabs
Fields
Field properties
Move the Explorer pane
You can move and configure the Explorer pane to meet your preferences. Explorer is normally docked
on the left of the screen but you can undock it and drag it elsewhere.
1. To move Explorer, click and drag on the title bar at the top.
2. Drag the Explorer pane to the location you prefer. The pane can be floating or
docked. To dock on either side, top or bottom move the mouse as you are dragging
to the control buttons.

14
3. When Explorer is docked you can resize it by dragging on its vertical bar on the right
edge.
See also: Show or hide Explorer pane tabs

15
Show or hide Explorer pane tabs
By default, both Explorer pane tabs are visible when you open 2020 Report Designer.
You can close and open each of the different tabs individually by doing any of the following:
From View menu select the Field Explorer Bar or Report Explorer Bar.
Right-click on any toolbar or button in 2020 Report Designer then select the bar you wish to
show or hide.
View tabs
There are two view tabs in the 2020 Report Designer work area:
Use the Design View to design your report. From here you can add fields and sections, filter or
sort data, and add group headers and footers containing subtotals.
Use the Report View to see how the report looks with data extracted from the worksheet. From
here you can print or export a report.


17
Status bar
The Status bar displays the 2020 Report Designer program status, the selected section's name and
height, and the selected field's name, position and size.
Also, when you hover the mouse pointer over an icon on the toolbar or a Menu
item, the Status bar
displays a brief command description.
Context menus
Context menus—sometimes called pop-up menus—display a subset of commands that are specific to
the context or the element selected.
To display a context menu, right-click.
Example:
Right-click on a field then select Delete to delete it.
Preferences
Report Designer Preferences allow you to control specific characteristics of the program.
See the topic Design View Tab
to modify preferences related to the Design View.
See the topic Report View Tab to modify preferences related to the Report View.


19
Category
Settings
Display Units
Select the unit of measure to use in the design view
Show tool tips
Grid Lines
Show grid lines on the design view
Select the spacing used between grid lines
Snap fields to the nearest grid line
Select the sensitivity to use when snapping fields
Fields
Default Field Properties - click to select the default
formatting (font, size, style, alignment, background
color, border) for fields that you will add to the report
design
Default field width
Default field height
See also: Design a report

20
Report View Tab
The Report View tab in the Preferences dialog changes settings related to the Report View.
1. From the View menu, select Preferences.
2. Click the Report View tab.

21
3. Click to choose the default worksheet to use when previewing the report.
4. Under Item Display, leave Display all Items checked to display all worksheet items
on the report.
Or, to generate a report more quickly with a limited number of items, uncheck this
box and select the number of items to appear on the report.
5. Click OK.
See Generate - Preview a report

22
Create a blank report design
To create a new blank report design click on the Standard toolbar.
See also:
Sections
Fields
Open a report design
1. Click on the Standard toolbar.
2. In the Look in field, choose the disk/folder where the file is located.
By default, user report designs are saved under My Documents\CAP\UserReports.
3. In the List of files and folders area, select the file then click Open.
Note: To open a report design you worked on recently, select the File menu. Right before the Exit
command are the last five files you worked on. Select the file to open it.

23
Create a report design based on an
existing one
The quickest way to create a report design is to use any of the Standard report designs available and
then save it as a user report design.
1. Click on the Standard toolbar
.
2. In the Look in field, browse to the folder Documents and Settings\All
Users\Application Data\CAP\StandardReports.
3. Click Open.
4. From the File menu, select Save As.
5. Beside Save In, browse to the user report designs folder. By default, this should be
My Documents\CAP\UserReports.
6. Type a new file name.
7. Click Save.
You can also create a new report based on an existing one from 2020 Worksheet. See Create, edit and
manage reports in the 2020 Worksheet online help for details.
See also:
Sections
Fields

24
Save the report design
1. Click on the Standard toolbar.
2. If this is the first time you are saving the report design, enter the file name in the
Save As dialog.
By default, user report designs are saved under My Documents\CAP\UserReports.
To save under a different name:
1. Click Save As on the Standard toolbar
.
2. Enter the new file name in the Save As dialog.
By default, user report designs are saved under My Documents\CAP\UserReports.

25
Design a report
To design your report, you must be in Design View.

26
From here you can do the following to customize your report:
Add Sections
Add Fields into each section
Filter data that will appear on a report
Group data and show subtotals
Sort data
See also:
Undo an action
Redo an action
Generate (preview) a report
Print a report
Export a report to a PDF file
Sections
A report design is divided into sections. Different data fields can be added to specific sections.
Report Header - prints at the top of the first page of a report
Page Header - prints at the top of every page of a report
Item Detail - prints line item information (Product Detail, Option Detail and Attribute Detail)
Grand Total - prints the grand total
Page Footer - prints at the bottom of every page
Report Footer - prints at the bottom of the last page
In addition, you can group data in the report and display Group 1 Header and Group 1 Footer sections.

27
See the following topics:
Show or hide a section
Resize a section
Section Properties
Fields
Group data and show subtotals
Show or hide a section
From the Report menu, select Sections, then select the section you want to display.
Or, click the section icon on the Report toolbar.
Icon
Description
Show or hide the Report Header section of the report
Show or hide the Page Header section of the report
Show or hide the Product Detail section of the report
Show or hide the Option Detail section of the report
Show or hide the Attribute Detail section of the report
Show or hide the Grand Total section of the report

28
Icon
Description
Show or hide the Page Footer section of the report
Show or hide the Report Footer section of the report
Resize a section
1. Hover the mouse pointer over the top or bottom edge of the section:
Example - resize from the top:
Example - resize from the bottom:
2. Drag the mouse to resize.
29
Section Properties
Use Section Properties to modify the appearance of a section.
From the Product Detail's section properties you can also check to show price adjustments or control
the display of outline and standard levels.
Different tabs are available in the Section Properties dialog, depending on where it is called from:
Click on the Report toolbar
.
The Section Properties dialog opens with the tabs Report Header, Report Footer and Item Detail.

30
Click on a section and then click on the Report toolbar
.
Only the tabs applicable to that section are displayed. For instance, from the Product Detail section, the
Section Properties displays the Item Detail, Common and Fields tabs.

31
See:
Report Header tab
Report Footer tab
Item Detail tab
Common tab
Fields tab
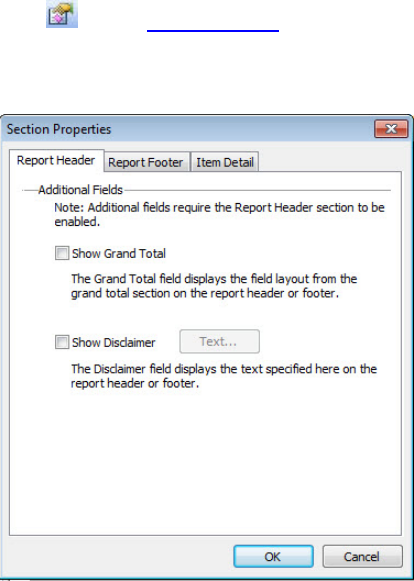
Report Header tab
1. Click on the Report toolbar
.
The Section Properties dialog opens, with the Report Header tab selected by
default.
2. Check Show Grand Total to display fields from the Grand Total section on the
Report header.
3. Check Show Disclaimer to display a disclaimer field on the report header.
4. If you checked Show Disclaimer, click the Text button to enter the disclaimer text.
In the Field Properties dialog, enter the text and select its font, size, color, style,
alignment. You can also change its indentation or create a bulleted list. Click OK.

32
Note: You can also access this tab by right-clicking on the Report Header section of the report design
then selecting Section Properties.

33
Report Footer tab
1. Click on the Report toolbar
.
2. Click the Report Footer tab.
3. Check Show Grand Total to display fields from the Grand Total section on the
Report footer.
34
4. Check Show Disclaimer to display a disclaimer field on the report footer.
5. If you checked Show Disclaimer, click the Text button to enter the disclaimer text.
In the Field Properties dialog, enter the text and select its font, size, color, style,
alignment. You can also change its indentation or create a bulleted list. Click OK.
6. Click OK.
Note: You can also access this tab by right-clicking on the Report Footer section of the report design
then selecting Section Properties.

35
Item Detail tab
Use the Section Properties' Item Detail tab to show price adjustments or control the display of outline
or standard levels.
1. Click on the Report toolbar
.
2. Click the Item Detail tab.

36
3. By default, Check Flatten Outline Levels is checked so that items within outline
levels are displayed on the report. Clear the check if you only want to see Outline
Levels.
4. By default, Check Flatten Standards is checked so that items within standards are
displayed on the report. Clear the check if you only want to see Standards.
5. Check Show Price Adjustments to display price adjustments (ex. taxes, installation,
freight) on the report. Click the Color dropdown to select a background color for
price adjustments, in order to highlight them in the report.
Note: If filtering is enabled, price adjustments will not be displayed.
6. Click OK.
See also:
Outline Levels in the 2020 Worksheet online help
Standards in the 2020 Worksheet online help
Price Adjustments in the 2020 Worksheet online help
Filter data that will appear on a report
Note:You can also access this tab by right-clicking on the Product Detail section of the report design
then selecting Section Properties.

37
Common tab
Use the Section Properties' Common tab to add borders around the section, change its height, or select
a background color.
1. Click the Section Properties icon beside the Section Name.
2. In the Section Properties dialog, click the Common tab.
3. Under Height, enter the height of the section.

38
4. Under Borders, check Left Border, Top Border, Right Border and/or Bottom
Border.
Specify the line thickness and the color.
5. Under Colors, select the section background color.
6. Click OK.
Note: Depending on the section you selected, other tabs are available in the Section Properties
dialog:
Report Header, Report Footer, or Item Detail.
Fields tab
Use the Section Properties' Field tab to see a list of fields included in the section and edit each field.
1. Click the Section Properties icon beside the Section Name.
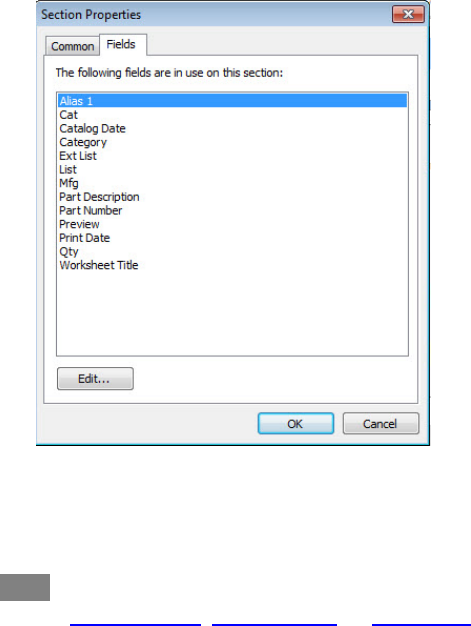
39
2. In the Section Properties dialog, click the Field tab.
3. Select a field then click Edit to change its appearance.
4. Change the settings in the Field Properties dialog then click OK.
5. Click OK in the Section Properties dialog.
Note: Depending on the section you selected, other tabs are available in the Section Properties
dialog:
Report Header, Report Footer, or Item Detail.

40
Fields
From the Field Explorer tab of the Explorer bar, you can add five types of fields into your report design:
Data fields - these are linked to data in a worksheet
Product image fields
Column header fields
Rich text fields
Images
See the following topics:
Add a data field
Add a product image field
Field properties
Add a column header field
Add a rich text field
Add an image
Select a field
Delete a field

41
Add a data field
1. Click the Field Explorer tab.
2. Click on the + sign to open the section
. You will see all the fields that you can add to
that section in the report design.
The section must be displayed on the report design before you can add fields to it.
See
Show or hide a section to display a section.

42
3. Drag the desired report fields into that section of the Design view.
A green check should appear next to field names as they are added to the sections.
4. You can resize each field by selecting it then hovering over the green box to stretch
or shrink the field.
5. Double-click the field to change its properties. See Field properties
for details.

43
Note: If you have column header fields in the Page Header section, you can copy these as data fields to
the Product Detail, Option Detail, Attribute Detail or Grand Total sections by right-clicking on the
destination section then selecting Insert Column Header Field Design.
Only column header fields that have equivalent fields in the destination section will be copied.
Add a product image field
1. Click the Field Explorer tab.

44
2. Click on the + sign to open the Product Detail section.
The Product Detail section must be displayed on the report design before you can
add fields to it. See Show or hide a section
to display a section.
3. Drag the Preview Image field into the Product Detail section of the Design view.
4. You can resize the preview field by selecting it then hovering over the green box to
stretch or shrink the field.
Note: By default, the image dimensions in the report are 64x64, but the image can
be enlarged. However, since the resolution of the stored image is 256x256, the
image may look poor if stretched above that resolution.
Field properties
To change a text field's properties, see the topic Add a rich text field.
To change an image field's properties, see the topic Add an image.
1. To change a data field's appearance, double-click on the field.
2. From the Field Properties dialog modify any of the following settings and then click
OK.

45
Font
Size
Styles
Alignment
Color
Border
Add a column header field
You can add column header fields into the Page Header section only.
1. Click the Field Explorer tab.

46
2. Click on the + sign to open the Page Header section
.
The section must be displayed on the report design before you can add fields to it.
See
Show or hide a section to display a section.
3. Click on the + sign beside Column Header to see all the column header fields you
can add to the Page Header section.
4. Drag the desired fields into the Page Header section of the Design view.
A green check should appear next to field names as they are added to the sections.
You can resize each field by selecting it then hovering over the green box to stretch
or shrink the field.
5. Double-click the field to change its properties. See Field properties
for details.
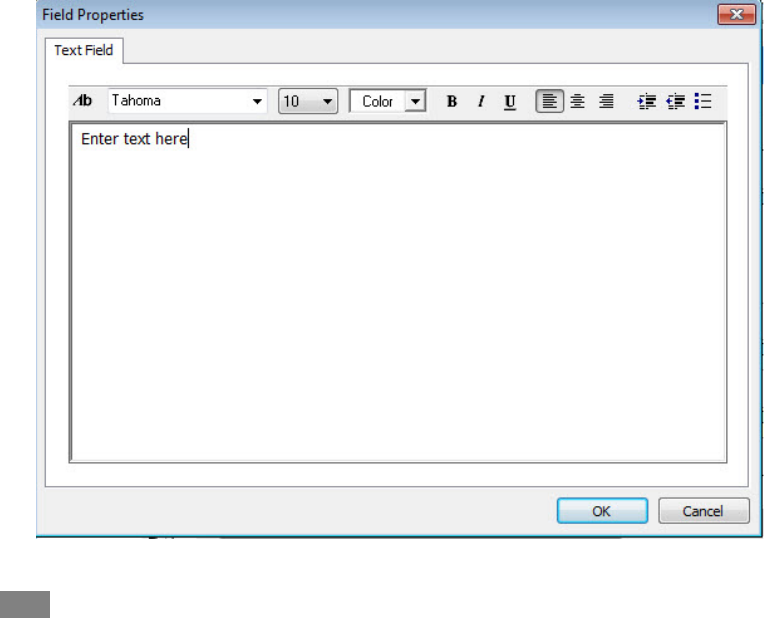
Add a rich text field
1. Click the Field Explorer tab.
2. Click on the + sign beside Reusable Fields.
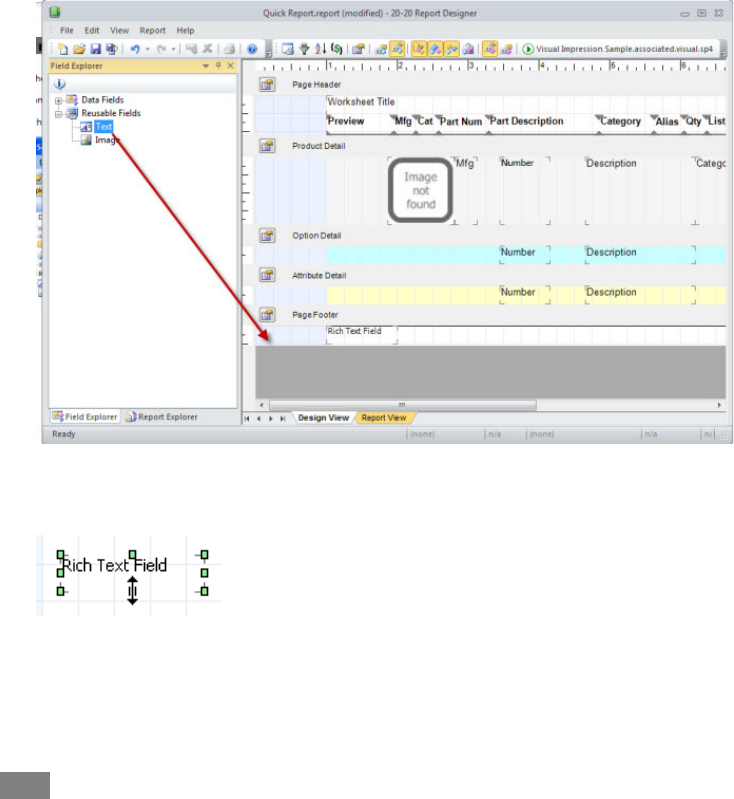
47
3. Drag the Text field into a section of the Design view.
4. You can resize the field by selecting it then hovering over the green box to stretch
or shrink the field.
5. Double-click the field to enter text.
6. In the Field Properties dialog, enter the text and select its font, size, color, style,
alignment. You can also change its indentation or create a bulleted list.
7. Click OK.
Note: You can add up to 10 rich text fields in a section.

48
Add an image
1. Click the Field Explorer tab.
2. Click on the + sign beside Reusable Fields.
3. Drag the Image field into a section of the Design view.
4. You can resize the field by selecting it then hovering over the green box to stretch
or shrink the field.

49
5. Double-click the field to select an image.
6. In the Field Properties dialog, click to select an image.
Or, click to use the current Prepared By image as set in 2020 Worksheet
Preferences.
7. By default, the image is automatically resized to fit the size of the field. Click to
restore the image to its original size. Note that the image may no longer fit the
page.
8. Click OK.
Note: You can add up to 5 image fields in a section.
Select a field
To select one field, click on it. Green squares will appear around the field.

50
To select more than one field do either of the following:
1. Click on the first field you want to select.
2. Press and hold the Shift key, then click on the other fields you want to select.
OR
1. Click and hold the left mouse button.
2. Drag the mouse to draw a box around the fields you want to select, then release the
mouse button.
Delete a field
Select the field(s) then press the Delete key.
Filter data that will appear on a report
You can filter data based on any column available within worksheet. You can select more than one
column.

51
In the example below, we will filter data so that only panels appear on the report:
1. Click on the Report toolbar
.
2. On the Filtering dialog, scroll down the list and check Category.
3. In the Value column, type
Panel.
4. In the Operator column leave the value as Equals.
Note: You can click on the field to select other operators. For text fields, you can
select Equals or Not Equals. For numeric fields you can select Equals, NotEquals,
LessThan, LessThanEqual, GreaterThan or GreaterThanEqual.
5. Click OK.
Note: When you generate (preview) a report, 2020 Report Designer informs you that data has been
filtered by displaying a brief message on the right side of the Status bar.
Group data and show subtotals
2020 Report Designer gives you the flexibility to group data by field and create subtotals for each group.
1. Click on the Report toolbar
.
2. On the Grouping and Subtotals dialog, click Add under Groups.
52
3. Under Group Details, check the field you want to group with.
You can add more than one field to each group. Data will be sorted first by using the
first field checked, then the second field. If you want to change the sort order use
any of the arrow buttons: Move to top, Move up, Move down and Move to
bottom.
4. Under Group Header, check Show to insert a Group Header section in the report
design.
If you want to start each group on a new page, check the box.
5. Under Group Footer, check Show to insert a Group Footer section in the report
design.
6. Repeat steps 2 to 5 if you want to add another group.
If you want to change the group order, click the Move up or Move down buttons.
If you want to remove a group, select it then click Remove.
7. Click OK.
Notice that new sections are added to your report design. Now you will need to add
the fields you want to display to the Group Header and Group Footer sections.
8. From the Field Explorer tab expand the + sign beside Group 1 Header.
9. Drag fields to the Group 1 Header section of the report design.
For example, if you are grouping by Alias 1, add this field.

53
10. From the Field Explorer tab, expand the + sign beside Group 1 Footer.
11. Drag fields to the Group 1 Footer section.
For example, if you want to show the Ext List subtotal, add this field.
See the topic Exercise - Group and Subtotal by Category
for a step-by-step example of grouping and
subtotaling by category.

54
Exercise - Group and Subtotal by Category
In this exercise, you will group data by category and show subtotals for each category. Note that the
products in your worksheet must have information assigned in the Category column.
Before you start this exercise, create a user report based
on the Standard report called List Price
Report.
1. Click on the Report toolbar.
2. On the Grouping and Subtotals dialog, click Add under Groups.
3. Under Group Details, check Category.
4. Under Group Header, check Show to insert a Group Header section in the report
design.
5. Under Group Footer, check Show to insert a Group Footer section in the report
design.
6. Click OK.
Now you will add the fields you want to display in the Group Header and Group
Footer sections.
7. From the Field Explorer tab expand the + sign beside Group 1 Header.
8. Drag the field Category to the Group 1 Header section.
9. Double-click on the field to display its properties. Change the style to Bold then click
OK.
10. Double-click on the section to change its properties. Under Borders, check Bottom
border then click OK.
11. Resize the section from the bottom to remove the empty space.
The Group Header
section should look like this:

55
12. From the Field Explorer tab, expand the + sign beside Group 1 Footer.
13. Drag the field Ext List to the righthand side of the Group 1 Footer section.
14. Double-click on Ext List to change its properties. Under Alignment, choose Right
then click OK.
15. Add a text
field to the left of the Ext List field you just added. Double-click on it then
type Category Subtotal. Change the Size to 8 and display it in Bold. Resize the
field so that the text is displayed one line.
16. Double-click on the section to change its properties. Under Borders, check Top
border. Click OK.
17. Resize the section to remove the empty space at the bottom. The Group Footer
section should look like this:


57
See also:
Group data and show subtotals
Add a data field
Field properties
Add a rich text field
Section Properties
Sort data
The Sorting command sorts data within the report view. It does not re-sort the worksheet.
1. Click on the Report toolbar
.
2. In the Sorting dialog, check the column names you want to sort by.
Data will be sorted according to the order the checked names appear on the list.
For example, according to the image above, data will be sorted first by Alias 1 then
by Category.
3. Use any of the arrow buttons to change the sort order: Top, Move up, Move down
and Bottom.

58
4. Check Ascending to sort by ascending order (0..9, A..Z) or
Descending to sort by desceinding order (9..0, Z..A).
5. Click OK.
See also:
Filter data that will appear on a report
Group data and show subtotals
Undo an action
To undo the last action, click on the Standard toolbar
To undo more than one action:
1. Click the arrow next to to see a list of the most recent actions you can undo.
2. Click the action you want to undo. If you don't see the action, scroll through the list.
When you undo an action, you also undo all actions above it in the list.
Note: If you later decide you didn't want to undo an action, click Redo .

59
Redo an action
To redo the last action you undid, click on the Standard toolbar.
To redo more than one action:
1. Click the arrow next to to see a list of the most recent actions you can redo.
2. Click the action you want to redo. If you don't see the action, scroll through the list.
When you redo an action, you also redo all actions above it in the list.
Note: If you later decide you didn't want to redo an action, click .

60
Generate (preview) a report
The Preview Report command generates the report, applying worksheet data to the report design. You
must generate a report at least once before you can print it
.
The report design must be saved before you preview a report. If it is not yet saved, you will be
prompted to do so.
1. Generate the report by clicking the following icon on the toolbar and then select the
currently open worksheet or any other preset worksheet that may be in the drop-
down list:
The report generation may take a few minutes, please wait.
2. The Report View displays the report using the worksheet specified in Preferences.
If you want to change the default worksheet to use when previewing a report, go to
the View menu, select Preferences and click the Report View tab. Click to
select the worksheet, click Open in the Open dialog, then click OK.


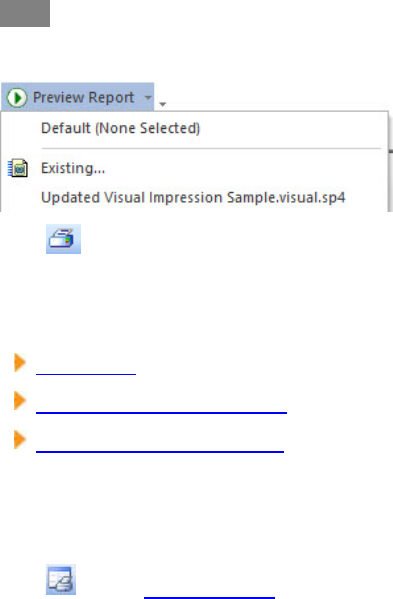
64
Note: If you never previewed the report or if you made changes to the report
design, you must generate the report by clicking Preview Report in the toolbar.
2. Click on the Report View toolbar.
3. Select the Printer, Print Range and Number of Copies then click OK.
See also:
Page Setup
Generate (preview) a report
Export a report to a PDF file
Page Setup
Use Page Setup to change the page layout used for the report.
1. Click on the Report toolbar.
2. On the Page Setup dialog, select the paper size.
3. Under Watermark, click the Browse button to select a watermark image file.
Check the Location: Header, Report Body or Footer.
4. Under Margins, type in the left, right, top or bottom margin or use the dropdown
arrows to change the margin by 0.01 inch increments.
5. Under Orientation, select Portrait or Landscape.
6. Click OK.

65
Export a report to a PDF file
You can export a report to PDF format.
1. On the Report View tab, click the Export Report button.
2. In the Save As Type dialog, choose the folder to save in, type the File Name then
click Save.
The exported file will now be in the location you specified.

66
Command reference
This section lists commands available through the various menus. All commands are already referenced
by their respective tasks in this document. The following topics give you a brief description of menus
and commands and provide links to corresponding topics.
See:
File menu
Edit menu
View menu
Report menu
Help menu
File menu
Name
Shortcut
Description
Topic
New Ctrl+N
Create a new report
design
Create a blank report design
Open Ctrl+O Open a report design Open a report design
Save Ctrl+S Save the report design Save the report design
Save as
Save the report design
under a different name
Save the report design
Print
Ctrl+P
Print a report
Print a report

67
Name
Shortcut
Description
Topic
Export
Export a report to a PDF
file
Export a report to a PDF file
<Recent files>
Open any of the last five
report designs you
worked on
Open a report design
Exit Alt+X
Close 2020 Report
Designer
Edit menu
Name
Shortcut
Description
Help topic
Undo
Ctrl+Z
or
Alt+Backspace
Undo an action. Click on
the drop-down arrow
beside it to undo more
than one action at a
time.
Undo an action
Redo Ctrl+Y
Redo an action you just
undid. Click on the
dropdown arrow beside
it to redo more than one
action at a time.
Redo an action
Section
Properties
Ctrl+Enter
Format a specific section
of a report design
Section Properties
68
Name
Shortcut
Description
Help topic
Field
Properties
Alt+Enter
Format text or data
fields once they are in a
report design
Field properties
Insert
Column
Header
Field
Design
Insert data fields into the
current section that
mirror the column
header fields in the Page
Header section
Add a data field
Delete Delete
Remove the selected
item from the report
design
Delete a field
View menu
Name
Description
Help topic
Menu Bar Show or hide the Menu bar Menu bar
Status Bar Show or hide the Status bar Status Bar
Tool Bars
Show or hide a toolbar; create a custom
toolbar
Show or hide a toolbar
Custom toolbars

69
Name
Description
Help topic
Field
Explorer
Bar
Shows a list of all of the available fields
for each of the sections that are turned
on in the current report design
Show or hide Explorer bar tabs
Report
Explorer
Bar
Shows a list of the fields that are
currently placed in a report design
Show or hide Explorer bar tabs
Design
View
Shows the fields that have been selected
to be seen in the current report design
View tabs
Report
View
Shows the current report design applied
to either generic data or a default
worksheet
View tabs
Preferences
Allows you to set up default settings for
any report design
Preferences

70
Report menu
Name
Description
Help topic
Page
Setup
Set up the page paper size, watermark,
margins and orientation
Page Setup
Filtering
Pull only selected information from a
worksheet
Filter data that will appear on a
report
Sorting
Select the fields used to sort the data in a
worksheet when it is applied to a report
design
Sort data
Grouping
Create groupings by department, category
and other worksheet columns
Group data and show subtotals
Sections
Show or hide sections in various locations in
a report design
Show or hide a section
Report
Preview
Generate a preview using pre-selected
worksheet
Generate (preview) a report

71
Help menu
Name
Shortcut
Description
Topics F1
Opens the 2020 Report
Designer Help file
About 2020 Report Designer
Indicates build and version
information
