
THE SOURDOUGH JOURNEY
Post-Pandemic Sourdough
for Busy People
The Sourdough Journey©
Version 1.0, Dec 2022
25-Minute Prep
Overnight Bulk Fermentation
3-Day Baking Window

Page 1 Post-Pandemic Sourdough for Busy People The Sourdough Journey 2022©
POST-PANDEMIC SOURDOUGH FOR BUSY PEOPLE – OVERVIEW
This document is a companion guide to the YouTube Video, “Post-Pandemic Sourdough for Busy
People.” This guide will be updated from time to time, so check the website at
thesourdoughjourney.com/tools periodically for new releases of this guide.
This guide includes step-by-step instructions and the following appendices:
Appendix 1: Baking Worksheet (Sample)
Appendix 2: Baking Worksheet (Blank)
Appendix 3: Controlling Overnight Dough Temperatures
Appendix 4: Baking Your First Loaf
Appendix 5: Sample Timelines
Appendix 6: Bulk Fermentation Timetables
Appendix 7: Calculating Water Temperature for DDT
Appendix 8: Calibrating the Timetables for Your Starter Strength
Appendix 9: Measuring your Refrigerator Temperatures
Appendix 10: Step-by-Step Details
Appendix 11: Process Optimization Ideas
Appendix 12: The Fermentation Model: How Fermentation Works
As your read this guide for the first time, I recommend printing Appendix 1: Sample Baking Worksheet.
Introduction
Many home bakers learned to bake sourdough bread during the lockdowns of the coronavirus pandemic
in 2020. Sourdough baking brought great joy, a fascinating hobby, and nourishment to so many people
and their families. However, it is sad to hear how many people gave up sourdough baking once things
returned to “normal,” largely because of the time commitment required. The daily starter maintenance,
the stretching, the folding, the waiting, and the mess in the kitchen seemed tolerable when we all had
more time at home, but for busy people the process became unmanageable.
Over the past 18 months, I have dissected the sourdough baking process from start to finish and created
an innovative new process for busy people. The method features:
• 25 minutes total elapsed time to prepare your dough for overnight bulk fermentation. No
autolyse, no fermentolyse, no stretch and folds, no coil folds, no lamination,
• Predictable, unattended overnight bulk fermentation at low temperatures – the dough is
ready for shaping before you go to work in the morning, and
• A three-day window to bake your loaves from the refrigerator.

Page 2 Post-Pandemic Sourdough for Busy People The Sourdough Journey 2022©
By using unique techniques to keep the dough at a low temperature and stretch out the process over a
multi-day period, you have greater flexibility to fit the sourdough baking schedule into your busy
schedule.
A Sourdough Process and Tools for Busy People
This process is optimized for people with busy schedules. Here is a typical timeline:
1) After dinner on a weeknight, spend 25 minutes mixing your dough for overnight,
unattended bulk fermentation, and preparing all of your tools for shaping and baking.
2) The next morning, before you got to work, pre-shape and final shape your dough – eight
minutes of hands-on time and 35 minutes elapsed time.
3) Any time in the next three days, bake your loaf.
How does this method work?
The unique features of this method include:
1) Up-front gluten development, using the slap-and-fold method, eliminates the need for stretch
and folds and minimizes total prep time
2) New Fermentation Timetables support flexible, predictable, unattended overnight bulk
fermentation at low temperatures that works around your schedule
3) New final proof / cold retard techniques in your refrigerator support a 3-day window for baking
A Typical Timeline

Page 3 Post-Pandemic Sourdough for Busy People The Sourdough Journey 2022©
FAQ: Do I need to follow the process exactly?
No. You can mix and match the components of this method with other sourdough recipes and methods.
FAQ: Is overnight, unattended bulk fermentation a fit for you?
The “Low and Slow Method” is based on an overnight, unattended bulk fermentation at low
temperatures. The results are highly dependent on your overnight dough temperature. The optimal
temperature for this method is 68-72F/20-22C. The process is workable between 66F-74F/19C-23C, but
if you cannot keep your dough temperature at or below 74F/23C, this method is not recommended.
Your dough will likely overproof overnight. Consult thesourdoughjourney.com/tools for the “Bulk-o-
Matic System” for bulk fermentation methods at warmer temperatures.
If you can control your overnight dough temperature, this method works extremely consistently. When
this method fails it is almost always due the inability to control overnight dough temperatures. See
Appendix 3: Controlling Overnight Dough Temperatures for help on this topic.
Is this method right for you?
This approach requires a little math, a little science, and good recordkeeping, but easy-to-use tools are
included in this guide to help you through the process. While it may seem intimidating at first, after 8-
10 bakes using this method, the skills will become second nature.
Once you master the Low and Slow Method, the way you think about sourdough baking will completely
change. Instead of planning your schedule around your sourdough, you will begin to effortlessly plan
sourdough baking around your schedule.

Page 4 Post-Pandemic Sourdough for Busy People The Sourdough Journey 2022©
OVERVIEW OF THE METHOD
If you are using this method for the first time, consult Appendix 4: Baking Your First Loaf, to establish
your “baseline” loaf and calibrate the Fermentation Timetables for your starter strength. This is an
important step.
The Low and Slow method utilizes low bulk fermentation temperatures and long, but predictable,
fermentation times to work around busy schedules.
• Part 1 – Mix all ingredients and prepare dough for overnight bulk fermentation. This process is
optimized to required only 25 minutes of hands-on time and elapsed time. You will start with a
clean kitchen and end with a clean kitchen in 25 minutes. Bulk ferment overnight.
• Part 2 – Pre-shape and final shape your dough the next morning. This step takes about 8
minutes of hands-on time and 5-35 minutes of total elapsed time. You have the option to skip
pre-shaping for a shorter process. Move your dough to refrigerator for a cold retard.
• Part 3 – Score and bake the loaf. This part takes about 10 minutes of hands on time, 20 minutes
of “attended time” (while baking), and 90 minutes total elapsed time, including pre-heating.
The first few times you test this process (assuming you are working Monday-Friday), I recommend
mixing the dough on Friday evening, bulk fermenting overnight, shaping on Saturday, cold retarding
until Sunday, and baking the loaf on Sunday.
Here is a typical Friday to Sunday timeline:
Many other sample timelines are included in the Appendix 5: Sample Timelines. Review those examples
for more options.

Page 5 Post-Pandemic Sourdough for Busy People The Sourdough Journey 2022©
PREPARING YOUR TIMELINE
One of the new skills you need to develop with this method is planning your sourdough baking over
multiple days.
If you are not concerned about trying to precisely time the duration of your bulk fermentation, you can
largely skip this section. Just bulk ferment the dough overnight on your countertop – assuming it is
between 66-74F/19-23C, and wait for the dough to rise 75%.
If you want to learn how to precisely time your bulk fermentation duration, continue reading!
Print a blank copy of the Baking Worksheet included in the document and available separately for
download on thesourdoughjourney.com website. There is also a sample version of the Baking
Worksheet with an illustrative example filled in. That example is also included in the following sections.
Planning Step 1: Plan Your Mixing, Shaping and Baking Days/Time
The first step in the planning your bake is to think about what days will be convenient for you to mix,
shape and bake the dough. Start with your target baking day and time, then work backwards.
1) What day/time do you plan to Bake?
2) What day/time do you plan to Mix? This can be 1-4 days prior to your baking day.
3) What day/time do you plan to Shape? This should be 8.5-20 hours after mixing.
For example:
FAQ: Once I plan these dates/times, do I have flexibility to change them?
• Prior to mixing the dough, you can obviously change anything.
• Once you mix the dough, you can generally exceed the planned shaping time by a few hours.
The dough will generally not overproof in a few hours at temperatures around 70F/21C. If you
are unable to shape the dough within that few hour window, you can put the dough in the
refrigerator and restart the process at any time within about 12 hours. The dough will keep
fermenting in the refrigerator, but it will slow down. Allow the dough to come back up to room
temperature before shaping, then resume the normal process.
• Once you have shaped the dough and refrigerated it, you have great flexibility to change your
baking day and time. You can bake the loaf anytime within 8-72 hours after shaping.

Page 6 Post-Pandemic Sourdough for Busy People The Sourdough Journey 2022©
FAQ: Can I make a multi-loaf batch?
Of course. The mixing steps, shaping steps and timing do not change for a multi-loaf batch. The benefit
of a multi-loaf batch is that you can space out the baking time over three days. For example, you can
mix a three-loaf batch on Saturday night and bake a loaf on Monday, Tuesday and Wednesday. Or you
could mix a two-loaf batch on Thursday night and bake a loaf on Saturday morning and Sunday morning.
FAQ: Do I need to mix the dough in the evening?
Many of the examples in this guide assume you are mixing dough in the evening and shaping the next
morning, but the process provides the flexibility to mix at any time.
Planning Step 2: Calculate Your Bulk Fermentation Duration
Once you have selected your mixing, shaping and baking days/times you need to calculate your bulk
fermentation duration (the time between mixing and shaping).
This example assumes you began mixing your dough at 6 p.m. on Friday and the mixing is completed in
30 minutes, at 6:30 p.m.
Calculate your bulk target bulk fermentation time by determining the number of hours between the end
of mixing and shaping. In this example, we plan to shape at 8 a.m. Saturday so our target bulk
fermentation time is 13.5 hours.
Planning Step 3: Find Your Bulk Fermentation Formula
Once you have determined your planned bulk fermentation duration, consult the Bulk Fermentation
Timetables and choose a combination of Starter % and Dough Temperature that fits your planned
duration.
For example, if your overnight kitchen temperature is 70F/21C, the bulk fermentation timing options at
that temperature are:
Starter % Temp 75% Rise 100% Rise
20% 70F/21C 11.5 13.0
15% 70F/21C 13.0 15.0
10% 70F/21C 15.0 17.0
5% 70F/21C 17.5 19.0
BF Hours

Page 7 Post-Pandemic Sourdough for Busy People The Sourdough Journey 2022©
Selecting the Best Fit from the Bulk Fermentation Timetables
When bulk fermenting in the recommended temperature range, the target percentage rise is 75%.
Additional information is included in the appendices to explain how to measure the percentage rise, and
how to calibrate the percentage rise for your specific environment and preferences, if necessary.
Note: The Bulk Fermentation Timetables show the typical bulk fermentation times for both a 75% and
100% rise in the dough. The “safe zone” for bulk fermentation at these temperatures is typically
between a 75% rise and a 100% rise. 75% is the recommended target, but you should think of 75% as
the minimum rise you are looking for within your time window.
If you don’t find an exact match for your timing in the Fermentation Timetables, it is better to select a
slightly shorter time for the 75% rise from the timetables.
In this example above, if the dough rise time is consistent with the timetable it will reach a 75% rise at
13 hours, or 7:30 a.m. It will continue rising until you shape the dough at your planned shaping time of
8:00 a.m. so it may slightly overshoot the rise target in your planned 13.5-hour window. It is always
better to “overshoot” the 75% rise rather than to undershoot the target percentage rise.
In this example, if you wanted to try to more accurately time the rise to exactly 13 hours, you could also
reduce the starter percentage (e.g., use 12.5% instead of 15%) to slightly extend the fermentation time
and exactly match the estimate to your desired end time. I do not recommend these small changes until
you’ve mastered the standard process, but once you’ve mastered these skills, you can dial in very
specific timing targets with small adjustments like this.
Or, if you want to find a better fit with the exact target time, you can modify your overnight dough
temperature. Continue reading to learn about options for controlling overnight dough temperatures.
Overnight Temperature Control Options – Ambient Temperature or Controlled Temperature
You have two options for overnight bulk fermentation:
1) Bulk ferment at your ambient overnight kitchen temperature, or
2) Use a proofing chamber to hold the overnight dough temperature above our below your
kitchen temperature.
If your overnight kitchen temperature is in the desired range, you can bulk ferment on your countertop.
If it is outside the range, you need to control your dough temperature using another method.
Option 1: Bulk Ferment at your ambient overnight kitchen temperature
If your kitchen temperature remains fairly constant overnight and it is within the recommended range,
determine your average overnight kitchen temperature. Consult Appendix 6: Bulk Fermentation
Timetables and look at the options in the temperature range of your kitchen. Select a Starter % that
works for your timing window. See example above for this option.

Page 8 Post-Pandemic Sourdough for Busy People The Sourdough Journey 2022©
Option 2: Use a temperature control method (e.g., proofing chamber) to control your overnight dough
temperature
If your kitchen does not maintain a desirable temperature overnight, then select a temperature control
option to maintain a target overnight dough temperature.
Example:
My kitchen temperature is 75F/23.5C overnight. I plan to use a thermostatically controlled mini-
fridge to keep my dough temperature at 68F/20C overnight. I plan to finish mixing my dough at
6:30 p.m. and I plan to shape the dough at 8 a.m. the next day, so I am looking for a 13.5-hour
bulk fermentation window at 68F/20C.
By using 15% starter (relative to flour weight), the projected rise time at 68F/20C is 13.5 hours – an
exact match with the target time.
This option is a better fit than the 13-hour option at 70F/21C, so we choose this option for continuing
our example.
Planning Step 4: Calculate Final Proofing Duration
After finalizing your bulk fermentation plan, now you can calculate your final proofing duration.
To calculate your final proofing duration:
1) Add 30 minutes to your shaping start time to determine your final proofing start time, and
2) Calculate the number of hours between your final proof starting time and your target baking
time.
The baking process usually takes about 90 minutes of elapsed time including preheating, baking and
cleanup.
Starter % Temp 75% Rise 100% Rise
20% 68F/20C 12.0 14.0
15% 68F/20C 13.5 15.5
10% 68F/20C 15.5 17.5
5% 68F/20C 18.0 19.5
BF Hours

Page 9 Post-Pandemic Sourdough for Busy People The Sourdough Journey 2022©
Planning Step 5: Summarize Your Schedule on the Baking Plan
Transfer the information from the example above to your baking plan on the Baking Worksheet.
You can also complete the details for the Bulk Fermentation plan on the Baking Worksheet:
Now that we have determined our overall timeline and our bulk fermentation plan, your planning steps
are complete. We are now ready to mix the dough.
Baking Plan and Summary Actual Variance
Day Time Hours Hours Hours
Mixing Fri 6:00 PM 0.5
Overnight Bulk Fermentation 6:30 PM 13.5
Shaping Sat 8:00 AM 0.5
Final Proof / Cold Retard 8:30 AM 24
Baking Sun 8:30 AM 1.5
Planned
Starter %
BF Dough
Temp
BF Hours BF % Rise
Bulk Fermentation Plan Planned 15% 68 13.5 75%
Use Fermentation Timetables for Actual
Planned Starter % and Dough Temp Variance
To achieve % Rise at your target time Notes:
Use mini-fridge to maintain 68F/20C overnight
dough temperature

Page 10 Post-Pandemic Sourdough for Busy People The Sourdough Journey 2022©
THE RECIPE
The recommended recipe for this method is:
90% Bread Flour (at least 12.5% protein)
10% Whole Wheat Flour
75% Water
2% Salt
Starter % based on fermentation timetables and target time
There is not standard definition of “bread flour.” In some countries, it is called “strong” flour. In
general, for your “bread flour” you should use a refined flour (not whole wheat or whole meal) with at
least 12.5% protein. The long, overnight bulk fermentation and long cold retards used in this method
work best with “stronger,” higher protein bread flours.
In the companion video, I bake a 400g flour-weight loaf. You can use the baker’s percentages to scale
up or down the recipe to your preferences. Five examples are shown on the baking worksheet.
Each time you bake, the Starter % is determined from the bulk fermentation target duration and
timetables as illustrated in the example above. Multiply the Starter % by the Flour Weight to determine
the amount of starter, in grams. Fill that number in on your worksheet.
Also keep a record of the exact types of flour you are using. Different types of flours will ferment faster
or slower than others.
You are free to use any flours or recipe with this method, but the fermentation timetables are based on
a blend of 90% Bread Flour and 10% Whole Wheat Flour. Variations from this formula will cause
differences in fermentation times. You should use the standard recipe a few times to learn the standard
method and assess the “standard” results.
Over time, you can experiment with different flour and flour blends. For example, a higher percentage
of whole wheat flour will typically ferment faster.
If you keep accurate records, you will develop the skills to predict the differences on fermentation times
based on different flour blends.
Recipe 2x 500g 2x 400g
Flour Weight Total 500g 400g 300g 1000g 800g
Bread Flour (90%) 450 360 270 900 720
Whole Wheat Flour (10%) 50 40 30 100 80
Water (75%) 375 300 225 750 600
Salt (2%) 10 8 6 20 16
Starter (% from table above)
Flours Used:
Single Loaf Options

Page 11 Post-Pandemic Sourdough for Busy People The Sourdough Journey 2022©
STEP 1: DAY 1 – THE 25-MINUTE MIXING PROCESS
This method features a unique, 25-minute mixing process. The process has been optimized for busy
bakers. Many “Pandemic Bakers,” – myself included – learned lengthy, complex methods of preparing
the dough – including steps such as autolyse (30-60 minute prep of flour and water), fermentolyse (30-
40 minute rest of dough with starter but no salt), adding salt separately with reserved water (i.e.,
bassinage). These steps condition the dough for optimal performance, but also required lengthy
preparation time in the kitchen.
Then, during the bulk fermentation process, most sourdough methods include stretch-and-folds at 30-
minute intervals and other handling techniques such as coil folds and lamination, typically continuing for
two to four hours into bulk fermentation.
Our method eliminates all of these steps:
- No autolyse
- No fermentolyse
- No delayed adding of salt
- No stretch and folds
- No coil folds
- No lamination
In the evening of Day 1, you will prepare your ingredients, mix them all together at the same time (no
autolyse, fermentolyse, etc.), and use the Slap-and-Fold method to mix the ingredients. The Slap-and-
Fold method, popularized by Richard Bertinent, is demonstrated in the companion video.
Watch the video for the best demonstration of this method. The full detail as shown in the video is
included in Appendix 10: Step-by-Step Details.
After a total of 25 minutes, your dough is ready for overnight bulk fermentation, your kitchen is clean,
and your tools and supplies are prepared for all future steps.
How can this possibly work?
The unique Slap-and-Fold method of mixing the dough fully develops the gluten very quickly and
eliminates the need for additional dough handling during bulk fermentation.
Also, by utilizing a long fermentation at cooler temperatures, you allow the starter to “make the bread”
rather than the baker making the bread. It is a small miracle when you let the starter do all the work.
I’ve made over 40 videos utilizing the more complex Tartine method and I now have difficulty identifying
from photos, the difference between loaves using this method versus the Tartine method.
There are a few minor differences. These loaves will generally have a more consistent crumb rather than
the “wild, open crumb” found in Tartine, and these loaves can sometime sit flatter due to longer
fermentation times in the refrigerator and less dough handling in bulk fermentation. Also, if you choose
to do longer, cold retards in the refrigerator, the loaves take on a more pronounced sour flavor.

Page 12 Post-Pandemic Sourdough for Busy People The Sourdough Journey 2022©
The 25-Minute Mixing Process
7 Minutes – Prepare all ingredients and mixing tools. See Appendix 7: Calculating Water Temperature
for Desired Dough Temperature for additional insights on this step.
3 Minutes – Measure and mix all ingredients until dry ingredients (flour and salt) are absorbed into the
wet ingredients (starter and water). Turn the dough out onto your countertop.
2 Minutes – Wet your hands, then Slap and Fold the dough 90-100 times to blend the ingredients and
build some gluten strength. At the end of this step, the dough should be a homogeneous
mixture with no dry clumps of flour, and it will be quite sticky. Set a 3-minute timer.
3 Minutes – Let dough rest for 3 minutes. During this time, put away ingredients and clean up your
mixing tools. Prepare and organize your tools for shaping.
1 Minute – Slap and Fold 30-40 times to develop gluten. The dough should firm up and become
smoother.
3 Minutes – Let dough rest for 3 minutes. During this time, prepare tools and supplies for scoring and
baking. Clean up your kitchen.
1 Minute – Slap and Fold 30-40 times to develop gluten. The dough should become tighter, taller, and
smoother.
5 Minutes – Perform final cleanup and prepare the dough for overnight bulk fermentation. Place your
dough in your bulk fermentation vessel and mark your starting volume, in milliliters. If you
are using a proofing chamber, set up your proofer, set the target temperature and place
your dough in the proofing chamber. Document your final mixed dough temperature and
other notes on your Baking Worksheet.
25 Minutes – Total Elapsed Time and Hands-on Time
Note: The times and steps listed above are the minimum times for mixing, resting, etc. With some
flours or large batches, it will take longer to initially mix the dough. Most doughs will always benefit
from longer rest times between slap and folds. Three minutes is the minimum rest time recommended.

Page 13 Post-Pandemic Sourdough for Busy People The Sourdough Journey 2022©
Here is an example of the Baking Worksheet at this step:
Overnight Bulk Fermentation
If you have completed all of the prior steps properly, your work is done until the next morning. Now,
you make sourdough while you sleep.
The first few times you use this process, it can be helpful to periodically check our dough temperature to
ensure that your temperature control methods are working properly. Controlling overnight dough
temperature can be the trickiest part of this process, but once you work out a method, it is highly
repeatable. Check out my recommended products at thesourdoughjourney.com/products for the
various tools and thermometers I use for overnight bulk fermentation.
Also consult Appendix 3: Controlling Overnight Dough Temperature for tips on this topic.
25-Minute Prep Planned Actual Notes:
Start Time 6:00 PM 6:00 PM
Prepare and Combine Ingredients 10 min 10 min
Slap and Fold Round 1 100x, 2 min 100x
Rest Dough (3 min minimum) 3 min 3 min
Slap and Fold Round 2 40x, 1 min 40x
Rest Dough (3 min minimum) 3 min 3 min
Slap and Fold Round 3 40x, 1 min 50x
Final Clean Up 5 min 10 min
End Time 6:25 PM 6:30 PM
Total Prep Time 25 min 30 min
Mixed Dough Temperature Planned Actual Notes:
Kitchen/Ambient Temperature 74F
Water Temperature 66F
Mixed Dough Temperature 68 68F
Clean up and prepare shaping, scoring
and baking tools during the rest periods.
Dough mixed up exactly at target bulk
fermentation temperature
Total mixing and prep time was 30
minutes

Page 14 Post-Pandemic Sourdough for Busy People The Sourdough Journey 2022©
STEP 2: DAY 2 - SHAPE THE DOUGH AND COLD RETARD
Assess Your Percentage Rise
On the morning of Day 2, your dough should have risen to the Target % Rise at the target time. For
example, our dough should have risen 75% in 13.5 hours. Use a kitchen probe thermometer to test the
temperature at the center of your dough. Note that temperature on the Baking Worksheet. Compare
your actual dough temperature to the planned dough temperature. This is a very important step
because the overnight timing is highly impacted by the internal dough temperature.
Example:
The dough was expected to achieve a 75% rise at 8 a.m. on Day 2. When checking the dough at 7 a.m.,
you see that it has already achieved the 75% rise. You test the dough temperature and see that the
overnight dough temperature was 69F/20.5C, or one degree Fahrenheit warmer than expected, so the
bulk fermentation time took one hour less than planned. Document the actual times, temperatures,
and percentage rise on your Baking Worksheet.
Important: The planned bulk fermentation times are provided as a guideline for planning, but the dough
readiness is always determined by the percentage rise, not the duration! When determining if the
dough is “ready” for the next step, always ignore the clock and wait for the target percentage rise in the
dough. The percentage rise does not lie. In this example, we cut of bulk fermentation one hour earlier
than planned because the dough reached the target percentage rise of 75% one hour earlier than
planned.
Here is an example of the Baking Worksheet section from the morning of Day 2:
Overnight Bulk Fermentation (BF)
Planned
Temp
Starting
Temp
Ending
Temp
Average
Temp
Temp
Variance
BF Dough Temperature 68 68F
69F 69F +1F
Planned Rise
(%/ml)
Starting
Volume (ml)
Ending
Volume (ml)
Actual %
Rise
% Rise
Variance
BF Percentage Rise/Volume 75%/1050
600 1050 75% 0%
Planned Actual Variance Notes:
BF Start Time 6:30 PM 6:30 PM
BF End Time 8:00 AM 7:00 AM
Bulk Fermentation Duration (hours) 13.5 12.5 -1
Temperature Control Method
Mini-fridge was set at 68F. Dough temp started and stayed at 69F
all night. Will adjust thermostat next time.
Overnight temp was 1
degree F warmer than
planned

Page 15 Post-Pandemic Sourdough for Busy People The Sourdough Journey 2022©
Bulk Fermentation Troubleshooting and Frequently Asked Questions
My dough did not achieve the target rise at the target time. What happened?
First, check your dough temperature against your target. Variations in dough temperature (even +/- 1
degree Fahrenheit) can impact the rise time. Warmer dough rises faster. Cooler dough rises more
slowly. It is generally better to err on the high side versus the low side of your temperature setting if
you have a tight time window to shape in the morning.
My temperature was on target and I still missed the target rise?
Everyone’s starter is different, and different flours will ferment more quickly or slowly than others.
However, these differences are predictable and you should be able to calibrate the timetables for your
starter and flour. If your timing or percentage rise is consistently missing the target in the tables,
consult the Appendix 8: Calibrating the Timetables for you Starter Strength. Once you perform the
calibration steps, you should see very consistent, repeatable results.
My dough has not met the target percentage rise. What should I do?
If your schedule permits, just give it more time. If your dough temperature is below room temperature,
you can let it come up to room temperature to speed it up. Monitor the percentage rise until it hits the
target. When evaluating if your dough is ready to shape, always use the percentage rise, not the rise
time! The time is just a guideline for scheduling purposes. The percentage rise does not lie!
My dough has not met the target percentage rise and I need to go to work. What should I do?
Put your dough in the refrigerator. It will continue fermenting but will slow down until you return from
work. Check the percentage rise when you return from work and resume the process at that time. You
should let the dough come back up to room temperature before shaping. Always wait for the dough to
achieve the target percentage rise before shaping.
My dough has risen more than the target. What should I do?
By bulk fermenting at low temperatures (around 70F/21C), it is very difficult to overproof the dough. If
your target rise is 75%, you generally have a “safe zone” up to 100% rise. I’ve even risen dough to a
150% rise without overproofing it. Take notes and make adjustments to avoid the overage next time.
My dough rose by 75% but it overproofed. What should I do?
It is very uncommon for your dough to overproof at a 75% rise and 70F/21C dough temperature. But it
is possible. Consult Appendix 4: Baking Your First Loaf for instruction on how to assess proofing levels
and how to make adjustments. Many bakers are afraid of overproofing their dough. I encourage you to
push beyond your comfort zone and always push for longer fermentations. You have more runway than
you may think. Once you find the “end point” where your dough turns the corner to overproofing, you
will then know with certainty your acceptable “fermentation window” which provides great schedule
flexibility.

Page 16 Post-Pandemic Sourdough for Busy People The Sourdough Journey 2022©
Pre-shaping and Final Shaping
The recommended process is a two-step shaping method with a bench rest:
1) Pre-shape the dough into a tall round with good surface tension,
2) Let the dough rest for 20-30 minutes,
3) Final shape the dough into a shape of your choosing (e.g., boule or batard).
Shaping Considerations
In this method, we do not perform any handling of the dough after the initial mixing (e.g., no stretch and
folds during bulk fermentation). By eliminating the handling steps in bulk fermentation, the dough will
have less “structure,” so we need compensate for this in pre-shaping and final shaping.
When pre-shaping your dough, you want to be careful not to de-gas the dough with rough handling, but
you also need to build layers in the dough when pre-shaping. You can see my technique demonstrated
in the video. Focus on building dough height during pre-shaping with four strong folds from the four
sides of the dough (I think of this as an upside-down coil fold if you are familiar with that method).
After resting the dough for 20-30 minutes, final shape the dough. Similarly, in final shaping you want to
do “strong” shaping. Strong shaping includes building many layers, tight handling and may include
stitching and/or secondary rolls. If you are planning on a long, cold retard, the dough can handle very
tight final shaping because it will have a long time to relax in the refrigerator.
Place your shaped dough into a shaping basket and place it in the refrigerator. When doing a long, cold
retard in the refrigerator, these loaves can benefit from using a slightly under-sized shaping basket to
keep the dough from spreading.
Refrigerator Placement for Optimal Final Proofing
The Low and Slow Method supports a wide range of final proofing options from 8 hours to 72 hours in
the refrigerator.
Every refrigerator has warm and cool spots. In the companion video, I demonstrate how to test the
temperature at different points in your refrigerator (i.e., The Coffee Cup Test). You should perform this
test one time and keep a record of your refrigerator warm and cool spots. See Appendix 9: Measuring
Your Refrigerator Temperatures for more details.
Your “baseline” loaf should be calibrated to your midpoint or average refrigerator temperature and a
24-hour cold retard.
When placing your shaped dough in the refrigerator, consider when you plan to take it out and bake it. If
you plan to do a short cold retard, such as 8 hours, place the shaped dough in the warmest spot in your
refrigerator. If you plan to do a long cold retard, such as 72 hours, place the shaped dough in the
coolest spot in your refrigerator. A few degrees temperature difference can have a material impact on
proofing over a very short or very long final proofing times.
By understanding the different temperature zones in your refrigerator, you can fine-tune the final
proofing of short and long fermented loaves.

Page 17 Post-Pandemic Sourdough for Busy People The Sourdough Journey 2022©
Clean Up and Notes
Clean up and put away your shaping tools and supplies. The entire shaping process should take about
35 minutes of elapsed time and less than 8 minutes of hands-on time. If you do not have time to
complete the 35-minute process, you can skip pre-shaping and go directly to final shaping. As discussed
above, there are benefits from a strong pre-shaping, but it is not essential.
Test your dough temperature before placing your shaped dough in the refrigerator and note this on the
Baking Worksheet. Also note your planned final proofing time, target dough temperature and
refrigerator placement.
Here is a sample of the Baking Worksheet at this step:
Troubleshooting and Frequently Asked Questions
How does final proofing time relate to bulk fermentation time?
The vast majority of what you see in your final loaf and crumb is attributable to bulk fermentation.
Optimizing your bulk fermentation is the most critical skill in sourdough baking.
In the Low and Slow method, however, your dough will continue fermenting in the refrigerator – albeit
very slowly. Most of the fermentation in the refrigerator happens in the first eight hours as the dough
temperature is dropping to refrigerator temperature. Once your dough reaches refrigerator
temperature (e.g., 37F/3C) it significantly slows down the fermentation. 8-12 hour extensions of final
proofing at refrigerator temperature have no material impact. I would equate one extra day of final
proofing in the refrigerator as the same as one extra hour of bulk fermentation time (at 70F/21C). For
example, if you are getting perfectly proofed loaves at 75% rise and 24 hours in the refrigerator, then by
extending your final proofing to two or three days in the refrigerator is the equivalent of adding one or
two extra hours to your bulk fermentation time (at 70F/21C). And this difference can be mitigated by
placing the dough in the coldest spot in the refrigerator. It is very difficult to overproof a loaf in the
refrigerator once the dough temperature reaches 37F/3C. Use this to your advantage when planning
your baking schedule. You have more flexibility with baking times than you may realize.
Shape Loaf Planned Actual Notes:
Shaping Day Sat Sat
Shaping Start Time 8:00 AM 7:00 AM
Pre-shape Dough 5 min 5 min
Bench Rest (20-30 min) 20 min 20 min
Final Shape and Clean up 5 min 5 min
Shaped Dough Temp into Fridge 68F 70F
Final Proof in Refrigerator Planned Actual Notes:
Final Proof Start Time 8:30 AM 7:30 AM
Final Proof Duration (hours) 24
Target Dough Temp in Fridge
39F
Dough temp rose slightly while shaping
and went into the fridge at 70F

Page 18 Post-Pandemic Sourdough for Busy People The Sourdough Journey 2022©
STEP 3: DAY 2-5: FINAL PROOFING, SCORING AND BAKING
Once the dough is in the refrigerator, you have a wide range of options of when to bake the loaf or
loaves. The minimum time in the refrigerator for the cold retard / final proof is 8 hours. However, if
you can keep your dough at a low temperature in your refrigerator (37F/3C), you can bake it any time in
the next 72 hours (or even longer if your dough is strong and your refrigerator is cool).
Longer final proofs in the refrigerator should be kept in the coldest spot in your refrigerator. Long-
fermented loaves may be slightly flatter and will be more sour, but are still delicious, nice looking loaves.
FAQ: What if I planned a 24-hour final proof in the fridge, but now I need to let it go for 72 hours?
Move your dough to the coldest spot in your refrigerator. It will still be fine.
FAQ: What if I planned a 72-hour final proof in the fridge, but now I need to bake it at 24 hours?
Take it out and bake it. I will be fine.
FAQ: My loaves are really rising in the fridge and are spilling out of the banneton. What should I do?
This means your refrigerator is likely warmer than you think. You should see a small amount of dough
rise in the refrigerator with long-fermenting loaves, but it is uncommon for the dough to rise above the
top of the shaping basket if the refrigerator is cool enough. Test your refrigerator temperature and your
dough temperature. Your dough temperature should ideally be at 37F/3C for any final proofing beyond
24-36 hours. Slightly higher temperatures may work for you. Keep records and assess your results.
Scoring and Baking the Loaf
Preheat your Dutch oven in the oven to 500F/260C. As your oven is approaching the target
temperature, take your dough out of the refrigerator.
When you take your loaf out of the refrigerator, take the temperature of the center of the dough and
note the temperature and total time it spent in the refrigerator on your worksheet. This is very
important information for planning your future bakes. Here is an example of the Baking Worksheet at
this step.
Dust the bottom of the loaf with rice flour (it is helpful to keep some rice flour in a labeled shaker, rather
than taking out flour bags every time you bake).
Turn the dough out of the shaping basket onto a piece of parchment paper. You should cut your
parchment paper to just fit under the dough and have two flaps on the side for lower the dough into the
Dutch oven. Excessively large parchment paper can impede ovenspring.
Score the dough to your preference. I prefer a single slash, but you can do decorative scoring if you
prefer. Observe how the dough opens up on the scoring line and take notes on your worksheet.
Final Proof in Refrigerator Planned Actual Notes:
Final Proof Start Time 8:30 AM 7:30 AM
Final Proof Duration (hours) 24 25
Target Dough Temp in Fridge
39F 39F
Placed loaf on middle shelf, front.
Typically 39F. Extended planned cold
retard by one hour to keep original
schedule

Page 19 Post-Pandemic Sourdough for Busy People The Sourdough Journey 2022©
Carefully remove the preheated Dutch oven from the oven and use the parchment paper sling to lower
the loaf into the Dutch oven. Be careful and always wear good quality oven mitts/gloves.
Reduce the baking temperature to 450F/230C and set a timer for 20 minutes. Bake the loaf covered, for
20 minutes. If your loaves tend to burn on the bottom, place a baking sheet on a separate rack under
the Dutch oven. This acts as a heat shield and keeps the bottom from burning.
After 20 minutes, remove the lid and continue baking for another 15-20 minutes until the loaf is fully
browned on top to your preference. Remove the loaf, place it on a cooling rack and let it cool for 90
minutes before slicing.
After cutting the loaf, assess the crumb to determine if the loaf is underproofed, overproofed, or nicely
proofed. Use this information to modify your next bake.
Document your work in the Baking Worksheet. Here is a sample:
Summarize your final timing on the top summary section of the Baking Worksheet. Here is an example:
Frequently Asked Questions:
How do I know if my loaf is overproofed or underproofed?
I have lots of tools on this topic on my website. Check out the video, “How to Read a Sourdough
Crumb,” and download the “How to Read a Sourdough Crumb Guide.”
If my loaf is underproofed, what should I do?
The vast majority of what you see in the crumb comes from the bulk fermentation step. If you used a
75% rise and the loaf was underproofed, then go up to an 85% rise next time.
Score and Baking Planned Actual Notes:
Scoring and Baking Day Sun Sun
Scoring and Baking Start Time 8:30 AM 8:30 AM
Preheat Oven to 500F/260C 30 min 40 min
Score Loaf 5 min 5 min
Bake 20 minutes with Lid On 20 min 20 min
Bake approx 20 min until browned 20 min 20 min
Total Time 75 min 85 min
Loaf baked up nicely. Crumb was
slightly underproofed. Next time I will
push bulk rise to 85%.
A nice loaf, slightly more sour than
usual.
Baking Plan and Summary Actual Variance
Day Time Hours Hours Hours
Mixing Fri 6:00 PM 0.5 0.5
Overnight Bulk Fermentation 6:30 PM 13.5 12.5 -1
Shaping Sat 8:00 AM 0.5 0.5
Final Proof / Cold Retard 8:30 AM 24 25 +1
Baking Sun 8:30 AM 1.5 1.5
Planned

Page 20 Post-Pandemic Sourdough for Busy People The Sourdough Journey 2022©
It is also possible that your dough was too cool in the refrigerator. Try moving your dough to warmer
spot in the refrigerator. Only change one variable at a time.
If my loaf is overproofed, what should I do?
The vast majority of what you see in the crumb comes from the bulk fermentation step. If you used a
75% rise and the loaf was overproofed, then go down to a 65% rise next time.
It is possible that your refrigerator was too warm for the final proofing. Try moving your dough to a
cooler spot in your refrigerator. Only change one variable at a time.
My bulk fermentation times are always different than the Fermentation Timetables. What should I
do?
Check out Appendix 8: How to Calibrate the Timetables for your Starter.
Final Thoughts
Once you master the basic skills, you will begin to think about sourdough baking completely differently.
You can now think about baking over a multi-day period, and you can accurately schedule the short,
hands-on steps when it best fits your schedule.
This is a totally different way of thinking about sourdough baking. And when you become comfortable
leaving shaped loaves in the refrigerator for a few days without worrying about overproofing, you
unleash vast options for flexibility in your baking schedule. For example:
- You were planning to bake a loaf from the refrigerator on Friday night, but your schedule
doesn’t permit? No problem. Bake it any time on Saturday.
- You decide at 10 p.m. to mix up a batch of dough but cannot shape it until the next day after
work? No problem. Select a long fermentation timeline to work with your schedule.
- You have time to mix and shape a 3-loaf batch of dough on Thursday night and Friday morning
but don’t know when you will have time to bake? No problem. Put the shaped loaves in the
coldest spot in your refrigerator and fit the baking into your schedule anytime in the next 3 or
more days.
I hope you find this new approach helpful. If you’ve found value in this method, please consider
donating to The Sourdough Journey at thesourdoughjourney.com/donate so I can continue making
more videos and tools to support this method.

Page 21 Post-Pandemic Sourdough for Busy People The Sourdough Journey 2022©
APPENDICIES
Appendix 1: Baking Worksheet (Sample)
Appendix 2: Baking Worksheet (Blank)
Appendix 3: Controlling Overnight Dough Temperatures
Appendix 4: Baking Your First Loaf
Appendix 5: Sample Timelines
Appendix 6: Bulk Fermentation Timetables
Appendix 7: Calculating Water Temperature for DDT
Appendix 8: Calibrating the Timetables for Your Starter Strength
Appendix 9: Measuring your Refrigerator Temperatures
Appendix 10: Step-by-Step Details
Appendix 11: Process Optimization Ideas
Appendix 12: The Fermentation Model: How Fermentation Works

Page 22 Post-Pandemic Sourdough for Busy People The Sourdough Journey 2022©
Appendix 1 – Sample Baking Worksheet
Post-Pandemic Sourdough for Busy People The Sourdough Journey © V1.0
Baking Worksheet Date 1/1/2023
Baking Plan and Summary Actual Variance
Day Time Hours Hours Hours
Mixing Fri 6:00 PM 0.5 0.5
Overnight Bulk Fermentation 6:30 PM 13.5 12.5 -1
Shaping Sat 8:00 AM 0.5 0.5
Final Proof / Cold Retard 8:30 AM 24 25 +1
Baking Sun 8:30 AM 1.5 1.5
Starter %
BF Dough
Temp
BF Hours BF % Rise
Bulk Fermentation Plan Planned 15% 68 13.5 75%
Use Fermentation Timetables for Actual 69 12.5 75%
Planned Starter % and Dough Temp Variance 1 -1 0
To achieve % Rise at your target time Notes:
Recipe 2x 500g 2x 400g
Flour Weight Total 500g 400g 300g 1000g 800g
Bread Flour (90%) 450 360 270 900 720
Whole Wheat Flour (10%) 50 40 30 100 80
Water (75%) 375 300 225 750 600
Salt (2%) 10 8 6 20 16
Starter (% from table above) 60g
Flours Used:
25-Minute Prep Planned Actual Notes:
Start Time 6:00 PM 6:00 PM
Prepare and Combine Ingredients 10 min 10 min
Slap and Fold Round 1 100x, 2 min 100x
Rest Dough (3 min minimum) 3 min 3 min
Slap and Fold Round 2 40x, 1 min 40x
Rest Dough (3 min minimum) 3 min 3 min
Slap and Fold Round 3 40x, 1 min 50x
Final Clean Up 5 min 10 min
End Time 6:25 PM 6:30 PM
Total Prep Time 25 min 30 min
Clean up and prepare shaping, scoring
and baking tools during the rest periods.
Planned
Overnight temperature was 1 degree (F) higher than
planned. Rise time took 1 hour less than planned to
reach 75% rise.
Total mixing and prep time was 30
minutes
Single Loaf Options
90% King Arthur Bread Flour (Organic)
10% Central Milling Whole Wheat Flour

Page 23 Post-Pandemic Sourdough for Busy People The Sourdough Journey 2022©
Mixed Dough Temperature Planned Actual Notes:
Kitchen/Ambient Temperature 74F
Water Temperature 66F
Mixed Dough Temperature 68 68F
Overnight Bulk Fermentation (BF)
Planned
Temp
Starting
Temp
Ending
Temp
Average
Temp
Temp
Variance
BF Dough Temperature 68 68F
69F 69F +1F
Planned Rise
(%/ml)
Starting
Volume (ml)
Ending
Volume (ml)
Actual %
Rise
% Rise
Variance
BF Percentage Rise/Volume 75%/1050
600 1050 75% 0%
Planned Actual Variance Notes:
BF Start Time 6:30 PM 6:30 PM
BF End Time 8:00 AM 7:00 AM
Bulk Fermentation Duration (hours) 13.5 12.5 -1
Temperature Control Method
Shape Loaf Planned Actual Notes:
Shaping Day Sat Sat
Shaping Start Time 8:00 AM 7:00 AM
Pre-shape Dough 5 min 5 min
Bench Rest (20-30 min) 20 min 20 min
Final Shape and Clean up 5 min 5 min
Shaped Dough Temp into Fridge 68F 70F
Final Proof in Refrigerator Planned Actual Notes:
Final Proof Start Time 8:30 AM 7:30 AM
Final Proof Duration (hours) 24 25
Target Dough Temp in Fridge
39F 39F
Score and Baking Planned Actual Notes:
Scoring and Baking Day Sun Sun
Scoring and Baking Start Time 8:30 AM 8:30 AM
Preheat Oven to 500F/260C 30 min 40 min
Score Loaf 5 min 5 min
Bake 20 minutes with Lid On 20 min 20 min
Bake approx 20 min until browned 20 min 20 min
Total Time 75 min 85 min
The Sourdough Journey©
Mini-fridge was set at 68F. Dough temp started and stayed at 69F
all night. Will adjust thermostat next time.
Loaf baked up nicely. Crumb was
slightly underproofed. Next time I will
push bulk rise to 85%.
A nice loaf, slightly more sour than
usual.
Dough mixed up exactly at target bulk
fermentation temperature
Overnight temp was 1
degree F warmer than
planned
Placed loaf on middle shelf, front.
Typically 39F. Extended planned cold
retard by one hour to keep original
schedule
Dough temp rose slightly while shaping
and went into the fridge at 70F

Page 24 Post-Pandemic Sourdough for Busy People The Sourdough Journey 2022©
Post-Pandemic Sourdough for Busy People - 25 Minute Prep The Sourdough Journey © V1.0
Baking Worksheet Date 1/1/2023
Baking Plan and Summary Actual Variance
Day Time Hours Hours Hours
Mixing
Overnight Bulk Fermentation
Shaping
Final Proof / Cold Retard
Baking
Starter %
BF Dough
Temp
BF Hours BF % Rise
Bulk Fermentation Plan Planned
Use Fermentation Timetables for Actual
Planned Starter % and Dough Temp Variance
To achieve % Rise at your target time Notes:
Recipe 2x 500g 2x 400g
Flour Weight Total 500g 400g 300g 1000g 800g
Bread Flour (90%) 450 360 270 900 720
Whole Wheat Flour (10%) 50 40 30 100 80
Water (75%) 375 300 225 750 600
Salt (2%) 10 8 6 20 16
Starter (% from table above)
Flours Used:
25-Minute Prep Planned Actual Notes:
Start Time
Prepare and Combine Ingredients 10 min
Slap and Fold Round 1 100x, 2 min
Rest Dough (3 min minimum) 3 min
Slap and Fold Round 2 40x, 1 min
Rest Dough (3 min minimum) 3 min
Slap and Fold Round 3 40x, 1 min
Final Clean Up 5 min
End Time
Total Prep Time
Planned
Single Loaf Options
Clean up and prepare shaping, scoring
and baking tools during the rest periods.

Page 25 Post-Pandemic Sourdough for Busy People The Sourdough Journey 2022©
Mixed Dough Temperature Planned Actual Notes:
Kitchen/Ambient Temperature
Water Temperature
Mixed Dough Temperature
Overnight Bulk Fermentation (BF)
Planned
Temp
Starting
Temp
Ending
Temp
Average
Temp
Temp
Variance
BF Dough Temperature 0 0
Planned Rise
(%/ml)
Starting
Volume (ml)
Ending
Volume (ml)
Actual %
Rise
% Rise
Variance
BF Percentage Rise/Volume
Planned Actual Variance Notes:
BF Start Time
BF End Time
Bulk Fermentation Duration (hours)
Temperature Control Method
Shape Loaf Planned Actual Notes:
Shaping Day
Shaping Start Time
Pre-shape Dough 5 min
Bench Rest (20-30 min) 20 min
Final Shape and Clean up 5 min
Shaped Dough Temp into Fridge
Final Proof in Refrigerator Planned Actual Notes:
Final Proof Start Time
Final Proof Duration (hours)
Target Dough Temp in Fridge
Score and Baking Planned Actual Notes:
Scoring and Baking Day
Scoring and Baking Start Time
Preheat Oven to 500F/260C
Score Loaf 5 min
Bake 20 minutes with Lid On 20 min
Bake approx 20 min until browned 20 min
Total Time
The Sourdough Journey©
Support The Sourdough Journey at thesourdoughjourney.com/donate

Page 26 Post-Pandemic Sourdough for Busy People The Sourdough Journey 2022©
Appendix 3: Controlling Overnight Dough Temperatures
If you are trying to tightly control your fermentation times – for example, if you plan to shape your
dough in the morning before leaving for work – controlling your overnight dough temperature is the
most important skill to master.
Controlling overnight dough temperature can be tricky due to seasonal changes, and kitchen
temperatures often vary overnight. Over the years I have done many experiments on controlling dough
temperature are these are the best recommendations.
Getting Your Initial Mixed Temperature Correct
The easiest way to control your overnight dough temperature is to get the initial mixed dough
temperature correct. It is much easier to maintain a dough temperature than to change it. See the
Appendix – Calculating Water Temperature for Desired Dough Temperature for details on how to get
the initial dough temperature correct.
Maintaining Dough Temperature
Once you have mixed your dough, it is important to keep your dough at the target temperature
overnight if you want the fermentation timetables to work as expected. Always first consider your
kitchen temperature and determine if you need to keep your dough warmer or cooler than your kitchen
temperature overnight.
If your kitchen temperature is not at your desired dough temperature look for other locations in your
home that may maintain a different temperature overnight – garage, basement, laundry room, upstairs
closet, etc. Homes often have many warm and cool spots overnight, and by using a thermometer you
can sometimes find the perfect spot for overnight fermentation.
Testing Temperatures
As you experiment with any of the methods described below, an easy way to test them, without mixing
a batch of dough is to perform a water test. Fill a vessel with 350-375ml of water and take the
temperature. Place that vessel in your proofing chamber and check the water temperature every hour
or so. This is a very reliable test of how your dough temperature will behave. A cup of water is just like a
loaf of bread without the flour.
It is very important to test this water temperature over time rather than the air temperature in any
proofing location. The air temperature can change rapidly, but the water temperature will change very
slowly, and it will maintain its temperature for a long time. Your dough will behave the same way.
KEEPING YOUR DOUGH WARMER THAN YOUR KITCHEN TEMPERATURE
If your kitchen or ambient temperature is cooler than the temperature you need to maintain overnight,
there are many ways to increase your dough temperature by a few degrees.
Electric Proofer
You can purchase an electric proofing box, such as the popular Brod and Taylor proofer. It is a
thermostatically controlled warming box. You set the desired temperature and it will keep that
Page 27 Post-Pandemic Sourdough for Busy People The Sourdough Journey 2022©
temperature overnight. These work very well and are a very worthwhile investment if you plan to use it
frequently. Note, these proofers only warm the dough, they do not cool it.
Warming Mats
You can create your own makeshift proofer by using a warming mat. Seed warming mats and reptile
warming mats are popular choices for warming dough. Reliaheat also makes the Raisenne Dough Riser
which is specifically designed for bread proofing.
Warming mats require some trial and error because they are not thermostatically controlled. For
example, you can place your dough directly on a warming mat and directly warm it from the bottom. Or
you can place your dough on a cooling rack, above the warming mat and put it in an enclosed space (in a
cooler or plastic storage bin) and create an ambient warming chamber. Use a thermometer to test the
internal dough temperature over time. The internal dough temperature is always more important than
testing the air temperature.
Lightbulbs
Many bakers use their oven or microwave with the light on as a proofing chamber. Test yours with a
thermometer. Many ovens will be too warm for overnight bulk fermentation. If your is too warm, try
propping the oven door open 2 inches, 4 inches, or 6 inches. You can often moderate the temperature
this way.
Some bakers also put a small string of holiday lights in a cooler or plastic bin to create a warming
chamber. Small lamps with dimmers are also a convenient way to moderate the temperature. Any time
you are using light bulbs to create heat, always be careful that you are not creating a fire risk! A light
bulb inside a cardboard box or Styrofoam cooler could create a fire. Safety first! LED lights are cooler
than incandescent bulbs. Experiment with different types and wattage bulbs.
Warm Water
If you place your dough in the oven with a small container of warm or boiling water, the boiling water
will raise the ambient air temperature in the oven quite significantly. You may need to refresh the water
from time to time, but this is a simple method to create a warm environment for your dough. Your
dough will also like the humid environment created by the warm water.
Mini Fridge
Some inexpensive miniature refrigerators also include a warming function. Some of these small desktop
refrigerators (typically 4-6 liter capacity) have a switch allowing them to operate in either heating or
cooling mode. However, these mini-fridges are generally not thermostatically controlled and the
warming function tends to warm up very hot and very quickly. If you plan to use one for dough
proofing, you will need to add a thermostat.
You can purchase an external thermostat controller to control the refrigerator temperature. Most
external controllers come with a thermostat on the end of a wire. Drill a small hole in the mini-fridge
and insert the thermostat into the refrigerator (or your dough!). You can then use the controller to very
precisely dial in your target temperature. The controller will turn on the power when the temperature is
Page 28 Post-Pandemic Sourdough for Busy People The Sourdough Journey 2022©
below target and turn it off when it meets the target. Always test your internal dough temperature with
a probe thermometer from time to time. Some thermostats are notoriously inaccurate.
Look for an upcoming video on my YouTube channel on this topic.
Incubators
Incubators are a relatively inexpensive solution for a temperature-controlled environment. These
devices are typically the size of a small refrigerator (25 Liter capacity) and can hold a lot of dough. They
are often advertised as incubators for reptile or poultry eggs. Incubators are bulky appliances, and they
are more suited for a permanent setup (for example, in your basement or garage). These incubators
typically can maintain a constant temperature, year-round, by heating or cooling as necessary. I am
testing one of these devices now and plan to publish a video on this topic.
Other Options
Some home bakers have found warm spots in their home such as a furnace room or laundry room. You
can sometimes find warm spots near appliances. Many home electronics produce a small amount of
heat and I’ve seen some bakers use this method of keeping their dough warm (e.g., keeping their dough
in a cabinet with their wi-fi router.
KEEPING YOUR DOUGH COOLER THAN YOUR KITCHEN TEMPERATURE
If your kitchen or ambient temperature is warmer than the temperature you need to maintain
overnight, there are many ways to decrease your dough temperature a few degrees.
Ice Pack
If your put your dough in your oven with an ice pack (or a bowl of ice), it will reduce your dough
temperature for about 6 hours. Make sure your oven light is turned off. Place the ice pack on a
separate rack from your dough (do not make surface contact with your dough bowl). Place a
thermometer in the oven to check the air and dough temperature periodically.
Although the ice will eventually melt, this method can reduce your dough temperature by 6-8F/2-4C
lower than your kitchen temperature. I often use this method in the summer. You could also put your
dough in a cooler with ice or an ice pack. Experiment with different amounts of ice or different sized ice
packs. I’ve found larger ice packs reduce the temperature faster and they last longer, but they don’t
reduce the actual dough temperature much more than small ice packs. Once you get a method that
works, this is very repeatable.
Note: The ice pack method is slightly different than other methods because it essentially enables a
“delayed start” to the fermentation, rather than keeping a consistent cool temperature overnight
(assuming the ice melts after 4-6 hours).
Mini Fridge
I am a big fan of using a thermostatically controller mini refrigerator to control my overnight dough
temperature. These small tabletop refrigerators are very inexpensive (under $40 in the US) and you can
attach a thermostat controller to them. Drill a hole in the fridge and insert the thermostat through the

Page 29 Post-Pandemic Sourdough for Busy People The Sourdough Journey 2022©
hole. These are very good at keeping your dough a few degrees below room temperature. As noted
above, some of these devices also have a warming mode and can be used as a warm or cold proofer.
Find a plastic food storage container, for your dough vessel, that fits in your mini-fridge. Rectangular,
clear food storage containers are a popular option – and many already include milliliter markings.
Locations
If you are baking in the winter but your kitchen is too warm overnight, you can often find some place in
your home that remains cooler overnight during cold weather. Test the temperature in your basement,
garage, upstairs rooms, a closet, or even on a windowsill.
If you are baking in the summer, but your kitchen is too warm overnight, do you run air conditioning in
your bedroom? Sleep with your sourdough? Perhaps.
Incubator
Incubators are a relatively inexpensive solution for a temperature-controlled environment. These
devices are typically the size of a small refrigerator (25 Liter capacity) and can hold a lot of dough. They
are often advertised as incubators for reptile or poultry eggs. Incubators are bulky appliances, and they
are more suited for a permanent setup (for example, in your basement or garage). These incubators
typically can maintain a constant temperature by heating or cooling. Incubators are a great year-round
solution. I am testing one of these devices now and will publish a video on this topic.
Recommended Products
You can find a list of the thermometers and other tools I use for temperature monitoring and control at
thesourdoughjourney.com/products

Page 30 Post-Pandemic Sourdough for Busy People The Sourdough Journey 2022©
Appendix 4: Baking Your First Loaf
When you prepare to bake your first loaf, print Appendix 2: Baking Worksheet. Before baking your first
loaf, watch the video, “Post-Pandemic Sourdough for Busy People.”
Your Timeline and “Baseline” Loaf
The first time you try this process (assuming you work Monday-Friday), I recommend starting on a Friday
evening, so you have flexibility to shape on Saturday and bake on Sunday.
The overnight bulk fermentation timing will be dependent upon your overnight kitchen temperature.
Assuming your kitchen temperature is in the appropriate range, consult Appendix 6: Bulk Fermentation
Timetables and select a combination of Starter % and Bulk Fermentation Temperature that will have
your dough reaching the 75% rise sometime on Saturday morning.
While the dough is bulk fermenting, do a one-time test of your refrigerator temperatures. See Appendix
9: Measuring your Refrigerator Temperatures for tips on how to do this. This will help with your dough
placement during the final proofing.
Shape the dough on Saturday when the dough has reached the target percentage rise and place the
shaped dough in the “average” temperature spot in your refrigerator for 24 hours.
Final proof the dough in the refrigerator for 24 hours and bake it on Sunday.
This will be your “baseline loaf” at a 75% rise and 24-hour final proof in the refrigerator.
Estimating Your Bulk Fermentation Time
Your bulk fermentation time is a function of the amount of starter you use (relative to your flour weight)
and your overnight dough temperature. Based on these two variables you can estimate your bulk
fermentation duration by using Appendix 6: Bulk Fermentation Timetables.
Select a timeframe that works for you, for example, if you are mixing your dough at 7 pm and plan to
shape the dough at 8:30 am the next morning, look for a 13.5-hour option on the timetable. For
example, by using 15% Starter and a 70F/21C dough temperature, the estimated bulk fermentation time
is 13.5 hours. This is a good fit.
The 25-Minute Process – Mixing the Dough
Watch the video and follow along with the 25-minute process pausing the video as you complete each
step. Your first time will take longer. Don’t rush. It’s not a race or a competition. Get a feel for the
dough in the slap-and-fold process. Try to think about how best organize your ingredients and tools to
create an efficient, repeatable process in your kitchen.
Use the percentage starter determined in the prior step (for example, 15% starter relative to the total
flour weight) when you mix your dough. Your mixed dough should be close to the target dough
temperature. You can use warmer or cooler water to adjust the starting mixed dough temperature. See
Appendix 7 – Calculating your Target Water Temperature for Desired Dough Temperature for more
details on this topic.
Page 31 Post-Pandemic Sourdough for Busy People The Sourdough Journey 2022©
Measuring the Percentage Rise
To be successful with this method, it is critically important to accurately measure the percentage rise in
the dough during bulk fermentation. If you are making a single-loaf batch, I recommend using a 1-liter
Pyrex measuring cup as your bulk fermentation vessel. If you want to make your own vessel, you can
put any vessel on your kitchen scale, pour water into the vessel in 100-gram or 100-milliliter increments
(grams and milliliters are equal for water) and mark a line on the vessel.
After mixing the dough, tamp the dough down into your vessel to get a good marker of the starting
point. Sometimes the dough is domed in the center so you need to estimate the exact starting volume,
in milliliters.
I’ve found when using this recipe that the initial volume of the mixed dough (flour, water, salt, starter) in
milliliters is typically equal to 1.5x the flour weight in grams. For example, a 400g flour-weight batch will
mix up to 600 milliliters in volume (400 grams x 1.5 = 600 milliliter volume). If you validate this
relationship one time with an actual batch of dough, you can simply use this measurement as your
starting point rather than trying to “eyeball” the starting volume in milliliters.
Similarly, when you are trying to measure the ending volume in milliliters, the dough is often domed in
the center. I generally look at where the dough is touching the side of the bowl. I know this is the
“minimum” percentage rise (because the center of the dough is actually higher). This approach works
with this method where we generally want to overshoot versus undershoot the target percentage rise.
Overnight Bulk Fermentation
For your overnight bulk fermentation, you want your dough temperature to remain between 66-74F /
19-23C. Ideally, you want the dough to be as close to 70F/21C a possible, but for your first attempt,
don’t worry about hitting that exact dough temperature.
Assess the Percentage Rise
On Saturday morning, asses the percentage rise in the dough. If the dough has not yet risen 75%, give it
more time and wait until it reaches that percentage. Do not rush this step of the process. Your dough is
ready when it reaches the target percentage rise, not the estimate time! Ignore the clock and watch
the percent rise. The rise does not lie.
If your dough has risen more than 75%, note the percentage rise and continue the next steps. You have
a wide window (typically up to 100% rise) to “overshoot” the target and still not overproof the loaf. Try
to dial in the exact target rise next time.
Shape the Dough
Shape your dough using your preferred method and place the dough in the refrigerator. Place the
shaped dough in the “average” temperature spot in your refrigerator and let the dough final proof for
24 hours.
Score and Bake
On Sunday, remove the dough from the refrigerator and take the temperature of the center of your
dough. Compare this test to your refrigerator temperature test for that location. It should be the same

Page 32 Post-Pandemic Sourdough for Busy People The Sourdough Journey 2022©
temperature. Score and bake the loaf. You do not need to let the dough come up to room temperature
before baking. Preheat your Dutch oven in your oven. As the oven is approaching the target
temperature, score your loaf. Load the scored loaf into the preheated Dutch oven. See the Baking
Worksheet for baking details. Let the dough cool for at least 90 minutes before cutting it.
Assessing the Crumb
After baking your first loaf, you need to assess the sufficiency of the 75% rise in the dough in bulk
fermentation. Everyone’s starter, flour and water are different so you need to individual assess the
proofing level at 75% rise. Does a 75% rise sufficiently ferment your dough?
Cut the loaf down the middle and assess the crumb. To determine if the loaf is underproofed,
overproofed, or nicely proofed, watch the video, “How to Read a Sourdough Crumb,” and download the
“How to Read a Sourdough Crumb Guide.” Assess your loaf against the guide.
If your loaf is underproofed, then on your next bake, take your target percentage rise up to 85%. If the
loaf is overproofed (which would be unlikely), try a 65% rise on the next bake. Repeat this process as
necessary – moving the target rise up or down by 5-10% – until you determine the perfect percentage
rise for your dough (and a 24-hour final proof in the same location in the refrigerator).
Once you identify the percentage rise that works best for you, it should be repeatable every time in this
temperature range. Always remember to isgnore the clock and only focus on the percentage rise. The
rise does not lie.
Your Baseline Loaf
Once you’ve determined your optimal percentage rise, this is now your “baseline loaf” with a nicely
proofed crumb and a 24-hour cold retard at your “average” refrigerator temperature. You will use that
target percentage rise for all loaves in the future. It should not change for any loaves within this
method. f

Page 33 Post-Pandemic Sourdough for Busy People The Sourdough Journey 2022©
Appendix 5: Sample Timelines
You can mix and match elements of this method to create many different baking timelines. Here are
some popular examples.
Timeline 1: Weeknight Prep, Saturday Morning Bake
Everyone loves a fresh baked loaf on a Saturday morning. Prepare your dough on Tuesday, Wednesday
or Thursday and bake on Saturday.
• Tuesday, Wednesday, or Thursday Evening – Prepare dough select an overnight bulk
fermentation option 8.5-20 hours
• Next Morning – Shape dough and put in refrigerator for 24, 48 or 72 hours
• Saturday Morning – Score and Bake Loaf
Timeline 2: Friday Night Dinner Loaf
Prepare a loaf earlier in the week so you can have fresh-baked bread with dinner on Friday night.
• Tuesday or Wednesday Evening – Prepare dough select an overnight bulk fermentation option
8.5-20 hours.
• Wednesday or Thursday Morning (i.e., the morning after mixing) – shape the dough and place it
in the refrigerator for cold retard / final proof.
• Friday Afternoon – Score and Bake Loaf (plan for sufficient cooling time before cutting)

Page 34 Post-Pandemic Sourdough for Busy People The Sourdough Journey 2022©
Timeline 3: Morning Dough Prep, Evening Shaping, Bake Any Time in Next 3 Days
Prepare you dough in the morning, shape it in the evening and bake any time in the next three days.
• Any Day Morning – Prepare Dough, select a 10 to 12-hour Bulk Fermentation option.
• Same Day Evening – Shape Dough and move to refrigerator.
• Next 1 to 3 Days – Bake anytime in the next 8-72 hours.
Timeline 4: Three-Loaf Batch for Daily Bread
Prepare a three-loaf batch every three days, and bake a fresh loaf of bread every day.
• Sunday Evening – Prepare dough and bulk ferment dough for 3 loaves
• Monday morning – Shape three loaves and place in refrigerator
• Tuesday morning – Bake Loaf #1 (24-hour cold retard)
• Wednesday Morning – Bake Loaf #2 (48-hour cold retard)
• Thursday Morning – Bake Loaf #3 (72-hour cold retard)
• Repeat process on Wednesday evening to prepare dough.
• Shape on Thursday morning.
• Bake Loaves on Friday, Saturday and Sunday.
• Repeat the process every third day.
More Options
As you can see from the examples above, you can put together endless options to work around your
busy schedule. Once you master estimating and executing planned bulk fermentation, you can
customize the process to accommodate your schedule.

Page 35 Post-Pandemic Sourdough for Busy People The Sourdough Journey 2022©
The Sourdough Journey
Appendix 6: Bulk Fermentation Timetables
Sorted by 75% Rise Time Sorted by Temperature Group
Notes
These fermentation timetables are based on multiple, actual observed batches at each combination of Starter % and Dough
Temperature in a highly controlled test environment. Over 60 tests were performed with high levels of repeatability. No test
results were averaged across sample batches. Outlying examples were thrown out. Some minor smoothing has been done and
times have been rounded to half-hours.
Recipe
100g flour weight batches. 90% King Arthur Bread Flour, 10% King Arthur Whole Wheat Flour, 2% Salt, Starter Percentage 5%,
10%, 15%, 20%. Starter was fed 1:2:2 approximately 4-6 hours prior to mixing and generally used at or near peak volume.
Starter Strength
Everyone’s starter is different. Your starter strength may produce different results, but the results should be relatively
consistent. For example, if your initial tests show faster rise times, it is likely that all of your results will be faster in a consistent
proportion to the estimates.
Updates
These tables are featured in the video, “Post-Pandemic Sourdough for Busy People.” Tests are continuing at these and other
temperature ranges. Updated tables will be posted periodically at thesourdoughjourney.com/tools. Support these experiments
at thesourdoughjourney.com/donate
The Sourdough Journey © 2022 V1.0 Dec 2022
Starter % Temp 75% Rise 100% Rise
20% 74F/23C 8.5 9.5
15% 74F/23C 10.5 11.5
20% 72F/22C 10.5 11.5
20% 70F/21C 11.5 13.0
20% 68F/20C 12.0 14.0
10% 74F/23C 12.5 14.0
15% 72F/22C 12.5 13.5
20% 66F/19C 13.0 14.5
15% 70F/21C 13.0 15.0
15% 68F/20C 13.5 15.5
5% 74F/23C 14.0 15.5
10% 72F/22C 14.0 15.0
15% 66F/19C 14.5 16.5
10% 70F/21C 15.0 17.0
10% 68F/20C 15.5 17.5
5% 72F/22C 16.5 17.5
10% 66F/19C 17.0 18.5
5% 70F/21C 17.5 19.0
5% 68F/20C 18.0 19.5
5% 66F/19C 18.5 20.0
BF Hours
Starter % Temp 75% Rise 100% Rise
20% 66F/19C 13.0 14.5
15% 66F/19C 14.5 16.5
10% 66F/19C 17.0 18.5
5% 66F/19C 18.5 20.0
20% 68F/20C 12.0 14.0
15% 68F/20C 13.5 15.5
10% 68F/20C 15.5 17.5
5% 68F/20C 18.0 19.5
20% 70F/21C 11.5 13.0
15% 70F/21C 13.0 15.0
10% 70F/21C 15.0 17.0
5% 70F/21C 17.5 19.0
20% 72F/22C 10.5 11.5
15% 72F/22C 12.5 13.5
10% 72F/22C 14.0 15.0
5% 72F/22C 16.5 17.5
20% 74F/23C 8.5 9.5
15% 74F/23C 10.5 11.5
10% 74F/23C 12.5 14.0
5% 74F/23C 14.0 15.5
BF Hours

Page 36 Post-Pandemic Sourdough for Busy People The Sourdough Journey 2022©
The Sourdough Journey
Appendix 6: Bulk Fermentation Timetables – Page 2/2
The Sourdough Journey © 2022 V1.0 Dec 2022

Page 37 Post-Pandemic Sourdough for Busy People The Sourdough Journey 2022©
Appendix 7: Calculating Water Temperature for Your Desired Dough Temperature (DDT)
It is always helpful if your initial mixed dough temperature equals your target dough temperature.
Otherwise, it may take a few hours to get the temperature to the desired level and this will throw off
the fermentation timing.
Your initial mixed dough temperature is known as the “Desired Dough Temperature,” or DDT. There are
many desired dough temperature calculators available online to calculate the water temperature
required to achieve a target dough temperature.
I suggest starting with the “4-Factor Desired Dough Temperature” calculation.
Here is an example for a target dough temperature of 68F:
Target Dough Temp x 4 272 (68 x 4)
minus
Flour Temperature -72F
Starter Temperature -72F
Room Temperature -74F
Target Water Temp 54F
Another option is the online DDT calculator (using a better, different formula) at Rise — Smart DDT
Calculator (madebywindmill.com)
If you keep accurate records for your first 10 or 12 bakes you will get a feel for what water temperatures
you need to use to arrive at the correct starting dough temperature. Use the calculators the first few
times to get the temperature in the ballpark. They are a good starting point but none are 100%
accurate.
Adjusting for Slap and Fold Method
The Slap and Fold mixing method quickly introduces a lot of room-temperature air into the dough while
you are mixing it. Also, the dough is making a lot of contact with your countertop, so your kitchen air
temperature and your countertop temperature significantly impact the dough temperature while
mixing.
During the slap and fold process, the dough will rapidly approach room temperature. If you are
targeting a dough temperature lower than your room temperature, your water temperature and initial
mixed dough temperature – when you initially combine the ingredients – should be much cooler than
your target dough temperature.
I suggest using the 4-Factor calculation as a starting point, but if your mixed dough temperature is
coming in higher (or lower) than expected, feel free to make adjustments as necessary. The standard
methods do not contemplate the slap and fold method.
These tools provide a rough approximation. I am working on a more precise calculator specifically
tailored for the slap and fold method. I will publish it on my website when it is completed.

Page 38 Post-Pandemic Sourdough for Busy People The Sourdough Journey 2022©
Appendix 8: Calibrating the Timetables for Your Starter Strength
The Bulk Fermentation Timetables are based on actual experiments (not a mathematical formula), so
they are based on my starter strength and flour combination. Your results may differ, but if your results
differ, they should differ in a predictable manner (e.g., always seeing 10% longer fermentation times).
Matching the Test Conditions
The fermentation timetables are based on actual, 100g flour-weight samples using 90% King Arthur
Bread Flour, 2% King Arthur Whole Wheat Flour, 75% Water and 2% Salt. The Starter percentages were
carefully measured for each test. My starter was generally given a 1:2:2 feeding prior to baking and the
starter was generally used within 1 hour (plus or minus) of peaking in volume.
If you match these criteria and your times still vary from the timetables, this is normal because
everyone’s starter is different.
How to Calibrate Your Results
When trying to control for variations in bulk fermentation times, consider the following:
- Dough Temperature has a significant impact on rise times
- Starter “strength” has a moderate impact on rise times
- Flour type has a small impact on rise times
The Impact of Dough Temperature
The vast majority of differences between your experience and the timetables will typically come from
variations in bulk fermentation dough temperature. It is difficult to maintain constant dough
temperatures overnight, and you can see from the timetables, a small change in temperature can have a
significant impact on fermentation times. Consult Appendix 3: Controlling Bulk Fermentation Dough
Temperature for tips this topic.
Bakers often ask if the ending dough temperature is most important. It is not. The fermentation time
tables work best at a consistent dough temperature. Warmer starting dough temperatures are similar
to using a higher percentage of starter. Warmer ending dough temperatures are similar to bulk
fermentation times at the end of the cycle at that temperature (i.e., the hourly growth rate will
approximate the growth rates at the ending temperature curves).
Once you’ve controlled the temperature, the only other differences in rise times are attributable to your
starter and flour combination.
The Impact of Starter Strength
Everyone’s starter is different, and your starter strength can vary from day to day. To calibrate your
results to the timetables it is helpful if you can prepare you starter the same way before each bake. This
will reduce the day-to-day variability so you can focus on true strength differences between your starter
and the starter used in the timetables. Always feed your starter the same feeding ratio and try to catch
your starter at the same point in its rise before adding it to the dough.
When thinking about your dough “strength,” you should consider two variables: 1) the yeast population,
and 2) the acidity level. Your yeast population remains fairly consistent in a healthy starter, but the
Page 39 Post-Pandemic Sourdough for Busy People The Sourdough Journey 2022©
acidity level of your starter can vary day-to-day and hour-to-hour. The acidity level significantly impacts
the starter “strength.”
Although you may have a sourdough starter with a large healthy yeast population, as your starter
becomes acidic it “chokes off” the yeast. The yeast slows down its reproduction rate and it slows down
its carbon dioxide production. Even with the same yeast cell population, your starter becomes weaker
as it becomes more acidic.
If your starter is “past peak,” it is generally becoming more acidic and therefore weaker. The
fermentation timetables were created by using a starter within 1 hour (plus or minus) of peak at
72F/21C. You do not need to match this criteria exactly, but try to employ a consistent method of
feeding and using your own starter if you are doing calibration tests against the timetables.
Once you are getting consistent results with your own starter from day-to-day, you can then compare
differences to the timetable. A blank copy of the Calibration Worksheet is included in this document.
Print that worksheet and keep records of your results versus the results in the timetable.
A sample version of a calibration worksheet is provided on the next page.

Page 40 Post-Pandemic Sourdough for Busy People The Sourdough Journey 2022©
Bulk Fermentation Timetable - Calibration Worksheet The Sourdough Journey©
Variance = Actual minus Planned
Date Flours Used Temp Hours % Rise Notes
Planned
70F/21C 15 hrs 75%
Actual
70F/21C 16 hrs 75%
Starter %
10%
Variance
0 +1 hr 0
Date Flours Used Temp Hours % Rise Notes
Planned
70F/21C 13.5 75%
Actual
70F/21C 14.5 75%
Starter %
15%
Variance
0 +1 hr 0
Date Flours Used Temp Hours % Rise Notes
Planned
72F/22C 12.5 hrs 75%
Actual
72F/22C 13.5 hrs 75%
Starter %
15%
Variance
0 +1 hr 0
Date Flours Used Temp Hours % Rise Notes
Planned
72F/22C 10.5 hrs 75%
Actual
68F/18C 14 hrs 75%
Starter %
20%
Variance
-4F +3.5 hrs 0
Date Flours Used Temp Hours % Rise Notes
Planned
68 12 hrs 75%
Actual
67 14 hrs 75%
Starter %
20%
Variance
-1F +2 hrs 0
Date Flours Used Temp Hours % Rise Notes
Planned
70F/21C 11 hrs 75%
Actual
70F/21C 10 hrs 75%
Starter %
20%
Variance
0 -1 hr 0
Date Flours Used Temp Hours % Rise Notes
Planned
70F/21C 11 hrs 75%
Actual
74F/23C 8.5 hrs 75%
Starter %
20%
Variance
+4 hrs -2.5 hrs 0
Date Flours Used Temp Hours % Rise Notes
Planned
74F/23C 8.5 hrs 75%
Actual
74F/23C 8.5 hrs 75%
Starter %
20%
Variance
0 0 0
Starter Prep
10-Dec
Fed 1:2:2 5 hours prior.
Used at peak.
65% CM HM HG
25% CM ABC+
10% CM WW
Warmer bulk
fermentation worked
exactly as estimated.
Starter Prep
7-Dec
Fed 1:2:2 5 hours prior.
Used at peak.
65% CM HM HG
25% CM ABC+
10% CM WW
Much warmer
temperature (+4
degrees), fermented
faster.
Starter Prep
3-Dec
Fed 1:2:2 5 hours prior.
Used at peak.
65% CM HM HG
25% CM ABC+
10% CM WW
Starter at peak and
new flour fermented
faster.
Starter Prep
27-Nov
Fed 1:2:2 8 hours prior
Past peak.
65% CM HM HG
25% CM ABC+
10% CM WW
Past peak starter and
lower temp (1F) added
2 more hours to rise
time.
Starter Prep
21-Nov
Fed 1:2:2 7 hours prior
Used past peak
90% King Arthur Bread
Flour
10% King Arthur Whole
Wheat
Actual temp was 4-
degrees cooler than
planned. Stretched out
time.
Starter Prep
19-Nov
Fed 1:2:2, 6 hours prior
Used just past peak
90% King Arthur Bread
Flour
10% King Arthur Whole
Wheat
75% rise at higher
temp (72F) took 1 hour
longer than estimated
Starter Prep
11-Nov
Fed 1:2:2, 4 hours prior
Used at peak
90% King Arthur Bread
Flour
10% King Arthur Whole
Wheat
75% rise took 1 hour
longer than estimated
with higher Starter %
Starter Prep
1-Nov
Fed 1:2:2 4 hours before.
Used close to peak.
90% King Arthur Bread
Flour
10% King Arthur Whole
Wheat
75% rise took 1 hour
longer than estimated.
Nicely proofed loaf

Page 41 Post-Pandemic Sourdough for Busy People The Sourdough Journey 2022©
Calibration
After 5-10 bakes you should see a clear pattern in your results versus the results in the timetable. For
example, if your rise times are always longer than the results in the timetable, it is likely that you will see
the same results across all possible combinations in the timetable. If you can calculate this difference as
a percentage of total time, or as a consistent number of hours, simply add or subtract that factor to the
timetable values in the future.
For example, if after five experiments, your results are always taking approximately one hour longer
than the expected results, simply add one hour to the timetable values in the future. The differences
may vary across wide temperature ranges (e.g., 1 hour difference at 74F/23C and a 3 hour difference at
66F/18C). In these cases, you may want to adjust the timetable values by the percentage difference in
rise time.
After a few months, you should have enough data points to create your own customized timetables
based on your starter strength. There are only 20 data points in these tables. If you keep good records,
you can create your own customized timetables. Even if you produce 10 repeatable results across the
range of temperature and starter percentage combinations, you could likely approximate the entire
table with some accuracy for your specific conditions.
The Fermentation Model – How Fermentation Works
When analyzing your calibration results you may find it helpful to consult Appendix 12: The
Fermentation Model – How Fermentation Works.
The Impact of Flour
The type of flour you use can impact your rise times, but similar to your starter, if you always use the
same type of flour, you should see consistent differences in rise times (e.g., always faster, or always
slower than the timetables). Differences attributable to flours usually have a small impact on
fermentation and rise times. The typical impacts are:
Faster Fermentation Times
Slower Fermentation Times
- Home-milled flours
- Stone ground flours
- Higher percentage of whole wheat
- Higher “extraction rate” flours
- Fresh flour
- Rye flour
- Mass-produced flours
- Roller milled flours
- Lower percentage of whole wheat
- Lower “extraction rate” flours
- Old or stale flour
- Einkorn, spelt, all-purpose flour
Because flour factors have a relatively small impact on fermentation times, I recommend focusing on all
other variables first.

Page 42 Post-Pandemic Sourdough for Busy People The Sourdough Journey 2022©
Bulk Fermentation Timetable - Calibration Worksheet The Sourdough Journey©
Variance = Actual minus Planned
Date Flours Used Temp Hours % Rise Notes
Planned
Actual
Starter % Variance
Date Flours Used Temp Hours % Rise Notes
Planned
Actual
Starter % Variance
Date Flours Used Temp Hours % Rise Notes
Planned
Actual
Starter % Variance
Date Flours Used Temp Hours % Rise Notes
Planned
Actual
Starter % Variance
Date Flours Used Temp Hours % Rise Notes
Planned
Actual
Starter % Variance
Date Flours Used Temp Hours % Rise Notes
Planned
Actual
Starter % Variance
Date Flours Used Temp Hours % Rise Notes
Planned
Actual
Starter % Variance
Date Flours Used Temp Hours % Rise Notes
Planned
Actual
Starter % Variance
Starter Prep
Starter Prep
Starter Prep
Starter Prep
Starter Prep
Starter Prep
Starter Prep
Support The Sourdough Journey at thesourdoughjourney.com/donate
Starter Prep

Page 43 Post-Pandemic Sourdough for Busy People The Sourdough Journey 2022©
Appendix 9: Measuring Your Refrigerator Temperatures
Everyone’s refrigerator is different, and your refrigerator will have many different temperature points at
different locations in the refrigerator. There may only be one location in your entire refrigerator that is
the same as your refrigerator’s temperature setting.
Small temperature differences can be used to your advantage with this method where we perform very
short (8 hour) and very long (72 hour) final proofs in the refrigerator.
To test your refrigerator temperatures, I suggest placing four to six cups of water in the refrigerator at
different locations. Leave them in the refrigerator for about 24 hours. In the video, I demonstrate this
as “The Coffee Cup Test.”
After 24 hours, test the water temperature in each cup. This is what your dough temperature will be in
that location. A cup of water is basically the same as a loaf of bread without the flour!
Document your refrigerator temperatures in different locations using the image below.
When you make your first “baseline” loaf, I recommend doing a 24-hour cold retard and placing the
dough in the midpoint temperature location in your refrigerator.
Then validate (or modify) the target percentage rise (for example, 75%), with a 24-hour cold retard in
your “midpoint” temperature location. You want to consistently produce perfectly proofed loaves with
a 24-hour cold retard in your “midpoint” temperature location.
Once you’ve established your baseline bulk fermentation target rise (e.g., 75%) you can always use the
same percentage rise for bulk fermentation regardless of how long you plan to final proof, However,
when you place your loaves in the refrigerator, consider how long you plan to final proof them.
• Place short duration loaves (e.g., 8-12 hours) in the warmest spot in your refrigerator
• Place medium duration loaves (e.g.,24-48 hours) in the midpoint spot in your refrigerator
• Place long duration loaves (e.g, hours) in the coolest spot in your refrigerator

Page 44 Post-Pandemic Sourdough for Busy People The Sourdough Journey 2022©
Appendix 10: Step-By-Step Details
THE DETAILED STEPS FROM THE VIDEO
The following steps closely follow the steps from mixing through baking, as demonstrated in the video,
“Post-Pandemic Sourdough for Busy People.”
Advanced Preparation
The only thing you need to prepare in advance is your sourdough starter. Use your preferred method to
have your starter ready to add to the dough. Also print a copy of the Baking Worksheet to keep records
of your process.
The 25-minute Prep Method
This method starts with a completely clean kitchen and ends with a completely clean kitchen, and all
tools and materials prepped for shaping and baking.
Step 1: Prepare for Mixing
Prepare mixing tools on your countertop:
1. Countertop Mat (I use a silicone mat, this is optional)
2. Digital Kitchen Scale
3. Large Mixing Bowl (larger is better)
4. Flour Prep Bowl (if you are using more than one type of flour)
5. Water Vessel
6. Salt Cup
7. Dough Whisk or Bowl Scraper (or both)
8. Spoon (for starter)
9. Timer (kitchen timer, phone, Alexa, etc.)
10. Kitchen Probe Thermometer
11. A Kitchen Towel or Paper Towels for hand wiping
Prepare the ingredients on your countertop:
1. Flour (or multiple flours if you are blending)
2. Fill water vessel with 2 times the water required for recipe (you will also use this to wet your
hands). Measure and note the water temperature.
3. Adjust your water temperature per your Desired Dough Temperature calculation (warm it or
cool it as appropriate). Note final water temperature.
4. Salt
5. Sourdough Starter
Step 2: Measure and Combine the Ingredients
1. Measure 360g of Bread Flour into your Flour Prep Bowl
2. Measure 40g of Whole Wheat Flour into your Flour Prep Bowl
3. Measure 8g of Salt into your Salt Cup
4. Pour the Salt into the Flour Prep Bowl
Page 45 Post-Pandemic Sourdough for Busy People The Sourdough Journey 2022©
5. Blend Flours and Salt with Dough Whisk
6. Pour 300g of Water from your Water Vessel into your Large Mixing Bowl (not the Flour Bowl!)
7. Add 60g of Starter to your Large Mixing Bowl (Starter quantity may vary based on Bulk
Fermentation Target Times!)
8. Blend the Starter in the Water with a Dough Whisk or your hand. Vigorously mix the starter and
water, especially if you are using small starter quantities (e.g., 5-10%).
9. Add approximately 2/3
rds
of the Flour from the Flour Prep Bowl to the Large Mixing Bowl
10. Mix in the Flour with a Dough Whisk, Spoon or Bowl Scraper until it hydrates the dry flour
11. Add in the remaining 1/3
rd
of Flour from the Flour Prep Bowl
12. Mix Flour with a Dough Whisk, Spoon or Bowl Scraper only until there is no dry flour remaining
Step 3: Slap and Fold – Round 1
1. Dump the blended ingredients on to the countertop
2. Measure and note the initial mixed dough temperature
3. Wet your hands
4. Slap-and-Fold the mixture to combine ingredients. Typically 90-100 slap and folds are
recommended. Large batches of dough may require more. You should not feel any dry flour
clumps in the dough at the end of this step. The dough should be a homogeneous mixture and
will begin forming into a shaggy ball. As the dough becomes very sticky, stop Round 1.
5. Note your actual number of slap and folds on the Baking Worksheet
6. Set a timer for 3 minutes
Step 4: 3-Minute Rest Period #1
1. Let the dough rest on the countertop for 3 minutes
2. Place strainer over sink drain (optional)
3. Put Large Mixing Bowl in Sink
4. Fill Large Mixing Bowl with cool water and dish soap (if preferred) for soaking and hand washing
5. Wash dough off hands, catching crumbs in the Large Mixing Bowl
6. Soak Dough Whisk and Starter Spoon in Large Mixing Bowl
7. Put Away Flour Bags
8. Put Away Salt
9. Put Away Sourdough Starter
10. Wipe out Flour Blending Bowl and put away
11. Wipe out Salt Cup and put away
Step 5: Prepare Shaping Tools
1. Baking Sheet Pan (for organizing tools, and for baking heat shield)
2. Banneton
3. Banneton Liner (optional)
4. Rice Flour and Bread Flour 50/50 Blend (pre-mixed in advance) for dusting Banneton Liner
5. Bench Knife / Bench Scraper
6. Bowl Scraper (optional)
7. Flour Shaker with 100% Bread Flour (for dusting shaped loaf, optional)
8. Kitchen Towel to cover shaped loaves during bench rest
Page 46 Post-Pandemic Sourdough for Busy People The Sourdough Journey 2022©
9. Dust your Banneton Liner and put away Dusting Flour Blend
Step 6: Slap and Fold – Round 2
1. Wet your hands
2. Slap and Fold the mixture to develop gluten – approximately 30-40 slap and folds. The dough
should come together in a firmer and smoother ball which holds its shape.
3. After it firms up, it may then start loosening or tearing. Stop slapping and folding
4. Document actual number of slap and folds on the Baking Worksheet
5. Set a timer for 3 minutes
Step 7: 3-minute Rest Period #2
Prepare Scoring and Baking Suppliers
1. Dutch Oven
2. Lame
3. Rice flour (in shaker) for dusting bottom of loaf before baking
4. Water Spritzer (optional)
5. Sesame Seeds or other toppings (optional)
6. Cut Parchment Paper to size of loaf with two flaps for lifting (can be done in advance)
Wash, Dry and Put Away all Mixing Tools and Clean Kitchen
1. Dough Whisk
2. Starter Spoon
3. Large Mixing Bowl
4. Sink Strainer
5. Clean Sink
6. Clean Countertop
7. Sweep Floor
Step 8: Slap and Fold Round 3
1. Slap and Fold the dough for final gluten development, approximately 30-40 slap and folds. The
dough should be a firmer, tighter, smoother ball that keeps its shape. If the tight ball starts
loosening or tearing, stop slapping and folding.
2. Document the actual number of slap and folds on the Baking Worksheet
3. Put dough into Bulk Fermentation Vessel (recommended same as water vessel)
4. Measure and note starting dough volume in milliliters
5. Measure and note the final mixed dough temperature. Compare to target.
6. Cover the dough with an elastic food cover, kitchen towel, or plastic wrap
7. Update Baking Worksheet with additional notes
Step 9: Bulk Fermentation
1. Place dough in a temperature-controlled location (e.g., proofing chamber)
2. Monitor dough temperature and percentage rise
3. Check for target percentage rise at designated time per Fermentation Timetables
Page 47 Post-Pandemic Sourdough for Busy People The Sourdough Journey 2022©
4. Wait for the dough to reach the target percentage rise. Timetables are only provided for
planning. Always rely on the percentage rise, not the planned timing
5. Document the final dough temperature, timing and other notes
Step 10: Shaping
There are two options for shaping. I recommend pre-shaping, a 20 to 30-minute bench rest and final
shaping. Because we did not build layers in the dough through stretch and folds, for example, these
loaves benefit from pre-shaping. However, if you are pressed for time, you skip pre-shaping and take a
few minutes to final shape only and put the dough directly into the refrigerator.
1. Dump the pre-shaped dough onto countertop (I prefer to not use any flour, but you can)
2. Pre-shape the dough into a round, building structure and surface tension
3. Rest 20-30 minutes
4. Wash Bulk Fermentation vessel and put away remaining bulk fermentation tools
5. Final Shape Loaf
6. Dust with Bread Flour (optional)
7. Place shaped loaf into Floured Banneton
8. Cover loaf with Plastic Food Cover
9. Mark the date and time on your loaf when it goes into the refrigerator
10. Place loaf in refrigerator (location based on final proofing time)
11. Update Baking Worksheet with dough temperature and refrigerator location
Step 11: Final proofing – 2 Options
Final Proof / Cold Retard shaped loaf in refrigerator for at least 8 hours and up to 72 hours.
1. Final proof in refrigerator for:
a. Minimum of 8 hours for same-day bake
b. 24 hours for next morning bake
c. Any time in the next 72 hours for flexible baking schedule
d. Note: for long refrigerator fermentations, the internal temperature of the dough in the
refrigerator should be 37F/3C. Warmer dough will keep fermenting and may overproof
in the refrigerator. You should not see much of a rise in the refrigerator. If it is rising a
lot, it is typically too warm.
Short and Long Cold Retard Considerations
As your dough continues final proofing in the refrigerator it will become more sour over time. Short final
proofed loaves will be mildly sour and 72-hour loaves can be quite sour. Adjust your fermentation times
based on your personal preferences. Long fermentation times will also continue fermenting and
breaking down gluten. If your 72-hour loaves are starting to look overproofed, try placing them in the
coldest spot in your refrigerator. If this does not work, you can cut off bulk fermentation slightly earlier
if you plan to final proof a loaf for three days. For example, if a 75%-rise loaf is overproofing in 3 days,
consider cutting off bulk fermentation at a 65% rise. Always try to adjust refrigerator placement before
adjusting the percentage rise in bulk fermentation. A consistent bulk fermentation rise is highly
recommended with this method. If your dough is still overproofing, your refrigerator may be too warm
for a 3-day final proof.
Page 48 Post-Pandemic Sourdough for Busy People The Sourdough Journey 2022©
FAQ: Should my shaped loaves rise in the refrigerator?
With a typical cold retard in the refrigerator (8-16 hours), you generally will not see the dough rise. The
dough is still fermenting and producing carbon dioxide, but cool refrigerator temperature shrinks the
gasses (like putting a balloon in the refrigerator), so you generally won’t see the dough rise. However,
with long cold retards like those called for in this method, you may see the dough inflate between 24-72
hours. Pay attention to how much the dough is rising and compare this to the final proofing of the loaf.
If your dough is significantly rising in the refrigerator, your refrigerator temperature may be too warm
for long final proofs.
Day 2-5 Scoring and Baking
You have two options for baking. You can preheat your Dutch oven, or you can use the “cold start”
method.
Option: 1 Preheat Dutch Oven
1. Preheat Dutch oven and lid in the oven to 500F/260C. Everyone’s oven is different. I
usually preheat my Dutch Oven only until the oven temperature reaches 500F. This takes
about 25-30 minutes. Some recipes recommend preheating your oven and Dutch oven for
60-minutes. I find this to be unnecessary.
Option 2: Cold Start Method (credit: Elaine Boddy’s Foodbod Cold Bake Method)
In the cold start method. Do not preheat the oven or Dutch oven. You will load your cold dough
directly into the cold Dutch oven and then into the cold oven.
Step 12: Scoring
1. Assemble Scoring and Baking Tools (prepared on Day 1)
2. When oven has 5 minutes left to preheat complete the following steps
3. Remove loaf from refrigerator
4. Remove cover and dust bottom of the loaf with Rice Flour
5. Turn loaf out on to Pre-cut Parchment Paper on countertop
6. Spritz with water and add Sesame Seeds (optional)
7. Score the loaf with Lame
8. Load dough into Dutch Oven (preheated or cold)
Step 13: Baking
1. Load Dutch oven into oven
2. Load Baking Sheet on a separate rack under Dutch oven as a heat shield (optional)
3. Set oven temperature and set Timer
a. Standard Bake – 450F/232C for 20 minutes with lid on
b. Cold Start – 450F/232C for 55 minutes with lid on
4. While loaf is baking, clean up and put away Rice Flour, Lame, Elastic Food Cover and Shaping
Basket
5. When timer sounds, remove the Dutch Oven Lid
6. Reset timer
Page 49 Post-Pandemic Sourdough for Busy People The Sourdough Journey 2022©
a. Standard bake: 15-20 minutes, until browned to preference
b. Cold start bake: 5-10 minutes, until browned to preference
7. When Timer sounds, remove loaf from oven and check for doneness
8. Remove Parchment Paper from bottom of loaf. Save or discard.
9. Place loaf on Cooling Rack
10. When baking vessels have cooled, clean and put away Dutch oven and Baking Sheet
Step 14: Cooling
1. Allow loaf to cool for at least 90 minutes before slicing
2. Wipe down countertop, sweep floor and put away any remaining baking items
3. Update Baking Worksheet with baking notes
Step 15: Slicing and Eating
1. Remove loaf from Cooling Rack and put away rack
2. Slice loaf on Cutting Board with Bread Knife
3. Inspect the loaf and finalize notes on the Baking Worksheet
4. Enjoy your loaf of Sourdough Bread!
Page 50 Post-Pandemic Sourdough for Busy People The Sourdough Journey 2022©
Appendix 11: Optimization Ideas and Tips
There are always ways to improve the 25-minute mixing process. Here are some ideas.
Use One Type of Flour - Rather than mixing three types of flour, this recipe will also work with a single
type of flour like a T80 or T85 high-extraction flour. High extraction flours are similar to a pre-blended
mix of bread flour and whole wheat flour. I have had good success with Central Milling Company Old
World Bread Flour.
Pre-blend and Measure Flours – If you are using multiple types of flours, it can be helpful to pre-
measure and blend your flours (and salt) and store the pre-measured and pre-mixed dry ingredients in a
storage bags or containers. This technique saves time and mess because you do not need to handle
multiple bags during the 25-minute prep process. You can do this measurement and mixing in advance
and take that task off the critical path when you are mixing. I keep a few bags of pre-measured and pre-
mixed dry ingredients (flour and salt) in my pantry at all times.
Shakers for Dusting Flours – For your dusting flours (bread flour, 50/50 mix of bread flour and rice flour,
and rice flour), I prefer to use labeled flour shakers. It is messy and time consuming to take full bags of
flour out for these small amounts. You can typically purchase flour shakers for less than $5.
Pre-cut Parchment Paper – You can precut your parchment paper in advance and keep a large supply of
cut sheets. I show an example of how I cut my parchment in the accompanying video.
Store Your Tools Together - Many of the tools used for sourdough baking are dedicated items that are
not used for other cooking or baking. You can speed up your preparation time by storing items together
in preparation for baking. For example:
1) Store your dough whisk, bowl scraper, water vessel and salt cup in your large mixing bowl
2) Store your bench knife, bread flour shaker, dusting flour shaker and banneton liners in your
banneton
3) Store your lame, pre-cut parchment paper, and rice flour shaker, spritzer (optional) and sesame
seeds (optional) in your Dutch oven. (Be careful not to pre-heat them!)
If you come up with new or different ideas, please share them in the comments on the YouTube video.
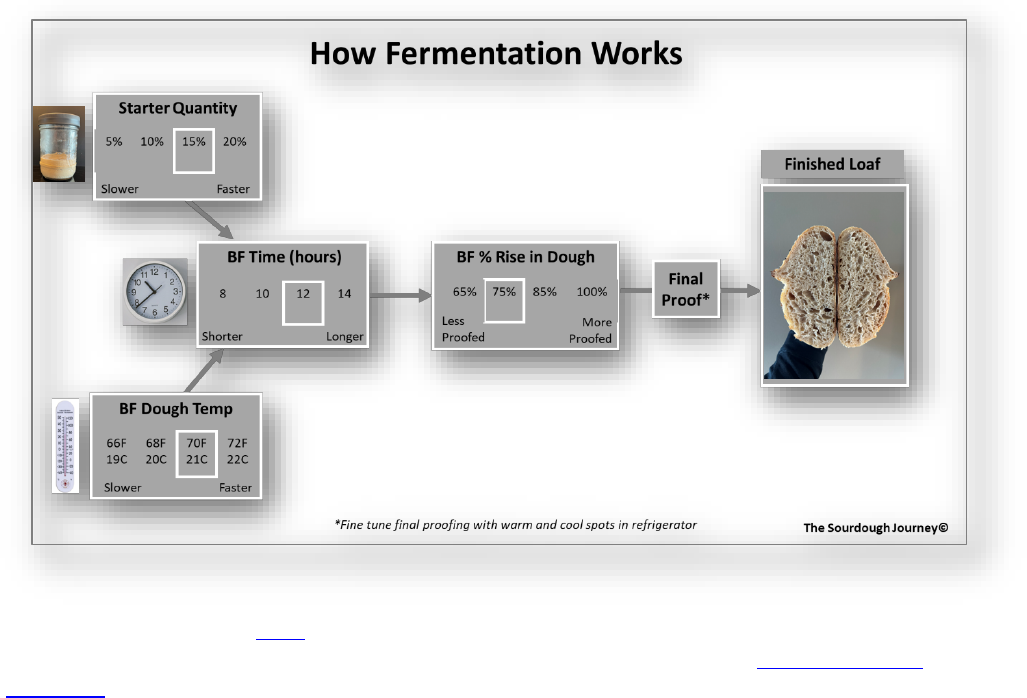
Page 51 Post-Pandemic Sourdough for Busy People The Sourdough Journey 2022©
Appendix 12: The Fermentation Model - How Fermentation Works
This chart is featured in the video, Post-Pandemic Sourdough for Busy People, and it is provided here for
reference. The numbers shown in the chart are an illustrative example. Consult the Bulk Fermentation
Timetables for actual values.
Reading from right to left:
Finished Loaf
Your final proofed loaf is the accumulation of all prior steps. However, 80%+ of what you see in your
final crumb is the result of proper bulk fermentation. Experiment with different percentage rises in bulk
fermentation until you optimize your crumb. Use a 24-hour final proof in the refrigerator for your
“baseline” loaf.
Final Proof
In this method, we final proof in the refrigerator (cold retard). Place your dough in the warmest spot in
your refrigerator for short final proofs (e.g., 8 hours) and in the coolest spot in your refrigerator for long
final proofs (e.g., 72 hours). Small temperature differences in final proofing can be used to “fine tune”
the final fermentation of the loaf.
Bulk Fermentation (BF) Percent Rise in Dough
In this method, the percentage rise in the dough is the key element you want to utilize to dial in the
proofing of your “baseline” loaf. At the desired temperature range (+/- 70F/21C), you will typically get
best results with a 75-100% rise in the dough. Experiment and find the percentage rise that works best

Page 52 Post-Pandemic Sourdough for Busy People The Sourdough Journey 2022©
for you. Once you lock it in, it should deliver very consistent results at that temperature range. The Bulk
Fermentation Timetables show typical rise times using different starter percentages and dough
temperature combinations to achieve a 75-100% rise.
Bulk Fermentation (BF) Time in Hours
The bulk fermentation “rise time” is a function of the Starter Quantity (a.k.a. starter inoculation rate)
and the Dough Temperature. You can produce repeatable results by controlling these two variables.
The Fermentation Timetables show the impact of these two variables on rise times.
Starter Quantity
The amount of starter you use relative to your flour weight (i.e., “starter percentage,” or “inoculation
rate”) controls the speed of fermentation. A higher starter percentage ferments faster than a smaller
percentage relative to flour weight. These relationships are quite predictable. However, when you
think of your starter “quantity” it is assuming a consistent starter strength. Your starter strength may
vary day to day. Try to prepare your starter the same way every time for consistent, predictable results.
Bulk Fermentation (BF) Dough Temperature
Dough Temperature has a massive impact on the rise time. This is the most important variable to
consider when estimating bulk fermentation rise times. Controlling overnight dough temperature is a
critical skill to master if you want to tightly control your bulk fermentation rise times. Consult Appendix
3: Controlling Overnight Dough Temperature for tips on this important skill.
