
Infor Mongoose
Creating and Customizing Reports

Copyright © 2013 Infor
Important Notices
The material contained in this publication (including any supplementary information) constitutes and
contains confidential and proprietary information of Infor.
By gaining access to the attached, you acknowledge and agree that the material (including any modi-
fication, translation or adaptation of the material) and all copyright, trade secrets and all other right,
title and interest therein, are the sole property of Infor and that you shall not gain right, title or interest
in the material (including any modification, translation or adaptation of the material) by virtue of your
review thereof other than the non-exclusive right to use the material solely in connection with and the
furtherance of your license and use of software made available to your company from Infor pursuant
to a separate agreement, the terms of which separate agreement shall govern your use of this mate-
rial and all supplemental related materials ("Purpose").
In addition, by accessing the enclosed material, you acknowledge and agree that you are required to
maintain such material in strict confidence and that your use of such material is limited to the Purpose
described above. Although Infor has taken due care to ensure that the material included in this publi-
cation is accurate and complete, Infor cannot warrant that the information contained in this publication
is complete, does not contain typographical or other errors, or will meet your specific requirements.
As such, Infor does not assume and hereby disclaims all liability, consequential or otherwise, for any
loss or damage to any person or entity which is caused by or relates to errors or omissions in this
publication (including any supplementary information), whether such errors or omissions result from
negligence, accident or any other cause.
Without limitation, U.S. export control laws and other applicable export and import laws govern your
use of this material and you will neither export or re-export, directly or indirectly, this material nor any
related materials or supplemental information in violation of such laws, or use such materials for any
purpose prohibited by such laws.
Trademark Acknowledgements
The word and design marks set forth herein are trademarks and/or registered trademarks of Infor
and/or related affiliates and subsidiaries. All rights reserved. All other company, product, trade or ser-
vice names referenced may be registered trademarks or trademarks of their respective owners.
Publication Information
Release: Infor Mongoose 9.00
Publication date: October 30, 2013

Infor Mongoose - Creating and Customizing Reports | 1
Contents
About This Guide . . . . . . . . . . . . . . . . . . . . . . . . . . . . . . . . . . . . . . . . . . . . . . . . . . . . . . . . . . . . . . . .5
Related documents. . . . . . . . . . . . . . . . . . . . . . . . . . . . . . . . . . . . . . . . . . . . . . . . . . . . . . . . . . . . .5
Contacting Infor . . . . . . . . . . . . . . . . . . . . . . . . . . . . . . . . . . . . . . . . . . . . . . . . . . . . . . . . . . . . . . .5
Chapter 1: Overview. . . . . . . . . . . . . . . . . . . . . . . . . . . . . . . . . . . . . . . . . . . . . . . . . . . . . . . . . . . . . .7
Setting up the Report . . . . . . . . . . . . . . . . . . . . . . . . . . . . . . . . . . . . . . . . . . . . . . . . . . . . . . . . . . .7
Report-related Terminology . . . . . . . . . . . . . . . . . . . . . . . . . . . . . . . . . . . . . . . . . . . . . . . . . . .7
Creating or Modifying a Report. . . . . . . . . . . . . . . . . . . . . . . . . . . . . . . . . . . . . . . . . . . . . . . . .8
Specific System Configuration with Respect to Reports . . . . . . . . . . . . . . . . . . . . . . . . . . . . .8
Linking the Report to a Form . . . . . . . . . . . . . . . . . . . . . . . . . . . . . . . . . . . . . . . . . . . . . . . . . .8
Using RunReport.exe to Process Reports . . . . . . . . . . . . . . . . . . . . . . . . . . . . . . . . . . . . . . . .9
Previewing a Report . . . . . . . . . . . . . . . . . . . . . . . . . . . . . . . . . . . . . . . . . . . . . . . . . . . . . . . . . . . .9
User View. . . . . . . . . . . . . . . . . . . . . . . . . . . . . . . . . . . . . . . . . . . . . . . . . . . . . . . . . . . . . . . . .9
System View. . . . . . . . . . . . . . . . . . . . . . . . . . . . . . . . . . . . . . . . . . . . . . . . . . . . . . . . . . . . . .11
Printing a Report. . . . . . . . . . . . . . . . . . . . . . . . . . . . . . . . . . . . . . . . . . . . . . . . . . . . . . . . . . . . . .12
User View. . . . . . . . . . . . . . . . . . . . . . . . . . . . . . . . . . . . . . . . . . . . . . . . . . . . . . . . . . . . . . . .12
System View . . . . . . . . . . . . . . . . . . . . . . . . . . . . . . . . . . . . . . . . . . . . . . . . . . . . . . . . . . . . .15
Using Email with Reports . . . . . . . . . . . . . . . . . . . . . . . . . . . . . . . . . . . . . . . . . . . . . . . . . . . . . . .16
Sending Email to Yourself . . . . . . . . . . . . . . . . . . . . . . . . . . . . . . . . . . . . . . . . . . . . . . . . . . .16
Sending Email to Customers and Vendors. . . . . . . . . . . . . . . . . . . . . . . . . . . . . . . . . . . . . . .16
Chapter 2: Creating Reports . . . . . . . . . . . . . . . . . . . . . . . . . . . . . . . . . . . . . . . . . . . . . . . . . . . . . .19
Report Definition Files . . . . . . . . . . . . . . . . . . . . . . . . . . . . . . . . . . . . . . . . . . . . . . . . . . . . . . . . .19
Example: Creating a Report Based on a Stored Procedure. . . . . . . . . . . . . . . . . . . . . . . . . . . . .20
Creating the Report Project . . . . . . . . . . . . . . . . . . . . . . . . . . . . . . . . . . . . . . . . . . . . . . . . . .20
Creating a Report Definition File without a Template. . . . . . . . . . . . . . . . . . . . . . . . . . . . . . .20
Creating a Report Definition File from a Template. . . . . . . . . . . . . . . . . . . . . . . . . . . . . . . . .21
Creating the Stored Procedure. . . . . . . . . . . . . . . . . . . . . . . . . . . . . . . . . . . . . . . . . . . . . . . .22
Setting Data Source Properties . . . . . . . . . . . . . . . . . . . . . . . . . . . . . . . . . . . . . . . . . . . . . . .25
Modifying the Report Parameters. . . . . . . . . . . . . . . . . . . . . . . . . . . . . . . . . . . . . . . . . . . . . .26

Contents
2 | Infor Mongoose - Creating and Customizing Reports
Setting the Report Title. . . . . . . . . . . . . . . . . . . . . . . . . . . . . . . . . . . . . . . . . . . . . . . . . . . . . .27
Testing the Report Configuration . . . . . . . . . . . . . . . . . . . . . . . . . . . . . . . . . . . . . . . . . . . . . .28
Populating the Report with Data. . . . . . . . . . . . . . . . . . . . . . . . . . . . . . . . . . . . . . . . . . . . . . .28
Example: Creating a Report Based on an IDO. . . . . . . . . . . . . . . . . . . . . . . . . . . . . . . . . . . . . . .29
Creating the Report Project . . . . . . . . . . . . . . . . . . . . . . . . . . . . . . . . . . . . . . . . . . . . . . . . . .29
Creating a Report Definition File from a Template. . . . . . . . . . . . . . . . . . . . . . . . . . . . . . . . .29
Creating a Connection String Parameter . . . . . . . . . . . . . . . . . . . . . . . . . . . . . . . . . . . . . . . .30
Setting Data Source Properties . . . . . . . . . . . . . . . . . . . . . . . . . . . . . . . . . . . . . . . . . . . . . . .31
Setting the Report Title. . . . . . . . . . . . . . . . . . . . . . . . . . . . . . . . . . . . . . . . . . . . . . . . . . . . . .33
Modifying the Report Parameters. . . . . . . . . . . . . . . . . . . . . . . . . . . . . . . . . . . . . . . . . . . . . .34
Testing the Report Configuration . . . . . . . . . . . . . . . . . . . . . . . . . . . . . . . . . . . . . . . . . . . . . .35
Configuring the Report Layout . . . . . . . . . . . . . . . . . . . . . . . . . . . . . . . . . . . . . . . . . . . . . . . . . . .35
About Report Layout Elements. . . . . . . . . . . . . . . . . . . . . . . . . . . . . . . . . . . . . . . . . . . . . . . .35
Laying Out the Report . . . . . . . . . . . . . . . . . . . . . . . . . . . . . . . . . . . . . . . . . . . . . . . . . . . . . .36
Modifying Column Labels to Support Localization . . . . . . . . . . . . . . . . . . . . . . . . . . . . . . . . .37
Making Formatting Changes . . . . . . . . . . . . . . . . . . . . . . . . . . . . . . . . . . . . . . . . . . . . . . . . .37
Laying Out the Report Header Page . . . . . . . . . . . . . . . . . . . . . . . . . . . . . . . . . . . . . . . . . . .38
Deploying the Report . . . . . . . . . . . . . . . . . . . . . . . . . . . . . . . . . . . . . . . . . . . . . . . . . . . . . . . . . .39
Resetting the Data Source Connection String . . . . . . . . . . . . . . . . . . . . . . . . . . . . . . . . . . . .40
Deploying the Report to the Report Server . . . . . . . . . . . . . . . . . . . . . . . . . . . . . . . . . . . . . .40
Running the Report . . . . . . . . . . . . . . . . . . . . . . . . . . . . . . . . . . . . . . . . . . . . . . . . . . . . . . . . . . .41
Chapter 3: Configuring TaskMan to Process and Generate Reports . . . . . . . . . . . . . . . . . . . . .43
TaskMan Installation and Configuration with Respect to Reports . . . . . . . . . . . . . . . . . . . . . . . .43
Report Developer Installation. . . . . . . . . . . . . . . . . . . . . . . . . . . . . . . . . . . . . . . . . . . . . . . . .43
Specifying Report Options On the Process Defaults Form . . . . . . . . . . . . . . . . . . . . . . . . . .44
Determining the Output Path . . . . . . . . . . . . . . . . . . . . . . . . . . . . . . . . . . . . . . . . . . . . . . . . . . . .45
Setting Default Report Output Paths . . . . . . . . . . . . . . . . . . . . . . . . . . . . . . . . . . . . . . . . . . .45
Checking the Status of Active Tasks . . . . . . . . . . . . . . . . . . . . . . . . . . . . . . . . . . . . . . . . . . .47
Adding Background Tasks for Reports. . . . . . . . . . . . . . . . . . . . . . . . . . . . . . . . . . . . . . . . . . . . .47
Chapter 4: Creating a Form to Run the Report . . . . . . . . . . . . . . . . . . . . . . . . . . . . . . . . . . . . . . .49
Creating the Report Criteria Form . . . . . . . . . . . . . . . . . . . . . . . . . . . . . . . . . . . . . . . . . . . . . . . .50
Creating the Report Input Fields and Parameters . . . . . . . . . . . . . . . . . . . . . . . . . . . . . . . . . . . .50
Adding Fields with Drop-Down Lists for the Report Input Parameters . . . . . . . . . . . . . . . . . .50
Adding an Increment Date Field . . . . . . . . . . . . . . . . . . . . . . . . . . . . . . . . . . . . . . . . . . . . . .53
Adding an Option to Display the Report Header Page. . . . . . . . . . . . . . . . . . . . . . . . . . . . . .53
Adding a Button to Run (Print) the Report . . . . . . . . . . . . . . . . . . . . . . . . . . . . . . . . . . . . . . . . . .54

Contents
Infor Mongoose - Creating and Customizing Reports | 3
Testing the Report . . . . . . . . . . . . . . . . . . . . . . . . . . . . . . . . . . . . . . . . . . . . . . . . . . . . . . . . . . . .57
Adding the Report Preview to the Form . . . . . . . . . . . . . . . . . . . . . . . . . . . . . . . . . . . . . . . . . . . .57
Designing a Report to Allow Scheduling . . . . . . . . . . . . . . . . . . . . . . . . . . . . . . . . . . . . . . . . . . .59
Modifying the Form to Submit Tasks to the Background Queue . . . . . . . . . . . . . . . . . . . . . .59
Testing a Form Designed to Submit Tasks to the Background Queue . . . . . . . . . . . . . . . . .60
Scheduling a Report to Be Generated on a Recurring Basis . . . . . . . . . . . . . . . . . . . . . . . . .61
Checking the Status of a Report. . . . . . . . . . . . . . . . . . . . . . . . . . . . . . . . . . . . . . . . . . . . . . . . . .61
Chapter 5: Modifying Reports . . . . . . . . . . . . . . . . . . . . . . . . . . . . . . . . . . . . . . . . . . . . . . . . . . . . .63
Customization vs. Modification of Existing Reports . . . . . . . . . . . . . . . . . . . . . . . . . . . . . . . . . . .63
Modifying a Report Definition File. . . . . . . . . . . . . . . . . . . . . . . . . . . . . . . . . . . . . . . . . . . . . . . . .63
Changing Report Logos . . . . . . . . . . . . . . . . . . . . . . . . . . . . . . . . . . . . . . . . . . . . . . . . . . . . . . . .64
Adding Barcodes to a Report . . . . . . . . . . . . . . . . . . . . . . . . . . . . . . . . . . . . . . . . . . . . . . . . . . . .65
Making Other Report Modifications . . . . . . . . . . . . . . . . . . . . . . . . . . . . . . . . . . . . . . . . . . . . . . .65
Appendix A: Troubleshooting . . . . . . . . . . . . . . . . . . . . . . . . . . . . . . . . . . . . . . . . . . . . . . . . . . . . .67
Where to Find Error Message Information . . . . . . . . . . . . . . . . . . . . . . . . . . . . . . . . . . . . . . . . . .67
Report Problems. . . . . . . . . . . . . . . . . . . . . . . . . . . . . . . . . . . . . . . . . . . . . . . . . . . . . . . . . . . . . .68
Reports Do Not Print . . . . . . . . . . . . . . . . . . . . . . . . . . . . . . . . . . . . . . . . . . . . . . . . . . . . . . .68
Scheduled Reports Do Not Run as Scheduled . . . . . . . . . . . . . . . . . . . . . . . . . . . . . . . . . . .69
Report Outputs Do Not Pick Up Header/Footer Variable Values . . . . . . . . . . . . . . . . . . . . . .69
Report Output Does Not Display the Company Logo Correctly . . . . . . . . . . . . . . . . . . . . . . .70
Truncated Data in Text Output. . . . . . . . . . . . . . . . . . . . . . . . . . . . . . . . . . . . . . . . . . . . . . . .70
File Not Found – Occurs for Certain (But Not All) Reports. . . . . . . . . . . . . . . . . . . . . . . . . . .71
File Not Found – Occurs for All Reports. . . . . . . . . . . . . . . . . . . . . . . . . . . . . . . . . . . . . . . . .72
Users Outside Your Network Are Not Receiving Forwarded Reports . . . . . . . . . . . . . . . . . .72
Labels Not Being Replaced with Strings Table Values . . . . . . . . . . . . . . . . . . . . . . . . . . . . .74
Missing RPT File . . . . . . . . . . . . . . . . . . . . . . . . . . . . . . . . . . . . . . . . . . . . . . . . . . . . . . . . . .75
Other Infor Mongoose TaskMan Report-Related Problems . . . . . . . . . . . . . . . . . . . . . . . . . . . . .76
No Report Output . . . . . . . . . . . . . . . . . . . . . . . . . . . . . . . . . . . . . . . . . . . . . . . . . . . . . . . . . .76
Intermittent Errors. . . . . . . . . . . . . . . . . . . . . . . . . . . . . . . . . . . . . . . . . . . . . . . . . . . . . . . . . .76
Reports Fail with Error Code . . . . . . . . . . . . . . . . . . . . . . . . . . . . . . . . . . . . . . . . . . . . . . . . .77
Notes Do Not Print on a Report . . . . . . . . . . . . . . . . . . . . . . . . . . . . . . . . . . . . . . . . . . . . . . .77
Error 13: Type Mismatch . . . . . . . . . . . . . . . . . . . . . . . . . . . . . . . . . . . . . . . . . . . . . . . . . . . .77
Error 128: Error Running Report . . . . . . . . . . . . . . . . . . . . . . . . . . . . . . . . . . . . . . . . . . . . . .78
Error 534: Error Detected by Database DLL . . . . . . . . . . . . . . . . . . . . . . . . . . . . . . . . . . . . .78
This Field Name Is Not Known. . . . . . . . . . . . . . . . . . . . . . . . . . . . . . . . . . . . . . . . . . . . . . . .78
No Users Are Receiving Email Messages . . . . . . . . . . . . . . . . . . . . . . . . . . . . . . . . . . . . . . .79

Contents
4 | Infor Mongoose - Creating and Customizing Reports
Event Messages from Infor Mongoose TaskMan. . . . . . . . . . . . . . . . . . . . . . . . . . . . . . . . . . . . .80
Infor Mongoose TaskMan Debug Mode Messages . . . . . . . . . . . . . . . . . . . . . . . . . . . . . . . . . . .80
Appendix B: Using RunReport.exe. . . . . . . . . . . . . . . . . . . . . . . . . . . . . . . . . . . . . . . . . . . . . . . . .81
MGReportProcessor. . . . . . . . . . . . . . . . . . . . . . . . . . . . . . . . . . . . . . . . . . . . . . . . . . . . . . . . . . .81
RunReport from the Command Line. . . . . . . . . . . . . . . . . . . . . . . . . . . . . . . . . . . . . . . . . . . . . . .81
Syntax . . . . . . . . . . . . . . . . . . . . . . . . . . . . . . . . . . . . . . . . . . . . . . . . . . . . . . . . . . . . . . . . . .81
Switches. . . . . . . . . . . . . . . . . . . . . . . . . . . . . . . . . . . . . . . . . . . . . . . . . . . . . . . . . . . . . . . . .82
Examples . . . . . . . . . . . . . . . . . . . . . . . . . . . . . . . . . . . . . . . . . . . . . . . . . . . . . . . . . . . . . . . .85
Substitution Keywords . . . . . . . . . . . . . . . . . . . . . . . . . . . . . . . . . . . . . . . . . . . . . . . . . . . . . .85
Debug Mode. . . . . . . . . . . . . . . . . . . . . . . . . . . . . . . . . . . . . . . . . . . . . . . . . . . . . . . . . . . . . .86
Appendix C: Reference . . . . . . . . . . . . . . . . . . . . . . . . . . . . . . . . . . . . . . . . . . . . . . . . . . . . . . . . . .87
Report Definition Templates. . . . . . . . . . . . . . . . . . . . . . . . . . . . . . . . . . . . . . . . . . . . . . . . . . . . .87
Objects Used in Reports. . . . . . . . . . . . . . . . . . . . . . . . . . . . . . . . . . . . . . . . . . . . . . . . . . . . . . . .88
Translating Messages from Reports. . . . . . . . . . . . . . . . . . . . . . . . . . . . . . . . . . . . . . . . . . . . . . .90
Structure of Report Stored Procedures . . . . . . . . . . . . . . . . . . . . . . . . . . . . . . . . . . . . . . . . . . . .90
Fonts Used in Reports . . . . . . . . . . . . . . . . . . . . . . . . . . . . . . . . . . . . . . . . . . . . . . . . . . . . . . . . .94
Date and Numeric Formats Used in Reports . . . . . . . . . . . . . . . . . . . . . . . . . . . . . . . . . . . . . . . .94
Languages Used in Reports. . . . . . . . . . . . . . . . . . . . . . . . . . . . . . . . . . . . . . . . . . . . . . . . . . . . .94
Document Profiles . . . . . . . . . . . . . . . . . . . . . . . . . . . . . . . . . . . . . . . . . . . . . . . . . . . . . . . . . . . .95
Splitting Up of Tasks. . . . . . . . . . . . . . . . . . . . . . . . . . . . . . . . . . . . . . . . . . . . . . . . . . . . . . . .96
Index . . . . . . . . . . . . . . . . . . . . . . . . . . . . . . . . . . . . . . . . . . . . . . . . . . . . . . . . . . . . . . . 97

Infor Mongoose - Creating and Customizing Reports | 5
About This Guide
This document describes how Infor Mongoose-based applications handle reports. It includes a
description of the reporting system architecture, specifics of creating reports, how to link custom
reports into an application, specifics of using the Infor Framework TaskMan and RunReport
executables, and how to troubleshoot problems with reports.
Note: By "Infor Mongoose-based applications," we mean any application that is built on the Infor
Mongoose framework. This includes programs such as SyteLine, Service Management, and other
applications that have been built or modified to use the Infor Mongoose framework. Where there are
specific points in this guide that apply to a particular application, we indicate that clearly throughout.
Related documents
You can find the documents in the product documentation section of the Infor Xtreme Support portal,
as described in "Contacting Infor" on page 5.
Additional information about reports, background processing, and customization can be found in the
following documents.
The Task Manager chapter in the system administration guide for your system
Infor Mongoose online help files (Customizing Forms...)
The modifications guide for your system (the chapter on "Architectural Guidelines for Customers
Modifying [your application]")
For the most up-to-date list of software and hardware requirements for Infor products, see the Infor
Guide to Technology. This document also lists typical system administration tasks you should be
familiar with before attempting to install and administer Infor products.
Contacting Infor
If you have questions about Infor products, go to the Infor Xtreme Support portal at http://
www.infor.com/inforxtreme.

About This Guide
6 | Infor Mongoose - Creating and Customizing Reports
If we update this document after the product release, we will post the new version on this Web site.
We recommend that you check this Web site periodically for updated documentation.
If you have comments about Infor documentation, contact documentation@infor.com
.

1
Infor Mongoose - Creating and Customizing Reports | 7
Chapter 1: Overview
This chapter explains how to set up reports for previewing and printing and then, first from a user’s
point of view, how a report is processed for previewing or for printing, and the forms that are used to
process it. The sections following explain what is happening behind the scenes during the print or
preview.
Setting up the Report
Before a report can be previewed or printed, it must exist and be set up so that the system can
process it correctly.
Report-related Terminology
For the purposes of this guide, here are some report-related terms that you should be aware of:
Report definition file – The parameters that determine how a report looks and what data it can
contain when it is output are contained within an XML file known as a report definition file. For
SQL Server Reporting Service (SSRS) reports, this file must have an .rdl extension.
Several template RDL files are included with Mongoose-based applications. These report
templates are installed as part of the base software installation and, if the default installation
locations are used, they can be found at:
Drive:\ProgramDirectory\Infor\Mongoose-based application\Report\Reports\Templates
If you do not have these templates, you can obtain them from the Infor Xtreme Support site (see
“Contacting Infor” on page 5). They are contained in a zip file named
SSRS_Report_Templates.zip. To find the file, you can search on "SSRS Report Templates."
For a description of the report templates, see Appendix C, “Reference."
Report form – The most direct and easiest way for a report to be generated and processed is with
the use of a report form. These are specialized forms from which you can specify what exact data,
Note: For legacy Crystal Reports, these are contained in .rpt files, which are no longer
distributed with SyteLine, as of version 8.03.10, or Service Management, as of version 4.10.

Overview
8 | Infor Mongoose - Creating and Customizing Reports
such as record numbers or ranges of dates, are to be included in the report output. You can also
create your own custom report forms.
Report output – The end result of a request to process and generate a report in some form usable
to the end user is the report output. Your Mongoose-based application includes several formats in
which report outputs can be previewed and generated, including PDF, HTML, DOC (Word),
MHTML, CSV, XLS (Excel), printer, and others.
Creating or Modifying a Report
Depending on your Mongoose-based application, the system comes with either a basic or
comprehensive set of reports defined. SyteLine, for example, includes a comprehensive set of
reports; the basic Infor Mongoose application includes only a basic set of reports. You can customize
or modify any of these predefined reports to meet your specific needs, assuming you have the license
rights. If the system does not have a report definition that you can modify to meet your needs, you can
also create your own custom reports.
For information and procedures to create new reports, see Chapter 2, “Creating Reports." For
information and procedures to modify existing reports, see Chapter 5, “Modifying Reports."
Specific System Configuration with Respect to Reports
The Infor Framework Task Manager, commonly referred to as TaskMan, is a Windows service that is
responsible for the oversight and management of a wide variety of application-driven tasks. Among
these tasks, it is responsible for handling the stored procedures and processing of reports. Before
TaskMan can accomplish these tasks, it must be installed and configured to handle them.
In addition, certain other system settings must be made to enable report preview, processing, and
generation.
For detailed information and procedures to set up TaskMan to handle reports, see Chapter 3,
“Configuring TaskMan to Process and Generate Reports."
Linking the Report to a Form
For users to be able to access, preview, and print a report, the report must be linked to a form that is
used to predefine the parameters to be used in processing the report.
For detailed information and procedures to create and modify these forms, see Chapter 4, “Creating a
Form to Run the Report."

Overview
Infor Mongoose - Creating and Customizing Reports | 9
Using RunReport.exe to Process Reports
Mongoose-based applications use the RunReport.exe application to process requests to preview or
print reports. Normally, this application is launched automatically from within the Mongoose-based
application. It can, however, be run as a standalone application using a command line interface (CLI).
For detailed information about RunReport.exe and its CLI options, see Appendix B, “Using
RunReport.exe."
Previewing a Report
For many reports, we recommend or require that the report be previewed before committing to print.
User View
Setting Options for Previewing the Report
To preview a report, open the report form and select the report parameters. Often, this includes
options like setting a date range, limiting the output to reports that deal with a single customer or
vendor, or filtering out other unwanted information that could potentially be included in the report. The
details of setting these parameters differ from one report to another.
When all the appropriate options have been set, click Preview.
Processing and Displaying the Report Preview
When you click Preview, the system attempts to add the preview task to the ActiveBGTasks table.
But, before the preview can be added to the ActiveBGTasks table, the system must first check for
excluded tasks and other options for displaying the report preview.
Checking for Excluded Tasks
Before adding a task to the ActiveBGTasks table, the system first checks the list of excluded tasks for
this report, as set up on the Excluded Tasks form. This form lists any other tasks that cannot be
active when this report task runs. If there are any excluded tasks listed for this report, the system
checks to see whether any of the task exclusions is currently in the ActiveBGTasks table. If so, the
system displays the message: "This task cannot be submitted at this time. Please check the Excluded
Tasks table."

Overview
10 | Infor Mongoose - Creating and Customizing Reports
Checking for Other Preview Settings
If the report is to be previewed in a language other than English, TaskMan searches the Forms
database specified in the Sites form for the Strings table associated with the current session. It then
uses that Strings table to translate the strings used for the report labels.
Note: In some applications, the Sites form is known as the Sites/Entities form.
TaskMan also searches to see what the output format is for the report preview. The output format for
report previews is defined on the Intranets form. The default preview format is PDF. For more
information about the Intranets form and preview formats, see the online help.
Displaying the Report Preview
Once TaskMan is finished checking for exclusions and other options, it builds the actual report
preview file. After the report preview file is built, TaskMan places a notice that the file exists on the
Active Background Tasks queue, always with a status of READY. The PrintPreview application polls
the queue and, when it sees the notice, finds the report preview file and displays it.

Overview
Infor Mongoose - Creating and Customizing Reports | 11
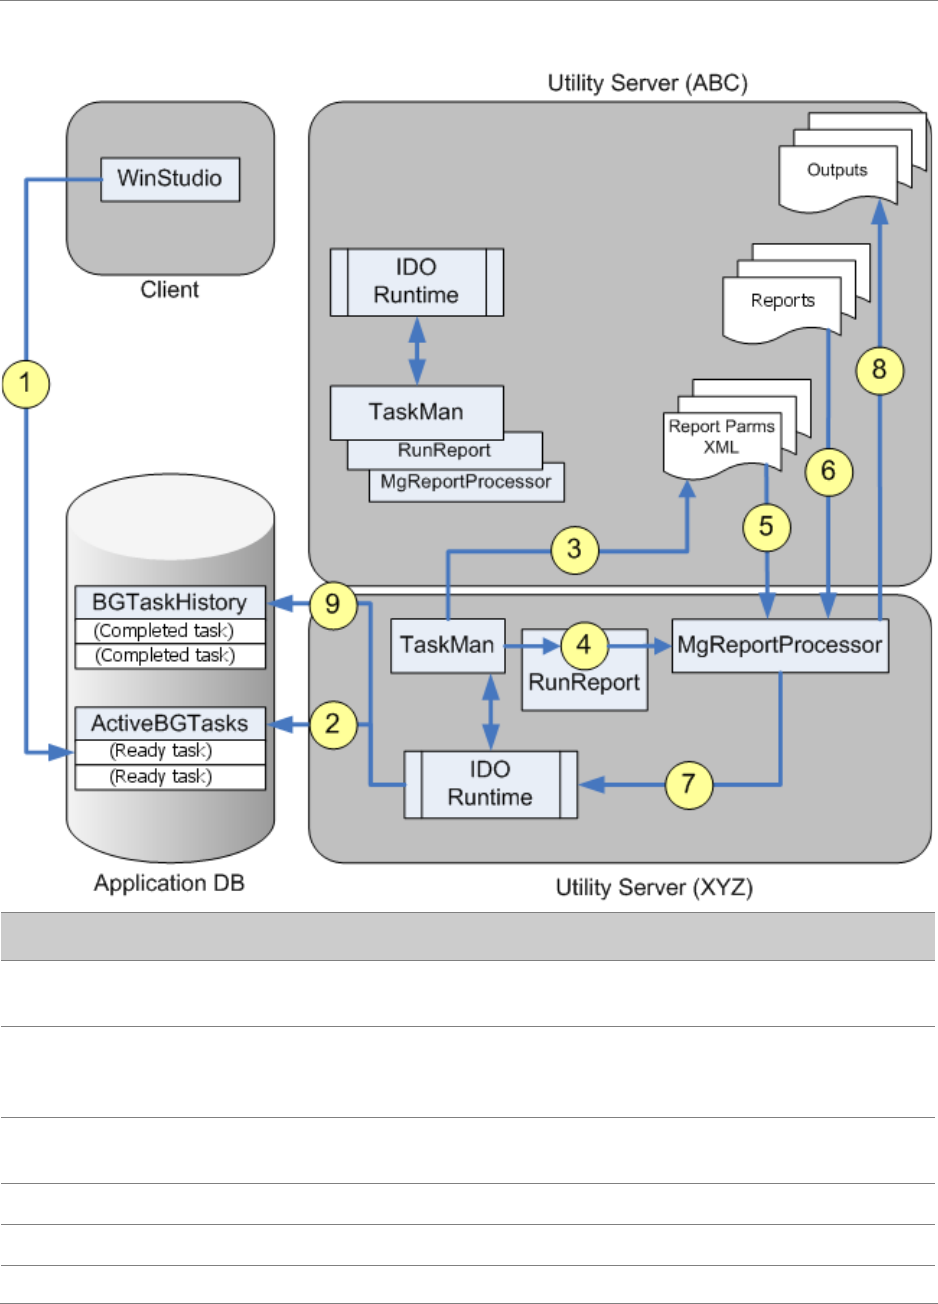
System View
This diagram represents a high-level view of what happens inside the system when a user submits a
request to preview a report.
Step Description
1 WinStudio submits a report preview task through BGTaskSubmitSp, which inserts a task
request record into the ActiveBGTasks table.
2 BGTaskSubmitSp returns the BGTaskHistory.RowPointer value to WinStudio.
3 WinStudio directs users to an ASP .NET page, which monitors the BGTaskHistory table
through the IDO service session. It can query the specific task history record, using the
RowPointer value, returned by BGTaskSubmitSp.

Overview
12 | Infor Mongoose - Creating and Customizing Reports
Printing a Report
When you are confident that the report output is what you want, then you can instruct the system to
process and print the report.
User View
Checking Report Options and Starting the Report
To run a report, open the report form and verify that the report parameters are set as desired. We
recommend that you then generate a report preview (see “Previewing a Report” on page 9). Typically,
a printed report uses the same parameters and options as a preview, so the preview is a good way to
get the report looking the way you want without committing to a published output.
When you are confident that the parameters and options are set correctly, click Print.
4 While processing the requested report task, TaskMan creates an XML file for the task
parameters.
5 After creating a parameter XML file, TaskMan executes RunReport.
6 RunReport causes MGReportProcessor to load the specified parameter XML file.
7 MGReportProcessor loads the requested report definition file.
This is a report specific to the current configuration. If not found, then it returns an error.
8 MGReportProcessor uses the IDO runtime service to process the report and export it to
a designated output location.
9 MGReportProcessor uses the IDO runtime service to query string objects and update
BGTaskHistory.ReportOutputPath.
The default report output path is:
\\<UtilityServer>\Report\OutputFiles\<UserId>\<ReportFileName>_<Site>_
<TaskNumber>.<FileExtension>
For more information, see “Determining the Output Path” on page 45.
10 After successfully exporting the requested report, MGReportProcessor updates
BGTaskHistory with the actual output file path (BGTaskHistory.ReportOutputPath).
11 The IDO runtime service delivers the report output to a predetermined ASP .NET page.
12 WinStudio directs the user to the ASP .NET page for viewing.
Step Description

Overview
Infor Mongoose - Creating and Customizing Reports | 13
Preparing to Process the Report
When you click Print, an event attempts to add the task to the ActiveBGTasks table, which is
essentially the task queue. But, before it can actually place the request on the queue, it must first
check for exclusions and other report printing options.
Alternatively, you can schedule the report to run at a specific time or a specific interval by selecting
Actions > Background from the report form, to display the Background Queue form. After checking
for exclusions and other report printing options, the scheduled task is then placed in the
ActiveBGTasks table with a status of Waiting. When the specified time/interval is reached, the status
changes to Ready and the task can be processed.
Checking for Excluded Tasks
Before adding a task to the ActiveBGTasks table, the system first checks the list of excluded tasks for
this report, set up on the Excluded Tasks form. This form lists any other tasks that cannot be active
when this report task runs. If there are any excluded tasks listed for this report, the system checks
whether any of the listed tasks is currently in the ActiveBGTasks table. If so, the system displays the
message: "This task cannot be submitted at this time. Please check the Excluded Tasks table."
Other Options for Printing the Report
If the report is to print in a language other than English, TaskMan searches the forms database
specified in the Sites form for the Strings table associated with the current session. It uses that
Strings table to translate the strings used for the report labels.
Note: In some applications, the Sites form is known as the Sites/Entities form.
TaskMan then controls the printing, using either the default system print settings or the settings
specified for a certain user/report combination through the Report Options form. (If the Output
Format field is set to Printer, the user can enter the name of any network printer; otherwise output
goes to the TaskMan server’s default printer.)
The printing process might also take into consideration fonts, language, and document profiles, as
described in Appendix C, “Reference."
Processing the Report
TaskMan polls the ActiveBGTasks table, looking for Ready tasks. When TaskMan finds them, it then
executes the tasks when resources are available.
In this case, TaskMan determines that a task is a report by looking at the task’s type in the
ActiveBGTasks table. After determining the task is for printing a report, it launches RunReport.exe to
process the task. Once the task processing is started, TaskMan resets the task’s status in
ActiveBGTasks to Running. It also updates the task information in the BGTaskHistory table, which
can be viewed through the Background Task History form. You can view information there about
active tasks as well as completed ones.

Overview
14 | Infor Mongoose - Creating and Customizing Reports
RunReport.exe processes the report, by calling a SQL Server stored procedure in the application
database to retrieve the data needed for the report or by launching an IDO-based query. The data is
then formatted according to the settings in the report definition file.
After the Report Is Processed
When the task finishes processing the report, TaskMan deletes the record from the ActiveBGTasks
table and updates this information in the BGTaskHistory table and Background Task History form:
Task parameters passed to TaskMan, set when the report was submitted
Start time, set when TaskMan started the report
Stop time, set when the report finished processing
Success/Failure indicator, set when the task finished
Return codes, set when the task finished
A return status of 0 indicates that the process completed successfully. Other return status indicators
generate error messages, which are routed to the appropriate logs.
Overview
Infor Mongoose - Creating and Customizing Reports | 15
System View
Step Description
1 WinStudio submits a report print task through BGTaskSubmitSp, which inserts a task
request record into the ActiveBGTasks table.
2 TaskMan service's polling thread monitors the ActiveBGTasks table through the IDO
runtime engine, looking for records with a status of Ready, which tells TaskMan to pick
up and process the record.
3 While processing the requested report task, TaskMan creates an XML file containing the
report parameters.
4 After creating the parameters XML file, TaskMan executes RunReport.
5 RunReport causes MGReportProcessor to load the specified parameter XML file.
Overview
16 | Infor Mongoose - Creating and Customizing Reports
Using Email with Reports
Email can be used with reports in two ways. With both methods, you must set the email preferences
on the Intranets form before any emails can be sent.
Sending Email to Yourself
The Report Options form has an option that allows you to send yourself email notification when a
report you submitted is complete. You can also specify that a copy of the report should be attached to
your email notification.
Specify the protocol with which to send the email using the Intranets form. For more information
about email notifications and attachments, see the section on setting up the utility server to send
email notifications in the system administration guide for your system.
Sending Email to Customers and Vendors
In applications (such as SyteLine and Service Management) that have them, the Customer
Document Profile form and Vendor Document Profile form provide options that allow you to send
copies of reports to all customers or vendors for whom you have created and activated a document
profile.
For more information, see the online help for those forms.
6 MGReportProcessor loads the requested report definition file.
This is a report specific to the current configuration. If not found, then it loads a default
report definition file.
7 MGReportProcessor uses the IDO runtime service to query string objects and update
BGTaskHistory.ReportOutputPath after successfully processing the report.
8 MGReportProcessor uses the output path to export the processed report file to a
specified location.
The default report output path is:
\\<UtilityServer>\Report\OutputFiles\<UserId>\<ReportFileName>_<Site>_
<TaskNumber>.<FileExtension>
For more information, see “Determining the Output Path” on page 45.
9 After successfully exporting the requested report, MGReportProcessor updates
BGTaskHistory with the actual output file path (BGTaskHistory.ReportOutputPath).
Step Description

Overview
Infor Mongoose - Creating and Customizing Reports | 17
This flowchart shows the process used to email reports to customers or vendors:

Overview
18 | Infor Mongoose - Creating and Customizing Reports

2
Infor Mongoose - Creating and Customizing Reports | 19
Chapter 2: Creating Reports
This chapter includes information specific to creating a report in an Infor Mongoose application
environment. It does not include related information about customizing or modifying existing reports.
For information about customizing or modifying existing reports, see Chapter 5, “Modifying Reports."
Report Definition Files
The first phase of creating a report is the creation of the report definition file. Report definition files are
special XML-based files that contain all the data and formatting specifications for a named report that
can be generated. The system uses this file, which must have the extension ".rdl", to generate and
render reports when requested.
A report definition and its file can be created using either Visual Studio 2008 or Report Builder 3.0.
SQL Server 2008 R2 includes a version of Visual Studio 2008, called SQL Server Business
Intelligence Development Studio, that can be used. These tools are nearly identical and can be used
interchangeably with one exception: IDO-based reports cannot be created using Report Builder 3.0.
Note: Visual Studio 2010 does not have the options to build reports at this time. You must use Visual
Studio 2008.
It is possible to create a report definition from scratch but it is much easier if you begin with one of the
report definition templates provided by Infor. These report templates are typically available in this
directory:
C:\Program Files (x86)\Infor\Mongoose-based application\Report\Reports\Templates
The report templates can also be obtained from the Infor Xtreme Support site (see “Contacting Infor”
on page 5). They are contained in a zip file named SSRS_Report_Templates.zip, which you can
download and unzip to the directory specified above. To find the zip file, you can search on SSRS
Report Templates.
This guide discusses only the techniques for creating report definition files using these templates. For
more information about these templates, see “Report Definition Templates" in Appendix C,
“Reference."

Creating Reports
20 | Infor Mongoose - Creating and Customizing Reports
Example: Creating a Report Based on a Stored
Procedure
In this example, which you can also use as a short tutorial, we will create a report based on a stored
procedure that displays data from the UserTask table. This simple report will be designed to list tasks,
grouped by user.
This example assumes that you are using Visual Studio 2008 or SQL Server Business Intelligence
Development Studio. Note that the steps would be very similar if you were to use Report Builder 3.0.
Note: Although this example provides the procedural steps for using these tools, this is not to be
considered a tutorial on how to use these tools. For information on how best to use these tools, see
their respective product documentation.
Creating the Report Project
To create a report project:
1 Run Visual Studio 2008 or SQL Server Business Intelligence Development Studio.
2From the File menu select New > Project.
3 In the New Project dialog box, select:
Project types: Business Intelligence Projects
Templates: Report Server Project
4 For the Name, specify ReportDemo.
5 For the Location, specify C:\Reports.
6 Click OK.
Visual Studio creates the report definition project with a set of default folders.
Creating a Report Definition File without a Template
Note: For our working example, we are going to use and modify one of the report templates Infor
provides. The procedure in this topic is included only to provide an example of how to create a report
definition file without using a template. If you are using the working example as a tutorial, you need
not complete this procedure.
To create a report definition file without a template:
1 With the ReportDemo project open, in the Solution Explorer, right-click Reports and, from the
context menu, select Add > New Item.
2 In the Add New Item dialog box, Templates field, select Report.
3 In the Name field, specify ReportDemo.rdl and then click Add.

Creating Reports
Infor Mongoose - Creating and Customizing Reports | 21
Visual Studio creates the RDL file and displays a Design workspace in which to design and build your
report definition.
Once the basic report definition file has been created, you can proceed to design the report output
with the items, components, and data available in Visual Studio 2008.
Creating a Report Definition File from a Template
To create a new report definition file from a template:
1 Locate the template you want to use as the basis for your report.
In this example, we will use the Template_Report_Landscape.rdl file.
For more information about the Infor-provided templates, see “Report Definition Templates” in
Appendix C, “Reference.”
2 Copy the template file into your ReportDemo project folder (if you have been following these
steps, it should be C:\Reports\ReportDemo\...
3 Rename the template file: UserTask.rdl
4 In Visual Studio, in the Solution Explorer, right-click Reports.
5 From the context menu, select Add > Existing Item.
6 Select UserTask.rdl and then click Add.
Visual Studio adds UserTask.rdl to the list of reports.
7 To open UserTask.rdl, double-click its name in the Solution Explorer.
Visual Studio displays a workspace with the UserTask.rdl in Design Mode, similar to this:

Creating Reports
22 | Infor Mongoose - Creating and Customizing Reports
Note that the report template already has report headers and footers configured. Many of the
entries in the headers and footers are preconfigured to pick up variable values from within the
system and need not be modified.
Creating the Stored Procedure
Before creating the report definition, we must create a stored procedure that will be used as the data
source for the report. This stored procedure is to be called Rpt_UserTaskSp.
Note: When creating stored procedures and other system elements, we recommend strongly that you
follow the naming conventions already in place. For example, with this stored procedure, we identify it
as a stored procedure to use in conjunction with reports using the prefix Rpt. We identify it as a stored
procedure with the suffix Sp. For more information about naming conventions, see the online help.
To create this stored procedure:
1 Open SQL Server Management Studio and connect to your database server.
2 Select your application database and click New Query.
SQL Server Management Studio displays a blank query window.
3 Copy and paste this stored procedure code into the query window.
Note: For an explanation of the structure of this stored procedure and Mongoose
stored procedures in general, see “Structure of Report Stored Procedures” in
Appendix C, “Reference.”
-- ==================================================================
-- Stored Procedure: Rpt_UserTaskSp
--
-- This is a report stored procedure used by the UserTask report demo.
-- ==================================================================
SET QUOTED_IDENTIFIER ON
GO
SET ANSI_NULLS ON
GO
IF EXISTS (SELECT * FROM sys.objects WHERE object_id =
OBJECT_ID(N'[dbo].[Rpt_UserTaskSp]') AND type IN (N'P', N'PC'))
DROP PROCEDURE [dbo].[Rpt_UserTaskSp]
GO
CREATE PROCEDURE Rpt_UserTaskSp
(
@UsernameStarting UsernameType = NULL
, @UsernameEnding UsernameType = NULL
, @TaskNameStarting MessageSubjectType = NULL
, @TaskNameEnding MessageSubjectType = NULL

Creating Reports
Infor Mongoose - Creating and Customizing Reports | 23
, @RemindDateTimeStarting DateTimeType = NULL
, @RemindDateTimeEnding DateTimeType = NULL
, @RemindDateTimeStartingOffset DateOffsetType = NULL
, @RemindDateTimeEndingOffset DateOffsetType = NULL
) AS
-- Transaction management.
BEGIN TRANSACTION
SET XACT_ABORT ON
-- Set the isolation level specified for the background task
-- or use the system default.
IF dbo.GetIsolationLevel(N'UserTaskReport') = N'COMMITTED'
SET TRANSACTION ISOLATION LEVEL READ COMMITTED
ELSE
SET TRANSACTION ISOLATION LEVEL READ UNCOMMITTED
DECLARE
@RptSessionID RowPointerType
, @LowDate DateType
, @LowCharacter HighLowCharType
, @HighCharacter HighLowCharType;
-- A session context is created so session variables can be used.
EXEC InitSessionContextSp
@ContextName = 'Rpt_UserTaskSp'
, @SessionID = @RptSessionID OUTPUT;
-- Set the low and high values used for defaulting.
SET @LowDate = dbo.LowDate();
SET @LowCharacter = dbo.LowCharacter();
SET @HighCharacter = dbo.HighCharacter();
-- Replace NULL input parameters with Min or Max values.
SET @UsernameStarting = ISNULL(@UsernameStarting, @LowCharacter);
SET @UsernameEnding = ISNULL(@UsernameEnding, @HighCharacter);
SET @TaskNameStarting = ISNULL(@TaskNameStarting, @LowCharacter);
SET @TaskNameEnding =
ISNULL(@TaskNameEnding, @HighCharacter);
-- Apply date offsets.
EXEC ApplyDateOffsetSp @Date = @RemindDateTimeStarting OUTPUT, @Offset
= @RemindDateTimeStartingOffset, @IsEndDate = 0;
EXEC ApplyDateOffsetSp @Date = @RemindDateTimeEnding OUTPUT, @Offset
= @RemindDateTimeEndingOffset, @IsEndDate = 1;

Creating Reports
24 | Infor Mongoose - Creating and Customizing Reports
-- Declare variables used to create the temp table.
DECLARE
@UserId TokenType
, @Username UsernameType
, @TaskName MessageSubjectType
, @RemindDateTime DateTimeType
, @TaskDescription NoteType
, @RowPointer RowPointerType;
-- Create an empty temp table for the report output.
SELECT
@UserId AS UserId
, @Username AS Username
, @TaskName AS TaskName
, @RemindDateTime AS RemindDateTime
, @TaskDescription AS TaskDescription
, @RowPointer AS RowPointer
INTO #ReportOutput
WHERE 1=0;
-- Insert data into the temp table.
INSERT INTO #ReportOutput
SELECT
t.UserId
, n.Username
, t.TaskName
, t.RemindDateTime
, t.TaskDescription
, t.RowPointer
FROM UserTask t
INNER JOIN UserNames n ON t.UserId = n.UserId
WHERE n.Username BETWEEN @UsernameStarting AND @UsernameEnding
AND t.TaskName BETWEEN @TaskNameStarting AND @TaskNameEnding
AND ISNULL(t.RemindDateTime, @LowDate) BETWEEN
@RemindDateTimeStarting AND @RemindDateTimeEnding;
-- Return the report data.
SELECT
UserId
, Username
, TaskName
, RemindDateTime

Creating Reports
Infor Mongoose - Creating and Customizing Reports | 25
4 Click Execute and verify that the stored procedure executes successfully.
5 Save the stored procedure with the name Rpt_UserTaskSp.sql.
Setting Data Source Properties
Before you can produce a report, you must have a source defined for the data to populate the report
fields. To set data source properties for the report:
1 In Visual Studio, locate the Data Source option in the Report Data panel.
If the Report Data panel is not displayed, you can view it by selecting View menu > Report Data.
2 Expand the Data Source option and locate or create the data source for your environment.
Typically, this data source has the same name as the application. If you see the data source you
are looking for, double-click the name of the data source and go on to sub-step c.
If you do not see the data source you are looking for, you must create it, using sub-steps a and b:
a. In the Report Data panel, right-click Data Sources and select Add Data Source.
b. In the Data Source Properties dialog box, specify a Name for the data source.
For this example, we will specify UserTaskDemo.
c. In the Type field, because this report uses a stored procedure, specify Microsoft SQL Server.
If this were for an IDO-based report, you would specify Mongoose IDO.
Below the Type field, you should see a field labeled Connection string. The default value in
that field might be blank or it might be: [@pConnectionString]
d. Change the default in the Connection string field, temporarily, to use this format:
Data Source=serverName;Initial Catalog=applicationDatabaseName
e. Click OK.
The Report Data panel should now display the data source you just specified, if it did not already.
3 Add and assign the dataset:
, TaskDescription
, RowPointer
FROM #ReportOutput
ORDER BY Username, RemindDateTime, TaskName;
COMMIT TRANSACTION
EXEC CloseSessionContextSp @SessionID = @RptSessionID;
GO
Note: You can use the Edit button to open a dialog box that simplifies the creation
of this string.
You are changing the value of this string only temporarily, until you are done
testing your report. Remember to change this string value back when you are
done testing!

Creating Reports
26 | Infor Mongoose - Creating and Customizing Reports
a. Right-click the name of your data source and, from the context menu, select Add Dataset.
b. In the Dataset Properties dialog box, Name field, specify an appropriate name for your
dataset, such as UserTaskDataset.
c. Verify that the Use a dataset embedded in my report option is selected.
d. Verify that the data source defined in Step 2 is specified in the Data Source field.
e. For the Query type option, select Stored Procedure.
f. In the Select or enter stored procedure name field, specify the name of the stored procedure
you created (in this case, Rpt_UserTaskSp).
g. Click Refresh Fields.
Visual Studio displays a list of automatically created query parameters in the Define Query
Parameters dialog box.
h. Verify that all Parameter Value fields specify <Null>.
i. Click OK.
j. In the Dataset Properties dialog box, click OK.
The Report Data panel displays the new dataset under the Datasets entry.
k. In the Properties panel field drop-down list (at the top of the panel), select Tablix 1.
l. In the General > Dataset Name field, specify the dataset you just created.
Modifying the Report Parameters
To make sure that the report form that we will create later can make use of the various report
parameters correctly, we must make sure that the parameters are defined with the correct data types,
properties, and default values (if any).
To modify the report parameters as required for the desired report output:
1 In the Report Data panel, double-click Parameters to expand the list of parameters.
2 Double-click each of the parameters specified in the table below and modify the values
appropriately, using the Report Parameter Properties dialog box for each parameter:
Note: Verify that the dataset you specified is the only one in the project. If there
are others, delete them.
Note: The “Tablix” area is where the data populates the report when generated.
For more information about a tablix and other report elements, see the Visual
Studio 2008 documentation.
Name Prompt
Data
Type
Allow
Null
Default
Value
UsernameStarting User Name Starting Text Selected (Null)
UsernameEnding User Name Ending Text Selected (Null)
TaskNameStarting Task Name Starting Text Selected (Null)

Creating Reports
Infor Mongoose - Creating and Customizing Reports | 27
Note: For the Default Value, you must select the Default Values tab and then select Specify values.
Click Add and then set the Value field to (Null).
Setting the Report Title
As it exists at this point, the report title refers to a non-existent report parameter called ReportName.
We must change this to refer to a parameter that will correctly define the report title we want to use.
Note: Before doing this procedure, it can be a good idea to create the name string
(fUserTaskReport) for the new report title. This allows you, in the Expressions Editor, to select the
string from a list. To do this in WinStudio Design Mode, from the Edit menu, select String and use the
Strings dialog box to create the string.
To set the report title parameter:
1 Change the report title element reference:
a. In the UserTask.rdl [Design] workspace view, click to select the placeholder element in the
upper left corner of the report.
This placeholder element is displayed as [@ReportName].
b. In the Properties sheet for this element, locate the General > Value, which should display as:
=Parameters!ReportName.Value
c. Change this value to: =Parameters!fUserTaskReport.Value
The report title now displays in the Design workspace view as [@fUserTaskReport].
2 Create the report parameter to associate with the reference:
a. In the Report Data panel, right-click Parameters and then select Add Parameter.
b. In the Report Parameter Properties dialog box, set the general properties like this:
Name: fUserTaskReport
Prompt: fUserTaskReport_
Data type: Leave as Text
c. On the Default Values tab, select Specify values.
TaskNameEnding Task Name Ending Text Selected (Null)
RemindDateTimeStarting Reminder Starting Date/Time Selected (Null)
RemindDateTimeEnding Reminder Ending Date/Time Selected (Null)
RemindDateTimeStartingOffset Reminder Starting Offset Integer Selected (Null)
RemindDateTimeEndingOffset Reminder Ending Offset Integer Selected (Null)
Note: The trailing underscore (_) is required for translatable string parameters.
Name Prompt
Data
Type
Allow
Null
Default
Value

Creating Reports
28 | Infor Mongoose - Creating and Customizing Reports
d. Click Add.
e. In the Value field, specify fUserTaskReport.
f. Click OK.
Visual Studio adds fUserTaskReport to the list of available Parameters.
Testing the Report Configuration
At this point, we should be able to test the report configuration, to make sure that the output is going
to have the layout configuration we want. We will not yet be able to test the data, only the
configuration.
To test the report configuration:
1 In Visual Studio, inside the workspace area, click the Preview tab for the report.
2 If prompted for the database login credentials, supply the user ID and password.
Visual Studio renders a preview of the report without any data populating the various fields similar
to this.
At this point, the variable elements, such as the report name still appear as variables.
Populating the Report with Data
Previewing the report at this point confirms only that it is configured to process correctly. But we still
have not populated it with any data. To populate the report with data at the time of report generation,
we can check to verify that the data is being properly queried.
To verify that the report query is correct:
1 In the Report Data panel, double-click the dataset you created earlier.
2 In the Dataset Properties dialog box, click Query Designer.
3 In the Query Designer dialog box, click the exclamation mark icon to query the data from the
database.
4 In the Define Query Parameters dialog box, if the Parameter Values column displays <Blank>
for any or all parameters, change them to <Null>.
5 Click OK.
6 Verify that the query returned the expected data from the UserTask table.
7 Click OK repeatedly to exit all dialog boxes.
Note: If you have not yet created any user tasks, there is no data with which to
populate this display. If this is the case, the query simply returns a row containing the
column headers. To see actual data displayed, first create some data using the Task
List form and then run this query again.

Creating Reports
Infor Mongoose - Creating and Customizing Reports | 29
Example: Creating a Report Based on an IDO
The report example we have been looking at is based on a stored procedure for the output. However,
we can base a report on an IDO rather than a stored procedure. The primary advantage of an IDO-
based report is that you can easily augment it with new properties.
For example, if you have an IDO-based report called UserTasks and decide that you want to add a
Task Priority field, you could just add the new property as normal. It would then be automatically
available to be used on the report. If, however, the UserTasks report was stored procedure-based,
then you would need to modify the stored procedure before the new field would be available on the
report.
In this example, we will build a report that does the same thing as the report we built in the previous
example. The difference is that this report will be based on an IDO, rather than a stored procedure.
Many of the steps are similar, if not identical.
Creating the Report Project
To create a report project:
1 Run Visual Studio 2008 or SQL Server Business Intelligence Development Studio.
2From the File menu select New > Project.
3 In the New Project dialog box, select:
Project types: Business Intelligence Projects
Templates: Report Server Project
4 For the Name, specify IDOReportDemo.
5 For the Location, specify C:\Reports.
6 Click OK.
Visual Studio creates the report definition project with a set of default folders.
Creating a Report Definition File from a Template
To create an IDO-based report definition file from a template:
1 Locate the template you want to use as the basis for your report.
In this example, we will use the Template_Report_Landscape_IDO.rdl file.
For more information about the Infor-provided templates, see “Report Definition Templates” in
Appendix C, “Reference.”
2 Copy the template file into your ReportDemo project folder (if you have been following these
steps, it should be C:\Reports\ReportDemo\...

Creating Reports
30 | Infor Mongoose - Creating and Customizing Reports
3 Rename the template file: UserTaskIDO.rdl
4 In Visual Studio, in the Solution Explorer, right-click Reports.
5 From the context menu, select Add > Existing Item.
6 Select UserTaskIDO.rdl and then click Add.
Visual Studio adds UserTaskIDO.rdl to the list of reports.
7 To open UserTaskIDO.rdl, double-click its name in the Solution Explorer.
Visual Studio displays a workspace with the UserTaskIDO.rdl in Design Mode, similar to this:
Note that the report template already has report headers and footers configured. Many of the
entries in the headers and footers are preconfigured to pick up variable values from within the
system and need not be modified.
Creating a Connection String Parameter
Before we can connect properly to a data source, we must have an appropriate “Connection String”
parameter defined. This parameter should be defined as a “hidden” parameter.
To define this connection string parameter:
1 Still in Visual Studio 2008, in the Report Data panel, right-click Parameters and select Add
Parameter.
2 In the Report Parameter Properties dialog box, specify these values:
Name: pConnectionStringIDO
Prompt: pConnectionStringIDO
Allow null values: Cleared
Select parameter visibility: Hidden
Default Values tab, Specify values: Add a default connection string using this format:
ConfigServerURL;ConfigName

Creating Reports
Infor Mongoose - Creating and Customizing Reports | 31
where:
ConfigServerURL is the standard URL formatted path to the configuration server’s default
page; for example: http://MyServer/IDORequestService/ConfigServer.aspx
ConfigName is the name of the configuration to which you want to connect; for example:
Mongoose701
Setting Data Source Properties
Before you can produce a report, you must have a source defined for the data to populate the report
fields. To set data source properties for the report:
1 In Visual Studio, locate the Data Source option in the Report Data panel.
If the Report Data panel is not displayed, you can view it by selecting View menu > Report Data.
2 Expand the Data Source option and locate or create the data source for your environment.
If you started with the IDO report template, this data source should already exist as
“MongooseIDO.” If you see this data source, double-click the name of the data source and go on
to sub-step c.
If you do not see this data source you are looking for, you must create it, using sub-steps a and b:
a. In the Report Data panel, right-click Data Sources and select Add Data Source.
b. In the Data Source Properties dialog box, specify a Name for the data source.
For this example, we will specify MongooseIDO.
c. In the Type field, because this report uses a stored procedure, specify Mongoose IDO.
Below the Type field, you should see a field labeled Connection string. The default value in
that field should be blank.
d. Specify your connection string in the Connection string field, temporarily, to use this format
(see “Creating a Connection String Parameter” on page 30).
Later, we will change this to reference to the pConnectionStringIDO parameter we created
earlier, so that it will work in WinStudio. For now, we will hard-code it here for testing and
development purposes.
e. (Optional, but recommended) On the Credentials tab, specify user login credentials for your
application database in the Use this user name and password option. Make sure you enter
your Mongoose login credentials and not the SQL Server login credentials, because this is for
an IDO-based report.
This allows you to preview report layouts without having to enter login credentials every time.
Later, we will change this.
f. Click OK.
The Report Data panel should now display the data source you just specified, if it did not already.
3 Add and assign the dataset:
a. Right-click the name of your data source and, from the context menu, select Add Dataset.
Note: Take special notice of the semi-colon between the URL and the configuration name.

Creating Reports
32 | Infor Mongoose - Creating and Customizing Reports
b. In the Dataset Properties dialog box, Name field, specify an appropriate name for your
dataset, such as UserTaskDataset.
c. Verify that the Use a dataset embedded in my report option is selected.
d. Verify that the data source defined in Step 2 is specified in the Data Source field.
e. For the Query type option, select Text.
f. Click Query Designer.
When the Query Designer dialog box opens, it should look like this:
If it does not, click the Edit as Text option to toggle to this view.
g. In the IDO Name drop-down field, specify UserTasks.
h. From the Properties list, select these properties:
UserID
Username
TaskName
RemindDateTime
TaskDescription
RowPointer
i. In the Filter field, specify this code:
Username BETWEEN ISNULL(@UsernameStarting,Username) AND
ISNULL(@UsernameEnding, Username)
AND TaskName BETWEEN ISNULL(@TaskNameStarting,TaskName) AND
ISNULL(@TaskNameEnding,TaskName)
AND ISNULL(RemindDateTime, '1753-01-01') BETWEEN
ISNULL(@RemindDateTimeStarting,'1753-01-01') AND
ISNULL(@RemindDateTimeEnding,'9999-12-31')
j. In the OrderBy field, specify this:

Creating Reports
Infor Mongoose - Creating and Customizing Reports | 33
Username, RemindDateTime, TaskName
k. Click the Edit as Text option to view your query in text mode.
l. To execute and verify the query, click the Run ( ) button.
Visual Studio displays a list of the selected query parameters in the Define Query
Parameters dialog box.
m. Verify that all Parameter Value fields specify <Null>, changing them if necessary.
n. Click OK.
o. In the Query Designer dialog box, click OK.
p. In the Dataset Properties dialog box, click OK.
The Report Data panel displays the new dataset under the Datasets entry.
q. In the Properties panel field drop-down list (at the top of the panel), select Tablix 1.
r. In the General > Dataset Name field, specify the dataset you just created.
s. Save the project.
Setting the Report Title
As it exists at this point, the report title refers to a non-existent report parameter called ReportName.
We must change this to refer to a parameter that will correctly define the report title we want to use.
Note: Before doing this procedure, it can be a good idea to create the name string (fUserTaskReport)
for the new report title. This allows you, in the Expressions Editor, to select the string from a list. To do
this in WinStudio Design Mode, from the Edit menu, select String and use the Strings dialog box to
create the string.
To set the report title parameter:
1 Change the report title element reference:
a. In the UserTaskIDO.rdl [Design] workspace view, click to select the placeholder element in
the upper left corner of the report.
This placeholder element is displayed as [@ReportName].
b. In the Properties sheet for this element, locate the General > Value, which should display as:
=Parameters!ReportName.Value
c. Change this value to: =Parameters!fUserTaskIDOReport.Value
The report title now displays in the Design workspace view as [@fUserTaskIDOReport].
2 Create the report parameter to associate with the reference:
a. In the Report Data panel, right-click Parameters and then select Add Parameter.
Note: Verify that the dataset you specified is the only one in the project. If there
are others, delete them.
Note: The “Tablix” area is where the data populates the report when generated.
For more information about a tablix and other report elements, see the Visual
Studio 2008 documentation.

Creating Reports
34 | Infor Mongoose - Creating and Customizing Reports
b. In the Report Parameter Properties dialog box, set the general properties like this:
Name: fUserTaskIDOReport
Prompt: fUserTaskIDOReport_
Data type: Leave as Text
c. On the Default Values tab, select Specify values.
d. Click Add.
e. In the Value field, specify fUserTaskIDOReport.
f. Click OK.
Visual Studio adds fUserTaskIDOReport to the list of available Parameters.
Note: Before deploying and testing the report, you must define the fUserTaskIDOReport string. To do
that, go into Design Mode in your Mongoose-based application and select Edit menu > String to
create the string. Be aware that you must use fUserTaskIDOReport as the string name, but you can
set it to display as “User Task Report”.
Modifying the Report Parameters
To make sure that the report form that we will create later can make use of the various report
parameters correctly, we must make sure that the parameters are defined with the correct data types,
properties, and default values (if any).
To modify the report parameters as required for the desired report output:
1 In the Report Data panel, double-click Parameters to expand the list of parameters.
2 Double-click each of the parameters specified in the table below and modify the values
appropriately, using the Report Parameter Properties dialog box for each parameter:
Note: The trailing underscore (_) is required for translatable string parameters.
Name Prompt
Data
Type
Allow
Null
Default
Value
UsernameStarting User Name Starting Text Selected (Null)
UsernameEnding User Name Ending Text Selected (Null)
TaskNameStarting Task Name Starting Text Selected (Null)
TaskNameEnding Task Name Ending Text Selected (Null)
RemindDateTimeStarting Reminder Starting Date/Time Selected (Null)
RemindDateTimeEnding Reminder Ending Date/Time Selected (Null)
RemindDateTimeStartingOffset Reminder Starting Offset Integer Selected (Null)
RemindDateTimeEndingOffset Reminder Ending Offset Integer Selected (Null)

Creating Reports
Infor Mongoose - Creating and Customizing Reports | 35
Note: For the Default Value, you must select the Default Values tab and then select Specify values.
Click Add and then set the Value field to (Null).
If the last two do not yet exist in your project, create them now.
Testing the Report Configuration
At this point, we should be able to test the report configuration, to make sure that the output is going
to have the layout configuration we want. We will not yet be able to test the data, only the
configuration.
To test the report configuration:
1 In Visual Studio, inside the workspace area, click the Preview tab for the report.
2 If prompted for the database login credentials, supply the user ID and password.
Visual Studio renders a preview of the report without any data populating the various fields similar
to this:
At this point, the variable elements, such as the report name still appear as variables.
Configuring the Report Layout
About Report Layout Elements
Before configuring the report layout, a few words of explanation are warranted.
Reports are typically made up of different sections. Most have these elements:
Page header
Report header
Data section

Creating Reports
36 | Infor Mongoose - Creating and Customizing Reports
Page footer
Some reports have additional features, such as notes, and some, such as label reports, contain only
data.
SSRS has four container classes. Three of these are subclasses of the Tablix class: Lists, Tables, and
Matrices. The fourth container class is the Rectangle. Data stored in a Tablix object can be filtered,
sorted, and grouped. Tablix objects also change their size and shape to best fit the space provided by
a particular output format. Rectangles are used to contain other objects, like tablix objects, textboxes,
images, and so on. Rectangles are useful to restrain the movement of objects, such as tables, as they
grow. This is especially important for reports like "label reports," where precise control of object
positioning is required.
In general, most reports use a rectangle for the report header, page header, page footer, and one or
more tables for detail data. In some instances, where there is a parent child relationship to data, a list
format can be used for the parent data, and one or more tables for the child data.
Laying Out the Report
The report we are building is fairly simple, consisting basically of a list of tasks grouped by user. Most
of the basic elements, such as report header, page header and footer, and basic data section, have
already been built in to the template we started out with. Basically, all that is left is to modify the data
fields for our purposes and apply any formatting changes we might want.
To add the fields to the report:
1 In the body section of the report, locate the tablix component named Tablix1.
This tablix component currently has two columns.
2 Right-click the tablix component and, from the context menu, select Insert Column > Right.
3 Select the column data sources and header row labels:
a. In the first body row cell (not the header row), click the data selection icon ( ).
b. From the drop-down list, select TaskName.
c. In the second cell, do the same thing and select TaskDescription.
d. In the third cell, do the same thing and select RemindDateTime.
Note that, as you make these selections, Visual Studio automatically adds correctly formatted
header row labels.
4 Add the group by which returned data is to be grouped and sorted:
a. In the Row Groups section (just below the main workspace area), click the drop-down arrow.
b. From the context menu, select Add Group > Parent Group.
c. In the Tablix group dialog box, Group by field, specify [Username].
d. Click OK.
Visual Studio creates a new column, on the left side of the Tablix table, labeled Username.
5 (Optional) Select the Preview tab and view the results of your changes.

Creating Reports
Infor Mongoose - Creating and Customizing Reports | 37
Notice that the the preview now displays the returned data, the tasks are grouped together, and
they are sorted by user name.
TIP: To preview the report header page, in Preview mode, clear the NULL check box for the Display
Header parameter, and in the field, specify 1. Then click View Report.
Modifying Column Labels to Support Localization
For column labels to support localization, we must set them using report parameters. To modify the
column labels, create new parameters for each column using the values below.
For each column in the table:
1 In the Report Data panel, right-click Parameters and then select Add Parameter.
2 In the Report Parameter Properties dialog box, set the properties like this:
3 Click OK.
4 Update the column header to reference the appropriate parameter:
a. Right-click inside the header cell and, from the context menu, select Text Box > Expression.
b. In the Expression dialog box, Set expression for: Value field, specify the expression using
this pattern: =Parameters!ParameterName.Value
where ParameterName is the specified parameter name, such as sUsername.
Notice that each header cell changes to something like this: [@ParameterName]
Making Formatting Changes
Virtually any element or component of a report can be formatted independently of the others. In our
example, we want the header row for the returned data to be gray with white letters. We also want to
reformat our columns, mostly to make extra room for the Task Description column, which typically
requires more space.
To change the header row formatting:
1 To select the entire header row, click the far left box.
Name Prompt
Data
Type
Allow
Null
Visibility Default Value
sUsername sUsername_ Text False Visible sUsername
sTaskName sTaskName_ Text False Visible sTaskName
sTaskDescription sTaskDescription_ Text False Visible sTaskDescription
sReminder sReminder_ Text False Visible sReminder

Creating Reports
38 | Infor Mongoose - Creating and Customizing Reports
2 In the Properties sheet, set the Fill > BackgroundColor to gray.
3 In the Properties sheet, set the Font > Color to white.
Notice that the Design display changes to reflect these settings.
To change the widths of columns:
1 Position the mouse cursor over the right-side border line of the setup row just above the header
row until the cursor changes to a horizontal double-headed arrow.
2 Click and drag the line left or right to the position you want.
Challenge: Specifically, see if you can widen the Task Description column and line up the right
side of the Reminder column with the right-most element in the report.
Feel free to experiment and make other layout and formatting changes to suit your taste.
Laying Out the Report Header Page
The report header page is typically used to display general information that applies to the entire
report. Whether the report header page is visible or hidden depends on the value of a parameter, in
this case, the DisplayHeader report parameter.
In this report the report header is contained in a Rectangle immediately below the page header. For
this report, the report header is to display the report filter criteria that is passed in from the report
parameters. Our template provides a starting point for entering the filter criteria, identified by three
field boxes, the first of which has a right-justified colon (:), like this:
Our filter criteria is to correspond with the criteria specified on the User Task Report form, which we
have not yet created. For information on creating report forms and the example to create this one, see
Chapter 4, “Creating a Form to Run the Report."
For this example, we need four rows to display the filter criteria in our report header: One row is the
header row. The other three rows are to be used to display the filter criteria; specifically in this case,
the user name of the user to whom tasks are assigned, the names of the tasks assigned to the user,
and the reminder date for each task.
To create the extra rows:
1 Select and copy the existing set of text box components from the report header section.
2 Paste three copies of these text boxes into the report header section.
3 Move and align the three new sets of text boxes with the original set, aligning them vertically
below each other.

Creating Reports
Infor Mongoose - Creating and Customizing Reports | 39
Your entire set of text boxes should now look something like this:
4 Fill in the criteria for these text boxes with labels and values that are to be passed in as report
parameters from the User Task Report form.
Your final set of text boxes should look like this:
Note: When filling in your text boxes take note of the following:
The first (most upper left) box has been deleted, because we are not using it.
Top-row and left-most fields are formatted using a boldface font, because they reference
string labels. The other, non-bolded boxes reference filtered values from the report form.
The sStarting and sEnding string parameters in this example have not yet been created.
Before doing this step, you might want to create those string parameters using the
procedures you have already learned. You can then select the new parameters in the
expression editor when assigning the value.
When filling in these values, the most reliable method is to right-click inside the box and,
from the context menu, select Create Placeholder or Text Box Properties (depending
on what box or field you are in). In the Placeholder Properties or Text Box Properties
dialog box, then, use the expression editor for the Value to assign the correct value. You
can also use this dialog box to set other attributes, such as the font family (Arial, for
instance) and font weight (Bold).
Deploying the Report
At this point, the report should be almost ready to run. If you want, you can preview the report again,
but the labels and other parameters that are based on expressions will not display properly until you
see the final actual output. Before the report can actually be run, however, there are still two matters
to attend to: Resetting the data source connection string and deploying the report to the report server.

Creating Reports
40 | Infor Mongoose - Creating and Customizing Reports
Resetting the Data Source Connection String
If you remember, back in the section “Setting Data Source Properties” on page 25, we changed the
"connection string" for the data source to a hard-coded value for testing purposes. Before we can run
the report successfully, though, we must reset the connection string back to its original value.
To reset the data source connection string:
1 In Visual Studio, locate and double-click the name of your data source.
2 In the Data Source Properties dialog box, General tab, change the hard-coded value in the
Connection string field to:
[@pConnectionString] for a report based on a stored procedure
[@pConnectionStringIDO] for a report based on an IDO
You can use the expression editor to do this.
3 Select the Credentials tab and then select the Prompt for credentials option.
4 In the Enter prompt text field, enter some text to use as a prompt.
Deploying the Report to the Report Server
The final step is to deploy the report definition file you have created to the report server from which it
is to be called and run. To do this:
1 Verify that your project is set up to use the correct deployment settings:
a. In the Solution Explorer, right-click the name of your project. (Note that this is not the RDL file,
but rather the top-level project entry.)
b. From the context menu, select Properties.
c. In the Project Property Pages dialog box, verify that you are using the correct settings. If
necessary, change those that are not set correctly.
The fields that you are particularly concerned with are:
TargetReportFolder – Set this to the name of the report folder on your report server in
which report definition files are deployed.
TargetServerURL – Using a standard HTTP path, specify the name and location of the
report server to which reports are deployed. Typically, this follows the format: http://
serverName/ReportServer, where serverName is the DNS or IP address of your report
server.
TargerServerVersion – Verify that this is SQL Server 2008 R2. Other versions do not
work.
2 Deploy the report definition file:
a. Right-click the name of your RDL file.
b. From the context menu, select Deploy.
Note: This text never really displays anywhere in our system, but without something
in this field, Visual Studio does not let you save your changes to the data source.

Creating Reports
Infor Mongoose - Creating and Customizing Reports | 41
Running the Report
Assuming you have not yet created the form from which to launch this report, before you can actually
run and process the report, you must create a background task definition, and you must create the
form. For information and the procedures to create:
The background task definition for your report, see Chapter 3, “Configuring TaskMan to Process
and Generate Reports"
The report form for this example, see Chapter 4, “Creating a Form to Run the Report."

Creating Reports
42 | Infor Mongoose - Creating and Customizing Reports

3
Infor Mongoose - Creating and Customizing Reports | 43
Chapter 3: Configuring TaskMan to
Process and Generate
Reports
Infor Task Manager, commonly known as TaskMan, is the Infor Windows service that is responsible
for processing and generating reports, among other things. There are several ways and places that
TaskMan settings can be made. This chapter covers settings that must be made in conjunction with
TaskMan to preview and print reports. Most of these settings were probably made during initial
system installation and configuration.
Additional information about TaskMan can be found in the system administration guide for your
system.
Note: Infor Task Manager is not the same as the Windows Task Manager.
TaskMan Installation and Configuration with Respect
to Reports
The installation and configuration of Infor Task Manager is covered in detail in the installation guide
and the system administration guide for your system. The information presented here is extra
TaskMan information specific to report processing and generation.
Report Developer Installation
Developers who are creating many custom reports might want to set up a separate, nonstandard test
environment. If you do this, be sure these requirements are met:
On the Intranets form, the TaskMan Path field should be set to the directory where TaskMan.exe
and RunReport.exe are both installed. If this is blank, or filled in incorrectly, reports cannot be
previewed. For additional information, see the description of the error “Missing RPT File” on page
75.
Configuring TaskMan to Process and Generate Reports
44 | Infor Mongoose - Creating and Customizing Reports
On the Sites form, the Forms Database Name field should contain the name of the forms
database. If this is filled in incorrectly, the report can be previewed, but the labels remain
untranslated. For more information, see the description of the error “Labels Not Being Replaced
with Strings Table Values” on page 74.
The System Parameters form should display the site ID. This site ID is used to select the
appropriate Sites record. The Sites form should contain the intranet name, which is used to
select the intranets record. If any of these links is incorrect, the report cannot be previewed.
If you are developing Crystal reports, after you install TaskMan, you must separately install
Crystal Reports. For information on how to install and use Crystal Reports, see the previous
version of this document and the documentation for your version of Crystal Reports.
If you are using Crystal Reports, the Crystal Reports DLLs must be on the same machine as
MGCore.dll.
Specifying Report Options On the Process Defaults Form
You can use the Sites/Entities form to enable several TaskMan options without having to restart the
Infor Task Manager service. For more information about the Sites/Entities form, see the online help
for that form.
Note: In some applications, the Sites form is known as the Sites/Entities form.
Note: In some Mongoose-based applications, the System Parameters form is
known as the General Parameters form.
Process Default Description
Report Output Obfuscation Use this option when you want to expose the report output
directory over the Web, for instance, without indexing the folder,
making illegitimate access to the reports of users more difficult.
When this option is set to 1, report output is directed into this path:
\\TaskMan_Path\Output
Files\ReportName_GUID.FileExtension
All report files reside in the Output Files folder and are
distinguished by the session ID appended to the report name.
If this option is set to 0 (the default), report output is directed into
the following paths, unless a Report Output Directory is specified
in the Report Options form or a Report Output Folder is specified
on the Sites/Entities form:
\\TaskMan_Path\Output
Files\UserID\ReportName_Site_TaskNumber.FileExtension
\\TaskMan_Path\Output
Files\UserID\Preview\ReportName_Site_TaskNumber.FileExt
ension (for preview)

Configuring TaskMan to Process and Generate Reports
Infor Mongoose - Creating and Customizing Reports | 45
Determining the Output Path
There are several ways to define the report output path. Whatever the output directory ends up being,
TaskMan looks for a user-specific subfolder at that location. If the subfolder is not found, TaskMan
appends that subfolder to the output path, except in the case of Report Output Obfuscation.
For more information about these options, see the online help.
Setting Default Report Output Paths
Intranet Defaults
The primary default path for report outputs is the path as specified on the Intranets form, TaskMan
Path field. This is the path the system uses for report outputs if no report output path is specified
either on the Sites/Entities form or the Report Options form.
TaskMan Options debug - Runs the current TaskMan thread in debug mode. For
more information, see the section on running TaskMan in debug
mode in the system administration guide for your system.
debugrep - Creates a text file containing a log of messages
generated during the running of a report.
eventlog - When debugging background tasks (with the debug
option above), TaskMan directs its debug logs to the toolset
messaging systems, which can be viewed using the IDO Runtime
Host or Log Monitor utilities. If you want to direct TaskMan debug
logs to the Windows event system so you can view and debug
them through the Windows Event Viewer, use this option.
taskmsg - If this is specified, TaskMan inserts some task-specific
messages while processing requested tasks, allowing you to
review the status/process of tasks. These messages can be
viewed in the Task Messages area on the Background Task
History form.
UsernameFilter - user01, user02, etc.
TasknameFilter - taskname01, taskname02, etc.
Process Default Description

Configuring TaskMan to Process and Generate Reports
46 | Infor Mongoose - Creating and Customizing Reports
Site Defaults
The Report Output Folder on the Sites/Entities form allows you to define a global file system/UNC
path (for example C:\\servername\ReportOutputs) to which all report outputs are directed. This folder
overrides the TaskMan Path field on the Intranets form. However, any user/task specific output
directory defined on the Report Options form overrides this default setting.
Within this directory, TaskMan looks for a user-specific subfolder. If not found, TaskMan creates the
subfolder and directs report output into it. User-specific subfolders are used only if the Report Output
Obfuscation process default (described above) is set to 0.
You can specify the following TaskMan keywords within the output path, which are substituted
accordingly:
BG~TMHOMEDIR~ - TaskMan home directory
BG~TASKID~ - Task ID/number
BG~TASKNAME~ - Task name
BG~CONFIG~ - Configuration name
BG~REQUSER~ - User requesting the task
BG~SITEID~ - ID of the site
Note: If you have overridden the TaskMan Path by specifying a Report Output Folder on the Sites/
Entities form, then use the Report Preview URL field on the Intranets form to specify the URL path
to that directory for report previews.
Process Defaults
The Report Output Obfuscation process default on the Process Defaults form appends the
session ID to the report name, rather than appending a user subfolder name. This option is useful if
you want to expose the report output directory over the Web without indexing the folder, which makes
illegitimate access to the reports of users more difficult.
Report Options
TaskMan looks first for a report output designation in the Output Directory field of the Report
Options form. The Report Options form allows you to specify a different output location for each
user/report task combination. You can specify a valid system path/file, and report outputs are
generated and exported to that location. Entering an output directory here overrides any path defined
on the Intranets form or the Sites/Entities form.

Configuring TaskMan to Process and Generate Reports
Infor Mongoose - Creating and Customizing Reports | 47
Checking the Status of Active Tasks
Information about the task queue is stored in the ActiveBGTasks table and can be viewed using the
Active Background Tasks form. Tasks are marked as WAITING (on hold until a scheduled time),
READY (waiting for resources), or RUNNING (currently being processed).
A history record for the task is also created in the BGTaskHistory table (see below) when the task is
added to ActiveBGTasks.
Note: Sometimes, tasks are processed so quickly and active so briefly that they do not appear on the
Active Background Tasks form. The more reliable way to verify that the task ran successfully is with
the Background Task History form.
Adding Background Tasks for Reports
Before a report can be previewed or printed, the report must be predefined as a task using the
Background Task Definitions form. If you know what the actual name of your report is going to be,
you can create this task even before creating the report definition file itself (though, of course, you
cannot actually test the task until the report definition file has been created).
To create a background task definition for a report:
1 Open the Background Task Definitions form.
2 Add a new task (record) on this form with these settings:
Task Name - Specifies the name by which the system recognizes the report task.
Task Description - Enter an optional description or leave blank.
Executable Name - Specify the name of the report file, without the file extension.
Continuing our example from the previous chapter, this name would be either UserTask or
UserTaskIDO.
Executable Type - Select RPT.
Report Type - Specifies whether the report is a SQL Server Reporting Service (SSRS) or
Crystal report (CR). For most reports, this should be SSRS. If you leave this field blank, the
default is SSRS.
TIP: For simplicity, you can use the same name as the Executable Name with
"Report" appended; for example, UserTaskReport or UserTaskIDOReport.
Note: Use the CR report type option only for legacy Crystal Reports that have
not been converted to SSRS.

Configuring TaskMan to Process and Generate Reports
48 | Infor Mongoose - Creating and Customizing Reports
Max Concurrent - Specifies the maximum number of instances of this report that can be
processing at one time.
Isolation Level - The setting Read Uncommitted allows faster query performance. For more
information about the effects of Read Uncommitted versus Read Committed, see the online
help for this form and the Process Defaults form.
3 Save the definition.
Note: The default Max Concurrent limit of 20 (which is required for Crystal
reports) does not necessarily apply to SSRS reports. However, for system
performance reasons, we recommend that you do not set this field to a number
greater than 20.
Also, be aware that this field controls, separately and simultaneously, the
number of report preview tasks and report printing tasks that can be processing
at the same time.

4
Infor Mongoose - Creating and Customizing Reports | 49
Chapter 4: Creating a Form to Run the
Report
Once you have the report definition file and the background task created for your report, you must
make the report available to users before they can actually use it. To do this, you must create or
modify a form. This chapter describes the steps needed to do that. The steps are organized so that
they continue setting up the example report used in the previous two chapters.
Most reports are launched from "criteria" forms. Criteria forms typically have several editable fields for
the report’s parameters. These fields can include criteria such as date ranges, selection of customers
or vendors, and selection of particular criteria either to include or not include in the report output.
Criteria forms also typically have two buttons: a Preview button that allows you to preview the report
output before committing it to a more permanent output; and a Print button that actually sends the
command to generate the report using the designated print options.
This is an example of a typical report criteria form:

Creating a Form to Run the Report
50 | Infor Mongoose - Creating and Customizing Reports
Creating the Report Criteria Form
To create a criteria form from which users can launch a new report:
1 In your WinStudio application, go into Design Mode.
2From the Form menu, select Definition > New.
3 In the Specify Form Name and Type dialog box, Name field, specify a form name.
This should be the report name with "Report" appended onto the end (continuing our examples
from Chapter 2, “Creating Reports," it would be UserTaskReport or UserTaskIDOReport).
4From the Form Type drop-down list, select Build From Scratch.
You need not select a data source for this form, since it is simply a report options form that passes
parameters to the stored procedure.
5 Click Next and then Finish.
6 In the Form properties sheet, Caption field, specify a form caption and click the ellipses (...)
button to create it.
7 When the system queries whether you want to create a new string, click Yes.
8 In the String Properties dialog box, verify that the String Value is correct, and then click OK.
9 Save the form.
10 If you are using a source control system, check the form in to your source system and then check
it out again immediately.
Creating the Report Input Fields and Parameters
So far, all we have is a basic, blank form. Obviously, to do anything, it must be populated with fields
that do things. In the case of a criteria form, this means creating fields to determine what data is to be
returned and processed with the report.
Adding Fields with Drop-Down Lists for the Report Input
Parameters
1 In the new form, still in Design Mode, from the Toolbox > Controls list, select ComboBox.
Note: The caption should be a string that begins with the letter "f". In the string that
follows, each capital letter causes the system to start a new word in the title/caption
display of the form. For example, fUserTaskReport, when saved as a string,
appears as User Task Report in the title bar of the form.

Creating a Form to Run the Report
Infor Mongoose - Creating and Customizing Reports | 51
2 Use the mouse to draw a rectangle on the form, or just click in the form to create the component,
and resize it later.
3 In the Component properties sheet, the Name field, specify a name for the component, (for our
example, UsernameStarting).
4 In the Data Source section of the Component properties sheet, create a variable with the name
UsernameStarting:
a Click Binding and then click the associated ellipses (...) button.
b In the Edit Component Data Binding dialog box, in the Type field, specify Variable.
c Click Edit.
d In the Edit Variable Binding dialog box, Variable field, specify UsernameStarting as the
name of the variable.
e Click OK repeatedly until you return to the form.
The Binding field should now display: variables.UsernameStarting
5 In the Component properties sheet, the Inheritance > Component Class field, specify
UserName.
6 Repeat Steps 1 through 5 to create three more components. Name the components and their
associated variables:
UsernameEnding, with component class UserName.
TaskNameStarting, with component class TaskNameVar.
TaskNameEnding, with component class TaskNameVar.
7 Repeat Steps 1 through 5, using DateCombo component types, to create date-range fields.
Name the components and their associated variables:
RemindDateTimeStarting, with component class DateVar.
RemindDateTimeEnding, with component class DateVar.
8 Save the form.
At this point, your form should look something like this, where:
The top two fields are the UsernameStarting and UsernameEnding combo boxes.
The middle two fields are the TaskNameStarting and TaskNameEnding combo boxes.

Creating a Form to Run the Report
52 | Infor Mongoose - Creating and Customizing Reports
The bottom two fields are the RemindDateTimeStarting and RemindDateTimeEnding date
combo boxes.
9 Add Static field labels:
Above the first set of fields, add a field with the caption sStarting.
Above the second set of fields, add a field with the caption sEnding.
Left of the Username set of fields, add a field with the caption sUserName.
Left of the Task Name set of fields, add a field with the caption sTaskName.
Left of the Reminder set of fields, add a field with the caption sReminder.
Your form should now look something like this:

Creating a Form to Run the Report
Infor Mongoose - Creating and Customizing Reports | 53
Adding an Increment Date Field
Reports are often designed to be run periodically (and automatically). For reports like these, there is
an option to automatically increment the dates on each successive report run. The amount by which
the dates are incremented is set on the Background Queue form.
To add an Increment Date field with the correct properties:
1 Add a check box component and:
Name it DateFieldIncrement, where DateField is the base name of your date fields.
For example, if the base name of the date fields is RemindDateTime, with associated
RemindDateTimeStarting and RemindDateTimeEnding components, then the name of this
check box field should be RemindDateTimeIncrement.
Use the component class DateIncrementVar.
Bind it to a variable with the same name as the component; in this case,
RemindDateTimeIncrement. Give this variable an initial value of 0 (zero).
Notice that, when you save the form, the Increment Date check box label displays automatically.
2 For each date field, create a hidden Edit field:
Name it DateFieldOffset, where DateField is the name of the date field.
For example, for the RemindDateTimeStarting date combo box, this field should be named
RemindDateTimeStartingOffset.
Set the Behavior > Hidden property to True.
Bind it to a variable with the same name as the component; for example,
RemindDateTimeStartingOffset (no initial value).
Use the component class DateOffsetVar.
Note that if your system does not have the DateOffsetVar component class, you can instead
set the Data Type > Underlying Type to CHAR and the Length to 50.
Remember to do this step for both the RemindDateTimeStarting and RemindDateTimeEnding
fields.
Adding an Option to Display the Report Header Page
Most report criteria forms provide the user with an option to either display or hide the report header
page of a report. We are going to include that option on our example report.
To add the option to display the report header page:
1 Add a check box to the form with these properties:
Name the check box DisplayHeader.
Bind it to a variable with the same name as the check box component (DisplayHeader).
Assign this variable an Initial Value of: V(Parm_DisplayReportHeaders)
Use the component class DisplayHeaderVar.

Creating a Form to Run the Report
54 | Infor Mongoose - Creating and Customizing Reports
Notice that, as with the Increment Date check box, setting this component class
automatically creates and displays the check box label.
2 Save the form.
At this point, the form should look similar to this:
Adding a Button to Run (Print) the Report
For the report to actually run (process and print), we must provide a mechanism to launch the
RunReport.exe process for our report. We will use a button and associated event handlers for this
purpose.
To add the button to run the report:
1 In the new form, still in Design Mode, from the Toolbox > Controls list, select Button.
2 Use the mouse to draw a rectangle on the form, or just click in the form to create the component,
and resize it later.
3 Name the button PrintButton.
4 Set the Caption to sPrint.
5 Use the component class Button.
6 On the Events tab of the Component property sheet, specify GenerateReport as the primary
event. To create this event:
a Click the Events button (appears as a yellow lightning bolt on the Component properties
sheet).
b Click Primary, and then click the associated ellipses (...) button.

Creating a Form to Run the Report
Infor Mongoose - Creating and Customizing Reports | 55
c In the Event Handlers dialog box, click New.
d In the Event Handler Properties dialog box, Event field, specify GenerateReport.
e For the type, specify Run Script.
f Click Parms and then the associated ellipses (...) button.
g In the Event Handler Parms dialog box, click Type Specific Parameters.
h In the Script Name and Parameters dialog box, specify these values:
Name: SetDateOffset
Parameters: Date field name, Offset field name, Increment field name
If there is more than one set of date fields, specify all the date fields in this order. For our
example:
RemindDateTimeStarting, RemindDateTimeStartingOffset,
RemindDateTimeIncrement, RemindDateTimeEnding,
RemindDateTimeEndingOffset, RemindDateTimeIncrement
i Click OK repeatedly until you return to the Event Handlers dialog box.
7 Add a second event handler to the GenerateReport event.
a In the Event Handlers dialog box, click New.
b In the Event Handler Properties dialog box, Event field, specify GenerateReport.
c For the Type, specify Run Background Task.
d Click Parms and then the associated ellipses (...) button.
e In the Event Handler Parms dialog box, in the Error Message field, specify
mBackEndMessage.
f In the Event Handler Parms dialog box, click Type Specific Parameters.
g In the Edit Background Task Name and Parms dialog box:
In the Task Name field, specify V(BGTaskName).
In the Task Parms field, specify V(BGTaskParms).
h Click OK until you return to the form, and verify that the new GenerateReport event is
specified in the Primary field.
If the parameter list is too long to fit into a single variable, break it into two or more variables and
set the value of BGTaskParms to those variables. For example, set the value of BGTaskParms to
V(BGTaskParms1)V(BGTaskParms2), with BGTaskParms1 and BGTaskParms2 containing the
actual report parameters. The actual report parameters can include the TaskMan keywords
described in the system administration guide for your system.
8 Select and assign values to the BGTaskName and BGTaskParms variables:
Note: For the report to be able to run through the background queue, the task name
must be in a variable called BGTaskName and the parameters must be in a variable
called BGTaskParms. If these variables do not yet exist on your system, you must
create them as form-based, persistent variables.

Creating a Form to Run the Report
56 | Infor Mongoose - Creating and Customizing Reports
aFrom the Edit menu, select Variable.
bFrom the Variables dialog box, select the variable BGTaskName, and then click Edit.
c In the Variable Properties dialog box:
In the Value field, specify UserTaskReport
Set the Persistent field to True.
Click OK.
dFrom the Variables dialog box, select the variable BGTaskParms, and then click Edit.
e In the Variable Properties dialog box:
In the Value field, specify:
V(DisplayHeader), V(UsernameStarting), V(UsernameEnding),
V(TaskNameStarting), V(TaskNameEnding), V(RemindDateTimeStartingOffset),
V(RemindDateTimeEndingOffset), V(DateNullVar), V(DateNullVar)
Set the Persistent field to True.
Click OK.
9 Add a third event handler to the GenerateReport event:
a In the Event Handlers dialog box, click New.
b In the Event Handler Properties dialog box, Event field, specify GenerateReport.
c For the Type, specify Run Script.
d Click Parms and then the associated ellipses (...) button.
e In the Event Handler Parms dialog box, click Type Specific Parameters.
f In the Script Name and Parameters dialog box:
In the Name field, specify ReportSubmitted.
Leave the Parameters field blank.
10 Click OK until you return to the form, and verify that the GenerateReport event is specified in the
Primary field.
11 Save the form.
Note: This must be the Task Name as defined on the Background Task Definitions
form. So, to print the IDO-based version of the report, specify UserTaskIDOReport.
Note: These parameters must be passed to the system in the same order they are
defined in the report definition file. If not, errors result when you try to run the report. If
necessary, check the order of the report parameters in your report definition file and
then make sure these are in the same order.

Creating a Form to Run the Report
Infor Mongoose - Creating and Customizing Reports | 57
At this point the form should look something like this:
Testing the Report
To check whether your report is working at this stage, try running it and checking the results:
1 Open the Background Task History form and the Active Background Tasks form to monitor
the progress of your report.
2 To run the report, select some dates and click the Print button.
3 Monitor the progress in the Background Task History form and the Active Background Tasks
form.
Note: Sometimes, tasks are processed so quickly and active so briefly that they do not appear on the
Active Background Tasks form. The more reliable way to verify that the task ran successfully is with
the Background Task History form.
Adding the Report Preview to the Form
If you are not using a standard application installation (for example, if you installed multiple pieces on
a single machine), you must make sure that TaskMan is set up so that report previews will work on
your computer. For more information, see “Report Developer Installation” on page 43.
To add report preview functionality to your form:
1 Add a button to the form and specify the caption sPreview.

Creating a Form to Run the Report
58 | Infor Mongoose - Creating and Customizing Reports
2 Add a "PreviewReport" event:
a Click the Events button (appears as a yellow lightning bolt on the Component properties
sheet).
b Click Primary, and then click the associated ellipses (...) button.
c In the Event Handlers dialog box, click New.
d In the Event Handler Properties dialog box, specify these values:
Event: PreviewReport
Description: Enter an optional description or leave blank.
Type: Print Preview
e For the parameters:
Click Parms and then the ellipses (...) button.
In the Event Handler Parms dialog box, click Type Specific Parameters.
For the Task Name, specify V(BGTaskName).
For the Task Parameters (Parms), specify V(BGTaskParms).
Click OK.
In the Error Message field, specify mPrintPreviewError.
3 Click OK repeatedly until you return to the form.
4 Verify that PreviewReport is specified as the Primary event.
5 Save the form and test it.
Your finished report form should look similar to this:

Creating a Form to Run the Report
Infor Mongoose - Creating and Customizing Reports | 59
Designing a Report to Allow Scheduling
Many reports are designed to run on a regular basis, according to a set schedule. To actually set this
for a report, the report must first be designed to be able to submit tasks to the background queue, and
then it must be scheduled to run using the Background Queue form.
Modifying the Form to Submit Tasks to the Background Queue
Before a report can submit tasks to the Background Queue, it must be set up to do so. This is done by
adding a hidden component to the form that allows it to activate a Background option on the Actions
and right-click (context) menus.
To set up the form to submit tasks to the background queue:
1 Add a component of type MenuItem (ObjMenuItem) to the form.
2 Name the menu item component BackgroundQueueTask.
3 In the Caption field, specify s&Background.
4 Add a "RunBackgroundQueue" event:
a Click the Events button (appears as a yellow lightning bolt on the Component properties
sheet).
b Click Primary, and then click the associated ellipses (...) button.
c In the Event Handlers dialog box, click New.
d In the Event Handler Properties dialog box, set these values:
Event: RunBackgroundQueue
Description: Enter an optional description or leave blank.
Type: Run Form As Modal Child
e For the parameters:
Click Parms and then the ellipses (...) button.
In the Event Handler Parms dialog box, click Type Specific Parameters.
For the Form, specify BackgroundQueue.
Click Set Variables.
In the Edit Set Variable Values dialog box, click New.
In the Edit Set Variable Value Pair dialog box, define a variable with the Target of
BGTaskName and a Value of V(BGTaskName), and then click OK.
Create a second variable with the value pair of Target: RunTaskEvent and Value:
GenerateReport.
5 Click OK repeatedly until you return to the form.
Note: "GenerateReport" is the name of the Run Background Task event that we
want to schedule and be placed on the background queue.

Creating a Form to Run the Report
60 | Infor Mongoose - Creating and Customizing Reports
6 Verify that RunBackgroundQueue is specified as the Primary event.
7 (Optional) Add these parameters to the end of the parameter string for the Run Background Task
event that submits the task (for a report and in our example, this event is defined with the Print
button):
TASKSTATUS(V(BGTaskStatus))TASKNUMBER(BGTaskNumber)
where:
TASKSTATUS is an optional input parameter to BGTaskSubmit. If the TASKSTATUS keyword
is omitted, or if its value is anything other than WAITING, the task is inserted into the
ActiveBGTasks table with status READY and will be run by TaskMan. If TASKSTATUS is set
to WAITING, the task is entered in the ActiveBGTasks table with status WAITING. TaskMan
ignores any records in this table with status other than READY or RUNNING.
TASKNUMBER is an optional keyword that specifies a variable name to hold the
TaskNumber generated when a record is inserted into the ActiveBGTasks table. If this
keyword is used, Mongoose creates the variable and sets its value.
You can also include substitution keywords that are replaced by appropriate values after the
task is submitted to TaskMan. For a list of the keywords, see the section on Infor Framework
TaskMan substitution keywords in the system administration guide for your system.
8 Save and close the form, and clear the metadata cache.
Testing a Form Designed to Submit Tasks to the Background
Queue
Before you assign a regular schedule to a form, you should test the form to verify that it can in fact
submit tasks to the Background Queue and that the Background Queue is able to subsequently
process the tasks.
To submit and test a report task on the Background Queue:
1 Open a form that can submit a background task to TaskMan.
In the case of our running example, this is the report form we just created and added the
RunBackgroundQueue event handler to in the previous sections.
2 Select Actions > Background.
3 Fill in the scheduling information on the Background Queue modal form. To test this feature:
On the Daily tab, select the option Occurs > Once.
Set the task for a few minutes from the current time.
4 Click OK.
Note: These two optional parameters (TASKSTATUS and TASKNUMBER) are also available
in the MGCore IDO and in the BGTaskSubmitSp stored procedure.

Creating a Form to Run the Report
Infor Mongoose - Creating and Customizing Reports | 61
This adds the task to the Background Queue and sets the BGTaskStatus variable on the parent
form to WAITING. When the scheduled time arrives, TaskMan automatically sends the command
to print the scheduled report.
5 When the scheduled time arrives, verify that the report generated correctly.
Scheduling a Report to Be Generated on a Recurring Basis
Once you have verified that the report can be added to the Background Queue and processed
correctly, you can go ahead and use the same basic procedure (from the previous section) to
schedule the report to run on a recurring basis.
Checking the Status of a Report
After you add a report task to the background queue, check the Active Background Tasks form to
be sure the task is listed with a status of WAITING. After the time when the report is scheduled to run,
check the Background Task History form to be sure the task is listed there. Verify its status, return
codes, and parameters.
To check the task’s scheduling information:
1 Open SQL Server Management Studio and connect to the appropriate server.
2 In the Object Explorer, select SQL Server Agent > Jobs.
Your scheduled task should appear in the list, in the format: TaskName_TaskID_DatabaseName.
3 Right-click on the task and select Properties.
4 To display the scheduling information, select the Schedules tab and click Edit.

Creating a Form to Run the Report
62 | Infor Mongoose - Creating and Customizing Reports

5
Infor Mongoose - Creating and Customizing Reports | 63
Chapter 5: Modifying Reports
This chapter includes only information specific to modifying an existing report in an Infor Mongoose-
based application application environment. It does not include everything you might need to know to
modify a report.
Note: For the procedures to create a new report—that is, a report not based on an already existing
report definition—see Chapter 2, “Creating Reports."
Customization vs. Modification of Existing Reports
Changes to existing reports can combine customizations and modifications. (The differences between
customization and modification, and the guidelines for both, are defined in the "Architectural
Guidelines for Customers" chapter of the modifications guide for your system.) One component of a
report is its front-end linking form, which can be customized like other forms, using standard
Mongoose techniques.
Changes to the other report components—the report definition file, the SQL Server stored procedure,
or the IDO that the report is based on, and the background task definition stored in the application
database BGTaskDefinitions table—are considered modifications. When a base report needs to be
modified, each of these elements should be copied and renamed, and the modifications applied to the
copies.
If you must produce multiple variations of a base report, consider building a version of the report that
presents users with all the options they might need as components on the report form, corresponding
to parameters passed to the report and the stored procedure or IDO, much like a template.
Modifying a Report Definition File
A report definition and its file can be modified using either Visual Studio 2008 or Report Builder 3.0.
SQL Server 2008 R2 includes a version of Visual Studio 2008, called SQL Server Business
Intelligence Development Studio, that can be used. These tools are nearly identical and can be used
interchangeably with one exception: You cannot modify IDO-based reports using Report Builder 3.0.

Modifying Reports
64 | Infor Mongoose - Creating and Customizing Reports
Note: Visual Studio 2010 does not have the options to build reports at this time. You must use Visual
Studio 2008.
Changing Report Logos
Each report contains a graphics logo in the upper right corner. If you want to replace that logo with
one of your choosing, ensure that it adheres to the following rules:
The format must be bitmap (.bmp).
The size must be 2.00 inches wide by 0.65 inches high to preserve proper report formatting.
If you’re changing the logo for all reports, the file must be named SLHeaderLogo.bmp.
The file must be placed on the utility server (wherever TaskMan is installed), in a configuration
folder inside the ..\Report\Reports directory.
Follow these steps to change the logo on all reports. You must be logged in as an administrative user
for this procedure to work.
1 On the utility server (or wherever your Mongoose-based application is installed), browse to:
..\ProgramFiles(x86)\Infor\Mongoose-based application\Report\Reports
2 In the Reports folder, create a new folder and give it the same name as your Mongoose-based
application configuration name, which is selected on the Sign In screen and then displayed in the
top left corner when you are signed in to your Mongoose-based application.
If you have more than one configuration and you need to use a different logo for each
configuration, you should create a separate folder for each configuration. If you are a single site
and have only one configuration when logging in, then make only one new folder.
3 Edit the original SLHeaderLogo.bmp file in the Reports folder by inserting your image; or create
your own new SLHeaderLogo.bmp, following the guidelines above for format, size, and name.
4 Save the new file to the appropriate configuration folder.
5 On the database server (or wherever SSRS is installed), choose Start > Programs > Microsoft
SQL Server 2008 R2 > Configuration Tools > Reporting Services Configuration Manager.
6 Click Connect and then, in the left panel, click Report Manager URL.
7 In the center panel, click the hyperlink to access SSRS Report Manager. The link should be
similar to: http://ServerName:80/Reports. A new Internet Explorer browser titled Report
Manager opens.
Note: You must use Internet Explorer to work with SSRS Report Manager. Other browsers do not
provide all of the necessary functionality.
8 Click the Reports folder for your Mongoose-based application.
9 Click New Folder to create a new folder inside the Reports folder. Again, give the new folder the
same name as your configuration name. Make a new folder for each configuration that needs a
different logo.

Modifying Reports
Infor Mongoose - Creating and Customizing Reports | 65
10 Click the new folder and once inside that folder, click Upload File. Browse to the new logo file that
you created in step 3: \\ServerName\Mongoose-based
application\Report\Reports\configuration folder\SLHeaderLogo.bmp. If you have done this
more than once, make sure to select the Overwrite item if it exists check box.
11 Click OK. This uploads the new graphic to the SSRS report server. You should not have to restart
the TM server or the SSRS server for this to take effect. When you print reports for the selected
configuration, the new logo displays.
12 If you have multiple configurations with different logos, repeat steps 9 and 10 for each
configuration folder.
Adding Barcodes to a Report
The system implements barcoding by loading the barcodes as fonts on the report server, and then
setting a report field to use the barcode font.
To add a barcode field to a report:
1 Create a text field.
2 Set this field to display the element from the dataset that is to be presented as barcode.
3 Set the font of the text field to be the desired barcode font (for example, Code39QuarterInch).
4 Set the font size.
Making Other Report Modifications
Using Visual Studio 2008 or Report Builder 3.0, you can make many modifications to your reports
using the options provided in those tools. For example, you can control which lines print on a financial
statement using the Row Visibility setting shown here:
For information about using the settings in Visual Studio 2008 or Report Builder 3.0, refer to the
documentation provided those applications.

Modifying Reports
66 | Infor Mongoose - Creating and Customizing Reports

Infor Mongoose - Creating and Customizing Reports | 67
A
Appendix A: Troubleshooting
This chapter describes how to troubleshoot problems with printing reports, previewing reports, or
using TaskMan in conjunction with reports. The information here is presented for developers, with
solutions that might include fixing stored procedures or performing SQL queries. Some of the same
troubleshooting information is also presented, without the developer-related sections, in the system
administration guide for your system.
The list of problems is organized according to general area. You might find it easier to locate a
specific problem or error by using the Acrobat Reader "Find" feature with this online document.
Where to Find Error Message Information
You might find error messages or additional information about an error in the following places:
Background Task History Form
Error messages for reports and previews are placed in the Error Message field on the Background
Task History form.
Error Log
If the SQL Server Reporting Service (SSRS) generated an error message, see the error log for
additional information. The error log is located in the \Reports\Errors\userID subdirectory, in the
base installation directory on the server where TaskMan resides.
Event Viewer
TaskMan runs as a service under Windows and generates event messages that you can view in the
Microsoft Event Viewer. Some common event messages are listed in the system administration guide
for your system. If you are having problems with a background task, you can run TaskMan in debug

Troubleshooting
68 | Infor Mongoose - Creating and Customizing Reports
mode, which generates additional messages. (See the section on running Infor Framework TaskMan
in debug mode in the system administration guide for your system.)
Report Problems
Several common problems can occur when users try to preview or print a report.
Reports Do Not Print
Symptoms
Run-time users cannot print reports.
Possible Solutions
Make sure the Infor Mongoose TaskMan service is started on the utility server.
Verify that TaskMan is set up as a Windows service that logs on as with a user account created to
access printers.
Verify that the user account configured as the owner of the Infor Mongoose TaskMan service has
print privileges under Windows for the default printer, plus all printers listed on the Report
Options form.
Verify that a default printer has been configured for the server on which TaskMan resides.
If the report being printed requires a printer other than the default printer on TaskMan's server,
verify that the correct printer is defined for the report on the Report Options form.
Verify that the user account that was used to run the Infor Mongoose TaskMan service is the
same user account that was used to map the printers on the TaskMan machine.
Verify that the printer was mapped using the printer name, not the share name.
Use SQL Profiler to verify that only one instance of TaskMan is monitoring the application
database. For more information, see the section on using SQL Profiler to trace TaskMan
instances in the system administration guide for your system.

Troubleshooting
Infor Mongoose - Creating and Customizing Reports | 69
Scheduled Reports Do Not Run as Scheduled
Symptoms
Tasks that have been scheduled to run as background tasks using the Background Queue form are
submitted but do not get processed when scheduled. The report task status remains WAITING.
Possible Solution
Verify that the SQL Server Agent service is running on the report server. If necessary, reset the
properties of the SQL Service Agent service to start automatically.
Report Outputs Do Not Pick Up Header/Footer Variable Values
Symptoms
The report output for predefined reports or reports based on a supplied template do not display the
name of the company in the footer. Instead, they display the name of the variable
BG~COMPANYNAME~ or the space is blank.
Possible Solutions
The system looks for the value to replace this variable from a field on System Parameters form. If
this field is null or missing, there is no value to pick up.
Note: In some Mongoose-based applications, the System Parameters form is known as the General
Parameters form.
If your application has a System Parameters form, check and verify that there is a Company or
Company Name field and that it has a value specified. If the field is there, but there is no value,
specify a value for the field. If the field is missing, perform these procedures:
a. Use the Sql Columns form to add a column to the "parms" table.
This column must be named company, set to the nvarchar data type, be 40 characters in
length, and be nullable.
b. Starting with the IDOs form, create a new IDO to extend and replace the "Parms" IDO.
c. Create a new property for the IDO you just created.
This property must be bound to the "par.company" column you created earlier.
d. Modify the System Parameters form by adding an Edit field component bound to the
"company" property.

Troubleshooting
70 | Infor Mongoose - Creating and Customizing Reports
Make sure you also add a field label (Static component).
e. After saving the System Parameters form and exiting Design Mode, enter a value into the
new field and save it.
f. Make sure your system is set to unload IDO metadata with global objects. Then clear the
metadata cache and restart the report form.
If your application has a General Parameters form, check and verify that there is a value
specified in the Company field on the Address tab.
Report Output Does Not Display the Company Logo Correctly
Symptoms
With some report output types—notably HTML and MHTML—the company logo in the upper right
corner does not display at all or it displays incorrectly (at the wrong size, for instance).
Possible Solutions
This is caused by known bugs and, at this time, we have not been able determine a resolution to the
problems. Our best recommendation is to use the Acrobat Output (PDF) format until a resolution has
been found.
If, however, you determine that you really want or need to use HTML or MHTML outputs, then you
can use Visual Studio 2008 or Report Designer to actually embed the logo graphic in the report
definition file.
Truncated Data in Text Output
Symptoms
Field contents for reports is being truncated.
Possible Solutions
This problem is specific to Crystal Reports. For information and solutions, see the earlier
documentation that came with your system and/or the Crystal Reports documentation.

Troubleshooting
Infor Mongoose - Creating and Customizing Reports | 71
File Not Found – Occurs for Certain (But Not All) Reports
Symptoms
Some reports (but not all) generate a "File not found" error message.
Possible Solutions
This error message usually indicates an error in the programming of the report. Check for messages
generated when the task ran in the Background Task History form, or check the reports error log
(TaskMan_Path\Report\Errors\user_directory). Either of these might give more information about
the problem.
There are a number of things that can cause this error:
The report's stored procedure was changed, but the report definition file was not resynchronized
with the stored procedure.
For Crystal-specific solutions to this problem, see the earlier documentation that came with your
system and/or the Crystal Reports documentation.
A Transact-SQL error occurred in the stored procedure.
To get a more meaningful error message for a T-SQL error, run the report stored procedure
through the SQL Server Management Studio. The easiest way to do this is to print the report and
copy the report parameters from the Background Task History form. Paste these in as the
parameters for the report stored procedure in SQL Server Management Studio, making these
changes:
Enclose character and date parameters in single quotes.
Replace empty parameters with NULL.
If there is a T-SQL error, this will give a line number and error description. The most common SQL
errors in report stored procedures are data truncation errors. Many report stored procedures use
temporary tables created using SQL data types. These tables are often populated from variables
declared with user-defined data types. The lengths of many of these UDFs have been increased
(for example, address fields for an internationalized site ID). This can cause a SQL exception by
executing INSERT or UPDATE statements against the temporary tables using these variables, or
applying the CONVERT function to them.
The parameters passed by the report form are in the wrong order or are of the wrong data type,
which can produce a T-SQL error.
For example, if a string or date parameter is plugged into an integer parameter, SQL generates an
exception. Following the remedial steps in the preceding item catches these errors as well.
You should also check the Background Task History form to make sure there are no
uninterpreted V(…) or P(…) keywords in the parameters.
Finally, subreports are linked to the main report by parameters on the subreport. When Notes
subreports are linked in, the ShowInternal, ShowExternal, Rowpointer, and
pConnectionString subreport parameters must be linked back to the appropriate main report
fields (typically, two main report parameters). In addition to these four parameters, any other

Troubleshooting
72 | Infor Mongoose - Creating and Customizing Reports
parameters used in the subreport must also be linked in the properties. Finally, the parameters
linked in the properties should allow Null values or have Null as their default values.
If this is not done, the system expects these values to be passed from the originating form. If the
wrong types of values are passed, the system generates an error. If no values are passed, the
report usually "hangs" when run through TaskMan, while the report engine tries to prompt for
these values on the TaskMan machine.
The stored procedure makes a call to RaiseErrorSp or raiserrorsp.
RaiseErrorSp and raiserrorsp are used to generate a SQL exception with a user-specified error
message. Neither of these two stored procedures should be used in report stored procedures.
File Not Found – Occurs for All Reports
Symptoms
All attempts to generate a report result in a "File not found" error message.
Possible Solutions
The computer responsible for running reports probably has not been configured properly.
This machine must have access to the TaskMan folder (where TaskMan.exe and RunReport.exe
are installed) on the machine where TaskMan is running, or the TaskMan URL if previewing over
the internet. The easiest way to check this is to select Run from the Windows Start menu and try
to run a report.
In rare cases, this error occurs if the RunReport.exe has become corrupted. If this is the case,
running the report through TaskMan produces an error code of -1,073,741,819 and the report
fails.
Users Outside Your Network Are Not Receiving Forwarded
Reports
Symptoms
Users and customers outside your network are not receiving automatically forwarded reports.

Troubleshooting
Infor Mongoose - Creating and Customizing Reports | 73
Possible Solutions
If only certain users are not receiving the reports, but others are, verify that report options are set
correctly for those users, by performing the following actions:
a. On the Background Task Definitions form, click Report Options.
b. For the report and user you are checking, verify that the Email Notification option is set to
Yes.
If Attach Report is set to Yes, you must also set Email Notification to Yes.
If no users outside your network are getting the reports, verify that the Exchange Server through
which the system routes email is set to relay email, by performing the following actions:
a. Open the Intranets form, Reports/TaskMan tab, and make note of the contents in the
following fields:
SMTP Server
SMTP Server Port
SMTP From Email
a. Click Start > Run.
b. In the Open field, specify cmd, and then click OK.
c. The system displays a Windows Command Prompt window.
d. At the command prompt, enter the command: telnet
e. At the Microsoft Telnet command prompt, enter the command: set localecho
f. At the prompt, enter the command: o SMTPserver SMTPport
or open SMTPserver SMTPport
where SMTPserver is the name of the SMTP server you collected from the SMTP Server field
and SMTPport is the port number you collected from the SMTP Port field in Step a.
g. At the SMTP server prompt, enter the command: hello
On some systems, this command might vary; for instance, you might have to enter the
command as HELO or some other variation.
The SMTP server responds with a message that ends with Hello, followed by the IP address.
h. Enter the command: mail from:<SMTPfrom>
where SMTPfrom is the email address you collected from the SMTP From Email field in Step
a.
The SMTP server responds with a message ending in ...Sender OK.
i. Enter the command rcpt to:<recipient_email>
where recipient_email is the email address of the user you are trying to relay the reports to.
If the SMTP Exchange server is not set up to relay email, the server displays a message
similar to the following:
550 5.7.1 Unable to relay for recipient_email
If you see this type of message, configure your SMTP Exchange server to relay the email.
For the procedure, see your Exchange server documentation.

Troubleshooting
74 | Infor Mongoose - Creating and Customizing Reports
If the SMTP Exchange server is set up to relay email, the server displays a message
similar to the following:
250 2.1.5 recipient_email
If you see this type of message, continue with the next step.
j. Enter the command: data
k. Type a test message to send to the recipient. When you are finished with your message,
press the Enter key, followed by a period ( . ), followed by the Enter key again. This
terminates the message and queues it for sending.
l. To exit the SMTP server session, enter quit, followed by any other key press.
m. To exit the Microsoft Telnet session, enter quit.
n. To exit the command prompt window, enter exit.
o. Confirm with the recipient that the test message was received.
Note: If you receive the error "Could not open connection to the host, on port [port #]" check the
firewall and virus software on the mail server to see if they are blocking the email.
Labels Not Being Replaced with Strings Table Values
Symptoms
Labels on report outputs are not correct or are not being translated correctly.
Possible Solutions
Verify that the report is configured to use the correct Strings table. It might be that the system has
been incorrectly configured and the report cannot find the correct Strings table.
To select the correct String table record on the Sites form, use the Site Name field on the System
Parameters form. Make sure that, for this site, there is a value in the Forms Database Name
field of the Sites form (in some versions, labeled as the Strings Table Specification field). If the
forms database is on a different server than the application database, the value for this field
should also indicate the linked server name, using this format: server_name.Forms_database
TaskMan then determines the proper Strings table name by searching the specified forms
database for the Strings table associated with the current session.
Find the Strings table value using a query.
Note: In some applications, the Sites form is known as the Sites/Entities form, and
the System Parameters form is known as the General Parameters form.

Troubleshooting
Infor Mongoose - Creating and Customizing Reports | 75
You can check this using the SQL Server Management Studio. Run the following query against
the application database:
If this SELECT does not return any rows, then some piece of initialization data required by
TaskMan is missing.
Validate the Strings table name using a query.
To test the Strings table name using the SQL Server Management Studio, run the following
statement against the application database to return the number of strings in the Strings table:
If the Strings table specification is invalid, this SQL code returns something similar to the
following:
Verify that you are using the correct version of TaskMan.
One indicator that you might not be using the correct version of TaskMan is an error message that
says "Invalid String Table Name" followed by a number.
Missing RPT File
Note: This symptom applies only to Crystal-based reports.
Symptoms
Attempts to generate a report instead generate a missing RPT file error message, such as "Missing
RPT file" or "RPT file missing".
SELECT i.intranet_name, p.site, i.tm_path , s.strings_table
FROM parms p
INNER JOIN site s ON s.site = p.site
INNER JOIN intranet i ON i.intranet_name = s.intranet_name
DECLARE
@StringSQL AS NVARCHAR(255),
@FormsDB AS NVARCHAR(255),
@OwnerPos INT
SELECT @FormsDB = s.strings_table
FROM parms p INNER JOIN site s ON s.site = p.site
SELECT @OwnerPos = CHARINDEX( N'.dbo.', @FormsDb)
IF @OwnerPos <= 0 SELECT @OwnerPos = CHARINDEX(N'..', @FormsDb)
IF @OwnerPos > 0 SELECT @FormsDb = LEFT(@FormsDb, @OwnerPos - 1)
SELECT @StringSQL = N'SELECT COUNT(*)FROM ' + @FormsDB + N'.dbo.' +
l.StringTableName
FROM LanguageIDs l
WHERE l.LanguageID = 1033
EXEC (@StringSQL)
Server: Msg 208, Level 16, State 1, Line 1
Invalid object name 'String_Table_Specification'.

Troubleshooting
76 | Infor Mongoose - Creating and Customizing Reports
Possible Solutions
These error messages indicate a problem with a Crystal Reports file. For information and solutions,
see the earlier documentation that came with your system and/or the Crystal Reports documentation.
Other Infor Mongoose TaskMan Report-Related
Problems
No Report Output
Symptoms
Reports might be marked as Started and Completed in the Background Task History form, but
there is no output in the TaskMan\Reports\Output Files folder.
Possible Solutions
There are probably two or more instances of TaskMan monitoring the same database. To verify this,
shut down the instance of TaskMan you think should be monitoring the database and resubmit the
report. If the Background Task History record still gets updated, then there is at least one more
instance of TaskMan monitoring the database. To find out if this is the case, launch the SQL Profiler
against the database to see what hosts were polling.
Intermittent Errors
Symptoms
The same report is run a number of times, sometimes running successfully, and other times failing
with errors. This happens for all reports. Whether it succeeds or fails appears to be random.

Troubleshooting
Infor Mongoose - Creating and Customizing Reports | 77
Possible Solutions
This could occur because of the same issues described under the “No Report Output" section.
Alternatively, there might be two instances of TaskMan: one has the privileges needed to run reports,
but the other does not.
Reports Fail with Error Code
Symptoms
Reports fail to process and return an error code of 1,073,741,819.
Possible Solutions
If you see this return code, an executable might have become corrupt. Try double-clicking on the
RunReport.exe file. If it does not open dialog boxes, the EXEs have been corrupted, possibly by a
virus. Delete them and copy them again from the installation CD.
Notes Do Not Print on a Report
Symptoms
You print a report, but the notes do not print along with it.
Possible Solutions
Verify that notes are set up correctly to print with the report.
Error 13: Type Mismatch
Symptoms
There is a data type mismatch between either what is passed from the form to the report file, or from
the report file to the stored procedure.

Troubleshooting
78 | Infor Mongoose - Creating and Customizing Reports
Possible Solutions
This can occur if the form passes the parameters in the wrong order, or a parameter is not defaulted
correctly. For example, a form might be passing in a blank for the Show Header check box. If you get
this error, try selecting the check box and running it again.
If this does not work, try selecting every check box and putting a value in every field.
Finally, try running the stored procedure through the SQL Server Management Studio with the same
parameters as those in BGTaskHistory, replacing blank parameters with NULL, and putting single
quotes around strings, dates, and guids.
Error 128: Error Running Report
Symptoms
Reports fail with the message:
Error running report. This field name is not known.
Possible Solutions
Verify that the report field was correctly mapped to the appropriate stored procedure field. The
solution is similar to the solution for type mismatches. For more information, see “Error 13: Type
Mismatch."
Error 534: Error Detected by Database DLL
This is similar to and has the same possible solutions as a "File not found" error. More information,
see the suggestions under “File Not Found – Occurs for Certain (But Not All) Reports” on page 71.
This Field Name Is Not Known
Symptoms
Running a report produces the error: "This field name is not known."

Troubleshooting
Infor Mongoose - Creating and Customizing Reports | 79
Possible Solutions
Having a report field that was not successfully mapped to a stored procedure field, can sometimes
cause this. In these cases, the unmapped stored procedure field will be part of the error message; for
example:
This field name is not known : {Rpt_Ap01FRISp;1.TcAmtAmtPaid}
Make sure the report field is in the stored procedure’s result set, and set the datasource location as
described in the previous bullet.
No Users Are Receiving Email Messages
Symptoms
No users are receiving email messages about background tasks (including reports).
Possible Solutions
Verify that TaskMan is set up as a Windows service that logs on as a user account. If TaskMan is
configured as a Local System Account, email notification cannot be sent.
Verify that the user account configured for the Infor Mongoose TaskMan service under Windows
has email privileges in your mail system.
On the Intranets form, verify that the Send Email Notification field is selected. TaskMan gets
the value that is set here for the first database TaskMan is configured to use, and then uses that
value for all databases to which it connects from the utility server.
If you do not know which database is the "first" database, you can select the Send Email
Notification field for another database; then no email will be sent and no error messages appear
in the event logs. You must either determine what the "first" database is and set the flag there, or
set the flag in all databases. Conversely, to stop email notifications, either clear the flag in the
"first" database or clear the flag in all databases.
Verify that the recipient's user ID specifies an email address in the Users form.
The system requires a default email profile, or a profile called "TaskMan," on the server where
TaskMan resides. To verify this, if Microsoft Outlook is installed, open its properties (right-click on
the Outlook icon and select Properties). Click Show Profiles. If there is no TaskMan profile,
copy one that already exists, copy it, and rename it TaskMan.
If the notification concerns a Crystal Report, verify that email access is set up correctly for the
report you are troubleshooting.

Troubleshooting
80 | Infor Mongoose - Creating and Customizing Reports
Event Messages from Infor Mongoose TaskMan
For event messages generated by Infor Mongoose TaskMan, see the system administration guide for
your system.
Infor Mongoose TaskMan Debug Mode Messages
For debug mode messages generated by Infor Mongoose TaskMan, see the system administration
guide for your system.

Infor Mongoose - Creating and Customizing Reports | 81
B
Appendix B: Using RunReport.exe
Infor Mongoose TaskMan launches a system process (RunReport.exe) to generate a report. The
RunReport application then connects to the application database.
Once connected, RunReport queries any user options for running the report, for example, output
format or printer name. Once these options are set, RunReport prints the report.
Generally, RunReport is called from the application; however, you can also run RunReport from a
command line, specifying connection options, the report name, and report options. This could be
used, for example, to run reports directly from an add-on product, or to run reports immediately from a
workflow on a client (without having to put the report on a background queue) and then do something
with the report’s output in the workflow.
Keep in mind, however, that if you execute RunReport from a command line, you cannot take
advantage of TaskMan’s task history and management features.
MGReportProcessor
Core report processing is handled by MGReportProcessor, for which RunReport is a wrapper to call
methods in MGReportProcessor. This allows you to create your own executable, being processed by
TaskMan, which could access report execution functionality using MGReportProcessor.
RunReport from the Command Line
Syntax
The command line syntax is this:
RunReport.exe switches

Using RunReport.exe
82 | Infor Mongoose - Creating and Customizing Reports
where switches must be preceded by either a minus sign ( - ) or a forward slash ( / ). If the -m switch
is used, it must be the last switch; the order of the other switches does not matter. Any switch that is
used must be followed by the appropriate value. All switches, other than -m, require their values to be
enclosed in parentheses if the value contains blank spaces. The value following -m must not be
enclosed in parentheses.
Switches
These are the switches that can be used in the RunReport.exe command line:
Switch Description
-h
(optional)
TaskMan home directory, where taskman.exe runs.
If this parameter is omitted, RunReport uses its own directory.
-t
(optional)
Task number.
For reports run through TaskMan, this is the Task Num field on the Active
Background Tasks form, and the Task Number field on the Background Task
History form. This number is generated by SQL when a record is inserted into the
ActiveBGTasks table.
-r Report name.
-d DSN for the ODBC that RunReport uses to connect to the database.
Use this parameter plus the -db parameter if you are using either ODBC (RDO) or
OLE DB (ADO) to connect to an ODBC data source to access the database.
This parameter is ignored if you are using a direct OLE DB (ADO) connection to the
SQL database.
-p
(optional)
Password for the ODBC connection, or for the SQL database, if you are using a
direct OLE DB (ADO) connection.
This value defaults to an empty string.
-l
(optional)
Login for the SQL database, if you are using a direct OLE DB (ADO) connection.
This value defaults to sa.
-u
(optional)
User ID of the person submitting the report.
This refers to the User ID field on the Users form. It is also displayed on the
Background Task History form, for tasks submitted to TaskMan.
-db
(optional)
Name of the application database. This is used to set the location for the main
report and subreport data sources. If omitted, the data sources are left as is.
-g
(optional)
User group ID.
If provided, this is used in a SQL WHERE clause when querying the Strings table. It
is used to filter on the ScopeName (the user’s group) and the ScopeType (2, for
Group).

Using RunReport.exe
Infor Mongoose - Creating and Customizing Reports | 83
-session
(optional)
Session identifier, passed when TaskMan calls RunReport, to indicate the session
for which variables can be accessed by the report's stored procedure.
-s
(optional)
Name of the Strings table used to translate report labels.
RunReport uses an ODBC connection to the application database to query the
Strings table, so the table name must be qualified enough for the query to work.
If the Strings table is in a forms database on the same server as the application
database, then the Strings table name must include that database name (for
example, Formsdb.dbo.StringTable.)
If the Strings table is in a database on a different server, then this server must be a
linked server, and the Strings table name must include both the server name and
the forms database name (for example, Server.Formsdb.dbo.StringTable).
If this parameter is omitted, the report runs, but the labels are not translated and
display as the literal string name; and a warning message is placed in the error log.
-f
(optional)
Integer code for the report output format:
1 - Crystal Report (RPT)
2 - Acrobat Format (PDF)
3 - Comma Separated Values (CSV)
4 - Excel 8.0 (format used with Excel 97 and Excel 2000)
5 - Excel 8.0 extended (format used with Excel XP and Excel 2003)
6 - HTML 4.0
7 - Printer
8 - Rich Text Format (RTF)
9 - Word for Windows (DOC)
10 - XML
11 - Text
12 - MHTML
13 - TIFF
-o
(optional)
Output file name.
If this is omitted, RunReport uses the format
HomeDir\Report\OutputFiles\UserName\TaskName_Site_TaskNum.Extension
-n
(optional)
Number of copies to print, if the report output is sent directly to a printer (output
format 7). The default value is set with the printer settings.
-e
(optional)
Error file name.
If a file name without a path is passed in, RunReport prepends to the path:
HomeDir\Report\Errors\UserName\
If this parameter is omitted, RunReport uses the format:
HomeDir\Report\Errors\UserName\TaskName_TaskNum.txt
TaskMan puts the contents of this file in the error message field on the
Background Task History form and then deletes the file.
Switch Description

Using RunReport.exe
84 | Infor Mongoose - Creating and Customizing Reports
-font
(optional)
Crystal-
specific
Name of the font to use for the report.
The specified font (Arial, Times New Roman, etc.) must be loaded on the machine
where RunReport is running. This value defaults to the font used when the report
was created. If that font is not on the RunReport machine, Crystal Reports defaults
the value to Arial.
RunReport loops through all of a report’s fields and resets the font. If there are fields
where the font should never be reset (for example, barcode fields), then use the
field prefix LEAVEFONT or LF_ .
-prt
(optional)
Printer name, if the output is sent directly to a printer.
If the printer is not local, this value should be the UNC name. If omitted, this value
defaults to the default printer of the machine where RunReport is running.
-site
(optional)
Site name, from the Sites form.
This value is used as part of the output file name. This parameter is used so that, if
TaskMan is monitoring multiple databases, the report output from one database
does not overwrite that from a different database.
-datefmt
(optional)
Crystal-
specific
Format to use for date fields on the report, taken from the Date Format setting on
the Language IDs form.
This parameter overrides the default date formats set on the report; however, any
date fields with LD_ prefixes are not overridden.
-numfmt
(optional)
Crystal-
specific
Numeric format to use for number fields on the report, taken from the Numeric
Format setting on the Language IDs form.
This parameter overrides the default numeric formats set on the report; however,
any number fields with LN_ prefixes are not overridden.
-config
(optional)
Application configuration to which you are connected.
-svr
(optional)
SQL Server name.
-debug
(optional)
Report debug option.
-papersize
(optional)
Report output paper size.
-m
(optional)
Indicates that the rest of the command line is a comma-delimited list of report-
specific parameters. RunReport parses this list and plugs these values into the
report’s parameters.
This switch must be the last one used in the command line. If any other switches
occur after this one, RunReport treats them as report parameters. RunReport
supports the ~LIT~(...) keyword.
Switch Description

Using RunReport.exe
Infor Mongoose - Creating and Customizing Reports | 85
Examples
When TaskMan and MGCore generate reports, they format and then execute command lines like the
ones in these examples.
If TaskMan is run with the debug startup parameter, this command line is printed to the Application
Event log. Reports can be tested by putting this command line in a batch file and executing it. The ****
-p parameter should be replaced by the appropriate password.
Example Using an ODBC (RDO) or OLE DB (ADO) ODBC Connection
RunReport.exe -d MyServerDSN -l sa -p **** -s MyCompany_Forms.dbo.Strings -f 1
-r ItemQuantitiesbyABCCode -t 199 -u sa -e
"D:\TaskMan\Report\Errors\sa\ItemQuantitiesbyABCCodeReport_MI_199.txt" -site
"MI" -db SLMI_App -n 1 -m
~LIT~(A)~LIT~(B)~LIT~(C),~LIT~(M)~LIT~(P)~LIT~(T),~LIT~(M)~LIT~(T)~LIT~(F)~LIT
~(O),~LIT~(1),~LIT~(1),~LIT~(),~LIT~(DIS1),~LIT~(MAIN),~LIT~(AD-
10000),~LIT~(AL-10000),~LIT~(),~LIT~(),~LIT~(0)
Example Using an OLE DB (ADO) Direct SQL Connection
RunReport.exe -svr MyServer -l sa -p **** -s MyCompany_Forms.dbo.Strings -f 1 -
r ItemQuantitiesbyABCCode -t 199 -u sa -e
"D:\TaskMan\Report\Errors\sa\ItemQuantitiesbyABCCodeReport_MI_199.txt" -site
"MI" -db SLMI_App -n 1 -m
~LIT~(A)~LIT~(B)~LIT~(C),~LIT~(M)~LIT~(P)~LIT~(T),~LIT~(M)~LIT~(T)~LIT~(F)~LIT
~(O),~LIT~(1),~LIT~(1),~LIT~(),~LIT~(DIS1),~LIT~(MAIN),~LIT~(AD-
10000),~LIT~(AL-10000),~LIT~(),~LIT~(),~LIT~(0)
Substitution Keywords
RunReport also support several keywords. These keywords are replaced with values if they occur in
the text of formulas used in reports.
Keyword Description
BG~USERID~ User who submitted the report.
BG~UID~ User who submitted the report. This parameter is replaced when
passed from a form, as well as being replaced in report formulas.
BG~SITEID Site field from the parms table.
BG~COMPANYNAME~ Company field from the parms table.

Using RunReport.exe
86 | Infor Mongoose - Creating and Customizing Reports
Debug Mode
RunReport can be run in debug mode. To set this up, use TaskMan start parameter debugrep. The
output from debug mode is explained in the section on running TaskMan in debug mode in the
system administration guide for your system.

Infor Mongoose - Creating and Customizing Reports | 87
C
Appendix C: Reference
This appendix covers miscellaneous reference-type topics related to reports.
Report Definition Templates
Infor provides the following report definition templates, which help ensure uniform report layout when
converting or creating reports.
Template_Report_Landscape.rdl
Template_Report_Landscape_IDO.rdl
Template_Report_Portrait.rdl
Template_Report_Portrait_IDO.rdl
Template_SubReport_Landscape.rdl
Template_SubReport_Portrait.rdl
Landscape report width is 10.5 inches and portrait report width is 7.77 inches. IDO report templates
are for reports that retrieve data using an IDO, and subreport templates are for reports that are part of
main reports. For example, ReportNotes.rdl is a subreport.

Reference
88 | Infor Mongoose - Creating and Customizing Reports
Objects Used in Reports
Executables
DLLs
Tables/IDOs/Forms
Executable Description
Taskman.exe Runs as a service on the utility server. It monitors the queue of tasks.
See Chapter 3, “Configuring TaskMan to Process and Generate
Reports." It references MGReportProcessor to generate the task
parameter (XML) file, which is passed to RunReport as its command-
line input parameter.
RunReport.exe Used to launch reports. Can also be run from a command line. See
Appendix B, “Using RunReport.exe."
DLL Description
TMMsgs.dll Used by TaskMan
MGCore.dll Used by report previews
MGReportProcessor.dll A .NET class library which contains the core reporting logic, which both
TaskMan.exe and RunReport.exe reference.
Table IDO Form Description
ActiveBGTasks MGCore.ActiveBGTasks Active
Background
Tasks
Queue of tasks.
N/A N/A Background
Queue
Schedules tasks to run
later.
BGTaskHistory MGCore.BGTaskHistories Background
Task History
Is created by a trigger on
ActiveBGTasks, updated
by
TaskMan. Contains a
record of when a task was
submitted, started and
completed, plus any error
messages.

Reference
Infor Mongoose - Creating and Customizing Reports | 89
Stored Procedures/COM Methods
BGTaskDefinitions MGCore.BGTaskDefinitions Background
Task
Definitions
Creates a record that
identifies each background
task to
TaskMan.
ReportOptions MGCore.ReportOptions Report
Options
Sets the output format for
reports, and the UNC
printer name if the report is
sent directly to a printer.
SP/COM Method Description
BGTaskSubmit Used with Mongoose to submit reports
to
TaskMan. It returns the row pointer of
BGTaskHistory
(@TaskHistoryRowPointer) for a task
being created.
SL.SLJobQueues.BackGroundQueueSP Used with the Background Queue
form.
MGCore.ActiveBGTasks.BackGroundQueueDeleteSP Used with the Background Queue
form.
CLM_GetBGTasksToProcessSp TaskMan calls this at its polling time,
querying the ActiveBGTasks table to
retrieve background tasks to be
processed.
GetTaskOptionsSp Used to determine the report output
directory, based on the Report Output
Directory process default on the
Process Defaults form or the Output
Directory field on the Report Options
form.
UpdateActiveBGTaskSp While processing a requested task,
TaskMan is to update the task status
using the stored procedure.
Table IDO Form Description

Reference
90 | Infor Mongoose - Creating and Customizing Reports
Translating Messages from Reports
In most cases, your custom report file should use string formulas for messages, so they will be
translated properly. The stored procedure should return an indication that a message is needed,
instead of the actual message, and then the report should include selection criteria that determine
which message string to display.
However, in some cases it might be appropriate to call MsgAppSp to provide messages. Be aware
that, because of the way report stored procedures are initialized, MsgAppSp always uses the
session’s default language (en-US) for messages displayed by report stored procedures. TaskMan
creates a session before generating a report. The session variable MessageLanguage contains the
language ID of the user requesting the report. TaskMan then passes the Session ID to RunReport as
a command line parameter.
If another language is desired for messages, to work around this, you must get the variable for the
proper language:
1. If a report stored procedure calls MsgAppSp, add this parameter to the stored procedure:
When RunReport sees this parameter, it passes the Session ID to the stored procedure.
2. In the stored procedure, immediately after the call to InitSessionContextSp, add this code:
This copies the MessageLanguage session variable to the current session context, so when
MsgAppSp is called, it uses the correct language ID.
3. Perform a database verification on the associated report after the stored procedure has been
updated.
Structure of Report Stored Procedures
Note: The sample code for this section is taken from the stored procedure used in Chapter 2,
“Creating Reports."
All report stored procedures have the same basic structure:
There is a set of input parameters typically defaulted to NULL. A NULL input parameter indicates
that the parameter should not be used to restrict the record set returned by the stored procedure.
The stored procedure may have additional parameters for notes and the report header.
Example:
@BGSessionId nvarchar(255) = NULL
-- Copy the session variables referenced by @BGSessionId to the current
-- session created by the call to InitSessionContextSp.
EXEC CopySessionVariablesSp
@SessionId = @BGSessionId
SET QUOTED_IDENTIFIER ON
GO

Reference
Infor Mongoose - Creating and Customizing Reports | 91
There is a block of code setting current session values, starting a transaction, and setting the
session.
Example:
SET ANSI_NULLS ON
GO
IF EXISTS (SELECT * FROM sys.objects WHERE object_id =
OBJECT_ID(N'[dbo].[Rpt_UserTaskSp]') AND type IN (N'P', N'PC'))
DROP PROCEDURE [dbo].[Rpt_UserTaskSp]
GO
CREATE PROCEDURE Rpt_UserTaskSp
(
@UsernameStarting UsernameType = NULL
, @UsernameEnding UsernameType = NULL
, @TaskNameStarting MessageSubjectType = NULL
, @TaskNameEnding MessageSubjectType = NULL
, @RemindDateTimeStarting DateTimeType = NULL
, @RemindDateTimeEnding DateTimeType = NULL
, @RemindDateTimeStartingOffset DateOffsetType = NULL
, @RemindDateTimeEndingOffset DateOffsetType = NULL
) AS
-- Transaction management.
BEGIN TRANSACTION
SET XACT_ABORT ON
-- Set the isolation level specified for the background task
-- or use the system default.
IF dbo.GetIsolationLevel(N'UserTaskReport') = N'COMMITTED'
SET TRANSACTION ISOLATION LEVEL READ COMMITTED
ELSE
SET TRANSACTION ISOLATION LEVEL READ UNCOMMITTED
DECLARE
@RptSessionID RowPointerType
, @LowDate DateType
, @LowCharacter HighLowCharType
, @HighCharacter HighLowCharType;
-- A session context is created so session variables can be used.
EXEC InitSessionContextSp
@ContextName = 'Rpt_UserTaskSp'
, @SessionID = @RptSessionID OUTPUT
;

Reference
92 | Infor Mongoose - Creating and Customizing Reports
NULL input parameters used to specify ranges are set to minimum and maximum values. Use the
SQL user-defined functions for this: LowDate, LowInt, LowString, HighDate, HighInt, HighString,
and so on. There is also the function ExpandKyByType for parameters of type NUMSORTCHAR.
Example:
Date offset parameters are set.
Example:
Many report stored procedures use temp tables for the report's record set. These should be
created by selecting variables into a temp table, so that User Defined Types can be used.
Example:
-- Set the low and high values used for defaulting.
SET @LowDate = dbo.LowDate();
SET @LowCharacter = dbo.LowCharacter();
SET @HighCharacter = dbo.HighCharacter();
-- Replace NULL input parameters with Min or Max values.
SET @UsernameStarting = ISNULL(@UsernameStarting, @LowCharacter);
SET @UsernameEnding = ISNULL(@UsernameEnding, @HighCharacter);
SET @TaskNameStarting = ISNULL(@TaskNameStarting, @LowCharacter);
SET @TaskNameEnding = ISNULL(@TaskNameEnding, @HighCharacter);
-- Apply date offsets.
EXEC ApplyDateOffsetSp @Date = @RemindDateTimeStarting OUTPUT, @Offset
= @RemindDateTimeStartingOffset, @IsEndDate = 0;
EXEC ApplyDateOffsetSp @Date = @RemindDateTimeEnding OUTPUT, @Offset =
@RemindDateTimeEndingOffset, @IsEndDate = 1;
-- Declare variables used to create the temp table.
DECLARE
@UserId TokenType
, @Username UsernameType
, @TaskName MessageSubjectType
, @RemindDateTime DateTimeType
, @TaskDescription NoteType
, @RowPointer RowPointerType;
-- Create an empty temp table for the report output.
SELECT
@UserId AS UserId
, @Username AS Username
, @TaskName AS TaskName
, @RemindDateTime AS RemindDateTime
, @TaskDescription AS TaskDescription
, @RowPointer AS RowPointer
INTO #ReportOutput

Reference
Infor Mongoose - Creating and Customizing Reports | 93
There is a large block of code populating the result set.
Example:
At the end of the stored procedure, the report record set is returned, the transaction is committed,
and the session is closed.
Example:
WHERE 1=0;
-- Insert data into the temp table.
INSERT INTO #ReportOutput
SELECT
t.UserId
, n.Username
, t.TaskName
, t.RemindDateTime
, t.TaskDescription
, t.RowPointer
FROM UserTask t
INNER JOIN UserNames n ON t.UserId = n.UserId
WHERE n.Username BETWEEN @UsernameStarting AND @UsernameEnding
AND t.TaskName BETWEEN @TaskNameStarting AND @TaskNameEnding
AND ISNULL(t.RemindDateTime, @LowDate) BETWEEN
@RemindDateTimeStarting AND @RemindDateTimeEnding;
-- Return the report data.
SELECT
UserId
, Username
, TaskName
, RemindDateTime
, TaskDescription
, RowPointer
FROM #ReportOutput
ORDER BY Username, RemindDateTime, TaskName;
COMMIT TRANSACTION
EXEC CloseSessionContextSp @SessionID = @RptSessionID;
GO

Reference
94 | Infor Mongoose - Creating and Customizing Reports
Fonts Used in Reports
Reports print using appropriate fonts as assigned by the application from which the report is being
generated.
Note: In previous releases, the use of Crystal Reports to generate reports mandated that font settings
be made on the Language IDs form. With SSRS, this is no longer the case.
Date and Numeric Formats Used in Reports
Reports print using appropriate date and numeric formats, as assigned by the application from which
the report is being generated.
Note: In previous releases, the use of Crystal Reports to generate reports mandated that date and
numeric format settings be made on the Language IDs form. With SSRS, this is no longer the case.
Languages Used in Reports
In some Mongoose-based applications (such as SyteLine and Service Management), some reports
print in a language other than the language currently in use on the client workstation. For example, if
a language is specified for a vendor in the Vendors form, certain reports, such as the Purchase
Order Report, print in the language specified for the vendor. The report uses the font associated with
that language in the Language IDs form.
The following reports print in the vendor’s or customer’s language, if specified:
In SyteLine only:
Bill of Lading (prints in the site’s language)
Estimate Response Form Report
Order Invoicing Credit Memo
Order Verification Report
Packing Slip
Post Project Invoice Milestones
Price Adjustment Invoice
Pro Forma Invoice (prints in the site’s language)
Project Packing Slip
Reprint Packing Slip Report
Reprint Project Packing Slip Report
RMA Credit Memo
In both SyteLine and Service Management:

Reference
Infor Mongoose - Creating and Customizing Reports | 95
AR Invoice Credit/Debit Memo Report
Change Order Report
Customer Statements Report
Purchase Order Report
When these reports are printed, TaskMan selects the proper Strings table to use for report labels,
based on the language code setting in the Vendors form or Customers form. If there is no language
code setting for the vendor/customer, the user’s language code is used to print the report. Special text
(for example, the CO text on the order invoice) can be translated using the Multi Lingual Order
Invoice form (SyteLine only) or Multi Lingual Purchase Orders form.
All other reports print in the user’s language. The user language is set at login, using the Windows
Control Panel setting. After logging in, the user can manually choose a different Strings table by
selecting Settings > Runtime > Behavior > Language. The currently active Strings table is used to
print the report.
Print-preview always displays the report in the user’s language.
Document Profiles
In some Mongoose-based applications, the Customer Document Profile and Vendor Document
Profile forms enable you to send certain reports to customers and vendors. When defining the report
parameters, select the Use Profile field to trigger use of the document profiles when you print the
report (document profiles are ignored when previewing).
The Customer Document Profile form and Vendor Document Profile form are subject to record
collection caps. For example, if your collection cap is set at 100, and you attempt to send a report to
150 customers, only the first 100 will be processed. For more information, see the “About Caps on
Collection and Drop-Down Lists” topic in the online help.

Reference
96 | Infor Mongoose - Creating and Customizing Reports
The following flowchart shows how report output is sent using the document profile forms.
Splitting Up of Tasks
All reports that use the Language Code and/or the Customer/Vendor Doc Profile are split up into
smaller tasks prior to being submitted to TaskMan. The Active Background Tasks form and the
Background Task History form show multiple entries based upon the split.

Infor Mongoose - Creating and Customizing Reports | 97
Index
A
Active Background Tasks form B-82, C-88
checking status with 3-47
using to monitor report progress 4-57
adding barcodes to a report 5-65
B
Background Queue form 1-13, 4-53, 4-60, C-88
Background Queue form, using to monitor sched-
uled report tasks
4-60
Background Task Definitions form C-89
adding background tasks 3-47
Max Concurrent field 3-47
background task forms
using to monitor status of report activities
4-61
Background Task History form 1-13, 3-47, A-67,
C-88
using to monitor report activity 4-57
background tasks, adding 3-47
barcodes
adding to a report
5-65
BGTaskSubmit C-89
C
changing report logos 5-64
CLM_GetBGTasksToProcessSp C-89
common report problems A-68
connection string
resetting
2-39
temporarily changing 2-25, 2-31
container classes 2-36
customization of reports 5-63
D
datasets
adding
2-25, 2-31
setting properties 2-28
date formats used in reports C-94
debug messages
TaskMan
A-80
deployment, report definition file 2-39
DisplayHeader
adding to report criteria form
4-53
report parameter 2-38
DLLs used for reports C-88
E
elements of report layout 2-35
e-mailing reports 1-16
error log A-67
error messages, finding information A-67
excluded tasks 1-9, 1-13
executables used for reports C-88
F
fonts used in reports C-94
formatting report elements 2-37
forms used for reports C-88
forms used with reports
Active Background Tasks
3-47, B-82, C-88
Background Queue 1-13, 4-53, C-88
Background Task Definitions 3-47, C-89
Background Task History 1-13, 3-47, A-67, C-
88
Report Options 1-13, 3-46, C-89

98 | Infor Mongoose - Creating and Customizing Reports
G
GetTaskOptionsSp C-89
I
IDOs used for reports C-88
Increment Date field, adding 4-53
L
labels, modifying for localization 2-37
languages used in reports C-94
layout
configuring
2-35
elements 2-35
formatting changes 2-37
procedure 2-36
report header page 2-38
localization, modifying labels for 2-37
logos
changing
5-64
requirements 5-64
M
Max Concurrent field, Background Task Defini-
tions form
3-47
MGCore.ActiveBGTasks.BackGroundQueueDe-
leteSP
C-89
MGReportProcessor B-81
Microsoft Event Viewer error messages A-67
modifications to reports 5-63
N
numeric formats used in reports C-94
O
output paths, defaults for reports 3-45
overview of this guide 1-7
P
Preview button, adding and configuring 4-57
Print button, adding and configuring 4-54
Process Defaults form
report options
3-44
Report Output Obfuscation 3-44
TaskMan options 3-45
R
Rectangle container class 2-36
Report Builder 3.0, using for RDLs 2-19, 5-63
report criteria form
adding button to launch report
4-54
adding preview button 4-57
creating 4-50
defined 1-7
described 4-49
Increment Date field, adding 4-53
testing 4-57
testing tasks on background queue 4-60
report definition file
basic layout elements
2-35
configuring the report layout 2-35
creating 2-19, 2-20
creating from a template 2-21, 2-29
creating the report project 2-20, 2-29
creating, example for stored procedure-based
reports
2-20, 2-29
defined 1-7
deploying 2-39
modifying 5-63
populating with data 2-28
setting the report title 2-27, 2-33
testing the report configuration 2-28, 2-35
tools required for creating 2-19
tools required for modifying 5-63

Infor Mongoose - Creating and Customizing Reports | 99
report definition files 2-19
report header page
adding option to display on the report form
4-53
laying out 2-38
report logos
changing
5-64
requirements 5-64
report modifications
changing logos
5-64
hiding lines on a financial statement 5-65
report options
default output directories
3-45
Process Defaults form 3-44
Report Options form C-89
Report Output Obfuscation 3-44
report outputs
default output paths
3-45
defined 1-7
Report Output Obfuscation 3-44
report parameters
adding
2-37
DisplayHeader 2-38
modifying 2-26, 2-34
report project
creating
2-20, 2-29
report parameters
adding
2-37
modifying 2-26, 2-34
setting the data source properties 2-25, 2-31
reports
customization vs. modification
5-63
date formats used C-94
fonts used C-94
languages used C-94
numeric formats used C-94
objects used in
DLLs
C-88
executables C-88
tables, IDOs, and forms C-88
process for previewing
system view
1-11
user view 1-9
process for printing
system view
1-15
user view 1-12
related terminology 1-7
setup process 1-7
system configuration for 1-8
templates for creating 2-19
using e-mail with 1-16
RunReport.exe C-88
debug mode B-86
running from a command line interface B-81
using B-81
RunReport.exe, described 1-9
S
setting up reports 1-7
SL.SLJobQueues.BackGroundQueueSP C-89
SQL Server Business Intelligence Development
Studio, using for RDLs
2-19, 5-63
SSRS container classes 2-36

100 | Infor Mongoose - Creating and Customizing Reports
status
checking for active background tasks
3-47
checking with background task forms 4-61
stored procedures
creating
2-22
used with reports
BGTaskSubmit
C-89
CLM_GetBGTasksToProcessSp C-89
GetTaskOptionsSp C-89
MGCore.ActiveBGTasks.BackGroundQueu
eDeleteSP
C-89
SL.SLJobQueues.BackGroundQueueSP C-
89
UpdateActiveBGTaskSp C-89
system view
printing process
1-15
report preview process 1-11
T
tables used for reports C-88
Tablix container class, described 2-36
TaskMan 1-8
debug mode messages A-80
described 3-43
event messages A-80
installation and configuration for reports 3-43
options on Process Defaults form 3-45
Taskman.exe C-88
templates
creating a report definition file from
2-21, 2-29
for reports 2-19
terminology 1-7
testing the report form 4-57
troubleshooting reports A-67
file not found (all reports) A-72
file not found (not all reports) A-71
labels not being translated A-74
missing RPT or RDL file A-75
reports do not print A-68
TaskMan-related problems
e-mail messages not being received
A-79
error 128, error running report A-78
error 13, type mismatch A-77
error 534, error detected by database DLL
A-78
field name not known A-78
intermittent errors A-76
no report output A-76
notes not printing A-77
reports fail with error code A-77
truncated data in text output A-70
users not receiving forwarded reports (outside
network)
A-72
U
UpdateActiveBGTaskSp C-89
user view
print report process
1-12
report preview process 1-9
V
Visual Studio 2008 R2
basic layout elements
2-35
configuring the report layout 2-35
creating the report definition file 2-20
creating the report definition file from a tem-

Infor Mongoose - Creating and Customizing Reports | 101
plate 2-21, 2-29
creating the report project 2-20, 2-29
creating the stored procedure 2-22
populating the report with data 2-28
setting data source properties 2-25, 2-31
setting the report title 2-27, 2-33
testing the report configuration 2-28, 2-35
using for RDLs 2-19, 5-63

102 | Infor Mongoose - Creating and Customizing Reports

Infor Mongoose - Creating and Customizing Reports | 103

104 | Infor Mongoose - Creating and Customizing Reports

Infor Mongoose - Creating and Customizing Reports | 105

106 | Infor Mongoose - Creating and Customizing Reports

Infor Mongoose - Creating and Customizing Reports | 107

108 | Infor Mongoose - Creating and Customizing Reports

Infor Mongoose - Creating and Customizing Reports | 109

110 | Infor Mongoose - Creating and Customizing Reports

Infor Mongoose - Creating and Customizing Reports | 111

112 | Infor Mongoose - Creating and Customizing Reports
