
Office 365 Forms

Office of Information Technology - Technology Learning Center Office 365 Forms
1
Table of Contents
WHAT IS OFFICE 365 FORMS ................................................................................................................................
................................................................................................................................................................
................................................................................................
................................................................................................................................................................
................................................................................................................................
................................................................................................
................................................................................................................................
................................................................................................................................
................................................................................................................................................................................................
................................................................................................................................................................................................
....... 3
Objectives ......................... 3
OFFICE 365 FORMS VS. GOOGLE FORMS .................. 3
SIGNING IN ......... 4
THE OFFICE 365 INTERFACE ....... 5
FORMS APP & CREATION OF NEW FORM ................ 5
FORMS QUESTION TYPES .............. 7
FORMS QUESTION EXAMPLES ..... 7
Choice 7
Text ..... 9
Rating ............................................................................................................................................................................................... 10
Date .................................................................................................................................................................................................. 10
Ranking ........................................................................................................................................................................................... 11
Likert ................................................................................................................................................................................................ 11
Net Promoter Score .................................................................................................................................................................... 12
Sections ........................................................................................................................................................................................... 12
SHARING A FORMS DOCUMENT ................................................................................................................................ 14
ANALYZING DATA RESPONSES FOR FORMS ......................................................................................................... 15
Analyzing Data in Excel ............................................................................................................................................................ 16
ENHANCING FORMS AND QUIZZES .......................................................................................................................... 17
Applying a Theme ....................................................................................................................................................................... 17
Branching ....................................................................................................................................................................................... 18
Inserting Images and Media.................................................................................................................................................... 19
OFFICE 365 FORMS ICONS GUIDE .............................................................. ERROR! BOOKMARK NOT DEFINED.

Office of Information Technology - Technology Learning Center Office 365 Forms
2
Copy
right © 2021 WSSU Office of Information Technology
This document may be downloaded, printed, or copied for educational use without further permission of
the Office of Information Technology (OIT), provided the content is not modified and this statement is not
removed. Any use not stated above requires the written consent of OIT. The distribution of a copy of this
document via the Internet or other electronic medium without the written permission of the WSSU - OIT is
expressly prohibited.
Published by Technology Learning Center – 2021
The publisher makes no warranties as to the accuracy of the material contained in this document and
therefore is not responsible for any damages or liabilities incurred from OIT use.

Office of Information Technology - Technology Learning Center Office 365 Forms
3
What is Office 365 Forms
Office 365 Forms allows users easily and quickly create surveys, quizzes, and polls. Although, Office 365
Forms was designed specifically with educators in mind, it has been proven to be useful for other users to
create effective forms/quizzes for their use. For faculty members, Office 365 Forms can be used to create
quizzes, collect feedback from students, colleagues and parents, or plan class and staff activities. In
business organizations, Office 365 Forms can be used as a tool to collect customer feedback, measure
employee satisfaction, improve business or products, or organize company events.
In this training course, we will demonstrate how to get started using Office 365 Forms to quickly and
easily collect information. We will walk through the key features, including how to create a Form/Quiz,
how to distribute a Form/Quiz, as well as learn how to collect and review data from participant
responses. Throughout this training we will refer to Forms as Office 365 Forms.
Office 365 Forms has proven to be a useful tool for several reasons:
• Quickly and easily create surveys, registrations, and quizzes
• Forms/Quizzes are accessible on mobile devices
• Responses can be from authenticated and anonymous users
• Immediate grading functionality for quizzes
• Data can easily be extracted into Excel and other systems for analytical purposes
Objectives
This training session will allow users the ability to:
• Create new Forms and Quizzes.
• Manage forms via format and branding.
• View and analyze response data collected via Forms.
Office 365 Forms vs. Google Forms
Although both Office 365 Forms and Google Forms were both developed to allow users to focus on their
task rather than the complexities of a database; they are very much alike with only a few differences.
Both allow the ease of creating surveys, quizzes and polls. Each allowing the option of sharing and
collaboration. When compared side by side there a minimal differences.
Task
Office 365 Forms
Google Forms
Preview Form using Desktop or Mobile
Yes
No
Organize questions into multiple pages
Yes
Yes
Set start and end dates at specific times for
when the form is open or closed for access
Yes
No
View average completion time for the form
Yes
No
Organize form elements into sections
Yes
Yes

Office of Information Technology - Technology Learning Center Office 365 Forms
4
Signing In
To access Office 365 Forms sign in by opening a web
browser and going to Microsoft 365 Account. Google
Chrome or Mozilla Firefox are recommended browsers to
use.
Click in the first field to enter your Winston-Salem State
University account, using the fully qualified username:
(See Figure 1) username@wssu.edu.
Note that all logins for all Office 365 products should be
entered using the “username@wssu.edu” format.
When you click Next, you will be re-directed to the
Winston-Salem State University’s Office 365 sign-in page.
Enter your University password and click Sign in. (See
Figure 2)
Figure 1 - Office 365 Sign In
Figure 2 - WSSU Office 365 Sign In

Office of Information Technology - Technology Learning Center Office 365 Forms
5
The Office 365 Interface
Initial login is directed to the main apps landing page. (See Figure 3) From the landing page users can
access the following features:
• The application tiles for opening the range of available Office 365 apps
• The Install button for downloading and installing the latest version of Office software onto
personal devices, which is located below Search field.
Forms App & Creation of New Form
Open Office 365 Forms by clicking the Forms tile on the Office 365 landing page or by selecting Forms
from the Quick App launcher (the grid icon in the top left hand corner) .
The Office 365 Forms Quick Launch bar gives the options to Preview a Form/Quiz, Apply a Theme to a
Form/Quiz, Share a Form/Quiz. (See Figure 4)
Figure 4 - Office 365 Forms Command Bar
The Ellipses (…) on the Forms Command bar offer the option to edit Settings. (See Figure 5) Authors can
setup functions for a Form/Quiz. Authors can allow the Form/Quiz to “Show results automatically”, allow
“Anyone with the link to respond” to the Form/Quiz; which will only return anonymous responses or allow
“Only people in my organization can respond”; which will record and include the names and email
addresses of the participants; as well as restrict responses to one response per participant.
At this time the university faculty, staff and students are grouped in separate permission groups.
Although faculty, staff and students can collaborate within OneDrive for Business; they are not able to
collaborate within Forms. All forms and quizzes created requesting student responses will have to be
Figure 3 – Office 365 App Tiles

Office of Information Technology - Technology Learning Center Office 365 Forms
6
added the student tenant or the form will have to be set to allow “Anyone with the link to respond” and
additional fields can be added to the form to record the names for each response.
The option to allow a certain date and time range for when responses can be accepted can be enabled; as
well as to “Shuffle questions” “Lock questions” and “Email notifications for each response” can all be done in
the Settings window. (See Figure 6)
Figure 5 – Settings
Figu
re 6 – Settings Options
Office 365 Forms offers two types of Forms. Forms which allow users to create surveys, polls,
registrations, and Quizzes which allow users to create quizzes for any subject. Under the My Forms tab
click New Form or New Quiz to begin creating a new form/quiz.
(See Figure 7)
Figu
re 7 – Forms New Form/Quiz
Assign a Title to the Form/Quiz. The title field has a character limit of 90. A Subtitle field is optional to
add a description or subtitle to the form/quiz. The Subtitle field has a character limit of 1000. Questions

Office of Information Technology - Technology Learning Center Office 365 Forms
7
can be added to Forms/Quizzes by clicking the Add Question button as seen in the question setup
window. (See Figure 8)
Figure 8 – Forms Title & Subtitle Fields
Forms Question Types
Question types are determined by the type of functionality the user would like to use for each question
within the form/quiz. (See Figure 9).
In the “Forms Question Examples” section we will review the setup of sample question for each question
type of Office 365 Forms. To create a new question we will begin by clicking the Add question button
and selecting the question the preferred question type of the Choice, Text, Rating, Date, Ranking or Likert
as the question type; each time a new question is created. (See Figure 9)
Figure 9 – Office 365 Forms Question Types
Forms Question Examples
Choice
Choice questions allow users to create a multiple choice question that allows a single answer or multiple
answers. Choice Form/Quiz questions users can mark the correct answer(s) to be displayed with a
comment for quizzes. Choice questions give users the ability to include Math functionality for questions and
answers on Quiz forms.
1. Click the Add question button to add a new question to the Form/Quiz.
2. Select Choice as the question type.
3. Enter the question text in the question field.

Office of Information Technology - Technology Learning Center Office 365 Forms
8
Note: An additional text field may be added for questions by clicking the Subtitle option. (See
Figure 10)
4. Click the Add option button to add additional answer options for a question. (Two answer fields
are given by default). (See Figure 10)
5. Click the Add option to add additional answer fields to a question.
6. Click Shuffle Options to reorder the answer options each time the Form/Quiz is refreshed.
(Figure 10)
Figure 10 – Office 365 Form “Choice” question type
7. To provide the end user an opportunity to enter their own individual answer option users can
select Add “Other” Option. This inserts an option of “Other” textbox which the participants can
select and fill in an answer (See Figure 11).
Figure 11 - Office 365 Forms adding answer option
8. The option for multiple answers can be done by selecting the Multiple answers swipe button (See
Figure 12). Setting a question to be required can be done by selecting the “Required” swipe
button (See Figure 14) which requires participants to provide an answer to the question before
moving to the next question or completing the form. The order of the answer options can be
shuffled upon refreshing of the form/quiz for each use and subtitles can be added to allow
descriptions or additional text for the question text. (See Figure 13)
Figure 12 - Office 365 Forms Multiple/Required options Figure 13 Office 365 Forms Subtitles & Shuffle options

Office of Information Technology - Technology Learning Center Office 365 Forms
9
When using the “Multiple answers” option the radio selection buttons for the answers field will change
to check boxes, as seen below (Figure 14)
Figu
re 14 -Office 365 Forms Multiple Options Enabled
All questions share common features that can be used for every question type in Office 365 Forms. All
questions have a question text field with a character limit of 4000. All questions have the option to add
an image or media clip to be used as a part of each individual question. A toolbar in the top right
corner of each question give the options to copy or duplicate a question by clicking the Copy icon ;
delete questions by clicking the delete icon or questions can be moved up or down to change the
position on the form/quiz by clicking the up and down arrow icon . In the bottom right corner all
questions in Office 365 Forms can be marked as “Required” , and each have the option of
adding a Subtitle to each question.
Text
Text type questions can be used for Essay questions or questions which users want to add media. The add
media is a recent addition to the Office 365 Forms application and allows users to insert graphics or
video a form/quiz.
1. Enter the question text into the question text box
2. A slide button option is available for this type of question called Long answer which enables the
participant(s) to enter a paragraph answer instead of a single line answer (See Figure 15).
Figu
re 15 – Text question type Long answer enabled
Office of Information Technology - Technology Learning Center Office 365 Forms
10
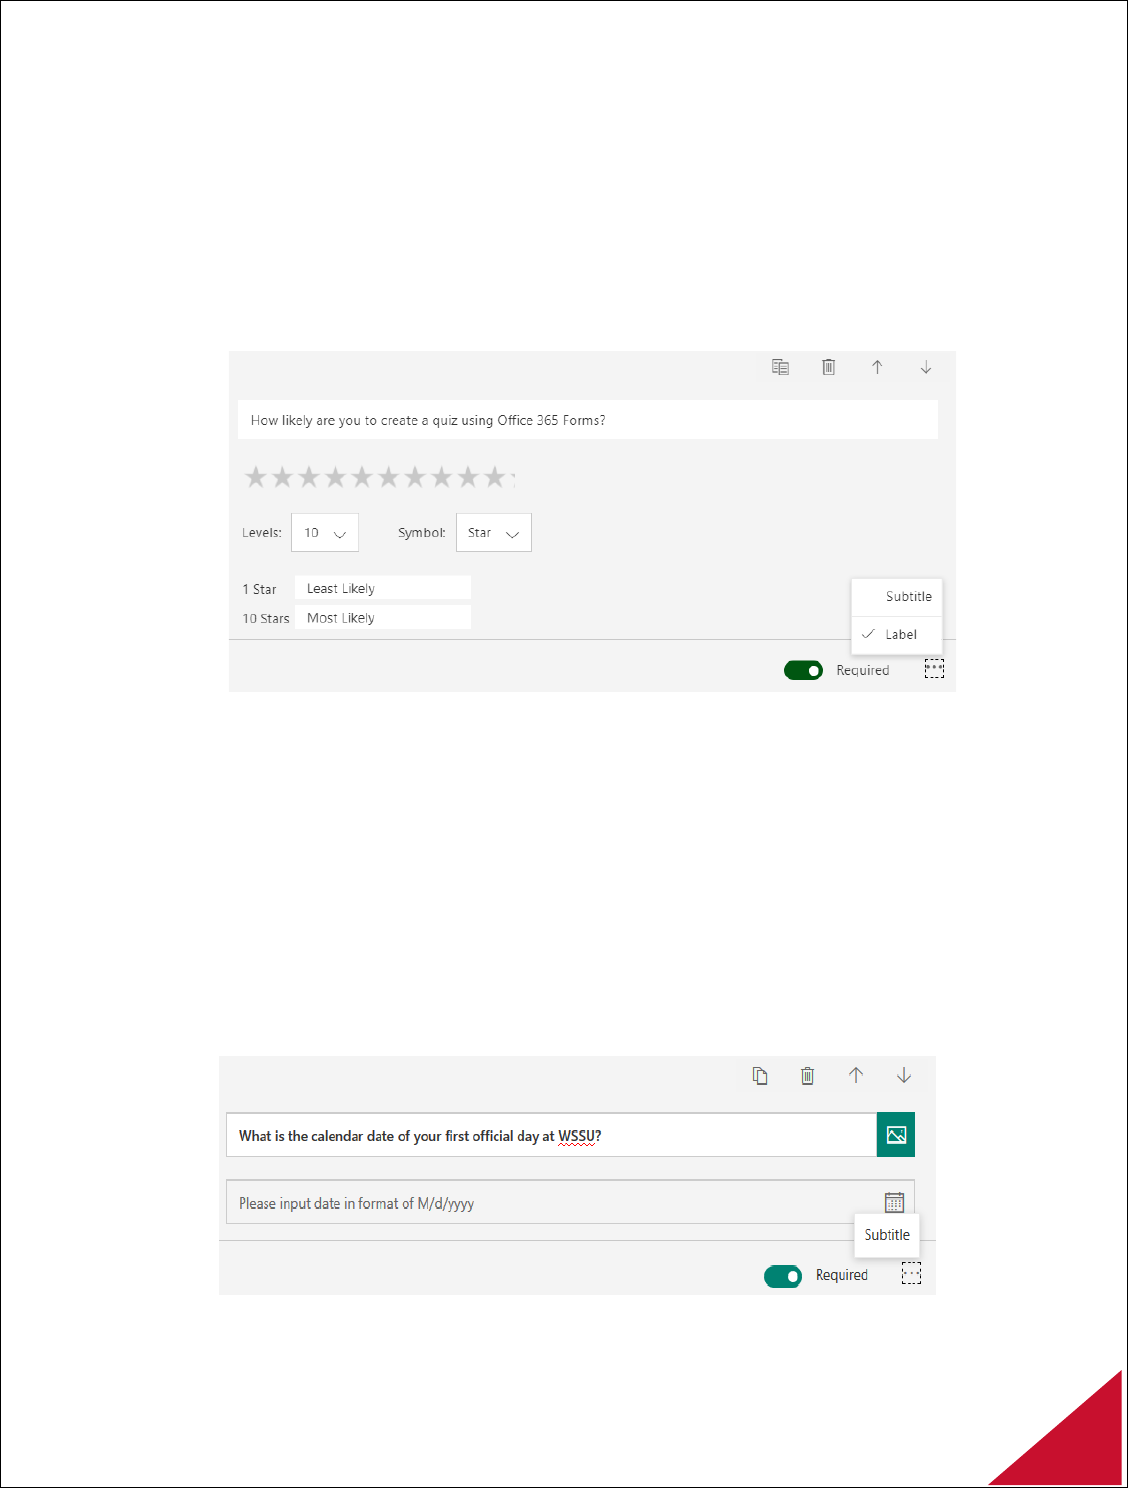
Rating
Rating type questions are best for survey type forms where participants are asked to rate a question on a
custom scale.
1. Enter the text for the question into the question text box.
2. Select the Levels from the two options of 5 or 10.
3. Select the Symbol of Stars or Numbers to represent the Rating
4. Users are also given the choice of adding a label to the lowest and highest options to provide a
visual description of measurement rating to the users. (See Figure 16)
Figu
re 16 – Office 365 Forms Rating question type
Date
Date type questions as the name suggests allows the author to create questions which only a date will be
required and accepted in a calendar date format. The participant is provided with a date box, which they
can select the correct date for the question from a calendar within Forms. This is useful in surveys or
other form types where you need to collect data for a date associated with the question.
1. Enter the text for the question into the question textbox.
Note: Only one field for the date to be entered by the user will be displayed. Users may select the
date from the calendar which will be displayed. (See Figure 17)
Figu
re 17 – Office 365 Forms Date question type

Office of Information Technology - Technology Learning Center Office 365 Forms
11
Ranking
Ranking questions allow Form/Quiz authors to ask participants to rank answer choices in a particular
order. Responses can be collected and visualized for easy analysis.
1. Enter text for the question into the question textbox.
2. Enter text for each answer option. (See Figure 18)
Figu
re 18 - Office 365 Forms Ranking question type
Likert
Likert give users the option to provide responses for matrix/rating scale multi-grid and multi-choice
question types. This question type provides the functionality found in popular survey creation programs
such as Adobe Forms and Survey Monkey.
1. Enter text for the question into the question textbox.
2. Enter text for each answer option. (See Figure 19)
Figu
re 19 - Office 365 Likert question type

Office of Information Technology - Technology Learning Center Office 365 Forms
12
Net Promoter Score
The Net Promoter Score question allows users to easily measure customer experiences and predict
business growth.
1. Enter text for the question into the question textbox..
2. Enter text for the Labels for the scale of 0 to 10. (See Figure 20)
Figu
re 20 - Office 365 Net Promoter Score question type
Sections
If you're creating a lengthy survey or questionnaire, it's helpful to organize your questions into multiple
pages—or sections—which you can easily rearrange and reorder. Sections also help orient your form
responders consume a long survey that has been organized into smaller parts. Clicking on More settings
for section in the upper right corner of the section allows users to Duplicate, Remove or Move a
section. (See Figure 21)
• Duplicate section - Make a copy of the questions within that
section.
• Remove section - Click Just section to remove just the section
header, or select Section and questions to remove the section and
all questions within it.
• Move section - Use the Move up and Move down arrows to
rearrange the order of your sections.
Figure 21 - Forms Sections Options
Note: Branching and shuffle question features are disabled when users include Sections in their form.

Office of Information Technology - Technology Learning Center Office 365 Forms
13
All Forms/Quizzes produced are optimized for both desktop and mobile viewing.
(See Figure 22 & Figure 23)
Fig
ure 22 - Office 365 Forms Computer Preview
Figure 23 - Office 365 Forms Mobile Preview
Office of Information Technology - Technology Learning Center Office 365 Forms
14
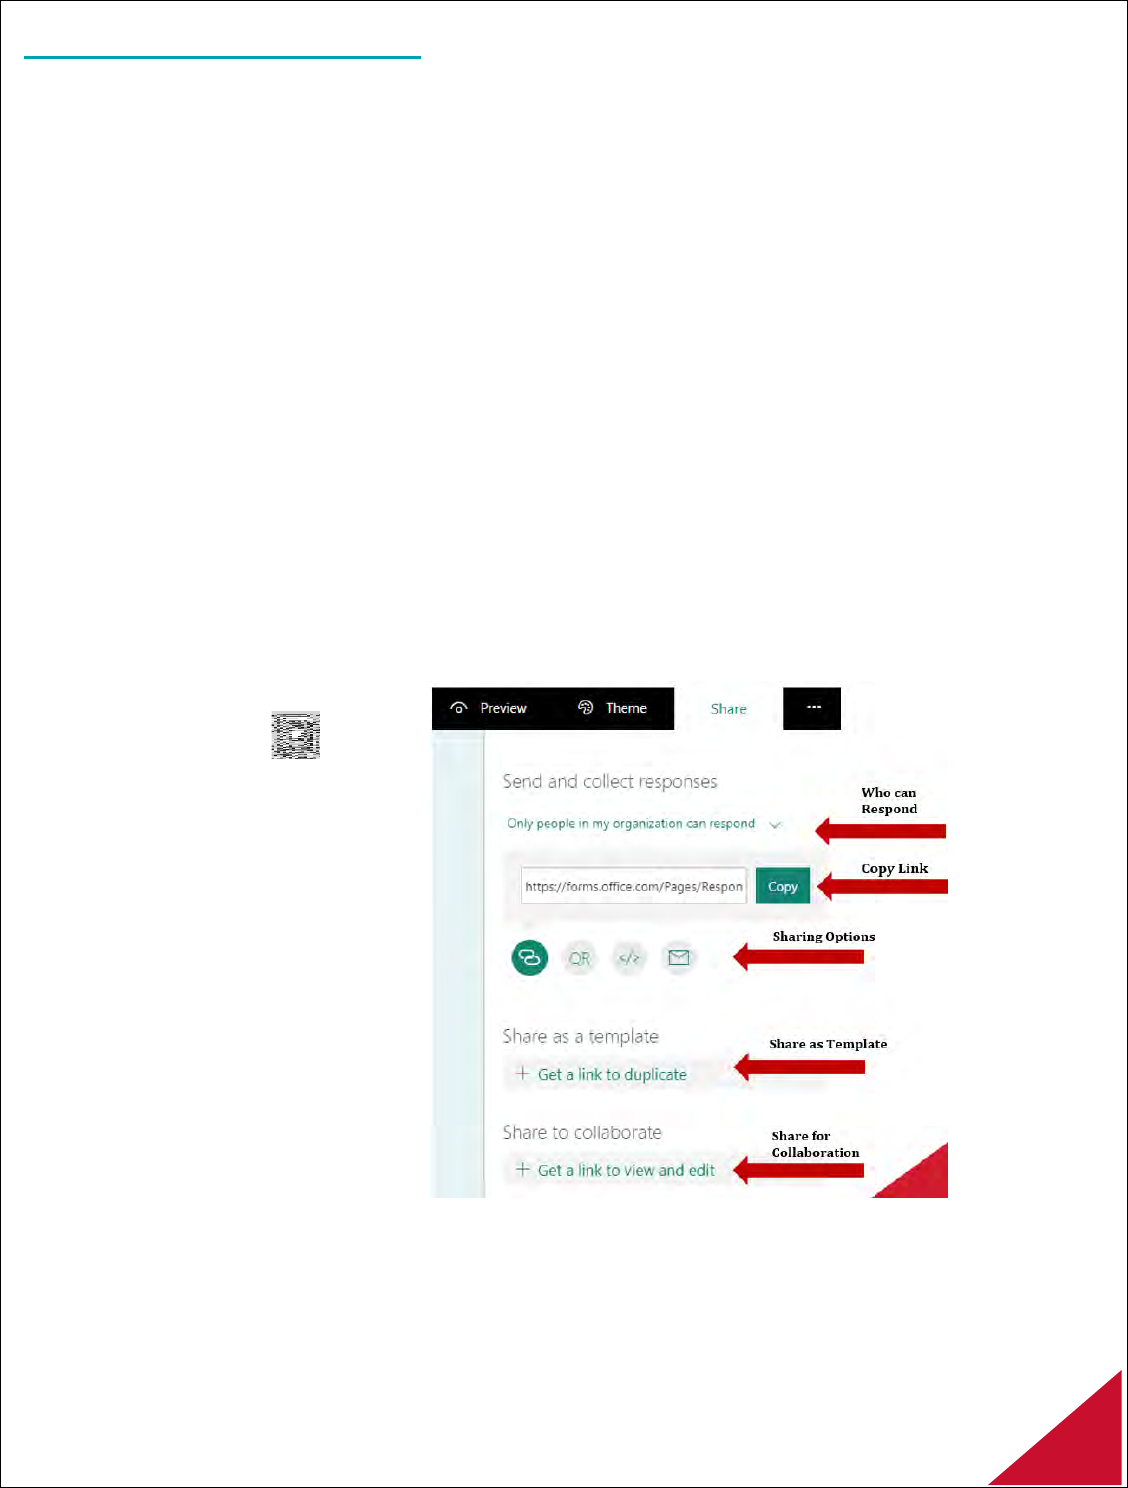
Sharing a Forms Document
Once the completed set of questions is complete, the Form/Quiz can be shared others by clicking the
Share tab in the Forms command bar. Sharing with participants within the W.S.S.U. domain will allow
the names and email addresses of the respondents to be collected. Forms/Quizzes can also be shared
with individuals outside of the W.S.S.U. domain; but all responses will show as being anonymously
submitted. (See Figure 24)
The Copy and Paste the Link: will produce a public facing URL for the Form/Quiz. The link can be
shared with anyone to complete the Forms/Quizzes.
Generating a Quick Response (QR) Code that links to the Forms/Quizzes, allows users to download the
QR code as an image. Recipients can scan the code using a phone or tablet to access the Form/Quiz. QR
codes are quite useful with mobile devices.
Users can use the Embed in a Webpage to allow the form/quiz to be included directly in a webpage
using the option to generate the HTML code needed to allow participants to complete the Form/Quiz
within a website.
Using the Email the Link feature will generate a link for the Form/Quiz that is pre-pasted in the window
of the default Mail client; that only requires a quick edit of the personal message to be sent to users the
email is ready to send.
• Copy/paste the link
• Send a QR-code
• Embed the form into a blog
or webpage
• Send the link via email
• Forms can be shared as
templates with others to use
for their use as duplicates
• Forms can be shared for
collaboration
Figure 24 - Methods of Sharing an Office 365 Form

Office of Information Technology - Technology Learning Center Office 365 Forms
15
Analyzing Data Responses for Forms
Office 365 Forms has a rich user interface and real – time analytics to display Form/Quiz summary
details as well as individual question response details for Forms/Quizzes. All the data received from
participants completing Forms/Quizzes is stored and can be viewed on the Responses tab. (See Figure
25)
There are three different methods of viewing the responses of a form.
• Summary report from Response tab
• Microsoft Excel export
• Individual view from each question
To view a Summary of responses:
1. Open the active Form/Quiz
2. Click on the Responses tab.
At the top of the screen, the summary details will be displayed for the Form/Quiz. Users will be able to
view Responses, Average time to complete and Status. The number of responses received for the
Forms/Quizzes on the Responses tab (See Figure 23) which shows the count icon. Each form can
receive a maximum of 5000 responses. There is a Review answers button , a Post scores button
and a link for Open in Excel. (See Figure 25).
Data from responses can be exported to Microsoft Excel for further analysis. Office 365 Forms has a
feature to delete the responses and print the summary of the form
Data responses can also be viewed in the Microsoft Excel desktop version. To view response details in
Microsoft Excel, click on the Open in Excel link in the Response tab view. (See Figure 25)
Clicking the ellipses in the Responses view window offers the options to Delete all responses, Print
summary, and Create a summary link. (See Figure 26). The option to Create a summary link will display a
new page containing a full summary of all responses for the form/quiz without the “More Details” and
“Export to Excel” links; but with individual results for each participant’s response.
Figure 26 - Office 365 Forms Response options
Figure 25- Office 365 Forms Response Data Analysis

Office of Information Technology - Technology Learning Center Office 365 Forms
16
Individual questions details can be displayed from the More Details link (See Figure 27) for each
question to show more in–depth details of how each individual participant answered the question. (See
Figure 28)
Figu
re 27 – Office 365 Forms Response
Figure 28 - Forms: Response More Details
Analyzing Data in Excel
Open in Excel (See Figure 29) provides a table of columns of each participant who responded to the form/quiz.
Columns will contain information such as the start time, end time, email address, name, total points of points were
assigned for immediate grading, as well as a the total points earned, feedback and answers selected for each
question. (See Figure 30)
F
igure 29- Forms Analyzing Data in Excel
Figure 30 – Forms: Response Data in Excel

Office of Information Technology - Technology Learning Center Office 365 Forms
17
Data analysis for exported responses can be performed in Excel from the simplest tables, charts and
graphs to the more advanced macros, charting and reporting depending on the users’ knowledge of Excel.
Enhancing Forms and Quizzes
Applying a Theme
Office 365 Forms allows you to change the background design and colors of your survey. At this time
applying a theme to the form does not users to apply branding to be a form/quiz. To change the
background design and color, you can follow below steps.
1. Open a Form/Quiz to apply or change the theme.
2. Click the Theme menu on the Forms command bar in the right corner of the design window
3. Select the desired background design/color for the Form/Quiz. (See Figure 31)
Figure 31 - Office 365 Forms Theme Options
4. Click the Upload image icon on the Themes menu to upload images to be used as a background
from OneDrive, the Bing search field or uploaded from a personal computer. (See Figure 32)
Figu
re 32 - Office 365 Forms Insert Image Options

Office of Information Technology - Technology Learning Center Office 365 Forms
18
Branching
Branching logic can be added to a Form/Quiz that allows changes based on the responses to specific
questions. When Forms/Quizzes are setup to use branching, the questions appear only if the question is
relevant to the responder. If a particular question does not apply, the participant is redirected to a
different group of questions or a group of questions will be skipped altogether. Branching is basically
allowing the responses of one or more questions to determine the next action of the form. It is
recommended that all questions are completed for the Form/Quiz before adding the branching
functionality.
To add Branching to a Form/Quiz:
1. Click the ellipses icon on the Forms command bar and select Branching
(See Figure 33)
Figu
re 33 - Office 365 Forms Branching
The Branching Option page will display a branching option for each answer for every question. (See
Figure 34)
2. Click the Drop arrow for each answer option to see the dropdown menu.
3. Select the function to be perform for each answer option for the question. The answer will
determine the function of the branch.
Figu
re 34 - Office 365 Forms Branching question
4. The dropdown menu contains a list all questions that follow on the Form/Quiz. For each possible
response to the question, select the question that you wish to branch to.
For example the first question of the Form/Quiz as seen in (See Figure 35) will determine if the
participant will continue to complete the Form/Quiz.

Office of Information Technology - Technology Learning Center Office 365 Forms
19
Figure 35 - Office 365 Forms Branching example
If a participant submits answers “Yes” or “Maybe” the form/quiz will direct them to the next question to
complete and submit. If the participant submits “No” as their answer the Form/Quiz will be redirected to
the final “Thank you” page. (See Figure 37)
Figure 37 - Office 365 Forms: Branching condition
Figure 36 - Office 365 Forms Branching Submittal
Inserting Images and Media
Office 365 Forms allows users to insert an image or media file to a Form/Quiz header or individual
questions for personalization. Users can insert a logo in the top left of the Form/Quiz header, or an image
or videos can be added to individual questions. This step may be done by performing an Image search
using the Bing search engine, downloading an image from OneDrive, or uploading an image from a personal
computer or mobile device.
1. Open a Form/Quiz
2. Click the Insert image icon found in the Form/Quiz title field. The Insert image icon is also
displayed in the question textbox. (See Figure 38)
Figure 38 - Office 365 Insert Image

Office of Information Technology - Technology Learning Center Office 365 Forms
20
3. Select Image or Video on the Insert media window (See Figure 39)
Figu
re 39 - Office 365 Forms Insert media options
4. Select the source of the image from the (See
Figure 40)
Figu
re 40 - Office 365 Forms image/media source
Images can be inserted as a logo on a Form/Quiz
to add branding or personalization. Images and
media type files can also be inserted, (See Figure
41 )
Figure 41 - Office 365 Forms Insert image example
or as a part of a question (See Figure 42)
Figu
re 42 - Office 365 Forms Insert media/video example
