Query and Export Guide
03/23/2016 Blackbaud CRM 4.0 Query and Export US
©2016 Blackbaud, Inc. This publication, or any part thereof, may not be reproduced or transmitted in any form or
by any means, electronic, or mechanical, including photocopying, recording, storage in an information retrieval
system, or otherwise, without the prior written permission of Blackbaud, Inc.
The information in this manual has been carefully checked and is believed to be accurate. Blackbaud, Inc., assumes
no responsibility for any inaccuracies, errors, or omissions in this manual. In no event will Blackbaud, Inc., be liable
for direct, indirect, special, incidental, or consequential damages resulting from any defect or omission in this
manual, even if advised of the possibility of damages.
In the interest of continuing product development, Blackbaud, Inc., reserves the right to make improvements in
this manual and the products it describes at any time, without notice or obligation.
All Blackbaud product names appearing herein are trademarks or registered trademarks of Blackbaud, Inc.
All other products and company names mentioned herein are trademarks of their respective holder.
QueryExport-2016

Contents
Getting Started with Query
4
Query: A Guided Tour
4
Common Query Fields
20
Common Query Filters
22
Query
25
InformationLibrary
27
Ad-Hoc Queries
27
Smart Queries
58
Selections
71
Copy an Existing Query
74
Export Queries
74
Browse Query Results
75
View Query Results
75
Organize Queries
75
Open Data Protocol (OData)
79
Export
82
Exports
82
Export Definitions
86
Export Process Status Page
100
Import Selections
106
Import Selections
106
Import Selection Process Status Page
110

Getting Started with Query
Query: A Guided Tour 4
Common Query Fields 20
Constituent Query Fields 20
Revenue Query Fields 21
Registrant Query Fields 22
Common Query Filters 22
Constituent Query Filters 22
Revenue Query Filters 23
Registrant Query Filters 23
Query is a powerful tool you can use to help filter and group records. But it can be a bit intimidating at
first. Don’t be afraid though! We put together this tutorial to help you get started. We also put
together some lists of common query fields and filters. Ready? Set? Go!
Query: A Guided Tour
With Query, you can group records according to whatever criteria you want. Before you even begin to
build your query, you need to think about what records you want to see. Form a statement, such as “I
want to see the names of all constituents who are members and have given a gift this month, listed
alphabetically by last name” or “I want to see all the revenue that came in last month, grouped by
date.” Be as specific as possible. You can even write down your statement to help you when begin to
build your query.
Note: To access the Query section, from Analysis, click Information library.
chapter 1

For this guided tour, let’s use “I want to see the names of all constituents who are members and have
given a gift this month, listed alphabetically by last name.”
Now that we have a clear idea of what records we want to group, let’s take a quick look at smart
queries and see if one fits our needs. Smart queries are predefined queries which you can use in place
of many common, but complicated, queries. For example, say we were looking for all constituents who
gave last year but unfortunately not this year (LYBUNT). This query would take some time to build and
it would be fairly complex. Instead, this is offered as a smart query—the LYBUNT smart query. Browse
through the list of smart query definitions and see if there’s one that suits your needs. For more
information, refer to Smart Query Definitions on page 59. If there isn’t one, we can build an ad-hoc
query ourselves!
Now that we have our statement, let’s start with the basics of query.
Queries are all about fields. Remember when you entered a birth date on the Personal tab of a
constituent record? That’s the Constituents: Birth date field in a query. There are definitely a LOT of
fields available in Query. But Query really is just a list of all the fields on all the different types of
records in the program. Ultimately, you just need to know where to look in the list. Noodles? Aisle 5 in
the grocery store. Date of revenue for constituents? Constituents > Revenue: Date. We'll talk more
about how to find this field in a bit and each part of the path to find it. For now, rest assured that you
will be able to find the fields you need because we put together a cheat sheet with some of the most
common fields used in queries. Take a look at Common Query Fields on page 20. Even better, we put
together a cheat sheet of common query filters. Check out Common Query Filters on page 22.
Remember, Query is a tool to group records; it’s not a reporting tool. You should browse the results of
your query to ensure you set up your query correctly!
You might even see (or think you see) duplicates in the query results. What if you wanted to see all the
constituents who gave money last month? If I gave twice last month, I’d appear twice unless you
summarized the query output or did another neat trick to help suppress duplicates. Refer to Suppress
Duplicates in Ad-hoc Query Results on page 36 for ideas.
But let’s get back to the basics. At the simplest level, a query answers four basic questions. These
correspond to the four main components of a query: source view, filters, output, and sort/group
options. When you answer these four questions in a query, you should have results that match your
statement about the records you want to see.
5 CHAPTER 1

To begin, we can break down our statement to see which parts match each of the four questions. I
want to see . . . the names of all constituents who are members and have given a gift this month, listed
alphabetically by last name.
The names
This tells us we want to see names in the results. This is the query’s Output.
Of all constituents
This tells us that we need a constituent query, which means we’ll use the Constituents Source View to
create the query.
Who are members and have given a gift this month
We want to see members, so we can use the constituency as a Filter. If the constituency is equal to
member, we match on the first part. So let’s look at the rest of it. “...and have given a gift this month”
makes things a little more complicated. So we’ll need another filter to find the gifts in that time frame.
Listed alphabetically by last name
This tells us how we want to Sort the results.
Now let’s look at each question individually so we can learn about the parts of the query and how we
can build it.
GETTING STARTED WITH QUERY 6

The answer to this question lets us know which source view to pick for the query. Based on our
statement “I want to see the names of all constituents who are members and have given a gift this
month, listed alphabetically by last name,” we can tell we need to use the Constituents source view.
With the Constituents source view, we will create a constituent query. But before we begin to build the
query, let’s review the terminology and basic layout of the query screen. In our case, we’ll use the
constituent query.
7 CHAPTER 1

The query screen has four tabs. On the Select filter and output fields tab, you select your parameters.
Parameters, criteria, filters all mean the same thing here: these are the pieces of our statement that
help us narrow down the results to see only the specific things we want. In our case, that is the names
of all constituents who are members and have given a gift this month, listed alphabetically by last
name.
All of the fields available in query can be part of your parameters. Field names appear in the center
column of the query screen. Under Browse for fields in, you see the field hierarchy that groups similar
fields together into expandable nodes. For example, all of the fields associated with constituencies are
grouped together under the Constituencies node. When you select Constituencies under Browse for
fields in, these fields appear in the center column. Remember, it’s all about fields.
On the query screen, we can also see some filter options and some output options. We’ll talk about the
filter options next. And we’ll get to the other tabs a little later!
The purpose of this question is to help determine the filters we’ll need for our query. Which records
do we want to include? Do we want to see only constituents who are major giving prospects? Or
board members? Or volunteers? Do we want to see only revenue given in the last month or year? In
our case, we know we want to see members who have given a gift this month.
To set the filters, we need to know a little more about the filter options. After we select fields for the
filters, we sometimes need to make additional decisions. For example, if we use a date field as a filter,
we must decide whether we want to use today’s date, a date range, or some other specific date.
Often, we need more than one filter. The filter options allow us to use different filters together. For
our example, we need to use a couple of filters to show us members who have given us a gift this
month. But to start us off, we need a filter to show constituency equal to member. To find the
Constituency field, we need to select Constituencies under Browse for fields in. Then the
Constituency field appears in the center column. After we drag the field into the Include records
where section, we can select the criteria operator and the values we want to use. So we would say:
Constituency is Equal To Member, where “Constituency” is the field, “Equal To” is the criteria operator,
and “Member” is the value to use.
GETTING STARTED WITH QUERY 8

What if we wanted to see all members AND all board members? (Although we hope our board
members are engaged enough to be members too!) We could select the criteria operator “One Of”
instead of “Equal To,” and then pick both “Member” and “Board member.”
9 CHAPTER 1

We also could have picked other criteria operators, such as “Not Equal To” or “Blank.” You can
experiment with them to get a feel for how each one works. For more information, refer to Query
Criteria Operators on page 37.
But that’s just the first part! We need to get creative with filters and combine them in order to see
members who have given a gift this month. Let’s take the “given a gift” part of our statement. We’re
going to have to dig a little deeper in the query screen to find this one. For gifts, we’ll need to select
Constituents > Revenue > Application Details: Type and set that filter equal to gift.
GETTING STARTED WITH QUERY 10

But we still have one more piece: this month. Now that one isn’t too difficult. That’s just the
Constituents > Revenue: Date field. And we’ll need to set that equal to this month!
Here are a few other examples of filters. Can you figure out what these filters mean?
Constituencies\Constituency is equal to Board member
This first part tells us the constituency must equal “Board member.”
Revenue\Application Details\Amount is greater than $10,000.00
The second part tells us the revenue amount must be greater than $10,000.
Did you notice the OR before the second one? That tells us the constituent can meet either criteria and
still be included. You might have a board member who has given only $5,000 and you might have a
major donor who has given $100,000—both would show up in the results. If we used AND instead of
OR to connect the two, only board members who had given more than $10,000 would be included.
Ready for another challenge? What do you think these filters mean?
11 CHAPTER 1

This one is definitely even more complex. It uses an OR, an AND, and parentheses. See if you pick the
right answer!
□ The constituents must be board members, regular members, and have given more than $1,000.
□ The constituents must be board members, regular members, or have given more than $1,000.
□ The constituents must be board members or regular members. And either way, they have to have
given more than $1,000.
If you picked the last one, you’re right! The OR between the first two filters tells us the constituent can
meet either criteria and still be included—you can be a board member or a regular member. The third
one tells us constituents with either constituency must also have given more than $1,000.
Who wants extra credit? Try this one!
Did you notice the difference? This time we changed the position of the parentheses. So this means
the constituent would have to be a board member OR the constituent could be a regular member who
has given more than $1,000. The results would show all board members, regardless of how much they
have given, and any regular members who have given more than $1,000. That’s the power of the
parentheses!
I think we’ve played enough with the filters for now, so let’s keep going.
GETTING STARTED WITH QUERY 12
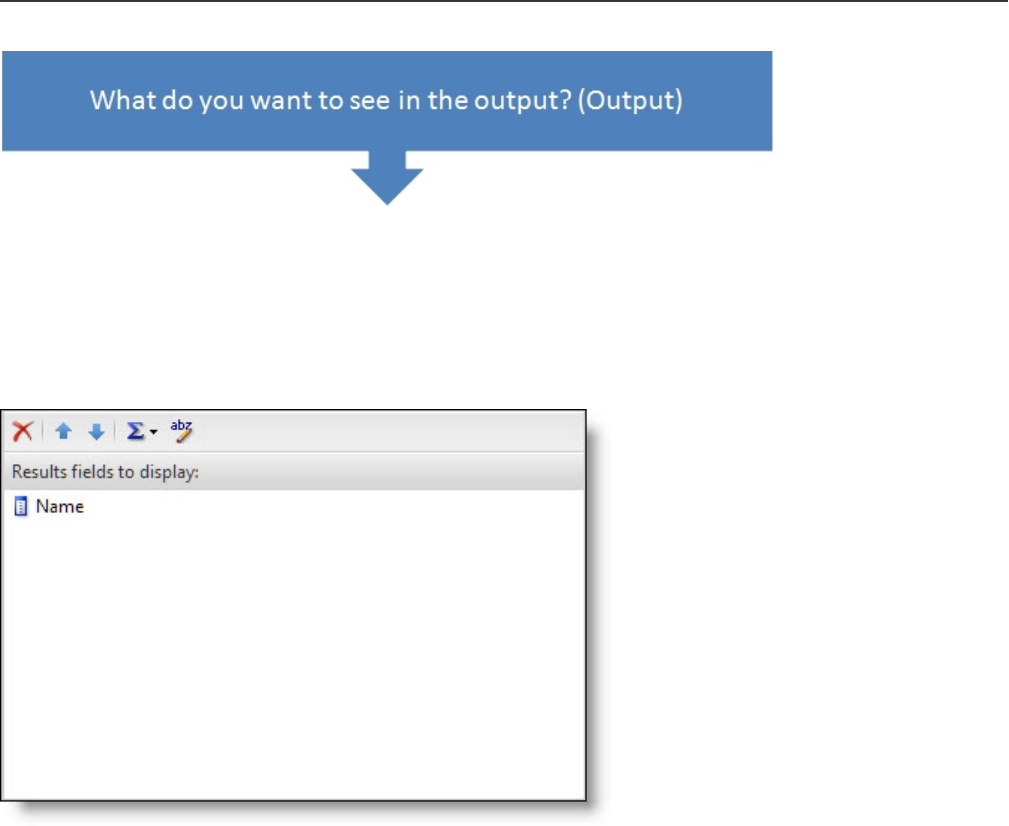
This question provides us with the output fields for our query. Which fields do we want the results to
display? For example, if we include phone numbers in the output, do we also want to see if the
numbers are marked “Do not call?” The fields we include in the Results fields to display section will
help us verify that our results match what we’re trying to accomplish. That means we want to include
enough fields for us to tell if we’re really seeing “the names of all constituents who are members and
have given a gift this month, listed alphabetically by last name.” So at a minimum, we know we want
name as an output field.
This one is pretty straightforward and, in fact, is the default output field for a constituent query! But
what if we wanted to see the amount of the gift too? That means we’ll need to also add Constituents >
Revenue > Application Details: Amount. Remember, when we see the gift amounts in the output, we're
only seeing the gifts that were given this month because of the filter we added.
13 CHAPTER 1

But what happens if we’re lucky enough for a member to have given us a couple of gifts this month?
That constituent would show up twice in our results—once for each gift. So maybe what we really want
to see is the total amount of all the gifts each member has given us this month. For that, we need our
good friend, the Summarize button. We briefly mentioned the ability to summarize output in the
Query Basics section, but let’s take a closer look at how this works.
The Summarize button can do different things depending on the summarize function we select and
the field we use it with. The results of the Summarize button are also impacted by the fields in our
output.
For our amount field, we can click the Summarize button and use the SUM function to show us a
calculation of the field results rather than the actual contents of the field. So what does this really
mean? If a member gave us two gifts this month—$50 and $100 (hey, it could happen!)—then we
could summarize the amount so the results would include the member only one time, with gift
amount combined as $150. Sound interesting? I thought so. So what we need to do is select the
amount field in the Result fields to display section, click the Summarize button, and select SUM
(Amount).
GETTING STARTED WITH QUERY 14
It’s almost like magic, having the revenue total like that! So let’s keep that as part of our statement
now.
A word of caution: if we summarize the revenue amount for constituents but include a date field in the
output, all of a sudden the game changes. Since the gift dates are probably different, the output of the
two gifts (including date) is now unique and the revenue won’t be summarized. But luckily, we don’t
need to include date as an output field since we’re using the date “this month” in our filters.
The Summarize button definitely has a lot of power, so don’t be afraid to use it! For more information
about all the functions that are available, refer to Summarize Query Output on page 49.
Had enough on output? Let’s move on.
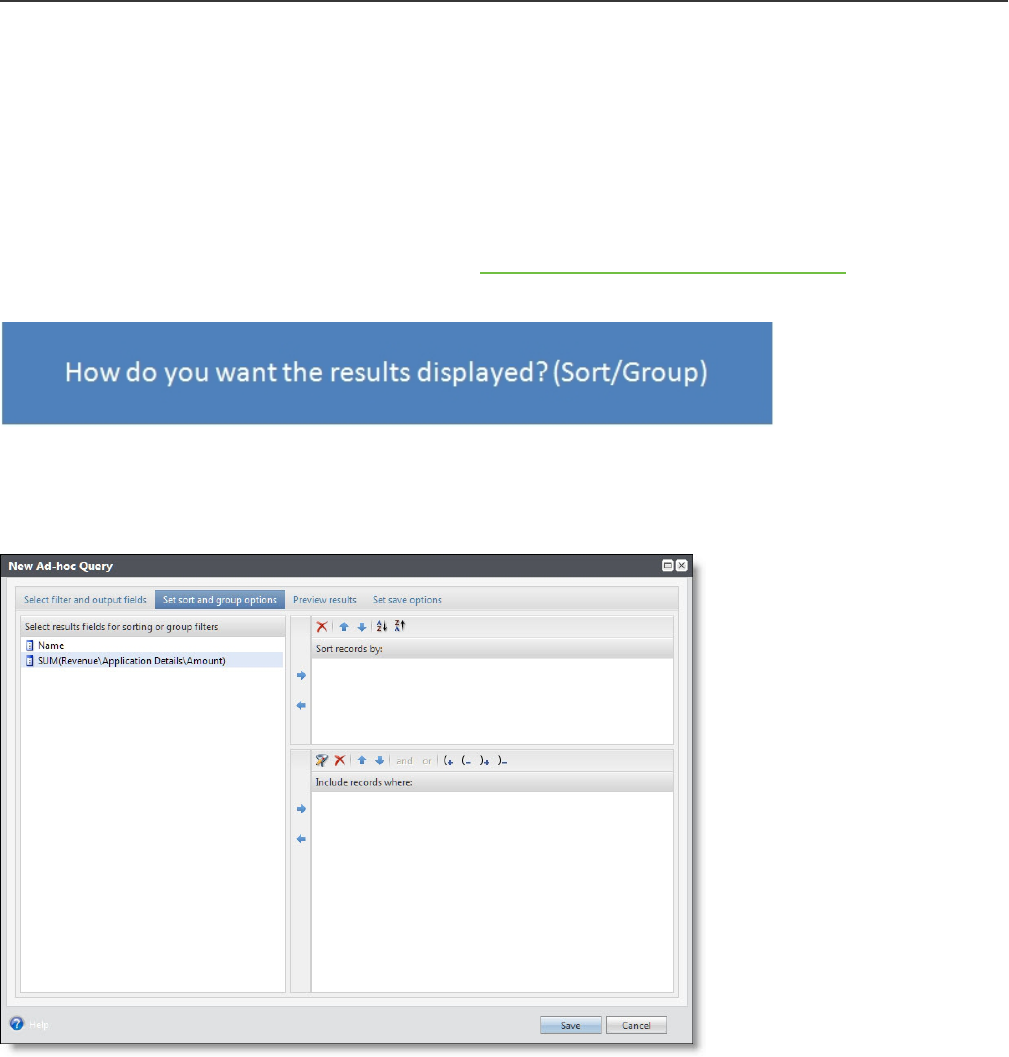
This question provides us with the sort options for our query. Do we want to list constituents in
alphabetical order? Do we want to list revenue by amount or by date? Let’s look back at our statement:
We wanted to see constituents in alphabetical order. So let’s jump on over to the Set sort and group
options tab and see what we can do!
We can sort our query results only by fields included in our output. If you don’t see it under Results
fields to display on the first tab, you won’t see it on the Set sort and group options tab. So, under
Select results fields for sorting or group filters, we have two choices: Name and SUM
(Revenue\Amount). In our statement, we said we wanted to see members, listed alphabetically by last
name. Can you figure that out?
15 CHAPTER 1

That wasn’t too bad. We wanted to sort by name in ascending order, which means A to Z.
Coincidentally, that’s the picture on the little button for the options in the Sort records bysection!
Note: Sometimes, we’ll get to the Set sort and group options tab or even the Preview results tab and
realize there’s something missing, or we have a new idea about how we want to sort our results. So
we might have to go back and add more fields to the output. Don’t worry—it’s not a big deal.
What if, instead of sorting alphabetically by member name, we wanted to sort by the date of the
revenue? Guess we’ll have to add the Constituents > Revenue: Date field to the output first. After we
do that, we can drag the date field under Sort records by instead of the name field. Now our results
would be sorted by date, with the oldest gift (still in this month!) first. But remember, if we include the
date field in our output, the SUM(Revenue\Amount) function won’t work to give us the totals.
So we need to think carefully about what’s more important. But keep in mind that queries are a way to
group records. We can save the results of the query to use elsewhere in the program or even export
the results to a spreadsheet.
But what about that Include records where section? That’s not really like the Sort records by section,
is it?
Nope, the Include records where section is a little different. This section is a way to extend the use of
a summarized output field. Remember how we used the SUM function a few minutes ago for the
output fields on the Select filter and oupt fields tab of our query? This gave us the total amount each
member gave this month, instead of having each gift on a separate line.
GETTING STARTED WITH QUERY 16

But what happens if we wanted to summarize the giving, but then also extend that summarized
information as yet another filter in our query? What if we wanted to see only the members who gave
$100 or more this month? Stick with me here!
For that, we need to use the summarized amount field under Include records where on the Set sort
and group options tab too.
Just like with regular filters, when we drag this field to the Include records where section, we get
some additional options.
17 CHAPTER 1

So we can then say that we want the total, summarized amount to be Greater Than Or Equal To $100.
Whew—that got a little crazy there at the end, didn’t it? Let’s pretend that didn’t happen and go back
to our nice, easier example. But let’s keep that amount field summarized, like we talked about. That
was pretty cool.
Before we check our results, let’s review our original statement (plus the one summarize modification
we added, because that was just too cool). We want to see the names of all constituents who are
members and have given a gift this month, listed alphabetically by last name. Plus we want to see the
amount of their gifts this month summarized instead of seeing each gift separately. Sound good?
Now we can go to the Preview results tab to check to see if things look okay, but . . . wait! The names
are sorted alphabetically, but by the whole name, not the last name! So we have Christopher Young
before Elizabeth Ashton—not exactly what we were expecting.
Remember how we talked about getting to the end and realizing we need to take a step or two back
to add other fields to the output or change the sort order to see exactly what we want? Well, that’s
where we are. No big deal.
Let’s jump back to the Select filter and output fields tab and add the last name to the Results fields to
display section. We’re looking for the Constituent: Last/Organization/Group/Household name field.
GETTING STARTED WITH QUERY 18

That’s a mouthful, but trust me; that’ll get us the last name. Now we also need to go to the Set sort and
group options tab to change our sort from the whole name to just the last name. Let’s make those
changes and take another look at the Preview results tab.
This looks great! It’s just what we were expecting, which means we built our query correctly! Now we
can let our membership director know about each of these loyal and generous members! If she wants
to use query results elsewhere in the program, we can create a selection of the results for her. Because
the selection is based on the record ID—of the constituents who are members in our case—a mailing
process will have access to all the other information about the constituents, such as addresses. So we
wouldn’t need to include that information as output in the query. See Create Selections from Queries
on page 34 for more information, including special rules for summarized fields!
Note: If we want to use our query results outside of the program, like in a spreadsheet, we can export
the results. However, if we do this, we get exactly what shows up on the Preview results tab. If we
summarized revenue, we’ll have only the total and not each individual gift. If we didn’t include a date
field, then no date. Check out Export Queries on page 74 for information on how to export our
results.
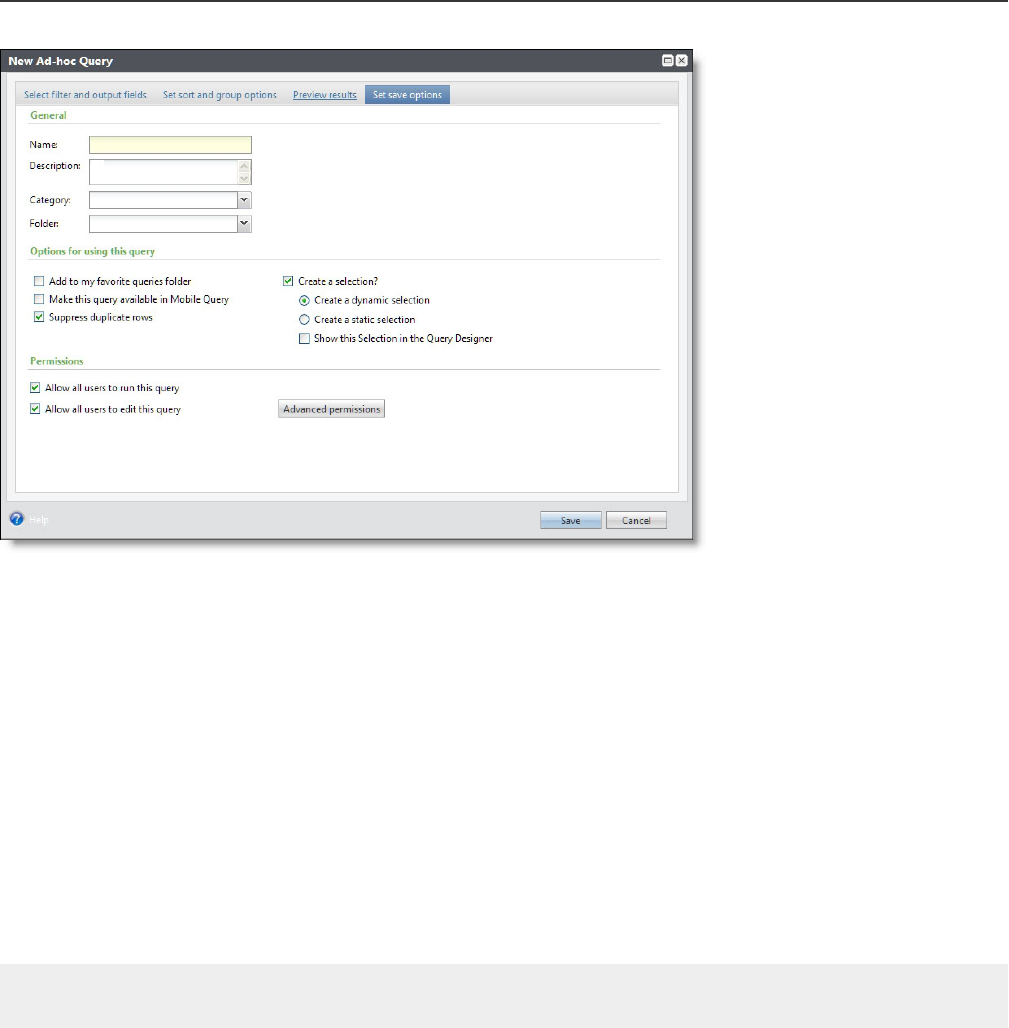
Now that we have the query squared away, let's give it a name and save it so we can find it again in the
future. On the Set save options tab, we can name the query and describe its criteria and output. We can
also assign it a category or folder to organize it with similar membership queries. Before we save the
query, we can also select to create that selection for the membership director and select whether to
allow other users to update the query.
19 CHAPTER 1
Well, we made it through the tour. Bravo—job well done! We learned a lot about queries and filters
along the way, so hopefully you’re ready to dive in and start putting together your own queries!
“I want to see . . . ”
Common Query Fields
With so many fields available in queries, it can be a challenge to find the ones you want. This section
provides a quick reference for some of the most commonly used fields in Query.
The field name is at the end of each item. This is the actual name of the field on the Select filter and
output fields of the query screen. This tab is where you see the field hierarchy that groups similar fields
together into expandable nodes. For example, all of the fields associated with constituencies are
grouped together under the Constituencies node. When you select Constituencies under Browse for
fields in, these fields appear under Select fields.
Tip: To quickly locate a field, enter its name in the Find field field and click Search up. Under Find
Results, all fields that meet the search criteria appear.
Constituent Query Fields
Constituency
Constituents > Constituencies: Constituency
Constituent record type
Constituents: Type
GETTING STARTED WITH QUERY 20

Note: Constituent types include Individual, Organization, Household, and Group.
Email address
Constituents > Email Addresses: Email address
Membership level
Constituents > Membership > Membership Level: Name
Recognition level
Constituents > Recognition Programs > [specific recognition program name]: Recognition level
Revenue amount
Constituents > Revenue: Amount
Revenue amount by application/split
Constituents > Revenue > Application Details: Amount
Revenue appeal
Constituents > Revenue > Appeal: Appeal record
Revenue appeal mailing
Constituents > Revenue > Appeal > Appeal Mailing: Name
Revenue application
Constituents > Revenue > Application Details: Application
Revenue application type
Constituents > Revenue > Application Details: Type
Revenue date range
Constituents > Revenue: Date
Revenue designation
Constituents > Revenue > Application Details > Designation: Designation record
Revenue Query Fields
Appeal
Revenue > Appeal: Appeal Record
Appeal mailing
Revenue > Appeal > Appeal Mailing: Name
Batch number
Revenue: Batch number
21 CHAPTER 1

Designation
Revenue > Application Details > Designation: Designation Record
Revenue amount
Revenue: Amount
Revenue amount by application/split
Revenue > Application Details: Amount
Revenue date
Revenue: Date
Registrant Query Fields
Attended
Registrants: Attended
Registration paid
Registrants: Balance
Specific event
Registrants > Event: Event record
Common Query Filters
The field name after the colon is the field name found in the Field Viewer of the query screen. The
others are the nodes or folder structure where the field is located in Field Explorer. Filters are shown in
quotation marks, with filter values in brackets.
Constituent Query Filters
Constituents added to the database within a date range
Constituents > Date added “Between” [specific date range]
Constituents by constituency
Constituents > Constituencies: Constituency “Equal To” [specific constituency]
Constituents by date of revenue (range)
Constituents > Revenue: Date “Between” [specific date range]
Constituents by date of revenue (last month)
Constituents > Revenue: Date “Equal To” [Last month]
Constituents by membership level
GETTING STARTED WITH QUERY 22

Constituents > Membership > Membership Level: Name “Equal To” [specific membership level]
Constituents by revenue amount range
Constituents > Revenue: Amount “Between” [specific range]
Constituents by recognition level
Constituents > Recognition Programs > [specific recognition program name]: Recognition level “Equal
To” [specific recognition level]
Constituents of record type
Constituents: Type “Equal To” [Individual/Organization/Group/Household]
Constituents who made a payment/pledge/recurring gift within a specific date range
Constituents > Revenue: Transaction type “Equal To” [Payment/Pledge/Recurring gift] AND
Constituents > Revenue: Date “Between” [specific date range]
Constituents without email addresses
Email Addresses: Email address “Blank”
Revenue Query Filters
Revenue by appeal
Revenue > Appeal: Appeal record “Equal To” [specific appeal]
Revenue by appeal mailing
Revenue > Appeal > Appeal mailing: Name “Equal To” [specific appeal mailing]
Revenue by date range
Revenue: Date “Between” [specific date range]
Revenue by designation
Revenue > Application Details > Designation: Designation record “Equal To” [specific designation]
Revenue by specific batch number
Revenue: Batch number “Equal To” [specific batch number]
Revenue over a specific amount
Revenue: Amount “Greater Than” [specific amount]
Revenue that has not been receipted
Revenue > Receipts > All Receipts: Process date is "Blank"
Registrant Query Filters
Registrants for an event
23 CHAPTER 1

Registrants > Event: Event record “Equal To” [specific event]
Registrants who did/did not attend an event
Registrants > Event: Event record “Equal To” [specific event] AND Registrants: Attended “Equal To”
[Yes/No]
Registrants who did not pay for an event
Registrants > Event: Event record “Equal To” [specific event] AND Registrants: Balance “Greater Than”
[0]
Registrants who paid for an event
Registrants > Event: Event record “Equal To” [specific event] AND Registrants: Balance “Equal To” [0]
GETTING STARTED WITH QUERY 24

Query
InformationLibrary 27
Ad-Hoc Queries 27
Source Views 28
Constituents (with Household Information Rolled Up) 28
Active Users 28
Create Ad-Hoc Queries 29
Query Criteria Operators 37
Days 44
Weeks 44
Months 45
Quarters 45
Years 46
Fiscal Years 47
Merge Two Queries 50
Create Smart Query Definitions from Ad-hoc Queries 52
Create Reports from Ad-hoc Queries 55
Create Data List 57
Edit Ad-hoc Queries 57
Delete Ad-hoc Queries 58
Use Selections in Queries 58
Smart Queries 58
Smart Query Definitions 59
Smart Query Default Definitions 59
Constituent 59
Membership 65
Organization Position 66
Registrant 66
Revenue 67
Sponsorship 69
chapter 2

Create Smart Query Instances 69
Edit a Smart Query 70
Delete a Smart Query 70
Search for Smart Queries 70
Selections 71
Manage Selections with a Query Type of Other 71
Edit a Selection with a Query Type of Other 72
Set the Active Status of a Selection with a Query Type of Other 72
Merge Two Selections 72
Copy an Existing Query 74
Export Queries 74
Browse Query Results 75
View Query Results 75
Organize Queries 75
Query Categories 75
Assign Categories to Queries 76
Manage Query Folders 76
Assign Query Folder Permissions 77
Mark Queries as Favorites 78
Open Data Protocol (OData) 79
Set ApplicationRoot URL 79
Get OData Link 79
OData inMicrosoft Excel 2010 80
OData inMicrosoft Excel 2013 80
OData inTableau 81
Queries are used to group records that meet a set of criteria you define. There are two types of query:
ad-hoc and smart. Ad-hoc queries can include numerous output fields and enable you to browse
through a specific set of records. Smart queries perform complex calculations that would be difficult
to achieve using ad-hoc queries, and are based on templates included in the program. Additionally,
the program features a third mechanism to group records — selections.
Selections are created from either type of query and include only record IDs. In many cases, you create
an ad-hoc query solely to create a selection. Although selections do not include information about the
records other than their IDs, you can select output fields in the query. This enables you to view a
sampling of records so you can verify that the criteria you selected are accurate and the process will
work on the records you intend. Selections are designed for use by the program in various features
and are optimized for processing speed.
Note: To access the Query section, from Analysis, click Information library.
26 CHAPTER 2

InformationLibrary
Queries and KPIs appear in the information library. To access the information library, from Analysis
click Information library. The library opens directly to the Queries tab. To access KPIs, click the KPIs
tab.
The information library offers features to organize and navigate your queries and KPIs.
l View Options: The left-side pane allows you to view queries by folder, category, owner, or
record type, and to view KPIs by folder, type, or record type. Select an option from the View by
field, and the results display below.
l List Updates: The list of queries or KPIs is easy to navigate. Use the Search field to quickly
search for a query or KPI, use filters on each column, and select the columns to see. To view
different columns, click Columns and select the ones you want to display.
Note: The Last run on column shows the date that the query was last run. When you edit a
query definition and view the Preview results tab, that is not the same as running the query, and
does not affect the "Last run on" date.
l Folders: To organize your queries or KPIs by folders, click Manage folders.
l Favorites: To mark queries and KPIs as favorites, click the star next to the query or KPI name.
l Categories: To add queries to a category, select the checkbox next to the query and click Move.
Select a category and click Save. You can move multiple queries at one time.
Ad-Hoc Queries
An ad-hoc query is a tool that enables you to select, group, and list records that meet a set of
conditions you define. It provides access to all of your data and helps you answer specific
organizational questions. Ad-hoc queries are available in Query. To access the Query section, from
Analysis, click Information library.
After you select an initial source view to indicate the type of records to include in the query such as
constituent or revenue, you filter and view data according to your needs. For information about source
views, refer to Source Views on page 28. For information about how to create ad-hoc queries, refer to
Create Ad-Hoc Queries on page 29.
Show Me: Watch this video to learn more about ad-hoc queries.
You can also generate a named set of IDs of the same record type, called a selection, for use for in
other processes throughout the program. When you use query to produce a selection, you produce
only a set of IDs. In many cases, you create an ad-hoc query solely to create a selection. Although
selections include no information about the records other than their IDs, you can select a set of output
fields in the query. This enables you to view a sampling of records so you can verify the accuracy of the
criteria you selected and that the process will work with the records. For more information, refer to
Selections on page 71.
QUERY 27

Source Views
Before you create a query, you must select a source view. A source view indicates the type of records
to include in the query such as constituent or revenue, and also the field categories to filter data. The
record type you select determines where the results are available and how the program uses them.
Base your source view selection on the type of information you want to find. For example, to send an
appeal to all alumni, use a constituent source view. To determine how many donations are associated
with that appeal, use a revenue source view. Most source views are self explanatory — use a
constituent source view to query constituent records or an application user source view for application
users. However, some are more complex and require additional information.
Constituents (with Household Information Rolled Up)
The Constituents (with household information rolled up) source view option is a constituent query
of individuals, organizations, groups, and households that rolls up household members and
information into a household view. Most information rolls up into a household summary view when a
household exists—that is, household member giving shows for the household, not its individual
members. Some information, such as household modeling and propensity, cannot be aggregated, so
the household view presents the maximum values instead.
Revenue information may count multiple times when gifts are given by individuals who join and leave
households. For example, Jill Jones (an individual with no household record) gives a gift. She marries
and gives another gift (as an individual with a household). At this point, both gifts would roll up under
the Jill and Dave Thompson Household in the query. If Jill leaves the household, a new query of
constituent giving would show Jill Jones with her individual giving, along with the Jill and Dave
Thompson Household with Jill's same gifts. Any of Jill's future giving will not roll up to her former
household in this query.
To see individual constituents, such as for event invitations or to compare individual donors, use the
Constituents source view. To compare households to individual constituents without households and
see the revenue or recognition credit information consolidated at the household level, use the
Constituents (with household information rolled up) source view.
Active Users
The Active Users source view allows you to see user activity in the system. For example, you can create
an active user query to see logins to the system to see which users were actively using the system on a
given date, or see if there have been any logins after a specific date.
The Active Users source view tracks requests sent through the Blackbaud CRM API. These requests
usually originate from the program itself, but results for queries of this type also reflect requests from
associated utilities or other sources.
In order to avoid performance degradation when tracking this information, the program does not track
user activity for the purposes of this type of query when the performance burden on the system
28 CHAPTER 2

reaches the thresholds established by the Microsoft Health web dashboard. These settings are
controlled by the web.config file for your database.
You can query on user login activity with this source view. Because the query tracks requests only,
logouts are defined as fifteen continuous minutes without a request.
Create Ad-Hoc Queries
When you create an ad-hoc query, you first select the source view to indicate the type of records to
include in the query. Next, you select the output fields and filter criteria and specify how to sort and
group the data. You can then preview the results and indicate how to save the query. To group a query
with other similar queries, you can assign it to a query category. When you view ad-hoc queries, you
can use criteria such as type or category to limit how many queries appear.
Ad-hoc queries are available in Query. To access the Query section, from Analysis, click Information
library.
Tip: To learn how to create an export definition, you can review the information in this section, as the
steps are the same. However, the query filters and results do not apply to export definitions.
Create an ad-hoc query
1. From Analysis, click Information library. The information library appears.
2. On the Queries tab, click Add an ad-hoc query. The Select a Source View screen appears.
3. Select the source view that contains the type of records to include in the query. For information
about source views, refer to Source Views on page 28.
4. Click OK. The New Ad-hoc Query screen appears.
5. On the Select filter and output fields tab, select the fields to include in the query output and the
filter criteria to determine which records appear in that output. For information about this tab,
refer to Select the filters and output fields on page 30.
6. On the Set sort and group options tab, specify the sort fields and their order, and filter on
QUERY 29

aggregate values. For information about this tab, refer to Set the sort and group options on
page 31.
7. On the Preview results tab, browse through the query results. For information about this tab,
refer to Preview the results on page 32.
8. On the Set save options tab, specify the properties of the query and then click Save. For
information about this tab, refer to Set query properties on page 33.
Select the filters and output fields
1. When you create a new ad-hoc query, after you select a source view, the New Ad-hoc Query
screen appears open to the Select filter and output fields tab.
Under Browse for fields in, you can view the types of fields that are available for the query
source view you selected. You can expand a node to drill-down to a specific group of fields.
Tip: To quickly search for a field, enter the field name in Find field and press ENTER on your
keyboard. The program displays applicable fields in the middle pane. Use the arrows on your
keyboard to browse through the list. If you select a group and click Search up, the search
applies only to fields in the selected node.
The middle pane lists the Fields and System fields for the selected group.
2. Under Include records where, select the criteria fields and select operators to determine which
records to include in the query.
For example, to create an individual query to find the names of everyone with a home telephone
number, you can use the criteria field and operator of Phone Type “equals” Home to group all
records with a value in this field. For information about the available combining operators, refer
toQuery Criteria Operators on page 37. For information about how to compare values of output
fields, refer to Compare Output Field Values on page 48.
3. To specify output fields for the query, select them in the middle pane and drag them into Result
30 CHAPTER 2

fields to display. You must specify at least one output field. Selected fields correspond to the
information you want to view in the query results and they appear as column headings in the
query output.
Note: Depending on the source view of the query, some fields may automatically appear under
Result fields to display. You can remove these default fields from the output as necessary.
l To view a calculation of the field results instead of the actual contents of the field, select
an output field and click Summarize. For example, if you select a date field as an output
and assign a minimum date, all records included in the query must satisfy the minimum
date requirement.
The calculation options available depend on the field you select. For information, refer to
Summarize Query Output on page 49.
Note: If you create a selection from the query, it cannot contain summary output fields
unless it also contains the system record ID of the query view. The system record ID is the
unique identifier for a record in the program. For example, for a constituent query, the
system record IDfield is the Constituent record field. You must include it because
summary fields can cause the output to not contain unique values, such as when you
select the average revenue for each constituent. For information about how to save
queries as selections, refer to Create Selections from Queries on page 34.
l To edit the label of an output field for the header row of an export, select the field name,
click Change column header, and enter the name to appear in the export header.
Set the sort and group options
1. To specify a sort order for the query results or filter on aggregate values, select the Set sort and
group options tab.
2. Under Select results fields for sorting or group filters, the output fields selected on the Select
QUERY 31

filter and output fields tab appear. Select the fields to sort by and drag them under Sort records
by.
3. Under Sort records by, include the fields to sort by and select whether to sort in ascending or
descending order. Sort fields are optional. For example, to create a query to list the name and
home telephone number of individuals, you can select an ascending sorting order by last name
of the individual.
4. Under Include records where, filter on aggregate values of filter fields. For example, to return
the names and date added information for all system administrators added to the system as of a
specific date:
a. On the Select filter and output fields tab, select the Date added field and select MIN from
the Summarize option.
b. On the Set sort and group options tab, drag MIN (Date added) under Include records
where and enter the date to use as criteria.
Preview the results
1. To browse the query results, select the Preview results tab.
This tab displays the first 500 rows of the query results so you can quickly browse the records
and ensure they are correct.
l To view the query ID for each record, click Show ID column. The QUERYRECID column
appears.
l To view the Structured Query Language (SQL) command used to generate the query, click
View SQL. The SQL command appears so you can review or copy and paste into another
application as necessary.
2. Adjust your settings on the other tabs as necessary.
32 CHAPTER 2

Set query properties
1. To specify the properties of the query, select the Set save options tab.
2. Enter a unique name and description to help identify the query. For example, in the Description
field, explain the criteria used to create the query.
3. To group the query with similar queries, select its category. Query categories are code table
entries that your organization defines in Administration. For information about code tables, refer
to the Administration Guide.
4. To restrict use of the query to a specific site at your organization, in the Site field, select the site
to use the query. For information about sites, refer to the Security Guide.
5. If you use folders to organize your queries, select the folder in which to save the query. When
you select a folder, the default query permissions from the folder apply to the query. If you
select a folder but then edit the selection to "none" before you save the query, the default
permissions from the original folder no longer apply to the query. With a selection of "none," all
system roles can modify the query.
6. Select whether to add the query to your Favorites folder. We recommend you add queries you
access often to your Favorites folder.
7. To enable users to access the query through a mobile device, select Make this query available
in Mobile Query.
8. To exclude duplicate rows from the results of an ad-hoc query, select Suppress duplicate rows.
When you select this checkbox, rows that contain identical data do not appear in the query
results. However, duplicate rows may still appear for one-to-many fields. For example, if you
include Phone number in the output, and a constituent has multiple phone numbers, each
number appears on a separate row in the query results. For more information about the
suppression of duplicate rows, refer to Suppress Duplicates in Ad-hoc Query Results on page 36.
9. To make ad-hoc query results available from the Blackbaud Internet Solutions REST API, select
QUERY 33

Enable query for CMS RESTAPI.
Warning: This checkbox provides access to the query’s results when you use Blackbaud
Internet Solutions RESTAPI. When you edit a query with the checkbox selected, any change to
it affects your website. For example, the website reflects the security rights of the last user to
save the query. If that user has rights to view A and C in query results but not B, website users
can only view A and C. If that user has rights to view A, B, and C in query results, website users
can also view all three. For more information about Blackbaud Internet Solutions REST API,
see the SDK / APIGuide.
10. Select whether to create a selection from the query results. A selection is a named set of IDs of
the same record type. It has a name and description and is often used as input into a process or
report as a means to specify which set of records should be acted on by that process. For
information about how to create a selection from the query, refer to Create Selections from
Queries on page 34.
11. Select whether other users can generate and edit the query. To assign permissions by system
role, click Advanced permissions. For information about how to assign advanced permissions,
refer to Assign System Role Permissions to a Query on page 35.
12. Click Save. The results page appears.
Create Selections from Queries
When you specify the properties of a query, you can select whether to create a selection from its
results for use in other areas of the program. When you select to create a selection, you can select
whether users can access the selection in the query screen to create output fields and filters for other
queries.
To create a selection from a query, you must select whether to create a dynamic or static selection.
• Dynamic - A dynamic selection automatically refreshes each time you use it. When you use a
dynamic selection in a function, the program searches the database for any new records that meet
the criteria of the selection and adds them to the results. For example, you can use a dynamic
selection to track system administrators assigned in the application. Every time you use the
selection, it includes administrators you recently added, even if they did not meet the criteria when
you previously used it.
• Static - A static selection is like a snapshot of your database at the time you first create it. The
program only includes the records that meet the criteria when you first create the selection. The
selection includes these same records until you refresh it.
Note: Deleted records are not included in static selections, even when those recrords were deleted
after the selection was created.
• For example, you can use a static selection to track system administrators assigned in the
application. However, each time you use the selection, it does not include administrators you
recently added, even if they meet the selection criteria. To manually refresh a selection, regenerate
the results for the query you used to create it. To automatically refresh a selection, include it when
you create a business process.
Note: You cannot save a selection based on an ad-hoc query that contains summary output fields
unless it also contains the primary key field of the query view. For example, for a constituent query,
34 CHAPTER 2

the primary key field is the Constituent record field. The use of summary fields can cause the output
to not contain unique values (a primary key), such as when you select the average age among all
constituents. Therefore, to create a selection from a query, you must explicitly include the primary key
field in the query. If the primary key is not included, the Create a selection checkbox is disabled.
Create a selection from a query
1. When you add or edit the query, select the Set save options tab.
2. Select Create a selection.
3. Select whether to create a dynamic or static selection.
l To create a selection that automatically refreshes each time you use it, select Create a
dynamic selection. When you use a dynamic selection in a function, the program searches
the database for any new records that meet the criteria of the selection and adds them to
the results. For example, if a record does not meet the selection criteria when you first
create it because of a data entry error, the selection includes the record the next time you
use it if the error is corrected.
l To create a fixed set of IDs that does not change, select Create a static selection. For
example, if a record that originally met the criteria of the query on which the selection is
based changes so that it does not currently meet the criteria, the record ID is still included
in the selection each time you use it. The selection contains the same records until you
refresh it manually or with an automated process.
4. Select Show this selection in the Query Designerto have this selection appear in the Selections
folder of the Field Explorer on the query screen.
5. Click Save. The results page appears.
Assign System Role Permissions to a Query
When you specify the properties of a query or the default query permissions for a folder, you can
select whether users can generate or edit the query. For more specific security rights, you can assign
advanced permissions by system role. For a smart query, you assign permissions to access and manage
the query together. For an ad-hoc query, you can assign permissions to generate or edit the query
separately.
After you grant rights to generate or edit a query for selected roles, the Allow all users to run this
query and Allow all users to edit this query checkboxes or the Allow other users to modify this
query checkbox are disabled on the Set save options tab.
For users without rights to edit an ad-hoc query, the Edit task on the Queries tab of the information
library is disabled when they select the query.
For users without rights to modify a smart query, the query does not appear on the Queries tab of the
information library.
Assign query permissions by system role
1. When you add or edit the query, select the Set save options tab.
2. Click Advanced permissions. The Assign permissions screen appears.
QUERY 35

3. Select whether to assign query permissions for all application users or only those in specific
system roles. If you select Selected roles, under System roles, manage the rights for each role.
To grant rights to a system role, select the role and click Grant. To deny rights, click Deny. To
undo a selection, click Clear.
Note: For an ad-hoc query, you can only grant edit rights for system roles with rights to
generate the query. On the Edit query tab, you cannot select All roles unless all roles are
granted rights to generate the query.
4. After you assign advanced permissions, text appears to describe the defined permissions. To
edit the permissions, click Advanced permissions.
5. Click OK. You return to the Set save options tab.
Suppress Duplicates in Ad-hoc Query Results
There are several ways to prevent duplicate information in query results. For example, when you first
create the query, use the correct source view. For information about source views, refer to Source
Views on page 28.
To eliminate as many duplicates in query results as possible, follow these recommendations.
l Limit the number of output fields in the query. Specifically, limit the number of one-to-many
fields such as Transaction type or Phone number. For example, if you include Phone number
in the output, and a constituent has multiple phone numbers, each number appears on a
separate row in the query results. However, when you save the query and use it to generate
labels, the constituent’s name appears only once.
l Create a selection for each filter. For example, to create an ad-hoc query that returns all
constituents with a cell phone and a home address in South Carolina, create a query to identify
all the constituents with Phone type equal to "Cell" and create a selection from the results. Next,
create a query to identify all the constituents with an Address type equal to "Home" and State
equal to "SC" and create a selection from those results. To create the final query, add the two
selections to the filter criteria and specify the records must exist in both selections.
l Increase the number of filters in the query. For example, when you filter Number, also filter
Phone type to limit the phone number to a specific type.
l For a query that does not contain one-to-many fields, configure the query’s properties to
suppress duplicate rows.
Note: Use the suppress duplicate rows option when you use fields from more than one query
node to filter data, but do not use the fields from the additional nodes in the output. For
example, if you include fields from the Addresses node to create a selection of constituents in
a certain state, but do not include the address fields in the output, then constituents with more
than one address in the state could appear in the results multiple times.
l Include the system record ID field under Result fields to display and use the COUNT function
from the Summarize button. For more information about how to use the Summarize button to
suppress duplicates, refer to Summarize Query Output on page 49
36 CHAPTER 2

Suppress duplicate rows in an ad-hoc query
To remove rows of matching data from the results of an ad-hoc query, you can configure the query’s
properties to suppress duplicate rows. However, duplicate rows may still appear for one-to-many
fields. For example, if you include Phone number in the output, and a constituent has multiple phone
numbers, each number appears on a separate row in the query results. To delete or hide duplicates,
you can use the query in a report or export the query to Microsoft Excel.
1. When you add or edit the query, select the Set save options tab.
2. Select Suppress duplicate rows.
3. Click Save. The results page appears.
Query Criteria Operators
When you define a query, you establish a set of conditions each record must meet to be included in it.
To establish these requirements, apply the criteria operators to the fields you select to use as filter
fields for the query output.
Note: You can use wildcard characters with certain criteria operators to further refine your search. For
information, refer toWildcard Characters in Query on page 48. Also, some of the criteria operator
labels that appear for date fields use different terminology so you can more easily associate them
with dates. For information, refer to Query Criteria Operators for Date Fields on page 41.
Operator Description
Equal to When you select this condition, the program returns records that include the exact
value you define. For example, if you select City is "Equal to" Portsmouth, the results
only include records with the exact entry of Portsmouth as the city.
QUERY 37

Operator Description
Not equal to When you select this condition, the program returns records that do not include the
exact value you define.
For some fields, the Only return records that do not have a value equal to the
selected value checkbox appears. To not return records associated with the value
selected for the field, regardless of whether the record is associated with additional
values for the field, select this checkbox. For example, if Robert Hernandez has multiple
constituencies of Board Member, Volunteer, and Alumnus, and you select
Constituency is "Not equal to" Alumnus, the results will not include Robert’s Alumnus
constituency record or any other constituency records for Robert.
If you do not select the checkbox, the results do not include records associated with
Alumnus, but do include records for Robert's additional constituencies.
Note: The Include blanks checkbox appears for the criteria operators of "Not equal
to," "Not one of," "Less than," "Less than or equal to," "Not between," "Not like," and
"Does not contain." To include records with no entry for the selected field, select this
checkbox. If the checkbox is not selected, records with no entry for the field do not
appear in the results. From Administration, you can use the Enable/Disable default
blank query criteria configuration task select whether to select Include blanks by
default.
One of When you select this condition, the program returns records that include one of the
values you define.
For some fields, the Only return records that match all selected values checkbox
appears. To return only records that match all the values defined, select this checkbox.
For example, Robert Hernandez has multiple constituencies of Board Member,
Volunteer, and Alumnus. You select Constituency is “One of” Alumnus or Volunteer
and select the Only return records that match all selected values checkbox. Returned
results will include all constituencies for Robert as well as any other constituents
associated with both the Alumnus and Volunteer constituencies.
If you do not select the checkbox, the program returns constituent records associated
with either Alumnus or Volunteer or both. The constituent does not have to be
associated with both constituencies, but must be associated with at least one of the
constituencies. Returned results will include all constituencies for Robert as well as any
other constituents who meet the criteria.
38 CHAPTER 2

Operator Description
Not one of When you select this condition, the program returns records that do not include any of
the values you define.
Less than When you select this condition, the program returns records that include a value less
than the one you define.
For example, if you select Amount is "Less than" $100, the results include records with a
revenue amount less than $100. The results do not include records with a revenue
amount of $100 or more.
When you only use the "Less than" operator for a field, records that do not include an
entry are considered the same as records with valid blank entries. For example, a query
with the criteria Amount is "Less than"$100, returns records with a revenue amount
less than $100, records without an amount value (a blank Amount field), and records
with a zero amount value. To exclude blanks, add a second filter to specify “AND
Amount is not blank.”
Note: The query returns records without revenue information. To exclude people
without revenue, you must explicitly filter those records from the query.
Less than or equal to When you select this condition, the program returns records that include a value less
than or equal to the one you define. For example, if you select Age is "Less than or
equal to" 25, the results include records with an age value of 25 or younger. The results
also include records with the value you select, in this case 25.
Greater than When you select this condition, the program returns records that include a value
greater than the one you define. For example, if you select Age is "Greater than" 25, the
results include records with an age value older than 25. The results do not include
records with an age value of 25 or younger.
Greater than or equal
to
When you select this condition, the program returns records that include a value
greater than or equal to the one you define. For example, if you select Age is "Greater
than or equal to" 25, the results include records with an age value of 25 or older. The
results also include records with the value you select, in this case 25.
Between When you select this condition, the program returns records that include a value
within the range you define. The operator is inclusive. For example, if you select Age is
"Between" 25 and 30, the results include records with an age value between 25 and 30,
as well as records with an age value of 25 or 30.
Not between When you select this condition, the program returns records that do not include a
value within the range you define. This operator is exclusive. For example, if you select
Age is "Not between" 25 and 30, the results include records with an age value before
25 and after 30. The results do not include records with an age value equal to 25 or 30.
Like When you select this condition, the program returns records with a value that is
spelled like the one you define. With this condition, you can use the “_” and “%”
wildcard characters to replace characters in a field.
QUERY 39

Operator Description
Not like When you select this condition, the program returns records with a value that is not
spelled like the one you define. With this condition, you can use wildcard characters to
replace characters in a field.
Begins with When you select this condition, the program returns records with a value that begins
with the one you define. For example, if you select Last name "Begins with" Bell, the
results include records with a last name value that begins with "Bell," such as Bell,
Bellmont, or Bellingham. With this condition, you can use wildcard characters to
replace characters in a field.
Does not begin with When you select this condition, the program returns records with a value that does
not begin with the one you define. For example, if you select Phone number "Does not
begin with" 800, the results include records without numbers that begin with 800. With
this condition, you can use wildcard characters to replace characters in a field.
Blank When you select this condition, the program returns records that do not include an
entry in the field. For example, if you select City is "Blank," the results include records
without a city value specified for the address.
Not Blank When you select this condition, the program returns records that include an entry in
the field. For example, if you select Country is "Not blank," the results include all
records with a country value.
Contains When you select this condition, the program returns records with a value that includes
the one you define. For example, if you select City "Contains" York, the results include
any records with "York" anywhere in the City field, such as York, York City, and New
York. With this condition, you can use wildcard characters to replace characters in a
field.
Does not contain When you select this condition, the program returns records that do not include the
value you define anywhere in the field. For example, if you select City "Does not
contain" London, the results exclude records with London anywhere in the City field,
such as London, New London, and Londonderry. With this condition, you can use
wildcard characters to replace characters in a field.
Under The “under” operator is used to filter data stored hierarchically. When you select this
condition, the results include all records that are children of the selected parent field.
For example, in an appeal query, when you filter by Site record and select “under” as
the operator, the results include all child sites of the parent site. When you select
Include current hierarchy, the parent site also appears in your results. In the Value
field, you can search for the parent site.
40 CHAPTER 2

Operator Description
Not under The “Not under” operator is used to filter data stored hierarchically. When you select
this condition, the results include all records that are not children of the selected
parent field.
For example, in an appeal query, when you filter by Site record and select “Not under”
as the operator, the results include all sites in the hierarchy except the selected
parent's child sites. When you select Include current hierarchy node, the parent site
also appears in your results, but its child sites are still excluded. In the Value field, you
can search for the parent site.
Sounds like When you select this condition, the program uses an algorithm included with
Microsoft SQL Server to return records that sound like the value you define. For
example, if you select Last name "Sounds like" Smith, the results include all records
with Smith and names that sound similar, such as Smyth. With this condition, you can
use the “_” and “%” wildcard characters to replace characters in a field.
Query Criteria Operators for Date Fields
When you define a query and select date fields as filters, the criteria operator labels use terminology
that is more easily associated with date information than the labels that appear for other types of
fields.
The table below explains the date filter operators. To learn about the criteria operators for other types
of fields, refer to Query Criteria Operators on page 37.
Operator Description
Is When you select this condition, the program returns records that include the exact value
you define. For example, if you select Date added "Is" 01/01/2014, the results only include
records with the exact date added value of 01/01/2014.
QUERY 41

Operator Description
Is not When you select this condition, the program returns records that do not include the exact
value you define.
For some fields, the Only return records that do not have a value equal to the selected
value checkbox appears. To not return records associated with the value selected for the
field, regardless of whether the record is associated with additional values for the field,
select this checkbox. If you do not select the checkbox, the results do not include records
associated with the value you select, but do include records for additional values for the
field.
Note: The Include blanks checkbox appears for the date criteria operators of "Is not," "Not
one of," "Before," "On or before," "Not between," "Not like," and "Does not contain." To
include records with no entry for the selected field, select this checkbox. If the checkbox is
not selected, records with no entry for the field do not appear in the results. From
Administration, you can use the Enable/Disable default blank query criteria configuration
task select whether to select Include blanks by default.
One of When you select this condition, the program returns records that include one of the values
you define. For example, if you select Date added is "One of" 01/01/2014 or 02/02/2014, the
results include records with a date added value of either 01/01/2014 or 02/02/2014.
For some fields, the Only return records that match all selected values checkbox appears.
To return only records that match all the values defined, select this checkbox. If you do not
select the checkbox, the program returns records associated with any combination of
values you define.The record does not have to be associated with all the values, but must
be associated with at least one.
Not one of When you select this condition, the program returns records that do not include any of the
values you define. For example, if you select Date added is "Not one of" 01/01/2014 or
02/02/2014, the results include records with a date added value other than 01/01/2014 or
02/02/2014.
Before When you select this condition, the program returns records that include a date value
before the one you define. For example, if you select Date added is "Before" 01/01/2014, the
results include records with a date added before 01/01/2014. The results do not include
records with a date added value of 01/01/2014 or later.
On or before When you select this condition, the program returns records that include a date value on or
before the one you define. For example, if you select Date added is "On or before"
01/01/2014, the results include records with a date added value of 01/01/2014 or earlier. The
results also include records with the value you select, in this case 01/01/2014.
After When you select this condition, the program returns records that include a date value after
the one you define. For example, if you select Date added is "After" 01/01/2014, the results
include records with a date added value after 01/01/2014. The results do not include
records with a date added value of 01/01/2014 or earlier.
42 CHAPTER 2

Operator Description
On or after When you select this condition, the program returns records that include a date value on or
after the one you define. For example, if you select Date added is "On or after" 01/01/2014,
the results include records with a date added value of 01/01/2014 or later. The results also
include records with the value you select, in this case 01/01/2014.
Between When you select this condition, the program returns records that include a date value
within the range you define. This operator is inclusive. For example, if you select Date added
is "Between" 01/01/2014 and 01/01/2015, the results include records with a date added
value between 01/01/2014 and 01/01/2015, as well as records with a date added value of
01/01/2014 and 01/01/2015.
Not between When you select this condition, the program returns records that do not include a date
value within the range you define. This operator is exclusive. For example, if you select Date
added is "Not between" 01/01/2014 and 01/01/2015, the results include records with a date
added value before 01/01/2014 and after 01/01/2015. The results do not include records
with date added value equal to 01/01/2014 and 01/01/2015.
Blank When you select this condition, the program returns records that do not include an entry in
the field. For example, if you select Birth date is "Blank," the results include records without
a birth date value.
Not blank When you select this condition, the program returns records that include an entry in the
field. For example, if you select Birth date is "Not blank," the results include all records with
a birth date value.
Filter Options for Date Fields
When you define a query and include date fields as filters, you select criteria operators such as "Is,"
"Before," or "After," and then the date filter options to use. For example, to create a query of records
added the previous week, you select Date added "Is" "Last week."
The "Rolling date" option is a date range relative to the current date, that either occurred in the past or
will occur in the future. For example, you can create a query to search for constituent records that were
added three days ago or memberships that will expire three months from today. When you select
"Rolling date," specify the number and type of range to use and then select "Ago" or "From today."
Note: The "Rolling date" option is only available when you use a source view from the data
warehouse, so the results include dates relative to the last time the data was refreshed. Also, rolling
dates are not available for "fuzzy" or incomplete dates such as 08/2014.
QUERY 43

The tables below provide detail about each date filter option that is available. For "Rolling date," the
tables list each combination of options you can select.
Note: The tables represent the number for each rolling date combination as N (such as N Day(s) Ago).
Days
A day starts at 12:00:00 a.m. and continues until 11:59:59 p.m. Start and end times use the database
server's time zone.
Option Description
Specific date Starts at 12:00:00 a.m. on the day you specify and continues for 24 hours.
Today Starts at 12:00:00 a.m. on the current day and continues for 24 hours.
Yesterday Starts at 12:00:00 a.m. on the day before the current day and continues for
24 hours.
Rolling date: N Day(s) Ago
Starts at 12:00:00 a.m. n days before the current day and continues 24 hours.
For example, if the current day is August 8th, three days ago is August 5th.
Tomorrow Starts at 12:00:00 a.m. on the day after the current day and continues for 24
hours.
Rolling date: N Day(s) From
today
Starts at 12:00:00 a.m. n days from the current day and continues for 24
hours. For example, if the current day is August 8th, three days from today is
August 11th.
Weeks
A week starts at 12:00:00 a.m. on Sunday and continues for seven consecutive days until 11:59:59 p.m.
on the seventh day. Start and end times use the database server's time zone.
Option Description
This week Starts at 12:00:00 a.m. on the Sunday of the current week and continues for
seven days.
44 CHAPTER 2

Option Description
Last week
Starts at 12:00:00 a.m. on the Sunday of the week before the current week
and continues for seven days.
Rolling date: N Week(s) Ago
Starts at 12:00:00 a.m. on the Sunday of the week n weeks before the current
day and continues for seven days. For example, if today is Saturday, August
14th, one week ago is Sunday, August 1st to Saturday, August 7th.
Next week Starts at 12:00:00 a.m. on the Sunday of the week after the current week and
continues for seven days.
Rolling date: N Week(s) From
today
Starts at 12:00:00 a.m. on the Sunday of the week n weeks from the current
day and continues for seven days. For example, if today is Monday, August
2nd, one week from today is Sunday, August 8th to Saturday, August 14th.
Months
A month starts at 12:00:00 a.m. on the first day of a month and continues until 11:59:59 p.m. on the last
day of the month. Start and end times use the database server's time zone.
Option Description
This month Starts at 12:00:00 a.m. on the first day of the current month and continues
for all the days in the month.
Last month Starts at 12:00:00 a.m. on the first day of the month before the current
month and continues for all the days in that month.
Rolling date: N Month(s) Ago
Starts at 12:00:00 a.m. on the first day of the month that started n months
before the current day and continues for all the days in that month. For
example, if today is August 8th, three months ago is May 1st to May 31st.
Next month Starts at 12:00:00 a.m. on the first day of the month after the current month
and continues for all the days in that month.
Month to date Starts at 12:00:00 a.m. on the first day of the current month and continues to
the current date.
Rolling date: N Month(s) From
today
Starts at 12:00:00 a.m. on the first day of the month n months from the
current day and continues for all the days in that month. For example, if
today is August 8th, three months from today is November 1st to November
30th.
Quarters
Each year is divided into four, three month long calendar quarters. The program uses the following
quarter definitions:
l First quarter - January through March
l Second quarter - April through June
QUERY 45

l Third quarter - July through September
l Fourth quarter - October through December
Option Description
This quarter Starts at 12:00:00 a.m. on the first day of the current calendar quarter and
continues to the end of the quarter.
Last quarter Starts at 12:00:00 a.m. on the first day of the calendar quarter before the current
calendar quarter and continues to the end of that quarter.
Rolling date: N Quarter(s)
Ago
Starts at 12:00:00 a.m. on the first day of the calendar quarter that started n
quarters before the current day and continues to the end of that quarter. For
example, if today is August 8th, one quarter ago is April 1st through June 30th.
Next quarter Starts at 12:00:00 a.m. on the first day of the calendar quarter after the current
calendar quarter and continues to the end of that quarter.
Quarter to date Starts at 12:00:00 a.m. on the first day of the current quarter and continues to the
current date.
Rolling date: N Quarter(s)
From today
Starts at 12:00:00 a.m. on the first day of the calendar quarter n quarters from the
current day and continues to the end of that quarter. For example, if today is
August 8th, one quarter from today is October 1st through December 31st.
Years
A year is the 12 month time period that begins at 12:00:00 a.m. on January 1st and ends at 11:59:59
p.m. on December 31st.
Option Description
This calendar year Starts at 12:00:00 a.m. on January 1st of the current year and continues for
365 days.
Last calendar year Starts at 12:00:00 a.m. on January 1st of the year before the current year and
continues for 365 days.
Rolling date: N Calendar year
(s) Ago
Starts at 12:00:00 a.m. on January 1st of the year that started n years before
the current day and continues for 365 days. For example, if today is August 8,
2014, one year ago is January 1, 2013, through December 31, 2013.
Next calendar year Starts at 12:00:00 a.m. on January 1st of the year after the current year and
continues for 365 days.
Calendar YTD Starts at 12:00:00 a.m. on January 1st of the current year and continues to
the current date.
Rolling date: N Calendar year
(s) From today
Starts at 12:00:00 a.m. on January 1st of the calendar year n years from the
current day and continues to the end of that year. For example, if today is
August 8, 2014, one year from today is January 1, 2015, through December
31, 2015.
46 CHAPTER 2

Fiscal Years
Fiscal year definitions vary for each organization. To use them in ad-hoc queries, you must first
configure them in Administration. For information, refer to the General Ledger Setup section of the
Administration Guide.
Option Description
This fiscal year Starts at 12:00:00 a.m. on the first day of the current fiscal year and continues to
the end of the last day of the fiscal year.
Last fiscal year Starts at 12:00:00 a.m. on the first day of the fiscal year before the current fiscal
year and continues to the end of the last day of that fiscal year.
Rolling date: N Fiscal year
(s) Ago
Starts at 12:00:00 a.m. on the first day of the fiscal year n fiscal years from the
current day and continues to the end of the last day of that fiscal year. For
example, if the fiscal year is July through June and today is July 8, 2014, one fiscal
year ago is July 1, 2013, through June 30, 2014.
Next Fiscal year Starts at 12:00:00 a.m. on the first day of the fiscal year after the current fiscal year
and continues to the end of the last day of that fiscal year.
Fiscal year to date Starts at 12:00:00 a.m. on the first day of the fiscal year of the current fiscal year
and continues to the current date.
Rolling date: N Fiscal year
(s) From today
Starts at 12:00:00 a.m. on the first day of the fiscal year n fiscal years from the
current day and continues to the end of that fiscal year. For example, if the fiscal
year is July through June and today is July 8, 2014, one fiscal year from today is July
1, 2015, through June 30, 2016.
Query Combining Operators
With combining operators, you can combine two separate sets of filtering criteria to narrow your
query even further. Combining operators are characters that provide a link between selected criteria
and define the records included in the query.
Operator Description
and To indicate that records must meet both criteria to be selected, select the second of
the criteria and click and. For example, if you use the field criteria City “equals”
Cambridge AND Country “equals” United Kingdom, the query excludes records with
addresses in Cambridge, Massachusetts, in the United States. The records selected
must meet both criteria to appear in the results. The default combining operator used
in a query is and.
QUERY 47

Operator Description
or To indicate records can meet either criteria to be selected, select the second of the
criteria and click or. For example, if you use the field criteria County “equals” Norfolk OR
Suffolk, the query includes all records with addresses in either Norfolk and Suffolk.
Parenthesis () Use parentheses to make two pieces of a criteria a whole. For example, if you use State
“equals” Texas AND (City “equals” Dallas OR City “equals” Fort Worth), the records
selected must first have Texas as a value in the Statefield, and must also have either
Dallas or Fort Worth in the City field. In this case, records must meet the first criteria
and at least one of the criteria within the parentheses.
Wildcard Characters in Query
Some criteria operators enable you to use special characters or a series of characters to define
conditions that a record must meet to be selected. These special characters are called “wildcards.”
Wildcards are extremely helpful when you are unsure how to spell a name or suspect something may
be misspelled. Below is a list of wildcard characters and examples of how they are used.
Operator Description
Question Mark (?) or
Underscore (_)
Use the question mark or the underscore symbol to replace a character. When you
include a question mark within a word, you search for every possible spelling of the
word with the question mark in that specific spot. You can use multiple question marks
within a word. For example, to locate any records with a last name like Smith or Smyth,
you can use the criteria Last name “is like” Sm?th. The program selects all records
whose last name fits the pattern specified.
Asterisk (*) or
Percent (%)
Use the asterisk or percent sign to replace a series of characters. For example, to locate
all constituents with a last name like Johnson, you can enter the criteria Last name
“like” John*. The program selects all records with a last name that starts with “John”,
such as Johnson, Johnssen, and Johnston.
Brackets ([]) Use brackets to query for a range of characters or to locate several characters. For
example, use the criteria Last name “begins with” [A-C] to locate all records with a last
name that begins with A through C. When you use the brackets with a comma
between characters, you search for records with the specific values listed. For example,
if you select the criteria Last name “begins with” [A,C,F], the program selects all records
with last names beginning with A, C, and F and skips those with last names that begin
with B, D, and E.
Compare Output Field Values
You can compare output fields of the same data type. For example, you can create a query that selects
constituents whose Last Gift Amount equals their Largest Gift Amount.
To do this, add the Last Gift Amount and Largest Gift Amount smart fields under Result fields to
display, and add the Last Gift Amount field under Include records where. On the criteria screen, select
48 CHAPTER 2

the criteria operator, such as “Equal to”. Select Output Field and then select the Largest Gift Amount
field. When you return to the query, “Last Gift Amount is equal to Largest Gift Amount” appears under
Include records where.
Note: For information about how to add smart fields, see the Administration Guide.
On the Sort/Group Filters tab, you can compare COUNT, SUM, AVG, MIN, or MAX values of filter fields.
For example, you can compare the SUM of planned gifts payments to the SUM of pledge payments.
Summarize Query Output
When you add or edit an ad-hoc query and select a field under Result fields to display on the Select
filter and output fields tab, the Summarize button enables you to view a calculation of the field results
rather than the actual contents of the field.
Query is a way to group records; it is not a reporting tool. As such, the output fields identify records
included in the query. If a field with a one-to-many relationship is selected under Include records
where or Result fields to display, the record may appear multiple times in the query: once for each
time the record satisfies the selected criteria. This allows you to check your query to ensure you get
the expected results.
For example, you may query to find everyone who has donated gifts to your organization this year.
l Filter criteria: Revenue\Application Details\Type equals “Gift” AND Revenue\Application
Details\Revenue Details\Date equals “This calendar year”
l Output Fields: Name AND Revenue\Application Details\Amount
If you include these fields, the output displays a unique row in the query for each gift. For your
purposes, these may be considered duplicates. For instance, if a donor made five gifts, his name
appears five times with the amount of each gift listed separately.
The Summarize button's functions - Count, Sum, Average, Min, Max - can help prevent these
duplicates.
If you use the SUM function for the amount, the donor appears once in the query with his gift revenue
summarized. If you add a second amount field for the output and use the COUNT function for it, the
donor appears once in the query and the second amount COUNT field would be “5,” the total number
of gifts from the donor this year.
Some summary function scenarios include:
l COUNT: For number or amount fields, the COUNT function is the total number of records
included.
l SUM: For number or amount fields, the SUM function is the combined total of the numbers.
l AVG: For number or amount fields, the AVG function is the average of the numbers included.
l MAX: For date fields, the MAX function displays the maximum or latest date. For number or
amount fields, MAX displays the largest number.
l MIN: For date fields, the MIN function displays the minimum or oldest date. For number or
amount fields, MIN displays the lowest number.
QUERY 49

Merge Two Queries
You can merge two queries together to create a new query. For example, if you want to send your
organization's Annual Report to your constituents and you already mailed this information to your
Board of Directors, you can create a query for your mailing using merging operators to exclude your
Board of Directors from your mailing list. The records included in the resulting query are determined
by the merging operator you select. To help you visualize the queries and how their records relate to
one another, the program provides a Venn diagram to represent each merge option. When you build a
merged query, you select the merge option to use based on the records to include in the new query.
Note: A Venn diagram depicts two circles — one for each selection used to build the merged
query— that overlap in the middle. The middle section of the diagram, where the circles overlap,
represents the records that appear in both queries. The outer sections represent the records that
appear in each respective query but not the other.
Create a merged query from two queries
1. From Analysis, click Information library. The information library appears.
2. On the Queries tab, click the double arrows beside one of the queries you want to use to expand
the options and click Merge. The New Ad-hoc Query screen appears.
3. The first query appears in the Query A field. In the Query B field, search for and select the query
you want to merge with query A.
Note: You can only merge queries from the same source view. For information about source
views, refer to Source Views on page 28.
4. For Include records that are in, click the merge option to use. Under Description, an
50 CHAPTER 2

explanation of the records included in the selected option appears.
5. In the Selection name field, enter the name to appear for the selection of records the program
automatically creates for the merged results. By default, the selection is active and available in
the Selections folder of the source view query screen. To edit the selection properties, open it
from the Selections page of the information library.
6. To select output fields, click the Select output fields tab.
7. Under Browse for fields in, you can view the types of fields that are available for the query
source view the queries use. You can expand a node to drill-down to a specific group of fields.
Tip: To quickly search for a field, enter the field name in Find field and press ENTER on your
keyboard. The program displays applicable fields in the middle pane. Use your arrows to
browse through the list. If you select a group and click Search up, the search applies only to
fields in the selected node.
The middle pane lists the Fields and System fields for the selected group.
8. To specify output fields for the query, select them in the middle pane and drag them into Result
fields to display. Selected fields correspond to the information you want to view in the query
results and they appear as column headings in the query output.
Note: The output fields from each of the queries you selected automatically appear under
Result fields to display. You can remove these fields from the output as necessary.
l To view a calculation of the field results instead of the actual contents of the field, select
an output field and click Summarize. For example, if you select a date field as an output
and assign a minimum date, all records included in the query must satisfy the minimum
date requirement.
The calculation options available depend on the field you select. For information, refer to
Summarize Query Output on page 49.
l To edit the label of an output field for the header row of an export, select the field name,
click Change column header, and enter the name to appear in the export header.
9. To specify a sort order for the query results or filter on aggregate values, select the Set sort
order for rows tab.
10. Under Select results fields for sorting or group filters, the output fields selected on the Select
output fields tab appear. Select the fields to sort by and drag them under Sort records by.
11. Under Sort records by, include the fields to sort by and select whether to sort in ascending or
descending order. Sort fields are optional. For example, to create a query to list the name and
home telephone number of individuals, you can select an ascending sorting order by last name
of the individual.
12. To browse the query results, select the Preview results tab.
This tab displays the first 500 rows of the query results so you can quickly browse the records
and ensure they are correct.
l To view the query ID for each record, click Show ID column. The QUERYRECID column
appears.
l To view the Structured Query Language (SQL) command used to generate the query, click
QUERY 51

View SQL. The SQL command appears so you can review or copy and paste into another
application as necessary.
13. Adjust your settings on the other tabs as necessary. Otherwise, select the Set save options tab to
specify the properties of the query.
14. Enter a unique name and description to help identify the query.
15. Specify the properties of the query as necessary. For information about the items on this tab,
refer to Query Properties on page 1.
16. Click Save to save your query and view the results.
Create Smart Query Definitions from Ad-hoc Queries
After you create an ad-hoc query, you can create a smart query definition from the results. You can
then create new smart query instances and base them on the definition. For information about smart
queries, refer to Smart Queries on page 58.
When you create the definition, all the output fields from the ad-hoc query are available so you can
specify whether to include them in the output of smart query instances created from this definition.
You can also specify the fields to include as filter options, their filter operators, and the record type to
use as the source view.
The filter fields you select appear on the Parameters tab when you create smart query instances from
this definition. For example, if you include Account Number with a filter operator of Not Equal To, the
Parameters tab displays an Account Number not equal to field. You can specify which parameter this
number should not equal in the query results.
52 CHAPTER 2

We recommend you include a system record ID as an output field in the ad-hoc query you use to
create the definition so query instances created from it can uniquely identify records that appear in the
results. For example, for a revenue view smart query, include the Revenue record field.
Note: If the ad-hoc query on which you based your smart query definition changes, the change does
not appear in the smart query. You must update the smart query separately.
Create a smart query definition from an ad-hoc query
1. From Analysis, click Information library. The information library appears.
2. On the Queries tab, click the double arrows next to the ad-hoc query to use to create a smart
query definition.
3. On the action bar, click Create and select Smart query. The Create smart query from ad-hoc
query screen appears.
Note: You can also create a smart query from the Ad-hoc query screen when you add or edit a
query.
QUERY 53

Under Field, each output field selected for the ad-hoc query appears.
4. From the Output type column, select whether to include, exclude, or hide the output field in
the smart query definition.
5. To apply criteria to limit the results in the smart query, select Filter and choose a filter in the
Filter operator column.
When you create a smart query instance based on this query definition, each field you select to
filter appears on the Parameters tab of the Smart Query screen with the selected filter operator.
For example, if you include Account Number with a filter operator of Not Equal To, the
Parameters tab displays an Account Number not equal to field. You can specify which
parameter this number should not equal in the query results.
6. In the Primary key field, select an output field from the ad-hoc query to specify the type of
smart query to create. When you select a field, the record type associated with it automatically
appears in the Record type field.
We recommend you select a system record ID so query instances created from the definition can
uniquely identify records that appear in the results, and so the queries appear in the results of
smart query searches.
Note: System record IDs appear as options when you include them as output fields from the
ad-hoc query. For example, to create a constituent view smart query, include the Constituent
record field.
7. In the Record type field, select the record type to use as the source view for the definition. If
you selected an output field in the Primary key field, the record type associated with it
automatically appears. You can search for the query definition based on the record type you
select.
8. Enter a unique name and description to help identify the new smart query.
9. Click Save. You return to the information library.
54 CHAPTER 2

To view the smart query definition you created, select Add a smart query. Your smart query
definition appears under the selected record type category.
Delete a smart query definition created from an ad-hoc query
1. From Administration, click Application. The Application page appears.
2. Click Shell design. The Shell Design page appears.
3. On the User-defined Smart Queries tab, click the double arrows to select the smart query
definition and click Delete. A confirmation message appears.
4. Click Yes. You return to the Shell Design page.
Create Reports from Ad-hoc Queries
After you create an ad-hoc query, you can create a report to display or print the results. When you
create the report, you select options to further define the context and layout. If you select a context,
you specify a filter so report users can view the data in the context of a specific field. This feature
allows users who are not familiar with the query functionality to easily access information within the
report.
For example, if the query results include revenue from a group of constituents, you could include
constituent name as the context record.
When report users access the report, they enter names and view the results for specific people.
QUERY 55

Once you save a report, you can work with it through Report Explorer in Analysis or Shell Design in
Administration. For information about Report Explorer, refer to the Manage Reports chapter of the
Reports Guide or the Reports section of the help file. For information about working with ad-hoc query
reports through Shell Design, refer to the Shell Design chapter of the Page Designer Guide or the Page
Designer section of the help file.
Create a report from an ad-hoc query
1. From Analysis, click Information library. The information library appears.
2. On the Queries tab, click the double arrows next to the ad-hoc query to use to create a report.
3. On the action bar, click Create and select Report. The Create report from ad-hoc query screen
appears.
Note: You can also create a report from the Ad-hoc query screen when you add or edit a query.
4. In the Name and Description fields, enter a name and description to help identify the report.
5. In the Destination field, click the Browse button to access the Choose Report Folder screen.
From this screen, select a folder destination for your ad-hoc query report.
The Choose Report Folder screen displays the available folder options in Report Explorer. You
can select an existing folder or create a new one.
6. To enable a filter so report users can view the data in the context of a specific field, select
Require a context record for report. For example, if the query results include revenue from a
group of constituents, you could include constituent name as the context record to allow report
users to view the results for specific people. This feature allows users who are not familiar with
the query functionality to easily access information within the report.
7. In the Context record ID field, select an output field from the ad-hoc query as the filter field for
56 CHAPTER 2

the query. When you select a field, the record type associated with it automatically appears in
the Context record type field. For example, to include constituent name as the filter field to
appear on the report, you would select Name in the Context record IDfield, and Constituent
would appear in the Context record type field.
8. In the Context record type field, select a record type to associate with the report. If you
selected an output field in the Context record ID field, the record type associated with it
automatically appears. You can search for the record type based on the context record you
select.
9. Select to view your report in Portrait or Landscape format.
10. Click Create. The screen refreshes after the program creates the report.
11. To edit and customize your report using Report Builder version 2.0 or higher, mark Open report
with report builder.
If you do not click this link, the program generates the report but you do not have the ability to
customize as you would with Report Builder 2.0 (or higher).
Note: To customize an ad-hoc query report, you can access your report in Report Builder 2.0
(or higher) through Report Explorer, the Shell Design page, or from the query report.
12. Click Close. You return to the information library.
The ad-hoc query report displays results associated with the site or sites accessible by the user
who generates the query.
Note: You can edit existing reports and create new reports from Report Explorer in Analysis.
You can also add, edit, and delete ad-hoc query reports from the Ad-hoc Query Reports tab of
the Shell Design page in Administration
Create Data List
From an ad-hoc query, you can create a data list of the query results. If the query contains a date field
in the output, you can also base an RSS feed or email alerts on the data list. To create a data list from
an ad-hoc query, click the double arrows next to the query to use on the information library page.
Next, click Create, Data list on the toolbar that appears when you expand the query. Once created, you
can add the data list and RSS feed to other pages if you have the proper administrative rights. For
more information, refer to the Shell Design information in the Page Designer documentation.
Edit Ad-hoc Queries
You can edit the properties and criteria of a saved ad-hoc query. If you created a selection based on
the query, any changes to the query also impact that selection.
Edit an ad-hoc query
1. From Analysis, click Information library. The information library appears.
2. On the Queries tab, click the double arrows to select an ad-hoc query and click Edit. The query
QUERY 57

screen appears. The options on this screen are the same as when you create the query. For
information about the items on this screen, refer to Create Ad-Hoc Queries on page 29.
3. To edit the query properties, select the Set save options tab. For information about the items on
this tab, refer to Query Properties Screen on page 1.
4. Click Save to save your changes and view the results.
Delete Ad-hoc Queries
When you delete an ad-hoc query, any selections you created based on it are also deleted. If a query
(or selection based on it) is in use anywhere in the program as part of a process or other functionality,
the query cannot be deleted. If you attempt to delete a query that is in use, a message appears to
inform you that the operation is not allowed.
Delete an ad-hoc query
1. From Analysis, click Information library. The information library appears.
2. On the Queries tab, click the double arrows to select the ad-hoc query and click Delete. A
confirmation message appears.
3. Click Yes. You return to the information library.
Use Selections in Queries
When you create an ad-hoc query, you can use an existing selection of records that match the query's
source view record type to create output fields and filters. A selection is a named set of IDs of the
same record type. For information about selections, refer to Selections on page 71.
If you use a selection as a filter in a query, you specify whether the records to include in the results
exist in the selection. This saves you time because you do not need to recreate the selection's filter
criteria.
Smart Queries
A smart query is a tool that enables you to use a previously defined query, known as a definition, to
generate an instance of the results for parameters you specify. Definitions typically perform complex
calculations that use business logic, so you save time when you create smart query instances because
you only need to enter the parameters for the results you need. Smart queries are available in Query.
To access the Query section, from Analysis, click Information library.
To create a smart query instance, you select a definition and then specify values for parameter fields.
Parameter field values provide the definition with the information necessary to generate results. For
example, a definition based on SYBUNT (constituents who gave Some Year But Unfortunately Not This
year), might include parameter fields for year and donor.
After you generate the results, you can review, export, or create a selection from them. For detailed
information about how to create smart queries, refer to Create Smart Query Instances on page 69.
58 CHAPTER 2

Smart Query Definitions
To create a smart query instance, you must first select a definition. A definition is a previously defined
query you use in a smart query instance to generate results for parameters you specify. They are
typically created to perform complex calculations that use business logic.
The program includes a number of default definitions, but users who are familiar with the
organization's data model can use ad-hoc query within the program to create them. Also, Infinity
SDKsoftware developers can create them and add them to your database.
Note: Default definitions and definitions created from ad-hoc queries restrict results to the site
security levels of users who generate smart queries. Custom definitions only include site security
when developers add it to them.
For information about how to use definitions to create instances of smart queries, refer to Create
Smart Query Instances on page 69. For information about how to create smart query definitions from
ad-hoc queries, refer toCreate Smart Query Definitions from Ad-hoc Queries on page 52.
Smart Query Default Definitions
The tables below provide detail about each default smart query definition by source view. For
information about how to use definitions to create instances of smart queries, refer to Create Smart
Query Instances on page 69. For information about how to create smart query definitions from ad-hoc
queries, refer toCreate Smart Query Definitions from Ad-hoc Queries on page 52.
Constituent
Option Description
Constituents Associated with
Tributes Smart Query
Enables you to browse a list of constituent records that are associated with
tributes. A tribute is a revenue recognition that is in relation, or tribute, to
someone else. For example, tributes can include "In memory of," "In honor
of," 'In recognition of," or "On behalf of."
On the Parameters tab, specify the tribute association type. You can include
acknowledees, tributees, or both. You can also select a tribute type or default
designation.To base the query on a certain group of constituents, you can
specify a constituent selection to use. You can also specify a tribute letter.
After the query processes, the Results tab displays the constituent records
that meet the criteria, along with primary address information and tribute
details.
On the Set save options tab, you can save the results as a selection for use in
other processes, such as when you generate correspondence.
QUERY 59

Option Description
Constituents by Address Smart
Query
Enables you to browse a list of constituents whose primary addresses meet
specified criteria. You can use County, City, State, and ZIP/Postal code as
address criteria to create a smart query.
On the Parameters tab, you specify the address criteria to use and then the
countries, cities, states, or ZIP/postal codes to match with your constituents.
After the query processes, the Results tab displays the constituent records
that meet the criteria, and their primary address information and lookup IDs.
On the Set save options tab, you can save the results as a selection for use in
other processes, such as when you determine discount eligibility. For
example, you could create a discount that is only available to patrons who live
in a certain city or are residents of a certain state.
Constituents by Last
Interaction Smart Query
Enables you to browse a list of constituents with a last recorded interaction
during a specified time period.
On the Parameters tab, you can specify a constituent selection to use. You
can also specify the time range for the last interaction, such as greater than
or less than a certain number of days, weeks, months, or years ago. If you use
interaction categories, you can limit the results to a certain one.
After the query processes, the Results tab displays the constituents who fit
the criteria and their primary address information; the date, owner of, and
category of the interaction; and a calculation of how much time has elapsed
since the interaction.
On the Set save options tab, you can save the results as a selection for use in
other processes, such as when you generate appeal mailings or other types
of correspondence. You might, for example, try to reengage donors who
have no interactions recorded in the last 3 years.
60 CHAPTER 2

Option Description
Constituent by Last Revenue
Smart Query
Enables you to browse a list of constituents with a last recorded revenue
during a specified time period.
On the Parameters tab, you can specify a constituent or revenue selection to
use. You can also specify the time range for the last revenue, such as greater
than or less than a certain number of days, weeks, months, or years ago.
After the query processes, the Results tab displays the constituents who fit
the criteria and their primary address information; the revenue date and
amount; and a calculation of how much time has elapsed since the revenue
was recorded.
On the Set save options tab, you can save the results as a selection for use in
other processes, such as when you generate appeal mailings or other types
of correspondence. You might, for example, try to reengage donors who
have not given a gift in the last 3 years.
Constituent Selection Browse
Smart Query
Enables you to browse the records included in any constituent selection,
whether it was created by an ad-hoc query, another smart query, or a
business process.
On the Parameters tab, select the constituent selection to use. After the
query processes, the Results tab displays the constituents in the selection
and their primary address information.
On the Set save options tab, you can save the results as a selection for use in
other processes, such as when you generate correspondence.
QUERY 61

Option Description
Donor Anniversary List Smart
Query
Enables you to browse a list of constituents who gave a gift on a specific date
or within a specified date range.
On the Parameters tab, you can specify a constituent or revenue selection to
use. You can also specify a date or date range for the anniversary, as well as a
total amount given. If you want to limit the results of the query to a smaller
number of records, you can select to include only a top number or
percentage of donors.
Note: The Top percent of donors parameter does not take the Total
amount given parameter into account. The Top percent of donors
parameter is always based on the time period specified, along with the
specified designation, appeal, and constituent selection parameters.
Therefore, if you enter both a Total amount given and a Top percent of
donors, the results will first calculate the top percentage and then, of those
constituents, show the one who meet the total amount given parameters.
After the query processes, the Results tab displays the constituents in the
selection and their primary address information, and the amount and date of
the revenue transaction.
On the Set save options tab, you can save the results as a selection for use in
other processes, such as when you generate appeal mailings or membership
renewals.
Donor List Smart Query
Enables you to browse a list of constituents who gave a gift.
On the Parameters tab, you can specify a designation, campaign, appeal, or
selection to use. You can also specify a time period or a total amount given. If
you want to limit the results to a smaller number, you can select to include
only a top number or percentage of donors.
Note: The Top percent of donors parameter does not take the Total
amount given parameter into account. The Top percent of donors
parameter is always based on the time period specified, along with the
specified designation, campaign, appeal, and constituent selection
parameters. Therefore, if you enter both a Total amount given and a Top
percent of donors, the results will first calculate the top percentage and
then, of those constituents, show the one who meet the total amount given
parameters.
After the query processes, the Results tab displays the constituent records
that meet the criteria.
On the Set save options tab, you can save the results as a selection for use in
other processes, such as when you generate correspondence.
62 CHAPTER 2

Option Description
Event Registrant Attendance
Smart Query
Enables you to browse a list of constituents who registered for past events.
On the Parameters tab, select whether to view the registrants for a specific
event, any event on a specific date, or within a specific time period such as
last year. You can also select whether to include only registrants who
attended the event.
After the query processes, the Results tab displays the constituent records
that meet the criteria.
On the Set save options tab, you can save the results as a selection for use in
other processes, such as when you generate event invitations.
LYBUNT Constituents Smart
Query
There are two LYBUNT constituents smart queries. One uses actual revenue
and the other uses recognition credit. They enable you to browse a list of
constituents who gave a gift — or received recognition credit for a gift — Last
Year But Unfortunately Not This year.
On the Parameters tab, you can define which dates to use for this year and
last year in the LYBUNT comparison. You can also specify a constituent
selection to use.
After the query processes, the Results tab displays the constituent records
that meet the criteria.
On the Set save query options tab, you can save the results as a selection for
use in other processes, such as when you generate correspondence.
QUERY 63

Option Description
Member Smart Query
Enables to you browse a list of members based on parameters you specify
such as membership program or level, membership type, membership status,
or months before or after expiration.
On the Parameters tab, select the parameters to use in the query.
After the query processes, the Results tab displays the members that meet
the criteria.
On the Set save options tab, you can save the results as a selection for use in
other processes, such as when you send membership renewal notices or
membership upgrade appeals.
Potential Gift Aid Smart Query
Provides a list of donors who gave gifts that qualify for Gift Aid but do not
have a valid declaration on file.
On the Parameters tab, you can select constituents to include as well as a
date range.
After the query processes, the Results tab displays the donor’s name and
donations received. The Donations received column displays the total of all
potential payment application amounts that are qualified for Gift Aid.
Payments to pledges for covenants are not included.
The potential total tax claim amount is the sum of the potential base tax claim
amount and the potential transitional tax claim amount.
Note: The Potential Gift Aid smart query displays potential tax claim
associated with the site or sites accessible by the user running the query.
64 CHAPTER 2

Option Description
Potential Matching Gifts
Smart Query
Enables you to identify gifts from constituents who have a relationship to a
matching gift organization. You can use the smart query to send
correspondence to constituents who meet the criteria.
On the Parameters tab, you can specify a constituent selection to use. You
can also specify an organization and date range.
After the query processes, the Results tab displays the constituent records
that meet the criteria.
On the Set save options tab, you can save the results as a selection for use in
other processes, such as when you generate correspondence.
SYBUNT Constituents Smart
Query
There are two SYBUNT constituents smart queries. One uses actual revenue
and the other uses recognition credit. They enable you to browse a list of
constituents who gave a gift — or received recognition credit for a gift —
Some Year But Unfortunately Not This year.
On the Parameters tab, you can define which dates to use for this year in the
SYBUNT comparison. You can also specify constituent selection to use.
After the query processes, the Results tab displays the constituent records
that meet the criteria.
On the Set save options tab, you can save the results as a selection for use in
other processes, such as when you generate correspondence.
Membership
Option Description
Membership Mailing
Preference Smart Query
Enables you to browse a list of members based on membership program and
mailing preference.
On the Parameters tab, select the parameters to use in the query.
After the query processes, the Results tab displays the members that meet
the criteria.
On the Set save options tab, you can save the results as a selection for use in
other processes, such as when you send membership renewal notices or
membership upgrade appeals.
QUERY 65

Option Description
Membership Smart Query
Enables to you browse a list of memberships based on parameters you
specify such as membership program or level, membership type, membership
status, or months before or after expiration.
On the Parameters tab, select the parameters to use in the query.
After the query processes, the Results tab displays the memberships that
meet the criteria.
On the Set save options tab, you can save the results as a selection for use in
other processes, such as when you send membership renewal notices or
membership upgrade appeals.
Organization Position
Option Description
Organ
iz
ation Positions Smart
Query
Enables you to browse a list of constituents who are associated with a
particular organization team, as defined in Manage organization hierarchy
in Administration. You can use this smart query to help evaluate the
fundraising performance of teams.
On the Parameters tab, select which team or branch of the organization to
include.
After the query processes, the Results tab displays the selected positions,
assigned fundraisers and business units, as well as the dates of the fundraiser
assignments.
On the Set save options tab, you can save the results as a selection for use in
other processes, such as when you view the opportunity pyramid in Prospects.
Registrant
Option Description
Multi-level Event Registrant
Smart Query
Provides registrant information for any event within a multi-level event. For
example, you could use it to view registrants for an Alumni Reunion Weekend
that includes supporting events such as a tailgate, family picnic, and formal
gala.
On the Parameters tab, specify the event to use. You can also specify a
registrant selection to narrow the results. For example, you can include a
selection of host registrants or registrants with an outstanding balance.
After the query processes, the Results tab displays the registrant records that
meet the criteria.
On the Set save options tab, you can save the results as a selection for use in
other processes, such as when you generate event invitations.
66 CHAPTER 2

Revenue
Option Description
Global Pledge Write-Off
Smart Query
Enables to you browse a list of pledges you want to write off based on
parameters you set such as all unpaid pledges, those due by a certain date, or
of a certain maximum amount.
On the Parameters tab, you can select whether to include all unpaid pledges,
unpaid pledges by a certain date, or unpaid pledges with a certain balance.
After the query processes, the Results tab displays the unpaid pledges that
meet the criteria.
On the Set save options tab, you can save the results as a selection for use in
other processes, such as Global pledge write-off in Revenue.
QUERY 67

Option Description
Revenue Dynamics Smart
Query
The Revenue Dynamics smart query provides a list of constituents based on
their revenue activity during two separate time periods.
On the Parameters tab, enter the start and end dates of the two time periods
to include in the comparison. Under Status, you can select the status of the
constituents to include in the list based on the comparison of their activity
during the two time periods.
Below is the list of status options and their descriptions.
New: Constituents with a revenue transaction during the later period, but
not prior to the later period.
Recaptured:Constituents with a revenue transaction during the later period
and prior to, but not during, the earlier period.
Upgraded: Constituents with revenue transactions during both periods, but
with a larger revenue amount during the later period than the earlier period.
Same: Constituents with revenue transactions during both periods, with an
equal revenue amount during each period.
Downgrade: Constituents with revenue transactions during both periods,
but with a larger revenue amount during the earlier period than the later
period.
Lapsed new: Constituents with a revenue transaction during the earlier
period, but not prior to the earlier period nor during the later period.
Lapsed repeat: Constituents with a revenue transaction during and prior to
the earlier period, but not during the later period.
Under Revenue filters, you can select the types of revenue transactions to
include in the activity comparison. You can also select to include only
transactions toward specific designations or campaigns.
After the query processes, the Results tab displays the constituent records
that meet the criteria and their revenue amounts during each time period. On
the Set save options tab, you can save the results as a constituent selection
for use in other processes, such as a mailing.
68 CHAPTER 2

Sponsorship
Option Description
Sponsorship Delinquency
Smart Query
Enables to you browse a list of delinquent sponsorships based on parameters
you set such as program, payment frequency, past due amount, or number of
missed installments.
On the Parameters tab, you can select which sponsorships to include.
After the query processes, the Results tab displays the sponsorships that
meet the criteria.
On the Set save options tab, you can save the results as a selection for use in
other processes, such as sponsorship pledge reminders or write offs.
Note: The Past due amount field includes options for all active currencies.
To see the amount past due in a specific currency, select the currency from
the drop-down menu. The currency drop-down menu appears only when
the multi-currency option is turned on.
Create Smart Query Instances
To create a smart query instance, you select a smart query definition and then specify values for
parameter fields. Parameter field values provide the definition with the information necessary to
generate results. For example, a definition based on SYBUNT (constituents who gave Some Year But
Unfortunately Not This year), might include parameter fields for year and donor.
After the query processes, the Results tab displays the records that meet the criteria and details
specific to the parameters you specified. On the Set save options tab, you can save the results as a
selection for use in other processes.
Create a smart query instance
1. From Analysis, click Information library. The information library appears.
2. On the Queries tab, click Add a smart query. The Select a Smart Query Definition screen
appears.
3. Select the definition for the type of smart query instance to create. For information about the
definitions, refer to Smart Query Definitions on page 59.
4. Click OK. The New Smart Query screen appears.
5. On the Parameters tab, specify field values to provide the definition with the information
necessary to generate results.
6. To view the query results and ensure the criteria and output appear as intended, select the
Results tab.
7. Adjust your parameters as necessary.
QUERY 69

8. On the Set save options tab, enter a unique name and description to help identify the query and
specify the query's properties. For information about the items on this tab, refer to Query
Properties on page 1.
9. Click Save to save your query and see the results.
Edit a Smart Query
You can edit the parameters or view the results of a saved smart query.
Edit a smart query
1. From Analysis, click Information library. The information library appears.
2. On the Queries tab, click the double arrows to select a smart query and click Edit. The query
appears. The items on this screen are the same as the New Smart Query screen. For information
about the items on this screen, refer to Create Smart Query Instances on page 69
3. Edit the query parameters as necessary.
4. Click Save. You return to the results page.
Delete a Smart Query
If a query, or selection based on the query, is used anywhere in the program, such as part of a process,
you cannot delete the query.
Note: If your system administrator created a custom, user-defined smart query through Shell Design
page in Administration, you cannot delete it from the information library. You can only delete it from
the User-defined Smart Queries tab on the Shell Design page in Administration.
Delete a smart query
1. From Analysis, click Information library. The information library appears.
2. On the Queries tab, click the double arrows to select a smart query and click Delete. A
confirmation message appears.
3. Click Yes. You return to the information library.
Search for Smart Queries
You can use the Smart Query Instance Search to locate a smart query. You can search by name or by the
type of records included in the smart query results.
With Smart Query Browse, you can view a list of smart query definitions, rather than a list of all smart
queries. For more information, refer to Smart Query Definitions on page 59.
70 CHAPTER 2

Selections
A selection is a named set of IDs of the same record type. It has a name and description and is often
used as input into a process or report as a means to specify which set of records should be acted on by
that process. For example, the “Acknowledge Revenue” process accepts a selection as a parameter and
acknowledges previously unacknowledged gifts only for records included in that selection. Because
selections consist only of IDs (rather than output fields), they are optimized for peak processing speed.
A selection can be either static or dynamic. A static selection is a fixed set of IDs that does not change.
For example, if a record that originally met the criteria of the query on which the selection is based
changes so that it does not currently meet the criteria, the record ID is still included in the selection
each time you use it. The selection contains the same records until you refresh it manually or with an
automated process. A dynamic selection analyzes membership each time it is used in a function, so
records may be added or removed from it each time you use it.
Many processes not only use selections as parameters, they also produce static selections as output
because selections capture the records that were processed. For example, you can use a static selection
of exceptions from a process as input when you use the process again.
To view a list of all the selections in your database, navigate to Analysis and click View selections.
There are several ways to create selections.
• You can use ad-hoc queries to create selections. The selections are either static or dynamic and
contain the IDs of the rows that meet the query criteria. In many cases you create ad-hoc queries
just to create selections from the results. For more information, refer to Create Selections from
Queries on page 34.
• You can use smart query instances to create selections. The selections are either static or dynamic
and contain the IDs of the rows that meet the query criteria. For more information, refer to Smart
Queries on page 58.
• Business processes throughout the program prompt you to create selections, or the program may
create selections as part of processes. Selections you create from business processes have a query
type of Other. For information about how to edit or set the active status of these selections, refer
to Manage Selections with a Query Type of Other on page 71.
• You can merge two selections of the same type together. For example, you can merge two
constituent selections to create a selection of recipients for a communication. For information
about how to merge selections, refer to Merge Two Selections on page 72.
Manage Selections with a Query Type of Other
Throughout the program, a business process may prompt you to create a selection, such as a static
output selection from a batch or communication. The program may also automatically create a
selection as part of a process. These system-defined selections have a query type of Other.
Note: User defined selections are either Ad-hoc or Smart because you use those types of queries to
create them.
QUERY 71

From the Selections page, you can edit the detail information of these selections, such as name or
description. You can also manage the active status of these selections, such as to prevent its use with a
communication or business process.
Edit a Selection with a Query Type of Other
From the Selections page, you can edit the detail information of a system-defined selection as
necessary. For example, you can edit its name or description to help users easily identify the selection.
Edit the detail information of a selection
1. From Analysis, click View selections. The Selections page appears.
2. Select the criteria of the selection to edit and click Apply. At a minimum, you must select
Include other to display editable selections in the grid.
3. Under Selections, select the selection to edit. The selection must have a query type of Other.
4. Click Edit. The Edit selection screen appears.
5. To help identify the selection, edit its name or description as necessary.
6. To use the selection in the Microsoft SQL Server Reporting Services Query Designer, select Show
this selection in the query designer. If you select this checkbox, the selection appears in the
Selections folder of the Field Explorer in Query Designer.
7. Select whether the selection is active. If you select Active, users can use the selection, such as
with a process.
8. Click Save. You return to the Selections tab.
Set the Active Status of a Selection with a Query Type of Other
To prevent the use of a selection with a query type of Other, such as with future communications or
business processes, you can mark the selection as inactive. Inactive selections remain in the database
but do not appear in selection search results, such as when users choose a selection for a process. To
mark a selection as inactive from the Selections page, click the double arrows to select it and click
Mark inactive on the action bar. When a message appears to ask whether to mark the selection as
inactive, click Yes.
After you mark a selection with a query type of Other as inactive, you can mark it as active from the
Selections page to resume its use. To mark an inactive selection as active, click the double arrows to
select it and click Mark active on the action bar. When a message appears to ask whether to mark the
selection as active, click Yes.
Merge Two Selections
You can merge two selections together to create a new selection. For example, you can merge two
constituent selections to create a selection of recipients for a communication. To help you visualize
the selections and how their records relate to one another, the program provides a Venn diagram to
72 CHAPTER 2

represent each merge option. When you build a merged selection, you select the merge option to use
based on the records to include in the new selection.
Note: A Venn diagram depicts two circles — one for each selection used to build the merged
selection — that overlap in the middle. The middle section of the diagram, where the circles overlap,
represents the records that appear in both selections. The outer sections represent the records that
appear in each respective selection but not the other.
Create a merged selection from two selections
1. From Analysis, click View selections. The Selections page appears.
2. Under Tasks, click Merge selections. The Selection Record Type Search screen appears.
3. Search for and select the type of selections to merge for the new selection. The Merge
selections screen appears.
4. Under Selections, select and drag the two selections to merge to the Selection A and Selection
B fields, or search for and select the selections to merge.
5. To view the total records that appear in the possible merge options, click Calculate totals.
Under each option, the sum of its records appears.
6. For Include records that are in, click the merge option to use. Under Description, an
explanation of the records included in the selected option appears.
7. In the Name field, enter a unique name to help identify the merged selection.
8. Click Save. You return to the Selections page.
QUERY 73

Copy an Existing Query
To copy an existing query so you can use it as a template for a new query, use the Copy option.
When you copy a query, the current user is the owner of any new query created from the copy. In
addition, if you generate the copy from a locked query, the new query is unlocked. The Copy
functionality mirrors the system security of the Add functionality, so users with rights to add queries
also have rights to copy them.
Copy a query
1. From Analysis, click Information library. The information library appears.
2. On the Queries tab, click the double arrows to expand the row of the query to copy.
3. Click Copy. The Copy of Ad-hoc Query screen appears. The items on this screen are the same as
when you add or edit a query.
4. Edit the criteria, output, and properties as necessary for the new query.
5. Click Save. The results page appears.
Export Queries
From the Queries tab of the information library, you can create an export process based on a query to
export its results for use in another software application. You can also download a query's results as a
comma-separated values (*.csv) file or spreadsheet, such as for use in Microsoft Excel.
Export query results
1. From Analysis, click Information library. The information library appears.
2. On the Queries tab, click the double arrows to expand the row of the query with the results to
export and click Create, Export. The Create export process screen appears.
3. Enter a unique name and description to help identify the export process.
4. To restrict the export process to a specific site at your organization, in the Site field, select the
site to use the process.
5. Click Save. The Export page appears, where you manage the export process. For information,
refer to Export Process Status Page on page 100.
Download query results to a comma-separated values file or spreadsheet
1. From Analysis, click Information library. The information library appears.
2. On the Queries tab, click the name of the query with the results to download. The query results
page appears.
3. Under Results, click Export and select the format of the file to download.
74 CHAPTER 2

l To manage the results in a comma-separated values file, select Download to CSV.
l To manage the results in a spreadsheet file, such as for Microsoft Excel, select Download
to XLSX.
4. Open or save the file as necessary.
Browse Query Results
From the results page of a query, or from the Queries tab of the information library, you can select a
page in the program to view the query result records.
Note: When a record does not meet the criteria for a page, a message appears to indicate the
program cannot open the page. If you receive this message, use another page type to browse the
query results.
Browse query records
1. From Analysis, click Information library. The information library appears.
2. On the Queries tab, click the double arrows to expand the row of the query that includes the
results to browse and click Browse. The Choose page definition screen appears and lists the
pages you can use to view the records. Each page displays different information about a record.
3. Select the page to use to view the records and click OK. The selected page appears, with a grid
of all the records in the query.
4. Click Previous record or Next record to browse through records. To use a different page to
view the records, in the View record with field, select the page to use.
View Query Results
To view the results of a query, click its name on the Queries tab of the information library. On the
results page, you can click to process the query and view its results. From this page, you can also edit
the query and browse or export its results.
Organize Queries
To easily search for and maintain your queries, you can use query categories or folders to organize and
group them.
Query Categories
Query categories are code table entries your organization defines in Administration. They enable you
to group queries so you can sort and view them by group. For information about code tables, refer to
the Administration Guide.
QUERY 75

You can add an ad-hoc query to a category from the Set save options tab when you add or edit the
query. You can also select the query's Properties option to specify the category from the information
library.
Create a query category
1. From Administration, click Code tables. The Code Tables page appears.
2. Under Query, click Query Category. The Query Category Table Entries Screen appears.
3. Add or manage entries for the Query Category code table as necessary.
To add a category, click Add. On the New Table Entry screen, enter a description of the new
category and click Save. When users select a category for a query, the new category appears as
an option.
Assign Categories to Queries
After you save a query, you can add it to a category from the information library. On the Queries tab,
click the double arrows to expand the row of the query to assign and then click Properties. From the
Query Properties screen that appears, select the options tab. In the Category field, select the category
to assign to the query and click OK.
Manage Query Folders
You can use the Manage folders option on the Queries tab of the information library to organize your
queries with a folder hierarchy. For example, you can create multiple folders and sub-folders and drag
and drop existing queries into the folders. You can add, edit, and delete query folders at any time
based on your organizational needs.
Use the up and down arrows to move folders and queries up or down in your treeview. Use the right
and left arrows to move queries into a folder or out of a folder. Depending on your folder structure
organization, you can use the arrows to move queries into sub-folders or to the top level of the
hierarchy. Top level queries do not use folders.
Note: With the Manage folders option, you can only add, edit, or delete query folders. You cannot
add, edit, or delete queries. To work with queries, select a query in the information library and use the
actions from the action bar.
When you create or edit a query, you can use the Folder field on the Set save options tab to add your
query to a folder. All existing folders appear as choices in the Folder field. You cannot, however, create
a new folder directly from this field.
After you save a query, you can add it to a folder from the information library. On the Queries tab, click
the double arrows to expand the row of the query to assign and then click Properties. From the Query
Properties screen that appears, select the options tab. In the Folder field, select the folder and click
OK.
76 CHAPTER 2

Create and manage a query folder
1. From Analysis, click Information library. The information library appears.
2. Click Manage folders. The Manage folders screen appears and displays existing query folders at
the top level.
3. Manage the query folders as necessary.
l To add a query folder and begin a hierarchical folder structure, click Add on the toolbar.
On the Add a folder screen, enter a unique name to help identify the folder and click Save.
On the Manage folders screen, the new folder appears under All queries.
l To arrange the order of multiple folders or move a query or folder into another folder,
select the item to move and click the arrows on the toolbar or drag and drop the item as
necessary. You can move queries into a folder or onto the top level. Top level queries do
not use folders.
After you add a query or folder to a folder, a plus sign (+) appears next to the folder to
indicate that it contains nested items. As you add queries and sub-folders to folders, your
list takes on more of a tree-view appearance.
Note: To move an entire folder, use the arrows in the toolbar. When you move an entire
folder, all its nested folders and queries also move. The nested structure of the items you
move is maintained.
l To edit or delete a folder, select it under Query folders and click Edit or Delete on the
toolbar. You cannot delete a folder that contains queries and sub-folders.
Note: You cannot add, edit, or delete queries from the tree-view.
l To assign query folder permissions, click Permissions on the toolbar. The Assign folder
permissions screen appears.
Note: After you assign permissions, you must click OK on the Assign folder permissions
screen and click Save on the Add and configure folder screen to save your permissions.
For information about folder permissions, see Assign Folder Permissions Screen on page
1.
4. Click Save. You return to the information library. On the Queries tab, your folder and query
structure appears.
Assign Query Folder Permissions
To manage access to query folders, you can assign query folder permissions and set default
permissions for sub-folders within a folder. You can allow users to run and edit queries within a folder
as well as new queries you add to the folder. You can also set query permissions for existing queries in
a folder and set default permissions for any query added to the folder.
QUERY 77

Assign query folder permissions
1. From Analysis, click Information library. The information library appears.
2. On the Queries tab, click Manage folders. The Manage Folders screen appears.
3. Select a folder and click Permissions. The Assign folder permissions screen appears.
4. Select whether to apply the folder permissions and default query permissions set as defaults to
all sub-folders within the folder.
5. On the Folder permissions tab, select whether to grant folder rights to users in all system roles
or only those in specific system roles. If you select Selected roles, under System roles, manage
the rights for each role. To grant rights to a system role, select the role and click Grant. To deny
rights, click Deny. To undo a selection, click Clear.
6. Select the Default query permissions tab.
7. The program automatically applies the selected query permissions to any new queries added to
the folder. To also apply the permissions to queries that already exist in the folder, select Apply
default query permissions to existing queries.
When you select Apply default query permissions to existing queries, the query permissions
apply as defaults and override the permissions configured for the queries currently within the
selected folder, but not for queries you subsequently add to this folder. Therefore, the Apply
default query permissions to existing queries checkbox does not remain checked after you
save. To apply permission defaults again as you add more queries to the folder, follow the same
steps. From an individual query, you can edit the permissions as necessary. For information about
how to edit query permissions, refer to Query Properties on page 1.
8. Select the default permissions for queries saved in the folder.
a. Under Ad-hoc queries, select whether all users can generate or edit ad-hoc queries saved
in the folder.
b. Under Smart queries, select whether all users can access and modify smart queries saved
in the folder.
c. To assign permissions for ad-hoc or smart queries by system role, click Advanced
permissions. For information about how to assign advanced permissions, refer to Assign
System Role Permissions to a Query on page 35.
9. Click OK. You return to the Manage Folders screen.
Mark Queries as Favorites
You can identify the queries you use most often as your favorites so you can find them easily in the
information library. When you indicate a query is a favorite, it appears in the Favorites folder in the
information library and the star icon next to its name is highlighted in the query list.
To mark a query as a favorite, click the star next its name in the information library. You can also select
Add to my favorite queries folder from the Set save options tab when you create or edit a query.
78 CHAPTER 2

Open Data Protocol (OData)
OData allows you to import data from Blackbaud CRM into other programs such as Microsoft Excel
and Tableau in order to consume, share, and manipulate the data in pivot tables, power views, and
dashboards. OData is available from any query in the system.
You can share dashboards and charts created withOData with any user, regardless of their Blackbaud
permissions. However, because users must enter their Blackbaud credentials when they consume the
data, any data refreshes respect the user's security permissions.
Note: Blackbaud CRM does not support Microsoft Power Query for Excel with OData feeds.
Set ApplicationRoot URL
Before you can use OData, you must make sure that the application root URL is set for your database.
From Administration, click Set application root URL under Configuration. On the Set Application
Root URL screen, enter the URL where your application is hosted and click Save.
The root URL must be in this format: https://[Server name]/[Virtual directory name]. You can see your
root URL on your browser address bar when you are logged into your database. The portion of your
URL before /webui portion of the address is your root URL.
Get OData Link
From the Query tab in the information library, select the query you want to use and click Get OData
link.
QUERY 79

OData inMicrosoft Excel 2010
In Microsoft Excel 2010, you can generate pivot tables using the OData information.
Note: If you do not already have it, you must first instal the power pivot add-in to Excel. From the
Microsoft Office Downloads page, download the add-in and install it. Most users have the 32-bit
version of Excel, so we recommend that you download the x86 version of the add-in, unless you know
that you are using a different version. If you are not sure, to see your version inExcel, click File, Help.
1. From the PowerPivot ribbon, click PowerPivot Window.
2. On the PowerPivot screen, click From Data Feeds under Get External Data.
3. In the Friendly connection name field, enter a descriptive name for your data feed, such as
"Blackbaud CRM."
4. In the Data feed URL field, paste the URL you got from your query in Blackbaud CRM.
5. Click Advanced. On this screen, enter your Blackbaud CRM user name and password and click
OK.
6. Click Next, and select ODataQuery.ashx as the source table.
7. Click Finish.
8. Once the import is complete, click Close. You can now manipulate and explore your data in the
power pivot.
OData inMicrosoft Excel 2013
In Microsoft Excel 2013, you can create power views using the OData information.
Note: If this is your first time using OData in Excel, click Options and make sure you have the Power
View add-in. Select "COM Add-ins." Then, select Power View and Microsoft Office PowerPivot for
Excel 2013 and click OK.
1. From the Data tab, select From Other Sources/From OData Data Feed.
2. Paste the URL you got from your query in Blackbaud CRM and enter your credentials.
3. Click Next.
4. Check the "ODataQuery.ashx" checkbox.
5. Click Next.
80 CHAPTER 2

6. You can enter a description and change the name if you prefer.
7. Click Finish, and then click OK to import the data.
8. On the Import Data screen, select "Power View" and click OK. You can now use Excel to create
charts and dashboards of your data.
OData inTableau
In Tableau, you can create dashboard using the OData information.
1. From Data, click Connect to Data.
2. Select "OData."
3. In the Select or enter a URL field, paste the URL from your query.
4. On Step 2, select Use a Username or Password and enter your Blackbaud CRM credentials.
5. On Step 3, click Connect.
6. On Step 4, enter a name for the feed.
7. Click OK.
QUERY 81
Export
Exports 82
Add Export Processes 83
Start an Export Process 84
Set the Format Options of an Export Process 84
Assign Permissions for an Export Process 86
Export Definitions 86
Export Definitions and Query Comparison 87
Export Definitions Criteria 94
Filter Export Definition Criteria Example 96
Export Definitions Address Processing 98
Export Process Status Page 100
Schedule an Export Process Job 100
Recent Status Tab 100
Download Export Output Files 100
History Tab 103
Delete a Process Status Record 104
Job Schedules Tab 104
When you export data from the program, you extract information from the database so you can
download it for use in another software application. For example, you can use information from the
program in a spreadsheet program to perform further analysis. In Export, you create export processes,
which are tools that enable you to extract data and generate output files. When you create a process,
you specify the records to export. You can use the output of ad-hoc queries or smart query instances,
or specify a selection of records to use in combination with export definitions. After you create a
process, you specify the format for the output file. You can also schedule the process so that it runs at
the time most convenient for your organization, such as overnight.
Exports
On the Exports page, you can view a list of all the export processes in the Exports grid. For each export
process listed, you can view its name, description, and export type.You can also view the query or
selection and export definition associated with it, the user who last ran the process, the date the user
chapter 3

ran it, the status of the most recent operation of the process, and the associated sites. To access the
Exports page from Administration, click Export.
From the grid, you can add, edit, delete, and start export processes. You can also click a process name
to go to the individual process status page and view its details.
Tip: Export processes, status records, and output files use space in the database. We recommend you
regularly remove old export files that you no longer use.
Add Export Processes
The export process helps you extract data from the program to use in other applications. For example,
you may want to export data to send to a mailing house to update addresses. Once you create an
export process, you can edit and reuse it as you update your data. When you add an export process,
you assign it a name and description and specify the records to export. You can export the output
from ad-hoc or smart queries, or a selection of records. When you export a selection, you also identify
an export definition so the program knows the output fields to include in the file.
Add an export process
1. From Administration, select Export. The Exports page appears.
2. On the action bar of the Exports grid, click Add. The Add export process screen appears.
3. Enter a unique name and description to help identify the export process.
4. To restrict use of the process to a specific site at your organization, in the Site field, select the
site to use the process. For information about sites, refer to the Security Guide.
5. In the Export type field, select whether to export the output of an ad-hoc query or a smart
83 CHAPTER 3

query instance. You can also specify a selection of records to use in combination with an export
definition.
l An ad-hoc query is a tool that enables you to select, group, and list records that meet a set
of conditions you define. It provides access to all of your data and helps you answer
specific organizational questions. If you select this option, the Ad-hoc query field
appears.
l A smart query is a tool that enables you to use a previously defined query, known as a
definition, to generate an instance of the results for parameters you specify. They are
typically created to perform complex calculations that use business logic. The program
includes a number of default definitions, but users who are familiar with the organization's
data model can use ad-hoc query within the program to create them. Also, Infinity
SDKsoftware developers can create them and add them to your database. If you select
this option, the Smart query instance field appears.
Note: For information about ad-hoc queries and smart query instances, refer to Query on
page 25.
l An export definition is a tool you use to specify the fields, but not the records, to include
in an export. When you use this export type, you first specify a selection of records to
export and then the export definition to determine the fields to include in the output. For
information about export definitions, refer to Export Definitions on page 86. If you select
this option, the Selection and Export definition fields appear.
6. In the field or fields that appear, select the query or selection and export definition to use.
7. Click Save. You return to the Exports page.
Start an Export Process
After you add an export process to the database, you can run the process to extract its data from the
database and create the export file. You can run an export process directly from the Exports page. In
the Exports grid, select the export process to run and click Start export. The program uses the data in
the selected query and stores the information in an export file. The export process status page appears
and displays the status of the process. When the export process finishes, the Status field on the Recent
status tab displays Completed. From the export process status page, you can download the
information stored in the export file to a comma-separated value (*.csv) or Excel workbook (*.xlsx)
output file. For more information about the items on the status page, refer to Export Process Status
Page on page 100.
Note: You can also click Start process under Tasks to start the export process from its status page.
Set the Format Options of an Export Process
The query or export definition you select for an export process determines the output fields and
information the program generates when you download the output file. The format options determine
how the exported data appears in the output file. On the Edit export format screen, you determine
how the program formats the data in the output file.
EXPORT 84

Set the format options of an export process
1. On the Exports page, click the double arrows beside the export process with the format to set
and then click Set format options. The Edit export format screen appears.
2. On the Currency tab, specify the general options, such as the currency symbol and the number of
digits after the decimal.
Under Additional options for CSVoutput, select the digit grouping symbol and the decimal
symbol. These format options apply only to CSVoutput. Output in XLSX format uses the settings
on the user's workstation for the digit grouping symbol and the decimal symbol. The Example
field displays how currency data appears with the selected options.
3. Select the Date and Time tab.
4. Under Date format, Fuzzy date format, and Month/day format, select or enter how the
various types of dates should appear in the exported data. The Example field displays how a
date appears in the specified format.
The information in the CSV is formatted as specified. For example, if you open the CSV file in a
text editor, you can see dates in the date format you specified. However, if you open the CSV file
in Excel, Excel tries to recognize what the different fields and values represent and format them
according to your system date settings, which may not match the date format you specified.
Note: A “fuzzy date” is an incomplete date. For example, a fuzzy birth date of a constituent may
include the month and year, but not the day.
Date Specifier Description Example
d Numerical day of the month, single digit 4
dd Numerical day of the month, double digit 04
ddd Abbreviated day name Tue
dddd Full day name Tuesday
M Numerical month, single digit 7
MM Numerical month, double digit 07
MMM Abbreviated month name Jul
MMMM Full month name July
yy Year, two digits 80
yyyy Year, four digits 1980
5. In the Hour/minute format frame, select how times should appear in the exported data. Select
or enter the format from the drop-down list, or enter time specifiers to specify the format. The
Example field displays how a time appears in the specified format.
Note: You cannot include seconds or timezone offsets in the format of the exported time data.
85 CHAPTER 3

Date Specifier Description Example
hh Hour, two digits, in a 12-hour cycle 11
HH Hour, two digits, in a 24-hour cycle 23
mm Minute, two digits, 00 to 59 17
tt Ante meridiem (AM) or post meridiem (PM) PM
6. Select the Export tab.
7. The Line break character field allows you to select the line break option for your output. This
determines how the output separates lines and can be helpful if the default format does not
work for your needs. If you have problems when you use the output with a third-party program
such as Microsoft Word, change the line break character options and run the process again.
Different software programs may expect line break options to follow line feed breaks (LF),
carriage return breaks (CR), or both (CR+LF). If you do not know what format your software
program requires, you might need to test by trying each option. This field defaults to the line
feed (LF) option.
8. Click Save. You return to the Exports page.
Assign Permissions for an Export Process
After you add an export process, you can assign permissions to the roles for the people who can use
the process. When you assign permissions, you can select to allow all roles to use the process or only
select roles.
Assign permission for an export process
1. From the Exports page, click the double arrows beside the export process to establish
permissions and then click Assign permissions. The Assign permissions screen appears.
2. Select whether all roles or only selected roles may access the process.
If you select Selected roles, select the permissions for the roles in the System roles box.
To grant a role access, select it in the box and click Grant.
To deny a role access, select it in the box and click Deny.
To remove an existing permission assignment from a role, select it in the box and click Clear.
3. Click Save. You return to the Exports page.
Export Definitions
An export definition is a tool you use to specify the fields, but not the records, to include in an export.
Since a definition does not specify records, you cannot export data directly from it. Instead, you must
create an export process to output data from a selection based on the export definition. Typically, you
use an export definition for marketing efforts you send to mailing houses.
EXPORT 86

Note: When you create an export process, you select an export type. If you select “Export definition,”
the Selection and Export definition fields appear. You can specify the selection of records to export
and the export definition to determine the fields to include in the output.
When you create an export definition, the export fields you can choose from are determined by the
source view you select. For example, when you create an export definition for constituent letters, the
available fields are based on the constituent query view. After you select an initial source view, you
identify the fields to include in the output, the column order, the row sort order, and the sites to
associate with it. For information about source views, refer to Source Views on page 28.
You can create and manage export definitions from the Export definitions page in Administration.
Under Export definitions, you can view information about each export definition in the database. The
information includes the name and description of the definition, and the type of records to use with it.
Other details include the user who created the definition, the date it was created, the most recent user
to update it, the date it was changed, the sites associated with it, and the number of exports that use it.
You can also complete tasks for an export definition from the Export definitions page. To access task
buttons, click the double arrows next to a definition to expand the row. Use the task buttons to edit,
delete, copy, or create an export.
Export Definitions and Query Comparison
When you create an export process, you can select to use queries or export definitions as the export
type. There are benefits to each. This comparison shows an example, an export process for name
badge stickers, where a query is appropriate and a variation on the example where an export definition
is a better choice.
A simple Constituents query may have Name and Membership level as output fields.
If a constituent has one membership with one level, there is one line of output for the constituent:
Name: Robert Hernandez, Membership level: General
87 CHAPTER 3

If you add two membership levels to the constituent’s membership, the results become three lines.
1. Name: Robert Hernandez, Membership level: General
2. Name: Robert Hernandez, Membership level: Distinguished
3. Name: Robert Hernandez, Membership level: Student
This query outputs three lines for one constituent because the relationship between the constituent
and the membership levels is one-to-many. For one constituent, there can be many membership
levels. In some cases, you might want to produce an output like this, where each line represents the
constituent for a separate membership level.
With a query, you can filter, sort, and group these fields. For example, you can sort by Name to output
each line for a specific constituent next to each other. One use for this output is, using Mail Merge in
Microsoft Word or a similar program, to print badge labels for every constituent, with a separate label
for each membership level stacked by order of constituents. In this case, Robert Hernandez would get
three labels.
l Robert Hernandez: General
l Robert Hernandez: Distinguished
l Robert Hernandez: Student
At other times, it may be more useful for you to output all that information to a single line. For
example, with export definitions, you can set criteria for the output for one-to-many fields. This
enables you to place all the membership levels for the constituent on one line. You can create the
export definition with the same fields as the query:
l Name
l Membership level
EXPORT 88

However, with export definitions, when you select a one-to-many field, a screen appears that lets you
set criteria for the fields contained in that node. For this example, when you select “Membership level,”
the Criteria for Membership screen appears. You can select how many membership records to export
per constituent. In this example, “3” is selected.
89 CHAPTER 3

With queries, you can view results from the Results tab or export the results. With export definitions,
you can only export the results. Also, with export definitions, you must choose a selection from which
to export. For this example, the selection is one for individual constituents.
EXPORT 90

The export of this export definition contains one line with the same information for Robert Hernandez.
Here are the values for each field:
l BUSINESSPROCESSOUTPUT_PKID: 176
l CONSTITUENTS_NAME: Robert Hernandez
l CONSTITUENTS_MEMBERSHIP_MEMBERSHIPLEVELNAME: General
l CONSTITUENTS_MEMBERSHIP_2_MEMBERSHIPLEVELNAME: Distinguished
l CONSTITUENTS_MEMBERSHIP_3_MEMBERSHIPLEVELNAME: Student
You can use an output like this, along with Mail Merge in Microsoft Word or a similar program, to
create one badge label per constituent that lists all of the membership levels. In this case, Robert
Hernandez would get one badge label.
Robert Hernandez: General, Distinguished, Student
Create an export definition
1. From Administration, click Export definitions. The Export Definitions page appears.
2. Click Add. The Select a Source View screen appears.
Note: The text on the Select a Source View screen refers to queries because the screen is
shared with that feature.
91 CHAPTER 3

3. Select the source view that contains the type of records to include in the export definition. For
information about source views, refer to Source Views on page 28.
4. Click OK. The New Export Definition screen appears.
5. On the Fields and criteria tab, select the fields for each record in the export output.
Under Browse for fields in, you can view the types of fields that are available for the source
view you selected. You can expand a node to drill-down to a specific group of fields.
The middle pane lists the Fields and System fields for the selected group.
Tip: To quickly search for a field. enter the field name in Find field and press ENTER on your
keyboard. The program displays applicable fields in the middle pane. Use the arrows on your
keyboard to browse through the list. If you select a group and click Search up, the search
applies to only fields in the selected node.
6. To specify output fields for the export, select them in the middle pane and drag them into the
Selected Fields pane. You must specify at least one output field. Selected fields correspond to
the information you want to view in the export and they appear as column headings in the
export output.
When you select a one-to-many field, the Criteria screen appears. For information about how to
set criteria for a one-to-many field, refer to Export Definitions Criteria on page 94. When you
select a field from Address Processing, the Criteria for Address Processing screen appears. For
information about address processing, refer to Export Definitions Address Processing on page
98.
Note: Depending on the source view of the export definition, some fields may default into the
Selected Fields pane. These are only defaults and you can remove them if necessary.
7. Select the Column order tab. From this tab you can reorder and rename column headings for the
export file. Column headings identify the type of system field included in the column.
l To reorder the column names, use the up and down arrows.
l To change the column header name, select the field name and click Change column
EXPORT 92

header. Enter a new name in the field. If you do not change the column name, the column
header uses the system field name. For example, CONSTITUENTS_NAME.
8. Select the Sort order for rows tab. From this tab you can specify a sort order for the export. The
sort order helps ensure that mail merge documents, such as envelopes or labels, are in the
necessary order.
l To add a sort field, double-click or drag and drop a field to the Sort records by pane.
l To change the sort order, select a field and click the up or down arrow.
l To reverse the sort order within a column, click the Sort Ascending or Sort Descending
button.
9. Select the Set save options tab.
10. Enter a name and description for the export definition.
11. If your organization uses sites, in the Sites field, select the site to associate with the export
definition.
12. To make this definition available for constituent letter templates, select Allow definition to be
used by other areas of the application.
13. To use the field name as the column header for one-to-one fields, select Use field names for
one to one column headers. For example, with this option selected, the column header for
Name is NAME. If you do not select this option, the program uses the longer, less "friendly"
system field name CONSTITUENTS_NAME.
14. To use a shortened version of the system field name as the column header, select Use short
column headers. For example, Cns_NAME.
Note: If you select both options, the column header for one-to-one fields is the friendly field
name and the column header for one-to-many fields is the shortened system field name. If you
entered a custom name for a field on the Column order tab, the column header uses the
93 CHAPTER 3
custom name in some manner no matter which options you select. For example, if you select
Use short column headers, the column header for a custom field name is Cns_Custom Field
Name.
15. Click Save. You return to the Export Definitions page.
Export Definitions Criteria
In export definitions, you can select one-to-one and one-to-many export fields. A one-to-one export
field contains one value in your database. For example, Birth date is a one-to-one export field
because constituents have one birth date. A one-to-many export field contains several values in your
database. For example, Email address is one-to-many because constituents can have multiple email
addresses.
When you select a one-to-many field on the New Export Definition screen, the Export criteria screen
appears. On this screen, you can select the number to export and define how the export sorts and
filters the fields.
Note: When you select fields from Address Processing, the behavior is different. For information
about address processing, see Export Definitions Address Processing on page 98.
EXPORT 94

Define criteria for one-to-many records
1. When you select a one-to-many field, the Export criteria screen appears.
2. In the Number to export field, enter the number of records to export for the node or group
that contains the field. For example, if you select Email address from the Email Addresses node,
you can enter the number of email addresses to export for each contact.
The number to export applies to all fields in the node. For example, if you also select
Information source from the Email Addresses node, the program will export the same number
of information sources as email addresses.
When you add another field to the same node in the Selected fields and criteria pane of the
New Export Definition screen, the Export criteria screen does not appear again. To access the
screen for that node, from the New Export Definition screen, right click the node and select Edit
Filter.
For an example about how to use export definitions criteria to filter results, see Filter Export
Definition Criteria Example on page 96.
95 CHAPTER 3

3. Under Sort, in the Order by field, select which field to sort records by in their column of the
export. Then select whether to sort in ascending or descending order. For example, if you sort
by "Email type," the addresses appear in A-to-Z or Z-to-A order by email type.
Note: This option sorts the one-to-many records for a line in the export output and not the all
the lines in the output.
4. To add filters to the fields, under Filter, select Selected <node name>.
5. Drag a filter field to the Include records where pane. The Apply Criteria screen appears.
6. From the Apply Criteria screen, select how to apply the criteria. For example, you can select “Less
Than.”
7. From Value, enter the values for the criteria. For example, to apply criteria to Gift amount,
where you selected “Less Than,” you can enter “1000.” The export definition will filter to include
gift amounts less than $1,000.00.
8. Click OK. You return to the Export criteria screen.
9. If you add multiple filter fields, you can use the combining operator buttons to combine
filtering criteria to narrow your results. For example, you can combine Amount is less than $1000
AND Date is this month.
10. Click OK. You return to the New Export Definition screen.
11. Click Save. You return to the Export Definitions page.
Filter Export Definition Criteria Example
In this example, the goal is to create an export definition to export all members in a previously created
membership program called “Animal Friends.” The export includes member names, membership level,
expiration date, and amount paid for the membership.
Filter export definition criteria example
1. From Administration, click Export definitions. The Export Definitions page appears.
2. Click Add. The Select a Source View screen appears.
3. Select the Membership Program source view and click OK. The New Export Definition screen
EXPORT 96

appears open to the Fields and criteria tab.
4. Under Browse for fields in, select Membership, Membership Level, Name. You can double-
click the field or drag it to Selected fields box.
The Export Criteria screen appears. From this screen you can select the filters for the
membership information to include in the output.
97 CHAPTER 3

5. Under Filter, select Selected membership .
6. From Fields, drag Membership program to Filters.
The Apply Criteria screen appears. From this screen you can specify how to filter Membership
program.
7. From Membership program criteria, select "Equal to," and then select "Animal Friends."
An export based on this export definition will only output the Membership Level Name for the
Animal Friends Membership Program.
8. Click OK for the each screen and save the export definition.
Export Definitions Address Processing
When you select a field from the Address Processing node in the New Export Definition screen, the
Parameters screen appears so you can select the address processing, name format, and mail type
options to use.
EXPORT 98

Address processing options allow you to use constituent mail preferences for marketing efforts. They
also allow you to specify alternate addresses to use when constituent mail preferences are not
configured, or when you want to use seasonal addresses. For example, you can create an address
processing option for your holiday appeal that specifies to use the mail preferences from constituent
records, and to use seasonal addresses when available. The program uses the mail type you select with
the address processing option to determine which of a constituent's mail preferences to consider
when it chooses the address.
Name formats determine how names are formatted in a marketing effort. For example, for marketing
efforts such as event invitations and appeals, you may use a more formal format that includes titles and
suffixes (Mr. William H. Smith, Jr.). For marketing efforts like alumni letters, you may use a less formal
format such as the nick name and last name (Willie Smith).
You configure address processing and name format options in Marketing and Communications, and
you specify mail types when you configure mail preferences on the Communications tab of constituent
records. For information about how to configure communications options, refer to the
Communications Guide. For information about the constituent communication preferences, refer to the
Constituents Guide.
Define criteria for address processing
1. From the Parameters screen, in the Address format field, select the address processing option
to apply to addresses in the export definition. You define options for the field on the Address
Processing Options page in Marketing and Communications.
2. In the Name format field, select the name format to use with the address in the export
definition. You define options for the field on theName Format Options page in Marketing and
Communications.
3. In the Mail type field, select the mail type to use with the address processing option.The
program uses the mail type you select with the address processing option to determine which
of a constituent's mail preferences to consider when it chooses the address.
4. Click OK. You return to the New Export Definition screen.
99 CHAPTER 3

Export Process Status Page
Each export process in the database has a status page where you can view details about the process.
You enter this information when you add the process to the database. To view the status page of a
process, select its name on the Exports page.
The status page also includes the current status and historical information about the process. To help
you navigate through this information, each process status page contains multiple tabs:
l Recent Status Tab on page 100
l History Tab on page 103
l Job Schedules Tab on page 104
Depending on your security rights and system role, you can perform various tasks to manage the
export process from its status page.
l Start an Export Process on page 84
l Edit an Export Process on page 1
l Generate a Windows Scripting File for an Export Process on page 1
l Schedule an Export Process Job on page 100
l Delete an Export Process on page 1
Schedule an Export Process Job
From the export process status page, you can create a job schedule for an export process. When you
create a job schedule, you specify the frequency and scheduled time for the program to run the
process. To create a job schedule, click Create job schedule under Tasks. The Create job screen
appears.
For detailed information about how to create a job schedule for an export process, refer to Create a
job schedule for an export process on page 104.
Recent Status Tab
On the Recent status tab, you view the details of the most recent instance of the process and
download output. The details include the status of the process; the start time, end time, and duration
of the process; the person who last started the process; the name of the server most recently used to
run the process; the total number of records processed; and the number of those records that
processed successfully and resulted in exceptions.
Download Export Output Files
After you run an export process, you can download output files into a file for use in another
application. For example, you may want to take data from the program and send it to a spreadsheet
EXPORT 100

program for further analysis.
Note: To download the output of a new export process, you must first run the process to export its
data from the database. After you run the process, its status is Completed. For information about how
to run an export process, refer to Start an Export Process on page 84.
You have four options for downloading output files:
l CSV: downloads a single output file containing all data in comma-separated value format. In a
comma-separated value (*.csv) file, each piece of data is separated by a comma. A *.csv file is
also referred to as a “comma-delimited” file.
l XLSX: downloads a single output file containing all data in Microsoft Excel format. In an Excel
workbook (*.xlsx) file, data is stored in a variant of the Office Open XML format. You can open
XLSX files with Microsoft Excel 2007 or more recent versions. Other spreadsheet programs may
support this format. For some older versions of Excel, to open XLSX files, there is a compatibility
pack available at Microsoft’s Office website: http://office.microsoft.com.
l Multiple files: splits downloaded output into multiple files based on the unique values of a
selected field. For example, you can download an export of constituent information into
multiple files based on the states in which the constituents reside. When you download the
output, the program generates comma-separated value (*.csv) or Microsoft Excel (*.xlsx) files.
l Grouped files: creates output files with data grouped by field values as specified. The option is
only available when you download files for marketing efforts and appeal mailings. For example,
you can create a set of files broken out by region. To do this, include the State field in your
export definition and then select to group by State for the output download. Create a group for
each region and add the appropriate states to each group—for example, include FL, GA, SC,
and NC in the Southeast region group and CT, MA, NH, and VT in the Northeast region group.
This setup produces a file for each region and each file includes data for only the states included
in its region.
Download the output into a *.csv file
1. On the export process status page, select the instance of the process to download.
l To download the output of the most recent instance, select the Recent status tab. When
the status of the process is Completed, Download output is enabled on the action bar.
l To download the output of a previous instance, select the History tab. Under History,
select the instance to download.
2. On the action bar, click Download output and select Download to CSV. The program
downloads the file to your work station and provides an option for you to open and save it.
Note: In a comma-separated value (*.csv) file, each piece of data is separated by a comma. A
*.csv file is also referred to as a “comma-delimited” or “ASCII” file.
101 CHAPTER 3

Download the output into a *.xlsx file
1. On the export process status page, select the instance of the process to download.
l To download the output of the most recent instance, select the Recent status tab. When
the status of the process is Completed, Download output is enabled on the action bar.
l To download the output of a previous instance, select the History tab. Under History,
select the instance to download.
2. On the action bar, click Download output and select Download to XLSX. The program
downloads the file to your work station and provides an option for you to open and save it.
Note: In an Excel workbook (*.xlsx) file, data is stored in a variant of the Office Open XML
format. You can open XLSX files with Microsoft Excel 2007 or more recent versions. Other
spreadsheet programs may support this format. For some older versions of Excel, to open
XLSX files, there is a compatibility pack available at Microsoft’s Office website:
http://office.microsoft.com.
Download the output into multiple files
1. On the export process status page, select the instance of the process to download.
l To download the output of the most recent instance, select the Recent status tab. When
the status of the process is Completed, Download output is enabled on the action bar.
l To download the output of a previous instance, select the History tab. Under History,
select the instance to download.
2. On the action bar, click Download output and select Multiple files. The Download multiple files
screen appears.
EXPORT 102

3. On the Details tab, in the Create one file per field, select the output field to use to generate the
files. For example, to download multiple files of constituent data based on the states in which
the constituents reside, select to create one file per state.
4. When the program downloads multiple files, it generates file names based the values of the
field selected in the Create one file per field. For example, if you download an output file for
each state in constituent data, the program generates files named Alabama.csv, Alaska.csv, and so
on.
To help further identify the information in each output file, in the File prefix field, enter text to
appear at the beginning of the file names generated for the export output. For example, enter
“Constituents in -” to download files named Constituents in - Alabama.csv and Constituents in -
Alaska.csv.
5. In the Export format field, select whether to download as CSV (comma-separated value) or
XSLX (Excel workbook).
Tip: The program saves the output of each instance of the export process. To divide the export
data in multiple ways, download the output multiple times with a different output field
selected as the basis of the files generated.
6. To view the names and record counts of the multiple files the program will download, select the
Preview tab.
7. Click Download. The program downloads the files as a single ZIPfile to your work station. After
you open the ZIP file, you can open and save each output file.
History Tab
Each time you run an export process, the program generates a status record of the instance. On the
History tab, you view historical status record information about each instance of the process. The
History grid displays the status of the instance; the start time, end time, and duration of the instance;
the person who started the instance; and the total number of records that processed and resulted in
exceptions during the instance.
You can also filter by process status to limit the records that appear in the grid. If you filter the records,
it can reduce the amount of time it takes to find a process instance. For example, if you search for an
instance that did not finish its operation, you can select to view only status records with a status of "Did
not finish." To filter the records that appear in the grid, click Filters on the action bar. The Status field
and Apply button appear so you can select the status of the instances to appear in the grid. To update
the information that appears, click Refresh List on the action bar.
Depending on your security rights and system role, you can delete a status record from the grid on the
History tab.
Tip: Each instance of a process uses space in the database, so we recommend you regularly remove
status records after you download the output. You can manually remove status records from the
History tab, or use the "Business process output delete" global change process to remove multiple
records at one time. You can also remove a process that is no longer in use to delete all the status
records associated with it. For information about how to create the global change process, refer to
the Administration Guide.
103 CHAPTER 3

Delete a Process Status Record
On the History tab of a process status page, you can delete a specific status record of the process.
When you delete a status record, you delete only the record that contains information about the
process.
You can delete aprocess at any time. When you delete a process, you also delete the history for that
process. If you delete a process and need it again, you can only retrieve the process from a backup. We
recommend you backup your data before you delete status records.
Delete a process status record
1. On the process page, select the History tab.
Note: You can filter the status records that appear in the grid by the process status. If you filter
the records in the grid, it can reduce the amount of time it takes to find an process instance. For
example, if you search for a instance that completed its operation, you can select to view only
status records with a Status of Completed. To filter the records that appear in the grid, click the
funnel in the action bar. The Status field and Apply button appear so you can select the status
of the instances to appear in the grid.
2. In the grid, select the status record to delete.
3. On the action bar, select Delete. A message appears to confirm the deletion of the status record.
4. Click Yes. You return to the History tab. The selected status record no longer appears.
Job Schedules Tab
On the Job schedules tab, you view the job schedules of the process in the database. The details in the
Job schedules grid include the name of the job, whether a job schedule is enabled, the frequency of
the job schedule, the start date and time and end date and time of the scheduled jobs, and the dates
the job schedule was added and last changed in the database. You enter this information when you set
the job schedule of the process.
Depending on your security rights and system role, you can add, edit, and delete job schedules that
appear on the Job schedules tab. To update the information that appears, click Refresh List on the
action bar.
Create a job schedule for an export process
1. On the export process status page, select the Job schedules tab and click Add. The Create job
screen appears.
2. In the Job name field, enter a name to help identify the scheduled job.
3. In the Schedule type field, select the frequency to run the job.
l To run the job only once, select "One time." The One-time occurrence frame is enabled.
l To run the job every day, select "Daily." The Frequency, Daily frequency, and Duration
EXPORT 104

frames are enabled.
l To run the job every week, select "Weekly." The Frequency, Daily frequency, and
Duration frames are enabled.
l To run the job every month, select "Monthly." The Frequency, Daily frequency, and
Duration frames are enabled.
l To run the job with the SQL Server Agent service, such as if you use the SQL Server Agent
service with other tasks, select "Start when SQL Server Agent service starts."
l To run the job when enough resources are available on the server, as determined by the
Idle condition defined in the SQL Server Agent properties on the server, select "Start when
the computer becomes idle."
4. To mark the schedule active, select Enabled.
5. If you select "One time," under One-time occurrence, select the time and date to run the job.
6. If you select "Daily," under Frequency, in the Occurs every [ ] day(s) field, select how often to
run the job. For example, select "2" to run the job every other day.
7. If you select "Weekly," under Frequency, in the Occurs every [ ] week(s) on field, select how
often to run the job, and select the day of the week to run the job.
8. If you select "Monthly," under Frequency, in the Occurs every [ ] month(s) on field, select how
often to run the job, and then select a calendar date or general date frequency to run the job.
l To run the job the same date each month, select Day and, in the [ ] of the month field,
enter the date. For example, to run the job on the 15th of the month, enter "15."
l To run the job at a general frequency each month, select The and, in the[ ] [ ] of the
month field, enter the frequency. For example, to run the job on the first Sunday of the
month, select "First" and "Sunday."
9. If you select "Daily," "Weekly,"or "Monthly," under Daily frequency, select whether to run the
job one time or multiple times on the day selected under Frequency.
l To run the job one time on the selected day, select Occurs once at and enter the time of
the day to run the job.
l To run the job multiple times on the selected day, select Occurs every and enter the
frequency to run the job, such as "30 minutes." In the Starting at and Ending at fields,
select a time range to run the job at the selected frequency. For example, to run the job
overnight during off-hurs, enter select a start time of "12:01:00 AM" and an end time of
"5:30:00 AM."
10. If you select "Daily," "Weekly," or "Monthly," under Duration, in the Start date field, enter the
date to start the job schedule and select whether the schedule has and end date. If you select
End date, enter the date to end the job schedule.
11. Click Save. You return to the Job schedules tab. In the grid, the new job schedule appears.
105 CHAPTER 3

Import Selections
Import Selections 106
Add Import Selection Processes 107
Import a File for an Import Selection Process 109
Import Selection Process Status Page 110
Recent Status Tab 110
Download Import Selection Process Exceptions 110
History 111
Delete a Status Record of a Process Instance 112
From Analysis, you can create a process to automatically generate an import selection. An import
selection is a named set of IDs of the same record type, created from the record IDs in an import file.
For example, you might export information about a large selection of constituents for research, such as
to determine the constituents to include in a marketing effort. After you determine the constituents,
you create a comma-separated value (*.csv) file of those constituents and include their record IDs. You
then use the file to create a constituent selection for the marketing effort.
On the Import selections page, you can view and manage the processes your organization uses to
create import selections. After you create an import selection process, you can manage the process
and view detail information from its status page.
Import Selections
From the Import selections page in Analysis, you can create and manage import selection processes.
Under Imported selections, information about each import selection process appears. The
information includes the process name and description, the status of its most recent instance, and the
type of record selection it creates. Other details include the owner of the process, the category it is
assigned to, its availability in the query designer, and the sites associated with it. To view additional
information about a process such as its recent status or history, select the process name in the grid. The
process status page appears. For information about the items on this page, refer to Import Selection
Process Status Page on page 110.
To complete tasks for a process, click the double arrows next to the process name to expand the row.
Use the task buttons to edit, delete, or assign permissions to it. You can also import a different file to
use with the process. For information, refer to Import a File for an Import Selection Process on page
109.
chapter 4

You can also customize the list of import selection processes. You can add and remove columns and
choose how they filter and sort. For example, for the Record type column, you can set the filters to
display only constituent import selection processes. You can also save list parameters to quickly
display different views of the list. For example, you may want processes that imported with exceptions
to display fewer columns or in a different order. To save list parameters, click Save list. You can also
search the list by keyword.
Show Me: Watch this video to learn more about list features.
To reduce the amount of time it takes to find a process, you can filter the grid by criteria such as the
process name, type, and category. You can also select to view only processes you own. To filter the
processes that appear in the grid, click Filter, enter the criteria of the processes to view, and click
Apply.
Add Import Selection Processes
You can create a process to automatically generate a selection of records based on the record IDs
included in an import file. When you add an import selection process, you select the *.csv file of the
records to include in the selection, the type of record ID to use, and the column in the file that
contains the record ID.
Add an import selection process
1. From Analysis, click Import selections. The Import selections page appears.
2. Click Add. The Add selection screen appears.
107 CHAPTER 4

3. In the Name field, enter a unique name to help identify the import selection process and the
selection it creates. After you add a process, you can use it to create a selection of the same type
of records from a different import file.
4. In the Description field, enter a description or explanation of the process to further identify it.
For example, explain the type of selection the process generates or when to use it.
5. In the Record type field, select the type of records to include in a selection created by the
process.
When you edit the process, this field is disabled.
6. To group the selection with similar queries, select its category in the Category field. Query
categories are code table entries that your organization defines in Administration. For
information about code tables, refer to the Administration Guide.
7. In the Site field, select the site at your organization to use the process and its selection. To not
restrict the process to a specific site, select All sites.
8. To use the selection in Query, select Show this selection in the Query Designer.
IM PORT SELECTIONS 108

9. Under Import file information, browse to the *.csv file that contains the records to include in
the selection.
10. In the ID column field, select the column in the import file that contains the record ID to use to
identify records in the selection.
11. For some record types, such as Constituent or Event, in the ID type field, you can select whether
to use the system record or lookup ID. For the Constituent record type, you can also select
“Alternate lookup ID” and select the type of alternate lookup ID to use.
For other record types, the import uses the system record ID.
12. Click Save and Import. The program runs the process to import the *.csv file and generate a
selection based on the selected record IDs.
The status page for the process appears so you can view the status of the process and whether it
completes successfully. For information about the items on the status page, refer to Import
Selection Process Status Page on page 110.
Import a File for an Import Selection Process
After you add an import selection process and generate an import selection, you can import a
different file that includes the same type of records to create another selection. The new selection
overwrites the original and uses the same name.
Import a file for an import selection process
1. From Analysis, click Import selections. The Import selections page appears.
2. Under Imported selections, select the import selection process to use to import a file and click
Import. The Import selection screen appears.
Note: To import a file from the status page of an import selection process, click Start process
under Tasks.
3. Under Import file information, browse to the *.csv file that contains the records to include in
the selection.
4. In the ID column field, select the column of the import file that contains the record ID to use to
identify records in the selection.
5. For some record types, such as Constituent or Event, in the ID type field, you can select whether
to use the system record or lookup ID. For the Constituent record type, you can also select
“Alternate lookup ID” and select the type of alternate lookup ID to use.
For other record types, the import uses the system record ID.
6. Click Start Import. The program runs the process to import the *.csv file and generate a
selection based on the selected record IDs.
The status page for the process appears so you can view the status of the process and whether it
completes successfully. For information about the items on the status page, refer to Import
Selection Process Status Page on page 110.
109 CHAPTER 4

Import Selection Process Status Page
Each import selection process in the database has a status page where you can view details about the
process. You enter this information when you add the process to the database. To view the status page
of a process, select its name on the Import selections page.
The status page also includes the current status and historical information about the process. To help
you navigate through this information, each process status page contains multiple tabs:
l Recent Status Tab on page 110
l History on page 111
Depending on your security rights and system role, you can perform various tasks to manage the
import selection process from its status page.
l Import a File for an Import Selection Process on page 109
l Edit an Import Selection Process on page 1
l Delete an Import Selection Process on page 1
Recent Status Tab
On the Recent status tab, you can view the details of the most recent instance of the process and
download exceptions. The details include the status of the process; the start time, end time, and
duration of the process; the person who last started the process; the name of the server most recently
used to run the process; the total number of records processed; and the number of those records that
processed successfully and resulted in exceptions.
Note: The Download output option is disabled when a process does not include exceptions, or the
global change to remove business process output deletes them.
Download Import Selection Process Exceptions
If the most recent instance of the process completes with exceptions, such as when the import file
includes duplicate entries or entries without record IDs, then the process does not include the
exception in the selection. From the status page of an import selection process, you can download
these exceptions into a *.csv or *.xlsx file so you can correct the data and successfully generate a
selection.
Note: The Download output option is disabled when a process does not include exceptions, or the
global change to remove business process output deletes them.
IM PORT SELECTIONS 110

Download the exceptions into a *.csv file
1. On the process status page, select the instance of the process with the exceptions to download.
l To download exceptions of the most recent instance, select the Recent status tab. When
the status of the process is Completed with exceptions, Download output is enabled on
the action bar.
l To download exceptions of a previous instance, select the History tab. Under History,
select the instance to download.
2. On the action bar, click Download output and select Download to CSV. The program
downloads the file to your work station and provides an option for you to open and save it.
Note: In a comma-separated value (*.csv) file, each piece of data is separated by a comma. A *.csv file
is also referred to as a “comma-delimited” or “ASCII” file.
Download the exceptions into a *.xlsx file
1. On the process status page, select the instance of the process with exceptions to download.
l To download the exceptions of the most recent instance, select the Recent status tab.
When the status of the process is Completed with exceptions, Download output is
enabled on the action bar.
l To download the exceptions of a previous instance, select the History tab. Under History,
select the instance to download.
2. On the action bar, click Download output and select Download to XLSX. The program
downloads the file to your work station and provides an option for you to open and save it.
Note: In an Excel workbook (*.xlsx) file, data is stored in a variant of the Office Open XML
format. You can open XLSX files with Microsoft Excel 2007 or more recent versions. Other
spreadsheet programs may support this format. For some older versions of Excel, to open
XLSX files, there is a compatibility pack available at Microsoft’s Office website:
http://office.microsoft.com.
History
Each time you run the process, the program generates a status record of the instance. On the History
tab, you view historical status record information about each instance of the process. The History grid
displays the status of the instance; the start time, end time, and duration of the instance; the person
who started the instance; the total number of records that processed and resulted in exceptions during
the instance; and the server used to run the process for the instance.
You can also filter by process status to limit the records that appear in the grid. If you filter the records,
it can reduce the amount of time it takes to find a process instance. For example, if you search for an
instance that did not finish its operation, you can select to view only status records with a status of "Did
not finish." To filter the records that appear in the grid, click Filters on the action bar. The Status field
and Apply button appear so you can select the status of the instances to appear in the grid. To update
the information that appears, click Refresh on the action bar.
111 CHAPTER 4

From the grid, you can download the exceptions from a historical status record into a *.csv or *.xlsx file.
Depending on your security rights and system role, you can also delete a status record.
Tip: Each instance of a process uses space in the database, so we recommend you regularly remove
status records after you download the exceptions. You can also remove a process that is no longer in
use to delete all the status records associated with it.
Delete a Status Record of a Process Instance
On the History tab of a process status page, you can delete a specific status record of the process.
When you delete a status record, you remove the record and its exceptions from the history.
Delete a status record from the History tab
1. On the process status page, select the History tab.
2. In the grid, select the status record to delete and click Delete. A confirmation message appears.
3. Click Yes. You return to the History tab. The selected status record no longer appears.
IM PORT SELECTIONS 112
