
OAC FIN Instructions.Docx Page 1 of 66
OAC INTRODUCTION
Getting Started
Catalog
Filters
Pivots
Groupings (Bins)
Totaling (Sub-totals, grand totals)
Importing
Exporting
View Selector
Computed fields
Creating interactive queries
Creating a merged query for old and new structures
OAC FIN Instructions.Docx Page 2 of 66
Getting Started
OAC LOGGING IN
Access Oracle Business Intelligence Presentation Services/Analytics from the latest
version of a browser, preferably Firefox or Chrome, within your desktop/virtual machine
by selecting OAC Analytic Login:
Copy and paste the following OAC URL link into your browser.
https://oacprd-pittoac.analytics.ocp.oraclecloud.com/analytics/saw.dll?bieehome
If you receive an error, ‘401 Authorization Required’ or any other error message; logout,
clear the browser cache before logging in again.
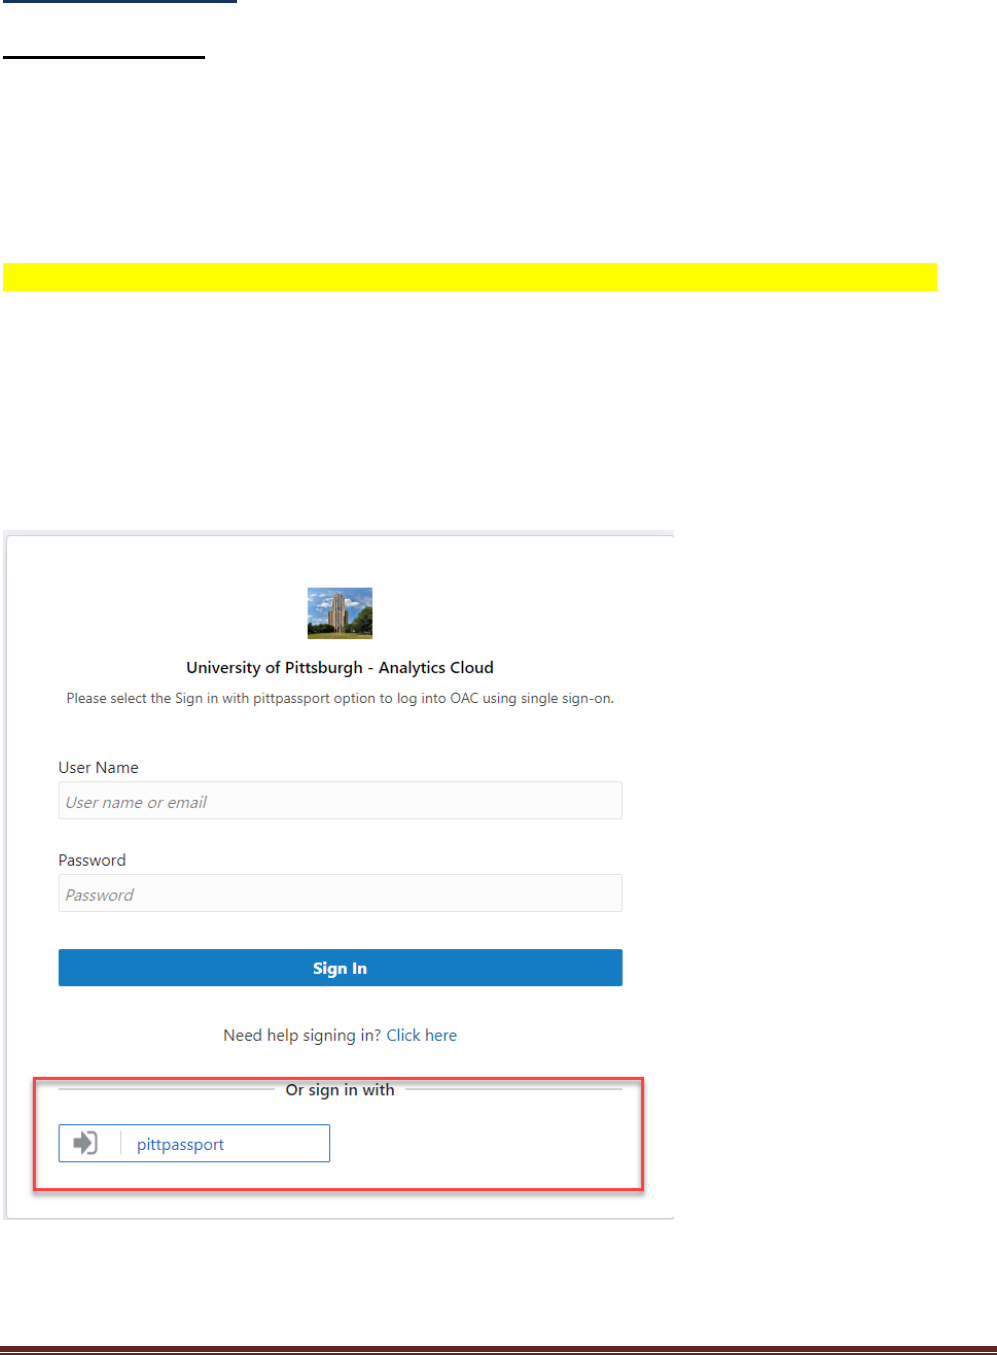
You will be directed to the Identity Cloud Service screen, which directs you to the
University single-sign on screen (pittpassport), where you will need to go through the
multi-factor authentication process using your University UserID and password.
Click on Or sign in with pittpassport
NOTE: Do not bookmark this page.

OAC FIN Instructions.Docx Page 3 of 66
Enter University ID and password
Click Submit
Complete multi-factor authentication process
After a successful login, the system displays your Home page which will be slightly

OAC FIN Instructions.Docx Page 4 of 66
different from example below since each user will have different access privileges and
queries.
NOTE: You can bookmark this page and in subsequent logins the bookmark will bring
you back to the appropriate Identity Cloud Service screen.
The menu bar in the upper right hand corner or Common Header directs you to various
screens.
The Home Page is divided into five sections: Create, Recent, and Most Popular
Create contains the commands to create new OBIEE objects.
Recent contains links to various objects used and stored within your access areas in
OBIEE.
Most Popular contains links to the most used objects by all users not just individual
user.
Note: The various commands are also accessible using the Menu Bar without having
to return to the Home page.

OAC FIN Instructions.Docx Page 5 of 66
USING THE CATALOG
The catalog is a location that lists all the resources (folders, analyses, filters, reports) available to you.
My Folders is your personal space and is not available to any other user.
Access to any folders within the Shared Folders area is dependent upon your assigned privileges.
Some privileges may be Read-Only which require you to open a query from the “Shared Folders” and
then save it to your “My Folder” area in order to use the query or modify it.
The catalog consists of three panes of information: Folders, Tasks, and a listing.
The Folders area indicates “My Folders” and the “Shared Folders” to which you have access
privileges. Expand the folder to view files or sub-folders by clicking on the right arrow to the left of the
Folder name.
The Tasks area indicates which tasks can be performed within OBIEE. Privileges are based upon
your UserID and granted responsibility.
The listings area indicates the expanded contents of a folder, showing not only the name of the file
but the date of last modification, the originator of the file, and OBIEE commands: Open, Edit and
More (a drop down menu of other commands).
The default setting for the listing is Descriptive -- which view includes the description stored when the
query was saved.

OAC FIN Instructions.Docx Page 6 of 66
Alternate listings are Details and List. Details view provides a listing similar to that of File Explorer. To
change the way your listing is displayed, click the drop down box of the View List icon and choose the
appropriate view method.
The List view is just a listing of the file names.
CREATING REPORTS

OAC FIN Instructions.Docx Page 7 of 66
Create analytic reports by selecting fields, formatting filters and modifying Compound
Layout/Results components to build reports/pivots.
1. Select Analysis from New Menu.

OAC FIN Instructions.Docx Page 8 of 66
2. Select Subject Area:
Our current subject areas are related to the tables/views in PRODFIWH:
FIS_EMPLOYEE /FIS_EMPLOYEE_WH (HR/Payroll); FIS_FIN/FIS_FIN_WH (GL
balances and detail); FIS_LVL1/FIS_LVL1_WH (Level I), related preliminary table areas
and selected external databases. Subject areas with the _WH suffix contain records
from fiscal year 2012 forward.
Subject areas address more than just the fields within the tables; they contain the
metadata related to the fields, tables and associated joins. Access to subject areas is
based upon the individual's UserID and access privileges. PRELIM tables are those
loaded with a single year’s preliminary JUN closing data; they are cleared and loaded at
the fiscal year preliminary closing with that year’s data only. PRELIM tables are not
cumulative; they are replaced each year.
Selecting a SUBJECT AREA brings up ANALYSIS EDITOR. Analysis editor allows for
selection of columns, measures, hierarchies, filters and other report related objects from
one of more subject area depending on the report needs.
OAC FIN Instructions.Docx Page 9 of 66
Examples of Tables & Columns from FIS_FIN_WH:
Subject areas contain dimension and fact tables. Dimension tables display the various
attribute fields while fact tables display measures or metrics.
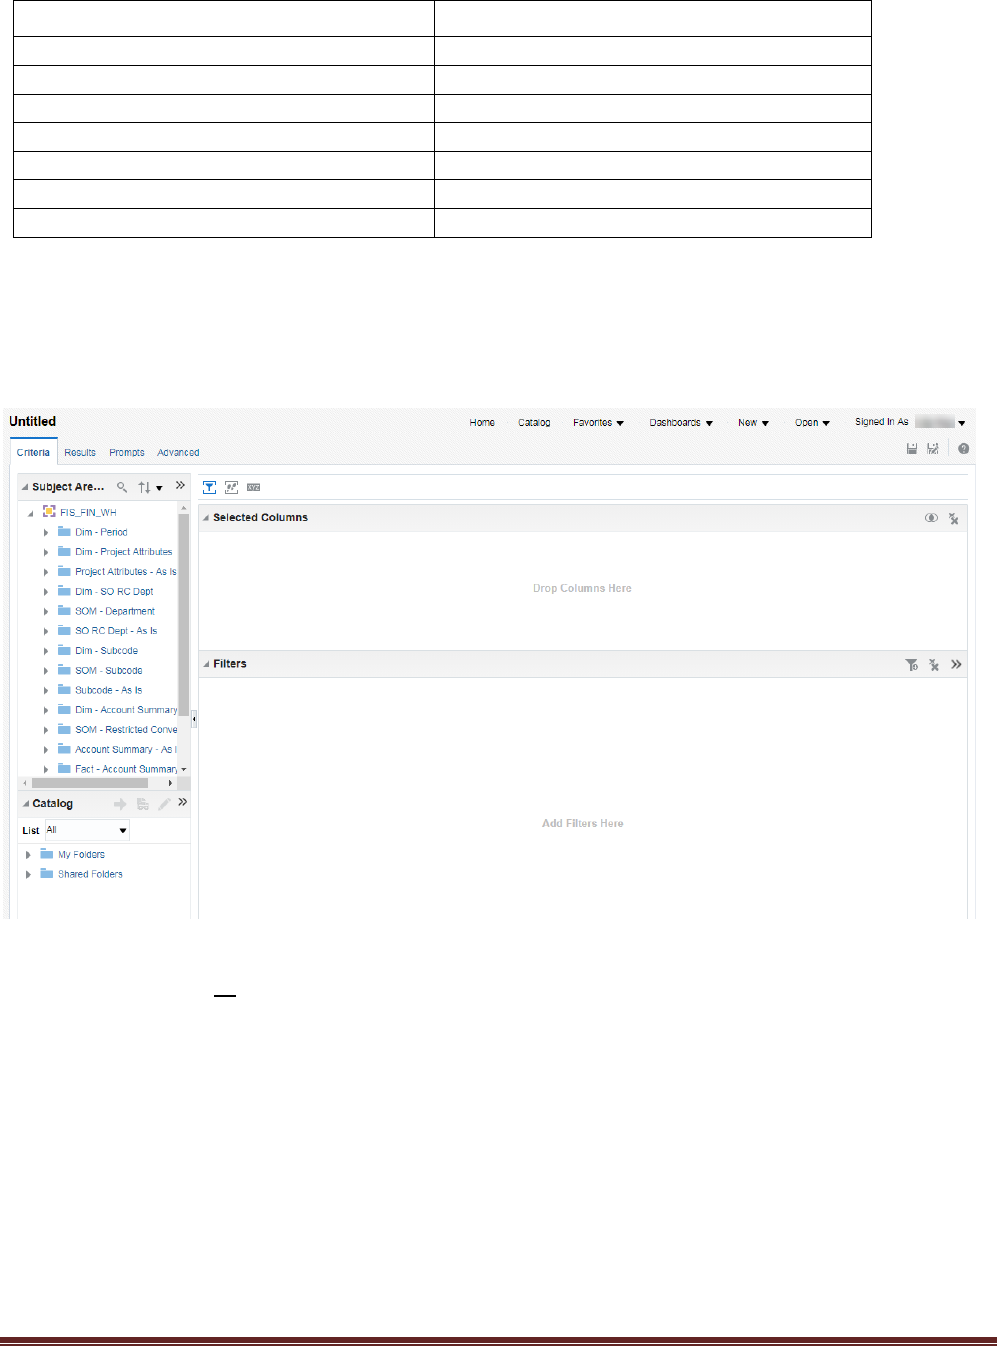
The system brings up an Untitled analysis window:
3. To select columns from the Subject Area, double click on each field to appear in the
criteria section or drag the field name from the Subject Area to the Selected Columns
pane.
To see the various fields within a table, click on the arrow icon beside the table name.
Table
Column
Dim – Account Summary
Account Desc
Fact – Account Summary
FYTD Actual Amount
Dim – Project Attributes
Billing Id
Dim – GL Detail
Batch Name
Fact – GL Detail
Entered CR
Dim – SO-RC-Dept
RC Desc
Dim – Period
Period Name

OAC FIN Instructions.Docx Page 10 of 66
Result values will display initially in the sequence in which the fields are placed in the
Selected Columns pane.
Note that variable names in the Subject Area are the names as they appear in the database.
However, some field names have been modified to a more report friendly format; e.g. FYTD
Actual Amt becomes Fiscal Actual when placed in the selected Columns area.

OAC FIN Instructions.Docx Page 11 of 66
Dragging and then dropping a field from the list can place it in a specific location.
Final selection
Within
each of the selected fields is an options box that allows you to sort, edit
the formula for the field, define column properties, apply a filter, delete, or save column as
(another name).
The Sort allows you to apply up to six levels of sorting within an analysis row in ascending or
descending order.

OAC FIN Instructions.Docx Page 12 of 66
The Edit formula allows you to modify the initial value from the database, define groupings,
define calculations.
Column Properties allows you to change the format of a field, including the name.
Filter allows you to define the restrictions for the field retrieved or conditions.
Delete allows you to delete the field from the selection.
Save Column As allows you to rename a column heading.
SORT

OAC FIN Instructions.Docx Page 13 of 66
EDIT Column Formula
Use Custom Headings to change the Column Heading
Change the default aggregation rule from Default (None)
Change the default Column Formula to a function, computed field, variable or other value

OAC FIN Instructions.Docx Page 14 of 66
COLUMN PROPERTIES
Example:

OAC FIN Instructions.Docx Page 15 of 66
Change the setting for Value Suppression to Repeat if you want to display the value on
each record – especially useful if you are exporting the records to Excel.
NOTE: This step is not necessary if you export data in Data format instead of Formatted
format.
Change Data Format from the default setting to a specific number format, e.g. two
decimal places, commas.

OAC FIN Instructions.Docx Page 16 of 66
FILTERS
Adding filters (limits to selection, required)
Within the Selected Columns pane, click on the options menu to the right of each field and
chose the Filter option

OAC FIN Instructions.Docx Page 17 of 66
Choose an Operator
Enter the criteria manually (separated by semi-colons, if a list) or choose from the drop down
box by clicking on the drop down box.
NOTE: A drop down menu lists the values alphabetically if a text field or numerically if a
number field. The values shown are all values defined in the PRISM system not just those
within the data warehouse.
Click on OK when done

OAC FIN Instructions.Docx Page 18 of 66
Alternate method: Click on the looking glass next to the drop down box button to see a
select values box which brings up all defined values of the field to be filtered within the data
warehouse.
This box offers limiting criteria for the Search -- where you can
enter a parameter to limit the search listing and avoid scrolling.
From here you can highlight the values you want to be included and move them to the
Selected Pane by clicking on the single blue arrow. Do not use the double blue arrow unless
you want all the fields shown in the left pane to be moved to the right pane.

OAC FIN Instructions.Docx Page 19 of 66
Setting filters for fields outside of those appearing in the selected columns.
Within the Filters pane, the Filter+ icon allows you to set filters for not only the selected
fields but for any other field within the subject area from the More Columns area.
System will display all tables/variables available.
Expand the tables/views to see the various fields available to be chosen for the new filters,
highlight the chosen field and click OK to begin building the filter for the other selected field.
Complete the filter dialog box.

OAC FIN Instructions.Docx Page 20 of 66
The Criteria section of an analysis indicates selected fields and filters. Within each field,
options allow you to change defaults or displays.
At this point, we recommend that you save the query to My Folders to avoid losing all your
actions. Do not use a file name of a previously saved analysis unless you want the new
object to overwrite the older object.
To save, click on Save or Save as icons in the upper right hand corner.
OAC FIN Instructions.Docx Page 21 of 66
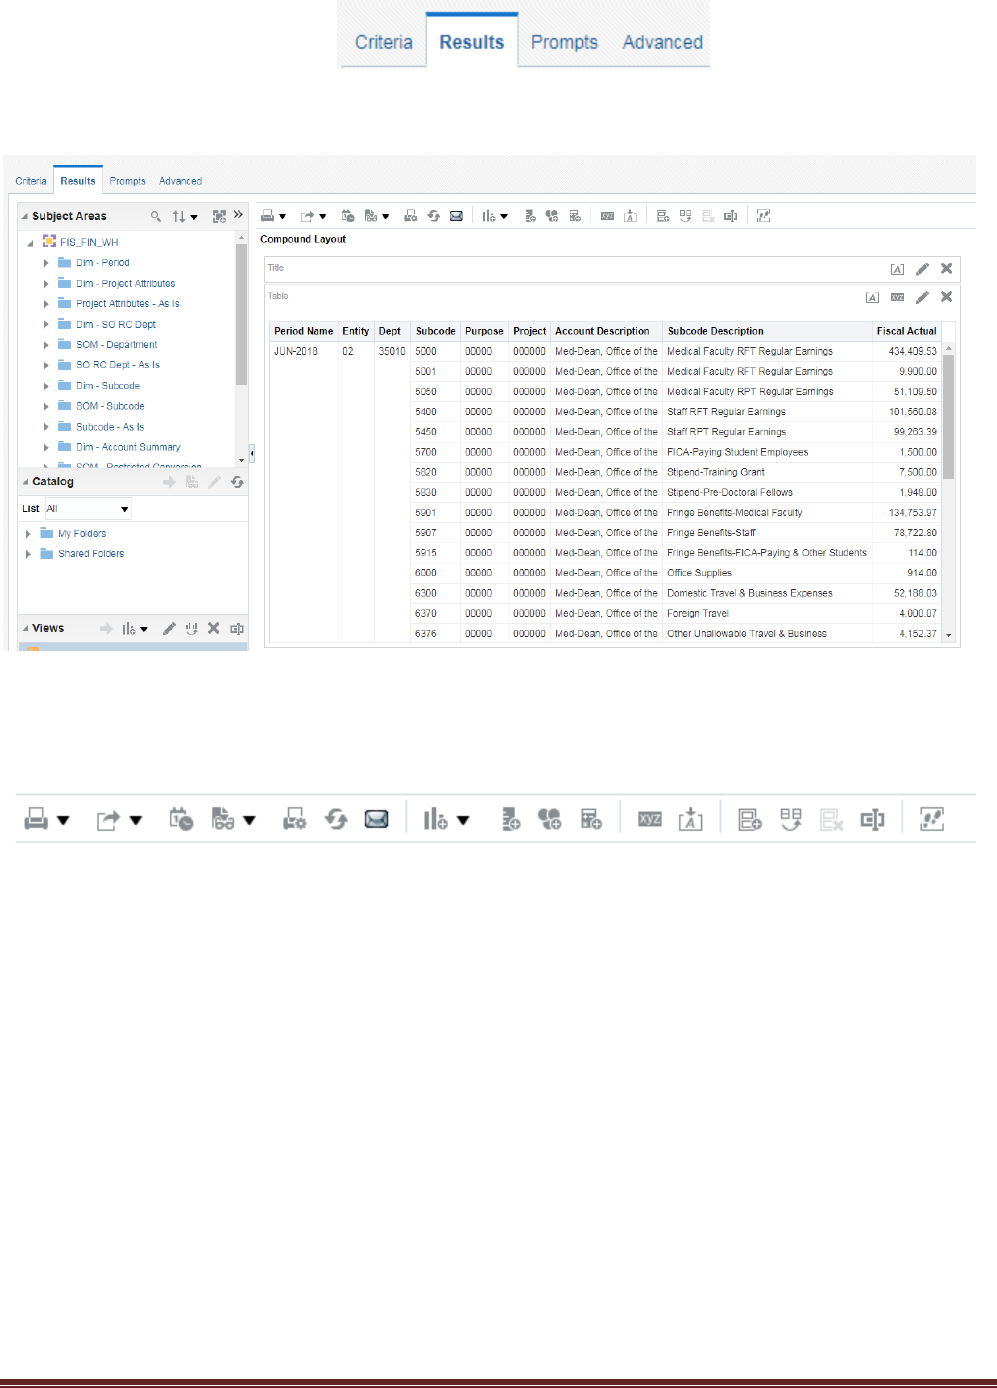
When you click on the Results tab, it will show the initial
output of your query on the “Compound Layout” as “Table”. You can rename the “Table” to
any meaningful name.
The toolbar above your compound layout has several icons allowing you to perform a
number of tasks:

OAC FIN Instructions.Docx Page 22 of 66
Now the Views pane in the lower left corner shows the available objects in the query: Title
and Table.
EDIT A VIEW
To change the viewable screen, go to View pane
in lower left screen
Highlight Table and click on pencil icon
to Edit View to access the Layout mode.

OAC FIN Instructions.Docx Page 23 of 66
Alternate way to edit a view
If you click on the edit (pencil) icon In the upper right corner of the view, it brings you to the edit
screen of the view.
Click on Table View Properties icon to adjust the screen size

OAC FIN Instructions.Docx Page 24 of 66
Enter Maximum width: 1600 for moderately sized report; 2880 is the maximum setting
Height does not need to be set.
Click OK.
Column widths can be adjusted by adjusting || within a column.
Field order can be modified by clicking on the column to be moved until the “handle” appears
(gray bar across column top) and dragging the column to appropriate place as indicated by
the blue-gray lines. Do not drop the field until you see the line to indicate where the field will
be moved.
NOTE: This doesn’t change the sequence of the Criteria tab entries.
Click DONE

OAC FIN Instructions.Docx Page 25 of 66
Any additional changes should be from the
View/Edit View also.
This dialog box also enables you to have 1) content paging, 2) alternating rows shaded on a
report and 3) repeated cell values showing on every row.

OAC FIN Instructions.Docx Page 26 of 66
ADDING VIEWS
Additional reports or pivots can be made in the View pane as a New View or Duplicate View
Choose View type, such as Pivot Table
NOTE: For older queries that have been modified over time, the use of the “New View” icon
from the Views section does not produce a connection the new view section. If that occurs,
use the “New View” icon at the top of the layout section

OAC FIN Instructions.Docx Page 27 of 66
Pivot table
System default brings ALL fields from Results to the Pivot table row line, you need to drag
unnecessary fields to Excluded row.
However, if you only need just a few fields from your selection for your pivot, you can click on
the Section heading, e.g. “Dim-Account Summary” and bring all the fields associated with
that section down to the Excluded section and then just bring back the fields needed up to
the Rows section.

OAC FIN Instructions.Docx Page 28 of 66
If you want a cross pivot with additional columns of facts, drag the fields to be included into
the Measure Labels section, sequence determines hierarchy on the report.
To view a Pivot table in the Compound Layout, you will need to drag the “pivot table” from the
lower left “Views” pane to the Compound Layout or use View Selector to see selected views
of data.

OAC FIN Instructions.Docx Page 29 of 66
View Selector is an added feature that allows you to build a drop down box that displays the
various reports/pivots defined within an analysis.
Click on “New View” and then choose Other Views then View Selector
The system will bring up a view in the Compound Layout pf a generic View Selector, which
you will need to edit.

OAC FIN Instructions.Docx Page 30 of 66
Choose the views to be included from the available views (left pane) and then click
the right arrow . Views will appear in the drop down box in the sequence they
appear in the right pane, which can be modified using the Up-Down arrows.
Once a View Selector is been defined, you will need to click Done to save it and move it to
an appropriate area of the Compound Layer to use it.
Moving the View Selector to the Compound Layout does not remove the existing objects on
the layout. If you do not want to see the old items replicated, just click the Red X mark within
the old objects window.

OAC FIN Instructions.Docx Page 31 of 66

OAC FIN Instructions.Docx Page 32 of 66
Again, save your query.
Save or Save as
My Folders or Shared folders
Default save is where you open original analysis unless the folder has restrictions for your
ability to save to that folder. The recommended save location is My Folders if you are still
working or the query is primarily for your personal use. Within My Folders, you can build
separate folders for specific types of queries. Use the Shared Folders when the query is to
be used by others within your department or area.
NOTE: If you are using a template analysis, save your changes under another name to
avoid over-writing the original template.

OAC FIN Instructions.Docx Page 33 of 66
SUB-TOTALING/TOTALING
Totaling at any level is defined at the Layout in the Edit mode using the summation icon at
the various levels: Table (Row), Sections, Columns, or individual fields.
Choices:
OAC FIN Instructions.Docx Page 34 of 66
Format label choices:

OAC FIN Instructions.Docx Page 35 of 66
Format value choices:
When totaling has been defined, the icon beside the various fields or levels will appear as
.

OAC FIN Instructions.Docx Page 36 of 66
PRINTING OUTPUT
Before printing any output, use the Preview icon to see how the report will display as a
dashboard.
On the Results tab, you can use the Print Option icon to change defaults settings

OAC FIN Instructions.Docx Page 37 of 66
To change the Orientation of the page, select
Landscape.
To print all results of an analysis, change the Print
Rows option from Visible to All
Click OK.

OAC FIN Instructions.Docx Page 38 of 66
EXPORTING OUTPUT
OBIEE can export a report in a variety of outputs from the Preview mode:
Formatted PDF
Excel
Powerpoint
Web Archive
Data Excel
CSV
Tab Delimited
XML
Exporting to a Formatted format brings the data in the report format as shown on the original
output with data suppression of values in certain columns.
Exporting to a data format overrides the default data suppression routines and shows all
values of a field in each row.
If you are exporting to data format, you will see a dialog box that directs you out of OAC-
OBIEE
Click Leave to continue export process
System will display a confirmation

OAC FIN Instructions.Docx Page 39 of 66
Click OK
The system will display a download indicator in the lower left hand corner of the screen
Click on the drop-down arrow to see options
For formatted exports, just click Open to open the file in the appropriate application.
For data exports, click Show in Folder to view text files properly. When the system brings up file
listing, right-click on the filename and choose Open With to define the appropriate text application,
NotePad or WordPad, to see the non-formatted values.
Opening a data file with Excel will bring up the Excel based formats as values. Values that appear as
numbers are treated as numbers not text values.

OAC FIN Instructions.Docx Page 40 of 66
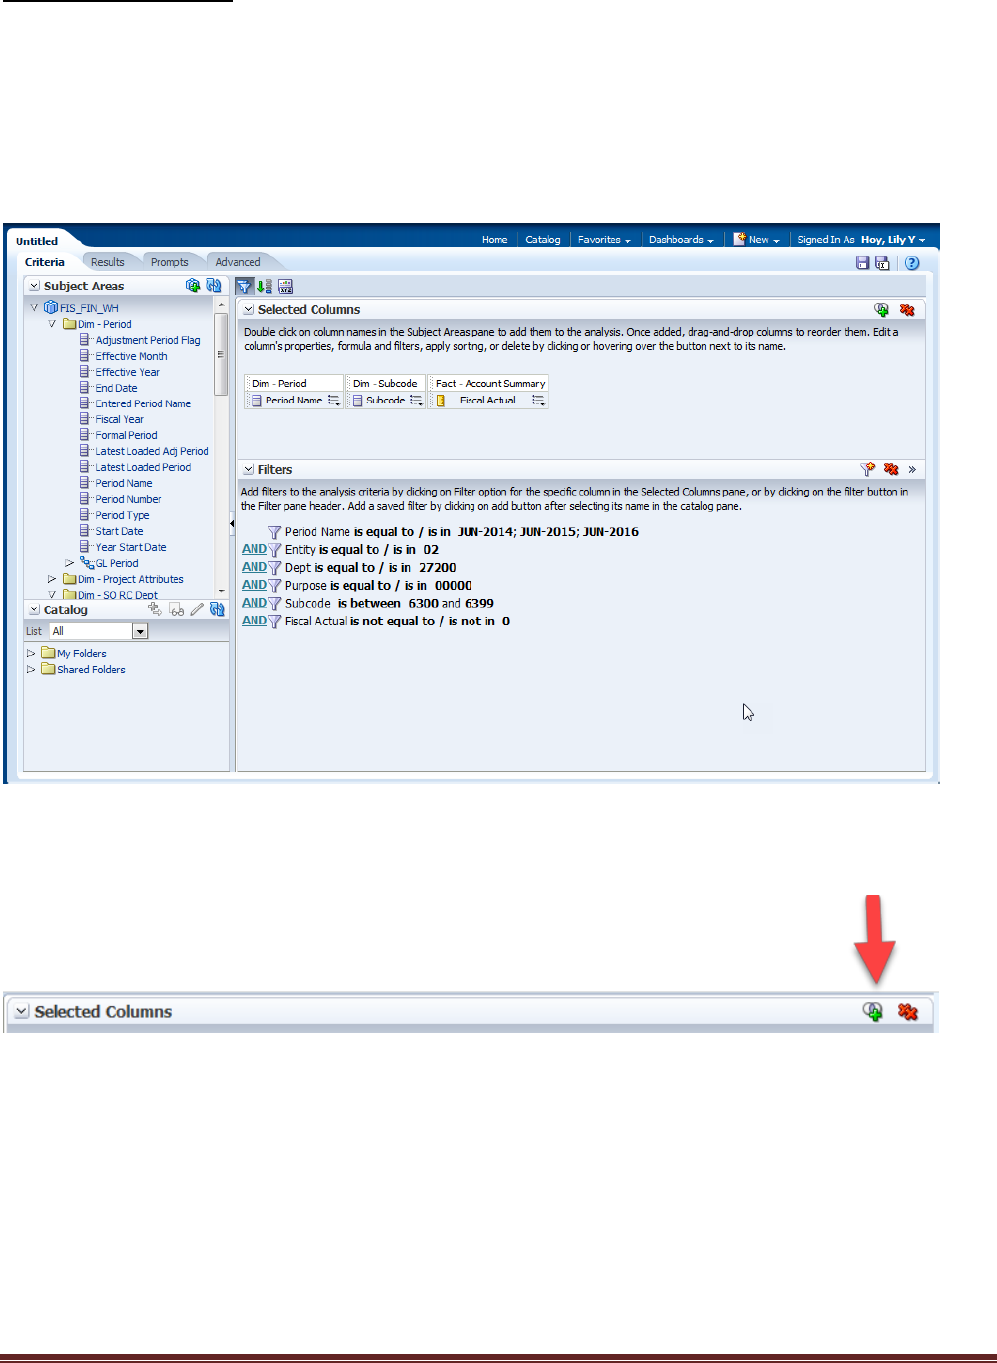
CREATING BINS
The process of redefining results in OBIEE is done within the filters of a field by defining Bins
in the Edit Formula process.
In OBIEE, the system overwrites the initial formula for a column with the new definitions of
the Bins. In order to retain the original column and view the new column defined in the Bins,
you must bring a field again.
In this example, we want to see the original subcode and then a subgroup grouping, so we
have brought over the field Subcode_ID again. We will rename the second column to
differentiate it from the original Subcode_ID column.
On the second Subcode field, select Edit Formula

OAC FIN Instructions.Docx Page 41 of 66
Click Custom Heading and type in the name of the new field, SC Cat.
Select the tab, Bins.
Click Add Bins to start the definition process.

OAC FIN Instructions.Docx Page 42 of 66
Add the operators and filters within the “bin” definition and click OK.
Enter the name of the Bin.
Click OK

OAC FIN Instructions.Docx Page 43 of 66
Enter a Bin name for this grouping
If non-contiguous values are necessary, use the same name of the bin to include the extra
values.
To add more bins, click the Add Bin button.

OAC FIN Instructions.Docx Page 44 of 66
The final definition to be created is a bin to include all undefined values, “All other values”.
Click OK when the definitions are complete.
Chose the Results Tab to view the new column, which can be maneuver to its desired location
within the table.

OAC FIN Instructions.Docx Page 45 of 66
Save your query.

OAC FIN Instructions.Docx Page 46 of 66
CREATING RECORD COUNT
Add a column to your analysis, any field from the table you want to count records in output.
Edit the formula for that field to COUNT(expr).
With your cursor on the old field name, add a function by clicking on function,

OAC FIN Instructions.Docx Page 47 of 66
Results:

OAC FIN Instructions.Docx Page 48 of 66
CUSTOM FORMULAS
There is no button or icon to add a blank column, but you can add a column multiple times
and then modify the formula to build a computed field. It doesn’t matter what field you use
because you are going to change the formula for the file calculations and the column name
On the Criteria page, add a field to your query
Select Options for the newly added column
Create the formula using the appropriate database column, operative(s), and variable(s)
Click the Custom Headings checkbox, and enter a new column name
Click OK to close the Edit Column Formula dialog
Select Column Properties options for the new column
On the Data Format tab, choose how to display the new calculations
Return to the Results tab to see the option
You can drag the new column to a new location within the table if necessary
Click Save
Creating conditional formulas
To build a computed value based upon conditions, modify the formula of a field to perform an
If statement.
In this example, we want to calculate an “Amount” based upon the Indirect Cost Rate,
defined multipliers, and the Period Actual Amount.
Add the Period Actual Amt column to the query, then:
Go to the edit formula in drop down
Change the column header to “Amount”

OAC FIN Instructions.Docx Page 49 of 66
Edit the column formula. For the IF statement in OBIEE we can use a case statement with
the conditions. Functions can also be applied to the edited column formula.
ROUND(CASE WHEN "Dim - Project Attributes"."Indirect Cost Rate" < 10 THEN
"Fact - Account Summary"."Period Actual Amt"*0 WHEN "Dim - Project
Attributes"."Indirect Cost Rate" IS NULL THEN "Fact - Account
Summary"."Period Actual Amt"*0 WHEN "Dim - Project Attributes"."Indirect
Cost Rate" BETWEEN 10 AND 24.99 THEN "Fact - Account Summary"."Period
Actual Amt"*2.5/"Dim - Project Attributes"."Indirect Cost Rate" WHEN "Dim -
Project Attributes"."Indirect Cost Rate" BETWEEN 25 AND 53.99 THEN "Fact -
Account Summary"."Period Actual Amt"*5/"Dim - Project Attributes"."Indirect
Cost Rate" WHEN "Dim - Project Attributes"."Indirect Cost Rate" >=54 THEN
"Fact - Account Summary"."Period Actual Amt"*6/"Dim - Project
Attributes"."Indirect Cost Rate" ELSE 0 END, 2)
Click OK.
CREATING INTERACTIVE QUERIES
OAC FIN Instructions.Docx Page 50 of 66
Drilling from a summary report of balances in Account Summary to the GL detail transactions
requires a separate detail query linked to the original balance query by an action link or an
interactive query. The filters in the detail query can use the filters from the original balance
query via prompts to report only those records meeting those conditions.
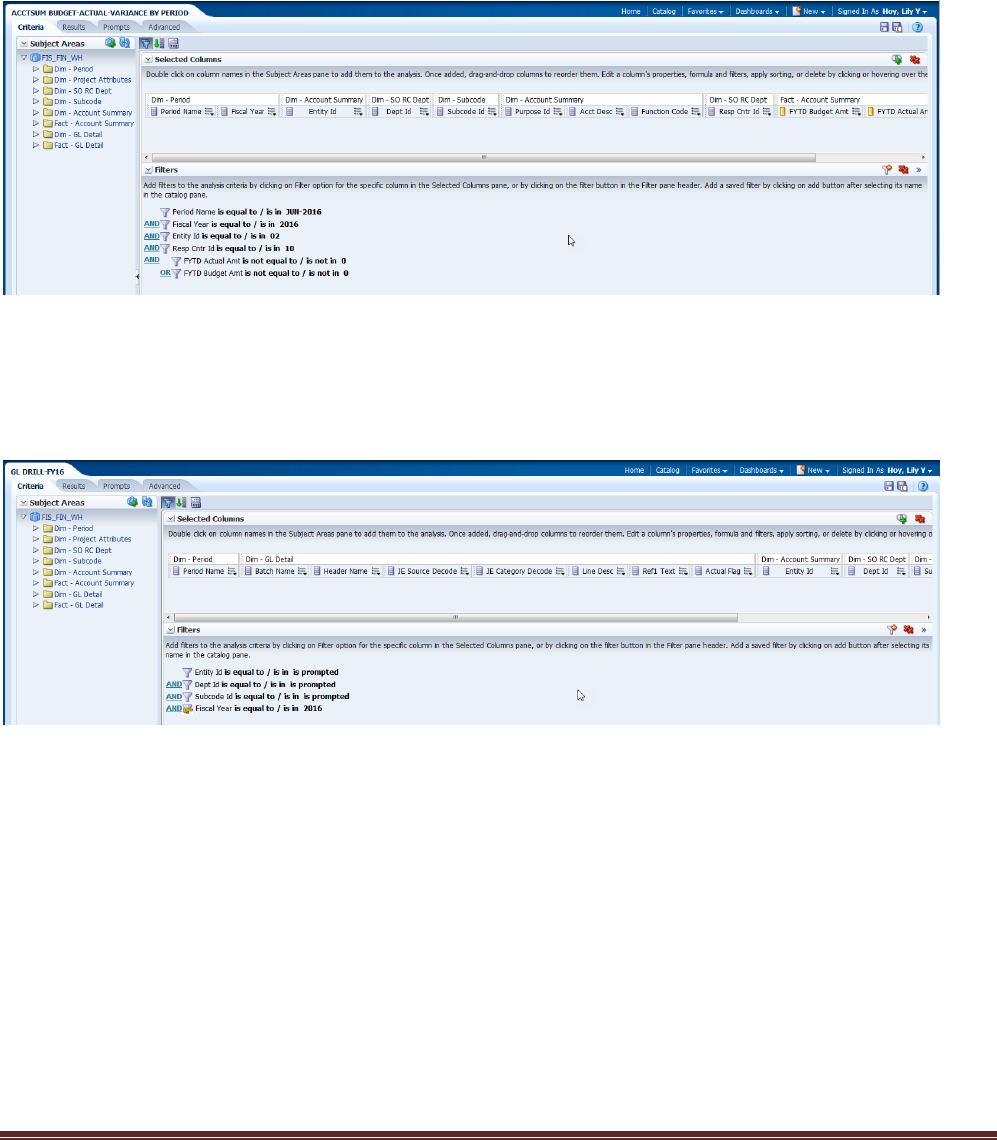
Create a summary balance query
In this example, the balances are for the year-end period, JUN-2016, fiscal year to date
figures.
Create a detail query
In this example, the drill for the detail transactions involves all GL detail records that made up
the FYTD figures for a specific subcode for FY16 not just for JUN-2016. The other filters are
prompted from the original balance query.
To be able to execute the GL drill from the balance query, you will need to define an action
link between the balance analysis to the detail query.

OAC FIN Instructions.Docx Page 51 of 66
From Criteria tab of the summary query, select the field linking the two queries, the values from which
you want to drilldown.
In this case, the field is Subcode ID. Click on Column Properties – Interaction tab.
Under Value, choose Action Links
The New Action Link dialog box will appear.

OAC FIN Instructions.Docx Page 52 of 66
To add the action link, click on the green + sign
Enter the text to display for the link
Click on the Action Link button

OAC FIN Instructions.Docx Page 53 of 66
Click on Navigate to BI Content to select the GL Detail query
Find the detail query to be executed from stored queries
Click OK

OAC FIN Instructions.Docx Page 54 of 66
Click OK to confirm
Click OK

OAC FIN Instructions.Docx Page 55 of 66
Click OK
When you return to balance query, view Results.

OAC FIN Instructions.Docx Page 56 of 66
To see the GL detail for a specific subcode, hover your mouse over the subcode.
Click on the link to execute the detail query

OAC FIN Instructions.Docx Page 57 of 66
Use your browser back button to return to original balance query results. If you use the
“breadcrumbs” in the lower left corner, you will return to the balance query criteria tab.
Saving a Link for Re-Use
If you wish to use the action linked query for other analyses, you can save it and reference
the saved link.

OAC FIN Instructions.Docx Page 58 of 66
Once a link has been saved, it can be referenced by using Select existing action
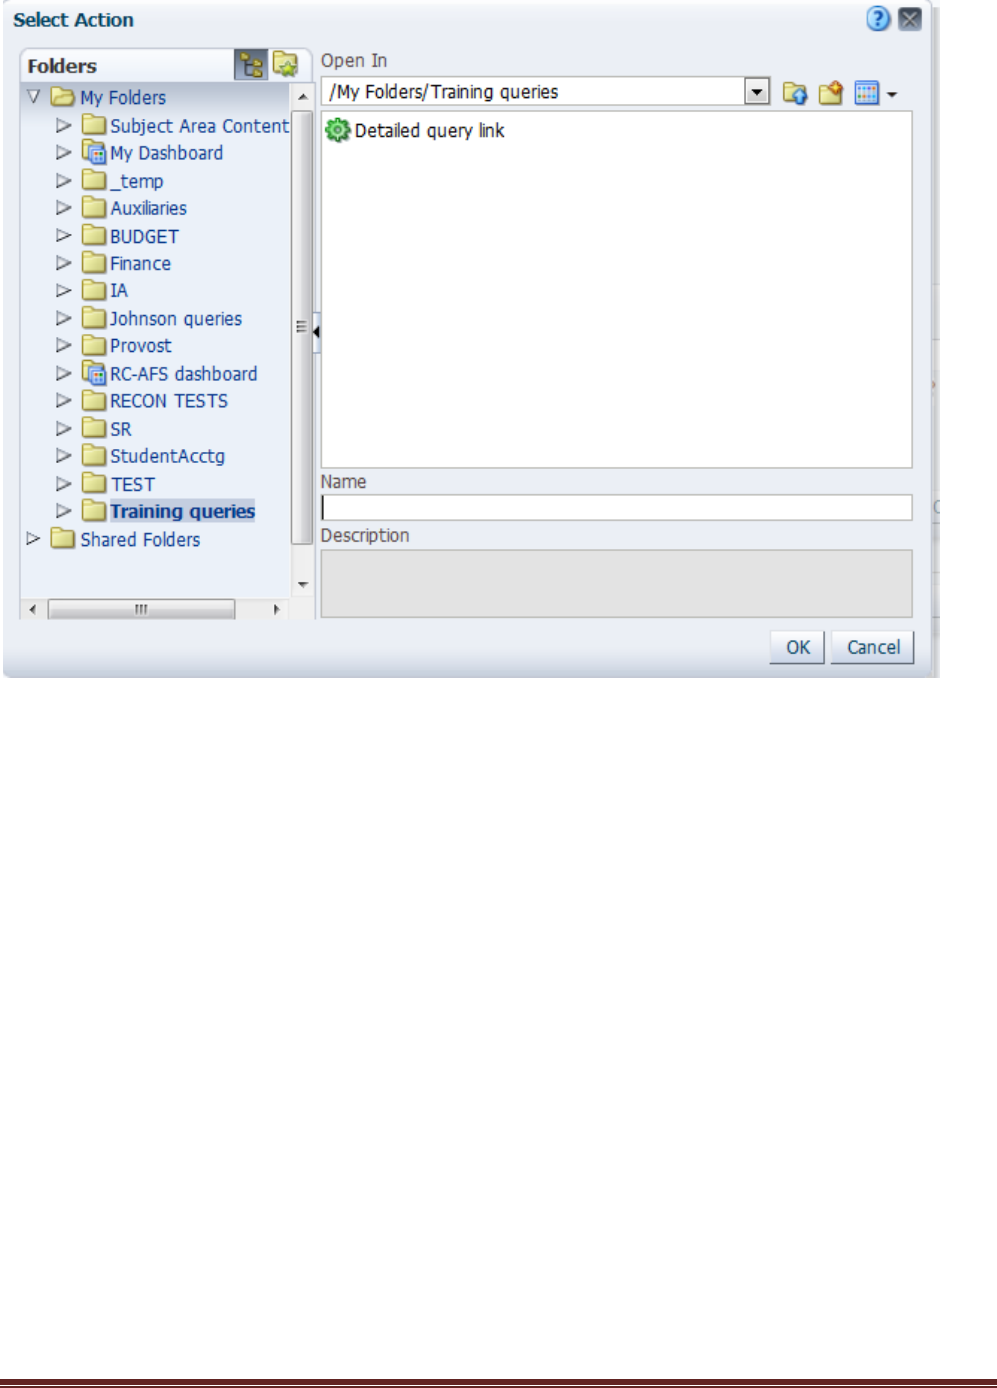
OAC FIN Instructions.Docx Page 59 of 66
Choose the appropriate saved link and click OK.
OAC FIN Instructions.Docx Page 60 of 66
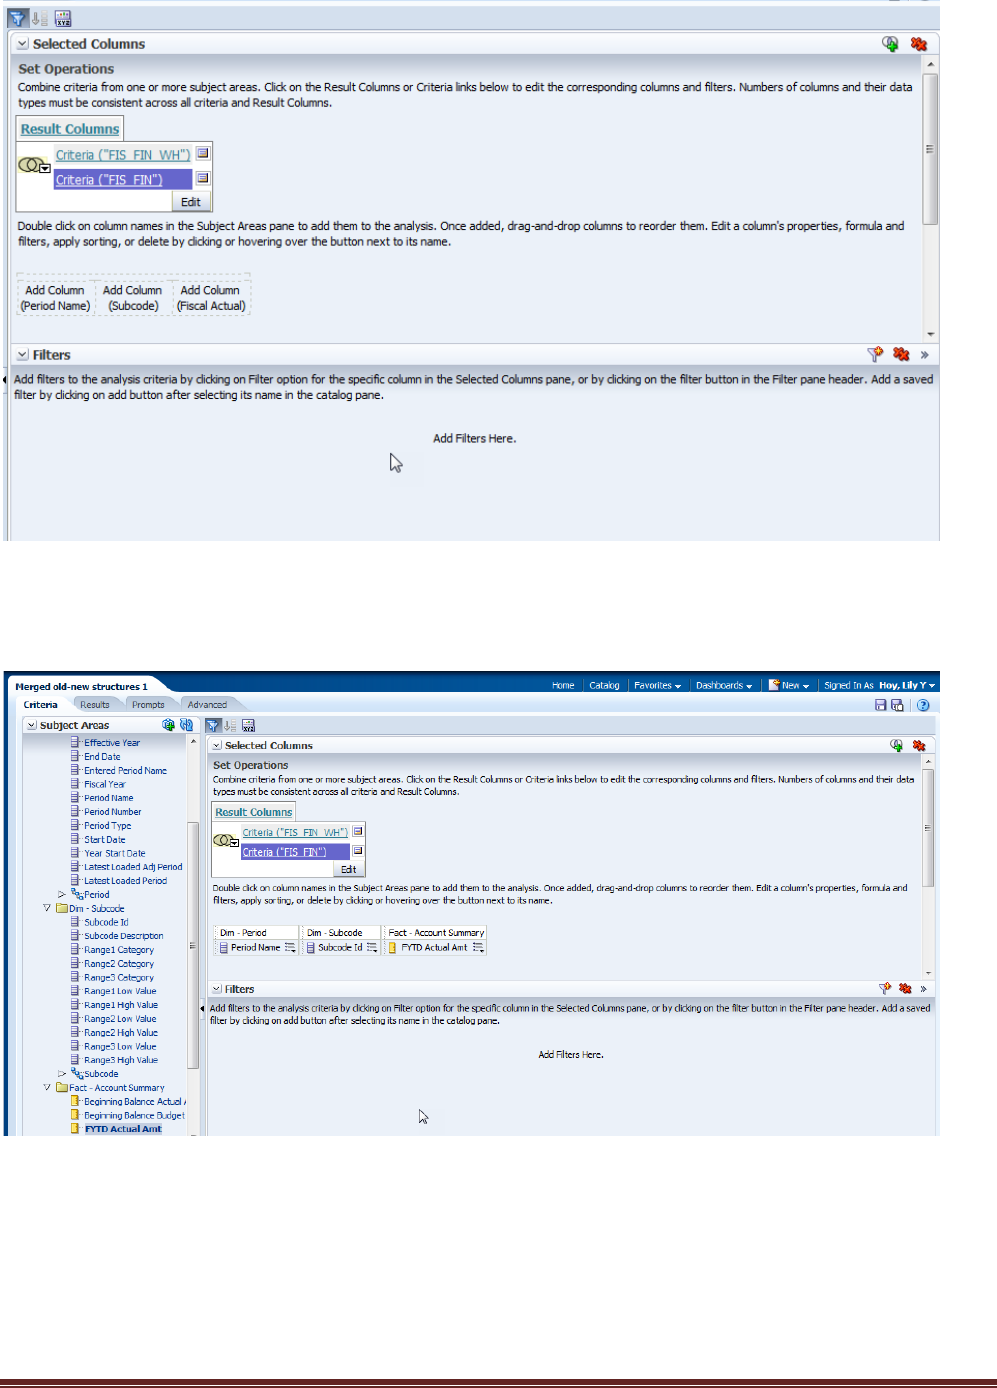
MERGING QUERIES
The latest financial subject areas only have data from fiscal year 2012 forward. If you need
an analysis for years prior to FY12 as well as more recent data, you will need to create two
queries, one for the data prior to FY12 with FIS_FIN subject area and another for the data
FY12 and later with FIS_FIN WH subject area.
Create a query with FIS_FIN WH
In the upper right hand corner of the Selected Columns area, click on the icon to “Combine
results based upon union, intersection and difference operations”
Select the subject area for the second query, FIS_FIN

OAC FIN Instructions.Docx Page 61 of 66
System will display a new query union with the older query
NOTE: The Filter area does not appear automatically, you will need to click the Filters icon to
see Filters
OAC FIN Instructions.Docx Page 62 of 66
Double click on column names in the Subject Areas pane to add them to the analysis. Once added,
drag-and-drop columns to reorder them. Edit a column's properties, formula and filters, apply sorting,
or delete by clicking or hovering over the button next to its name.
Add filters for second query

OAC FIN Instructions.Docx Page 63 of 66
Filters should “match” the original query; only the periods would differ.

OAC FIN Instructions.Docx Page 64 of 66

OAC FIN Instructions.Docx Page 65 of 66
EXITING OBIEE
Before exiting OBIEE, save your queries in My Folders or in the appropriate Shared Folder.
If you have changed a previously saved query, please save it with a modified names to avoid
overwriting the original query.
When you have completed your work, exit OBIEE by clicking on the Sign Out button in the
upper right corner. This effectively closes all the open windows in
OBIEE safely which may not occur if you just close session through the
browser window at

OAC FIN Instructions.Docx Page 66 of 66
Column Properties, 13
Creating Bins, 35
Creating Conditional Formulas, 41
Creating Record Row Count, 40
Creating Reports, 7
Custom Formulas, 41
Edit Column Formula, 12
Exiting Obiee, 58
Exporting Output, 34
Filters, 15
Interactive Queries, 43
Logging In
, 2
Merging Queries, 53
Printing Output, 33
Query-Criteria, 22
Query-Results, 23
Query-Table View Properties, 24
Query-Views, 23
Reporting-Adding Views, 26
Report-Pivot Table, 27
Report-Sub-Totaling/Totaling, 31
Report-View Selector, 28
Saving A Link For Re-Use, 50
Saving File, 30
Setting Filters Non-Fields, 20
Sort, 11
Using The Catalog, 4
