
i
PeopleSoft Pivot Grid Wizard
Data services
March 2020
Paula McDaniel
Data Analytics Learning and Education Instructor
Washington State Board of Community and Technical Colleges, Da ta Services

Table of Contents
Course Goal ........................................................................................................................................................................ 5
Course Learning Objectives .......................................................................................................................................... 5
Pivot Grid Viewer Layout .............................................................................................................................................. 5
Pivot Grid Terms .............................................................................................................................................................. 6
Aggregates ........................................................................................................................................................... 6
Attach Tree.......................................................................................................................................................... 6
Axes and Values ................................................................................................................................................. 6
Collapse All.......................................................................................................................................................... 6
Configure Pivot Grid Views ............................................................................................................................ 6
Detailed View or Result View ........................................................................................................................ 6
Detach Tree ......................................................................................................................................................... 6
Drilling URL......................................................................................................................................................... 6
Dual Y Axis........................................................................................................................................................... 7
Editable Facet ..................................................................................................................................................... 7
Expand All............................................................................................................................................................ 7
Facet ...................................................................................................................................................................... 7
Fluid Mode........................................................................................................................................................... 7
Left Panel Tab..................................................................................................................................................... 7
Mini Chart Facet................................................................................................................................................. 7
Modal Window ................................................................................................................................................... 7
Model View.......................................................................................................................................................... 7
Multi Select Filter .............................................................................................................................................. 8
Options Menu
..................................................................................................................................................... 8
Overlay ................................................................................................................................................................. 8
Personalizations ................................................................................................................................................ 8
Pivot ...................................................................................................................................................................... 8
Pivot Grid ............................................................................................................................................................. 8
Publish as Tile .................................................................................................................................................... 8
Publish as Pivot Grid ........................................................................................................................................ 8
Report filter......................................................................................................................................................... 8
Reset Layout ....................................................................................................................................................... 9
Result View or Detailed View ........................................................................................................................ 9
Series..................................................................................................................................................................... 9
Queries for Pivot Grids ................................................................................................................................................... 9
Query as a Data Source.................................................................................................................................... 9
Data Source Queries for Pivot Grid Naming Convention ...................................................................... 9
Query Considerations/Limitations for Use with Pivot Grid:............................................................... 9

Considerations ................................................................................................................................. 10
Limitations ........................................................................................................................................ 11
Making Updates to a Query Used as a Pivot Grid Data Source.......................................... 15
Pivot Grid Wizard.......................................................................................................................................................... 16
Pivot Grid Wizard Steps ............................................................................................................................... 16
Pivot Grid Wizard Navigation .................................................................................................................... 16
Pivot Grid Naming Convention .................................................................................................................. 17
How Pivot Grid Wizard Options Translate to Pivot Grid Viewer .................................................... 18
Pivot Grid Viewer Classic vs Fluid Mode ................................................................................................ 20
Pivot Grid Wizard - Step 1 - Specify Pivot Grid Properties .............................................................................. 20
Pivot Grid Wizard - Step 2 - Select the Data Source ........................................................................................... 21
Pivot Grid Wizard - Step 3 .......................................................................................................................................... 23
Specify Data Model Values .......................................................................................................................... 24
Select Data Source Information - General Options .............................................................................. 24
Data Source Columns .................................................................................................................................... 25
Column Label.................................................................................................................................... 26
Aggregate Label ............................................................................................................................... 27
Column Type..................................................................................................................................... 28
Total .................................................................................................................................................... 32
Aggregate ........................................................................................................................................... 34
Total Name ........................................................................................................................................ 36
Editable Facet (Only Fluid) .......................................................................................................... 37
Configure Visible Prompts .......................................................................................................................... 40
Select Query Prompt Values and Configure Visible Prompts............................................ 40
Pivot Grid Wizard - Step 4 .......................................................................................................................................... 41
Specify Data Model Options ........................................................................................................................ 41
View Options.................................................................................................................................................... 43
Default View...................................................................................................................................... 43
Pivot Grid Only ................................................................................................................................. 44
Chart Only.......................................................................................................................................... 47
Pivot Grid and Chart....................................................................................................................... 48
Specify Axis Information.............................................................................................................................. 50
Data Source Columns ..................................................................................................................... 50
Field Format...................................................................................................................................... 51
The Grid Axis and Chart Axis ....................................................................................................... 52
Grid Axis Selection of Column ..................................................................................................... 52
Grid Axis Selection of Row ........................................................................................................... 57
Grid Axis Selection of Filter ......................................................................................................... 60
Grid Axis and Chart Axis Balance ............................................................................................... 62

Display As .......................................................................................................................................... 63
Dual Y Axis......................................................................................................................................... 64
Define Threshold ............................................................................................................................. 66
Grid Options...................................................................................................................................... 70
Chart Options................................................................................................................................................... 73
Chart Options.................................................................................................................................... 75
Advanced Chart Options ............................................................................................................... 78
Display Options............................................................................................................................................... 85
View Grid ........................................................................................................................................... 86
Export Data ....................................................................................................................................... 88
Chart Options.................................................................................................................................... 88
Hide Chart.......................................................................................................................................... 90
Reset.................................................................................................................................................... 91
Save...................................................................................................................................................... 91
Bar Chart/Line Chart/Pie Chart/Horizontal Bar Chart ...................................................... 92
Update Filters ................................................................................................................................... 93
Show Help.......................................................................................................................................... 94
Save As................................................................................................................................................ 95
Fluid Options ................................................................................................................................................... 96
Viewer Options ............................................................................................................................................... 96
Result View ....................................................................................................................................... 97
Allow Multiple Y Axis ..................................................................................................................... 98
Result View Columns ..................................................................................................................... 99
Facet Selection ..............................................................................................................................................100
Allow Multi-select .........................................................................................................................101
Show as Chart/Chart Type .........................................................................................................102
Facets ................................................................................................................................................103
Pivot Grid Wizard - Step 5 ........................................................................................................................................104
Pivot Grid Display ........................................................................................................................................104
Options Menu .........................................................................................................................................105
Help Icon...............................................................................................................................................106
Expand All and Collapse All ......................................................................................................................107
Chart Type Icons...........................................................................................................................................108
Configure Related Content ........................................................................................................................109
Publish as Pagelet ........................................................................................................................................110
Configure Pivot Grid View .........................................................................................................................111
Publish as Tile ...............................................................................................................................................114
Submit a Pivot Grid Migration Request................................................................................................................115

Course Goal
The goal of this course is to train Query Developers on how to create pivot grids to view and
analyze data.
Course Learning Objectives
At the end of this course users will be able to:
• Explain the limitations and considerations that must be taken into account when creating or
selecting a query to use for a pivot grid.
• Create queries appropriate for use as a data source for pivot grids.
• Demonstrate understanding of the Pivot Grid Wizard set up and usage.
• Accurately use the pivot grid wizard to create pivot grids using a query as a data source.
• Demonstrate knowledge of how to migrate a pivot grid model from PCD to PRD.
Pivot Grid Viewer Layout
Below you will see where some of the terms defined in this section are seen within Pivot Grid
Viewer.

Page | 6
Pivot Grid Terms
Aggregates
Aggregate functions include SUM, MIN, MAX, AVG, COUNT and DISTINCT COUNT.
Attach Tree
Used to attach a PeopleSoft Tree to an axis to display hierarchical information for that axis.
Axes and Values
Axes and Values are at the core of analytical and operational reporting.
Axis members are those attributes that qualify Values. They give structure to Values and they
allow different views of the Values. They are also called Dimensions in a pivot grid.
Values are the metric that business users use to make business decisions. Generally, Values are
number type fields except when the aggregate function COUNT is used on non-numeric fields.
Collapse All
A link in the grid title region used to collapse any expanded positions in the grid row or column
for totals.
Configure Pivot Grid Views
A link used to create new Pivot Grid views or to edit existing ones.
Detailed View or Result View
All mapped fields selected to display in the pivot grid model in Step 2 of the Pivot Grid
Wizard. The fields selected will display in a format very similar to a result set from PS Query.
Detach Tree
Used to remove a PeopleSoft Tree that is attached to an axis.
Drilling URL
When you build a query using PeopleSoft Query - Query Manager, you can define drilling URLs
that are associated with this query. These settings are saved into the database as part of the
metadata for this query. When you run this query, the query results show the results as URL
links, which you can click to be redirected to either a PeopleSoft page, another query result
page, or an external page.

Page | 7
Dual Y Axis
Allows for a primary and secondary Y Axis to be used; each on their own Y Axis sharing the same
X Axis.
Editable Facet
A field which has been selected as an Axis Value Type and checked as an Editable Facet in Pivot
Grid Wizard. Fields that have been so designated will display and act as a prompt, with no
lookup list, in Pivot Grid Viewer.
Expand All
A link in the grid title region used to expand all the dimensions in the row and column positions
for totals.
Facet
Similar to multi-select filter, but facet is displayed as a collection of check boxes instead of a
drop-down list, and facet is applied to Pivot Grids fluid view only.
Fluid Mode
The PeopleSoft Fluid User Interface is designed to be a significant enhancement to the
PeopleSoft’s “classic” user interface, which has been the interface display on browsers for
PeopleSoft end users for well over a decade. The PeopleSoft Fluid User Interface moves away
from pixel-perfect page layout and provides greater flexibility with the enhanced use of
cascading style sheets (CSS3), HTML5, and JavaScript (if needed).
Left Panel Tab
The area of the rendered Pivot Grid Model that allows users to select facets, update prompts
and or slice and dice the data.
Mini Chart Facet
The facet values that appear as a chart instead of a list of values. You are able to select a data
point in the facet chart to filter data.
Modal Window
A pop up window that displays the detailed view when the chart graph or pivot grid total
hyperlinks are clicked in Pivot Grid Viewer.
Model View
A different view of the default pivot grid model which has been created by using Save As, either
by the developer or an end user.

Page | 8
Multi Select Filter
A drop-down list that enables you to select multiple items to filter data, which appears in grids
and charts.
Options Menu
Area of Pivot Grid Viewer where the end user can find which options have been made available
for personalization of the Pivot Grid.
Overlay
Two charts that share the same X and Y axes that are plotted and then one is superimposed over
the other.
Personalizations
Changes to the original Pivot Grid Model configured and saved at the user level.
Pivot
A change of the dimensional orientation of a report inside Pivot Grid.
Pivot Grid
A component that provides a multidimensional presentation of data.
Publish as Tile
Application developer can use this link to create the tiles that are used in the Fluid mode. These
tiles are added with chart preview in fluid landing pages by end-users. They are configured to
point to the Fluid Viewer component for the specific model.
Publish as Pivot Grid
A link in PeopleSoft Query - Query Manager used to access Pivot Grid Wizard. When you use the
Publish as Pivot Grid link to access Pivot Grid Wizard, the wizard appears with the query
definition and data columns populated.
Report filter
Report filter determines the range of values that appears in the Pivot Grid and the chart. In SQL
terms, report filter is similar to a WHERE clause that limits the data returned. In PeopleSoft Pivot
Grid, report filter presents a slice of data to viewers in both the chart and the grid. If the data
source uses prompt values, they are automatically added as filters. You can customize prompt
values when viewing the pivot grid. When you create a Pivot Grid model, you can select
additional columns to use as filters.

Page | 9
Reset Layout
An option used to clear all the personalizations and to reset the Pivot Grid model to the default
setting (without personalization).
Result View or Detailed View
All mapped fields selected to display in the pivot grid model in Step 2 of the Pivot Grid
Wizard. The fields selected will display in a format very similar to a result set from PS Query.
Series
Chart with two dimensions that qualifies a value. For example, Region can be X-axis and Product
can be series-axis to display the Sum of Sales.
Queries for Pivot Grids
Query as a Data Source
Pivot Grids can use queries, components or composite queries as a data source. In this course
we will cover using queries as the pivot grid data source. When using query as the data source
for the pivot grid there are certain considerations that must be taken into account or the pivot
grid will fail.
Data Source Queries for Pivot Grid Naming Convention
Queries used as data sources for Pivot Grid should have a _PG designation at the end of the
query
name. XXX_XX_XXXXX_PG
• Example: QFS_AR_ITEM_DST_GL_PG
Query Considerations/Limitations for Use with Pivot Grid:
Before beginning in pivot grid wizard it is extremely important to learn how to select or create
queries to use in conjunction with pivot grid wizard. There are certain aspects to take into
consideration, as well as certain limitations that must be paid attention to when creating or
selecting a query to use with a pivot grid. As pivot grid doesn’t generally give an error message
with the reason that a Grid failed to render, it can be especially important to pay close attention
to using the correct protocol when creating a query to be used with a pivot grid model in order
to successfully create functional pivot grids.

Page | 10
Considerations
When creating a query to use with a pivot grid, keep in mind that:
Any prompt values for the query will automatically be used as a prompt or filter for the pivot
grid. Developers will have the option when creating the pivot grid to determine whether end
users can change values in the prompt in the rendered pivot grid model.
The institution prompt created in PS Query will display as a filter in Pivot Grid
Due to a bug, related prompts will fail in pivot grid viewer. As of this writing, Oracle has not yet
released a date by which this will be corrected. A related prompt is one that is dependent on
another prompt or criterion. For example, ACAD_CAREER is dependent on INSTITUTION. So
while it is possible to filter on ACAD_CAREER when creating the pivot grid model, it is not
possible for the query used to prompt on ACAD_CAREER.

Page | 11
• The query will be executed to render data on the grid and the chart, so users should
consider these two points when constructing a query for a pivot grid model:
o Query should be conducive to manipulation.
o Query performance should be efficient enough to quickly render on the grid and on the
chart. An inefficient query will cause pivot grid to render very, very slowly.
• Alternatives to Complex Queries
o Request a SQL View to be created by Data Services
Limitations
• Query with UNION Clauses.
o Query with the UNION clauses are currently not supported in pivot grid. Pivot grid does
runtime manipulation on the SELECT field list in the query and this will not work properly
with queries containing UNION clauses.
Recommendation: Request a SQL View to be created by Data Services

Page | 12
• Query with JOINS on the Value Fields.
o Query with the JOINS on value fields receive an error in pivot grid because pivot grid
performs aggregation on the value fields and the same aggregation is used for the JOIN
field. This will cause the query to fail syntactically while executing on the database.
Recommendation: use different fields for Values and Join criteria.
• Query with Underlying Record Views Selecting the Same Field.
o A query built on an underlying View that selects the same field more than once will fail
when used as a data source for pivot grid if these fields are used as the axis columns in
the pivot grid model. This is because the pivot grid uses a GROUP BY clause for the axis
fields and the database fails to perform a GROUP BY on the same field more than once.
Generally this will cause the pivot grid not to render but it could also display with
incorrect results.

Page | 13
Recommendation: Use different fields in the View creation but if that is not possible
then change one to use a function such as UPPER or TRUNCATE.

Page | 14
• Query with Value Fields Used as Criteria
o Value fields that are used as criteria in the query are not supported. If one of the
selected fields in the query is selected as a value column in the pivot grid model and the
same field is used as criteria in the query, the query will fail and the pivot grid model will
not render. This is because when rendering the pivot grid model, aggregate functions
are applied on the value fields and the same aggregation will be applied on the criteria.
This issue does not only result in wrong criteria, but the query will also fail syntactically
because there is an aggregation in the WHERE clause and normal criteria will not work.
Note that a HAVING clause is needed for the aggregation.
Recommendation: use two fields, one representing the value column in the pivot
grid and the other used as criteria.
• Query with Value Fields Used as a Prompt
o Value fields that are used as a prompt in the query are also not supported.
Recommendation: use two fields, one representing the value column in the pivot
grid and the other used as criteria.

Page | 15
• Query with Expressions that are used as Axis Fields in the Pivot Grid Model.
o If a query has an expression and the expression is used as an axis field in a pivot grid
model, the pivot grid will display an error while rendering results because query
expressions are not supported in the ROLLUP clause in pivot grid and it may lead to
unpredictable results.
Recommendation: build a View with the Expression which can then be used in the
pivot grid model.
Making Updates to a Query Used as a Pivot Grid Data Source
If the Query used for the pivot grid is changed the pivot grid must also be modified to ensure all
changes are kept and displayed correctly in the pivot grid viewer and pagelets.

Page | 16
Also note that making excessive changes to a pivot grid model and/or the query data source
can cause the model to permanently fail.
Pivot Grid Wizard
Use pivot grid wizard to create, update and maintain pivot grid models. There are five steps that
walk Query Developers through the process of defining the fundamental components of the
pivot grid (data, values, axes) as well as the initial display selections (chart type, viewing
options). The definition of the data model in the pivot grid wizard will determine what actions
are available to end users as well as the initial view.
Pivot Grid Wizard Steps
• Specify Pivot Grid Properties
• Select the Data Source
• Specify Data Model Values
• Specify Data Model Options
• Pivot Grid Display
Pivot Grid Wizard Navigation
To navigate to the pivot grid wizard follow this path: Main Menu --> Reporting Tools --> Pivot
Grid --> Pivot Grid Wizard.
Users can select to either search for existing pivot grids or create a new one.

Page | 17
We are creating a new pivot grid so will select "Add a New Value" and enter the name for the
pivot grid then click "Add".
Pivot Grid Naming Convention
The pivot grid naming convention is:
PGXX_XXXXXXXXXX.
• Example: PGCS_FTE_SUMMARY

Page | 18
PG/Pillar Description
How Pivot Grid Wizard Options Translate to Pivot Grid Viewer
This course is designed to help developers learn how to use Pivot Grid Wizard to create pivot
grids, however to fully understand the options available in the wizard it is imperative that we
understand how they translate to the display of the model in Pivot Grid Viewer. With this in
mind, as we go through the course we will see where an option is located in Pivot Grid Wizard
and then also how that option affects the display of the model in Pivot Grid Viewer.
Pivot Grid Wizard Set Up Screenshots will be be denoted with:
Pivot Grid Viewer Display Screenshots will be denoted with:
As an example of this process, in the GIF below we see how in Pivot Grid Wizard the developer
can select the Default View to display the pivot grid in one of three ways:
1. Grid Only
2. Chart Only
3. Grid and Chart

Page | 19
The changes to the selection of the Default View in Pivot Grid Wizard are saved and then the
Pivot Grid Viewer screen is refreshed, so we can see in "real time" how a selection in Pivot Grid
Wizard affects the display of the model in Pivot Grid Viewer.
By using this concept in this course we will show the developer not only how to set up options
within Pivot Grid Wizard but also how those options display the model in Pivot Grid Viewer
giving the developer an all-encompassing understanding of Pivot Grids.

Page | 20
Pivot Grid Viewer Classic vs Fluid Mode
Taking this a step further, remember that all pivot grids have the option to be opened in fluid
mode or in classic mode in Pivot Grid Viewer. Whichever option is selected will affect how the
display of the model is rendered. Within Pivot Grid Wizard there are a few options which will
only display if the model is opened in classic mode and others that work only in fluid
mode. These will be noted in the course. However, the unless otherwise noted the examples of
how the pivot grid model will display in Pivot Grid Viewer will be shown in fluid mode.
Pivot Grid Wizard - Step 1 - Specify Pivot Grid Properties
The name of the pivot grid will pull in from the previous screen. The other options to fill in here
include:
• Pivot Grid Title
o This will be the title of the pivot grid and will display in the pivot grid results.
• Description
o The pivot grid description field is the only area where developers can enter notes about
the grid. There is no definition field for a pivot grid as there is in Query Manager.
Detailed description of purpose of pivot grid.
Any specific aggregation applied.
Include key search terms
Describe any changes or updates made to an existing grid including approval for
the modification.
College code and email address of developer, for example,
890: pmcdaniel@sbctc.edu
Date pivot grid was created or updated
Business process number, if applicable.
• Pivot Grid Type

Page | 21
o Select Public
• Owner
o Select PeopleTools
Pivot Grid Wizard - Step 2 - Select the Data Source
The data source will be a query that was created for use with the pivot grid. While both
Composite Queries and Components are available for use as data sources for pivot grids, the
scope of this course only includes using a query as a data source.
• Click on the magnifying glass to the right of the Query Name field and search for the correct
query.
• Click on the hyperlinked query name to pull it in.
• Once the query has been chosen the fields that have been selected to display in the query
results will appear. The default is to include all fields.
• Click in the checkbox to select/deselect a field.

Page | 22
o NOTE: If the field is not selected here it will not be available to display or use in the pivot
grid with the exception of fields used as prompts in the query.
o Users may also "Select All" or "Clear All" checkmarks.
While users may check to include fields used as prompts, it is not recommended as it could
confuse end users. What will happen is that the field will be used as a prompt AND as a facet in

Page | 23
the final rendering of the pivot grid, effectively displaying the field twice in two different
locations. In the screenshot below INSTITUTION was selected as a prompt in the query and
checked to display in Step 2 Select a Data Source in the pivot grid wizard. So, it is showing up
twice in the Pivot Grid Viewer rendering shown below. Thus, it is recommended to deselect all
fields used as prompts in Step 2 of the Pivot Grid Wizard.
Pivot Grid Wizard - Step 3
Step 3 allows the developer to select how the fields from the query will be used in the Pivot
Grid, either a Value, Axis or Display as well as possible different headings. Additionally, default
prompt selections are also determined in this step. This step offers many different options on
how the model will render in Pivot Grid Viewer. For this course we will only be reviewing the
General Options tab.

Page | 24
Specify Data Model Values
Specify Data Model Values offers many different options on how the model will render in Pivot
Grid Viewer.
Select Data Source Information - General Options
The General Options tab has nine columns which work together to help determine how the
pivot grid will render data in Pivot Grid Viewer. The General Options columns are:
• Data Source Columns
o These are the fields pulled in from the data source query selected for use in the pivot
grid in Step 2.
• Column Label
o Text entered here will override the heading text selected in the data source query.
• Aggregate Label
o The text entered here will display in the pivot grid (not in the chart) if an aggregate is
selected in the Aggregate Column. Note: when an aggregate is first applied to a field in
the Aggregate Column the space in the Aggregate Label column for text will remain
grayed out until the pivot grid model is saved, exited and then returned to.
• Field Format
o Denotes the field type from the query data source.
• Column Type
o Used to determine if the field will be used as an Axis, Value or Display.
• Total

Page | 25
o Allows the field to be used to "total by". For example, total by Admit Type.
• Aggregate
o Used to apply an aggregate value on fields. Aggregates available are:
Average
Count
Count Distinct
Maximum
Minimum
None
Sum
• Total Name
o Allows the developer to choose a distinct name for a field when totaled if it has been
selected to "total by" in the Total Column.
• Editable Facet (Only Fluid)
o Will not display if Classic Mode is selected in Pivot Grid Viewer. Fields set as "Display"
can not be set as an editable facet. If a field is selected as an Editable Facet it will display
in the Prompts section of the left panel in fluid view of Pivot Grid Viewer. It will behave
as a prompt as well though there is no lookup list associated with it. Since there is no
lookup list end users can put in an incorrect value which will not return any
results. Note: Security is not applied to user specific values so be careful which fields are
selected as editable facets.
Next we will look at each of these columns in more detail and show how they will display in
Pivot Grid Viewer.
Data Source Columns
The Data Source Columns are the fields from the data source query that were selected for use in
the pivot grid during Step 2 of the wizard. How they display in Pivot Grid Viewer is entirely
reliant upon how they are selected to be used. Those fields selected as Values will be used to
measure the data for example.

Page | 26
Column Label
• This will override the heading text from the query. In this example, the heading texts from
the query are ID and Appl Meth which were updated in the Column Label to display as
Student ID and Application Method instead.
When the pivot grid is displayed the text entered in the Column Label will display instead of the
text from the query.

Page | 27
Aggregate Label
• This is the label that can be applied to a field which has been aggregated. It will override
both the heading text from the query and the Column Label in the chart and grid
results. Note: when an aggregate is first applied to a field in the Aggregate Column the
space in the Aggregate Label column for text will remain grayed out until the pivot grid
model is saved, exited and then returned to. Here, Student ID Count is written in the
Aggregate Label
When the pivot grid is displayed the text displays Student ID Count.

Page | 28
Field Format
• States the format of the field from the query data source such as String, Date or Number.
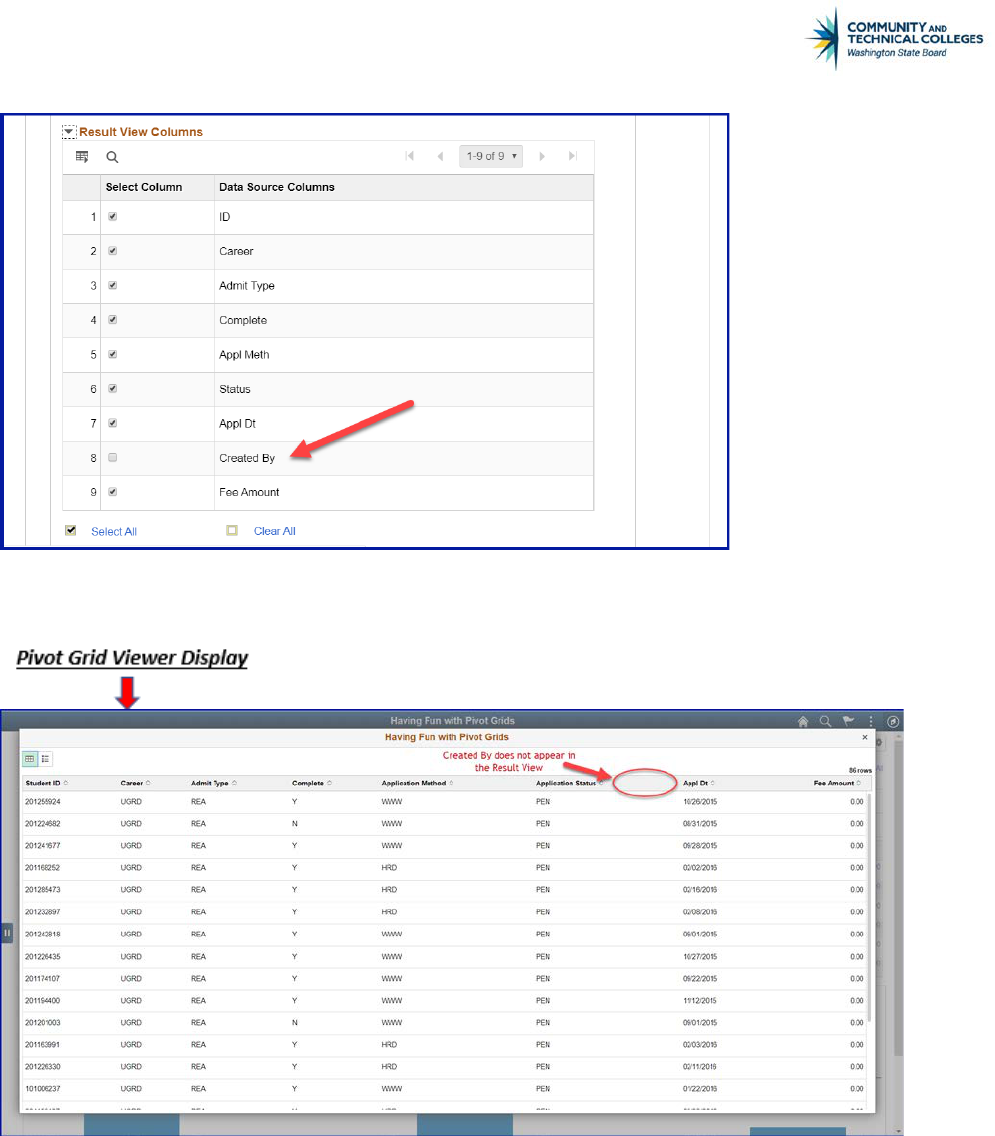
Column Type
• Allows the users to select how to use and/or display the field in the final pivot grid
results. Only fields selected as an Axis or Value will show in Step 4 and be used in the grid,
chart or as a facet. Fields selected as Display will not appear in Step 4 and will only display
in the Detailed View modal window in the pivot grid display. Fields selected as Display do
not display in either the grid, chart or as a facet. There are three options:
AXIS
An attribute that qualifies a value. Allows the field to be used as a facet in the pivot
grid results. Can be dragged and dropped, used as a filter, totaled, etc. One of the
axis column types will be selected as the X axis for the chart (which will be the row in
the grid or detail view). The other fields selected as an axis type will become the
pivot grid facets (filters) or editable facets (prompts).


Page | 30
VALUE
The metric used to make business decisions. Must be a numeric field or an count
aggregation of a non numeric field. One of the value fields will be selected as the Y
axis in the chart (which will be the column in the grid or detail view). It is possible to
have more than one value type field. They can be used as an Overlay or as a Dual Y
Axes.

Page | 31
DISPLAY
The field will not be used in the slicing and dicing of data, however it will display in
the detail view of the chart.
The field will display in either the chart detail view (as shown below) or the grid
detail view. However, it is not a facet which can be used to slice and dice the
data. In our pivot grid, Application Date was selected as Display.

Page | 32
Total
• Checking the total box will allow for a total by the selected field. It opens up the Total Name
column for the developer to establish a different name if totaling by the field. However, it
will only total by one field at a time. In the example below Career, Admit Type, Application
Method and Academic Level have all been checked to total their results.

Page | 33
However, when the pivot grid is rendered with all three selected as a row (or X axis) we see that
the last field selected is the one that is being totaled, in this case Academic Level.
Note: Developers can use the Select All or Clear All hyperlinks to either select or clear all of the
total checkboxes next to every Axis Column Type field.

Page | 34
Aggregate
• The aggregate column allows for users to select how to place an aggregate on a field with a
Value Column Type. It works in conjunction with the Aggregate Label column for the
heading text of the aggregated field. If the field has a format of string the only option that
will work is Count or Count Distinct. The other options will display but it will always
automatically revert back to count. Number fields can be aggregated by:
o Average
o Count
o Count Distinct
o Maximum
o Minimum
o None
o Sum


Page | 37
Editable Facet (Only Fluid)
If the field in this column is checked the field will appear and act as a prompt in the prompts
section of Pivot Grid Viewer where they can not be used to slice and dice the data instead of as
a facet filter . Only Axis and Value Column Types may be checked as Editable Facet, not Display
Column Types. If the Column Type is Value the field may not be selected as the Y Axis (or Dual
Y Axis) in Step 4 or it will not display as a prompt. The fields that have been checked as an
Editable Facet will display under the Prompts area of the rendered model in Pivot Grid Viewer
when the More Options hyperlink is clicked. Once the More Option hyperlink is opened users
will be able to select a hyperlink to Show or Hide Operators allowing for the selection of the
logical operator.
In the screenshot below we see that we have selected Admit Type, Application Method and
Academic Level as Editable Facets. In this example Admit Type has also been selected as the X
Axis (we will see this in Step 4) Since it is the X Axis, Admit Type will always remain a facet which
can be sliced and diced.

Page | 38
However, since Application Method and Academic Level have not been selected as the X axis
when the grid is rendered, and the More Options hyperlink is opened we see both these fields
as additional prompts. Admit Type, which is the X Axis and so will always display as a filter, and
Career, which was not selected as an Editable Facet, display as facets (filters) in the left panel.

Page | 39
There are a few things to keep in mind with this.
At least one of the prompts in the query must be selected as visible in Step 3
Specify Data Model Values or neither the prompts nor the Editable Facet prompt
will be able to be changed by the end user.
The data entered in the Editable Facet prompt has to be the non translated value
code if the field has a translate value.
There is also no way to add a look up list for the end user.
When the pivot grid is first rendered the default view will not display the
fields selected as an Editable Facet as a facet, but only as an additional
prompt.
However, we will learn later in this course how to update the filters in
the rendered pivot grid to select any of the fields chosen as an Axis
Column Type as a facet. This means that we will still be able to use
these fields to slice and dice data regardless of the default view.

Page | 40
Configure Visible Prompts
Select Query Prompt Values and Configure Visible Prompts
In this area of the Specify Data Model Values page the query developer will determine the
default values for any prompts in the query as well as decide whether an end user will be able to
update the prompts with different values. Remember that at least one of the prompts in the
query must be selected as visible in Step 3 Specify Data Model Values or any editable facet
prompts will not be visible to the end user either.
Since no visible prompts were selected no prompts or editable facets display in the left panel.

Page | 41
Pivot Grid Wizard - Step 4
Step 4 offers a plethora of options. There are display options, options on how the end user will
be able to interact with the pivot grid, options how the grid will be set up. This step can be
confusing just because of the sheer amount of available choices. Here we will again break down
each choice with how it is set up in Pivot Grid Wizard and how it will display in Pivot Grid
Viewer.
Specify Data Model Options


Page | 43
View Options
The View Options tab has two very important sections: selecting the Default View and Specify
Axis Information. The default view will determine how the data will be displayed and the axis
information will determine which fields are used for the X and Y axis and which fields are used
for filters.
Note: only fields selected as a Value or Axis in step 3 will display in the Specify Axis Information
box.
Default View
The default view can be:
• Pivot Grid Only
• Chart Only
• Pivot Grid and Chart


Page | 45
DETAILED VIEW
Clicking on the hyperlinked Value total to the right of the desired field will show a modal
window with the detailed view of the first 100 rows of data with a display very similar to a query
result set.
Note: the detailed view is where fields selected as Display in Step 3 will appear. In our example,
Application Date was selected as Display in Step 3 and while it does not display in the grid or as
a facet it does display in the detailed results as shown below.


Page | 48
DETAILED VIEW
Clicking on a particular area of the graph will display the detailed view for that area. For
example, clicking on the graphical representation for International Students we see that this part
of the pie is now outlined to show that it has been selected and the number of rows of detailed
information is 10.
Pivot Grid and Chart
The Pivot Grid and Chart view will display both the chart and the pivot grid with the grid being
at the top of the page and the chart at the bottom.


Page | 50
Specify Axis Information
There are 7 columns in the Specify Axis Information box:
• Data Source Columns
• Field Format
• Grid Axis
• Chart Axis
• Display As
• Dual Y Axis
• Define Threshold
Data Source Columns
These are the fields selected as an Axis or Value column type in Step 3. The name of these fields
comes from the heading text of the field in the data source query.


Page | 52
The Grid Axis and Chart Axis
Remember that pivot grids can display as both a grid and a chart. The Grid Axis column allows
the developer to select options related to the grid while the Chart Axis column allows for
selecting options related to the chart. Note: fields that were selected as Display in Step 3 will not
appear in Step 4 as they will only display in the Detailed View in Pivot Grid Viewer.
The Grid Axis has the following three options on how to use the field within the pivot grid
model:
Column - Will display as a column in the grid portion of the model.
Row - Will display as a row in the grid portion of the model.
Filter - Will display in the left panel as an option to slice and dice the data.
The Chart Axis options depend on the selection for the Grid Axis.
Grid Axis Selection of Column
When Column is selected in the Grid Axis the Chart Axis options are:
Y Axis
Overlay
Filter
SINGLE COLUMN/Y AXIS


Page | 55
The Two Column/Y Axes fields will simply display their totals on the same Y Axis on the left side
of the graph IF Chart Only Default Display has been selected.
If the Chart Only Default View was not selected both fields will display as Columns in the grid
section. If the Default View Pivot Grid and Chart was selected however, only the first field will
display on the Y Axis as shown below.

Page | 56
COLUMN/Y AXIS AND COLUMN OVERLAY
The Column/Overlay will display only if the Default View Chart Only was selected in Step 3. The
overlay will be on the same Y Axis as the Column/Axis field.
If two fields were selected as Column/Y Axis and Column/Overlay, Pivot Grid Viewer will display
the field selected as Column/Y Axis as the Y Axis in the chart section and the field selected as
Column/Overlay as the Overlay IF the Default View Chart Only was selected. No other default
views will display the overlay.

Page | 57
If the Chart Only Default View was not selected both fields will display as Columns in the grid
section. If the Default View Pivot Grid and Chart was selected however, only the first field will
display on the Y Axis as shown below.
Grid Axis Selection of Row
When Row is selected in the Grid Axis then the Chart Axis options are:
X Axis

Page | 58
Series
ROW/X AXIS
When the Grid Axis selection of Row and the Chart Axis selection of X Axis is made Pivot Grid
Viewer will display the selected field as a row in the grid and the X Axis in the chart.
ROW/X AXIS/SERIES
Once one field has been selected as the X Axis, another field may be chosen as a Series in the
chart.


Page | 60
If any other Default View is selected both fields selected will display as rows in the Grid but only
the first will display as the X Axis in the Chart.
Grid Axis Selection of Filter
When Filter is selected in the Grid Axis then the Chart Axis option is:
Filter
Note that the list shows X Axis and Series however, if selected as a Chart
Axis the Grid Axis will change to match the selection in the Chart Axis.
FILTER/FILTER


Page | 63
Display As
This column allows the developer to display the value as a percentage or as a percentage of
total. It will only display for fields selected as Value in Step 3.
Pivot Grid Viewer will display the chart and grid as selected. In the example below it is displayed
as percentage of grand total.

Page | 64
Dual Y Axis
Allows for a secondary Y Axis to be used; each on their own axis.
o Only available for the Default View of Chart Only and for columns that are set to a Chart
Axis type of Y Axis.
o Only one additional column can be used as a Dual Y Axis
o If a Dual Y Axis is selected, Series or other axis values can't be used in the chart.

Page | 65
By selecting two fields to be a Y Axis and then selecting one of those fields to be a Dual Y
instead of acting as an overlay where both fields share the same axis, one field will be the left Y
Axis and the other will be the right Y Axis in the Pivot Grid Viewer display. Both axes will only
display if the Chart Only Default View is selected. If any other Default View is selected only the
first Y Axis will display in the chart.

Page | 66
Define Threshold
Allows for a threshold line or range to display. A threshold can only be set on Value fields and
will not display if an Overlay or Dual Y Axis is used, however it will display if a Series is selected
on the X Axis.
There are two Threshold Types that can be selected.
Distinct
Range
DISTINCT THRESHOLD

Page | 67
If Distinct is selected the query developer can enter in a single number which will be the
threshold marker which will display in both the grid and the chart in Pivot Grid
Viewer. Additionally, the query developer can choose the color of the threshold line as well as a
description which will display when the mouse is hovered over the threshold line in Pivot Grid
Viewer.

Page | 68
RANGE THRESHOLD
If Range is selected the query developer can enter in a range which will be the threshold marker
which will display in both the grid and the chart in Pivot Grid Viewer. Additionally, the query
developer can choose the color of the threshold line as well as a description which will display
when the mouse is hovered over the threshold line in Pivot Grid Viewer.


Page | 71
These two options work together to allow the grid portion of the pivot grid to have the option
to collapse or expand and to be expanded automatically when initially viewed in Pivot Grid
Viewer.
NO DRAG AND DROP
If No Drag and Drop is selected the end user will not have the option to drag and drop facets to
change the pivot grid. The pivot grid Column and Row area, as shown below, will not display
which means that only the rows and columns selected by the developer will display.

Page | 72
No Drag and Drop will only affect the model display if the developer has selected a Default View
which includes grid. If Chart Only is selected this setting will have no effect.
If No Drag and Drop is not selected then the facets in the left hand panel will appear in Pivot
Grid Viewer with a drag and drop icon in their upper right corner that allow end users to use
these facets to slice and dice the data.
If No Drag and Drop has been selected and Chart Only is not the Default View then the drag
and drop icons will not appear in Pivot Grid Viewer so the data may not be sliced and diced.


Page | 75
Chart Options
Title
Type
X-Axis Label
Y-Axis Label
TITLE
The Title selected in the Chart Options section will overwrite the title for the chart only. Below
we see the overall title of the pivot grid model remains the same while the chart title has been
updated based on the Chart Options title.
"Fun with the X Axis" is the original title of both the pivot grid and the chart however in Chart
Options we selected "Fun with the XYZ Axis" as the chart title.

Page | 76
TYPE
The type of chart that can be selected can depend on whether a series, dual Y or overlay has
been selected. However, many of the standard types of charts are available. They are:
2D Bar Chart
2D Histogram Chart
2D Horizontal Bar Chart
2D Horizontal Percent Chart
2D Line Chart
2D Percent Bar Chart
2D Pie Chart
2D Stacked Bar Chart
2D Stacked Horizontal Bar
3D Bar Chart
3D Percent Bar Chart
3D Pie Chart
3D Stacked Bar Chart
Bubble Chart
Scatter Chart

Page | 77
X - AXIS AND Y- AXIS LABEL
The X-Axis and Y-Axis labels will override the Column Label selected in Select Data Source
Information in Step 3.
The labels previously selected or that come from the query if no label is selected in Step 3 are
overwritten and the new labels selected in Chart Options now display.

Page | 78
Advanced Chart Options
The Advanced Chart Options subset allow the developer to select additional display options for
the chart.
o Legend - select a legend for the chart
Available options are:
bottom
left
none
right
top
o Height - select a specific height for the chart
o Width - select a specific width for the chart
o Subtitle - add a subtitle to the chart
o Footer - add a footer to the chart
o Y-Axis Precision - enter the number of decimal places for Y Axis values
o Exploded Pie - only available for pie charts.
LEGEND
Will display a legend for the chart in Pivot Grid Viewer in the area selected by the query
developer if Chart Only is selected as the Default View.


Page | 86
View Grid
The View Grid checkbox allows the end user to view the Grid even if the Chart Only Default View
has been selected. Within the Options Menu in Pivot Grid Viewer an option of View Grid will
appear if the checkbox has been selected. If the checkbox is not selected or any other Default
View has been chosen, the option will not appear in the Options Menu in Pivot Grid Viewer.
When selected a modal window (pop up window) will appear displaying the Grid.

Page | 87
The modal window has many of the same options as the fluid view, such as prompts and facet
values to slice, dice and analyze the data. If the Apply button in the top right of the modal is
clicked the end user goes back to the chart view but it will be refreshed based on the selections
made in the modal window. Otherwise, if the Cancel button in the top left of the modal window
is clicked, the modal window closes the chart layout is not changed.
Page | 88
Export Data
Select to export the underlying data to Excel.
Chart Options
If checked then end users can change the chart layout, chart axis, and filters. If the checkbox is
not selected the option will not appear in the Options Menu in Pivot Grid Viewer. This option
will also not display if the Pivot Grid Only Default View has been selected.


Page | 91
Reset
If a model has been personalized the user is able to select to reset the pivot grid model to its
original display. If the model has not been personalized this option will not show in the Menu
Options of Pivot Grid Viewer.
Save
Allows the end user to save the current model layout as a default view of the current model. The
model layout, filter values, and prompt values are also saved as preferences.

Page | 92
Bar Chart/Line Chart/Pie Chart/Horizontal Bar Chart
This is the only display option that is part of the chart itself and not part of the Options Menu in
Pivot Grid Viewer. If checked the end user will have the option to change the chart display in
Pivot Grid Viewer. If one type is de-selected that chart type will not be an available selection for
the end user in Pivot Grid Viewer.


Page | 94
Show Help
Displays the help icon on the pivot grid model in Classic Mode Pivot Grid Viewer. Does not
affect Fluid Mode view. If checked the Help Message icon will appear in Pivot Grid Wizard when
displayed in Classic Mode.
Configure message text using PeopleSoft pre-configured Message Set Number and Message
Number. The message description shows when you roll over the Help button. This message will
only display in Classic Mode of Pivot Grid Viewer.

Page | 95
Save As
Select to display the Save As dialog box in Pivot Grid Viewer, which enables end users to save
the changes they have made to the default model as a new and separate model view.
If a separate model view is saved then users have the option to select and open either view of
the model.

Page | 96
Fluid Options
Fluid Options give the developer options that will affect only the fluid view of the pivot grid
model. It is broken down into three sections:
• List View Options
• Viewer Options
• Facet Selection
For the purpose of this course we will review Viewer Options and Facet Selection only. List View
Options will be covered in a later course.
Viewer Options
Viewer Options affect the display of the pivot grid model in Pivot Grid Viewer only when viewed
in fluid mode.

Page | 97
Result View
Result View determines how the Detailed View (or Result View) is displayed. There are 3 options
for how they can display.
• Grid
• List
• Grid and List
We only will be discussing the Grid view in this course as the List View uses List View Options
which will be covered in a later course.

Page | 98
When Grid is the selected Result View the results will display as a grid in Pivot Grid Viewer when
any Detailed View hyperlink is clicked.
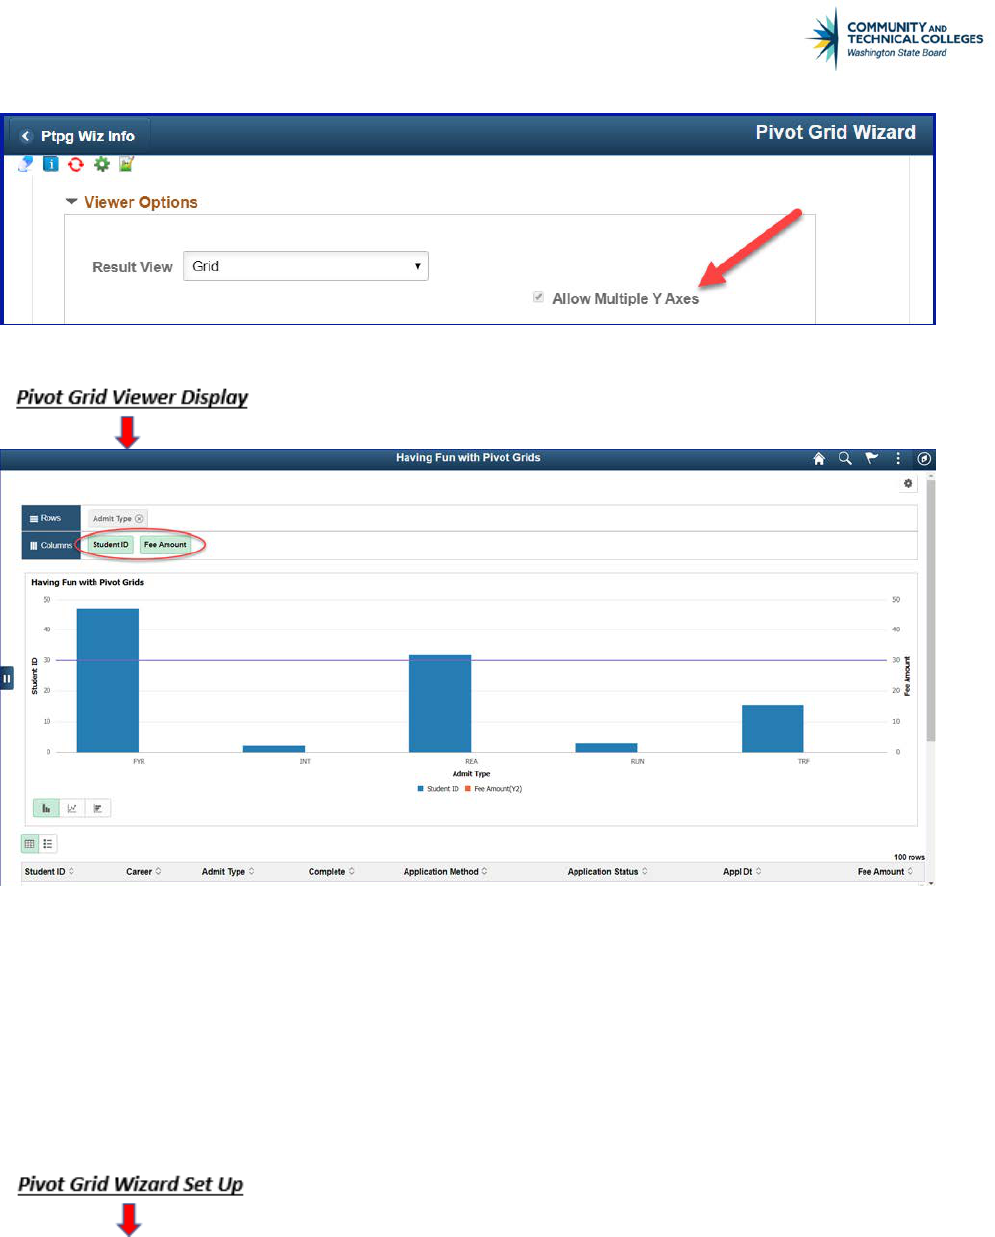
Allow Multiple Y Axis
Select this option to allow users to select multiple Y Axes on the chart. If this option is
deselected, any change to the Y axis will result in a single Y axis being plotted on the chart.

Page | 101
The columns available are:
• Allow Multi-select
• Show as Chart
• Chart Type
• Facets
Allow Multi-select
Gives the developer the option to either allow end users to select multiple facets or only a single
facet in Pivot Grid Viewer.
If the multi-select option is deselected then in Pivot Grid Viewer the end user will only have the
option to select one facet at a time, not the checkbox which allows for multiple facets to be
selected.

Page | 102
Show as Chart/Chart Type
Show as Chart and Chart Type work together to display the facet as a chart in the Left Panel in
Pivot Grid Viewer. Show as Charts allows for the display as a chart and Chart Type is where the
developer selects the type of chart which will display.
If setup then the facet will display as a chart in the Left Panel in Pivot Grid Viewer.


Page | 104
Pivot Grid Wizard - Step 5
Pivot Grid Display
The pivot grid model will display in classic mode in Step 5.
Step 5 of the Pivot Grid Wizard allows the developer to ensure that the model will display as
intended. It also allows the developer to make any final design changes to the chart and save
them. Step 5 also allows for the developer to Save As so the developer can save the model in a
different view which we will see a bit further on.
Note: a pivot grid model can be saved at any of the five steps during creation so the entire
model does not have to be designed at one time.
If the grid and/or chart does not display then the developer will need to go back and ensure
that the query used meets all of the requirements for use with pivot grid and/or that the model
has been set up correctly.
It is necessary to note that if the developer wants to really get into the weeds with the pivot grid
and test out ALL grid functionality - Pivot Grid Viewer is the place to do it. Step 5 of the Pivot
Grid Wizard does not give the developer access to all capabilities of the grid. In fact, it is quite
limited.

Page | 105
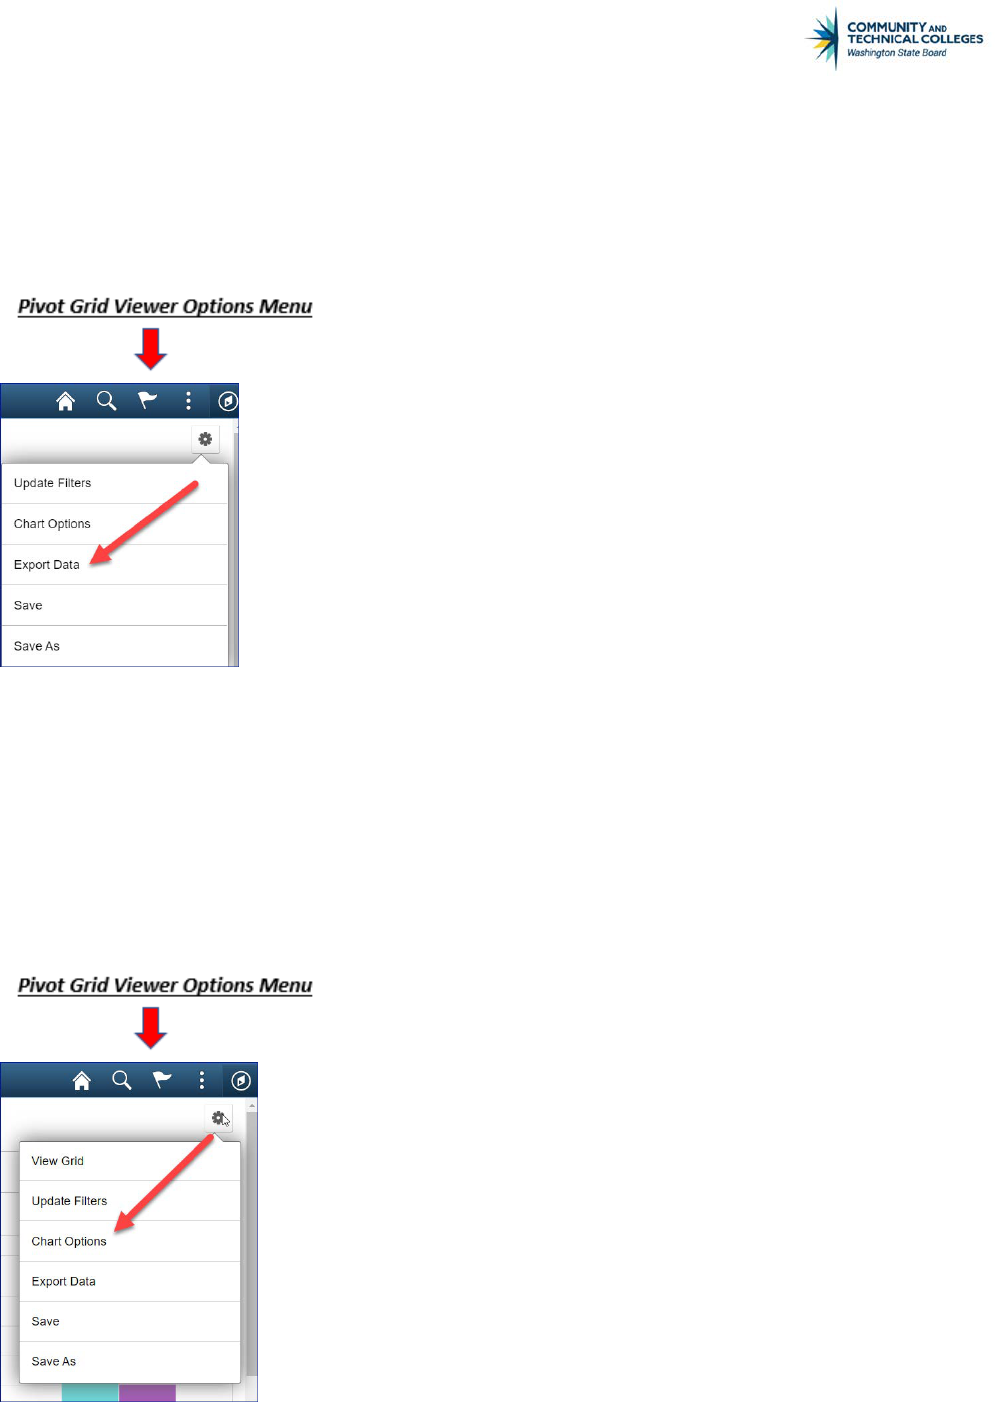
Options Menu
Use the Option Menu icon to select the actions for viewing the Pivot Grid model.
• Export Data: Select to export the underlying data to Microsoft Excel.
• Chart Option: Select to open the Options Menu (the same menu that appears to the end
user in Pivot Grid Viewer where changes to the chart can be made), where developers can
change the chart layout, chart axes, and filters.

Page | 106
Note: If the Default View is Chart Only or Pivot Grid and Chart, the available options are Export
Data and Chart Option. If the Default View is Pivot Grid Only the only option is Export Data.
The options Prompts, Reset, Save, View Grid, Display Chart, and Hide Chart are not available
in the Pivot Grid Wizard because these options are viewer-only options.
Help Icon
Click the Help icon to display the Help - Pivot Grid dialog box, where help information that may
have been defined for all actions for this Pivot Grid model can be viewed.

Page | 107
Expand All and Collapse All
The Expand All or Collapse All link appears when the Pivot Grid model contains totaled
values. These links are not available for the Pivot Grid models that have no totals defined.
• Click the Expand All link to expand all the positions on the grid row and column;
the Collapse All link appears.
• Click the Collapse All link to collapse all the positions on the grid row and column;
the Expand All link appears.


Page | 109
Configure Related Content
Click to access the Assign Related Actions page, where services to be used as Related Actions
can be assigned, select the service target to determine where the service will be displayed, and
define the parameter mappings and options for the service.
Note: The Configure Related Content link is available only after the Pivot Grid model has been
saved.

Page | 110
Publish as Pagelet
Click to access the Review Pagelets dialog box, where users can view a list of pagelets that are
using the current Pivot Grid model and where they can create a home page and template to use
the Pivot Grid pagelets without having to navigate to the pagelet wizard.
Developers can also add new, delete, or update existing pagelets that are based on the specific
Pivot Grid model.
The pivot grid must first be saved before being able to publish as a pagelet.
This topic will be covered in more depth in upcoming pivot grid courses.
Page | 111
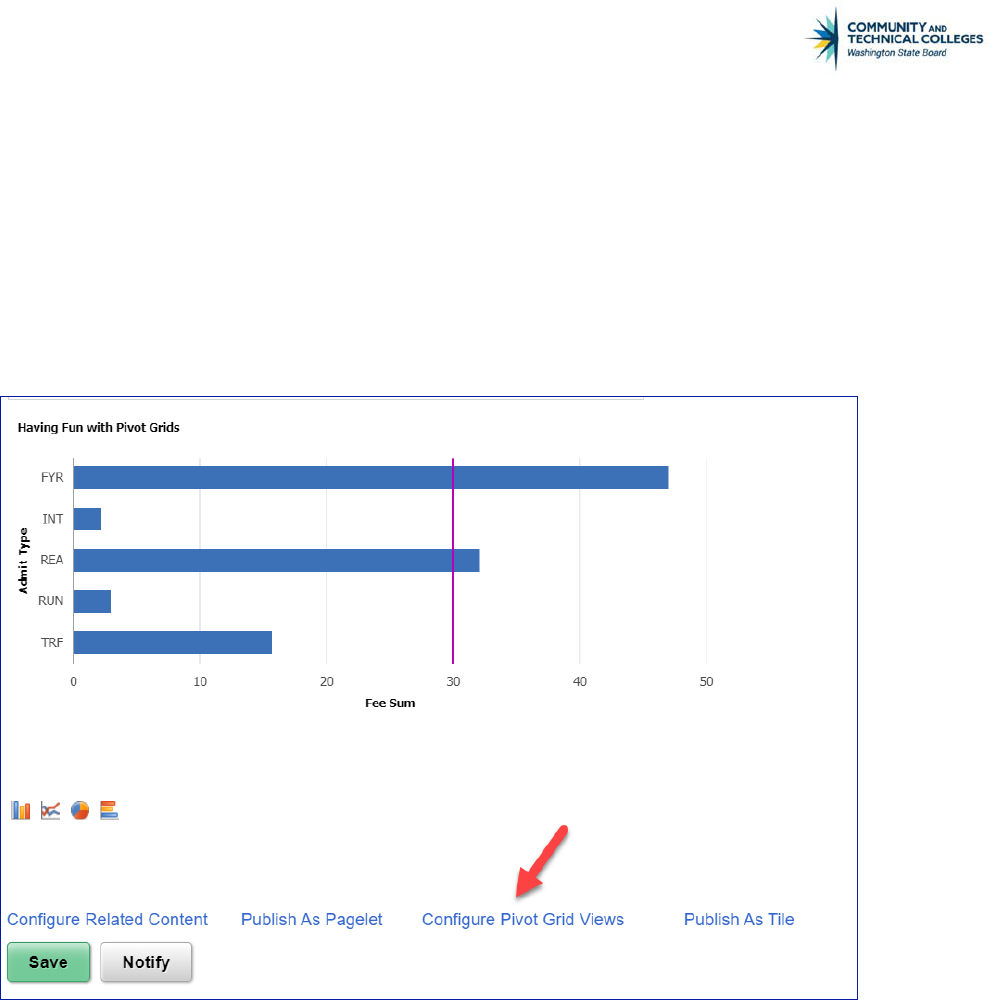
Configure Pivot Grid View
Click to access the Pivot Grid Views Component dialog box. This allows the developer to use the
model just created as a basis for different views of that same model. Users can create or edit
existing views here. For example, if a particular person wants to see the data in a chart only
format and save a particular college code for their view they can do so here. The pivot grid must
first be saved before being able to configure the pivot grid view.

Page | 112
To save a model view click on the hyperlink Configure Pivot Grid View at the bottom of the
page. A pop up window will appear where the developer can make changes to the setup and
display for the specific view they would like to create.
Once Save As is clicked on the developer can name the new view and add a description.


Page | 115
Submit a Pivot Grid Migration Request
To submit a pivot grid migration request follow the steps below:
• Log in into SBCTC Service Desk
• If not prompted into the Request screen, click in the “Request” icon.
• On Request Type select “ERP Support”, this will bring a second drop-down list.
• Select “Data & Reporting”, this will bring a third drop-down list.
• Select “Migration Request”.
• Fill in the “Subject” field.
• Describe the request with as much detail as possible.
• Choose the PeopleSoft Pillar from the drop-down list.
• From the “Instructions” field, click on the link “Pivot Grid Migration Request Form” to open
the form.
• Click “Enable Editing” button and completely fill out the form

Page | 116
• Source Environment is normally PCD
• Target Environment is normally PRD
• Fill out the Pivot Grid Migration Request form completely.
• Click “Save As” to save the form the users’ PC (the completed form needs to be attached in
the Migration Request)
The Next step is to attach the Pivot Grid Migration Request Form to the Migration Request:
• Click “Add File” button
• Click “Browse” to find the file
• Once found click “Open”
• Click “Upload”, once done the file name should be seen below the “Add File” button
• Location stays as SBCTC.
• Finally click “Save”
The Pivot Grid Migration Request form is used by Data Services and helps ensure that the Query
Developer has reviewed their query for compliance and performance before submitting for
migration. This form can also be used as a guide during development work to make sure the
standards described in this course are being adhered to.
