
PeopleTools 8.58: Pivot Grid
May 2020

PeopleTools 8.58: Pivot Grid
Copyright
©
1988, 2020, Oracle and/or its affiliates.
This software and related documentation are provided under a license agreement containing restrictions on use and
disclosure and are protected by intellectual property laws. Except as expressly permitted in your license agreement
or allowed by law, you may not use, copy, reproduce, translate, broadcast, modify, license, transmit, distribute,
exhibit, perform, publish, or display any part, in any form, or by any means. Reverse engineering, disassembly, or
decompilation of this software, unless required by law for interoperability, is prohibited.
The information contained herein is subject to change without notice and is not warranted to be error-free. If you
find any errors, please report them to us in writing.
If this is software or related documentation that is delivered to the U.S. Government or anyone licensing it on behalf
of the U.S. Government, then the following notice is applicable:
U.S. GOVERNMENT END USERS: Oracle programs (including any operating system, integrated software,
any programs embedded, installed or activated on delivered hardware, and modifications of such programs) and
Oracle computer documentation or other Oracle data delivered to or accessed by U.S. Government end users are
"commercial computer software" or “commercial computer software documentation” pursuant to the applicable
Federal Acquisition Regulation and agency-specific supplemental regulations. As such, the use, reproduction,
duplication, release, display, disclosure, modification, preparation of derivative works, and/or adaptation of i) Oracle
programs (including any operating system, integrated software, any programs embedded, installed or activated
on delivered hardware, and modifications of such programs), ii) Oracle computer documentation and/or iii) other
Oracle data, is subject to the rights and limitations specified in the license contained in the applicable contract. The
terms governing the U.S. Government’s use of Oracle cloud services are defined by the applicable contract for such
services. No other rights are granted to the U.S. Government.
This software or hardware is developed for general use in a variety of information management applications. It is
not developed or intended for use in any inherently dangerous applications, including applications that may create a
risk of personal injury. If you use this software or hardware in dangerous applications, then you shall be responsible
to take all appropriate fail-safe, backup, redundancy, and other measures to ensure its safe use. Oracle Corporation
and its affiliates disclaim any liability for any damages caused by use of this software or hardware in dangerous
applications.
Oracle and Java are registered trademarks of Oracle and/or its affiliates. Other names may be trademarks of their
respective owners.
Intel and Intel Inside are trademarks or registered trademarks of Intel Corporation. All SPARC trademarks are used
under license and are trademarks or registered trademarks of SPARC International, Inc. AMD, Epyc, and the AMD
logo are trademarks or registered trademarks of Advanced Micro Devices. UNIX is a registered trademark of The
Open Group.
This software or hardware and documentation may provide access to or information about content, products, and
services from third parties. Oracle Corporation and its affiliates are not responsible for and expressly disclaim all
warranties of any kind with respect to third-party content, products, and services unless otherwise set forth in an
applicable agreement between you and Oracle. Oracle Corporation and its affiliates will not be responsible for any
loss, costs, or damages incurred due to your access to or use of third-party content, products, or services, except as
set forth in an applicable agreement between you and Oracle.
The business names used in this documentation are fictitious, and are not intended to identify any real companies
currently or previously in existence.
Documentation Accessibility
For information about Oracle's commitment to accessibility, visit the Oracle Accessibility Program website at http://
www.oracle.com/pls/topic/lookup?ctx=acc&id=docacc.
Access to Oracle Support
Oracle customers that have purchased support have access to electronic support through My Oracle Support. For
information, visit http://www.oracle.com/pls/topic/lookup?ctx=acc&id=info or visit http://www.oracle.com/pls/
topic/lookup?ctx=acc&id=trs if you are hearing impaired.
Contents
Preface: Preface...........................................................................................................................................ix
Understanding the PeopleSoft Online Help and PeopleBooks............................................................. ix
Hosted PeopleSoft Online Help......................................................................................................ix
Locally Installed Help..................................................................................................................... ix
Downloadable PeopleBook PDF Files............................................................................................ix
Common Help Documentation........................................................................................................ix
Field and Control Definitions.......................................................................................................... x
Typographical Conventions.............................................................................................................. x
ISO Country and Currency Codes................................................................................................... x
Region and Industry Identifiers...................................................................................................... xi
Translations and Embedded Help................................................................................................... xi
Using and Managing the PeopleSoft Online Help...............................................................................xii
PeopleTools Related Links................................................................................................................... xii
Contact Us.............................................................................................................................................xii
Follow Us..............................................................................................................................................xii
Chapter 1: Getting Started with PeopleSoft Pivot Grid........................................................................15
PeopleSoft Pivot Grid Overview.......................................................................................................... 15
PeopleSoft Pivot Grid Implementation.................................................................................................15
Chapter 2: Understanding PeopleSoft Pivot Grid..................................................................................17
Pivot Grid Terms...................................................................................................................................17
High-Level Overview and Flow Diagram for PeopleSoft Pivot Grid..................................................19
Pivot Grid Components........................................................................................................................ 22
Pivot Grid Data Source Engine Component..................................................................................23
Pivot Grid User Interface Component........................................................................................... 23
Grid-Display Component............................................................................................................... 24
Chart-Display Component..............................................................................................................26
Pivot Grid Security............................................................................................................................... 28
Pivot Grid Administrator Role.......................................................................................................28
Pivot Grid Super User Role........................................................................................................... 28
Pivot Grid End User Role..............................................................................................................29
Data Masking in Pivot Grid................................................................................................................. 29
Data Synchronization Between the Grid and the Chart....................................................................... 31
Limitations of Charts and Grids...........................................................................................................33
Pivot Grid Chart Limitations......................................................................................................... 33
Pivot Grid Limitation..................................................................................................................... 33
Displaying Models in Various Form Factors....................................................................................... 34
Chapter 3: Using Query as a Data Source for Pivot Grid.................................................................... 45
Query Design Considerations............................................................................................................... 45
Query Limitation for Pivot Grid.................................................................................................... 45
Composite Query Design Considerations.............................................................................................49
Creating Composite Query Pivot Grid Models Using the Pivot Grid Wizard..................................... 49
Creating Pivot Grid Models Using Query Manager............................................................................ 51
Using Query Drilling URLs in Pivot Grid Models..............................................................................57
Viewing Component Drilling URLs.............................................................................................. 58
Drilling URLs in the Fluid View...................................................................................................62
Chapter 4: Creating Pivot Grid Models..................................................................................................65
Copyright
©
1988, 2020, Oracle and/or its affiliates. iii
Contents
Pivot Grid Wizard Overview................................................................................................................65
Specifying Pivot Grid Properties..........................................................................................................66
Selecting a Data Source........................................................................................................................68
Specifying Data Model Values............................................................................................................. 69
General Options..............................................................................................................................69
Selecting Query Prompt Values..................................................................................................... 71
Tree Options................................................................................................................................... 73
Formatting Options.........................................................................................................................74
Specifying Data Model Options........................................................................................................... 77
View Options.................................................................................................................................. 77
Grid Options................................................................................................................................... 80
Chart Options..................................................................................................................................80
Display Options.............................................................................................................................. 82
Fluid Mode Options....................................................................................................................... 85
Viewing Pivot Grid Displays................................................................................................................90
Configuring the Related Actions Menu................................................................................................93
Configuring Related Actions From Pivot Grid Wizard................................................................. 94
Configuring Bulk Related Actions.................................................................................................97
Publishing Pivot Grid Fluid Views as Tiles.........................................................................................98
Setting the Limit of the Pivot Grid Result Rows...............................................................................101
Setting the Format of Date Fields...................................................................................................... 102
Chapter 5: Working with Pivot Grid Wizard Features.......................................................................105
Configuring Thresholds...................................................................................................................... 105
Configuring Thresholds for Individual Data Points.....................................................................108
Configuring Thresholds for a Dual Y-Axis................................................................................. 110
Setting Notification Frequency for Thresholds............................................................................110
Personalizing Thresholds..............................................................................................................110
Displaying Thresholds in Pivot Grid Views................................................................................ 111
Configuring Facets and Filters........................................................................................................... 113
Understanding Filters................................................................................................................... 113
Creating Editable Facets...............................................................................................................115
Attaching Editable Facets to URLs............................................................................................. 116
Displaying Operators on Editable Facets.....................................................................................117
Configuring Facets as Mini Charts.............................................................................................. 119
Attaching PeopleSoft Trees to Dimensions........................................................................................121
Optimizing Trees.................................................................................................................................125
Understanding Tree Manager and Pivot Grid..............................................................................125
Updating Tree Selector Table Statistics....................................................................................... 126
Using Indexes............................................................................................................................... 126
Using Trees...................................................................................................................................126
Using Dynamic Selectors............................................................................................................. 127
Configuring a Series........................................................................................................................... 128
Configuring Overlay........................................................................................................................... 130
Chapter 6: Viewing Pivot Grid Models.................................................................................................133
Pivot Grid Viewer Overview.............................................................................................................. 133
Pivot Grid Viewer Component.....................................................................................................133
Pivot Grid Viewing Options.........................................................................................................134
Viewing Pivot Grid Models Using Pivot Grid Viewer...................................................................... 135
Pivot Grid Viewer Search Page................................................................................................... 135
Chart Only.................................................................................................................................... 137
Pivot Grid Only............................................................................................................................ 138
iv Copyright
©
1988, 2020, Oracle and/or its affiliates.
Contents
Pivot Grid and Chart.................................................................................................................... 139
Describing Features of the Classic Pivot Grid Viewer................................................................ 139
Performing Actions on the Pivot Grid Viewer...................................................................................141
Performing Drill-Down on a Grid............................................................................................... 141
Performing Drill-Down on Aggregate Values on the Grid.......................................................... 142
Performing Drill-Down on the Chart...........................................................................................144
Moving the Report Filter to the Axis.......................................................................................... 145
Changing the Level of Dimensions............................................................................................. 148
Moving Dimensions in the Grid.................................................................................................. 149
Moving an Axis to the Report Filter........................................................................................... 151
Filtering Data on the Viewer........................................................................................................151
Performing Actions on the Pivot Grid Fluid View............................................................................ 151
Actionable Grid Fact Data Point..................................................................................................153
Dragging Filters to Column or Row Regions..............................................................................153
Dragging Axis Between Column and Row Regions................................................................... 153
Changing the Axis Level............................................................................................................. 154
Expanding or Collapsing Nodes in a Grid...................................................................................156
Using Related Actions from a Data Point................................................................................... 157
Performing Actions on the Chart Fluid View.................................................................................... 158
Using the Actionable Chart Data Points......................................................................................158
Using Drag and Drop on the Chart............................................................................................. 161
Describing the Detailed View of the Chart..................................................................................161
Describing the Detailed View on a Modal Window....................................................................163
Using Facets in the Fluid View..........................................................................................................164
Single-Select Facet....................................................................................................................... 165
Multi-Select Facet.........................................................................................................................166
Mini Chart Facet.......................................................................................................................... 168
Using Prompts in the Fluid View.......................................................................................................168
Viewing Related Actions from the Fluid View..................................................................................172
Related Actions on Chart View................................................................................................... 173
Related Actions on Pivot Grid View........................................................................................... 175
Using the Options Menu.....................................................................................................................175
Describing the Options Menu...................................................................................................... 176
Sorting Data in the Pivot Grid Fluid View........................................................................................ 179
Sorting in Detailed View..............................................................................................................180
Sorting in Facets or Filters...........................................................................................................181
Sorting in Chart............................................................................................................................ 183
Sorting from Options Menu......................................................................................................... 183
Using the User Charting Options....................................................................................................... 184
Chapter 7: Using Component Real-Time Search................................................................................. 187
Understanding Component Real Time Search................................................................................... 187
Setting the Fluid Component Real Time Search......................................................................... 187
Security for Real Time Component Search................................................................................. 188
Creating a Component Pivot Grid Model Using the Pivot Grid Wizard............................................189
Viewing the Results of the Component Real Time Search................................................................ 192
Chapter 8: Working With Pivot Grid Models in Application Pages..................................................195
Understanding Personalized Analytics Notification...........................................................................195
Understanding Pivot Grid Fluid Subpages in Application Pages.......................................................195
Including Pivot Grid Fluid Subpages in Application Pages...............................................................196
Including Chart Only View and Search Options on the Application Page.................................. 197
Including Chart, Facets, and Locator Links on the Application Page......................................... 200
Copyright
©
1988, 2020, Oracle and/or its affiliates. v
Contents
Including Chart, Detail View Results, and Filters on the Application Page................................ 202
Including Pivot Grid and Chart View on the Application Page.................................................. 205
Including Pivot Grid Only View on the Application Page.......................................................... 207
Including Detail View Results with Facets on the Application Page.......................................... 208
Enabling the Options Menu......................................................................................................... 210
Listing the Limitations in Pivot Grid Fluid Subpages....................................................................... 210
Chapter 9: Working with Simplified Analytics.................................................................................... 213
Simplified Analytics Overview...........................................................................................................213
Accessing Simplified Analytics..........................................................................................................213
Accessing from the Unified Related Content Analytics Pane..................................................... 214
Personalizing Unified Related Content Analytics Pane...............................................................215
Accessing from the Fluid Homepage...........................................................................................218
Accessing from NavBar............................................................................................................... 220
Accessing from Fluid Dashboard.................................................................................................221
Configuring the Tile Size.............................................................................................................221
Creating Simplified Analytics.............................................................................................................222
Create Analytics-Step 1................................................................................................................222
Create Analytics- Step 2.............................................................................................................. 223
Create Analytics- Step 3.............................................................................................................. 225
Publishing Simplified Analytics......................................................................................................... 227
Editing Simplified Analytics.............................................................................................................. 228
Configuring Simplified Analytics.......................................................................................................230
Creating a Base Template............................................................................................................ 231
Associating the Base Template to a Component Using Related Content Framework................. 235
Modifying the Query Used in a Simplified Analytic Report............................................................. 243
Adding a New Field From an Existing Record in the Query...................................................... 243
Adding a Criteria Involving the Fields and Expressions............................................................. 243
Adding a New Expression to a Criteria or Field......................................................................... 244
Adding an Optional Prompt......................................................................................................... 244
Joining a New Record to the Query............................................................................................ 244
Changing the Join Criteria of the Query Tables.......................................................................... 245
Changing the Field Length or Field Type of Existing Fields...................................................... 246
Adding or Modifying Security Joins........................................................................................... 246
Removing a Join for Non-Referenced Records........................................................................... 246
Changing the Expression Text and Format..................................................................................246
Security Considerations When Using Simplified Analytics...............................................................247
Configuring to Restrict Reports Within the Component Context................................................247
Securing Access to Simplified Analytics Reports and Templates Using Web Services...............249
Masking Data in Simplified Analytics.........................................................................................251
Related Actions for Simplified Analytic Reports...............................................................................251
Using Simplified Analytics in Small Form Factor.............................................................................252
Chapter 10: Pivot Grid Administration................................................................................................ 267
Understanding Pivot Grid Administration..........................................................................................267
Deleting Pivot Grid Models................................................................................................................267
Deleting Non-Default Views...............................................................................................................269
Deleting User Personalization.............................................................................................................270
Exporting and Importing Pivot Grid Models..................................................................................... 271
Copying Pivot Grid Model................................................................................................................. 273
Copying the Fluid Component Between Databases.....................................................................274
Configuring Notification Frequency...................................................................................................274
Chapter 11: Preserving Pivot Grid Configuration and Personalizations...........................................277
vi Copyright
©
1988, 2020, Oracle and/or its affiliates.
Contents
Preserving Pivot Grid Configuration and Personalizations Overview............................................... 277
Terminology.................................................................................................................................. 277
Pivot Grid Customizations........................................................................................................... 278
Pivot Grid Personalizations..........................................................................................................278
Customizations Versus Configurations.........................................................................................278
ADSs Used for Preserving Pivot Grid Configurations and Personalizations...............................279
Merging Configurations, Customizations, and Personalizations Using ADS.................................... 281
Merging Configurations from Customer and Application Update...............................................282
Merging Customer Changes on Delivered Pivot Grid Objects....................................................283
Merging Changes to Merge-able Attributes.................................................................................284
Merging Configurations from Application Development and User Personalizations.................. 284
Merging Changes Dependent on One Another............................................................................285
Appendix A: Creating and Viewing a Pivot Grid Pagelet Using the Pagelet Wizard....................... 287
Pivot Grid Pagelet Overview..............................................................................................................287
Pivot Grid Pagelet Overview....................................................................................................... 287
Pivot Grid as a Subscriber........................................................................................................... 288
Pivot Grid as a Publisher............................................................................................................. 289
Creating a New Pivot Grid Pagelet Using the Pagelet Wizard.......................................................... 290
Specifying Pagelet Information....................................................................................................290
Selecting a Data Source............................................................................................................... 291
Specifying Data Source Parameters............................................................................................. 292
Selecting a Display Format..........................................................................................................299
Specifying Display Options......................................................................................................... 300
Specifying Publishing Options.....................................................................................................301
Viewing a Pivot Grid Homepage Pagelet...........................................................................................303
Copyright
©
1988, 2020, Oracle and/or its affiliates. vii
Contents
viii Copyright
©
1988, 2020, Oracle and/or its affiliates.

Preface
Understanding the PeopleSoft Online Help and PeopleBooks
The PeopleSoft Online Help is a website that enables you to view all help content for PeopleSoft
applications and PeopleTools. The help provides standard navigation and full-text searching, as well as
context-sensitive online help for PeopleSoft users.
Hosted PeopleSoft Online Help
You can access the hosted PeopleSoft Online Help on the Oracle Help Center. The hosted PeopleSoft
Online Help is updated on a regular schedule, ensuring that you have access to the most current
documentation. This reduces the need to view separate documentation posts for application maintenance
on My Oracle Support. The hosted PeopleSoft Online Help is available in English only.
To configure the context-sensitive help for your PeopleSoft applications to use the Oracle Help Center,
see Configuring Context-Sensitive Help Using the Hosted Online Help Website.
Locally Installed Help
If you’re setting up an on-premise PeopleSoft environment, and your organization has firewall restrictions
that prevent you from using the hosted PeopleSoft Online Help, you can install the online help locally.
See Configuring Context-Sensitive Help Using a Locally Installed Online Help Website.
Downloadable PeopleBook PDF Files
You can access downloadable PDF versions of the help content in the traditional PeopleBook format on
the Oracle Help Center. The content in the PeopleBook PDFs is the same as the content in the PeopleSoft
Online Help, but it has a different structure and it does not include the interactive navigation features that
are available in the online help.
Common Help Documentation
Common help documentation contains information that applies to multiple applications. The two main
types of common help are:
• Application Fundamentals
• Using PeopleSoft Applications
Most product families provide a set of application fundamentals help topics that discuss essential
information about the setup and design of your system. This information applies to many or all
applications in the PeopleSoft product family. Whether you are implementing a single application, some
combination of applications within the product family, or the entire product family, you should be familiar
with the contents of the appropriate application fundamentals help. They provide the starting points for
fundamental implementation tasks.
Copyright
©
1988, 2020, Oracle and/or its affiliates. ix

Preface
In addition, the PeopleTools: Applications User's Guide introduces you to the various elements of the
PeopleSoft Pure Internet Architecture. It also explains how to use the navigational hierarchy, components,
and pages to perform basic functions as you navigate through the system. While your application or
implementation may differ, the topics in this user’s guide provide general information about using
PeopleSoft applications.
Field and Control Definitions
PeopleSoft documentation includes definitions for most fields and controls that appear on application
pages. These definitions describe how to use a field or control, where populated values come from, the
effects of selecting certain values, and so on. If a field or control is not defined, then it either requires
no additional explanation or is documented in a common elements section earlier in the documentation.
For example, the Date field rarely requires additional explanation and may not be defined in the
documentation for some pages.
Typographical Conventions
The following table describes the typographical conventions that are used in the online help.
Typographical Convention Description
Key+Key Indicates a key combination action. For example, a plus sign
(+) between keys means that you must hold down the first key
while you press the second key. For Alt+W, hold down the Alt
key while you press the W key.
. . . (ellipses) Indicate that the preceding item or series can be repeated any
number of times in PeopleCode syntax.
{ } (curly braces) Indicate a choice between two options in PeopleCode syntax.
Options are separated by a pipe ( | ).
[ ] (square brackets) Indicate optional items in PeopleCode syntax.
& (ampersand) When placed before a parameter in PeopleCode syntax,
an ampersand indicates that the parameter is an already
instantiated object.
Ampersands also precede all PeopleCode variables.
⇒
This continuation character has been inserted at the end of a
line of code that has been wrapped at the page margin. The
code should be viewed or entered as a single, continuous line
of code without the continuation character.
ISO Country and Currency Codes
PeopleSoft Online Help topics use International Organization for Standardization (ISO) country and
currency codes to identify country-specific information and monetary amounts.
ISO country codes may appear as country identifiers, and ISO currency codes may appear as currency
identifiers in your PeopleSoft documentation. Reference to an ISO country code in your documentation
x Copyright
©
1988, 2020, Oracle and/or its affiliates.
Preface
does not imply that your application includes every ISO country code. The following example is a
country-specific heading: "(FRA) Hiring an Employee."
The PeopleSoft Currency Code table (CURRENCY_CD_TBL) contains sample currency code data. The
Currency Code table is based on ISO Standard 4217, "Codes for the representation of currencies," and
also relies on ISO country codes in the Country table (COUNTRY_TBL). The navigation to the pages
where you maintain currency code and country information depends on which PeopleSoft applications
you are using. To access the pages for maintaining the Currency Code and Country tables, consult the
online help for your applications for more information.
Region and Industry Identifiers
Information that applies only to a specific region or industry is preceded by a standard identifier in
parentheses. This identifier typically appears at the beginning of a section heading, but it may also appear
at the beginning of a note or other text.
Example of a region-specific heading: "(Latin America) Setting Up Depreciation"
Region Identifiers
Regions are identified by the region name. The following region identifiers may appear in the PeopleSoft
Online Help:
• Asia Pacific
• Europe
• Latin America
• North America
Industry Identifiers
Industries are identified by the industry name or by an abbreviation for that industry. The following
industry identifiers may appear in the PeopleSoft Online Help:
• USF (U.S. Federal)
• E&G (Education and Government)
Translations and Embedded Help
PeopleSoft 9.2 software applications include translated embedded help. With the 9.2 release, PeopleSoft
aligns with the other Oracle applications by focusing our translation efforts on embedded help. We
are not planning to translate our traditional online help and PeopleBooks documentation. Instead we
offer very direct translated help at crucial spots within our application through our embedded help
widgets. Additionally, we have a one-to-one mapping of application and help translations, meaning that
the software and embedded help translation footprint is identical—something we were never able to
accomplish in the past.
Copyright
©
1988, 2020, Oracle and/or its affiliates. xi

Preface
Using and Managing the PeopleSoft Online Help
Select About This Help in the left navigation panel on any page in the PeopleSoft Online Help to see
information on the following topics:
• Using the PeopleSoft Online Help
• Managing Hosted online help
• Managing locally installed PeopleSoft Online Help
PeopleTools Related Links
PeopleTools 8.58 Home Page
PeopleTools Elasticsearch Home Page
"PeopleTools Product/Feature PeopleBook Index" (PeopleTools 8.58: Getting Started with PeopleTools)
PeopleSoft Hosted Online Help
PeopleSoft Information Portal
PeopleSoft Spotlight Series
PeopleSoft Training and Certification | Oracle University
My Oracle Support
Oracle Help Center
Contact Us
Send your suggestions to [email protected]. Please include the applications update image or
PeopleTools release that you’re using.
Follow Us
Facebook.
YouTube
Twitter@PeopleSoft_Info.
xii Copyright
©
1988, 2020, Oracle and/or its affiliates.


Chapter 1
Getting Started with PeopleSoft Pivot Grid
PeopleSoft Pivot Grid Overview
PeopleSoft Pivot Grid supports operational dashboard reporting within the PeopleTools framework to
provide a pivot table and chart representation of data using PSQuery, Composite Query, and component
data source. The framework also enables you to see different views of the data, as in a Microsoft Excel
pivot table, and the same data is also available in a chart view.
Using Pivot Grid, you can view data in these different visualizations:
• Pivot Grid only.
You are able to view the operational reporting data in a grid, where data pivoting, slicing, and dicing
is possible.
• Chart only.
You are able to view the operational reporting data in a chart, change the axis, filter the results, drill
down to other dimensions and detail. In addition, you can display the grid from a chart-only view and
then perform various actions—such as pivoting data, dragging and dropping, and slicing and filtering
data—to change the grid layout. After the layout is satisfactory, you can synchronize the chart with
the grid view.
• Pivot Grid and chart.
You are able to view the operational reporting data in both a grid and a chart. The data between the
grid and the chart is synchronized.
PeopleSoft Pivot Grid Implementation
The following table lists the steps involved in implementing pivot grid models.
Step Reference
Create or configure the data source (a query, a composite
query, or a component) to extract the data you want to use for
your pivot data analysis.
See Query Design Considerations, Creating a Component
Pivot Grid Model Using the Pivot Grid Wizard, and Creating
Composite Query Pivot Grid Models Using the Pivot Grid
Wizard.
Create a pivot grid model with default display preferences. See Pivot Grid Wizard Overview.
View pivot grid models. See Pivot Grid Viewer Overview.
Adding Related Actions. See Configuring the Related Actions Menu.
Copyright
©
1988, 2020, Oracle and/or its affiliates. 15


Chapter 2
Understanding PeopleSoft Pivot Grid
Pivot Grid Terms
This topic defines terminology that is specific to Pivot Grid.
Aggregates Aggregate functions include SUM, MIN, MAX, AVG, COUNT,
and DISTINCT COUNT.
Attach Tree Used to attache a PeopleSoft Tree to an axis to display
hierarchical information for that axis.
See, Tree Options.
Axis and Values Axis and Values are at the core of analytical and operational
reporting.
• Axis members are those attributes that qualify Values. They
give structure to Values and they allow different views of the
Values. They are also called Dimensions in a pivot grid.
• Values are the metric that business users use to make
business decisions. Generally, Values are numbers except
when the aggregate function COUNT is used.
For example, in an expense report scenario, incurred expenses
is the Value; whereas attributes such as Employee, Department,
Business Unit, and Expense Type, the expense qualifiers, form
the Axis members.
In a scenario showing Product Sales, Actual Sales, Number of
Units Sold, and Cost of Each Unit, these items could be Values;
whereas attributes such as Region, Product Name, and Date
Range for the sales, the Value qualifiers, would form the Axis
members.
In an organization chart, the Count of Employees could be a
Value, and the axis members could be Departments, Job Codes,
Pay Grade, and so on.
Collapse All A link in the grid title region used to collapse any expanded
positions in the grid row or column for totals.
Configure Pivot Grid Views A link used to create new Pivot Grid views or to edit existing
ones.
Copyright
©
1988, 2020, Oracle and/or its affiliates. 17

Understanding PeopleSoft Pivot Grid Chapter 2
See Defining the Pivot Grid Display Options section in Creating
a New Pivot Grid Pagelet Using the Pagelet Wizard.
Detach Tree Used to remove a PeopleSoft Tree that is attached to an axis.
See, Tree Options.
Drilling URL When you build a query using PeopleSoft Query - Query
Manager, you can define drilling URLs that are associated with
this query. These settings are saved into the database as part of
the metadata for this query. When you run this query, the query
results show the results as URL links, which you can click to
be redirected to either a PeopleSoft Pure Internet Architecture
page, another query result page, or an external page.
See "Understanding Drilling URLs" (PeopleTools 8.58: Query).
Expand All A link in the grid title region used to expand all the dimensions
in the row and column positions for totals.
Facet Similar to multi-select filter, but facet is displayed as a
collection of check boxes instead of a dropdown list, and facet is
applied to Pivot Grids fluid view only.
See, Using Facets in the Fluid View.
Facet as Mini Chart The facet values that appear as a chart instead of a list of values.
You are able to select a data point in the facet chart to filter data.
See, Configuring Facets as Mini Charts.
Fluid Mode The PeopleSoft Fluid User Interface is designed to be a
significant enhancement to the PeopleSoft’s “classic” user
interface, which has been the interface display on browsers for
PeopleSoft end users for well over a decade. The PeopleSoft
Fluid User Interface moves away from pixel-perfect page
layout and provides greater flexibility with the enhanced use
of cascading style sheets (CSS3), HTML5, and JavaScript (if
needed).
Multi Select Filter A dropdown list that enables you to select multiple items to
filter data, which appears in grids and charts.
See Configuring Facets and Filters
Overlay Two charts with the same X axis but different Y axes that are
plotted and then one is superimposed over the other.
See Configuring Overlay.
Pivot A change of the dimensional orientation of a report inside Pivot
Grid.
18 Copyright
©
1988, 2020, Oracle and/or its affiliates.

Chapter 2 Understanding PeopleSoft Pivot Grid
Pivot Grid A Pure Internet Architecture component that provides a
multidimensional presentation of data.
Publish as Tile Application developer can use this link to create the tiles that are
used in the Fluid mode. These tiles are added with chart preview
in fluid landing pages by end-users. They are configured to
point to the Fluid Viewer component for the specific model.
Publish as Pivot Grid A link in PeopleSoft Query - Query Manager used to access
Pivot Grid Wizard. When you use the Publish as Pivot Grid link
to access Pivot Grid Wizard, the wizard appears with the query
definition and data columns populated.
See Creating Pivot Grid Models Using Query Manager.
Report filter Report filter determines the range of values that appears in the
Pivot Grid and the chart. In SQL terms, report filter is similar
to a WHERE clause that limits the data returned. In PeopleSoft
Pivot Grid, report filter presents a slice of data to viewers in
both the chart and the grid.
If the data source uses prompt values, they are automatically
added as filters. You can customize prompt values when
viewing the pivot grid. When you create a Pivot Grid model,
you can select additional columns to use as filters.
Reset Layout An option used to clear all the personalizations and to
reset the Pivot Grid model to the default setting (without
personalization).
Series Chart with two dimensions that qualifies a Fact. For example,
Region can be X-axis and Product can be series-axis to display
the Sum of Sales.
See, Configuring a Series
High-Level Overview and Flow Diagram for PeopleSoft Pivot Grid
PeopleSoft Pivot Grid provides the overall functionality of storing Pivot Grid metadata, generating
data sources at runtime, and rendering displays of the pivot grid and chart. Pivot Grid uses PSQuery,
Composite Query, and component as the data source, with Pivot Grids and PeopleSoft charts as the
visualization options. Pivot Grid can pivot and filter data, which enables business analysts to see different
views of the same data. PeopleSoft charts provide a different visual representation of the same data. If
users select the display option Pivot Grid and Chart, the chart data is always a subset of the data in the
grid, and the synchronization between the grid and the chart is unidirectional only. Users' actions on the
grid change the chart visualization as well.
Copyright
©
1988, 2020, Oracle and/or its affiliates. 19

Understanding PeopleSoft Pivot Grid Chapter 2
Image: High-level flow diagram for PeopleSoft Pivot Grid
This diagram illustrates the high-level flow for PeopleSoft Pivot Grid.
When using Pivot Grid, note that:
• PeopleSoft Pivot Grid supports PSQuery, Composite Query, and component as the data source.
• All user actions on the Pivot Grid grid and the chart are driven through the settings in PSQuery,
Composite Query, and component. No data is cached for viewing. Every user action that requires
fresh data results in a new set of the modifications in PSQuery and Composite Query at runtime, and
the ad hoc set of modified data source is run against the database to fetch data.
20 Copyright
©
1988, 2020, Oracle and/or its affiliates.

Chapter 2 Understanding PeopleSoft Pivot Grid
• Supported aggregate functions—MAX, MIN, COUNT, COUNT DISTINCT, AVG, and SUM—are
computed at the database level, and the results appear in grids and charts. In addition, an All (Total)
attribute can be defined for axis members that calculates subtotals based on the aggregate function
defined for the Values.
Note: Only a single level of subtotal (that is, the innermost level) is supported in PeopleSoft Pivot
Grid.
Image: Example of supporting subtotal for the axis immediately above the innermost Value
If the Values are at the innermost level, then subtotal is also supported for the axis immediately above
the innermost Value level, as shown in this example.
•
If users select the Pivot Grid and Chart display option, then the filtering operation in the grid
(changing the report filter values) filters on the chart as well.
• If an All attribute is defined for the axis members, then a drill-down operation on the grid indicates
the user's action of clicking the + (plus) icon associated with the label.
If users select the Pivot Grid and Chart display option, then the drill-down operation on the grid drills
down on the chart as well.
•
If users select the Chart Only display option, then the drill-down operation for a chart indicates the
user's action of clicking the chart to display a detailed level of data.
• To drill down on the Pivot Grid charts, you must enter an authentication domain either when you set
up the PeopleSoft Pure Internet Architecture or in the Web Profile page.
See the Configuring General Portal Properties section in "Configuring Web Profiles" (PeopleTools
8.58: Portal Technology).
• Pivot Grid supports all PeopleSoft chart types that are related to bar, pie, line, and horizontal charts.
• Pivot Grid assigns one field from the Grid Row Axis to the X axis and one field from the column axis
to the Y axis of the chart. In addition, you can select an overlay field and a data series (to display one
level of drill down) for the chart.
Note: If the display option is Chart Only, you are able to select the series and overlay values for the
charts. If the display option is Pivot Grid and Chart, series values are automatically calculated based
on the grid layout, but overlay is not supported.
For example, a query was built on a record that stores the number of product units sold and product
sales for a set of regions and products by month:
Copyright
©
1988, 2020, Oracle and/or its affiliates. 21

Understanding PeopleSoft Pivot Grid Chapter 2
Unit Cost Product Sales Region (Key) Product (Key) Month (Key) No. of Units
Sold
- - - - - -
If Region were selected on the X axis and Product Sales were selected on the Y axis, then a user could
select No. of Units Sold as an overlay field.
1. If No. of Units Sold were selected as an overlay field, then two separate charts would be plotted,
one chart with Product Sales on the Y axis and the other with No. of Units Sold on the Y axis.
One chart would be superimposed over the other chart. For overlay fields, the supported chart type
is Line Chart.
2. If Product were selected as a data series, then the chart would group the sales for each product for
each region and then plot the data.
• The synchronization between the chart and the grid is unidirectional and is always driven by a user
action on the grid.
• To support unidirectional synchronization between a chart and a grid, which is always driven by an
action performed on the grid, the data in the chart must always be a subset of the data shown in the
grid.
• Logging is available; by enabling the log application, developers or customer developers can analyze
errors or debug any products they build using this technology.
Pivot Grid Components
Pivot Grid has four main components:
• Pivot Grid Data Source Engine component.
This component is the back-end component of Pivot Grid. It provides the necessary framework
support for runtime manipulation and generation of data sources to render the grid and chart display.
This component also provides interfaces that can be used by the Pivot Grid User Interface component,
the Grid-display component, and the Chart-display component to perform the required data source
manipulations for rendering the controls on the Pure Internet Architecture page.
• Pivot Grid User Interface component.
You use this component to create and update Pivot Grid models using the Pivot Grid wizard, to view
the Pivot Grid models in the Pivot Grid Viewer, and to create different views for the same Pivot Grid
model.
• Grid-display component.
This component is primarily responsible for rendering data in the Pivot Grid grids. Its functionality
understands the current grid layout and invokes the interfaces of the Data Source Engine component
to execute data sources. It also interprets various actions in the grid and subsequently invokes the
engine component for executing the data source again.
22 Copyright
©
1988, 2020, Oracle and/or its affiliates.

Chapter 2 Understanding PeopleSoft Pivot Grid
• Chart-display component.
This component is primarily responsible for rendering data in the Pivot Grid chart. Its functionality
understands the current chart layout and invokes the interfaces of the Data Source Engine component
to execute data sources. It also interprets various actions in the chart and subsequently invokes the
engine component for executing the data sources again.
Pivot Grid Data Source Engine Component
The Pivot Grid Data Source Engine component is responsible for runtime data source manipulation to
retrieve the data required for a grid and chart. Any events in the grid and chart will result in a data source
modification and it being rerun, which are handled by the data source engine. The Pivot Grid Data Source
Engine component enables you to:
• Set Pivot Grid metadata.
Pivot Grid metadata includes axis members, Value members, total attribute, total name, column label,
tree name, tree node, aggregate functions for Value members, and Pivot Grid viewing options.
• Retrieve Pivot Grid metadata from the database.
• Return a result set for a chart, a result set for a grid, unique values for axis members, unique values for
filters, and drill-down values for detailed view.
Pivot Grid User Interface Component
The Pivot Grid User Interface component enables you to create new Pivot Grid models and to update
existing Pivot Grid models. This component is a step-by-step wizard with a user-friendly mechanism for
creating and updating Pivot Grid models. The last step of the wizard enables you to preview the models
that you created.
You can define two parts of a Pivot Grid model using the Pivot Grid User Interface component:
• Pivot Grid core.
Based on the definitions in data sources, this core defines which columns and aggregation functions
are used and which totals and subtotals appear. You cannot change the Pivot Grid core at runtime.
See Pivot Grid Wizard Overview.
• Pivot Grid model default view options.
This part displays the Pivot Grid model and defines the default values for the runtime prompts that
are associated with data source, grid and chart axis information, grid and chart display preferences,
and so on. One set of default view options is associated with the Pivot Grid model whenever it is
created. These view options are the preferences used to render the display when the Pivot Grid
appears initially. You can customize the display and save your personalizations for the Pivot Grid
model. These preferences take precedence when the system displays a Pivot Grid model for you.
See Pivot Grid Viewer Overview.
Copyright
©
1988, 2020, Oracle and/or its affiliates. 23

Understanding PeopleSoft Pivot Grid Chapter 2
Grid-Display Component
The Pivot Grid Grid-display component is based on the existing PeopleSoft analytic grid. This component
enables users to leverage the different functionality of the analytic grid, like multi-level display and the
drag-and-drop operation. However, unlike the analytic grid, the grid in a Pivot Grid does not require the
analytic server to run; it can function as a standalone Pure Internet Architecture component. As with the
analytic grid, the grid in a Pivot Grid has three axes—row, column, and filter. You can place the axis and
value members on any of these axes to provide different views of the same data.
The Grid-display component provides the following functionality:
• Uses the Pivot Grid Data Source Engine interfaces to execute the data source at runtime to render data
in a grid. The grid does not cache any data. Any layout modification will result in a new data source
execution to retrieve the data.
Note: Modifications in data sources are not saved; Pivot Grid executes data sources in an ad hoc way
to retrieve information.
• Responses to users' filtering, pivoting, and drill-down actions from within the grid. Each of these
actions will result in the data source being modified and rerun to retrieve the rowsets again.
• Exports the current slice of data visible in the grid to Microsoft Excel.
24 Copyright
©
1988, 2020, Oracle and/or its affiliates.

Chapter 2 Understanding PeopleSoft Pivot Grid
Image: Process flow of the Grid-display component
This diagram illustrates the process flow of the Grid-display component.
Note: While you are dragging and dropping values, a move icon with a visible label indicates axis and
values that can be dragged, and the droppable locations are indicated with a grey background for labels.
Copyright
©
1988, 2020, Oracle and/or its affiliates. 25

Understanding PeopleSoft Pivot Grid Chapter 2
Image: Visible Labels in Grid Display component
This example illustrates the axis value that is labeled Product and the drop zone that is labeled Unit Cost
(Sum).
Chart-Display Component
The Pivot Grid Chart-display component also uses the Pivot Grid Data Source Engine component to
retrieve data from the source. It provides the following functionality:
• Invokes the Pivot Grid Data Source Engine interfaces to modify the data source at runtime to retrieve
data.
If the display option is Chart Only, a single data source modification and run suffices for retrieving
the relevant charting data; extra modifications are required to get filter values. If the display option is
Pivot Grid and Chart, Pivot Grid uses the result set that was retrieved when populating the grid for
chart display.
• Calls the appropriate PeopleCode charting APIs for generating and rendering the chart control on the
page.
•
If the display option is Chart Only, users can drill down on the chart by clicking the data points of the
chart to display details.
26 Copyright
©
1988, 2020, Oracle and/or its affiliates.

Chapter 2 Understanding PeopleSoft Pivot Grid
After drilling down, a drill-out option is available as a locator link at the top of the chart. Clicking the
drill-out link restores the chart to its earlier state.
Note: The number of drill downs that can be performed on a chart-only view has no limitations. If
you perform the fifth drill down, Pivot Grid resets the drill-down links and restarts from the first
position.
• All the pivoting, drilling down, and filtering operations on the grid result in an appropriate
synchronization action on the chart if the display option is Pivot Grid and Chart.
Image: Process flow of the Chart-display component
This diagram shows the processes of the Pivot Grid Chart-display component.
Copyright
©
1988, 2020, Oracle and/or its affiliates. 27

Understanding PeopleSoft Pivot Grid Chapter 2
Pivot Grid Security
Various layers of security are available for users who access Pivot Grid:
• Data source security is the first layer.
If a user has access to run and modify the data source, that user can create a new Pivot Grid model or
view an existing Pivot Grid model based on the selected data source.
• Pivot Grid model type security is the second layer.
Any Pivot Grid model can be published as a private or public model. Private Pivot Grid models
are available only to the user or users who created the models. Public models are available to
administrators and power users for updates.
• Pivot Grid roles is the third layer.
Three primary roles are available for Pivot Grid users. PeopleSoft delivers the roles PivotGridAdmin
and PivotGridSuperUser. Users who are not assigned to one of these roles will be Pivot Grid end
users.
Pivot Grid Administrator Role
Users with the role PivotGridAdmin are granted access to:
• Use the Pivot Grid wizard to create new Pivot Grid models or update existing Pivot Grid models.
• Update and view all models that were created by all other users.
• Define how a Pivot Grid will be viewed by end users by specifying the axes and values.
• Select the aggregate functions for values and All members of the axes members.
• Select the initial prompt values for the runtime prompts.
• Define the initial view layout, which includes view options for the grid and the chart.
• Publish the Pivot Grid models as public or private.
• Define whether the selected model is valid.
• Use the Pivot Grid Administration component to administer Pivot Grid models, views, and user
personalization.
• Create and publish simplified analytic reports to users of the fluid components.
Pivot Grid Super User Role
Users with the role PivotGridSuperUser are granted access to:
• Use the Pivot Grid wizard to create new models or update existing public Pivot Grid models.
For the models that are accessible to super users, the tasks are the same as for the Pivot Grid
administrator.
28 Copyright
©
1988, 2020, Oracle and/or its affiliates.

Chapter 2 Understanding PeopleSoft Pivot Grid
• View all public Pivot Grid models and perform pivoting, filtering, or dicing on the initial view to set
their own user preferences.
• Save public models as user preferences.
• Create and publish simplified analytic reports to users of the fluid components.
Pivot Grid End User Role
Users with the role Pivot Grid end user are granted access to:
• Create new Pivot Grid models and publish them as public or private.
For models created by a Pivot Grid end user, the tasks are the same as for the Pivot Grid
administrator.
• View public Pivot Grid models that were created by other users and perform all operations on
accessible models.
• Save public models as user preferences.
Note: Pivot Grid end users cannot update Pivot Grid models created by other users.
Data Masking in Pivot Grid
A Pivot Grid report that uses query, connected query, or composite query as a data source may include
data fields containing sensitive or personally identifiable information (PII) data. Data masking enables
you to use a masking character, for example, an asterisk (*) or any character, to mask output and prevent
the display of this data. The SetDisplayMask method replaces each character of the displayed field text
value with the chosen mask character.
For Grids, if a field with PII or sensitive data is selected as Column, the values will be displayed only
if the aggregate is Count and for all other aggregates, the values will be masked. If a field with PII or
sensitive data is selected as Row, Grid will not be displayed.
For Charts, if a field with PII or sensitive data is selected as X-Axis or Y-Axis, Chart will not be
displayed.
If a field with PII or sensitive data is selected as Filter or Editable Facet, the values will be hidden in all
Pivot Grid Views and they will be masked in Detailed View.
Example: Sensitive or PII Field set as Column
In this example, the Unit Cost field is masked. The field has Column Type set as Value and Aggregate set
to Sum in Pivot Grid Wizard.
Copyright
©
1988, 2020, Oracle and/or its affiliates. 29

Understanding PeopleSoft Pivot Grid Chapter 2
Image: Sensitive or PII Field set as Column
The following example illustrates the behavior in a Grid only model when the Unit Cost field is set as Y-
Axis. The Grid shows masked values for Unit Cost field.
Example: Sensitive or PII Field set as Value but not Y-Axis
In this example, the Sales and Prd Sales fields are masked. The fields have Column Type set as Value and
Grid Axis set as Column in the Pivot Grid Wizard.
Image: Sensitive or PII Field set as Value but not Y-Axis
The following example illustrates the behavior in a Chart only model when the Sales and Prd Sales fields
are set as Value but not Y-Axis. The Chart is displayed and Detailed View shows masked values for the
sensitive or PII fields.
30 Copyright
©
1988, 2020, Oracle and/or its affiliates.

Chapter 2 Understanding PeopleSoft Pivot Grid
Related Links
Specifying Data Model Options
Specifying Data Model Values
"Data Privacy Framework" (PeopleTools 8.58: Security Administration)
"Setting Additional Options" (PeopleTools 8.58: Query)
Data Synchronization Between the Grid and the Chart
The grid and chart event listener captures grid events and constructs an appropriate PSQuery using the
row and column labels and filters. Each user action results in an appropriate event for the chart, so that
both the chart and the grid are synchronized. Pivot Grid enables users to move the fields among the row,
the column, and the report filter. Each of these actions results in a different view of the same data.
The chart event listener captures chart events and constructs an appropriate PSQuery using the chart axis
and filter information.
If users select Pivot Grid and Chart as the display option, the data that appears in the controls is
synchronized. Synchronization is achieved using the following two mechanisms:
• Unidirectional synchronization.
The flow between the chart and the grid is maintained in a single channel, unidirectionally. Only an
event or a user action in the grid will result in the chart being regenerated.
• Semi-intelligent chart axis.
Pivot Grid determines the chart axis information intelligently based on the grid layout and maintains
synchronized data between the grid and the chart. Therefore; the data in the chart is always a subset of
the data in the grid.
Pivot Grid is able to set the chart axis information correctly so that the chart always displays a subset of
the grid data. Pivot Grid always sets the field at the highest level on the row axis of the grid as the X axis
for the chart. When you change the grid layout, the X axis for the chart keeps changing based on the grid
layout. You can choose the Y axis in all scenarios except when any values are dragged to the filter axis on
the grid. In this case, the value selected on the filter of the grid will be the Y axis for the chart as well.
This table describes various actions you can perform on the grid, and the corresponding actions on the
chart that maintain synchronization.
Action in Grid Action in Chart
Drilling down in the grid by clicking the plus (+) icon on the
row axis
Note: In PeopleSoft Pivot Grid, this action is available only at
the lowest level of the row axis in the grid.
This grid action will result in a drill down in the chart as well.
Earlier, the chart would have displayed the All member for the
axis field, but now the chart also shows the relevant details.
The Y axis does not change.
Copyright
©
1988, 2020, Oracle and/or its affiliates. 31

Understanding PeopleSoft Pivot Grid Chapter 2
Action in Grid Action in Chart
Moving a row to the report filter This grid action will result in:
• The filter also being added to the chart.
• The highest level field on the row axis being selected as
the X axis for the chart.
• All of the lower levels on the row axis of the grid also
being part of the X axis.
• The Y axis of chart not changing except when the Value
columns are on the filter axis.
Moving a row to the column This grid action will result in:
• A series (grouping) field being added to the chart.
• The highest level field on the row axis being selected as
the X axis.
All of the lower levels on the row axis of the grid also
being part of the X axis.
• The Y axis of the chart not changing.
Moving a column to the report filter This grid action will result in:
• The filter also being added to the chart.
• The X axis remaining the same.
• The Y axis of the chart not changing except when the
Value columns are on the filter axis.
Moving a column to the row This grid action will result in:
• The highest level field on the row axis being selected as
the X axis.
• All of the lower levels on the row axis of the grid also
being part of the X axis.
• The Y axis of the chart not changing.
Moving values to the report filter This grid action will result in:
• The highest level field on the row axis being selected as
the X axis.
• All of the lower levels on the row axis of the grid also
being part of the X axis.
• The value selected on the report filter of the grid
becoming the Y axis for the grid.
Moving values to the row axis This grid action is essentially the same representation of data
as comparing values on the column axis except that the data
view is vertical rather than horizontal. Therefore, no change
will appear in the chart.
32 Copyright
©
1988, 2020, Oracle and/or its affiliates.

Chapter 2 Understanding PeopleSoft Pivot Grid
Limitations of Charts and Grids
Pivot Grid Chart Limitations
Pivot Grid chart has these limitations:
• Users can only assign Value fields to the Y axis because they are numerical.
•
If users select Chart Only as a display option, then only one level of detail can appear in the chart, and
users can have one field on the X axis and one field as a data series to group the data.
• If users drill down on the chart, they can select an overlay field to display two fields on the Y axis. If
an overlay field is selected, then two charts are plotted, and one is superimposed over the other.
Note: From PeopleTools 8.55, you can select multiple Y axes to be plotted in a Chart Only view.
From PeopleTools 8.53, the Chart Only view does not limit the number of filters.
• If users select multiple Data Source Columns as Y-axes, then the Overlay feature is restricted as
follows:
• In the Fluid Pivot Grid Viewer, the Overlay will not be available under Chart Options. Chart
Options is accessed from the Menu Options button on the pivot grid chart.
• In Step 4: Specifying Data Model Options of the pivot grid wizard, selecting Overlay as a Chart
Axis for a Data Source Column will be considered invalid.
•
If users select Pivot Grid and Chart as a display option, then the chart can use one Y axis for plotting
one of the Value members, and all the other axes are automatically determined based on the current
grid layout.
Note: In PeopleSoft Pivot Grid, overlay fields for a Pivot Grid and Chart display option are not
supported.
Pivot Grid Limitation
Pivot Grid grids has these limitations:
• It does not have a vertical scroll bar for viewing data, but it displays all possible rows based on the
current layout.
• Pagination is not available.
• Pivot Grid grid supports up to 75 axes and values; the character limit for each is 30.
Related Links
"Understanding WSRP" (PeopleTools 8.58: Portal Technology)
Copyright
©
1988, 2020, Oracle and/or its affiliates. 33

Understanding PeopleSoft Pivot Grid Chapter 2
Displaying Models in Various Form Factors
You can use a smart phone or other touch friendly device to view Pivot Grid models and perform
Component Real-Time Search.
These are the functions and limitations of using a smart phone to view Pivot Grid models or to perform
component real time search:
• Application developers must set the view of the Pivot Grid models as list views. Grid view is not
available on a smart phone. The result view must be set to List mode or List or Grid mode.
•
If the List view is not set for the Pivot Grid model, an error message appears on the Component search
page. In the Fluid Pivot Grid Viewer, the detail view is not available. Only the chart is available and
error message is not displayed.
• The multi-dimensional grid view (that enables you to drag and drop and to pivot) is not available.
•
If a Pivot Grid Only or a Pivot Grid and Chart model is viewed on a smart phone, it appears as a
Chart Only view and you cannot save the chart layout. The Save option is not available in these cases.
• Chart data points are not actionable.
• Row-level, bulk, and aggregate related actions are not available.
• The chart is best viewed in landscape mode.
• The Chart Options, Update Filters, Save, and Reset options are available in the Options Menu list
based on the settings in Pivot Grid Wizard, Step 4. The Export Data and View Pivot Grid options are
not available.
• The facets and prompts appear in full page after you select these options.
This table lists the availability of Pivot Grid’s features in smart phones, tablets, or desktops.
Feature Smart Phone Tablet or Desktop
Chart View yes yes
Chart Interaction no yes
Pivot Grid View no yes
Detail Grid View no yes
Detail List View
Note: In Pivot Grid Wizard - Viewer
Options section, the Result View list
should be set to List or Grid and List.
yes yes
Related Actions no yes
Filters yes yes
34 Copyright
©
1988, 2020, Oracle and/or its affiliates.

Chapter 2 Understanding PeopleSoft Pivot Grid
Feature Smart Phone Tablet or Desktop
Prompts yes yes
View Pivot Grid (Chart Only model) no yes
Example: Using the Component Real-Time Search and Pivot Grid in Smart
Phones
Image: Detail View in a smart phone - List view
This example shows the Detail View in a smart phone. In a component search, the detail list view
appears by default when the page loads.
Copyright
©
1988, 2020, Oracle and/or its affiliates. 35

Understanding PeopleSoft Pivot Grid Chapter 2
Image: Detail View in a smart phone - Chart view
This example shows the Chart View in a smart phone. In the Pivot Grid Viewer (analytics use
case), the chart appears when the page loads initially. When you click the Filters icon in a facet,
the Modify Search option appears, enabling you to modify the search filter options.
36 Copyright
©
1988, 2020, Oracle and/or its affiliates.

Chapter 2 Understanding PeopleSoft Pivot Grid
Image: Modify Search option
This example shows the Filters and Modify Search options when you click the Funnel icon. Note
that the Modify Search option is listed for Component Real Time search, but the Modify Prompts
option is listed for the Pivot Grid Viewer.
Copyright
©
1988, 2020, Oracle and/or its affiliates. 37

Understanding PeopleSoft Pivot Grid Chapter 2
Image: Search filter facets
This example shows the search filter facets after you select the Filters option. When you click the
Selected Filters button, all selected filters for the Pivot Grid model are listed. The Selected Filters
button is also available on a chart view.
38 Copyright
©
1988, 2020, Oracle and/or its affiliates.

Chapter 2 Understanding PeopleSoft Pivot Grid
Image: Selected Filters button on a chart view
This example shows the Selected Filters button on a chart view. When you click the Selected
Filters button, all selected filters for the Pivot Grid model are listed.
Copyright
©
1988, 2020, Oracle and/or its affiliates. 39

Understanding PeopleSoft Pivot Grid Chapter 2
Image: Search page
This example shows the search page, where you can modify the search options (or prompts).
40 Copyright
©
1988, 2020, Oracle and/or its affiliates.

Chapter 2 Understanding PeopleSoft Pivot Grid
Image: Options Menu
This example shows the action options after you click the Options Menu icon.
Copyright
©
1988, 2020, Oracle and/or its affiliates. 41

Understanding PeopleSoft Pivot Grid Chapter 2
Image: Chart Options facet
This example shows the Chart Options facet, where you can change the settings of the chart.
42 Copyright
©
1988, 2020, Oracle and/or its affiliates.

Chapter 2 Understanding PeopleSoft Pivot Grid
Image: Update Filters window
This example shows the Update Filters window, where you can add or remove filters from the
viewer.
Copyright
©
1988, 2020, Oracle and/or its affiliates. 43
Understanding PeopleSoft Pivot Grid Chapter 2
44 Copyright
©
1988, 2020, Oracle and/or its affiliates.

Chapter 3
Using Query as a Data Source for Pivot Grid
Query Design Considerations
When you create a query to use with a pivot grid, keep in mind that:
• Any prompt values for the query will be used for the Pivot Grid filter.
• A number of PSQueries may be run to render data in the grid and the chart, so you should consider
these two points when constructing a PSQuery for a Pivot Grid model:
• PSQuery should be conducive to manipulation.
• PSQuery performance should be efficient enough to render quickly in the grid and in the chart.
For example, you want to plot organization data attributes, such as Employee Information, Department
Information, Location Information, Country Information, and so on, in a pivot grid. The base database
table for this information contains the codes EMPLID, DEPT_ID, LOCATION_ID, and so on, but the
descriptions for all these attributes are in different tables. When a PSQuery is created, all these tables are
joined. Additionally, the related language tables, security records, effective date, and so on are relevant.
As a result, the PSQuery is complex and its performance may not be efficient. This kind of PSQuery is
not suitable for creating a Pivot Grid model. In this case, when table indexes are not defined properly, you
have two options:
• Define a fact table that contains all the data and use it to create a Pivot Grid model.
• Define a SQL view that joins all these tables and provides a simple view of the data.
You can then use this view as a source for the PSQuery. However, creating a SQL View on top of
multiple tables using joins might degrade performance.
For both options, you should consider effective date criteria, related language tables, and security records.
Note: If the query used in the Pivot Grid model is changed after the Pivot Grid model is created, you need
to modify and save the Pivot Grid model to ensure all changes are properly displayed in the Pivot Grid
Viewer and Pivot Grid pagelets.
Query Limitation for Pivot Grid
Pivot Grid uses PSQuery as the data source, and the aggregated results of the query appear in a grid and
chart. While displaying the results, Pivot Grid does an ad hoc runtime manipulation of the query to get the
desired results. Pivot Grid executes different types of queries at runtime for various uses.
For example, Pivot Grid executes a:
Copyright
©
1988, 2020, Oracle and/or its affiliates. 45

Using Query as a Data Source for Pivot Grid Chapter 3
• Query with a GROUP BY clause and multiple fields to retrieve a unique list of values for the filters
and axis fields.
• Query with a GROUP BY clause, ROLLUP clause, GROUPING clause, and multiple fields to
retrieve data to be displayed in a grid in Pivot Grid.
• Query with a GROUP BY clause and the chart axis fields to retrieve the data to be displayed in a chart
in Pivot Grid.
• Query with a DISTINCT clause and a single field to retrieve a unique list of values for a primary filter
that was last saved by the user.
Given these manipulations being done by Pivot Grid on the query and the complexity of PSQuery itself,
the query that is used as a data source for Pivot Grid has limitations, which are:
1. Query with the UNION clauses.
Query with the UNION clauses are not supported in Pivot Grid. Pivot Grid does runtime manipulation
on the SELECT field list in the query, and this will not work properly with queries containing UNION
clauses.
2. Query with the JOINS on the value (fact) fields.
Query with the JOINS on the value (fact) fields receive an error in Pivot Grid because Pivot Grid
performs aggregation on the value fields, and the same aggregation is used for the JOIN field. This
will cause the query to fail syntactically while executing on the database.
For example, consider a query where the resulting SQL looks like this:
SELECT TO_CHAR(A.ST_DT,'YYYY-MM-DD'),
A.ST_ID_NUM,
A.CRSPD_CUST_ID,
A.REMIT_ADDRESS1,
A.REMIT_ADDRESS2,
A.CUST_ID
FROM PS_AR32001_TMP A,
PS_RUN_CNTL_AR B,
PS_COUNTRY_TBL C,
PS_COUNTRY_TBL D,
PS_CUSTOMER E,
PS_STATE_TBL F
WHERE (B.OPRID = 'VP1'
AND (A.ST_ID_TYPE = 'O'
AND A.DRAFT_FLG <> 'Y'
AND A.ST_ID_NUM = B.ST_ID_NUM
AND B.RUN_CNTL_ID = :1
AND B.OPRID = :2
AND A.AG_PRINT_FLAG <> 'Y'
AND C.COUNTRY = A.COUNTRY
AND D.COUNTRY = A.REMIT_COUNTRY
AND A.CRSPD_SETID = E.CRSPD_SETID
AND A.CRSPD_CUST_ID = E.CRSPD_CUST_ID
AND A.CUST_ID = E.CUST_ID
AND A.CUST_ID LIKE :3
AND F.COUNTRY = A.COUNTRY
AND F.STATE = A.STATE ) )
ORDER BY 3, 50, 36, 35, 57, 37, 38, 54, 52 DESC, 51
Note: A.CUST_ID is in the SELECT statement, and A.CUST_ID = E.CUST_ID is in the
WHERE statement.
46 Copyright
©
1988, 2020, Oracle and/or its affiliates.

Chapter 3 Using Query as a Data Source for Pivot Grid
Suppose that a Pivot Grid model is built using this query and the field A.CUST_ID is selected as a
value type of field in the Pivot Grid model with an aggregation function of COUNT. This SQL will
fail at runtime because the aggregation COUNT will be applied to both the SELECT field and the
JOIN criterion.
In this case, you should use separate fields as the SELECT fields and the JOIN criterion.
3. Query with underlying Record Views selecting the same field.
A query built on an underlying view that selects the same field more than once will fail when used as
a data source for Pivot Grid if these fields are used as the axis columns in the Pivot Grid model. The
query will fail because the Pivot Grid uses a GROUP BY clause for the axis fields, and the database
fails to perform a GROUP BY comment on the same field more than once.
For example, consider a view that has the following SQL:
SELECT A.HRS_PERSON_ID
, A.HRS_RCMNT_ID
, A.HRS_PROFILE_SEQ
, A.OPRID
, %DatePart(A.HRS_SUBMITTED_DTTM)
, A.HRS_JOB_OPENING_ID
, A.POSTING_TITLE
, A.STATUS_CODE
, B.DESCR
, B.DESCR
, Z.RECRUITER_ID
, Z.MANAGER_ID
, Z.JOB_FAMILY
, Z.BUSINESS_UNIT
, Z.DEPTID
, Z.HRS_PRM_LOCATION
, %DateNull
, %DateNull
FROM PS_HRS_MY_APP_VW A LEFT OUTER JOIN PS_HRS_JOB_OPENING Z ON A.HRS_JOB_OPEN⇒
ING_ID = Z.HRS_JOB_OPENING_ID, PS_HRS_STS_REC_I B , PS_HRS_RCMNT C
WHERE B.STATUS_CODE = A.STATUS_CODE
AND B.STATUS_AREA = '3'
AND A.HRS_PERSON_ID = C.HRS_PERSON_ID
AND A.HRS_RCMNT_ID = C.HRS_RCMNT_ID
In this view, the same field B.DESCR is selected twice in exactly the same way. This view was used
in a query with both fields in the SELECT list of the query. If a Pivot Grid model was built using this
query and again both these fields are selected as the axis type of fields in the Pivot Grid model, then
the model will fail and not return the results.
In this case, you should use different fields in the view creation. If the same field has to be used, one
of them can be used with functions such as UPPER, TRUNCATE, and so on.
4.
Query with value fields used as a criterion or a runtime prompt.
If one of the selected fields in the query is selected as a value column in the Pivot Grid model and
the same field is used in a criterion in the query, then the query will fail and the Pivot Grid model
will not render. It will fail because when rendering the Pivot Grid model, aggregation functions are
applied on the value fields and the same aggregation will be applied on the criterion. This issue does
not only result in a wrong criterion, but the query will also fail syntactically because the WHERE
clause contains an aggregation and a normal criterion will not work. Note that you need a HAVING
clause for the aggregation.
Copyright
©
1988, 2020, Oracle and/or its affiliates. 47

Using Query as a Data Source for Pivot Grid Chapter 3
For example, consider a query such as this:
SELECT DISTINCT A.SETID
, A.VENDOR_ID
, A.VENDOR_NAME_SHORT
, A.BUSINESS_UNIT_GL
, A.NET_BALANCE_AP
, A.TXN_CURRENCY_CD
, A.NET_BALANCE_AP * B.RATE_MULT/ B.RATE_DIV, B.TO_CUR
FROM PS_AP_DB_VNDBAL_VW A, PS_RT_DFLT_VW B
WHERE (B.EFFDT =
(SELECT MAX(B_ED.EFFDT)
FROM PS_RT_DFLT_VW B_ED
WHERE B.FROM_CUR = B_ED.FROM_CUR
AND B.TO_CUR = B_ED.TO_CUR
AND B.RT_TYPE = B_ED.RT_TYPE
AND B_ED.EFFDT <= SYSDATE)
AND B.RT_TYPE = 'CRRNT'
AND A.TXN_CURRENCY_CD = B.FROM_CUR
AND A.SETID = :1
AND B.TO_CUR = :2
AND A.NET_BALANCE_AP * B.RATE_MULT/ B.RATE_DIV >= :3 )
The expression A.NET_BALANCE_AP * B.RATE_MULT/ B.RATE_DIV is used as a value
field in the Pivot Grid model. The query after aggregation will apply the aggregation function in the
SELECT list as well as in the criterion. These issues cause a failure.
In these cases, you should have two fields, one representing the value column in the Pivot Grid model
and another one that is used in the criterion.
5. Query with the expressions that are used as axis fields in the Pivot Grid model.
If a query has expressions and these expressions are used as the axis fields in a Pivot Grid model,
Pivot Grid will display an error while rendering results because query expressions are not supported in
the ROLLUP clause in Pivot Grid, which may lead to unpredictable results.
In this case, you should build a view on top of the query SQL with expressions, and then use this view
in the Pivot Grid model.
6. Limitations in Microsoft SQL server.
Microsoft SQL server database platform supports ROLLUP and CUBE with a compatibility mode of
100 or more. If the compatibility mode in the database is set to a value that is less than 100, then all
the queries associated with Pivot Grid models will fail.
This table summarizes the different query scenarios, results, and recommendations.
Query Scenario Result Recommendation
Query with UNION clauses. An error message appears to indicate that
the query execution has failed.
Build a view on top of the query SQL
with UNION clauses and then use this
view in the Pivot Grid model.
Query with JOINS on value (fact) fields. An error message appears to indicate that
the query execution has failed.
Use separate fields as the SELECT fields
and JOIN criterion.
48 Copyright
©
1988, 2020, Oracle and/or its affiliates.

Chapter 3 Using Query as a Data Source for Pivot Grid
Query Scenario Result Recommendation
Query with underlying Record Views
selecting the same field.
Usually, an error message appears to
indicate that the query execution has
failed. Occasionally, the Pivot Grid
model will display the results incorrectly.
Use different fields in the view creation.
If the same field must be used, use one
of them with functions such as UPPER,
TRUNCATE, and so on.
Query with value fields used as a
criterion.
An error message appears to indicate that
the query execution has failed.
Use two fields, one as the value column
in the Pivot Grid model and the other one
in the criterion.
Query with expressions used as the axis
fields in Pivot Grid model.
An error message appears to inform
users that expressions are not allowed.
Build a view on top of the query SQL
with expressions, and then use this view
in the Pivot Grid model.
Microsoft SQL server database with a
compatibility setting of less than 100.
An error message appears while
rendering the Pivot Grid model.
Set the compatibility mode for the
Microsoft SQL server database to a value
of 100 or greater.
Composite Query Design Considerations
When you use composite queries as data sources for Pivot Grid models, you encounter these limitations:
•
When you use the Count aggregate in a Pivot Grid model, Composite Query executes a
COUNT(FIELDNAME) and PSQuery executes a Count(*). Hence if the data is null for a field, the
system displays number 0 (zero) for the composite query based pivot grid model.
• While using expression as fact it is recommended to define the expression at the composite query
level.
• If the expression involves a Calculated Fact from other fact columns( i.e where ‘None’ is chosen for
the aggregate for the expression field), it is necessary that the expression is defined at the composite
query level.
Related Links
Creating Composite Query Pivot Grid Models Using the Pivot Grid Wizard
Creating Composite Query Pivot Grid Models Using the Pivot Grid
Wizard
Composite Query enables you to combine data from existing queries and then to apply filters, aggregates,
and so on before presenting the report results, which show the combined data set. Composite Query
retrieves multiple levels of related information about existing queries and presents the combined data as a
single, flattened query result.
Using Pivot Grid wizard, you are able to associate composites queries, PSQueries, and components as
the data sources when you create Pivot Grid models. The steps used to create composite query Pivot Grid
models are similar to the steps used to create PSQuery or component Pivot Grid models.
Copyright
©
1988, 2020, Oracle and/or its affiliates. 49

Using Query as a Data Source for Pivot Grid Chapter 3
To create a composite query Pivot Grid model using Pivot Grid wizard:
1. From the Main Menu, select Reporting Tools >Pivot Grid >Pivot Grid Wizard.
2. Select the Add a New Value tab to create a new Pivot Grid model.
3. Enter the Pivot Grid name and click the Add button to display the Specify Pivot Grid Properties page.
4. Use the Specify Pivot Grid Properties page (PTPG_WIZ_INFO) to identify and categorize the data
model for the Pivot Grid. See Specifying Pivot Grid Properties.
5. Use the Select Data Source (PTPG_WIZ_DATASRC) page to select the data source and output
columns.
In the Select Data Source page, select the Composite Query option from the Data Source Type drop-
down list.
Image: Select Data Source page with the Data Source Type set to Composite Query
This example illustrates the fields and controls on the Select Data Source page with the Data Source
Type set to Composite Query. Definitions for the fields and controls appear following the example.
Composite Query Name This field is available if the Data Source Type is set to
Composite Query.
Click the search icon to select a composite query from the
list of existing composite queries.
50 Copyright
©
1988, 2020, Oracle and/or its affiliates.

Chapter 3 Using Query as a Data Source for Pivot Grid
Note: Only one composite query can be associated with one
Pivot Grid model as a data source.
Select Columns Select the output columns to be plotted in the Pivot Grid
model.
Note: The Select Columns region is available after you
select an existing composite query in the Composite Query
Name field using the search icon or after you enter a valid
query name and tab out of the Composite Query Name field.
You must select at least two data source columns.
Base Query This column displays the descriptions of the underlying
base query that correspond to each field in the Data Source
Columns column.
If the base query has no description, the system displays the
name of the base query.
Next Click this button to advance the wizard to the next page.
Note: The Next button is available after you select at least
two columns in the Select Columns region.
See Selecting a Data Source.
6. Use the Specify Data Model Values page, define the column type, aggregate functions, and so on for
the selected data model. See Specifying Data Model Values.
7. Use the Specify Data Model Options page to define the initial layout of the grid and the chart. See
Specifying Data Model Options.
8. Use the Pivot Grid Display page to:
• Review the Pivot Grid model based on the display options and layouts selected.
• Modify the Pivot Grid model to finalize the design.
• Save the model using the Save button.
See Viewing Pivot Grid Displays.
Creating Pivot Grid Models Using Query Manager
From the Query Manager component, the Pivot Grid designer, application developers, or report
administrators can use the Publish as Pivot Grid link to create or edit Pivot Grid models.
Copyright
©
1988, 2020, Oracle and/or its affiliates. 51

Using Query as a Data Source for Pivot Grid Chapter 3
Image: Fields page
This example shows the Fields page in Query Manager, including the Publish as Pivot Grid link:
Steps Used to Create a Pivot Grid Model Using Query Manager
To create a Pivot Grid model using Query Manager:
1. From the Main Menu, select Reporting Tools >, Query >, Query Manager.
2. Open an existing query; in this example, open query QE_PIVOT_GRID.
3. Select the Fields tab.
4. Click the Publish as Pivot Grid link.
The Review Pivot Grids page appears listing all existing Pivot Grid models that currently use the
query definition, if any.
52 Copyright
©
1988, 2020, Oracle and/or its affiliates.

Chapter 3 Using Query as a Data Source for Pivot Grid
Image: Review Pivot Grids page
This example shows the Review Pivot Grids page. No existing Pivot Grid model is attached to the
current query.
5. From the Review Pivot Grid page, you can click either the Edit or the Add button to access the Pivot
Grid Wizard – Select Data Source page (Step 2), where you can add new Pivot Grid models or update
existing ones that are based on the current query.
If you add a new Pivot Grid, you must enter a unique value in the Pivot Grid Name field and a Pivot
Grid title. The query name and Select Columns section are populated in the Select Data Source page.
The security is the same as in Pivot Grid Wizard. You are able to open and edit the Pivot Grid models
that you are granted permission for (for example, Pivot Grid administrator or Pivot Grid model
creator).
Copyright
©
1988, 2020, Oracle and/or its affiliates. 53

Using Query as a Data Source for Pivot Grid Chapter 3
Image: Pivot Grid Wizard – Select Data Source page
This example shows the Pivot Grid Wizard – Select Data Source page.
Note: From this step, you can navigate through each wizard step and complete the Pivot Grid model
creation as in Pivot Grid Wizard.
6. Click the Next button to access the Specify Data Model Values page, where you can define the
column type, aggregate functions, and so on for the selected data model.
54 Copyright
©
1988, 2020, Oracle and/or its affiliates.

Chapter 3 Using Query as a Data Source for Pivot Grid
Image: Pivot Grid Wizard – Specify Data Model Values page
This example shows the Pivot Grid Wizard – Specify Data Model Values page (Step 3).
7. Click the Next button to access the Specify Data Model Options page, where you can define the initial
layout of the grid and the chart.
Image: Pivot Grid Wizard – Specify Data Model Options page
This example shows the Pivot Grid Wizard – Specify Data Model Options page (Step 4).
Copyright
©
1988, 2020, Oracle and/or its affiliates. 55

Using Query as a Data Source for Pivot Grid Chapter 3
8. Click the Next button to access the Pivot Grid Display page, where you can review the Pivot Grid
model based on the display options and layouts selected or modify the Pivot Grid model to finalize the
design.
Image: Pivot Grid Wizard – Pivot Grid Display page
This example shows the Pivot Grid Wizard – Pivot Grid Display page (Step 5).
9. From the Pivot Grid Display page:
• Click the Apply button to save the wizard.
• Click the OK button to save and close the Pivot Grid Wizard window and return to the Review
Pivot Grids page.
56 Copyright
©
1988, 2020, Oracle and/or its affiliates.

Chapter 3 Using Query as a Data Source for Pivot Grid
Image: Review Pivot Grid page
This example shows the Review Pivot Grid page after you click the OK button from the Pivot Grid
Display page. The Sales Model is created and listed as part of existing models.
10. Click the Return button to return to Query Manager.
Related Links
Specifying Pivot Grid Properties
Selecting a Data Source
Specifying Data Model Values
Specifying Data Model Options
Viewing Pivot Grid Displays
Using Query Drilling URLs in Pivot Grid Models
PSQuery supports drilling URLs that enable you to navigate to either a PeopleSoft Pure Internet
Architecture page, another query result page, or an external page. These drilling URLs can contain
context-sensitive bind values obtained from the query result row. For example, a drilling URL enables
you to navigate to a component by taking key values from the row where you click a cell. You use
PeopleSoft Query - Query Manager to define drilling URLs.
See "Understanding Drilling URLs" (PeopleTools 8.58: Query).
Pivot Grid supports the following drilling URL types:
• Component URL
• Query URL
Copyright
©
1988, 2020, Oracle and/or its affiliates. 57

Using Query as a Data Source for Pivot Grid Chapter 3
• External URL
• Free Form URL
Note: The Attachment URL type in PSQuery is designed for Search Framework and is not available to
any other subproducts, including PeopleSoft Pivot Grids.
To use the drilling URLs in Pivot Grid, the Content URI Text and Portal URI Text fields in the Portal
page of the default local node must have the valid values. To access the Portal page, select PeopleTools,
Integration Broker, Integration Setup, Nodes, Portal. See "Defining Portal Nodes" (PeopleTools 8.58:
Portal Technology)
Viewing Component Drilling URLs
In this example of component drilling URL settings, the target component has keys INV_ITEM_ID and
SETID mapped to the Key Value from the query field. At runtime, the values from the A.INV_ITEM_ID
and A.SETID fields are passed as component keys. In the detailed view of the Pivot Grid, the mapped
fields are shown as links. Clicking the URL links on the Detailed View enables you to access the target
component.
58 Copyright
©
1988, 2020, Oracle and/or its affiliates.

Chapter 3 Using Query as a Data Source for Pivot Grid
Image: Select a Component page
This example shows a component drilling URL. The target component has keys INV_ITEM_ID and
SETID which are mapped to the Key Value from the query field.
Copyright
©
1988, 2020, Oracle and/or its affiliates. 59

Using Query as a Data Source for Pivot Grid Chapter 3
Image: Pivot Grid Detailed View
This example shows the detailed view of the Pivot Grid, including 51 items that have the SetID value of
CRM01. Note that the mapped fields - SetID, Item, and Item Description - appear as links.
Note: The Pivot Grid Wizard does not have any configuration for drilling URLs. If a drilling URL is
defined in PeopleSoft Query - Query Manager, then it is available in the detailed view in the mapped
columns. Using PeopleSoft Query - Query Manager, you can include the drilling URL as a field. If you
include a drilling URL as a field, the drilling URL column should be set as a display-only column type in
the Pivot Grid Wizard – Specify Data Model Values page.
Image: Target Component
This example shows the target component after you click the link in the detailed view. The context values
for SetID and Item ID are passed from the detail view row.
60 Copyright
©
1988, 2020, Oracle and/or its affiliates.
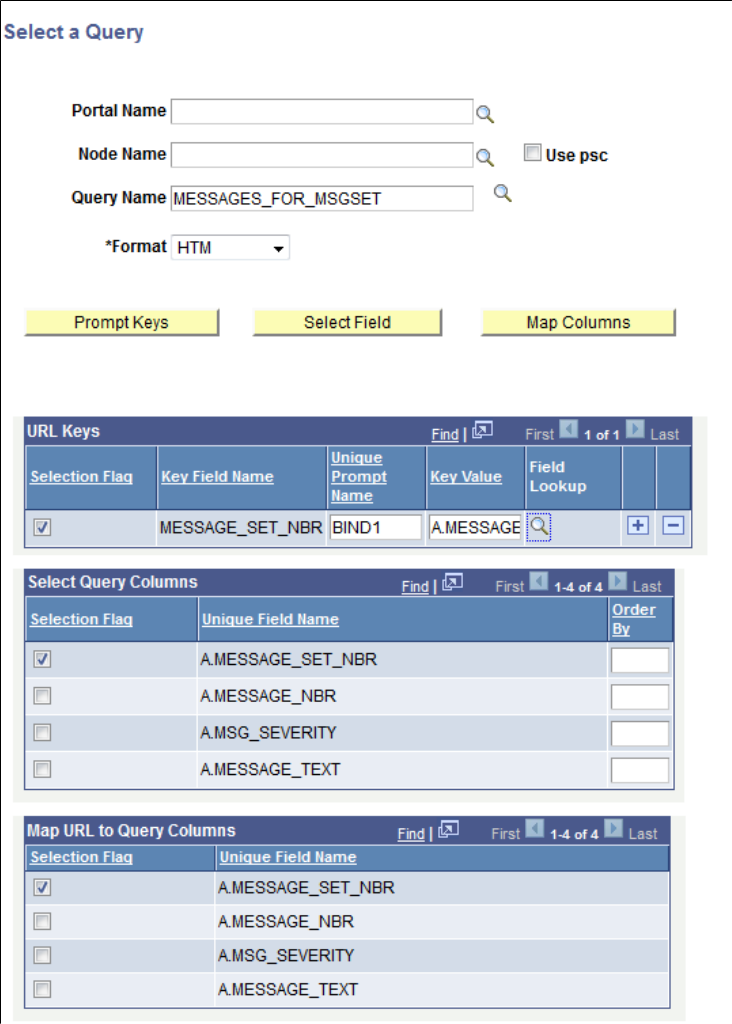
Chapter 3 Using Query as a Data Source for Pivot Grid
In the following examples, the drilling URL is set to Query URL type, and the message set
number from the detailed view is passed as a prompt (MESSAGE_SET_NBR) to the target query
MESSAGES_FOR_MSGSET and run.
Image: Select a Query page
This example shows the Select a Query page after you set the drilling URL to the Query URL type:
Copyright
©
1988, 2020, Oracle and/or its affiliates. 61

Using Query as a Data Source for Pivot Grid Chapter 3
Image: Pivot Grid Drilldown - Detailed Data page
This example shows the Pivot Grid Drilldown - Detailed Data in Pivot Grid model. Note that the Pivot
Grid model uses the MESSAGES_FOR_MSGSET query, and the default prompt value is set to 20051.
There are 43 messages that have the Set value of 20051.
Image: Detailed view, data is drilled to run the query with prompt passed from detail view row
After you click the 20051 link in the Detailed View, data is drilled into to run the query with a prompt
passed from the detail view row (Set).
Drilling URLs in the Fluid View
Drilling URLs are available in the detail grid and list views (the results view). The results grid columns
that are mapped to query drilling URL are displayed as links. Note that in fluid viewer, you can set the
display type of the target page to Full Page Modal, Modal Window, New Window, or Replace Window
using Pivot Grid Wizard (Specify Data Model Options page, Fluid Mode Options section, Drilling URL
Options subsection.) The drilling URLs is also available in the detail view that you open by clicking the
grid data point.
62 Copyright
©
1988, 2020, Oracle and/or its affiliates.

Chapter 3 Using Query as a Data Source for Pivot Grid
Image: Fluid mode, drilling URLs in the Chart Only view
This example shows the drilling URLs in the Chart Only view that is displayed in the Fluid mode. The
results grid columns Department ID and Department are displayed as links.
Image: Fluid mode, drilling URLs in the Pivot Grid Only or Pivot Grid and Chart view
This example shows the drilling URLs in the Fluid detailed view when the Pivot Grid model is set to
Pivot Grid Only or Pivot Grid and Chart. The results grid columns Department ID and Department are
displayed as links.
Note: Drilling URLs are not available in the list view.
See Fluid Mode Options.
Copyright
©
1988, 2020, Oracle and/or its affiliates. 63
Using Query as a Data Source for Pivot Grid Chapter 3
64 Copyright
©
1988, 2020, Oracle and/or its affiliates.

Chapter 4
Creating Pivot Grid Models
Pivot Grid Wizard Overview
You use the Pivot Grid wizard to create and maintain Pivot Grid models. The wizard consists of five
steps that lead you through the process of defining the core of the grid (data, values, and axes) and initial
pivot display (chart type and viewing options). Users with the appropriate security also use the Pivot Grid
wizard to update existing models.
Copyright
©
1988, 2020, Oracle and/or its affiliates. 65

Creating Pivot Grid Models Chapter 4
Image: Flowchart for creating and updating a Pivot Grid model
This diagram illustrates the processes of creating and updating a Pivot Grid model.
Specifying Pivot Grid Properties
Use the Specify Pivot Grid Properties page (PTPG_WIZ_INFO) to identify and categorize the data model
for the Pivot Grid.
66 Copyright
©
1988, 2020, Oracle and/or its affiliates.

Chapter 4 Creating Pivot Grid Models
Navigation
Access the Specify Pivot Grid Properties page by selecting Reporting Tools > Pivot Grid > Pivot Grid
Wizard.
Image: Specify Pivot Grid Properties page
This example illustrates the fields and controls on the Specify Pivot Grid Properties page. Definitions for
the fields and controls appear following the example.
Pivot Grid Title Enter a title for the pivot grid. This field is required.
Pivot Grid Type
Select whether the Pivot Grid model is Private or Public.
• Private models are only available to the users who created
the model and the users who have the PivotGridAdmin role.
• Public models are available to administrators and power
users for updating, and they are accessible to all users for
viewing.
Owner Select the owner for the Pivot Grid model.
The owner is used to identify which models are owned by which
PeopleSoft applications, such as PeopleSoft General Ledger,
Accounts Receivables, PeopleTools, and so on. This field is not
used for security purpose.
Next The Next button is available after you enter the title of the pivot
grid in the Pivot Grid Title field and move to any other field.
Click this button to advance the wizard to the next page.
Copyright
©
1988, 2020, Oracle and/or its affiliates. 67
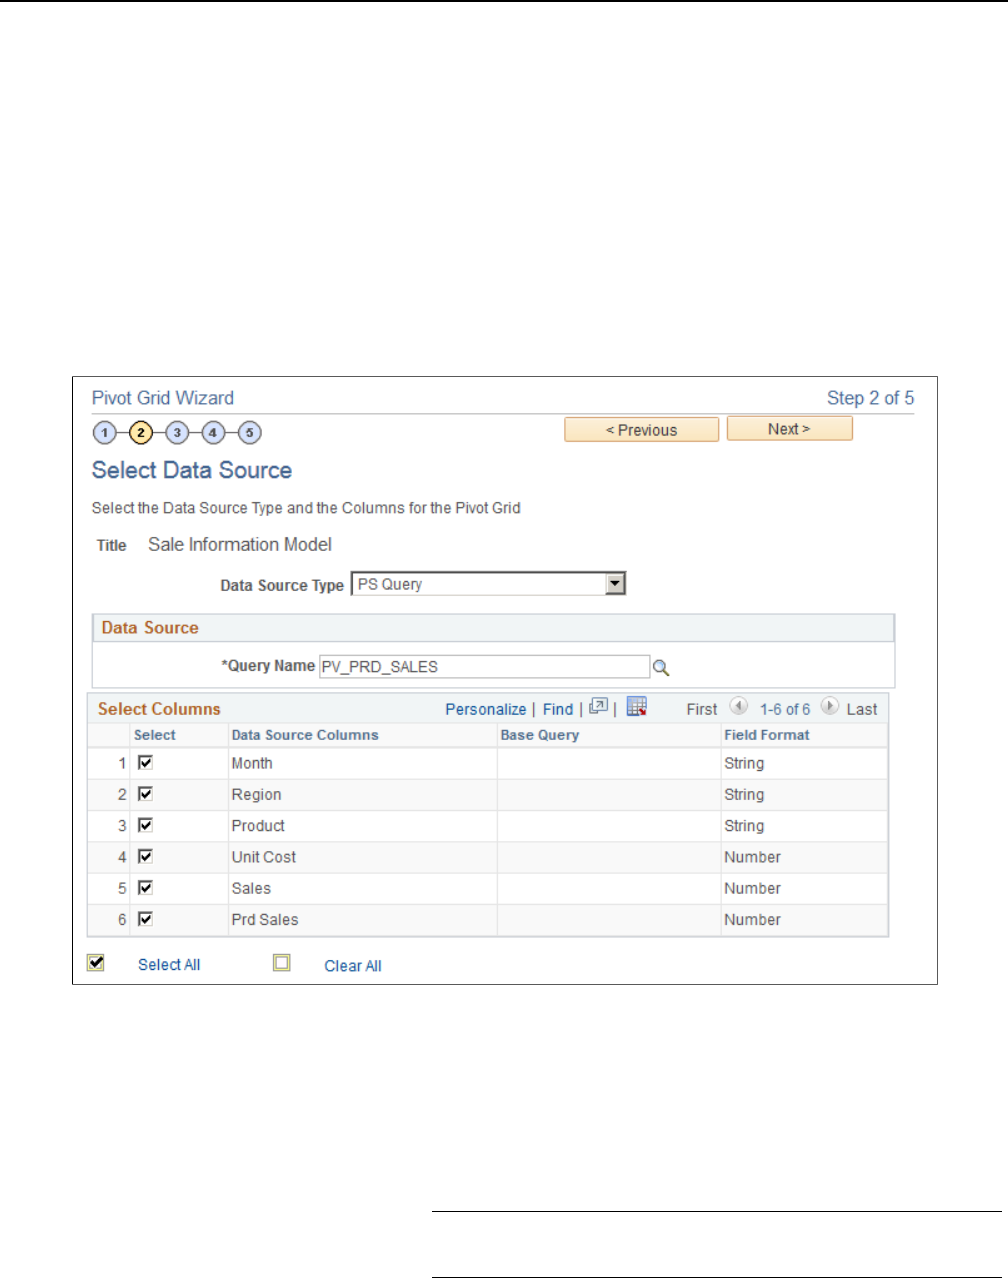
Creating Pivot Grid Models Chapter 4
Selecting a Data Source
Use the Select Data Source (PTPG_WIZ_DATASRC) page to select the data source and output columns.
Navigation
Access the Select Data Source page by selecting the Next button on the Specify Pivot Grid Properties
page.
Image: Select Data Source page - PSQuery
This example illustrates the fields and controls on the Select Data Source page when the Data Source
Type is set to PS Query.
Data Source Type
Available options are PS Query, Composite Query, and
Component.
Query Name
This field is available if the Data Source Type is set to PS
Query, and Composite Query.
Click the search icon to select a query from the list of existing
queries.
Note: Only one query can be associated with one Pivot Grid
model as a data source.
Select Columns Select the output columns to be plotted in the Pivot Grid model.
You must select at least two PSQuery output columns.
68 Copyright
©
1988, 2020, Oracle and/or its affiliates.

Chapter 4 Creating Pivot Grid Models
The Select Columns region is available after you select an
existing query in the Query Name field using the search icon
or after you enter a valid query name and tab out of the Query
Name field.
Next The Next button is available after you select at least two
columns in the Select Columns region.
Click this button to advance the wizard to the next page.
Related Links
Creating a Component Pivot Grid Model Using the Pivot Grid Wizard
Creating Composite Query Pivot Grid Models Using the Pivot Grid Wizard
Specifying Data Model Values
Use the Specify Data Model Values page (PTPG_WIZ_MODEL) to define the column type and aggregate
functions for the selected data model.
Navigation
Access the Specify Data Model Values page by selecting the Next button on the Select Data Source page.
General Options
Image: Specify Data Model Values page
This example illustrates the fields and controls on the Specify Data Model Values page. Definitions for
the fields and controls appear following the example.
Column Label (Optional) Specify the labels for columns (dimensions/facts).
The labels apply to grids and charts.
Copyright
©
1988, 2020, Oracle and/or its affiliates. 69

Creating Pivot Grid Models Chapter 4
Note: Column labels must be unique. No two data source
columns can have the same label.
Aggregate Label (Optional) Enter the aggregate labels for the columns. These
aggregate labels will be:
• Populated in the Y-axis field in the Specify Data Model
Values page, Chart Options section and in the User Charting
Options page.
• Displayed as the titles of the columns in the grid.
• Displayed as the title of the Y-axis in the chart.
• Populated in the Y-axis field in the User Charting Options
page when you update the chart options.
For example, the label of the Unit Cost column is set to Total
Cost, the label of the Sales column is set to Total Sales, and the
label of the Prd Sales column is set to Total Prd Sales.
• In the Specify Data Model Options page, Chart Options
section, if the Unit Cost column is selected as the Y-axis,
then the value in the Y-axis label is populated as Total Cost.
• In the chart, the title of the Y-axis is Total Cost.
• In the grid, the titles of the columns are Total Cost, Total
Sales, and Total Prd Sales.
The behavior of the Aggregate Label field is applied to both
classic and fluid views.
Column Type Define the axis, value, or display members for a column.
Select the Display option to enable the column to appear in the
detailed-data view of the grid and the chart.
Note: At least one Axis and one Value member are required. You
can also select this column as a related action parameter for a
Pivot Grid model in the detailed-data view.
If the PSQuery formula is based on an expression and that
expression is used in the Pivot Grid model, then:
• The formula-based expression can be used only as a column
value and no aggregate function should be applied if the
aggregation functions are derived from the other columns
which make up the expression.
You can select the None option in the Aggregate column for
the expression to avoid multiple aggregation on the column.
70 Copyright
©
1988, 2020, Oracle and/or its affiliates.

Chapter 4 Creating Pivot Grid Models
• The formula-based expression cannot be used as a column
axis.
• The formula-based expression should be comprised of only
other column values. For example, (ValueA + ValueB/100)
or ((ValueA + ValueB)/ValueA)*100.
Total
Select which Axis members have the Total (All) attribute
enabled.
Note: This column is available only for the data source column
with column type Axis.
Aggregate
Define the aggregate functions for the Value type members.
Available options are Average, Count, Count Distinct,
Maximum, Minimum, Sum, and None.
Note: This column is only available for the data source column
with column type Value.
Value members of type Number and Signed Number can be
associated with any of the aggregate functions. Value members
of any other type can only be associated with the Count
aggregate function.
Count or Count Distinct aggregates are available for the fact
fields that are set to character.
If the PSQuery expression is based on a formula and that
expression is used in the Pivot Grid model, then the type of the
column should be set to Value, and the Aggregate value should
be set to None to avoid multiple aggregations on the column.
Total Name (Optional) Specify the total names, which override the default
All string.
Editable Facet Select to enable the data source columns as editable facets
(prompts) in fluid view.
See Configuring Facets and Filters.
Next Click this button to advance the wizard to the next page.
Selecting Query Prompt Values
The Select Query Prompt Values region is only available when the selected query has prompts attached.
Copyright
©
1988, 2020, Oracle and/or its affiliates. 71
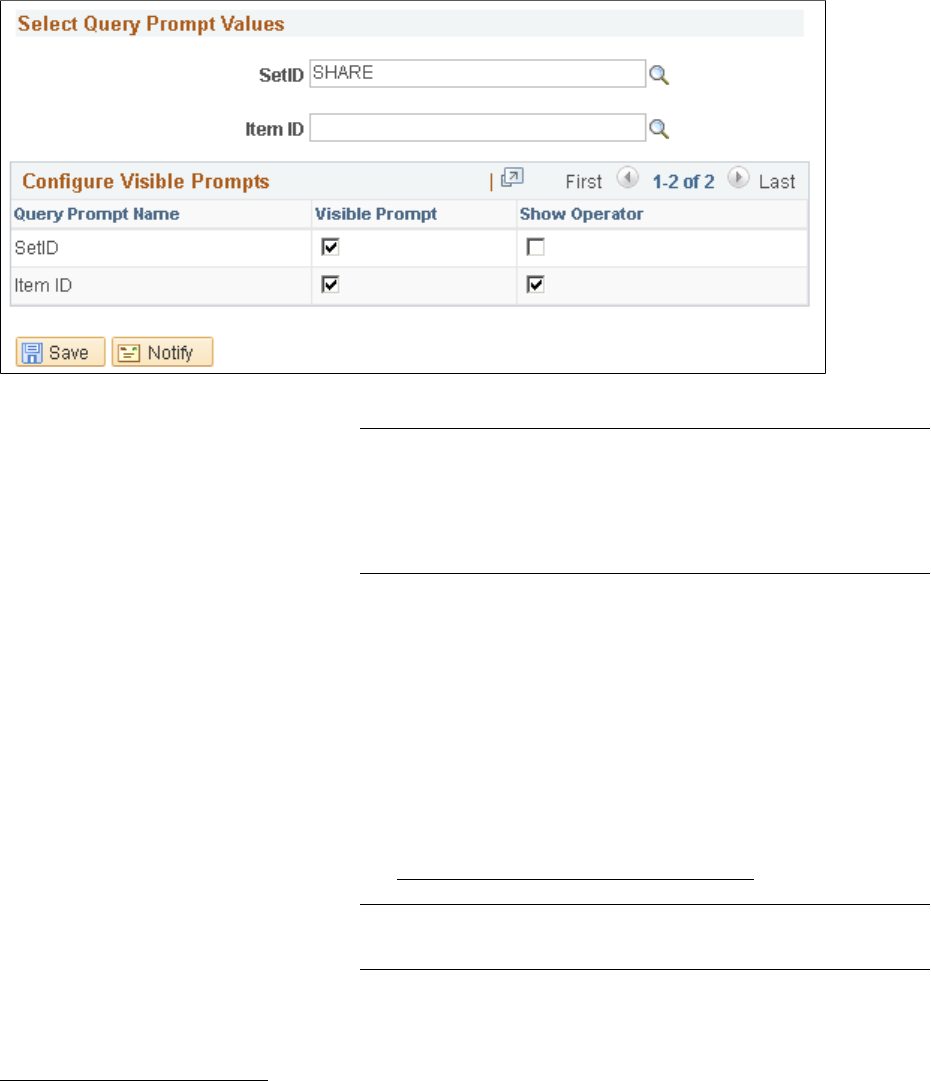
Creating Pivot Grid Models Chapter 4
Image: Specify Data Model Values page - Select Query Prompt Values section
This example illustrates the fields and controls on the Select Query Prompt Values section. You can find
definitions for the fields and controls later on this page.
Select Query Prompt Values Enter the default values for the PSQuery runtime prompts.
Note: The default value in the Select Query Prompt Values
region is blank and you are able to define your prompt values.
If the required prompt fields are blank or if the format of data
entered is incorrect, Pivot Grid Wizard displays a validation
error.
Configure Visible Prompts
Visible Prompt Select to make the query prompts visible to the viewer.
If you do not make any of the prompts visible then, the Prompts
option will not appear in the Options Menu in Pivot Grid
Viewer.
Show Operator Select to show the assigned operators for a prompt value.
See Displaying Operators on Editable Facets
Note: Show Operators is only supported in component based
pivot grid models.
Related Links
Configuring Facets and Filters
72 Copyright
©
1988, 2020, Oracle and/or its affiliates.

Chapter 4 Creating Pivot Grid Models
Tree Options
Image: Tree Options section
This example illustrates the fields and controls on the Tree Options section. You can find definitions for
the fields and controls later on this page.
Attach Tree Click to access the Attach Tree to Dimension window, where
you can select a tree from a list of available trees and attach it to
the dimension.
Note: Only Summer Detail Trees that match the corresponding
Axis are listed.
Detach Tree Click to detach a current PeopleSoft tree from the dimension.
Tree Name Display the tree names that you have selected using the Attach
Tree button.
Tree Node This field is required.
The Tree Node is populated with the Root node of the selected
tree. However, this value can be changed to point to any node
in the tree. The hierarchical information for the dimension is
shown from this node only.
Related Links
Tree Manager
Attaching PeopleSoft Trees to Dimensions
Optimizing Trees
Copyright
©
1988, 2020, Oracle and/or its affiliates. 73

Creating Pivot Grid Models Chapter 4
Formatting Options
Image: Formatting Options section
This example illustrates the fields and controls on the Formatting Options section. You can find
definitions for the fields and controls later on this page.
Currency Control Field Select Currency field as the Currency Control Field. The
decimal positions for the currency value are based on the
currency control field. For example, two decimal positions
appear for U.S. dollars or three decimal positions appear for the
Brazilian real.
Note: The query should include the Currency field as a Data
Source Column to associate it as the Currency Control Field.
These currency control fields can be associated with the
columns set to Value and Display.
Show Currency Symbol Select this option to display the currency symbol for the
columns that are set to Value. If this option is selected:
•
The Value column is appended by the currency symbol, such
as $, £, and so on.
• The Y-axis columns will display the currency symbols next
to the label of the axis.
• When users hover over the charts, the symbols appear in
the embedded labels to show the data points plotted on the
chart.
Note: This option is accessible only when the Currency option
is selected in the Currency Control Field.
74 Copyright
©
1988, 2020, Oracle and/or its affiliates.

Chapter 4 Creating Pivot Grid Models
Display 1000 Separator Select to display the 1000 separator for the Value. For example,
the value of ten thousand dollars appears as $10,000.00 and
Product Count appears as 1,000.
Sequence Click to access the Configure Column Axis Sequence page. Use
this page to define order or sequence for values of axis fields.
Note: If no value is set in the Formatting Options tab, the system displays the currency values using the
default settings, for example, 123456.78.
The alternate text in the chart and in the values on the Detail View displays the currency in the defined
formats.
Defining Sequence for Values of Axis Fields
Click the Sequence link in the Formatting Options section to access the Configure Column Axis Sequence
page. Use this page to define order or sequence for values of axis fields.
Copyright
©
1988, 2020, Oracle and/or its affiliates. 75

Creating Pivot Grid Models Chapter 4
Image: Configure Column Axis Sequence page
This example illustrates the fields and controls on the Configure Column Axis Sequence page. You can
find definitions for the fields and controls later on this page.
Translate Field Select this check box to use a field with translate values as the
Field Name. Correspondingly, a drop-down list with translate
values of the Translate Field appears in the Column Data field.
Field Name This field is enabled only when the Translate Field check box
is checked. Select a value for the Field Name to activate a
dropdown list with translate values of the Translate Field in the
Column Data field.
Seq Define order or sequence for values of axis fields.
76 Copyright
©
1988, 2020, Oracle and/or its affiliates.

Chapter 4 Creating Pivot Grid Models
Column Data Enter data for the axis field.
The Column Data field can either be a dropdown list with
translate values of the Translate Field if the Translate Field is
checked and the Field Name is provided, or a text box where
data for axis field can be entered.
Specifying Data Model Options
Use the Specify Data Model Options (PTPG_WIZ_OPT) page to define the initial layout of the grid and
the chart.
Navigation
Access the Specify Data Model Options page by selecting the Next button on the Specify Data Model
Values page.
Image: Specify Data Model Options page
This example illustrates the fields and controls on the Specify Data Model Options page. Definitions for
the fields and controls appear following the example.
This page has six main sections: View Options, Grid Options, Chart Options, Display Options, and Fluid
Mode Options. Each section can be expanded or collapsed.
View Options
Expand to display the view options.
Copyright
©
1988, 2020, Oracle and/or its affiliates. 77
Creating Pivot Grid Models Chapter 4
Default View Define Pivot Grid view options for the grid and the chart.
Available options are:
• Pivot Grid Only
• Chart Only
• Pivot Grid and Chart
Grid Axis and Chart Axis Select the initial grid and chart layout. Note that:
• Both grid and chart axes must be selected, irrespective of
the display option selected. Both grid and chart have the
same filters. All the Value type columns lie on one axis in
the pivot grid.
• For the chart, Axis type members can be selected as X axis
and Series, whereas the Value type members can be selected
as Y axis and overlay.
• You can select only one X-axis or one overlay member.
You can set multiple columns as Y axes, and these Y axes
will be plotted as series on the charts. This feature has these
limitations:
•
Multiple Y axes are solely available for the Chart-only
models. The X axis and series of the Pivot Grid and Chart
models are determined by the dynamic grid layout. Note that
it is not possible to have multiple Y axes because multiple Y
axes and chart series behave in the same way. At any given
point, only one Y axis and series can be plotted on the chart.
If multiple Y axes are set for a Pivot Grid and Chart model,
only the first Y axis is plotted on the chart.
• If two or more Y axes are selected on the chart, all Series
values will not be applied because both X axis Series and
multiple Y axes cannot be plotted simultaneously on the
chart.
• A maximum of 10 Y axes can be simultaneously plotted on
a chart.
• As with Series, the colors of multiple Y axes are determined
by the default colors set in the PeopleSoft Charting
stylesheet, and these default colors are not editable in Pivot
Grid.
• Selecting multiple Y axes will not automatically alter the
title of the Y axis. You can change the title manually. Also,
to distinguish among the different Y axes being plotted,
Oracle PeopleSoft recommends that you set legends (using
78 Copyright
©
1988, 2020, Oracle and/or its affiliates.

Chapter 4 Creating Pivot Grid Models
the Legend dropdown list in the Chart Options section) for
each Y axis when you have multiple Y axes.
Note: The behavior of the Multiple Y axes feature applies to
both classic and fluid views. In addition for fluid viewer, you
have the option to control the behavior when you select facts in
the column area that are displayed in the fluid viewer. See Fluid
Mode Options.
Display As The Display As column is available only for number (facts)
fields.
Select either the Percentage or the Percentage Grand Total
option to display the number (fact) values in the grid and chart.
Select display as Percentage if you want to show the data point
in percentage. Select display as Percentage Grand Total if you
want to show the calculated percentage of the data point on the
grand total of the field.
Dual Y-axis This option is available for the columns that are set to Y axis.
Select an option to set the corresponding Y axis column as a
dual Y axis on the Pivot Grid charts; this means that the system
will display a second Y axis on the chart. The values for the
second Y axis will be plotted like a series on the chart.
Note that:
• Only one column can be set and plotted as the dual Y axis
on the chart.
• If a dual Y axis is selected to be plotted on the chart, other
Series and axis values cannot be plotted on the chart.
• You can select multiple Y axes for a chart, and you can mark
one of the selected Y axes (that belongs to the multiple Y
axes) as dual Y axis for the chart.
•
Dual Y axis is solely available for the Chart-only models.
The X axis and Series of the Pivot Grid and Chart models
are determined by the dynamic grid layout, so it is not
necessary to have the dual Y axes as Series on the chart. If
dual Y axes are set for a Pivot Grid and Chart model, only
the first Y axis is plotted on the chart.
• The title of the dual Y axis is populated based on the name
of the axis column.
Note: The behavior of the Dual Y axis feature applies to both
classic and fluid views.
Copyright
©
1988, 2020, Oracle and/or its affiliates. 79

Creating Pivot Grid Models Chapter 4
Define Threshold Click to access the Configure Thresholds page, where you
can configure the basic threshold settings for the grids and the
charts.
All threshold settings are applied for both classic and fluid
views. For detailed description see, Configuring Thresholds.
Next Click to advance the wizard to the next page.
Grid Options
Use the Grid Options section to define Pivot Grid view options for the grid and the chart.
Image: Grid Options section
This example illustrates the fields and controls in the Specify Data Model Options page - Grid Options
section. Definitions for the fields and controls appear following the example.
Collapsible Data Area Select to allow viewers to collapse the data area.
Expanded State Select to have the initial view expanded.
No Drag and Drop Select if you do not want users to have the ability to drag and
drop filters, rows, and column axes.
Chart Options
Expand the Chart Options section to enter additional chart options.
80 Copyright
©
1988, 2020, Oracle and/or its affiliates.

Chapter 4 Creating Pivot Grid Models
Image: Chart Options section
This example illustrates the fields and controls on the Specify Data Model Options page - Chart Options
section. Definitions for the fields and controls appear following the example.
Title Enter a title for your chart. By default, the Pivot Grid model
name is used.
Type All PeopleSoft chart types are available, including:
• 2D Bar Chart
• 2D Histogram Chart
• 2D Horizontal Bar Chart
• 2D Horizontal Percent Chart
• 2D Line Chart
• 2D Percent Bar Chart
• 2D Pie Chart
• 2D Stacked Bar Chart
• 2D Stacked Horizontal Bar
Note: 3-D charts are not supported as a chart type.
X-Axis Label Enter a label for the X axis. By default, the field name for the X
axis is used.
Y-Axis Label Enter a label for the Y axis. By default, the field name for the Y
axis is used.
Copyright
©
1988, 2020, Oracle and/or its affiliates. 81

Creating Pivot Grid Models Chapter 4
Advanced Options Define display options for the chart, including chart legend, and
height and width of the chart.
Legend
Select a legend for the chart. The available options are Bottom,
Left, None, Right, and Left.
By default, the None option is selected.
Y-Axis Precision Enter the number of decimal places in the Y-axis values. For
example, when the Y-Axis Precision has a value of 2, the Y-axis
in the chart has two decimal values.
Note: When the pivot grid display is a pie chart type, then the
Y-Axis Precision is disabled and considered as 0.
Exploded Pie Select to view the 2D or 3D charts with exploded sectors.
Related Links
Using the User Charting Options
Display Options
Use the Display Options section to hide chart icon shortcuts and to disable menu options in the Pivot Grid
display. This configuration is at the model level and is applicable for all views.
For example, if the Hide Chart, Pie Chart, and Horizontal Bar Chart options are not selected in the
Display Options section, the Hide Chart option in the Option Menu dropdown list is disabled and the Pie
Chart and the Horizontal Bar Chart icons are invisible in the Pivot Grid display.
82 Copyright
©
1988, 2020, Oracle and/or its affiliates.

Chapter 4 Creating Pivot Grid Models
Image: Display Options section
This example illustrates the fields and controls on the Specify Data Model Options page - Display
Options section.
All selected options are available under the Options Menu on a pivot grid model view. See Using the
Options Menu.
View Grid Select to display the Pivot Grid view for the chart view on a
modal window. The modal window also includes the facet pane
on the left. You can select to slice and dice the data in the grid
by dragging the facets from the left pane to the columns and
rows of the grid.
In addition, you can change prompts and facet values to analyze
the data. When you click the Apply button in the top right of the
modal, the chart is refreshed based on the current layout of the
grid. Otherwise, when you click the Cancel button in the top left
of the modal, it is closed and the chart layout is not changed.
Export Data Select to export the underlying PSQuery data to Microsoft
Excel.
Export Filtered Data Select to export the filtered PSQuery data to Microsoft Excel.
Chart Options Select to open the User Charting Options dialog box, where you
can change the chart layout, chart axis, and filters. This option
is available only when the chart is visible. SeeUsing the User
Charting Options.
Hide Chart Select to show the option Hide Chart on a Pivot grid and Chart
model.
Copyright
©
1988, 2020, Oracle and/or its affiliates. 83

Creating Pivot Grid Models Chapter 4
Update Filters Select to display the Update Filters dialog box, which enables
you to add or remove filters for a model. The dimensions, that
are configured with blank values for the Chart Axis column
in Step 4: Specify Data Model Options page of the Pivot Grid
Wizard, will be available to add as additional filters in addition
to the default filter dimensions. See Specifying Data Model
Options
Bar Chart Line Chart Pie Chart
Horizontal Bar Chart
Select to provide the user options to change chart display visual.
Threshold Options Select to authorize users to personalize threshold configurations.
Allow User Addition Select to allow users to configure Personalized Analytic
Notification. See Understanding Personalized Analytics
Notification. Users will be able to personalize Threshold
Criteria and Alert Type from Threshold Personalization dialog
box. See Personalizing Thresholds.
If the option is not selected, then options to personalize a
threshold are available to the users or roles in the default
notification list in Configure Threshold dialog box. See
Configuring Thresholds.
Enable Threshold Options to enable Allow User Addition.
Show Help Displays the help icon on the pivot grid model.
Reset Select to reset the pivot grid model to its original display.
Save Select to save the current model layout as a default view of the
current model. The model layout, filter values, and PSQuery
prompt values are also saved as preferences.
Save As Select to open the Save As dialog box, which enables you to
copy the current Pivot Grid model and save it as a different one.
Add to HomePage Select to add the pivot grid model with personalizations to a
homepage. You are prompted to select the homepage when you
select the option.
Help Message Configure message text using the PeopleSoft preconfigured
Message Set Number and Message Number. The message
description shows when you roll over the Help button.
84 Copyright
©
1988, 2020, Oracle and/or its affiliates.

Chapter 4 Creating Pivot Grid Models
Image: Pivot Grid display without some viewer options
This example illustrates the Pivot Grid fluid view. The Export Data, Export Filtered Data, and View Grid
options are not listed in the Options Menu, and the Pie Chart and Horizontal Bar Chart icons are invisible.
Note that following points when you set the values in the Display Options section:
• If no view option is selected in the Display Options section and if all prompts are set to invisible, then
the Options Menu is invisible in Pivot Grid Viewer.
• You can selectively show and hide prompts using the Select Query Prompt Values section in the Pivot
Grid Wizard – Specify Data Model Values page.
• If the Show Help option is selected, the embedded Help icon is available in the Grid Viewer page.
Note: The Help icon is shown only in the classic viewer and it is unavailable in Fluid viewer.
• Use the Help Message section to define the help information. The default help message is from
message set number 268, and the message number 315. The message catalog entry is parsed for
special placeholders %PBCTXT(PTPG_PSPGVIEWER). Note that the Help URL field in the Web
Profile Configuration page must be specified (by selecting PeopleTools, Web Profile, Web Profile
Configuration).
See "Entering Embedded Help Messages in the Message Catalog" (PeopleTools 8.58: Application
Designer Developer's Guide).
Fluid Mode Options
The Fluid Mode Options are grouped as follows:
• List View Options
• Viewer Options
Copyright
©
1988, 2020, Oracle and/or its affiliates. 85

Creating Pivot Grid Models Chapter 4
• Facet Selection
List View Options
Use the Specify Data Model Options page - Fluid Mode Options section- List View Options region
to define the list view options for the pivot grid model. The list view options include the title and the
summary for each row of result. The Title and Summary regions use the dimension values that are
part of the detail grid. When designing the pivot grid model, application developers create the title and
summary text from message catalog entries. The bind values for the message catalog are passed from the
dimensions, facts, and display columns.
See the Message Catalog section in "Using Administration Utilities" (PeopleTools 8.58: System and
Server Administration)
Note: The list view options are also available at the Views Configuration page (Pivot Grid Wizard,
Configuration Pivot Grid View link). These properties can be configured at each view level. The Views
Configuration page for pivot grids overrides the Fluid Mode Options at the view level.
86 Copyright
©
1988, 2020, Oracle and/or its affiliates.

Chapter 4 Creating Pivot Grid Models
Image: Fluid Mode Options - List View Options
This example illustrates the fields and controls on the Specify Data Model Options page - Fluid Mode
Options section - List View Options group.
Viewer Options
Use the Specify Data Model Options page - Fluid Mode Options section - Viewer Options region to
define the result view for the pivot grid model.
Copyright
©
1988, 2020, Oracle and/or its affiliates. 87

Creating Pivot Grid Models Chapter 4
Image: Fluid Mode Options - Viewer Options
This example illustrates the fields and controls on the Specify Data Model Options page - Fluid Mode
Options section - Viewer Options group.
Result View The Result View can be set to Grid, List, Grid and List, or None.
Allow Multiple Y Axes Select this option to allow users to select multiple Y Axes on the
chart. If this option is deselected, any change to the Y axis will
result in a single Y axis being plotted on the chart.
Hide Chart Select this option to hide the Chart toggle on a Component Real
time Search page. If the check box is not selected the toggle will
show on the search result page.
Result View Columns By default, all the display type columns, axis rows, filters, and
facet fields appear in the detail view. You may not select any
column in the Result View Columns section to hide that column
in the fluid view.
Incremental Facet Count From the Facet Count dropdown select the incremental number
of facet values that will load at a time.
Facet State Select to keep the facets on the left pane, expanded or collapsed
when the model loads initially.
88 Copyright
©
1988, 2020, Oracle and/or its affiliates.

Chapter 4 Creating Pivot Grid Models
Detailed View Display Settings Select the Hide Detailed View check box to help chart models
load faster. This option defers loading the detailed view of a
chart.
Facet Selection
Use the Specify Data Model Options page - Fluid Mode Options section - Facet selection region to set the
facet display options.
Image: Fluid Mode Options - Facet Options
This example illustrates the fields and controls on the Specify Data Model Options page - Fluid Mode
Options section - Facet selection region.
Allow Multiselect Select to enable multi-select facets as charts and as lists in fluid
views.
Show as Chart Select to enable chart view.
Chart Type Set the chart type for the facet.
Facets Displays the facet name.
State
Select the state for the facet to appear as Expanded or Collapsed
or as Invisible when the model loads initially.
Sequence No. Define sequencing of the facets in the pivot grid configuration.
The facet with the lower sequence number value will take
precedence in order of appearance.
Drilling URL Options
Use the Specify Data Model Options page - Fluid Mode Options section - Drilling URL Options region to
define how mapped drilling URLs will appear in fluid view. The available options are Full Page Modal,
Modal Window, New Window, and Replace Window.
Copyright
©
1988, 2020, Oracle and/or its affiliates. 89

Creating Pivot Grid Models Chapter 4
Image: Fluid Mode Options - Drilling URL Options
This example illustrates the columns on the Specify Data Model Options page - Fluid Mode Options
section - Drilling URL Options region.
Note: PeopleSoft recommends that you set your drilling URLs to open in a new window for all external
drilling URLs and classic components. For pages with fluid views, the Replace Window and Modal
Window options are recommended.
The size of the modal window is controlled by the target page’s min-width and min-height settings,
which is similar to any fluid modal. In smart phones, the target page is displayed as full page modal
automatically when the column is configured to use the Modal window option.
Related Links
Configuring Facets and Filters
Viewing Pivot Grid Displays
Use the Pivot Grid Display page (PTPG_WIZ_DISP) to review the Pivot Grid model based on the display
option and layout selected. Optionally, you can modify the Pivot Grid model to finalize the design and
then click the Save button to save it. Pivot Grid model metadata is saved to the database.
Note that Pivot Grid displays the value 0 (zero) in the grid cell if:
• No data for the grid intersection point exists.
In this case, Pivot Grid displays 0 as text, and you cannot drill down to details from this text.
•
Aggregate function returns 0 for the grid intersection. A common use case could be +ve and -ve
values adding up to 0 for the Sum aggregate.
In this case, Pivot Grid displays 0 as a link, and you can drill down to details from this link.
Navigation
Access the Pivot Grid Display page by selecting the Next button on the Specify Data Model Options
page.
90 Copyright
©
1988, 2020, Oracle and/or its affiliates.

Chapter 4 Creating Pivot Grid Models
Image: Pivot Grid Display page
This example illustrates the fields and controls on the Pivot Grid Display page. Definitions for the fields
and controls appear following the example.
Use the Option Menu icon to select the actions for viewing the
Pivot Grid model.
• Export Data: Select to export the underlying PSQuery data
to Microsoft Excel.
• Export Filtered Data: Select to export the underlying filtered
PSQuery data to Microsoft Excel.
Copyright
©
1988, 2020, Oracle and/or its affiliates. 91

Creating Pivot Grid Models Chapter 4
• Chart Option: Select to open the User Charting Options
dialog box, where you can change the chart layout, chart
axes, and filters.
Note: To drill down on the chart, click the chart data points.
To drill out on the chart, click the drillout link, which
appears as a locator link at the top of the chart.
If the Pivot Grid model is in the Chart Only mode or in the Pivot
Grid and Chart mode, the available options are Export Data,
Export Filtered Data, and Chart Option.
If the Pivot Grid model is in the Pivot Grid Only mode, the
available options are Export Data and Export Filtered Data.
Note: The options Prompts, Reset, Save, View Grid, Display
Chart, Hide Chart, and Save As are not available in the Pivot
Grid Wizard because these options are viewer-only options.
Click the Help icon to display the Help - Pivot Grid dialog box,
where you can view the help information that you have defined
for all actions for this Pivot Grid model.
Expand All and Collapse All The Expand All or Collapse All link appears when the Pivot
Grid model contains dimensions with totals on the lowest level
of the grid row or column. These links are not available for the
Pivot Grid models that have no totals defined for dimensions on
the grid row and grid column.
• Click the Expand All link to expand all the positions on the
grid row and column; the Collapse All link appears.
• Click the Collapse All link to collapse all the positions on
the grid row and column; the Expand All link appears.
Click the Bar icon to display data in a bar chart.
Click the Line icon to display data in a line chart.
Click the Pie icon to display data in a pie chart.
Click the Horizontal Bar Chart icon to display data in a
horizontal bar chart.
Configure Related Content Click to access the Assign Related Actions page, where you can
assign services to be used as Related Actions, select the service
target to determine where the service will be displayed, and
define the parameter mappings and options for the service.
Note: The Configure Related Content link is available after you
save the Pivot Grid model.
92 Copyright
©
1988, 2020, Oracle and/or its affiliates.

Chapter 4 Creating Pivot Grid Models
See Configuring the Related Actions Menu.
Publish as Pagelet Click to access the Review Pagelets dialog box, where you
can view a list of pagelets that are using the current Pivot Grid
model and where you can create home page and template Pivot
Grid pagelets without navigating to the pagelet wizard.
You can also add new, delete, or update existing pagelets that
are based on the specific Pivot Grid model that you edited in the
wizard.
Note: The Publish as Pagelet link is available after you save the
Pivot Grid model.
See Creating a New Pivot Grid Pagelet Using the Pagelet
Wizard.
Configure Pivot Grid View Click to access the Pivot Grid Views Component dialog box,
where you can create or edit existing views that are associated
with the current Pivot Grid model.
Note: This link is available only after the Pivot Grid model is
saved for the first time; for example, in Update or Correction
mode.
See Defining the Pivot Grid Display Options in Creating a New
Pivot Grid Pagelet Using the Pagelet Wizard.
Publish as Tile Click to enable the Pivot Grid model to be published as a tile
and included in the landing pages. The tile can contain the Pivot
Grid chart as the dynamic tile content.
See Publishing Pivot Grid Fluid Views as Tiles.
Note: When working with the Pivot Grid Wizard, you can modify your previous selections at any step by
clicking the step number icons. Changes to your selections could change the Pivot Grid model.
Configuring the Related Actions Menu
In the Pivot Grid wizard - Specify Data Model Values page, you can select the Display option to enable
the column to appear in the detailed-data view of the grid and the chart. You can also select this column as
a related action parameter for a Pivot Grid model in the detailed-data view.
In Pivot Grid models, you can configure the related action at the cell level in the grid. Each cell in
the Pivot Grid model represents an aggregate fact value. For each fact, the combination of different
dimensions is defined for each related action service. Clicking the fact value number populates a related
action menu, which is a combination of all the related actions that were configured for that fact.
Copyright
©
1988, 2020, Oracle and/or its affiliates. 93

Creating Pivot Grid Models Chapter 4
Note: If related actions are not configured for the Pivot Grid model, then clicking the fact value number
opens the Detailed View page.
To drill down on the Pivot Grid charts, you must enter an authentication domain either when you set up
the PeopleSoft Pure Internet Architecture or in the Web Profile page. See “Configuring General Portal
Properties” in "Configuring Web Profiles" (PeopleTools 8.58: Portal Technology) and “Setting Up the
PeopleSoft Pure Internet Architecture” in the Installation Guide.
Configuring Related Actions From Pivot Grid Wizard
To configure Related Actions from Pivot Grid Wizard:
1. Select Reporting Tools, Pivot Grid, Pivot Grid Wizard.
2. Open an existing Pivot Grid model, and access Step 5 - Pivot Grid Display page.
3. Click the Configure Related Content link.
The Assign Related Content modal window appears.
4. Define the values for Service ID, Service Label, and Service Target.
Image: Assign Related Actions page
This example illustrates the fields and controls on the Assign Related Actions page.
5. Optionally, select the Bulk Action option.
See Bulk Related Actions for a list view in Viewing Related Actions from the Fluid View.
Click the Configure button.
6.
Set the Mapping Type to Data Column.
7. Click the search icon in the Select column to select an appropriate Pivot Grid data column.
8. In the Menu Options section:
94 Copyright
©
1988, 2020, Oracle and/or its affiliates.
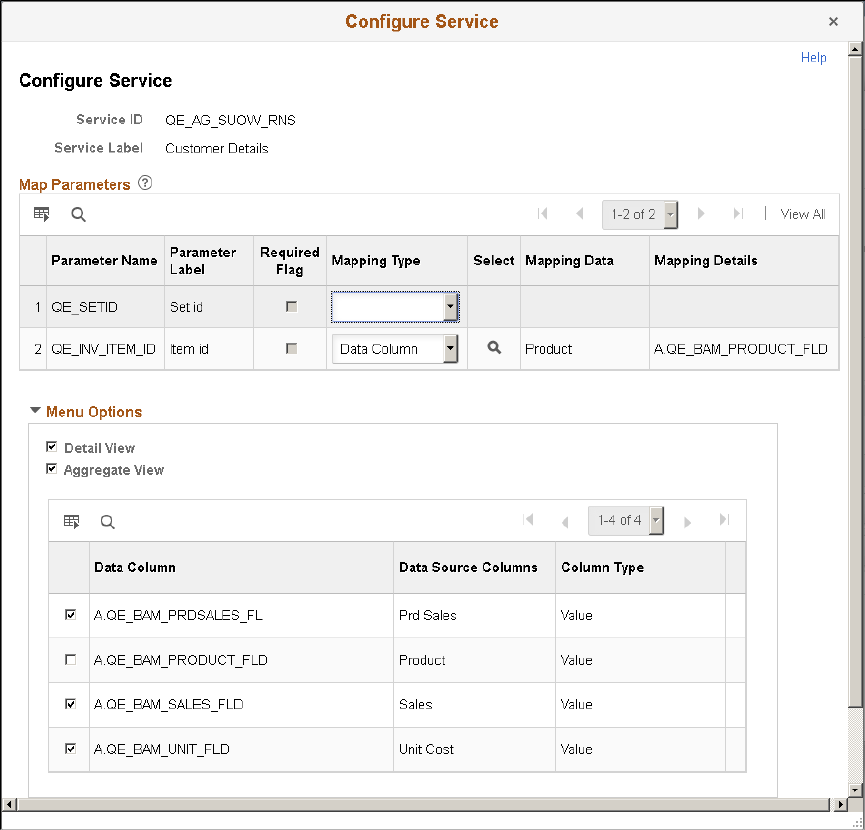
Chapter 4 Creating Pivot Grid Models
• Select the Detail View option to display the related actions menu only in the Detailed View grid.
• Select the Aggregate View option to display the related action menu in both grid and chart.
• Select the data columns on which you want to show the menu.
Image: Configure Service modal window
This example illustrates the Configure Service modal window.
9. Click the OK button to exit the Configure Service window, and click the OK button again to exit the
Assign Related Content modal window.
10. Save your settings.
Copyright
©
1988, 2020, Oracle and/or its affiliates. 95

Creating Pivot Grid Models Chapter 4
Image: Related Actions menu in a chart-only model
This example illustrates a chart-only model with the related action menu accessed on a chart. Note that, in
a chart view, clicking the chart displays the related actions for the fact being plotted on the Y axis.
96 Copyright
©
1988, 2020, Oracle and/or its affiliates.

Chapter 4 Creating Pivot Grid Models
Image: Related Action menu in the grid area of a grid-only model
This example illustrates a Pivot Grid Only model with the related action menu accessed on the grid.
Configuring Bulk Related Actions
You can use the Define Related Content Service page (Portal, Related Content Service, Define Related
Content Service) to set the related service definition and to enable the Bulk Mode option for the Pivot
Grid models.
Note: Aggregate bulk related actions are not applicable; therefore, the aggregate option is disabled for the
bulk related action configuration for Pivot Grid models.
Related Links
"Managing Related Content Configurations and Data" (PeopleTools 8.58: Portal Technology)
Viewing Related Actions from the Fluid View
Copyright
©
1988, 2020, Oracle and/or its affiliates. 97

Creating Pivot Grid Models Chapter 4
Publishing Pivot Grid Fluid Views as Tiles
You can publish a Pivot Grid Fluid view as a tile (or grouplet). The tile can contain the pivot chart as
dynamic tile content. Each tile is associated with the URL that corresponds to the Pivot Grid Fluid Viewer
component for that model. The tile is not interactive; for example, you cannot drill to dimension from
chart. However, you can click the tile to open the Fluid viewer component for the Pivot Grid model.
To publish the Pivot Grid Fluid view as a tile:
1. Create a new Pivot Grid model or open an existing one using Pivot Grid Wizard (by selecting
Reporting Tools >Pivot Grid >Pivot Grid Wizard.
2. Access the Pivot Grid Display page, Step 5 of the Pivot Grid Wizard.
3. Click the Publish as Tile link at the bottom of the Pivot Grid Display page.
If this is the first time you are publishing the current Pivot Grid model as a tile, the Publish as Tile
Definition page appears. Otherwise, the Publish as Tile page appears listing the published content
reference objects that use this Pivot Grid model as a tile.
Image: Publish as Tile page
This example illustrates the fields and controls on the Publish as Tile page. You can use this page to
create new tile definitions, or edit and delete the existing ones.
4. If applicable, click the Create button on the Publish as Tile page.
The Publish Tile Definition page appears.
98 Copyright
©
1988, 2020, Oracle and/or its affiliates.

Chapter 4 Creating Pivot Grid Models
Image: Publish Tile Definition page
This example illustrates the fields and controls on the Publish Tile Definition page. The system
populates the values in this page, such as the title, name, node name, and tile dimensions. The View
Name field displays the default view, and you can change the default view to any other available view.
5. Enter the required values and save the tile.
Copyright
©
1988, 2020, Oracle and/or its affiliates. 99

Creating Pivot Grid Models Chapter 4
Note: By default, the Public option in the Security section is selected and no Pivot Grid Viewer
component security is enforced. You can select the Author Access option to allow only the tile creator
to access the tile and select the role/permission to restrict the tile to specific set of users.
All settings in the Security section will be populated in the Content Reference Security page
(PeopleTools, Portal, Structure and Content, <label name>, Edit, General, Security).
See "SetGroupletActionUrl" (PeopleTools 8.58: PeopleCode API Reference), "SetGroupletDisplayIn"
(PeopleTools 8.58: PeopleCode API Reference), "SetGroupletEventMsg" (PeopleTools 8.58:
PeopleCode API Reference), "SetGroupletID" (PeopleTools 8.58: PeopleCode API Reference),
"SetGroupletImage" (PeopleTools 8.58: PeopleCode API Reference), "SetGroupletImageUrl"
(PeopleTools 8.58: PeopleCode API Reference), "SetGroupletMOptions" (PeopleTools 8.58:
PeopleCode API Reference), "SetGroupletTargetID" (PeopleTools 8.58: PeopleCode API
Reference), "SetGroupletTimer" (PeopleTools 8.58: PeopleCode API Reference), "SetGroupletType"
(PeopleTools 8.58: PeopleCode API Reference), and"SetGroupletUrl" (PeopleTools 8.58: PeopleCode
API Reference).
6. Access the Fluid Homepage and click Actions at the top right of the fluid window.
7. Select the Personalize option.
8. Click the Add Tile button on the Personalize Homepage page.
9. Navigate to the parent folder
In this example, navigate to the Procurement Operations folder. The newly created tile Search Items is
available in the parent folder and you can add it to the Fluid Homepage.
Image: Fluid homepage - Add Tile window displaying tiles
This example illustrates fluid homepage with the Add Tile window. You can add tiles in the Add Tile
window to the landing homepage.
10. Select the tile that you just created and click the Save button.
100 Copyright
©
1988, 2020, Oracle and/or its affiliates.
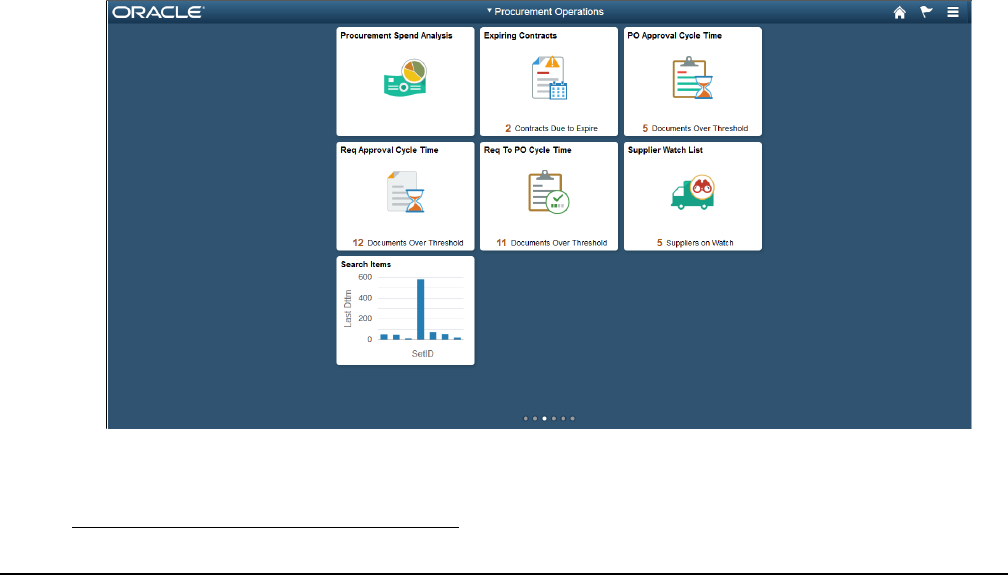
Chapter 4 Creating Pivot Grid Models
Image: Fluid homepage with a tile
This example shows fluid homepage with the added tiles. You can click the tiles in this fluid
homepage to open the Pivot Grid models fully in new modal window.
Related Links
Displaying Models in Various Form Factors
Setting the Limit of the Pivot Grid Result Rows
You use the Max Rows in Pivot Grids field in the PeopleTools options page (PeopleTools, Utilities,
Administration, PeopleTools Options) to set the number of rows returned in detail grid or list view (that is
obtained by executing the query). The default setting is 100. This setting is applying for component real
time search view, Fluid Mode Detail View, and Classic Pivot Grid Detail View.
Copyright
©
1988, 2020, Oracle and/or its affiliates. 101

Creating Pivot Grid Models Chapter 4
Image: PeopleTools Options page
This example illustrates the fields and controls on the PeopleTools Options page. The Max Rows in Pivot
Grids option is highlighted.
Note: You can specify a negative value for unlimited number of rows, but Oracle PeopleSoft strongly
recommends that you don't use unlimited rows for performance reasons.
Related Links
"Fluid User Interface Overview" (PeopleTools 8.58: Fluid User Interface Developer’s Guide)
Setting the Format of Date Fields
Use the My Preferences page to set the format of the date fields in Pivot Grid charts and Pivot Grid grids.
The format settings in this page are applied for all the date values in the fluid and classic views, including:
102 Copyright
©
1988, 2020, Oracle and/or its affiliates.

Chapter 4 Creating Pivot Grid Models
• Chart axes
• Grid axes
• Filters or facets
• Fields in the Detailed Grid View.
Navigation
Main Homepage >My Preferences >Regional Settings
Image: My Preferences page
This example illustrates the My Preferences page showing the Date Format field set to MMDDYY..
Copyright
©
1988, 2020, Oracle and/or its affiliates. 103

Creating Pivot Grid Models Chapter 4
Image: Date format in classic view
This example illustrates a Pivot Grid grid in the classic view displaying the Month filter. The format of
the dates in the Month filter is based on the settings in the My Preferences page.
Image: Date format in fluid view
This example illustrates a Pivot Grid chart in fluid view displaying the X-axis Month. The format of the
dates in the X-axis Month is based on the settings in the My Preferences page.
104 Copyright
©
1988, 2020, Oracle and/or its affiliates.

Chapter 5
Working with Pivot Grid Wizard Features
Configuring Thresholds
Use the Configure Thresholds page to configure the basic threshold settings for the grids and charts. Note
that all threshold settings are applied for both classic and fluid views.
• For the grids, the thresholds will appear as colored cells if the cell values are over the threshold values
that you have specified.
• For the charts, the values in the Reference Areas and Reference Lines fields from the sub product
PeopleSoft Charting are applied.
Access the Configure Thresholds page by:
1. Selecting Reporting Tools, Pivot Grid, Pivot Grid Wizard.
2. Accessing the Specify Data Model Options page - Step 4 of the wizard.
3. Clicking the Define Thresholds link displayed under Define Threshold column in the Specify Axis
Information grid.
Copyright
©
1988, 2020, Oracle and/or its affiliates. 105

Working with Pivot Grid Wizard Features Chapter 5
Image: Configure Thresholds page
This example illustrates the fields and controls on the Configure Thresholds page. Definitions for the
fields and controls appear following the example.
Data Source Column Displays the name of the field for which the threshold is being
defined.
Note: Only fields that are set to Value can apply threshold.
Threshold Type Set the threshold type. The available options are:
• Distinct
106 Copyright
©
1988, 2020, Oracle and/or its affiliates.

Chapter 5 Working with Pivot Grid Wizard Features
• Range
If the Distinct option is selected:
• Pivot Grid displays the Threshold Value field that enables
you to specify a single threshold value.
• This value is plotted on the chart as a single line. In the grid
any value crossing the distinct threshold value has the grid
cell marked with color.
A single threshold value is considered as having crossed
the threshold if that single threshold value is plotted on the
Pivot Grid model and that single threshold value is above
the value set in the Threshold Value dropdown list.
If the Range option is selected:
• Pivot Grid displays the Lower Limit and Higher Limit
fields that enable you to specify a range of minimum and
maximum threshold values.
• A range value is a part of the threshold if that range value is
plotted on the Pivot Grid model and that range value falls in
the limit range.
Threshold Value Specify a single threshold value.
The field is available when the Threshold Type is set to Distinct.
Lower Limit and Higher Limit Specify a range of minimum and maximum threshold values.
These fields are available when the Threshold Type is set to
Range.
Threshold Color Select one color from the list of 18 available colors. The color
that you select in this list will appear in the grids and the charts
for the values that are above the threshold.
The available colors are derived from the supported colors for
PeopleSoft Charting.
Note: Only one color can be specified for a threshold.
Threshold Description Enter the text that will appear when you hover over the charting
reference areas and lines.
Criteria Set a condition to trigger a verification of a threshold violation
when the condition is met. The dropdown values are displayed
according to the Threshold Type.
• Distinct
• Equal To
Copyright
©
1988, 2020, Oracle and/or its affiliates. 107

Working with Pivot Grid Wizard Features Chapter 5
• Not Equal To
• Greater Than
• Less Than
• Range
• In Range
• Above Range
• Below Range
• Out of Range
Note: A consolidated notification for each fact is sent to users
when the criteria matches.
Default Notification List Select users by their user ids or roles to receive the notification.
In addition to setting the notification conditions in the Configure Thresholds dialog box, you can opt to
disable user personalization of threshold. By default pivot grid allows user personalization of threshold
from the pivot grid model views of the threshold. See Display Options.
Related Links
Specifying Data Model Options
Understanding Personalized Analytics Notification
Configuring Notification Frequency
Configuring Thresholds for Individual Data Points
Use the Configure Notifications dialog box to configure threshold settings for individual data points on
the X-axis. Note that all threshold settings are applied for both classic and fluid views.
To access the Configure Notifications dialog box:
1. In the Pivot Grid Viewer, click on any data point on the grid or chart to display the Actions menu.
2. Click on the Configure Notifications menu option to display the Configure Notifications dialog box.
108 Copyright
©
1988, 2020, Oracle and/or its affiliates.

Chapter 5 Working with Pivot Grid Wizard Features
Image: Configure Notifications dialog box
This example illustrates the fields and controls on the Configure Notifications dialog box. Definitions for
the fields and controls appear following the example.
Enable Alerts Use this switch to enable or disable alerts.
Alert Criteria Set a condition to trigger a verification of a threshold violation
when the condition is met. The drop down values are displayed
according to the Threshold Type.
• Distinct
• Equal To
• Not Equal To
• Greater Than
• Less Than
• Range
• In Range
• Above Range
• Below Range
• Out of Range
Apply To All
Set this switch to N to apply the threshold configuration to a
single data point.
Copyright
©
1988, 2020, Oracle and/or its affiliates. 109

Working with Pivot Grid Wizard Features Chapter 5
Set this switch to Y to apply the threshold configuration to all
data points on the X-axis.
Configuring Thresholds for a Dual Y-Axis
This option is available when the chart contains a dual Y-axis. You can set thresholds for a dual Y-axis
from the Threshold Personalization dialog box in Pivot Grid Viewer.
Note: The behavior of the Dual Y axis feature applies to both classic and fluid views.
To access the Threshold Personalization dialog box:
1. In the Pivot Grid Viewer, click on the Options Menu.
2. Click on the Threshold Options menu option to display the Threshold Personalization dialog box.
Image: Threshold Personalization dialog box
This example illustrates the fields and controls on the Threshold Personalization dialog box.
Related Links
Using the Options Menu
Setting Notification Frequency for Thresholds
Pivot Grid administrators have to set the frequency at which notifications are sent to users. Only
authorized users get the notification. For details see Configuring Notification Frequency.
Related Links
Understanding Personalized Analytics Notification
Personalizing Thresholds
Authorized users can personalize thresholds on the pivot grid model from the viewer. Opt to change
threshold values of a model from the Options Menu. See Describing the Options Menu.
110 Copyright
©
1988, 2020, Oracle and/or its affiliates.

Chapter 5 Working with Pivot Grid Wizard Features
Image: Threshold personalizations
The example displays the Threshold Personalizations dialog box. The fields and controls are similar to the
fields on the Configure Thresholds dialog box
Displaying Thresholds in Pivot Grid Views
The following sections display how thresholds appear in pivot grid views.
Threshold Type Distinct on Chart View
Image: Threshold Type Distinct on Chart View
This example shows the thresholds for the Unit Cost column in a Pivot Grid chart. The threshold type is
set to Distinct, the color is set to green, and the value is set to 12000.
Copyright
©
1988, 2020, Oracle and/or its affiliates. 111

Working with Pivot Grid Wizard Features Chapter 5
Threshold Type Range on Chart View
Image: Threshold Type Range on Chart View
This example shows the thresholds for the Unit Cost column in a Pivot Grid chart. The threshold type is
set to Range, the lower limit is set to 15000, the higher limit is set to 18000, and the color is set to green.
Displaying Thresholds for a Dual Y-Axis
Image: Thresholds for Dual Y-Axis
This example shows thresholds for the Inv Amt column and the PreLoad Ind column in a Pivot Grid chart.
The threshold type for Inv Amt is set to Distinct, the threshold value is set to 2000000, and the color is set
to red.
The threshold type for PreLoad Ind is set to Range. The lower limit is set to 4, the higher limit is set to 6,
and the color is set to green.
112 Copyright
©
1988, 2020, Oracle and/or its affiliates.

Chapter 5 Working with Pivot Grid Wizard Features
Threshold Type Set to Distinct in Grid View
Image: Threshold Type Set to Distinct in Grid View
This example shows the thresholds for the Unit Cost column in a pivot grid. The threshold type is set to
Distinct, the value is set to 12000, and the color is set to green. Note that all the facts that are plotted on
the grid can have thresholds configured.
Configuring Facets and Filters
Facets help to filter and focus data on the model. You can select different facet values and see impact
on the model. You have to configure filters on data source columns in the pivot grid wizard. These data
source columns display as facets in the left hand pane of a pivot grid model in fluid view.
Initially ten facet values load. Click More link to incrementally load more values.
You can configure options to make the model load faster from Specify Data Model Options page, Fluid
Options section. See Fluid Mode Options.
Understanding Filters
A filter is a dropdown list that enables you to select multiple items to filter data, which appears in grids
and charts. You can select one or more Data Source Columns as a filter.
Filters on grid and chart are seen in the PeopleSoft Classic View. In fluid view facets behave like filters.
You have to configure a filter to display a facet. See Creating Editable Facets.
You can change the grid layout at runtime by dragging axes onto the filter area to create them as filters;
the chart layout also changes based on the grid layout to preserve synchronization between the grid and
the chart.
Chart Axis or Grid Axis can be assigned a filter for any Data Source Column. The Data Source Column
should be defined as a Axis in the Specify Data Model Values page in the Pivot Grid Wizard.
Copyright
©
1988, 2020, Oracle and/or its affiliates. 113

Working with Pivot Grid Wizard Features Chapter 5
Image: Example of filtering on Month
In this Specify Data Model Options page, Month is defined as a filter.
114 Copyright
©
1988, 2020, Oracle and/or its affiliates.

Chapter 5 Working with Pivot Grid Wizard Features
Image: Example of a Pivot Grid model when the display option is Pivot Grid and Chart
This example shows the view of a Pivot Grid model when the display option is Pivot Grid and Chart and
the filter is set to Month (Time). In the example Time is the Column Label assigned to the Data Source
Column Month.
Creating Editable Facets
In the Specify Data Model Options page, View Options, Specify Axis Information section, you can select
a Data Source Column to be a facet in the fluid view.
Copyright
©
1988, 2020, Oracle and/or its affiliates. 115

Working with Pivot Grid Wizard Features Chapter 5
Note: You can enable this option for the data source columns that are set as Axis or Value in the Column
Type. Columns that are set as Display in the column type cannot be defined as editable facets.
To enable the Axis or Value columns as editable facets:
1. In the Specify Data Model Values page, select the Editable Facet option for the columns.
2. In the Specify Data Model Options page, set the columns (that have Editable Facets enabled) to
Filters so these columns can appear in fluid view.
3. In fluid view, you will see the More Options link at the bottom-left of the Prompts section. Click to
display the editable facets.
Click the Show Operations link to display the operators that are specific to each prompt.
4. Select the available operators for the prompts to filter the data in the grid and in the chart.
Note: Editable facets behave as prompts; therefore, editable facet selections reset the other facet values.
Different operators are available for different type of fields:
• Character fields have these operators: Contains (Default), Does Not Contain, Equal To, Not Equal To,
In List, and Not In List.
• Date and number fields have these operators: Equal To (Default), Not Equal To, Between, Not
Between, Greater Than, Not Greater Than, Equal To, and Not Equal To.
Note: You can see the editable facets only in fluid view. They are not available in classic view.
Values entered in the editable facets are user-specified and not prompted, applying filters using the
editable facets may return zero value in the results, or an empty grid and empty chart. Also, security is not
applied on the user-specific values, so you must be careful as to which fields can be selected as editable
facets.
Attaching Editable Facets to URLs
PeopleSoft supports bind parameters as part of URL query string. The query bind parameters are passed
as query string values to the pivot grid viewer. This enables you to show the pivot grid any where.
Similarly relevant values and operators in editable facets in the pivot grid viewer is passed to query string.
The query string is attached to the URL. You can use this URL to replicate the same pivot grid view with
same values and operators for editable facets.
URL format is as follows. The parameters are described further.
http://<hostname>:<port>/psc/<site>/<Portal>/<Node>/c/PTPG_WIZ_MENU.PTPG_NUI.GBL?
Page=PTPG_NUI_VWR&Action=U&PGNAME=<PG Name> &VIEWNAME=<View
Name>&<Unique bind parameteer name>=<bind value>&fctNames=<facet names separated by
separator>&fctOper=<operators separated by separator>&fctValues=<facet values separated by
separator>&fctSeparator=<separator value>
fctNames Facet names passed in the queryString.
116 Copyright
©
1988, 2020, Oracle and/or its affiliates.

Chapter 5 Working with Pivot Grid Wizard Features
fctOper
Operators for all the facet values passed in fctNames. The
operators should be in the same order as facet values
fctValues Values assigned to the facet names for all the facet values passed
in fctNames. The values should be in the same order as the facet
values.
fctSeperator ^ is used as a default separator. If ^ is available in one of the
query string values being passed, the user may opt to use a
different separator and pass it as fctSeparator.
The supported operators for a querystring are listed in the table.
Operator Description
BET Between
BET- Not Between
LIS In List
LIS- Not In List
GRE Greater Than
GRE- Not Greater Than
LES Less Than
LES- Not Less Than
EQU Equal To
EQU- Not Equal To
LIK Like
LIK- Not Like
Displaying Operators on Editable Facets
Note: Pivot grid engine uses ^ as a reserved character for internal processing for facet values. Using the ^
character in values will cause unexpected results.
Component based pivot grid models support operators, even for Prompt fields. You have to click More
Options link to display all editable facets. Toggle Show Operators link and Hide Operators link to display
a dropdown list of available operators.
Copyright
©
1988, 2020, Oracle and/or its affiliates. 117

Working with Pivot Grid Wizard Features Chapter 5
Image: Editable Facets with Operators
The following example describes the editable facets on a component search page.
The following table lists few rules acting on the operators.
Field Types Supported Operators
Prompts with edit table • Equal To
• Not Equal To
String • Equal To
• Not Equal To
• Contains
• Does not contain
Number • Equal To
• Not Equal To
• Greater Than
• Less Than
Date • Equal To
• Not Equal To
• Greater Than
• Less Than
118 Copyright
©
1988, 2020, Oracle and/or its affiliates.

Chapter 5 Working with Pivot Grid Wizard Features
Related Links
Specifying Data Model Values
Understanding Component Real Time Search
Configuring Facets as Mini Charts
Using the Specify Data Model Options page, Fluid Mode Options section, Facet Selection region, you are
able to set the facet display options to display the single-select and multi-select facets as charts and as lists
in fluid views. In the chart facets, you can drill down by clicking the chart data point in the facets. Note
that the chart data point is highlighted after your selection.
Image: Specify Data Model Options page, Fluid Mode Options section, Facet Selection region
This example illustrates the fields and controls on the Specify Data Model Options page, Fluid Mode
Options section, Facet Selection region. The Contract Type facet is set to appear as a pie chart and the
Contract Status facet is set to appears as a bar chart. Other available chart types are Horizontal Bar Chart
and Line Chart.
Image: Mini facets in fluid view - facet are shown as bar and pie charts
In this fluid view, the Contract Status facet appears as a bar chart, and the Contract Type facet appears as
a pie chart.
Copyright
©
1988, 2020, Oracle and/or its affiliates. 119

Working with Pivot Grid Wizard Features Chapter 5
Image: Results are drilled down - ACTIVE, CLOSED, and COMMERCIAL facet values are
applied
This example shows the results drilled down after users click the chart data point, which is highlighted
after selection. Three facet values – ACTIVE, CLOSED, and COMMERCIAL – are applied from the
chart by the user.
The settings in this section apply to both component search and Pivot Grid Viewer. This section
is available for all model types in the fluid mode. These settings are also available in the Views
Configuration page, where you can set the facet property at each view level.
For all single-select and multi-select filters (facets), use the toggle icon at the lower-left of each facet to
switch that facet view between the chart view and the list view.
• For single-select configuration, only one value can be applied for a facet dimension. It is
recommended to use multi-select for facets.
• For multi-select facets, the selections are applied on top of the previous selections.
120 Copyright
©
1988, 2020, Oracle and/or its affiliates.

Chapter 5 Working with Pivot Grid Wizard Features
Image: Mini facets in fluid view - facets are shown as lists
In this fluid view, the Contract Status and Contract Type facets are shown as lists. ACTIVE, CLOSED,
AND COMMERCIAL values are selected.
Related Links
Specifying Data Model Options
Attaching PeopleSoft Trees to Dimensions
Each dimension in the Pivot Grid model can be associated with a PeopleSoft Summer Tree (which has the
tree details associated with a component). The totals that appear in the Pivot Grid model are limited to
only the lowest level of the tree structure.
Using the Attach Tree functionality, note that:
• This function is used for Detail Type Tree Structures, which have the tree details associated with a
component (Summer Trees). The function may not be used when the tree nodes correspond to details.
• The tree structure for the corresponding tree has to be as follows:
1. The Tree Node must be associated with the Tools delivered TREE_NODE_TBL table.
2. The Tree Details in the tree structure must point to the application data table.
3. The field name in Tree Details must match with the field that you are trying to attach the tree to.
• Totals at the lowest level are not available when the Total option is not selected for the dimension.
• Aggregation is available only for the lowest level.
Copyright
©
1988, 2020, Oracle and/or its affiliates. 121
Working with Pivot Grid Wizard Features Chapter 5
• You cannot specify skip levels for the tree while performing aggregation; for example, if the tree has
eight levels, you cannot select only level one through level five.
• For the chart-only view, trees are attached only in the filters.
• In fluid view, all filters, facets, grid rows, and grid columns that are attached to Trees are shown in
hierarchical order.
• In Pivot Grid Viewer, the tree hierarchy level appears only at the lowest level of the grid row or
column because Pivot Grid calculates totals only at the lowest levels.
• The tree nodes and the tree leaf values used with Pivot Grid models must be distinct to avoid incorrect
display of values.
• Users can select multiple tree filtering options (nodes or leafs) in fluid view. If partial or full nodes are
selected, the colored toggle icons indicate the selection.
• Parent nodes are marked as selected if all of their descendents are selected. Parent nodes are marked
as partially selected if any child node is selected.
• This functionality can be used only in Pivot Grid Viewer and cannot be used in CRTS.
122 Copyright
©
1988, 2020, Oracle and/or its affiliates.

Chapter 5 Working with Pivot Grid Wizard Features
Image: Pivot Grid Viewer When Tree is Attached to Pivot Grid Row
This example shows Pivot Grid Viewer displaying the results of a tree attached to a Pivot Grid row.
Copyright
©
1988, 2020, Oracle and/or its affiliates. 123

Working with Pivot Grid Wizard Features Chapter 5
Image: Pivot Grid Viewer When Tree is Attached to the Grid Filter
This example shows Pivot Grid Viewer displaying the results of a tree attached to the grid filter.
124 Copyright
©
1988, 2020, Oracle and/or its affiliates.

Chapter 5 Working with Pivot Grid Wizard Features
Image: Pivot Grid Viewer in the Fluid Mode displaying the results of a tree attached to the Pivot
Grid model
This example shows Pivot Grid Viewer in the Fluid mode displaying the results of a tree attached to the
Pivot Grid model.
Related Links
Optimizing Trees
Optimizing Trees
PeopleTools have enhanced the Tree Manager API reducing the time taken to load pivot grid models with
more than thousand leaves. Pivot grid models with multiple trees and deep trees load faster.
Understanding Tree Manager and Pivot Grid
Pivot Grid invokes tree manager API CTamTreeAccess::PVGWhereStringTokens by passing
tree meta data. Tree Access Manager returns the appropriate SQL phrases (string tokens containing
PSTREESELECT table number & additional Query Criteria) for the FROM and WHERE clauses. Pivot
Grid then appends the Query Criteria to the existing Pivot Grid Query.
Pivot Grid Query further performs a join with PSTREESELECT & PSTREENODE tables to retrieve tree
data.
Tree Select tables are frequently used by Pivot Grid for accessing Tree data. Substantial data change
operations such as insert, update or delete, changes the data distribution in the table or the indexed view
and makes the statistics irrelevant. This happens when the correct data distribution does not reflect on the
correct column or index, which results in the slow execution of Pivot Grid Query.
To make the pivot grid models load faster with multiple trees or deep trees, PeopleTools has:
• Updated tree selector table statistics.
• Added indexes.
Copyright
©
1988, 2020, Oracle and/or its affiliates. 125
Working with Pivot Grid Wizard Features Chapter 5
• Used dynamic selectors.
Updating Tree Selector Table Statistics
Updating statistics ensures that queries compile with up-to-date statistics.
The Application Engine program TREESTATUPD updates table. You can configure the program to run
at certain intervals.
Using Indexes
Multi-Column Indexes
Relational databases allow indexes over multiple columns, so that if you have Where criteria for two
or more columns in the index, the database manager can use one index to satisfy criteria on multiple
columns at a time. Having the pertinent criteria columns in an index, however, does not guarantee that
index will be used or that it will be used effectively on all the columns that have criteria.
Related Links
"Using Indexes and PS/nVision Tuning" (PeopleTools 8.58: PS/nVision)
Using Trees
There are three types of system tables in Tree Selectors and Controls:
• PSTREESELCTL: Tree Selection Control table
This system table controls and manages static selectors. Each row in this table corresponds to a row in
PSTREEDEFN and to a group of rows (with the same SELECTOR_NUM) in PSTREESELECTnn.
This table is only used for static selectors.
• PSTREESELECTnn: Tree Selector tables
The diagram shows the relationship between regular tree definition system tables with its counterpart
of cache tables
• PSTREESELNUM: Tree Selector Number
The diagram shows the relationship between regular tree definition system tables with its counterpart
of cache tables
126 Copyright
©
1988, 2020, Oracle and/or its affiliates.

Chapter 5 Working with Pivot Grid Wizard Features
Image: Tree Definition System Tables
The diagram shows the relationship between regular tree definition system tables with its counterpart of
cache tables.
Related Links
Attaching PeopleSoft Trees to Dimensions
Using Dynamic Selectors
Tree manager provides the options to improve the database performance:
• Static Selectors
• Selector represents entire tree data
• Selector tables are updated only when tree is modified
• Dynamic Selectors
• Selector represents only requested nodes
• Selector tables are updated with each query run.
Related Links
"Optimizing Indexes With Dynamic Selectors" (PeopleTools 8.58: PS/nVision)
Copyright
©
1988, 2020, Oracle and/or its affiliates. 127

Working with Pivot Grid Wizard Features Chapter 5
Configuring a Series
You can select Series in the Chart Axis column for any Data Source Columns. The data source column
should have Axis dimension assigned to it.
You can display a series only on chart view, which means the pivot grid can only have a display of Chart
or Pivot Grid and Chart.
Image: Month as Series in Pivot Grid Model
In this example Month is defined as a Series. All the axes columns have All (Total) enabled. The total
field is available on the Specify Data Model Values page.
In the Pivot Grid Viewer you can see the model with months as series.
128 Copyright
©
1988, 2020, Oracle and/or its affiliates.

Chapter 5 Working with Pivot Grid Wizard Features
Image: Chart displaying series
The chart shows Month as series.
You can also drill down using the X axis. Right click and select Drilldown Intersection To. The option
enables you to drill down to a datapoint in X axis, in this example you can drill down to product
information for the selected month.
Image: Drilldown Intersection To
This example shows the chart with Products selected from the Drilldown Intersection To options.
Copyright
©
1988, 2020, Oracle and/or its affiliates. 129

Working with Pivot Grid Wizard Features Chapter 5
Image: Months displayed as a series on grid and chart
This example shows the grid and chart with detailed data based on the Month field.
Configuring Overlay
Note: Chart overlay is available when the display option is Chart Only and the data appears in bar charts.
Image: Specify Data Model Options page, example of using overlay
If the display option is Chart Only in the Specify Data Model Options page, selecting a column as an
overlay field results in plotting multiple charts based on the Y axis and the overlay field. In this example,
Unit Cost is used as an overlay field.
130 Copyright
©
1988, 2020, Oracle and/or its affiliates.

Chapter 5 Working with Pivot Grid Wizard Features
Image: Initial display for overlay
The chart is plotted with Region as the X axis and Unit Sales as the Y axis. The second chart is plotted
with Region as the X axis and Unit Cost as the Y axis.
Note: You can change the overlay field using fields in the Specify Data Model Options page, Chart
Options section.
See also, Limitations of Charts and Gridsfor limitations on overlay.
Copyright
©
1988, 2020, Oracle and/or its affiliates. 131
Working with Pivot Grid Wizard Features Chapter 5
132 Copyright
©
1988, 2020, Oracle and/or its affiliates.

Chapter 6
Viewing Pivot Grid Models
Pivot Grid Viewer Overview
Pivot Grid Viewer is the component that Pagelet Wizard, applications, and so on use to view Pivot Grid
models. Pivot Grid Viewer parses the pivot grid attributes (Pivot Grid name, Query runtime prompt
values, grid axis information, grid view options, chart type information, and display options) and renders
the display on the page.
Pivot Grid Viewer Component
The Pivot Grid Viewer component enables varied features in classic and fluid views. You can:
• View the pivot grid in the browser.
• Change the layout of the grid and the chart to view the data differently.
• Drill down on the grid and chart to get detailed views of the data.
If the display option is Chart Only, drill-down can be performed by clicking the chart. If the display
option is Pivot Grid and Chart, drill-down is performed based on the All members that were defined
for the axis type columns.
• Export the original PSQuery data to Microsoft Excel.
• Change the PSQuery runtime prompt values.
• Change the chart types to either bar, line, pie, or horizontal bar.
• Change the chart options—chart axes, chart title, axis labels, and so on—using the User Charting
Options dialog box.
• Save user preferences in addition to the initial options set for the Pivot Grid View.
You can save the grid and chart layouts based on the filtering and dicing done on the grid and chart.
When rendering the Pivot Grid display, these user preferences have a higher priority than the default
view options.
The following table lists the attributes which can be customized by users:
Attribute Configured in View Option Configured as User
Personalization
Pivot Grid core (including axis,
values, aggregation functions, and All
members).
No No
Copyright
©
1988, 2020, Oracle and/or its affiliates. 133

Viewing Pivot Grid Models Chapter 6
Attribute Configured in View Option Configured as User
Personalization
Pivot Grid display option (including
Pivot Grid, Chart, or Pivot Grid and
Chart).
Yes No
Grid Display Options (including
Collapsible Data Area, expanded or
collapsed Initial Grid View, drag-and-
drop operations on the grid, and so on).
Yes No
Grid axis information. Yes Yes
Grid report filter values. No Yes
Chart type information. Yes Yes
Chart axis information. Yes Yes
Other chart display options, such as
legends, chart title, and so on.
Yes Yes
PSQuery runtime prompt values. Yes Yes
Display Mode Option (Default, Classic
Mode, and Fluid Mode)
Yes No
Note: If the query used in the Pivot Grid model is changed after the Pivot Grid model is created, you need
to modify and save the Pivot Grid model to ensure all changes are properly displayed in the Pivot Grid
Viewer.
Related Links
Pivot Grid Components
Performing Actions on the Chart Fluid View
Performing Actions on the Pivot Grid Fluid View
Using Prompts in the Fluid View
Pivot Grid Viewing Options
Pivot Grid Viewing Options facilitates creating new views and updating existing ones for a Pivot Grid
model. This component provides a framework to save the Pivot Grid View Name along with all the view
options. It enables Pagelet Wizard or applications to pass just the Pivot Grid View Name instead of the
whole list of Pivot Grid display preferences as content reference attributes. You can create multiple views
from a single model changing the axis, facts, prompts, and chart type.
134 Copyright
©
1988, 2020, Oracle and/or its affiliates.

Chapter 6 Viewing Pivot Grid Models
Image: Pivot Grid view options
This diagram shows Pivot Grid view options.
Note: Whenever a new Pivot Grid model is created, it is always associated with a default view. The
default view name is <Pivot Grid Model Name>.View.
Viewing Pivot Grid Models Using Pivot Grid Viewer
The viewer displays pivot grid models with the following default views which can be configured in the
Pivot Grid Wizard, Specify Data Model Options page:
• Pivot Grid Viewer page displaying chart only.
• Pivot Grid Viewer displaying grid only.
• Pivot Grid Viewer displaying grid and chart.
See,Specifying Data Model Options to configure the default view of your pivot grid.
Use the Pivot Grid Viewer page (PTPG_PSPGVIEWER) to open the pivot grid models with different
display options: Pivot Grid and Chart, Pivot Grid Only, or Chart Only. You can view the models in fluid
mode and the classic mode from this page.
Pivot Grid Viewer Search Page
Navigation
Reporting Tools >Pivot Grid >Pivot Grid Viewer
Copyright
©
1988, 2020, Oracle and/or its affiliates. 135

Viewing Pivot Grid Models Chapter 6
Image: Pivot Grid Viewer search page
This example illustrates the fields and controls on the Pivot Grid Viewer search page. If the Show All
Views option is selected, the system displays the default and non-default views associated with the Pivot
Grid models.
Pivot Grid Name Search using the pivot grid name.
Data Source Name Search using the data source value.
Data Source Type Search using PS Query, Component, or Composite Query.
Show all Views Select to see all views created from a pivot grid model.
Open in Fluid Mode Click the box to view the pivot grid model in the classic view.
The check box is selected by default for all the pivot grid
models in the search results.
Note: A search run without any search condition on the Pivot Grid Viewer search page yields a maximum
of 1000 search results. If you are looking for a search result which is not already displayed within the
1000 rows, then use a search condition to refine your search.
136 Copyright
©
1988, 2020, Oracle and/or its affiliates.

Chapter 6 Viewing Pivot Grid Models
Chart Only
Image: Pivot Grid Viewer page displaying chart only
This example illustrates the fields and controls on the Pivot Grid Viewer page with the default display of
Chart Only.
Copyright
©
1988, 2020, Oracle and/or its affiliates. 137

Viewing Pivot Grid Models Chapter 6
Pivot Grid Only
Image: Pivot Grid Viewer displaying grid only
This example illustrates the fields and controls on the Pivot Grid Viewer page with the default display of
Pivot Grid Only.
138 Copyright
©
1988, 2020, Oracle and/or its affiliates.

Chapter 6 Viewing Pivot Grid Models
Pivot Grid and Chart
Image: Pivot Grid Viewer displaying grid and chart
This example illustrates the fields and controls on the Pivot Grid Viewer page with the default display of
Pivot Grid and Chart. Definitions for the fields and controls appear following the example.
Describing Features of the Classic Pivot Grid Viewer
Use the Option Menu icon to select the actions for viewing the
Pivot Grid model.
See, Using the Options Menu.
Copyright
©
1988, 2020, Oracle and/or its affiliates. 139

Viewing Pivot Grid Models Chapter 6
Click the Help icon to display the Help - Pivot Grid dialog box,
where you can view the help information for all actions in this
page.
You can define the Help icon and its embedded help information
for each Pivot Grid model using the Show Help option in the
Pivot Grid Wizard - Specify Data Model Options page, Viewer
Options section.
See Creating a New Pivot Grid Pagelet Using the Pagelet
Wizard.
Expand All and Collapse All The Expand All and Collapse All links appear when the Pivot
Grid model contains dimensions with totals on the lowest level
of the grid row or column. These links are not available for the
Pivot Grid models that have no totals defined for dimensions on
the grid row and grid column.
Click the Expand All link to expand all the positions on the grid
row and column, and the Collapse All link appears.
Click the Collapse All link to collapse all the positions on the
grid row and column, and the Expand All link appears.
Click the Hide Filter icon to collapse the section that displays
the Pivot Grid filter options for the Pivot Grid models that have
the grid-only mode.
Click the Show Filter icon to expand the section that displays
the Pivot Grid filter options for the Pivot Grid models that have
the grid-only mode.
Filter Displays the Pivot Grid filter options for the Pivot Grid models
that have the chart-only mode.
You can click to collapse or expand the section. The default
setting is the expanded state.
Click the Download icon to download the slice of data seen in
the pivot grid to Microsoft Excel.
Click the Show All Columns icon to display all the grid
columns.
Click the Show Scrolling icon to scroll columns.
Click the Bar icon to display data in a bar chart.
Click the Line icon to display data in a line chart.
Click the Pie icon to display data in a pie chart.
140 Copyright
©
1988, 2020, Oracle and/or its affiliates.

Chapter 6 Viewing Pivot Grid Models
Click the Horizontal Bar Chart icon to display data in a
horizontal bar chart.
<Chart>
If the Related Actions are not configured for the aggregate view,
clicking the data point on the chart enables you to directly
access the detailed view to view the data that is being plotted.
If the Related Actions are configured on the aggregate view,
clicking the data point on the chart displays a context menu with
a list of available actions: Detailed View, Drilldown To, and
Actions.
Note: Beginning from PeopleTools 8.54, you select a chart
data point in a Pivot Grid and Chart view to see the detail
view for the data point or perform aggregate related actions (if
configured).
Return Click the Return button to close the Pivot Grid view and return
to the Pivot Grid Viewer page.
Performing Actions on the Pivot Grid Viewer
Performing Drill-Down on a Grid
Click the + button to drill down a dimension on the pivot grid.
Copyright
©
1988, 2020, Oracle and/or its affiliates. 141

Viewing Pivot Grid Models Chapter 6
Image: Pivot Grid Viewer Displaying Item Drill-Down on the Grid
The example displays an item drill-down on the pivot grid viewer.
Performing Drill-Down on Aggregate Values on the Grid
Drill down the aggregate values like SUM, AVG, COUNT, and so on. Click the aggregate value displayed
on the grid to display the data that comprise the aggregate value.
142 Copyright
©
1988, 2020, Oracle and/or its affiliates.

Chapter 6 Viewing Pivot Grid Models
Image: Pivot Grid Drilldown dialog box
The example displays detailed data view of an aggregate view item.
While performing drill down on the aggregate values, note that:
• You may not be able to drill down an aggregate value if the authentication domain is incorrect. Set
it up from the PeopleSoft Pure Internet Architecture or in the Web Profile page. See “Configuring
General Portal Properties” in "Configuring Web Profiles" (PeopleTools 8.58: Portal Technology).
• When you move the mouse over the value numbers, they appear as underlined links. Click the links to
open the Detailed Data view for the aggregate value.
• If related actions are configured for the aggregate view, clicking the value number links populates a
context menu with two options: Detailed View and Actions.
See Configuring the Related Actions Menu.
Copyright
©
1988, 2020, Oracle and/or its affiliates. 143

Viewing Pivot Grid Models Chapter 6
Performing Drill-Down on the Chart
By clicking the data point on the chart, you can also drill down on aggregate values in the chart to view
the detailed data that represents the chart data point; for example, a bar, a pie section, a line chart data
point, and so on. If related actions are configured for the aggregate view, clicking the data point on the
charts populates a context menu with three options: Detailed View, Drilldown To, and Actions.
Image: Drilldown on a chart
This example shows the Drilldown To option that enables you to drill down to an axis value.
144 Copyright
©
1988, 2020, Oracle and/or its affiliates.

Chapter 6 Viewing Pivot Grid Models
Moving the Report Filter to the Axis
Image: Dragging a filter to the column
Drag the filter and move it to row or column.
Image: Displaying the filter placed on the column axis
This example shows the report filter moved to the column axis.
Copyright
©
1988, 2020, Oracle and/or its affiliates. 145

Viewing Pivot Grid Models Chapter 6
Image: Dragging a filter to a row
This example shows how to move the Month filter to a row axis by clicking the Month field and dragging
it to the X axis.
146 Copyright
©
1988, 2020, Oracle and/or its affiliates.

Chapter 6 Viewing Pivot Grid Models
Image: Displaying the filter placed on the row axis
This example shows a portion of the grid view when the report filter is moved to the row axis.
When there is any change in the pivot grid, the corresponding chart also shows the change.
Copyright
©
1988, 2020, Oracle and/or its affiliates. 147

Viewing Pivot Grid Models Chapter 6
Changing the Level of Dimensions
Image: Changing the level of a dimension
In this example, Month is changed to the highest dimension level by dragging the month up on the X axis.
Image: Grid displaying changed dimensions
This example shows a portion of the grid after changing the dimension level.
Chart also shows similar changes when there is any modification made to the grid.
148 Copyright
©
1988, 2020, Oracle and/or its affiliates.

Chapter 6 Viewing Pivot Grid Models
Moving Dimensions in the Grid
You can move a row to a column and other way round too. Chart will also reflect changes made to the
grid.
Image: Dragging a row to column
In this example, the Region axis is dragged to the column axis.
Copyright
©
1988, 2020, Oracle and/or its affiliates. 149

Viewing Pivot Grid Models Chapter 6
Image: Change in chart and grid display
The chart and grid changes and shows data according to the changed axis.
150 Copyright
©
1988, 2020, Oracle and/or its affiliates.

Chapter 6 Viewing Pivot Grid Models
Moving an Axis to the Report Filter
Image: Displays the filter created by dragging an axis from the grid.
This example shows the Values filter. Drag any dimension from the grid to top of the grid to create a filter.
Filtering Data on the Viewer
You can use the filter above the grid on the pivot grid viewer to select specific items. The grid and chart
changes accordingly. You can select single or multiple values from one or more filter dropdown options.
The filters also apply progressive filtering if they are dependent on each other.
Performing Actions on the Pivot Grid Fluid View
Open the Pivot Grid Viewer search page from Reporting Tools >Pivot Grid >Pivot Grid Viewer. Click
the pivot grid model name to view pivot grid models in the fluid mode.
See, Pivot Grid Viewer Search Page.
Note: You can also use tiles on the dashboards and homepages or the Related Information panel to view a
Pivot Grid model in fluid mode.
Copyright
©
1988, 2020, Oracle and/or its affiliates. 151

Viewing Pivot Grid Models Chapter 6
Image: Pivot Grid Only model in the fluid view
This example illustrates a Pivot Grid Only model in the fluid view.
When the number of columns in the grid is less than the width of the view port, the grid expands to fill
the space. However, when the number of columns is more than can be accommodated in the view port, a
horizontal scrollbar is available for you to scroll and view the complete grid.
You can click the Need Help link in the grid region to view the help message for the drag-and-drop
function.
Image: Need Help window
This example illustrates the Need Help window when you click the Need help? link. Use the Need Help
window to view how to drag filter to row or column.
152 Copyright
©
1988, 2020, Oracle and/or its affiliates.

Chapter 6 Viewing Pivot Grid Models
Actionable Grid Fact Data Point
The grid fact data points are actionable. These options are similar to the classic Pivot Grid Viewer.
• When bulk-related actions are not configured, clicking the data point on the grid displays the Detail
View in a modal for the Grid and List view model.
• When bulk related action is configured, clicking the data point populates a menu that enables you to
either select an action or drill to the Detail View from that data point.
Dragging Filters to Column or Row Regions
The filters in the left panel of the fluid view can be dragged onto the regions that are marked with Column
and Row labels. You cannot perform drag-and-drop on the filters that include a disabled Drag icon.
Image: Dragging filters to regions in fluid mode
In this example, you cannot drag-and-drop the Product and Region filters because these filters include the
disabled Drag icons, but you can drag-and-drop the Month filter because its Drag icon is active.
Dragging Axis Between Column and Row Regions
You can drag-and-drop the axis between the column and the row regions that are above the grid.
Copyright
©
1988, 2020, Oracle and/or its affiliates. 153
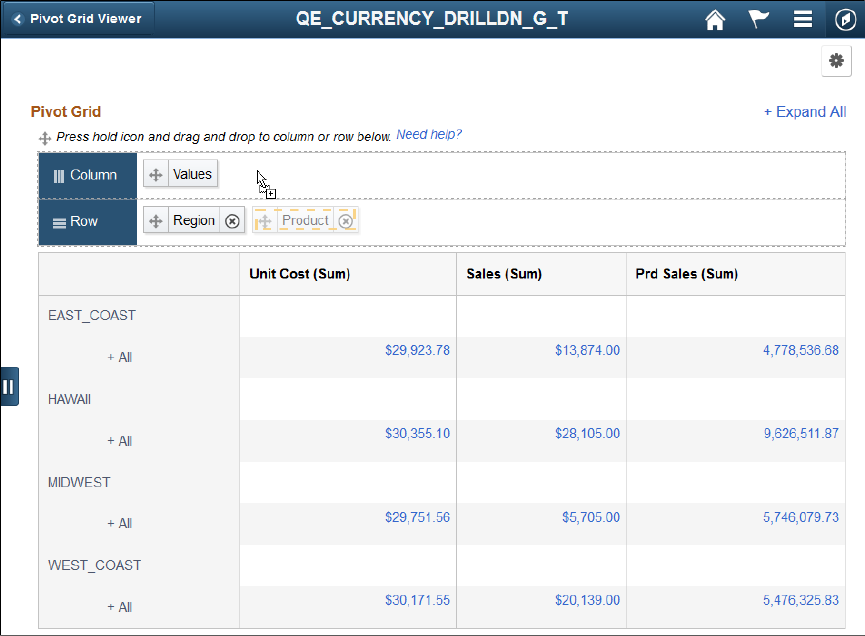
Viewing Pivot Grid Models Chapter 6
Image: Dragging axis between column and row in fluid mode
This example illustrates how the Product axis is dragged from the Row region to the Column region.
Changing the Axis Level
You can change the axis level by performing a dragging and dropping within row or column regions.
154 Copyright
©
1988, 2020, Oracle and/or its affiliates.

Chapter 6 Viewing Pivot Grid Models
Image: Moving Product axis to Region
This example illustrates how to drag the Product axis and move it to before the Region axis. This move
will place the Region axis below the Product axis.
Copyright
©
1988, 2020, Oracle and/or its affiliates. 155

Viewing Pivot Grid Models Chapter 6
Image: Results of changing the axis level
This example shows the Pivot Grid model after you drag Product axis and drop it on Region.
Expanding or Collapsing Nodes in a Grid
You can use the Expand All or Collapse All link at the top right of the grid to expand or collapse all data
points in the grid. This function is similar to that in the classic Pivot Grid Viewer. However, to expand or
collapse a single data point in the grid, you must click the +All link.
156 Copyright
©
1988, 2020, Oracle and/or its affiliates.

Chapter 6 Viewing Pivot Grid Models
Image: Expanding node
This example shows the Pivot Grid Only model after the product node (All) in the HAWAII region is
expanded.
Using Related Actions from a Data Point
Click on any data point on the grid to display Actions menu. This menu includes link to Detailed View of
the data point. It also has list of related actions applied to the data point.
Copyright
©
1988, 2020, Oracle and/or its affiliates. 157

Viewing Pivot Grid Models Chapter 6
Image: Actions on a data point
The example displays a pivot grid model on the fluid viewer. You can access related actions from any data
point on the grid, if the actions are configured.
Related Links
Configuring the Related Actions Menu
Performing Actions on the Chart Fluid View
The chart view is available as part of the Pivot Grid models that have the default view set to Chart Only
or Pivot Grid and Chart. The chart can include series, overlay, and legends.
Similar to classic Pivot Grid Viewer, the Chart Options in the Options Menu control the various chart
parameters.
See, Using the User Charting Options.
You can also use the Bar, Line, Pie, and Horizontal Bar icons to change the chart display.
Using the Actionable Chart Data Points
In a Chart Only model, clicking the chart data point enables you to drill down to the detailed view, drill to
available dimensions, drill to a series, and perform related actions.
If the Pivot Grid model view is set to Chart Only, selecting the chart data point populates the menu that
includes these options:
• Detailed View
158 Copyright
©
1988, 2020, Oracle and/or its affiliates.

Chapter 6 Viewing Pivot Grid Models
• Selecting the Detailed View option displays the data that corresponds to the selected chart data
point in the detailed view table below the chart. .
• When you click on the chart area, outside any data point , the Detailed View returns to the original
state, showing the complete chart view.
• The Detailed View shows both grid and list view, if it is configured for the model in Fluid options.
You can toggle between grid view and the list view.
See, Describing the Detailed View of the Chart.
• Drilldown To
• Select the Drilldown To option to display all available dimensions for the current chart data point.
Note that when you drill down to a dimension, you set that dimension as the new X-axis on the
chart and the existing X-axis value is added as a facet.
• Select the Previous button, which appears on a drilled down chart view. It enables you to drill out
to the initial view. These actions are similar to the classic Pivot Grid Viewer.
• Drilldown Intersection To
Define a chart model with a dimension defined as series. When you click on a chart data point, the
Actions menu displays the Drilldown Intersection To option. Select to drill down to series dimension.
See Configuring a Series.
• Actions
Selecting the Actions option displays the related actions configured on the model.
See, Configuring the Related Actions Menu.
Note: If there are no dimensions to drill down to and if there are no related actions configured on the
model, then selecting a data point will not display the Actions menu but will display the detailed view
corresponding to the data point.
Note: To drill down on the chart, click the chart data points. To drill out on the chart, click the drill out
link, which appears as a locator link at the top of the chart.
Copyright
©
1988, 2020, Oracle and/or its affiliates. 159

Viewing Pivot Grid Models Chapter 6
Image: Actions menu on a Chart Data Point
This example shows the chart menu after clicking the chart data point Unit Cost/MIDWEST on a Pivot
Grid model that has the related action configured. The Region facet is set as a bar-chart facet. Sales, Unit
Costs, and Prd Sales columns are set as Y-axes. Prd Sales column is also set as a dual Y axis.
Image: Drilldown To menu listing available dimensions
This example shows the Drilldown To menu that lists the dimension(s) on which a drilldown can be
performed. Note that Region is X axis, Sales and Unit Cost are Y axes, and Prd Sales is dual Y axis.
160 Copyright
©
1988, 2020, Oracle and/or its affiliates.

Chapter 6 Viewing Pivot Grid Models
Image: Pivot Grid model after it is drilled down to Product
This example shows the Pivot Grid model after it is drilled down to Product, which is the new X axis on
the chart. Product is also added to the facet area and the MIDWEST bar in the mini chart facet Region is
highlighted. When you click the locator button (Previous) at the top left of the chart, a list of the previous
dimensions appears enabling you to drill out to the previous selection.
Related Links
Fluid Mode Options
Using Drag and Drop on the Chart
Drag-and-drop filters on the chart view in fluid viewer. You can drag dimensions from facet area and drop
to rows to change the X-axes and series. The Column section in fluid viewer lists all the facts for the Pivot
Grid model and you can select these facts to change the Y-axis for the chart.
However, row and facet dimension cannot be dropped to columns; this means that you cannot add a new
fact in the pivot grid viewer.
Note: In Create Analytics Wizard – step 3, you can add or remove facts by dragging and dropping fields
from the facet or the Rows areas to the Columns area or changing the aggregate value. These operations
are not available in the classic Pivot Grid Viewer.
To change the axes of the chart on smart phones, you cannot drag and drop fields but you can use the
Chart Options from the Options menu.
Describing the Detailed View of the Chart
On a Chart Only model, the Detailed View appears below the chart on the fluid viewer. You can use the
Grid and List buttons at the top left of the Detailed View to switch between the grid and the list views.
Copyright
©
1988, 2020, Oracle and/or its affiliates. 161

Viewing Pivot Grid Models Chapter 6
You can defer the detailed view from loading so that the chart model loads faster. Select the Hide Detailed
View option on the Specify Data Model Options page in the Pivot Grid Wizard. Instead of the detailed
view the grid and list icons are visible. Click to expand the view. See, Fluid Mode Options.
Image: Detailed Grid View
This example shows the model displaying the Detailed Grid View. It is displayed below the chart area on
the fluid viewer.
Image: Detailed List View
This example shows the model displaying the Detailed List View. It is displayed below the chart area on
the fluid viewer.
162 Copyright
©
1988, 2020, Oracle and/or its affiliates.

Chapter 6 Viewing Pivot Grid Models
Describing the Detailed View on a Modal Window
On a Pivot Grid and Chart model, the Detailed View does not appear below the Chart. Only when you
click a data point on the grid or on the chart, the Detailed View appears on a modal window.
If the row level related actions are configured, a column displays the Actions menu.
Image: Grid and Chart view of a Pivot Grid and Chart model
This example shows the grid and chart view for a Pivot Grid and Chart model. The WEST_COAST bar on
the Region filter is selected and highlighted.
Image: Detailed Grid View of WEST_COAST
This example shows the Detailed Grid View in a modal window when you select the WEST_COAST data
point. When the row-level related action is configured, related action icons appear in the second column
in the Detailed Grid View.
Copyright
©
1988, 2020, Oracle and/or its affiliates. 163

Viewing Pivot Grid Models Chapter 6
Image: Detailed List View of WEST_COAST
This example shows the Detailed List View in a modal window when you toggle to List button at the
top left of the Detailed Grid View. When the row-level related action is configured, related action icons
appear at the right of the Detailed View.
Related Links
Fluid Mode Options
Using Facets in the Fluid View
Pivot Grid filter dimensions appear as facets in the left panel of the fluid viewer. The facets:
• Show the corresponding results with the total number of results or the facet value between brackets.
• Include the chart X-axis, series, and the grid rows by default.
• Apply progressive filtering.
• Allow to filter data which reflects on the chart and the grid.
• Include mini chart facets, single-select filters, or multi-select filters.
• Sort data on the facets using the Facet Sort icon at the top-right of each facet. Sorting is available for
all data types, including the formatted fields that are set to Date Time field format. However, sorting
for tree values in facets is not available.
Note: Facet items are sorted based on sorting preference either by count or ascending or descending
order. By default facet items are sorted by count. But filtered facet items take precedence in the
sorting order and are sorted separately.
• Follow incremental loading where only limited facet rows show initially. You must click the More
link to load more facets.
See, Fluid Mode Options to know more about configuring facets.
On a fluid view you can access the Options Menu to update filters. See Using the Options Menu.
When you are using the facets consider:
164 Copyright
©
1988, 2020, Oracle and/or its affiliates.

Chapter 6 Viewing Pivot Grid Models
• For all mini chart facets, use the toggle icon at the lower-left of each facet to switch that facet view
between the chart view and the list view. You can also select a data point in the facet chart to apply the
facet value and filter the pivot grid data.
• For single-select facets, applying the second facet value replaces the previous facet value selection for
that dimension and the chart shows only the selected data point.
• For multi-select facets, the selections are applied on top of the previous selections.
Oracle PeopleSoft recommends that you use multi-select with facet charts.
Related Links
Sorting Data in the Pivot Grid Fluid View
Configuring Facets and Filters
Single-Select Facet
Image: Single-select facet
This example illustrates a single-select facet with counts.
Copyright
©
1988, 2020, Oracle and/or its affiliates. 165

Viewing Pivot Grid Models Chapter 6
Multi-Select Facet
Image: Multi-select facet
This example illustrates a multi-select facet that is sorted based on the count of each item. You can click
the sort icon at the top-right of the facet to sort the facet values in ascending or descending order. The
facet initially display the first ten values and you can click the More link to incrementally load more facet
values.
166 Copyright
©
1988, 2020, Oracle and/or its affiliates.

Chapter 6 Viewing Pivot Grid Models
Image: Multi-Select facet - Filter enabled
This example illustrates a multi-select facet with filters applied to alternate accounting months. The
filtered facet items take precedence in the sorting order and are sorted separately. The unfiltered facet
items are sorted based on sorting preference either by count or ascending or descending order. If no
sorting preference is applied, the unfiltered facet items are sorted by count.
Copyright
©
1988, 2020, Oracle and/or its affiliates. 167

Viewing Pivot Grid Models Chapter 6
Mini Chart Facet
Image: Mini chart facet
This example illustrates a mini bar chart facet. You can click the sort icon at the top-right of the facet to
sort the facet values in ascending or descending order.
You can also toggle between chart view and list view using the bottom left buttons.
Using Prompts in the Fluid View
Pivot Grid prompts appear on the left panel of the fluid viewer. All types of prompts — including prompt
table with edits, prompt table with no edits, translate prompts, and date prompts — can be displayed. The
right panel and facet area are not refreshed on each prompt change, which happens only after you select
the prompt and click the Search button.
168 Copyright
©
1988, 2020, Oracle and/or its affiliates.

Chapter 6 Viewing Pivot Grid Models
Image: Prompts Facet on the Fluid Viewer
This example illustrates the prompts on the facet of the fluid viewer.
You can:
• Click the Search button to remove the applied facets and rerun the query using the new prompt values.
• Click the Clear button to clear all available prompt values.
• Click the More Options link to display the editable facets, Fewer Options link, and Show Operators
link.
The More Options link is available if the Editable Facet option is enabled for any axis or value
column in the Pivot Grid Wizard - Specify Data Model Options page.
Copyright
©
1988, 2020, Oracle and/or its affiliates. 169

Viewing Pivot Grid Models Chapter 6
Image: Prompts and editable facets in fluid view
This example illustrates the prompts and editable facets in fluid view after you click the More Options
link .
170 Copyright
©
1988, 2020, Oracle and/or its affiliates.

Chapter 6 Viewing Pivot Grid Models
Image: Prompts, editable facets, and prompt operators in fluid view
This example illustrates the prompts, editable facets, and prompt operators in fluid view after you click
the Show Operators link to display the operators that are specific to each prompt. You can select the
available operators for the prompts to filter the data in the grid and in the chart.
Component based pivot grid models support operators, like prompt fields for New Search. See Displaying
Operators on Editable Facets.
Related Links
Configuring Facets and Filters
Understanding Component Real Time Search
Copyright
©
1988, 2020, Oracle and/or its affiliates. 171

Viewing Pivot Grid Models Chapter 6
Specifying Data Model Options
Viewing Related Actions from the Fluid View
In the Fluid Viewer, you can access related actions as follows:
• Detailed View
Each row of data on the Detailed View has an Actions option to perform the row-level action. You can
select multiple rows in the grid or list view to perform the related action in bulk.
The detailed view opens on a modal window for the models displaying both the chart and the grid
view.
• Chart View
On the chart display, click any data point to display the Actions dropdown. Select related actions from
the dropdown.
• Pivot Grid View
Click any data point which shows a link, to access the Actions dropdown.
Related Links
Configuring the Related Actions Menu
"Creating and Managing Related Content Service Definitions" (PeopleTools 8.58: Portal Technology)
172 Copyright
©
1988, 2020, Oracle and/or its affiliates.

Chapter 6 Viewing Pivot Grid Models
Related Actions on Chart View
Viewing Related Actions on the Chart
Image: Aggregate-related actions when you click the chart data point
This example shows the related actions when you click the chart data point.
Viewing Related Actions on the Detailed View-Grid
Image: Row-level related actions on a grid view
This example shows the row-level related actions on a grid view. Each row of data in the Detailed View
has an Actions button. Click to display the row level related actions.
Copyright
©
1988, 2020, Oracle and/or its affiliates. 173

Viewing Pivot Grid Models Chapter 6
Viewing Related Actions on the Detailed View-List
Image: Row-level related actions on a list view
This example shows the row-level related actions on a list view. Each row in the detail view can be
configured to have the row-level related action.
Viewing the Bulk Actions on the Detailed View
Image: Bulk-related actions on a list view
This example shows the bulk-related actions on a list view. The Actions button is available when the Bulk
Mode option is selected. Select the rows and click the Actions button, which lets you perform the related
action on all the selected rows.
174 Copyright
©
1988, 2020, Oracle and/or its affiliates.

Chapter 6 Viewing Pivot Grid Models
Related Actions on Pivot Grid View
Note: The configuration for related actions for the fluid viewer is same as the configuration steps for the
classic viewer. The option to configure related actions is in Step 5 of the Pivot Grid Wizard.
Image: Related actions when you click a fact on the pivot grid of the model
This example shows the related actions when you click a fact on the pivot grid of the model.
Using the Options Menu
The Options Menu provides options to personalize the pivot grid model. Some of these options are
specific to fluid or classic. You will find them in Classic or Fluid pivot grid viewer.
You can configure the options included on the Option Menu button from the Step 4: Specify Data Model
Options page, on the Display Options section, in the Pivot Grid Wizard. See Display Options.
Option Name Classic Fluid
Add to Homepage No Yes
Copyright
©
1988, 2020, Oracle and/or its affiliates. 175

Viewing Pivot Grid Models Chapter 6
Option Name Classic Fluid
Chart Options Yes Yes
Export Data Yes Yes
Export Filtered Data Yes Yes
Hide Chart Yes Set it from Fluid Mode Options. See Fluid
Mode Options.
Prompts Yes No
Reset Yes Yes
Save Yes Yes
Save as Yes Yes
Sort Options No Yes
Threshold Options No Yes
Update Filters Yes Yes
View Grid Yes Yes
Describing the Options Menu
Use the Option Menu icon to personalize views of the pivot grid model.
Add to Homepage Select to add the pivot grid model with personalizations to a
homepage. You are prompted to select the homepage when you
select the option.
Chart Options Select to open the User Charting Options dialog box, where you
can change the chart layout, chart axis, and filters. This option
is available only when the chart is visible. SeeUsing the User
Charting Options.
Export Data Select to export the underlying PSQuery data to Microsoft
Excel.
Export Filtered Data Select to export the filtered PSQuery data to Microsoft Excel.
Hide Chart Select to hide the chart on a Chart and Pivot Grid model.
Prompts Select to open the data source Prompts dialog box, where you
can change the values for query prompts.
You can find the option only on a classic view.
Reset Select to delete all personalization of the current model and reset
the model to the default layout.
176 Copyright
©
1988, 2020, Oracle and/or its affiliates.

Chapter 6 Viewing Pivot Grid Models
Selecting this option displays a message asking you to confirm
the deletion.
Note: This option is available only when personalization is
available for the current model.
Save Select to save the current model layout as a default view of the
current model. The model layout, filter values, and PSQuery
prompt values are also saved as preferences.
Save As Select to open the Save As dialog box, which enables you to
copy the current Pivot Grid model and save it as a different one.
• For all Simplified Analytic models, the unique name of each
model is populated, and you are not required to enter the
new model name.
• If personalizations are defined for the current Pivot Grid
model, then personalization are also copied and included in
the new model.
Sort Options Select to open the Sort Options dialog box. See Sorting from
Options Menu.
Note: The Sort Options will only appear for Chart Only views.
Threshold Options Select to open the Threshold Personalization dialog box.
See Configuring Thresholds.
Update Filters Select to display the Update Filters dialog box, which enables
you to add or remove filters for a model. The dimensions, that
are configured with blank values for Chart Axiscolumn in Step
4: Specify Data Model Options page of the Pivot Grid Wizard,
will be available to add as additional filters in addition to the
default filter dimensions. SeeView Options.
By default, the Update Filters option is available for all Pivot
Grid models in Fluid Viewer, but you can hide this option for a
model. To hide it, use the Display Options section in the Step 4:
Specify Data Model Options page.
See, Display Options.
See Configuring Facets and Filters
View Grid Select to display the Pivot Grid view for the chart view on a
modal window. The modal window also includes the facet pane
on the left. You can select to slice and dice the data in the grid
by dragging the facets from the left pane to the columns and
rows of the grid.
In addition, you can change prompts and facet values to analyze
the data. When you click the Apply button in the top right of the
Copyright
©
1988, 2020, Oracle and/or its affiliates. 177

Viewing Pivot Grid Models Chapter 6
modal, the chart is refreshed based on the current layout of the
grid. Otherwise, when you click the Cancel button in the top left
of the modal, it is closed and the chart layout is not changed.
Note: View Grid option is not available in Component Real
Time Search.
Note: Pivot Grid displays the actions on the Option Menu dropdown list based on your selection to open
the model in fluid mode from the Pivot Grid Viewer search page.
Options Menu in Fluid View
Image: The Options Menu in Fluid View
The example shows the options available under the Options Menu in Fluid Pivot Grid Viewer.
178 Copyright
©
1988, 2020, Oracle and/or its affiliates.

Chapter 6 Viewing Pivot Grid Models
Options Menu in Classic View
Image: The Options Menu in Classic View
The example shows the options available under the Options Menu in Classic Pivot Grid Viewer.
Related Links
Viewing Pivot Grid Models Using Pivot Grid Viewer
Display Options
Specifying Data Model Options
Sorting Data in the Pivot Grid Fluid View
You can sort data in three ways in the Pivot Grid fluid view:
• Detailed View.
• Facets or filters.
• Chart.
This table summarizes the sorting features and their exceptions:
Copyright
©
1988, 2020, Oracle and/or its affiliates. 179

Viewing Pivot Grid Models Chapter 6
Feature View Mode Available Exception
Sorting in Detailed View Fluid Yes Sorting of formatted fields is
not available.
Sorting in facets or filters Fluid Yes Sorting of facets with tree
values is not available.
Sorting in chart Fluid Yes None
Sorting in Detailed View
In addition to sorting the string data type in the Detailed View, you can sort data for all the fields which
are assigned different field types, such as numbers, dates, and so on.
In the fluid view, you can specify the type (number, date, and so on) of fields at runtime and then perform
the sorting.
Note: Sorting is not available for formatted fields Currency/Number and Date/Date Time.
Image: Detailed View - Default sorting order based on the first column
This example illustrates the Detailed View in the fluid view. Data is sorted according to the first column
by default. You can click the column titles or the sort icons next to the column titles to sort data in
ascending or descending order.
180 Copyright
©
1988, 2020, Oracle and/or its affiliates.

Chapter 6 Viewing Pivot Grid Models
Image: Detailed View - Product column is sorted in ascending order
This example illustrates the Detailed View in the fluid view. Data is sorted according to the Product
column in ascending order. You can click the Product column title or the sort icon next to the Product title
to sort data in descending order.
Image: Detailed View - Product column is sorted in descending order
This example illustrates the Detailed View in the fluid view. Data is sorted based on the Product column
in descending order. You can click the Product column title or the sort icon next to the Product title to sort
data in ascending order.
Sorting in Facets or Filters
In addition to sorting the string data type in facets and filters, you can also sort data for all fields that are
set with different data types, such as numbers, dates, and so on.
Note: Sorting is available for all data types in facets and filters, including sorting for the formatted fields
that are set to Currency/Number and Date/Date Time. However, sorting for tree values in facets and filters
is not available.
Copyright
©
1988, 2020, Oracle and/or its affiliates. 181

Viewing Pivot Grid Models Chapter 6
Image: Facet - default sorting order based on count number
This example illustrates the Item Group facet that is sorted based on the count of each item in descending
order. You can click the sort icon at the top-right of the facet to sort the item groups in ascending or
descending order.
Image: Facet is sorted in ascending order
This example illustrates the Item Group facet that is sorted in ascending order. You can click the sort icon
at the top-right of the facet to sort the item groups in descending order.
182 Copyright
©
1988, 2020, Oracle and/or its affiliates.

Chapter 6 Viewing Pivot Grid Models
Image: Facet is sorted in descending order
This example illustrates the Item Group facet that is sorted in descending order. You can click the sort
icon at the top-right of the facet to sort the item groups in ascending order.
Sorting in Chart
Sort these values in the Pivot Grid charts:
• X-axis values.
• Series values.
• Facts.
Sorting from Options Menu
Select the Sort Options link to open the Sort Options dialog box.
Note: Sort Options is disabled for Pivot Grid Only and Pivot Grid and Chart views.
Copyright
©
1988, 2020, Oracle and/or its affiliates. 183

Viewing Pivot Grid Models Chapter 6
Image: Sort Options dialog box
This example shows the Sort Options dialog box.
Sort Field Select the Data Source Column to sort.
Sort By Select the Data Source Column which will be referred to while
sorting the Sort Field.
Order Select descending, ascending or by default order of sorting.
See Describing the Options Menu.
Using the User Charting Options
Use the User Charting Options dialog box to change the chart layout, chart axis, filters, and so on. In
the Advanced Options section, you can specify the chart default dimensions, exploded pie chart, Y-axis
precision, and legend positioning.
Navigation
Open the User Charting Options dialog box by selecting the Chart Options option from the Option Menu
icon on the Pivot Grid Viewer page.
184 Copyright
©
1988, 2020, Oracle and/or its affiliates.
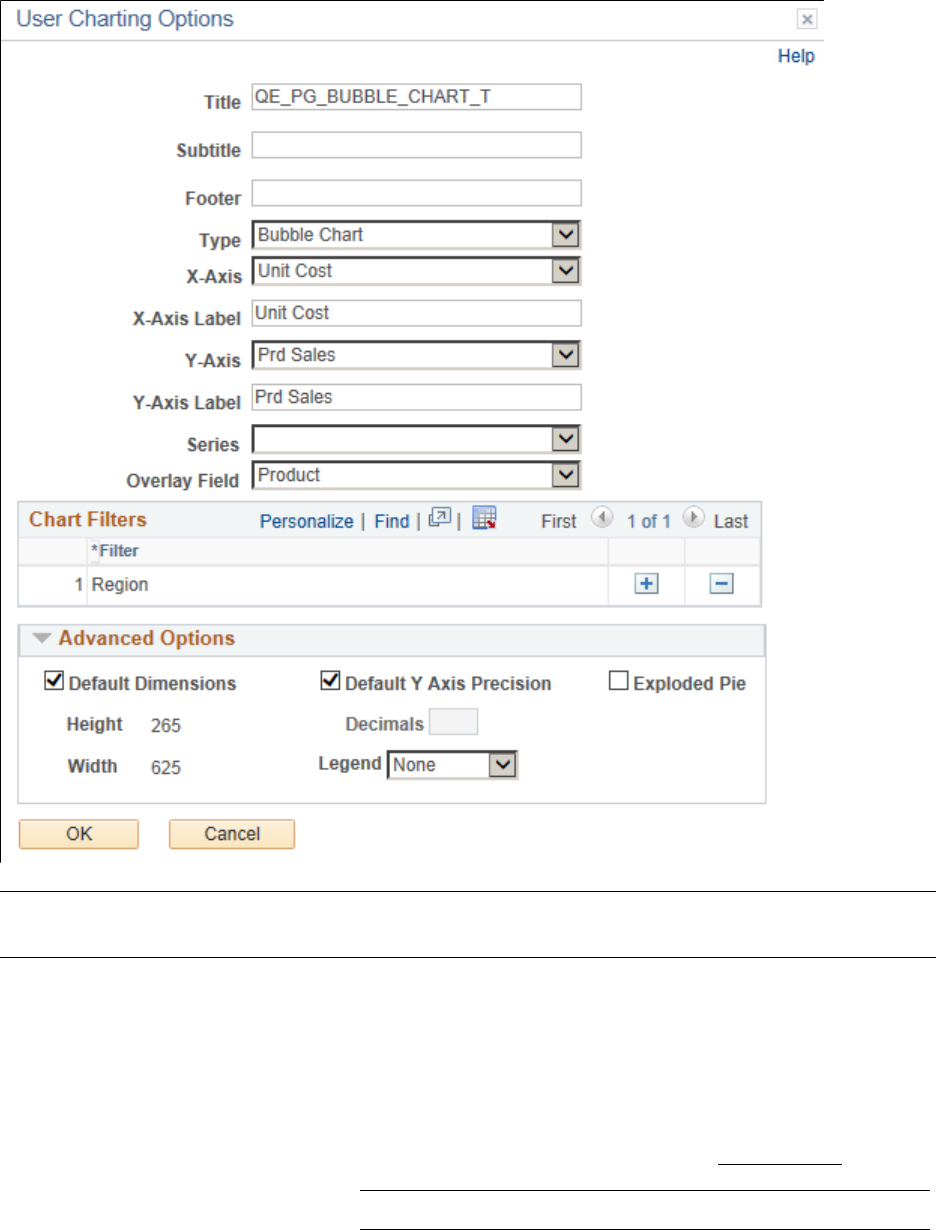
Chapter 6 Viewing Pivot Grid Models
Image: User Charting Options dialog box
This example illustrates the fields and controls in the User Charting Options dialog box.
Note: The X Axis, Y-Axis Series, Overlay Field, and Chart Filters fields in the User Charting Options
dialog box are not editable if the display option is Pivot Grid and Chart.
Title Enter the title of the pivot grid.
Subtitle Enter the subtitle if required. It displays under the title with
smaller font size.
Footer Enter additional information to display as footer text.
Type Select the display type of the chart . See Chart Options.
Note: 3-D charts are not supported as a chart type.
Copyright
©
1988, 2020, Oracle and/or its affiliates. 185

Viewing Pivot Grid Models Chapter 6
X-Axis Select to change the X-Axis. You can change the X-axis from
the User Charting Options, if you decide to use another field as
x-axis.
X-Axis Label Enter or modify the X-Axis label.
Y-Axis Select to change the Y-Axis. You can change the X-axis from
the User Charting Options, if you decide to use another field as
y-axis.
Y-Axis Label Enter or modify the Y-Axis label.
Series Select the x-axis field to define as series.
Overlay Field Select the Y-axis field to define as an overlay.
Chart Filters Add or delete filters displayed on the chart view.
Advanced Options Define display options for the chart, including chart legend, and
height and width of the chart.
Related Links
Chart Options
186 Copyright
©
1988, 2020, Oracle and/or its affiliates.

Chapter 7
Using Component Real-Time Search
Understanding Component Real Time Search
Fluid components should have the real-time search configured using Pivot Grid. To configure, application
developer can use Pivot Grid Wizard to define Pivot Grid models by selecting component data source.
The wizard creates a query behind the scenes with the same name of the component and associates it with
the model. This query is based only on the search record of the component. The keys of the search record
become the prompts for the model.
Note that:
• The component data source models are always set to Chart Only view.
• Only one Pivot Grid model can be associated to the component.
• Within a database, you’ll not be able to copy the component data source models using Pivot Grid
Administration, but you can copy a fluid component along with the associated Pivot Grid model
between databases.
See Copying the Fluid Component Between Databases.
Only default view for the Pivot Grid model is associated to the component. Additional non-default
views for the component model have no effect on the component search page.
• Component developers should create additional joins to the query so that component search using
the Pivot Grid model return better results. For example, the developer can add more facts and filter
dimensions to the query and use it in the model.
• Additional custom security-joins that are needed for the component should be performed on the auto-
generated query. When the auto-generated query is modified, you must recreate the model using the
Pivot Grid Wizard to include the newly joined fields.
Setting the Fluid Component Real Time Search
Component developers should set the Fluid properties before they register the component.
Copyright
©
1988, 2020, Oracle and/or its affiliates. 187

Using Component Real-Time Search Chapter 7
Image: Component Properties dialog box
This example shows the Component Properties dialog box, where component developers can set the
component properties to use in Pivot Grid.
See "Setting Component Properties for Fluid Components" (PeopleTools 8.58: Fluid User Interface
Developer’s Guide).
Security for Real Time Component Search
These are the security settings for real time component search:
• When users – including the Pivot Grid administrators – access a component that they are not granted
permission, an error message appears.
• When users create a component data source Pivot Grid model in Pivot Grid Wizard using a
component that they do not have the permission to access, an error message appears.
Note that Pivot Grid Administrators can create the Pivot Grid model for any component.
188 Copyright
©
1988, 2020, Oracle and/or its affiliates.

Chapter 7 Using Component Real-Time Search
• The values of the Query Access Tree and Access Group fields in the Pivot Grid Wizard - Select Data
Source page are applied for each permission that is associated to the component when the component
data source model is created. These settings ensure the query executes successfully when authorized
users access the component.
• If a new permission is added to a component, the query access tree and access group must also be
added to the permission. Otherwise, any user who has the access only to the newly added permission
cannot view the search results.
• When you create a Pivot Grid model using a component as the data source, clicking the Apply button
in the Pivot Grid Wizard - Select Data Source page automatically generates a query with the same
name as the component, adds the search record to the selected Query Access Tree, and enables all
authorized users for the component to access the Query Access Tree and the Search Record.
If authorized users also have access to Query Manager, they may edit and run the auto-generated
query and may view all rows of search results. To avoid exposing confidential data, you must ensure
that sensitive columns are not included in the search record.
In addition, deselecting columns in the Pivot Grid Wizard - Select Data Source page for a component
data source model does not exclude those columns from the auto-generated query, and users can view
that column data using Query Viewer and Query Manager. Therefore, you must not use deselecting
columns in the Pivot Grid Wizard - Select Data Source page as a security measure for hiding sensitive
data. Instead, you must remove columns that contain confidential data manually from the query and
search record.
See the Copying the Fluid Component Between Databases section in Copying Pivot Grid Model.
Creating a Component Pivot Grid Model Using the Pivot Grid
Wizard
You can create a component pivot grid model using the Pivot Grid Wizard. The steps to create a
component pivot grid model are similar to creating a query pivot grid model. To create a component pivot
grid model:
1. Use the Specify Pivot Grid Properties page (PTPG_WIZ_INFO) to identify and categorize the data
model for the Pivot Grid. See Specifying Pivot Grid Properties.
2. Use the Select Data Source (PTPG_WIZ_DATASRC) page to select the data source and output
columns. On this page for the component pivot grid model you require to select a component as a
Data Source Type.
Copyright
©
1988, 2020, Oracle and/or its affiliates. 189

Using Component Real-Time Search Chapter 7
Image: Select Data Source page - Component
This example illustrates the fields and controls on the Select Data Source page when the Data Source
Type is set to Component.
Data Source Type
Available options are Component, Composite Query, and PS
Query..
See Selecting a Data Source.
See , Creating Composite Query Pivot Grid Models Using
the Pivot Grid Wizard.
Component Name This field is available if the Data Source Type is set to
Component.
Click the search icon to select a Fluid component that needs
to be configured for Real Time Search.
Market This field is available after you select a component name.
The market value is set to GBL by default. You can
optionally change the value of this field to the market of the
component for which real time search is being configured.
Query Access Tree This field is available if the Data Source Type is set to
Component.
Select a Query Access Tree value that the search record
needs to be associated.
190 Copyright
©
1988, 2020, Oracle and/or its affiliates.

Chapter 7 Using Component Real-Time Search
Access Group This field is available if the Data Source Type is set to
Component.
Select a Access Group value which the search record needs
to be associated.
Apply Click to add the search record under the selected query
access tree and access group, which are added to each of the
permission list that is associated to the component and also
to the Pivot Grid Administrator permission (PTPT4600).
After the data source is applied, a query is created for the
search record. By default, all key fields are added as the
optional prompts and all search record fields are added as
dimensions for the model.
Note that, an appropriate error message appears after you
click the Apply button if:
• You don’t have the permission to access the selected
component.
• Another Pivot Grid model is already associated with the
selected component.
• The search record is not a SQL table or SQL view, but it
is a dynamic view.
Note: Only SQL tables or SQL views can be associated
with the component Pivot Grid model.
Select Columns The Select Columns region is available after you click the
Apply button.
Select the output columns to be plotted in the Pivot Grid
model. You must select at least two output columns.
Next The Next button is available after you select at least two
columns in the Select Columns region.
Click this button to advance the wizard to the next page.
See Selecting a Data Source.
3. Use the Specify Data Model Values page (PTPG_WIZ_MODEL) to define the column type and
aggregate functions for the selected data model. See Specifying Data Model Values.
4. Use the Specify Data Model Options (PTPG_WIZ_OPT) page to define the initial layout of the grid
and the chart. See Specifying Data Model Options
5. Use the Pivot Grid Display page (PTPG_WIZ_DISP) to review the Pivot Grid model based on the
display option and layout selected. Optionally, you can modify the Pivot Grid model to finalize the
Copyright
©
1988, 2020, Oracle and/or its affiliates. 191

Using Component Real-Time Search Chapter 7
design and then click the Save button to save it. Pivot Grid model metadata is saved to the database.
See Viewing Pivot Grid Displays.
Enabling Real Time Component Search
Viewing the Results of the Component Real Time Search
The results page of the Component Real Time Search displays:
• The chart — You can only see the chart if the Hide Chart option is not selected in the Fluid Mode
Options – Viewer Options section. The results page shows a toggle to hide and display the chart.
Select the Hide Chart option to remove the toggle from the search page.
See Fluid Mode Options.
• The Grid and List View — You can toggle between grid and list view from the button on the left top
most corner on the result page. The visibility of both views depend on what is set under the Fluid
Mode Options— Viewer Options.
See, Fluid Mode Options.
• The Options Menu — See Describing the Options Menu.
• The left pane with filters — Expand the left pane to display the facets where you can change the
prompts and search, or apply various filters on the search results.
• The result rows — Click any of the result rows to open the corresponding transaction page.
• Prompts facet— You can use operators for a new search. See, Displaying Operators on Editable
Facets.
192 Copyright
©
1988, 2020, Oracle and/or its affiliates.

Chapter 7 Using Component Real-Time Search
Image: Component Real Time Search results in Grid view
This example shows the grid view of the results in Component Real Time Search.
Image: Component Real Time Search results in List view
This example shows the list view of the results in Component Real Time Search.
Copyright
©
1988, 2020, Oracle and/or its affiliates. 193
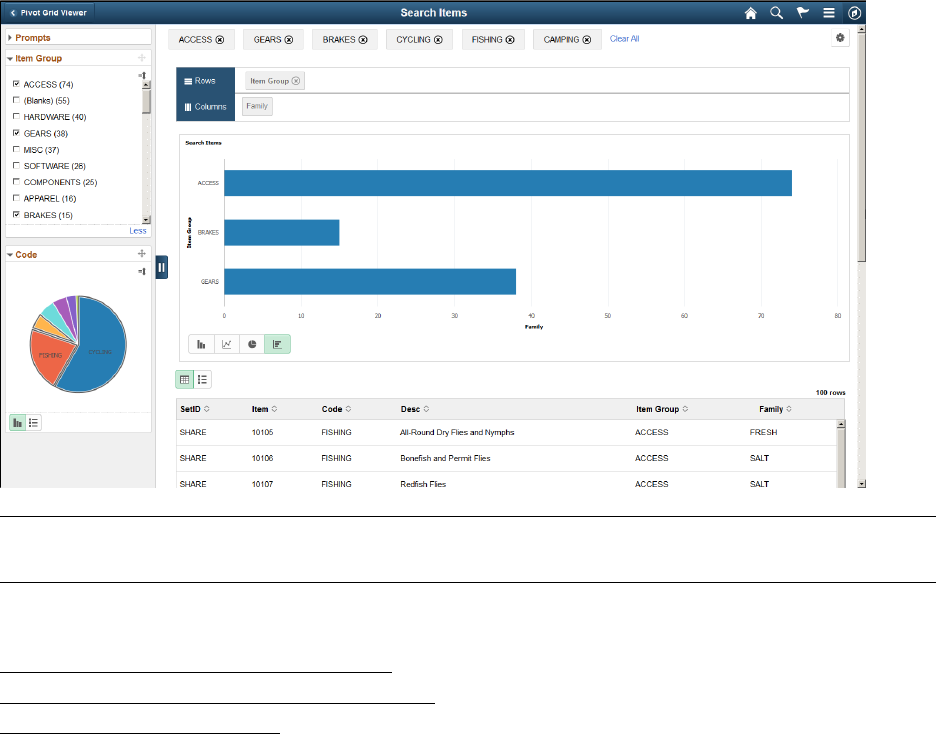
Using Component Real-Time Search Chapter 7
Image: Component Real Time Search results with the chart
In this example, you can see the chart because the Hide Chart option in Fluid Mode Options – Viewer
Options section is not selected.
Note: The search page displays related actions configured at the component level. The Pivot Grid related
actions does not apply in component search context.
Related Links
Performing Actions on the Chart Fluid View
Performing Actions on the Pivot Grid Fluid View
Specifying Data Model Options
194 Copyright
©
1988, 2020, Oracle and/or its affiliates.

Chapter 8
Working With Pivot Grid Models in
Application Pages
Understanding Personalized Analytics Notification
Applications pass important notifications and system alerts using Personalized Analytics Notification.
PeopleSoft pivot grid uses this feature for threshold functionality. You will get an alert to inform you
about a threshold violation.
To enable Personalized Analytics Notifications for threshold violations:
1. Pivot Grid administrator or the owner of the pivot grid model has to select Threshold Options and
Allow User Additions check boxes. You can find them in Specify Data Model Options page in the
pivot grid wizard. See Display Options.
2. Configure notification criteria and notification type from Configure Thresholds dialog box. See
Configuring Thresholds.
3. Pivot Grid administrator also needs to define recurrences of the notification for a model in the
Notification Frequency tab on the Pivot Grid Administration page. See Configuring Notification
Frequency..
User personalizes a threshold. If the system process request is running, an alert is generated on any
threshold violation. See Personalizing Thresholds.
Understanding Pivot Grid Fluid Subpages in Application Pages
Application developers can embed multiple Pivot Grid fluid subpages inside any application Fluid page to
display different views of the Pivot Grid model.
See "Using Subpages" (PeopleTools 8.58: Application Designer Developer's Guide), to define and insert
subpages into pages.
The available subpages that can be included on the application fluid page are elaborated in the following
table:
Subpage Names Description
PTS_NUI_CHARTAREA Chart area
PTS_NUI_GRIDAREA Grid area
PTS_NUI_RSLTSBP Result subpage (used to display the Detailed View)
Copyright
©
1988, 2020, Oracle and/or its affiliates. 195

Working With Pivot Grid Models in Application Pages Chapter 8
Subpage Names Description
PTS_NUI_FACETSBP Facet subpage
PTS_NUI_FLTSBP Filter (or prompt) subpage
PTS_NUI_BCRUMBSBP Breadcrumb subpage
PTS_NUI_PHONEHDR Phone specific subpage.
This subpage contains the controls to switch between the detail
view and the chart view. This subpage also contains the popup
menu that opens the prompts and facets modals.
PTS_NUI_SHOWFLTRS Show Filters subpage.
This subpage contains the button that expand or collapse the
facets and filters on the left panel if there are two panel layout.
PTS_NUI_HDR The subpage that contains the Options Menu and the Expand
and Collapse buttons for the facet.
PTS_NUI_SRCHSBP System search subpage
This is a system search subpage that must be included and
hidden in your application page at level 0.
PTPG_CHART_DND Include this subpage to enable chart dimension drag and drop
to change axis and series.
See Performing Actions on the Chart Fluid View.
Note: In smart phones or small form factors, the group box surrounding the Facets subpage, Show Filters
subpage, Pivot Grid subpage, and Locator Link subpages that are included on the application page should
be configured to be excluded.
To create a two-panel layout for the pivot grid model page, you can clone any existing pivot grid model
using the Save As option, on the Pivot Grid Fluid Viewer (PTPG_NUI_VWR) page along with the styles
to build the application page.
Including Pivot Grid Fluid Subpages in Application Pages
The Pivot Grid and Chart view and facets of the In Process Applicants model can be shown within the
Job Openings application page.
If you select Open Jobs tile from the default HCM homepage, a fluid page with a list of open job
positions, number of days open, number of people who have applied, and so on appears.
196 Copyright
©
1988, 2020, Oracle and/or its affiliates.

Chapter 8 Working With Pivot Grid Models in Application Pages
Image: Job Openings application fluid page
This example shows the Job Openings application fluid page listing open job positions, number of days
open, number of people who have applied, and so on.
The HRMS analytics models include a Chart Only Pivot Grid model named In Process Applicants. This
model presents data of applicants count. In addition, it has a collection of facets and prompts, such as
Business Unit, Country, Applicant Name, Recruiter, and so on.
Image: In Process Applicants
This example shows the In Process Applicants Pivot Grid model.
Application developers can create and include various views or subpages from a Pivot Grid model
on the application fluid page. These views can be constructed by laying out the subpages in different
combinations. In following sections you will use the In Process Applicants model within the Job
Openings application page.
Including Chart Only View and Search Options on the Application Page
To include the Chart Only view and the search options of the In Process Applicants Pivot Grid model in
the Job Openings application page:
Copyright
©
1988, 2020, Oracle and/or its affiliates. 197

Working With Pivot Grid Models in Application Pages Chapter 8
1. In Application Developer, open the application page for job opening HR_OPEN_JO_FLU.
Image: Application Developer - HR_OPEN_JO_FLU
This example shows the Application Developer with the application page HR_OPEN_JO_FLU
opened.
2. Insert the system search subpage PTS_NUI_SRCHSBP at level 0.
Because the system search subpage PTS_NUI_SRCHSBP is not the search page, you should hide it
using the psc_hidden style in the group box around this subpage.
3. Insert the chart area PTS_NUI_CHARTAREA into the application page.
198 Copyright
©
1988, 2020, Oracle and/or its affiliates.

Chapter 8 Working With Pivot Grid Models in Application Pages
Image: Application Developer - PTS_NUI_SRCHSBP and PTS_NUI_CHARTAREA are
inserted into the application page
This example shows the system search subpage PTS_NUI_SRCHSBP and chart area
PTS_NUI_CHARTAREA inserted into the application page.
4. Add the following page activation PeopleCode to the application page HR_OPEN_JO_FLU.
Note: The name of the global variables has to match the one shown below. The APIs are reused
for component searches as well as Fluid views in Pivot Grid, therefore the name of the classes and
packages are named as follows in the sample code.
Important! The ComponentLife variable scope shown in the following example is valid in custom
fluid search pages only. Custom fluid search page is a custom search page which replaces the
PeopleTools-delivered PTS_NUI_SEARCH page. The ComponentLife scope is not valid or supported
in any other context.
import PTS_SEARCH:PivotGridSearch;
import PTS_SEARCH:BaseSearch;
import PTS_SEARCH:Factory:DeviceSearchFactory;
ComponentLife PTS_SEARCH:BaseSearch &srch;
ComponentLife PTS_SEARCH:PivotGridSearch &srchPivotGrid;
ComponentLife string &sSrchPageName;
Declare Function HideChartSwitcher PeopleCode PTPG_NUI_WRK.PTPG_SHOWCHART Fiel⇒
dFormula;
Local PTS_SEARCH:Factory:DeviceSearchFactory &deviceFactory = create PTS_SEARC⇒
H:Factory:DeviceSearchFactory();
/*Initiate the pivot grid object. Pass the model and view name. The third para⇒
meter is empty for non-search views*/
&srchPivotGrid = &deviceFactory.GetPivotGridSearchObject(<Pivot Grid Name>, <V⇒
iew Name>, “”);
&srchPivotGrid.loadJavaScript_CSS();
&srch = &srchPivotGrid;
&srch.bUsePhoneLayout = &deviceFactory.bUsePhoneLayout;
Copyright
©
1988, 2020, Oracle and/or its affiliates. 199

Working With Pivot Grid Models in Application Pages Chapter 8
&srch.SetSearchType("R");
&srch.bViewerMode = True;
&sSrchPageName = %Page;
&srch.SetSearchPageName(&sSrchPageName);
/*Initiate the layout*/
&srch.Initiate();
/*Render the model*/
&srch.DoSearch();
/*Hide the chart on/off switcher. This is needed only for search view, not for⇒
pivot grid view.*/
HideChartSwitcher();
5. Optionally, enable the Options Menu. See Enabling the Options Menu.
6. Return to the application fluid page Job Openings.
Image: Job Openings after the chart and the search options were inserted into the application
page
This example shows the rendered application fluid page Job Openings after the chart and the search
options were inserted into the application page.
7. Optionally, you can change the chart types and other chart options using the application fluid page.
Including Chart, Facets, and Locator Links on the Application Page
To include the chart, facets, and locator links on the application page:
200 Copyright
©
1988, 2020, Oracle and/or its affiliates.

Chapter 8 Working With Pivot Grid Models in Application Pages
1. In Application Developer, open the application page for job opening HR_OPEN_JO_FLU.
Note: The application page HR_OPEN_JO_FLU already includes the system search subpage
PTS_NUI_SRCHSBP and chart area PTS_NUI_CHARTAREA.
2. Insert the facet subpage PTS_NUI_FACETSBP and the locator link subpage
PTS_NUI_BCRUMBSBP.
Note: You can add the facet pane either before or after the chart area. If you add the facets before the
chart in the layout order, remember to include a horizontal rule that is set to level zero before the chart
area.
3. Optionally, you can select a horizontal or vertical layout for both the chart and the facet.
Note: You can apply the layout for the subpages horizontally using the style ps_box_horizontal for
the group box surrounding them. Otherwise, you can apply the layout for the subpages vertically by
using the style ps_box_vertical for the group box surrounding them.
Image: Application Developer - PTS_NUI_SRCHSBP, PTS_NUI_CHARTAREA,
PTS_NUI_FACETSBP, and PTS_NUI_BCRUMBSBP are inserted into the application page
This example shows the application page for Job Openings HR_OPEN_JO_FLU, including the
system search subpage PTS_NUI_SRCHSBP, chart area PTS_NUI_CHARTAREA, facet subpage
PTS_NUI_FACETSBP, and locator link subpage PTS_NUI_BCRUMBSBP. This example includes a
horizontal layout that uses the ps_box_horizontal style around the group-box for the subpages.
4. Return to the application fluid page Job Openings.
Copyright
©
1988, 2020, Oracle and/or its affiliates. 201

Working With Pivot Grid Models in Application Pages Chapter 8
Image: Job Openings application page
This example shows the rendered application fluid page Job Openings. The application page includes
subpages to show a chart, search options, a facet, and locator links.
5. Optionally, you can apply facets on the results to narrow the size of the chart and add the locator links
as in the classic Pivot Grid Viewer.
Including Chart, Detail View Results, and Filters on the Application Page
To include the chart, detail view results, and filters (prompts) on the application page:
1. In Application Developer, open the application page for job opening HR_OPEN_JO_FLU.
Note: The application page HR_OPEN_JO_FLU already includes the system search subpage
PTS_NUI_SRCHSBP, chart area PTS_NUI_CHARTAREA, facet subpage PTS_NUI_FACETSBP,
and locator link subpage PTS_NUI_BCRUMBSBP.
2. Insert the results subpage PTS_NUI_RSLTSBP into the application page.
Note: You are not required to add a horizontal rule set to level 0 before the results subpage and before
the chart area subpage.
202 Copyright
©
1988, 2020, Oracle and/or its affiliates.

Chapter 8 Working With Pivot Grid Models in Application Pages
Image: Application Developer - PTS_NUI_SRCHSBP, PTS_NUI_FACETSBP,
PTS_NUI_BCRUMBSBP, PTS_NUI_CHARTAREA, and PTS_NUI_RSLTSBP are inserted into
the application page
This example shows the application page for job opening HR_OPEN_JO_FLU, including the
system search subpage PTS_NUI_SRCHSBP, facet subpage PTS_NUI_FACETSBP, locator link
subpage PTS_NUI_BCRUMBSBP, chart area PTS_NUI_CHARTAREA, and result subpage
PTS_NUI_RSLTSBP.
3. Return to the application fluid page Job Openings.
Copyright
©
1988, 2020, Oracle and/or its affiliates. 203

Working With Pivot Grid Models in Application Pages Chapter 8
Image: Application fluid page Job Openings
This example shows the rendered application fluid page Job Openings. The application page includes
subpages of search options, facet, locator links, chart, and detail results view.
Note: The facet will drive both the chart and the results view.
4. Optionally, you can remove the PTS_NUI_SRCHSBP subpage add the filter subpage
PTS_NUI_FLTSBP to display the filters (prompts) in the view if the Pivot Grid model has prompts.
204 Copyright
©
1988, 2020, Oracle and/or its affiliates.

Chapter 8 Working With Pivot Grid Models in Application Pages
Image: Application fluid page Job Openings
This example shows the rendered application fluid page Job Openings. The application page includes
subpages of prompts, facet, locator links, chart, and detail results view.
5. Optionally, enable the Options Menu icon to display the view Pivot Grid layout option on the Chart
Only model. See Enabling the Options Menu.
Including Pivot Grid and Chart View on the Application Page
To include the Pivot Grid and Chart view on the application page:
1. Access the Pivot Grid Wizard by selecting Reporting Tools, Pivot Grid, Pivot Grid Wizard.
2. In the Pivot Grid Display page - Step 5, click the Configure Pivot Grid Views link to access the
Pivot Grid View page and create an additional Pivot Grid and Chart view for the Pivot Grid model.
Alternatively, access the Specify Data Model Options page - Step 4 and change the default view of the
Pivot Grid model to Pivot Grid and Chart.
For detailed steps to configure the pivot grid model through pivot grid wizard see, Specifying Data
Model Options
Also see, Viewing Pivot Grid Displays.
3. In Application Developer, open the application page for job opening HR_OPEN_JO_FLU.
Copyright
©
1988, 2020, Oracle and/or its affiliates. 205

Working With Pivot Grid Models in Application Pages Chapter 8
Note: The application page HR_OPEN_JO_FLU already includes the system search subpage
PTS_NUI_SRCHSBP and chart area PTS_NUI_CHARTAREA.
4. Insert the grid area PTS_NUI_GRIDAREA next to the chart area PTS_NUI_CHARTAREA.
5. Insert the horizontal rule set to level 0 before PTS_NUI_GRIDAREA and PTS_NUI_CHARTAREA.
Note: You can apply the layout for the grid and chart areas horizontally using the style
ps_box_horizontal for the group box surrounding them. Otherwise, you can apply the layout for the
areas vertically by using the style ps_box_vertical for the group box surrounding them.
Image: Application Developer - PTS_NUI_SRCHSBP, PTS_NUI_CHARTAREA, and
PTS_NUI_GRIDAREA are inserted into the application page
This example shows the application page for job opening HR_OPEN_JO_FLU, including the
system search subpage PTS_NUI_SRCHSBP, chart area PTS_NUI_CHARTAREA, and grid
area PTS_NUI_GRIDAREA. This example also includes a horizontal layout that uses the
ps_box_horizontal style around the grid and chart areas.
6. Return to the application fluid page Job Openings.
206 Copyright
©
1988, 2020, Oracle and/or its affiliates.

Chapter 8 Working With Pivot Grid Models in Application Pages
Image: Application fluid page Job Openings
This example shows the rendered application fluid page Job Openings. The application page includes
a chart, search options, and a grid. The grid and chart areas are next to each other horizontally.
Note: You can include the facets and filters to the previous view. If you include the facets subpage, you
can drag and drop between the facets and the grid as in the classic Pivot Grid Viewer. The drag-and-
drop on the grid reflects the layout in the chart as well because the default view of the Pivot Grid model
is Pivot Grid and Chart. Clicking the data point in the grid or chart displays the Detail View in a modal
window by default. In a grid and chart view, the system cannot display the results grid on the face of the
viewer because of space constraints.
Including Pivot Grid Only View on the Application Page
To include the Pivot Grid Only view on the application page:
1. Access the Pivot Grid Wizard by selecting Reporting Tools, Pivot Grid, Pivot Grid Wizard.
2. Access the Pivot Grid Display page - Step 5 and click the Configure Pivot Grid Views link to access
the Pivot Grid View page, where you can create an additional Pivot Grid Only view for the Pivot Grid
model. Alternatively, access the Specify Data Model Options page - Step 4 and change the default
view of the Pivot Grid model to Pivot Grid Only.
For detailed steps to configure the pivot grid model through pivot grid wizard see, Specifying Data
Model Options.
Also see, Viewing Pivot Grid Displays.
3. In Application Developer, open the application page for job opening HR_OPEN_JO_FLU.
Copyright
©
1988, 2020, Oracle and/or its affiliates. 207

Working With Pivot Grid Models in Application Pages Chapter 8
4. Remove the chart area PTS_NUI_CHARTAREA, if needed.
5. Insert the grid area PTS_NUI_GRIDAREA.
6. Optionally, insert the facet subpage PTS_NUI_FACETSBT and the filter subpage
PTS_NUI_FLTSBP.
7. Return to the application fluid page Job Openings.
Image: Application fluid page Job Openings
This example shows the rendered application fluid page Job Openings. The application page includes
a grid, facet, and filters.
Including Detail View Results with Facets on the Application Page
To include the detail view with facets on the application page:
1. In Application Developer, open the application page for job opening HR_OPEN_JO_FLU.
2. Insert the system search subpage PTS_NUI_SRCHSBP, facet subpage PTS_NUI_FACETSBP, locator
link subpage PTS_NUI_BCRUMBSBT, and result subpage PTS_NUI_RSLTSBP.
208 Copyright
©
1988, 2020, Oracle and/or its affiliates.

Chapter 8 Working With Pivot Grid Models in Application Pages
Image: Application Developer - PTS_NUI_SRCHSBP, PTS_NUI_FACETSBP, and
PTS_NUI_BCRUMBSBT, and PTS_NUI_RSLTSBP are inserted into the application page
This example shows the application page for Job Opening HR_OPEN_JO_FLU, including the system
search subpage PTS_NUI_SRCHSBP, facet subpage PTS_NUI_FACETSBP, locator link subpage
PTS_NUI_BCRUMBSBT, and result subpage PTS_NUI_RSLTSBP.
3. Return to the application fluid page Job Openings.
Copyright
©
1988, 2020, Oracle and/or its affiliates. 209

Working With Pivot Grid Models in Application Pages Chapter 8
Image: Application fluid page Job Openings
This example shows the rendered application fluid page Job Openings. The application page includes
search options, facet, locator links, and detailed results view.
Enabling the Options Menu
To enable the Options Menu, which includes options to save the Pivot Grid model, reset personalizations,
view the grid, download to Excel, and so on:
1. Add the subpage PTS_NUI_HDR.
2. Invoke this line at the end of the page activate code:
&srchPivotGrid.createOptionsMenu();.
Note: To enable the View Pivot Grid layout on the Pivot Grid Chart-Only model, you need to enable the
Options Menu that includes options to save the model, reset all personalizations, view the grid, download
to Excel, and so on.
Listing the Limitations in Pivot Grid Fluid Subpages
These are the limitations when you embed Pivot Grid fluid subpages in the application pages:
• In a given page, you cannot obtain data from only one single Pivot Grid model.
210 Copyright
©
1988, 2020, Oracle and/or its affiliates.
Chapter 8 Working With Pivot Grid Models in Application Pages
• You cannot include the same sub-page twice on the same application page. For example, you cannot
include the chart subpage twice and try to populate different data in two pages.
• The names of the variables that are declared globally in the example code cannot be changed. The
names have to match the ones in the examples.
• The system search subpage PTS_NUI_SRCHSBP must be included as level 0 for the view.
Copyright
©
1988, 2020, Oracle and/or its affiliates. 211
Working With Pivot Grid Models in Application Pages Chapter 8
212 Copyright
©
1988, 2020, Oracle and/or its affiliates.

Chapter 9
Working with Simplified Analytics
Simplified Analytics Overview
Simplified Analytics enables:
• End users of a fluid application page to create contextual analytic reports.
They can create their own reports based on the pre-defined templates by selecting the fields, filling the
prompt fields, defining the layout, and selecting different types of visualizations.
• Pivot Grid administrators or Pivot Grid super users to create and publish reports (based on the
configured base templates) to all users of the component.
Note that:
• To enable Simplified Analytics for a component, application developers or business administrators
have to associate one or more Pivot Grid models (or base templates) to a component. They can also
map page fields to the prompts that are associated with the template model to define the required
context.
• In the previous PeopleTools releases, business administrator or application developers with product
training could create Pivot Grid models. Users used these pivot grid models, but they could not create
their own models. From PeopleTools 8.55, the Simplified Analytic feature enables users to create
contextual reports when accessing an application page.
• The Simplified Analytics feature is only available for fluid components, and this feature must be
enabled for fluid components before users can use the Simplified Analytics Wizard to create and view
analytic reports.
• If one or more pivot grid templates are associated with at least one page of a component, this feature
will be enabled for all pages of that component, and you can be in any page of the component to
create or view the analytic reports.
Enabling Simplified Analytics in a Fluid Component.
See the Assigning Related Content and Related Actions section in "Configuring Related Content, Related
Actions, and Menu and Frame Layouts" (PeopleTools 8.58: Portal Technology).
Accessing Simplified Analytics
You can access simplified analytics reports from the following regions in the PeopleSoft Internet
Architecture.
Copyright
©
1988, 2020, Oracle and/or its affiliates. 213
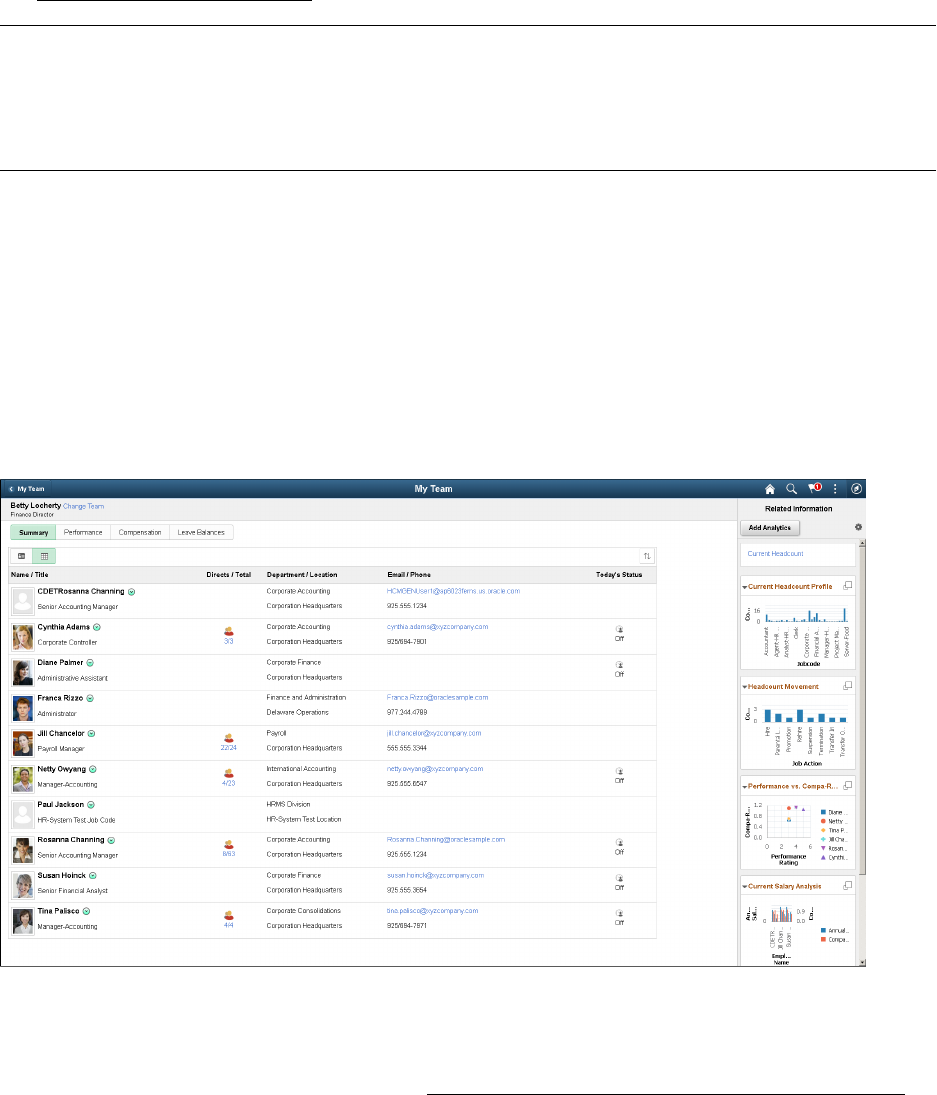
Working with Simplified Analytics Chapter 9
• Unified Related Content Analytic Pane
• Fluid Homepage
• NavBar
• Fluid Dashboard
The PeopleSoft administrator has to enable the simplified analytic on an application page.
See Simplified Analytics Overview.
Note: If you access a component with analytics and related information enabled as a master-detail or
activity guide target, make sure that the No System Side page option in the component property of the
master-detail component or the activity guide step component is selected. If the No System Side page
option is not selected, the side page with analytics and related information will not appear when you
access the component as part of a master detail target or activity guide step.
Accessing from the Unified Related Content Analytics Pane
You can find the pane on the right side of an application page. When both component-level related
information and Simplified Analytics are configured for the component, the right panel of the window
shows the related information and analytics. Add Analytics button is displayed only if any analytics
configuration exist for the component.
Image: Unified Related Content Analytics Pane
The example below shows the Unified Related Content Analytics pane on the right of the page.
Related Information show as tiles. See "Understanding the PeopleSoft Related Content Framework"
(PeopleTools 8.58: Portal Technology).
Simplified Analytics show as links by default. You can configure the analytics to show as tiles too from
the Personalize Related Information button. See Personalizing Unified Related Content Analytics Pane.
214 Copyright
©
1988, 2020, Oracle and/or its affiliates.

Chapter 9 Working with Simplified Analytics
You can click the link or the Display analytic in Modal Window button on the top right corner of the tile
to open the analytic in modal window.
You can edit the analytic or use other options to configure the analytics from the modal window.
Related Links
Editing Simplified Analytics
Publishing Simplified Analytics
Personalizing Unified Related Content Analytics Pane
The Personalize Related Information button gives you the option to display or hide related information
and analytics. It also allows you to sequence and reorder analytics as well as related content. You can also
delete an analytic and display the analytic as a tile or a link.
Personalize Unified Related Content Analytics - Order Items tab
Use the Personalize Unified Related Content Analytics - Order Items tab to set the order and properties of
items in your simplified analytics and related content.
Copyright
©
1988, 2020, Oracle and/or its affiliates. 215

Working with Simplified Analytics Chapter 9
Image: Personalize Unified Related Content Analytics - Order Items tab
The example illustrates the Order Items tab in the Personalize dialog box. The fields and controls are
listed further.
Section Order Use this option to select whether to display the links section or
the tiles section first.
Reset to Default Order Click to reset the entire Related Information pane to its defaults.
In the default settings:
• The Link section appears first, followed by the Tile section.
• Analytics in the Link section are reordered alphabetically.
• Tiles are reordered by the sequence number specified in the
manage related content configuration, or alphabetically if no
sequence number is specified.
Link Section Displays simplified analytics only. By default all analytics are
shown as links.
216 Copyright
©
1988, 2020, Oracle and/or its affiliates.
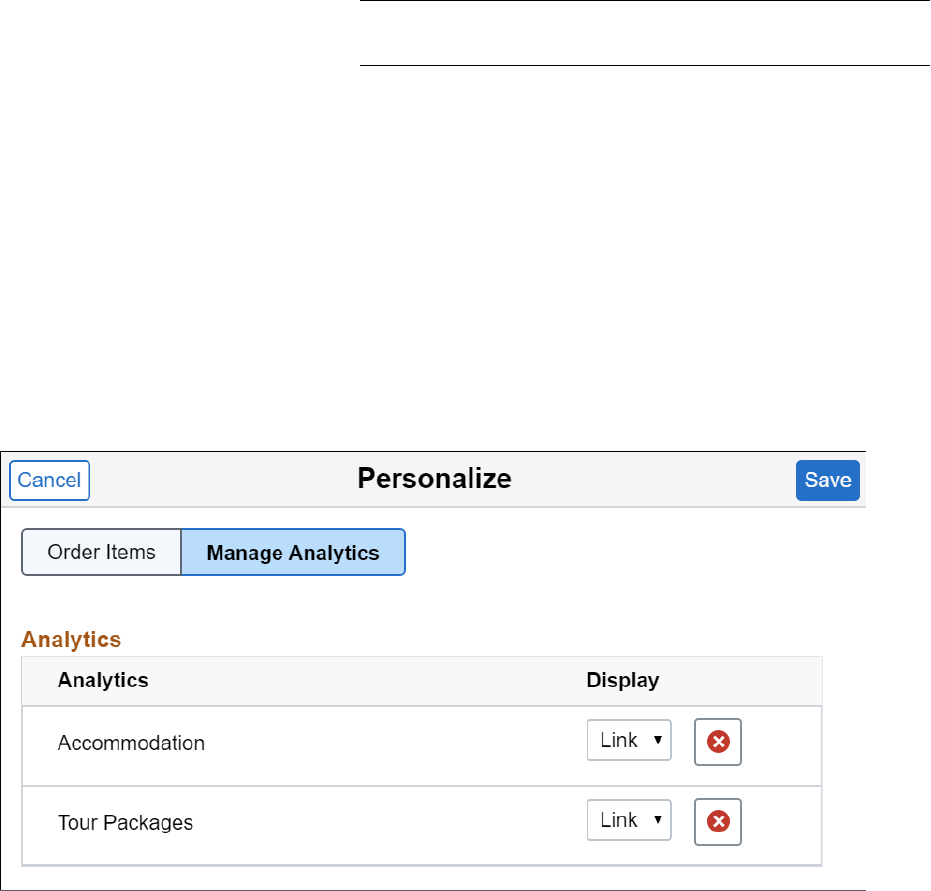
Chapter 9 Working with Simplified Analytics
Drag and drop to reorder the simplified analytics within the grid.
Tile Section Displays related content and the simplified analytics that are
displayed as tile.
Drag and drop to reorder the simplified analytics and related
content within the grid.
Note: Sequencing in this window overrides the sequence
numbers set in the Manage Related Content Configuration page.
Display Use this option to select if the simplified analytic or related
content should be displayed in the Unified Related Content
Analytics Pane.
Personalize Unified Related Content Analytics - Manage Analytics tab
Use the Personalize Unified Related Content Analytics - Manage Analytics tab to manage your analytics
separately from related content.
Image: Personalize Unified Related Content Analytics - Manage Analytics tab
The example displays the Manage Analytics tab in the Personalize dialog box. The fields and controls are
listed further.
Analytic Displays the simplified analytics.
Display
Select the Link or Tile option to display analytics as either tiles
or links.
These changes are reflected when you return to the Order Items
tab.
Copyright
©
1988, 2020, Oracle and/or its affiliates. 217

Working with Simplified Analytics Chapter 9
Delete analytics.
Note: Delete button will not appear for the analytics, for which
the user doesn’t have delete permissions.
Accessing from the Fluid Homepage
You can add a simplified analytic to the fluid homepage using the Add to Homepage option in theOptions
Menu. By default the analytics appear in a 2x2 tile with the chart preview.
Image: Add to Homepage and other options in Options Menu
This example illustrates the Add to Homepage link and other options in the Options Menu.
Pivot grid administrator can also add the analytic to homepage from the Create Analytics Wizard - step 3
or the Edit Analytics Wizard - step 3.
The system prompts you to select a homepage to add the analytics. It also gives you an option to change
the name of the analytics.
218 Copyright
©
1988, 2020, Oracle and/or its affiliates.

Chapter 9 Working with Simplified Analytics
Image: Add to Homepage dialog box
From the dialog box you can take following actions:
• Select to add the analytics from available homepage.
• Create new homepage if required.
• Change name of the analytics which will show as the tile label.
Note: You can add a report once to any homepage. If the report was already added to the homepage and
you attempt to add the report again, then you have the option to delete the report from the homepage and
add it back to the homepage.
Related Links
Publishing Simplified Analytics
Editing Simplified Analytics
Copyright
©
1988, 2020, Oracle and/or its affiliates. 219

Working with Simplified Analytics Chapter 9
Accessing from NavBar
Select NavBar from the Add To dropdown on the Analytics wizard. When you select NavBar, the Tile
Size dropdown becomes disabled.
The system prompts you to enter a name for the analytic in the Tile Label field, Add to NavBar dialog
box.
Image: Analytics on the NavBar
The Current Headcount analytic is on the NavBar.
220 Copyright
©
1988, 2020, Oracle and/or its affiliates.

Chapter 9 Working with Simplified Analytics
Related Links
Create Analytics- Step 3
Configuring the Tile Size
Accessing from Fluid Dashboard
You can even access the analytics from a fluid dashboard.
Select Fluid Dashboard from the Add To dropdown on the Analytics wizard. You will also need to select
the size of the tile from the Tile Size dropdown.
Related Links
Create Analytics- Step 3
Configuring the Tile Size
Configuring the Tile Size
You can select the tile size to display the analytics on a homepage or a fluid dashboard. The option Tile
Size is available on the Analytics Wizard Step 3.
Below are examples of analytics in available tile sizes.
Image: Small Tile Size
The example shows an analytic displayed on a homepage in small size.
Copyright
©
1988, 2020, Oracle and/or its affiliates. 221

Working with Simplified Analytics Chapter 9
Image: Medium Tile Size
The example shows an analytic displayed on a homepage in medium size.
Image: Large Tile Size
The example shows an analytic displayed on a homepage in large size.
Creating Simplified Analytics
Click the Add Analytics button from the Unified Related Content Analytics pane on the right of an
application page to open the Create Analytics Wizard. The Add Analytics button is visible if the
PeopleSoft administrator has enabled analytics on the component,
Create Analytics-Step 1
Use the Create Analytics Wizard - step 1 (PTPG_REPORT_WIZ_1) to specify the names of the analytic
reports, select the analytic report template and select the display options that will be used to create the
analytic report.
222 Copyright
©
1988, 2020, Oracle and/or its affiliates.

Chapter 9 Working with Simplified Analytics
Image: Create Analytics Wizard - step 1
This example illustrates the fields and controls on the Create Analytics Wizard - step 1. Definitions for the
fields and controls appear following the example.
Analytics Name Enter a name for the analytic report.
What kind of analytics would you
like to create?
Displays the available analytic templates that are used to create
the analytic report. The template you select from this list
determines the fields and prompts in the next step of the wizard,
Create Analytics - step 2.
Note: This drop-down list is not available when only one
template is available.
Display Option Define the display options for the analytic reports. The available
options and combinations are:
• Chart only.
• Simple table only.
• Pivot grid only.
• Chart and simple table (options 1 and 2).
• Pivot grid and chart (options 1 and 3).
Next Click to advance the wizard to the next page.
Create Analytics- Step 2
Use the Create Analytics Wizard - step 2 (PTPG_REPORT_WIZ_2) to select the fields for the analytic
reports and to change the default values of the prompt fields.
Note: This page displays only the prompts that are set to Visible in the base report template.
Copyright
©
1988, 2020, Oracle and/or its affiliates. 223

Working with Simplified Analytics Chapter 9
Image: Create Analytics Wizard - Step 2
This example illustrates the Create Analytics Wizard - step 2. Definitions for the fields and controls
appear following the example.
From Date, To Date,Supplier
OptionSupplier SetIDSupplier ID
These options are based on the parameters set in the Related
Content configuration. These prompts are defined in the Pivot
Grid base template model.
Note: The Supplier field is read-only because the value for this
field is implicitly passed from the transaction page because of
the related content configuration.
Choose Fields Use this section to select the fields that will appear in the
analytic reports.
Fields which are used as dimensions on the base model of the
analytic are already selected.
Choose Editable Fields Select fields which you can modify during runtime. A user can
change the prompt values to gain more insight into the analytics.
Runtime Prompts
Map a prompt field as a page field so that the value is taken from the page context, in this case context
of the analytic. The PeopleSoft administrator can map fields and configure parameters while creating the
pivot grid base template. A simplified analytic is always mapped with a pivot grid base template. See
"Configuring Related Content, Related Actions, and Menu and Frame Layouts" (PeopleTools 8.58: Portal
Technology).
You will not see a runtime prompt while editing or creating an analytic, but you can find it when you open
the analytic.
224 Copyright
©
1988, 2020, Oracle and/or its affiliates.

Chapter 9 Working with Simplified Analytics
Image: Runtime Prompts on an Analytic
From Date, and To Date were selected under Choose Editable Fields section. The fields are editable.
Note: The values provided for runtime prompts are only used for the current session. They are not
retained for further sessions. The analytics opens with default values assigned to the base template.
Create Analytics- Step 3
Use the Create Analytics Wizard - step 3 (PTPG_REPORT_WIZ_3) to preview the analytic reports based
on the display options, fields, and prompts selected in the previous steps of the wizard. Optionally, you
can modify (by dragging and dropping, applying filters, and so on) the analytic to finalize the design and
then click the Save button to save the final report.
After you save the analytic you will see the Add To dropdown options.
Copyright
©
1988, 2020, Oracle and/or its affiliates. 225

Working with Simplified Analytics Chapter 9
Image: Create Analytics Wizard - step 3
This example illustrates the preview window of the analytic report, Create Analytics Wizard - step 3.
Facets View, select, drag and drop facets to dimensions, and find the
required view which you will like to publish and share with
other users.
Add To Select from the dropdown to add to:
• Fluid Homepage. See Accessing from the Fluid Homepage
• NavBar. See Accessing from NavBar
• Fluid dashboard. See Accessing from Fluid Dashboard
.
Tile Size Select from tile sizes:
• Large
• Medium
• Small
The sizes are available only when you add to homepage or
dashboard. For the NavBar the option is disabled.
See, Configuring the Tile Size.
From the preview window, you can:
• Change the X-axis, Series, and Y-axis by dragging and dropping these dimensions from the facet area
to the row or column section.
• Change the chart type by using the chart type short cut icons.
226 Copyright
©
1988, 2020, Oracle and/or its affiliates.

Chapter 9 Working with Simplified Analytics
• Change the aggregate functions in the Columns area using the Aggregate dropdown list.
• Apply facet values.
• Use the Save button to save the analytic reports, which are listed under the My Analytics section of
the component.
• If you are an administrator or super user, saving the analytic enables the Publish Options
button, which you can use to publish the analytic reports to the My Analytics section or the Tile
repository of all users of the component.
• If you are not an administrator or super user, saving the analytic report enables the Add to
Homepage button, which you can use to add the analytic report to the fluid homepage.
Note: The Create Analytics Wizard - step 3 does not display the editable facets. If you select a field that is
used as an editable facet, that facet is displayed only when you view the analytic report.
Publishing Simplified Analytics
Administrators use the Publish Options dialog box (PTPG_REPORT_WIZPUB) to publish the analytics
that they created to other users.
Navigation
Click the Publish Options button from the Create Analytics Wizard - step 3.
Image: Publish Options dialog box
This example illustrates the Publish Options dialog box. Definitions for the fields and controls appear
following the example.
Publish this report as Related
Information to other users.
Select this option to publish the current analytics and display it
in the Unified Related Content Analytics pane of all other users
authorized to view the component.
Copyright
©
1988, 2020, Oracle and/or its affiliates. 227

Working with Simplified Analytics Chapter 9
Note: The analytics is available for other users only if they have
access permission to the underlying query that is used for the
analytics template.
Only the analytics owner is able to edit, delete, or save the
analytics. Other users who have shared access can use the Save
As option to save a copy of the current analytics, and then they
can edit, delete, and save their copies of the analytics.
Editing Simplified Analytics
You can edit analytics. When you view the analytic the Edit button is available. Click Edit button to
open the Edit Analytics Wizard. The steps in the Edit Analytics Wizard are similar to those in the Create
Analytics Wizard.
See Creating Simplified Analytics.
1. Use the Edit Analytics Wizard - Step 1 (PTPG_REPORT_WIZ_1) to modify the name of the analytic,
select the analytic report templates, and display options.
2. Use the Edit Analytics Wizard - Step 2 (PTPG_REPORT_WIZ_2) to modify the fields for the analytic
reports. You can modify editable fields too from Choose Editable Fields section.
See Create Analytics- Step 2
3. Use the Edit Analytics Wizard - Step 3 (PTPG_REPORT_WIZ_3) to preview the analytic. Optionally,
use this page to modify the analytic to finalize the design and then save the final configurations. Then
publish the analytic. You can select the tile size for homepage or dashboard. You can also publish to
the NavBar.
You can even use the options under Options menu to modify the analytic. See Using the Options Menu.
228 Copyright
©
1988, 2020, Oracle and/or its affiliates.

Chapter 9 Working with Simplified Analytics
Image: Edit Analytics Wizard - Step 1
This example illustrates the fields and controls on the Edit Analytics Wizard - step 1.
Image: Edit Analytics Wizard - Step 2
This example illustrates the fields and controls on the Edit Analytics Wizard - step 2.
Copyright
©
1988, 2020, Oracle and/or its affiliates. 229

Working with Simplified Analytics Chapter 9
Image: Edit Analytics Wizard - Step 3
This example illustrates the Edit Analytics Wizard - step 3 - preview window.
Related Links
Creating Simplified Analytics
Accessing Simplified Analytics
Configuring Simplified Analytics
The ANALYTICSERVICE service enables analytic on a component page. This is configured from Manage
Related Content Configurations page.
See "Configuring Related Content, Related Actions, and Menu and Frame Layouts" (PeopleTools 8.58:
Portal Technology).
230 Copyright
©
1988, 2020, Oracle and/or its affiliates.

Chapter 9 Working with Simplified Analytics
Image: Supplier Watch Fluid component
This example illustrates the Supplier Watch List application page with Unified Related Content Analytics
pane visible on right. It even has ANALYTICSERVICE assigned as service. If the service was not
assigned the Add Analytics button would not be visible.
Any simplified analytic requires a base template. A base template is a pivot grid model assigned to the
component page with ANALYTIC SERVICE service. Consider:
• Any Pivot Grid model in the database can be associated with the component as an analytic report
template. However, instead of using an existing model in the database as described in this example,
you can also create a new Pivot Grid model and then associate that model to the component as
analytic report template.
• No special setting is required in the Pivot Grid model to use it as a base template.
Creating a Base Template
Note: The query behind the analytics template model should not use the same select field as a prompt or
use the same select field as part of an expression that is used in the query criteria because the simplified
analytics can create an error when that dimension is dragged as a fact while creating the analytic report.
To view the configurations of an existing Pivot Grid model that will be associated to the analytic report
template:
1. Select Reporting Tools, Pivot Grid, Pivot Grid Wizard.
2. Search for and select the PO_NONCNTRCT_SPEND model.
3. Use the Specify Pivot Grid Properties page to view the name and add or change the title or description
of the model.
4. Click the Next button to access the Select Data Source page, where you can view or update the data
source and output columns of the model.
Copyright
©
1988, 2020, Oracle and/or its affiliates. 231

Working with Simplified Analytics Chapter 9
Image: Select Data Source page
This example illustrates the Select Data Source page displaying the data source and output columns of
the PO_NONCNTRCT_SPEND model.
5. Click the Next button to access the Specify Data Model Values page, where you can view or update
the settings of columns, aggregate functions, facets, tree options, formatting options, and so on.
232 Copyright
©
1988, 2020, Oracle and/or its affiliates.

Chapter 9 Working with Simplified Analytics
Image: Specify Data Model Values page
This example illustrates the Specify Data Model Values page displaying the settings of the data source
in the PO_NONCNTRCT_SPEND model.
6. Click the Next button to access the Specify Data Model Options page, where you can view the initial
layout of the grid and the chart.
Copyright
©
1988, 2020, Oracle and/or its affiliates. 233
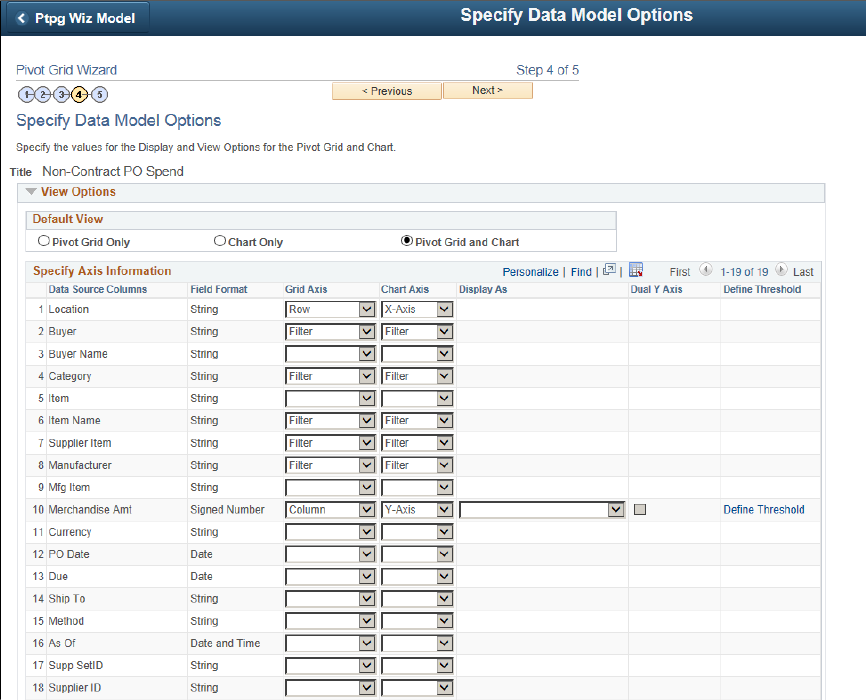
Working with Simplified Analytics Chapter 9
Image: Specify Data Model Options page
This example illustrates the Specify Data Model Options page displaying the settings of the grid and
chart for the PO_NONCNTRCT_SPEND model.
7. Scroll down and expand the Fluid Mode Options section.
234 Copyright
©
1988, 2020, Oracle and/or its affiliates.
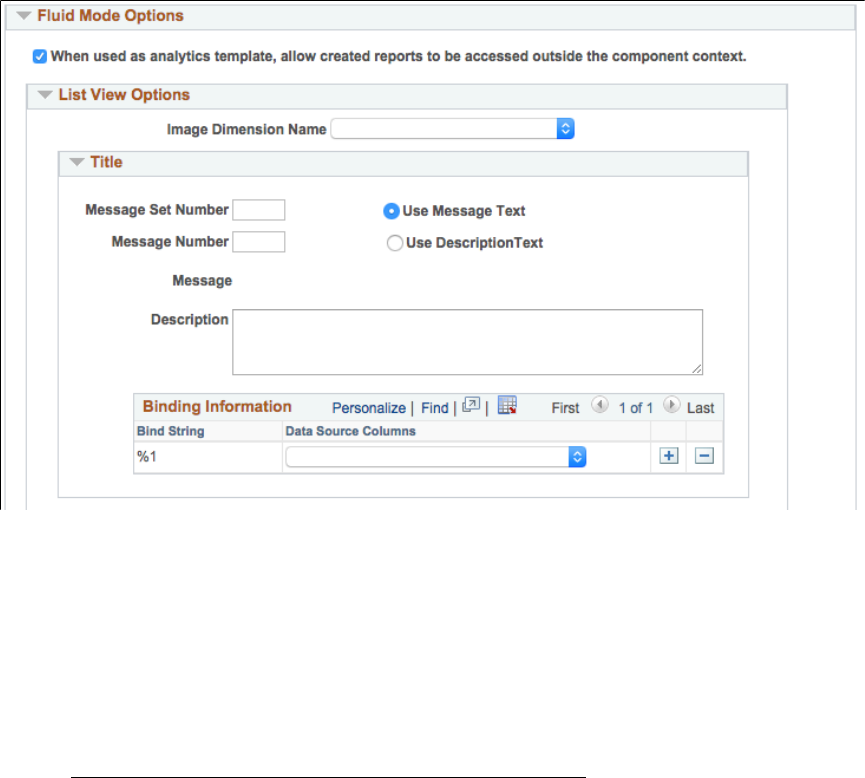
Chapter 9 Working with Simplified Analytics
Image: Specify Data Model Options page - Fluid Mode Options section
This example illustrates the Specify Data Model Options page - Fluid Mode Options section.
8.
Note the When used as analytics template, allow created reports to be accessed outside the component
context option:
• If this option is selected, the analytic reports that are created using the Create Analytics Wizard
are not restricted, and these reports can be accessed from outside the component context.
• If this option is deselected, the analytic reports that are created using the Create Analytics Wizard
are restricted to be accessed within the component.
See Security Considerations When Using Simplified Analytics.
9. Accept all default settings in the PO_NONCNTRCT_SPEND report without any modification.
Associating the Base Template to a Component Using Related Content
Framework
To associate the Pivot Grid template to a component using related content:
1. Select PeopleTools, Portal, Related Content Services, Manage Related Content Service.
2. Click the Assign Related Content to an Application Page link.
3. In the Select a Content Reference page, select the Include Hidden Crefs option.
Copyright
©
1988, 2020, Oracle and/or its affiliates. 235

Working with Simplified Analytics Chapter 9
Image: Select a Content Reference page
This example illustrates the fields and controls on the Select a Content Reference page.
4. Select the content reference that you want to enable the Simplified Analytics feature.
In this example, you select the Supplier Watch List application page under the Procurement
Operations fluid component.
Note: The association must be defined for CREF definitions pointing to the component. The
association should not be defined on the content reference links.
Simplified Analytics is only available for the fluid components.
236 Copyright
©
1988, 2020, Oracle and/or its affiliates.

Chapter 9 Working with Simplified Analytics
Image: Assign Related Content page
This example illustrates the fields and controls on the Assign Related Content page that appears after
you select a fluid page from the Select a Content Reference page. The selected Supplier Watch List
page appears as a link in the Content Reference field.
5. To assign a page in the component that you want to associate the Simplified Analytics feature, use the
Page search icon in the Page Level Related Content section to search for and select a page from the
list of available pages.
In this example, select the PO_SWL_WATCH_FL page. This page determines the page fields for the
mapping.
Note: The Simplified Analytics templates must be associated at the Page Level Related Content
section.
Copyright
©
1988, 2020, Oracle and/or its affiliates. 237
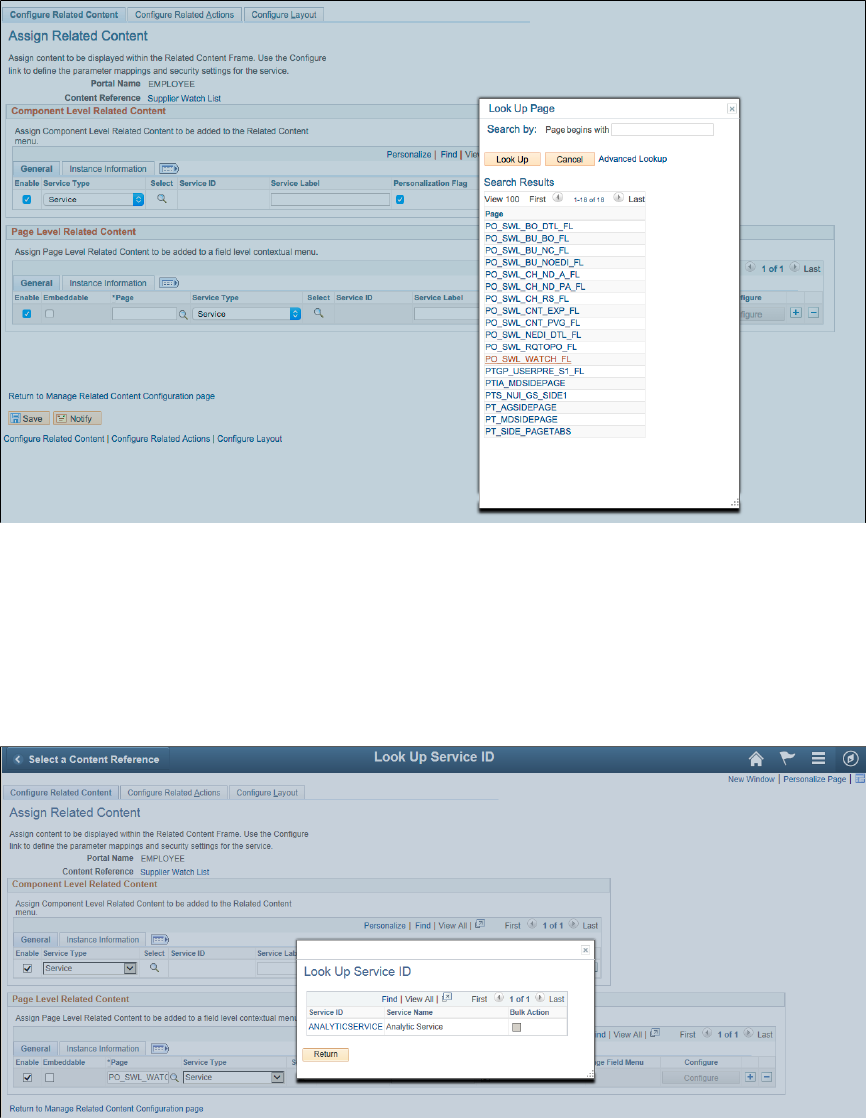
Working with Simplified Analytics Chapter 9
Image: Look Up Page
In this example illustrates the Look Up Page.
6. Click the Select search icon in the Page Level Related Content section to display the Look Up Service
ID page.
Image: Look Up Service ID page
This example illustrates the Look Up Service ID page. The Simplified Analytics feature must use the
service ID ANALYTICSERVICE, which associates a page to the analytic report template.
7. Click the ANALYTICSERVICE link in the Service ID list to display the Choose Pivot Grid page.
238 Copyright
©
1988, 2020, Oracle and/or its affiliates.

Chapter 9 Working with Simplified Analytics
Image: Choose Pivot Grid page
This example illustrates the Choose Pivot Grid page listing the available Pivot Grid models that you
can use as the base analytic report template.
Note: The Pivot Grid model that you select at the Choose Pivot Grid page will be the source of the
fields, prompts, criteria, query and settings for the analytic report template. This pivot grid template
(or base template model) will be used to create new analytic reports for end users. The query used
with the current Pivot Grid template will also be used for all analytic reports that will be created later
using this template.
Every Pivot Grid model that is available in the database can be selected as a base template model.
8. Select a Pivot Grid model that will be used in the analytic report template.
In this example, select the PO_NONCNTRCT_SPEND model.
The Assign Related Content page reappears. In the Page Level Related Content section, the Page field
is now set to PO_SWL_WATCH_FL and the Service ID field is set to ANALYTICSERVICE.
Note: An error message appears if no pivot grid model is selected in the Choose Pivot Grid page.
9. Click the Configure button in the Page Level Related Content section.
The Configure Service page appears displaying a list of available parameters (prompts).
Copyright
©
1988, 2020, Oracle and/or its affiliates. 239

Working with Simplified Analytics Chapter 9
Image: Configure Service page
This example illustrates the Configure Service page appears listing available parameters (prompts).
10.
Use the Mapping Type column to set the parameters as Page Field or Fixed Value.
Note: If the parameter is set as a fixed value, the fixed value will override the default value in Pivot
Grid Wizard. If the parameter has the mapping type set to Page Field, the value of the mapped field
from the page will be passed dynamically from the page to the analytic report when creating or
viewing the analytic report
Mapping is optional. If the mapping option is not set, then the default values (Page Field for Mapping
Type and Empty for Mapping Data) ensures the prompt is not mapped; in this case, the default values
in the Pivot Grid Wizard for the template model are applied while creating or viewing the analytic
report.
11. Click the Select icon next to the Supplier parameter to display the Page Fields List page.
240 Copyright
©
1988, 2020, Oracle and/or its affiliates.

Chapter 9 Working with Simplified Analytics
Image: Page Fields List page
This example illustrates the Page Fields List page listing all available fields on the Pivot Grid model.
12. Click the level-0 Supplier link in the Page Field Name column and return to the Configure Service
page.
Note: Simplified Analytic feature uses only level-0 fields for the mapping because Simplified
Analytics is common to the entire page (in the right panel), so Simplified Analytics cannot be mapped
to any specific row at level-1 and higher. A run-time error message appears if a field higher than level
0 is mapped.
Copyright
©
1988, 2020, Oracle and/or its affiliates. 241

Working with Simplified Analytics Chapter 9
Image: Configure Service page
This example illustrates the Configure Service page. The VENDOR_NAME parameter from the
prompt is mapped to the page field Supplier, which is a hidden field.
13. Optionally, select the mapping type and mapping data for the other parameters.
In this example, you will accept the default settings for all other parameters.
14. Click the OK button to return to the Assigned Related Content page.
15. Save your configurations.
Image: Assign Related Content page
This example illustrates the Assign Related Content page displaying the Page Level Related
Content section with the Page field set to PO_SWL_WATCH_FL and the Service ID field set to
ANALYTICSERVICE.
242 Copyright
©
1988, 2020, Oracle and/or its affiliates.

Chapter 9 Working with Simplified Analytics
16. Preview the analytic report template by:
Returning to the Supplier Watch List by clicking the Supplier Watch List link on the Assign Related
Content page. Alternatively, select the Supplier Watch List from the Procurement Operations landing
page.
Note: You can associate more than one analytic report template (Pivot Grid template model) to a page
in a component.
Modifying the Query Used in a Simplified Analytic Report
When you want to change the delivered base template of the pivot grid on a transaction page, you can:
• Modify axis, rows or columns or the chart type and so on to change the configuration of the pivot
grid definition. These changes will not affect existing simplified analytic reports on the same base
template.
• Modify the query definition used in the base template pivot grid. Any change to the query is
disruptive and will effect existing reports too.
The following section lists methods to modify query in noninvasive ways.
Adding a New Field From an Existing Record in the Query
To modify the simplified analytic query by adding a new field to the query:
1. Search and open the required query from the Query Manager. Under the Query tab, the records
associated with the query are listed.
2. Expand the records to see fields associated with each record. The list of fields for a record also
includes fields not selected to be used in the query.
3. Select a new field to be added to the query from this list. You can verify the selected field appears
under the Fields tab and the View SQL tab of the Query Manager.
4. Verify the new field is also shown on Selecting a Data Source- Step 2 page of the Pivot Grid Wizard
as a Data Source Column. Step through the wizard and save the model.
5. Open an existing simplified analytics report that uses the same query and pivot grid base template.
The report has no change.
6. Click Edit button on the report. Note that the new field is listed. You can make further modifications
to the report selecting the new field on the report.
The new field added to the query will be available when you create a new analytics using the same
query.
Adding a Criteria Involving the Fields and Expressions
To modify the simplified analytic query by adding a criteria:
1. Search and open the required query from the Query Manager.
Copyright
©
1988, 2020, Oracle and/or its affiliates. 243

Working with Simplified Analytics Chapter 9
2. Add a criteria under the Criteria tab. Verify the Expression Type of Expression 1 is set to a field and
the Expression Type of Expression 2 to a constant.
3. Save the query.
4. Open an existing simplified analytic report which uses the query. The report reflects the modification
in criteria.
Adding a New Expression to a Criteria or Field
To modify the simplified analytic query by adding a new expression to a criteria or a field:
1. Search and open the required query from the Query Manager.
2. Add an expression to the query in the Expression tab.
3. Add a criteria involving the new expression in the Criteria tab.
4. Open an existing report that uses the base template with the query you have modified. The report
reflects the change carried out in the query.
Adding an Optional Prompt
To modify the simplified analytic query by adding an optional prompt:
1. Search and open the required query from the Query Manager.
2. Add a new prompt in the Prompt tab:
• Add a new Field as a new prompt.
• Select the Optional check box.
• Search and select a Prompt table.
3. Use the new prompt to update the criteria in the Criteria tab.
4. Verify that the new prompt is added to the query using the Run tab.
5. Open the base template in the pivot grid wizard from Reporting Tools, Pivot Grid, Pivot Grid Wizard.
Navigate to Specify Data Model Values-Step 3 page. Enter appropriate value for the prompt in the
Select Query Prompt Values section and save the base template.
6. Create a new analytics report where you will find the new prompt listed. But existing analytic reports
remain unchanged.
Note: You can make the new prompt as a required prompt when you do not select the Optional check
box and provide a default value to the prompt. In this case the existing reports will remain unchanged but
when you create an analytic report using the same query, the new prompt is reflected.
Joining a New Record to the Query
To modify the simplified analytic query by joining a new record to the query:
244 Copyright
©
1988, 2020, Oracle and/or its affiliates.

Chapter 9 Working with Simplified Analytics
1. Search and open the required query from the Query Manager.
2. Search and select a record from the Record tab.
3. Click Join Record link to the join with the any of the existing records as a Standard Join or Left Outer
Join.
4. Click Add Criteria button on the Auto Join criteria dialog box after selecting all the required criteria
for the join.
After the above step, you can modify the queries following any of the methods described below:
• Add a new field from the newly joined record.
• Add a criteria involving Fields or Expressions.
• Add an optional prompt.
• Add a required prompt.
Add a new field from the newly joined record
After you select the criteria you can select a new field from the Records tab in Fields section. See Adding
a New Field From an Existing Record in the Query.
Add a criteria involving fields or expressions
After you select the criteria from the Auto Join criteria dialog box, you can add a new criteria under the
Criteria tab and save the query. Open existing reports that reflect the change and show the newly added
criteria. See Adding a Criteria Involving the Fields and Expressions.
Adding an optional prompt or a required prompt
After you select the criteria from Auto Join criteria dialog box, add a new prompt from the Prompt tab.
See Adding an Optional Prompt.
Changing the Join Criteria of the Query Tables
To modify the simplified analytic query by changing the join criteria of the query:
1. Search and open the required query from the Query Manager.
2. Search and select a record from the Record tab.
3. Click Join Record link to the join with any of the existing records as a Left Outer Join or a Standard
Join.
4. Make a change in join criteria for example delete an entity.
5. Save and open an existing simplified analytic report. The report shows the change in join criteria in
the query.
Copyright
©
1988, 2020, Oracle and/or its affiliates. 245
Working with Simplified Analytics Chapter 9
Changing the Field Length or Field Type of Existing Fields
To modify the simplified analytic query by changing the field properties of existing field used in the base
query:
1. Open the Application Designer.
2. Search and open the field properties of the record.
3. Modify the field properties for example changing the field type or field length.
This change in field type is reflected in Query Manager too. Changes are also seen in Pivot Grid
Wizard, when we open the base template or when we open any existing simplified analytic reports
that uses the modified field.
Adding or Modifying Security Joins
To modify the simplified analytic query by adding or modifying the security joins:
1. Open the record properties of the required record and enter or modify the record in the Query Security
Record field.
2. Click OK and save.
3. Reopen the existing report. You will find no change in the existing simplified analytic report.
See, "Using Row-Level Security and Query Security Record Definitions" (PeopleTools 8.58: Query) for
enforcing Row-Level security.
Removing a Join for Non-Referenced Records
To modify the simplified analytic query by removing a join if the record is not referenced in select list or
under prompts:
1. Join two records such that none of the fields of newly added record are listed in the select list of the
query and is not part of the prompt.
The fields from the second record appears only in the criteria.
2. Add an additional criteria. The existing reports change to reflect the join and the change in criteria.
3. Delete the record from the query. The criteria will automatically be updated to show the changes. The
existing report also changes to how they were prior to the join.
Changing the Expression Text and Format
To modify the simplified analytic query by changing the text and format of an expression used in the base
query:
1. Open the expression to be edited from the Query Manager
Click Edit button for the expression on the Fields page.
2. Modify any of the required field like Heading Text, Heading and so on.
246 Copyright
©
1988, 2020, Oracle and/or its affiliates.

Chapter 9 Working with Simplified Analytics
Save the query. Simplified Analytic Report reflects the change on editing the existing report or
creating a new report using the query. Existing reports remain unchanged.
Security Considerations When Using Simplified Analytics
Configuring to Restrict Reports Within the Component Context
The analytic reports that are created using Simplified Analytics can be restricted to be accessed only
within the component context, that is within the My Analytics section in the right panel of the component.
To configure for restricting reports within the component context, deselect the When used as analytics
template, allow created reports to be accessed outside the component context option in the Pivot Grid
Wizard - step 4 for the base template model. This option is selected for all Pivot Grid models by default.
Copyright
©
1988, 2020, Oracle and/or its affiliates. 247

Working with Simplified Analytics Chapter 9
Image: Pivot Grid Wizard - step 4 - Fluid Options
This example illustrates the Pivot Grid Wizard - step 4. In the Fluid Mode Options section, the When
used as analytics template, allow created reports to be accessed outside the component context option is
selected.
In general, this option should be deselected if Authorization as Service is implemented for the Simplified
Analytics of the component, where there is custom logic in code to control who can see or create which
type of reports. Because custom authorization code cannot be run outside the component context, this
option must be deselected.
When this option is deselected, the reports that are created using the Create Analytics Wizard based on the
specific template:
• Can be accessed only from the My Analytics section at the right of the component from which it is
created.
• Cannot be published to the fluid homepage using the Publish or Add to Homepage options.
248 Copyright
©
1988, 2020, Oracle and/or its affiliates.
Chapter 9 Working with Simplified Analytics
• Cannot be accessed using the Pivot Grid Viewer (Reporting Tools, Pivot Grid, Pivot Grid Viewer),
drilling URLs, pagelets, related actions, and so on.
This security option can also be used if the prompt values passed from the page (as bind parameters)
control the security of the data that the users are viewing. These prompts (such as the Supplier in the
previous examples) are:
• Read-only when they are accessed from within the component context (for example, My Analytics).
• Editable when they are accessed from outside the component context (such as when they are invoked
from the landing page).
Therefore, you can use this security option to restrict the report only to the component context as needed.
However, Oracle PeopleSoft strongly recommends that you implement row-level security on the query
to restrict the data for specific users. Further, the view behind the lookup prompts for the analytic reports
should also include the correct security joins to display only the list of values allowed for any user.
Securing Access to Simplified Analytics Reports and Templates Using Web
Services
You can use query security or web services to secure access to simplified analytics reports and templates.
For performance reasons, simplified analytics will execute query security before invoking an
authorization application class. In other words only if the user has access to the query behind the
template/report it will be part of the available list for authorization class to filter further.
Any authorization class defined on the component (enabled for simplified analytics) will be invoked
while getting the list of reports available for the user, or while getting the list of templates available to
create the report for the user.
Like any other authorization service, the PTCS_SECURITY:SECURITY:AuthRequest application class
needs to be extended to implement simplified analytics authorization logic. This class has a variable
“MasterTemplate”. The value of this variable is empty for all non-simplified analytics use cases. The code
gets invoked twice while rendering simplified analytics as follows:
1. The first request is for the list of templates. You can write custom logic to control which template can
be made available for specific users. In this case, the value of the ‘MasterTemplate’ variable value is
ANALYTICSERVICE.
2. The second request will be to correspond to the saved reports. This includes both the user-created
reports as well as the administrator-published reports. In this case, the ‘MasterTemplate’ variable will
point to the parent pivot grid template used to create the report.
In both requests you can use the details of the level 0 field values on the page to apply custom logic to
filter the reports/templates. The AuthRequest.KeyVal array in the app class includes all of the level 0 field
name and values in the format RECNAME.FIELDNAME=CURRENTFIELDVALUE.
In addition to using the authorization service as a security control for reports/templates, it can also be used
to control the list of reports/templates that can be made available based on the current page/current data in
the component the user is accessing.
Here is an example of implementing an application class that is associated to the supplier watch list
component.
Copyright
©
1988, 2020, Oracle and/or its affiliates. 249

Working with Simplified Analytics Chapter 9
Note: When authorization as a service is enabled, the code is called while getting the list of the reports to
be shown on "My Analytics" for the user and also while getting the list of templates for the user for report
creation. This example code handles both the cases.
import PTCS_SECURITY:Security:*;
class SupplierWatchlist extends PTCS_SECURITY:Security:SecurityHandler
method GetAuthorization
&arrAuthReq As array of PTCS_SECURITY:Security:AuthRequest);
protected
property array of PTCS_SECURITY:Security:AuthRequest oAuthRequest;
private
Constant &PGNAME = "PGNAME";
end-class;
method GetAuthorization
/+ &arrAuthReq as Array of PTCS_SECURITY:Security:AuthRequest +/
/+ Extends/implements PTCS_SECURITY:Security:SecurityHandler.GetAuthorization +/
Local string &SET, &SUPP, &master, &PG, &name, &val, &MST, &COMP, &COMPITEM,
&pglt, &ParentServiceId, &template;
Local number &i, &k, &j, &a, &b;
Local array of string &templ;
Local SQL &sql;
&pglt = %Page;
/*Process the level 0 field to get any needed context information.
In this case the application page field CONTEXT_WRK.CONTEXTVAL stores
context information*/
For &k = 1 To &arrAuthReq.Len
For &j = 1 To &arrAuthReq [&k].KeyVal.Len
&name = &arrAuthReq [&k].KeyVal [&j][1];
if &name = "VENDOR_SETID.VENDOR_ID " Then
&val = &arrAuthReq [&k].KeyVal [&j][2];
break;
end-if;
End-For;
End-For;
&templ = CreateArrayRept("", 0);
/*PS_TEMPLATE_CREF is an example custom application table that stores which
templates/admin published reports which user has access to. It is based
on the operator id, page name and context page field (VENDOR_ID) value.
Here we query to get the current list applicable for the specific user*/
&sql = CreateSQL
("select TEMPLATE_DESC from PS_TEMPLATE_CREF WHERE OPRID = :1
AND PAGE_FIELD_NAME = :2
AND VENDOR_ID =:3",
%OperatorId, &pglt, &val, &template);
While &sql.Fetch(&template)
&templ.Push(&template);
End-While;
For &i = 1 To &arrAuthReq.Len
/*Get the current report name*/
&PG = &arrAuthReq [&i].GetParameterValue(&PGNAME);
/*Get the current master template*/
&MST = &arrAuthReq [&i].MasterTemplate;
/*Is the current report is present in the allowed list of administrator
published reports for the user*/
&a = &templ.Find(&PG);
/*Is the current template available in the list of allowed templates for
the user for creating a report*/
&b = &templ.Find(&MST);
/*Allow if the current report is in the list of allowed published reports for
the user or allow if the template is allowed for report creation for the user.
Do not allow otherwiser*/
If (&a > 0 Or &b > 0) Then
&arrAuthReq [&i].Access = "T";
Else
&arrAuthReq [&i].Access = "F";
End-If;
End-For;
250 Copyright
©
1988, 2020, Oracle and/or its affiliates.

Chapter 9 Working with Simplified Analytics
end-method;
Note that the custom authorization logic to control the access for templates/reports will not be executed
outside the component context, for example, while accessing the published reports from the landing page.
As a result, it is recommended that if you are using the authorization service for controlling report access,
clear the Fluid option
When used as an analytics template, Step 4 of the Pivot Grid wizard allows created reports to be accessed
outside the component context
Related Links
"Understanding Using Web Services for Object and Row-Level Data Authorization" (PeopleTools 8.58:
Security Administration)
Masking Data in Simplified Analytics
A Simplified Analytic report that uses query, connected query, or composite query as a data source may
include data fields containing sensitive or personally identifiable information (PII) data. Data masking
enables you to use a masking character, for example, an asterisk (*) or any character, to mask output and
prevent the display of this data. The SetDisplayMask method replaces each character of the displayed
field text value with the chosen mask character.
Data masking in Simplified Analytic reports behave similar to data masking in Pivot Grid reports. See
Data Masking in Pivot Grid
Related Links
"Data Privacy Framework" (PeopleTools 8.58: Security Administration)
"Setting Additional Options" (PeopleTools 8.58: Query)
Related Actions for Simplified Analytic Reports
When the analytic report template (base template Pivot Grid model) has row-level or aggregate-related
actions, the same settings will be carried over to the analytic reports created by the users.
Application developers must ensure that the related action is suppressed using the authorization service if
all required fields needed for the related actions are not selected by the end users or administrator while
creating the analytic report.
For example, in the Supplier Watch List, the Notify Supplier service can be a related action at the detail
view that is associated to the analytic report template. This related action requires the Supplier ID field
to be one of the selected fields. If the user creates an analytic report and does not select the Supplier ID
field in the Create Analytics Wizard – step 2, then the application developer must ensure that the related
action is suppressed using the authorization service that is associated to the Notify Supplier service.
Alternatively, application developers can use the App Class or Component PeopleCode corresponding to
the Notify Supplier service to detect the missing bind parameters and display the appropriate message or
take default action.
Adding Related Actions to Simplified Analytics Reports
Copyright
©
1988, 2020, Oracle and/or its affiliates. 251

Working with Simplified Analytics Chapter 9
Image: Supplier Watch List with related action
This example shows the Supplier Watch List with a related action associated to the Notify Supplier
service.
Image: Supplier Watch List with the Notify window
This example shows the Supplier Watch List with the Notify window after you select the Notify option
from the related actions.
Using Simplified Analytics in Small Form Factor
You can use a small form factor to create, edit, and view the analytic reports.
252 Copyright
©
1988, 2020, Oracle and/or its affiliates.

Chapter 9 Working with Simplified Analytics
Note: The Simplified Analytic feature supports the Chart and Simple Table views on small form factor,
but this feature does not support Pivot Grid view on smart form factor. The reports that contain Pivot Grid
view (created in tablets or desktop) will not show up on small form factor, on the Unified Related Content
Analytics pane.
This example shows you how to create, edit, or view the analytics using a small form factor,
1. Access the fluid component for which you have the Simplified Analytics feature enabled.
In this example, access the Supplier Watch List component under Procurement Operations.
Copyright
©
1988, 2020, Oracle and/or its affiliates. 253

Working with Simplified Analytics Chapter 9
Image: Supplier Watch List component on a smart phone
This example illustrates the Supplier Watch page on a smart phone displaying the details of supplier,
purchase order, and entity for supplier Bike Shopper. The Expand icon at the right of the view is used
to display the Unified Related Content Analytics pane.
2. Click the Expand icon at the right of the view to expand the right panel that displays the Unified
Related Content Analytics pane. See, Accessing from the Unified Related Content Analytics Pane.
254 Copyright
©
1988, 2020, Oracle and/or its affiliates.

Chapter 9 Working with Simplified Analytics
Image: Unified Related Content Analytics pane on a smart phone
This example illustrates the Supplier Watch page displaying the Unified Related Content Analytics
pane on a smart phone. The pane also display related information tiles such as Supplier Performance,
Overall Score Trend and so on.
Note: On smart phones, all analytics that have the display option set to Pivot Grid View are
suppressed and not listed under the My Analytics section.
3. Tap the Add Analytics button on the Unified Related Content Analytics pane to create a new
simplified analytic.
Copyright
©
1988, 2020, Oracle and/or its affiliates. 255

Working with Simplified Analytics Chapter 9
The Create Analytics Wizard – step 1 appears.
4. Enter the name of the analytics into the Analytics Name field.
In this example, enter Score Trend.
5. Select an analytics template from the Analytic Type dropdown list.
In this example, select the Section Score Trend option from the list.
6. Use the Display Option section to set the chart and table views for the analytics.
Note: Using a smart phone, the available display options are Chart and Simple Table views. The Pivot
Grid view is not available.
256 Copyright
©
1988, 2020, Oracle and/or its affiliates.

Chapter 9 Working with Simplified Analytics
Image: Create Analytics Wizard - step 1 on a small form factor
This example illustrates the Create Analytics Wizard - step 1. The analytic report Non Contract Spend
will use the analytic template Non Contract PO Spend. The report will display the results in the Chart
and Simple Table view.
7. Tap the Next button to display the Create Analytics Wizard - step 2.
8. Select the prompt values for the analytics, if any.
9. Use the Choose Fields section to select the fields that will be available in the analytics. Also use
editable fields from the Choose Editable Fields section. See Create Analytics- Step 2.
Copyright
©
1988, 2020, Oracle and/or its affiliates. 257

Working with Simplified Analytics Chapter 9
Image: Create Analytics Wizard - step 2 on a smart phone
This example illustrates Create Analytics Wizard - step 2.
10. Tap the Next button to display the analytics preview window.
258 Copyright
©
1988, 2020, Oracle and/or its affiliates.
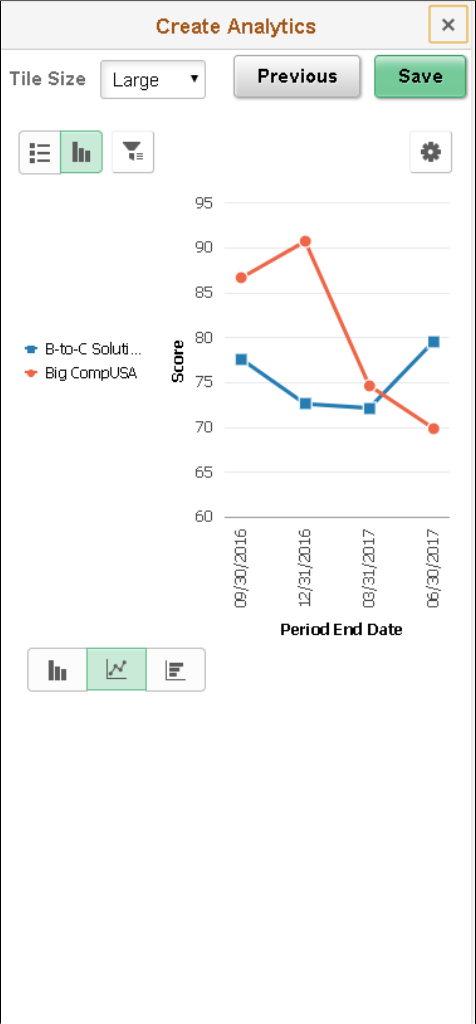
Chapter 9 Working with Simplified Analytics
Image: Create Analytics Wizard- step 3 - preview window
This example shows the preview window of the analytics Score Trend using the analytic template
Overall Score Trend.
11. Toggle to List view. Use the List button at the top-left of the chart to view the results in a list.
Copyright
©
1988, 2020, Oracle and/or its affiliates. 259

Working with Simplified Analytics Chapter 9
Image: Analytics displayed in a list view
List view of the analytics.
12. Tap the Filters (funnel) icon at the top-left of the chart to display the filters in a modal window. When
you view the analytics, you get the Modify Prompts option too.
260 Copyright
©
1988, 2020, Oracle and/or its affiliates.

Chapter 9 Working with Simplified Analytics
Image: Filters on a smart phone
This example shows the Filters and Modify Promptsoptions displayed.
13. Use the Chart Options from the Options menu to change the chart display options such as X axis,
Series, Y axis, and so on.
Note: On smart phones, you cannot use the drag-and-drop function to change the chart axes.
Copyright
©
1988, 2020, Oracle and/or its affiliates. 261

Working with Simplified Analytics Chapter 9
Image: Options Menu on a smart phone
This example illustrates the options from Options menu.
14. Save the analytic report using the Save button.
262 Copyright
©
1988, 2020, Oracle and/or its affiliates.

Chapter 9 Working with Simplified Analytics
Image: Saving confirmation on a smart phone
This example illustrates the confirmation for saving the analytic report after clicking the Save button.
15. Return to the Supplier Watch page; the Unified related Content Analytics pane lists the analytics with
other related information.
Copyright
©
1988, 2020, Oracle and/or its affiliates. 263

Working with Simplified Analytics Chapter 9
Image: My Analytics section lists the newly created analytic report
This example illustrates the Supplier Watch page displaying the Unified related Content Analytics
pane on a smart phone. The Score Trends analytics is available.
16. Tap the analytics link to view the it in a modal window.
When you view the analytics on small form factor, you are asked to enter values to relevant fields. These
fields are configured as runtime prompts for the analytics in the wizard.
264 Copyright
©
1988, 2020, Oracle and/or its affiliates.

Working with Simplified Analytics Chapter 9
266 Copyright
©
1988, 2020, Oracle and/or its affiliates.

Chapter 10
Pivot Grid Administration
Understanding Pivot Grid Administration
Pivot Grid administrators use the Pivot Grid Administration component to administer Pivot Grid models,
views, and user personalization.
Note: In the grid section, if you are not assigned the Pivot Grid Administrator users role, then when you
perform a search in the Pivot Grid Administration component, the search result is restricted to the models
that you have created in the Pivot Grid Wizard. Non-administrative users are not able to delete, copy,
import, export, or generate scripts on the models that they did not create.
Deleting Pivot Grid Models
Pivot Grid administrators use the Delete Pivot Grid Models page (PTPG_ADMN_DELETE) to delete the
models and all their associated views in the database.
Navigation
Reporting Tools > Pivot Grid >Pivot Grid Administration
Copyright
©
1988, 2020, Oracle and/or its affiliates. 267

Pivot Grid Administration Chapter 10
Image: Delete Pivot Grid Models page
This example illustrates the fields and controls on the Delete Pivot Grid Models page. Definitions for the
fields and controls on this page follow this example.
Keyword Click to perform a free-text search on model name and title.
Delete Non Default Views Click to access the Delete Non Default Views page, where you
can view and delete non-default views that are associated with
the models.
Delete Model(s) Click to delete the selected Pivot Grid models.
Note: An error message appears if any selected model or view is
referenced in pagelets or in related content. You have to remove
the references in the Pagelets or Related Content components
before you can delete the model or views.
To delete specific Pivot Grid models and all associated views in the database:
268 Copyright
©
1988, 2020, Oracle and/or its affiliates.

Chapter 10 Pivot Grid Administration
1. Select Reporting Tools, Pivot Grid, Pivot Grid Administration, Delete Models.
2. Click the Search button to display all Pivot Grid models that you have authorization to delete.
3. Select the models that you want to delete.
4. Click the Delete button to delete the selected models and their associated views.
If any selected model is referenced in an exported pagelet, an error message appears asking you to
delete the pagelet reference.
Note: A search run without any search condition on the Delete Pivot Grid Models page yields a maximum
of 1000 search results. If you are looking for a search result which is not already displayed within the
1000 rows, then use a search condition to refine your search.
Note: When you delete a Pivot Grid model that was created using a component as the data source, you
have the option to either delete or not delete the query that is associated with the component.
Deleting Non-Default Views
Pivot Grid administrators use the Delete Non Default Views page (PTPG_ADMN_DELNDV) to view
and delete non-default views that are associated with the models.
Navigation
Reporting Tools >Pivot Grid >Pivot Grid Administration >Delete Models
Image: Delete Non Default View page
This example illustrates the fields and controls on the Delete Non Default Views page.
To delete non-default views that are associated with a Pivot Grid model in the database:
1. Select Reporting Tools, Pivot Grid, Pivot Grid Administration, Delete Models.
2. Click the Search button to display all Pivot Grid models that you have authorization to delete.
Copyright
©
1988, 2020, Oracle and/or its affiliates. 269

Pivot Grid Administration Chapter 10
If non-default views are associated with the model, the Delete Non Default Views link appears.
3. Click the Delete Non Default Views link next to the Pivot Grid model.
The non-default views are listed by name and description.
4. Select appropriate non-default views and click the Delete button.
Note: Non-default views are created using the Pagelet Wizard - Specify Data Source Parameters page.
Deleting User Personalization
Pivot Grid administrators use the Delete User Personalization page (PTPG_ADMN_RSTPERS) to delete
the personalization, by users, on the views that are associated with any model in the database.
Navigation
Reporting Tools >Pivot Grid >Pivot Grid Administration >Delete Personalization
Image: Delete User Personalization page
This example illustrates the fields and controls on the Delete User Personalization page.
Note: The User ID and the view name are presented in model search results. The search lists only the
models whose views have user personalization. For users who are not Pivot Grid Administrators, the
search result is further limited to the models that they have created in the wizard.
To delete user personalization on specific Pivot Grid models in the database:
1. Select Reporting Tools, Pivot Grid, Pivot Grid Administration, Delete User Personalization.
2. Search for a model name.
All the user personalization and the associated USERIDs are listed.
270 Copyright
©
1988, 2020, Oracle and/or its affiliates.

Chapter 10 Pivot Grid Administration
3. Select and delete the personalization for a specific user or for all users.
Exporting and Importing Pivot Grid Models
Pivot Grid administrators can use the Generate Import/Export Scripts page (PTPG_ADMN_EXPIMP) to
generate the import and export scripts for the selected models.
Navigation
Reporting Tools >Pivot Grid >Pivot Grid Administration >Generate Scripts
Image: Generate Import/Export Scripts page
This example illustrates the fields and controls on the Generate Import/Export Scripts page. Definitions
for the fields and controls appear following the example.
Copyright
©
1988, 2020, Oracle and/or its affiliates. 271

Pivot Grid Administration Chapter 10
Export with Personalizations Select to export the generated script with personalizations or
deselect to export the generated script without personalizations.
Note: The existing personalization of the Pivot Grid models in
the target database are always cleared off after the import.
Generate Scripts Click to access the Export/Import Models dialog box, where you
can view the exported or imported scripts.
Image: Export/Import Models page - Data Mover Scripts
This example illustrates the fields and controls on the Export/Import Models dialog box with Data Mover
Scripts.
To generate the Export/Import scripts for migrating specific models in the database:
1. Select Reporting Tools, Pivot Grid, Pivot Grid Administration, Generate Scripts.
2. Search for and select Pivot Grid models for creating a script.
3. Define the option to include or exclude personalization.
272 Copyright
©
1988, 2020, Oracle and/or its affiliates.
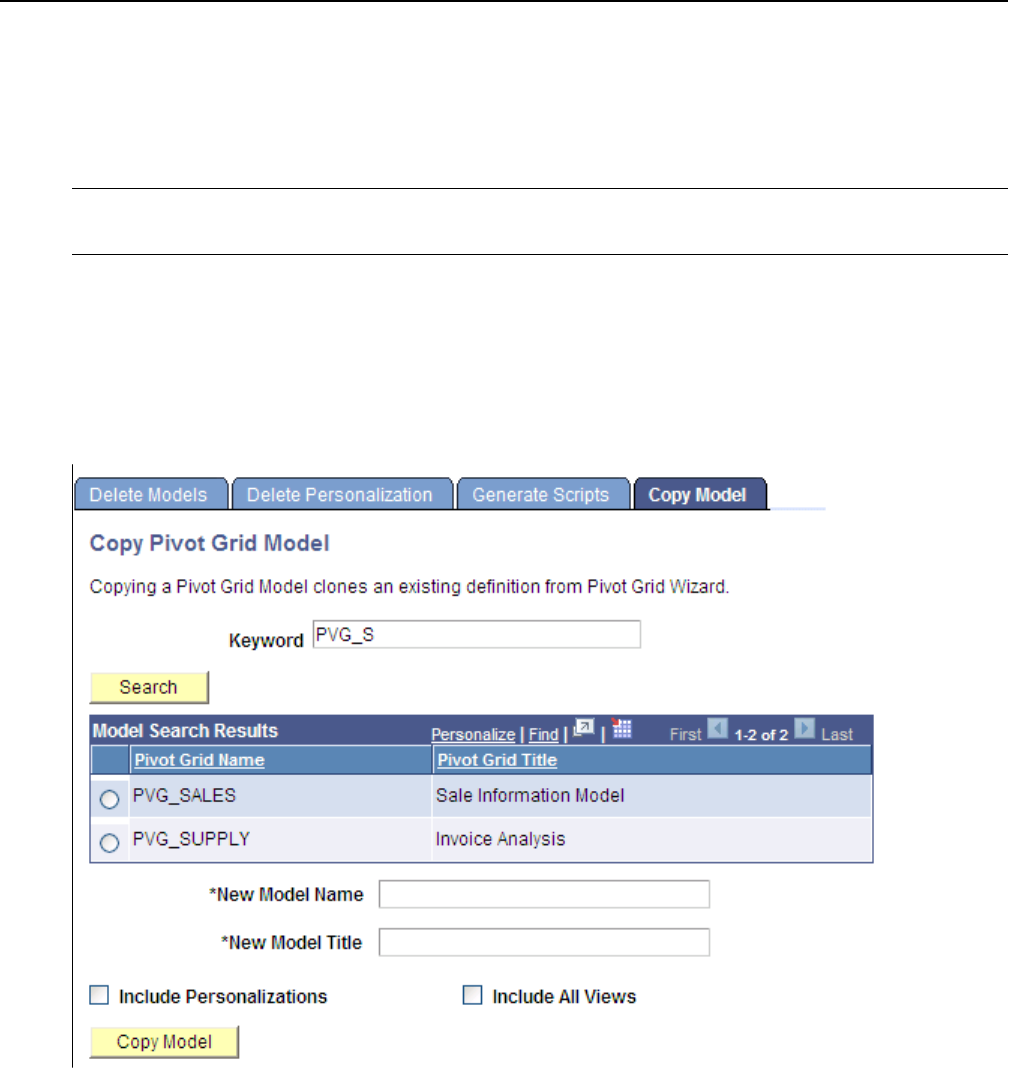
Chapter 10 Pivot Grid Administration
4. Click the Generate Scripts button to create the scripts.
Copying Pivot Grid Model
Pivot Grid administrators use the Copy Pivot Grid Model page (PTPG_ADMN_SAVEAS) to copy
an existing model and give it a new model name and title. Optionally, they can select to copy user
personalization using the Include Personalizations option.
Note: You cannot copy the Pivot Grid model that was created using a component as the data source
because only one Pivot Grid model can be associated with a component.
Navigation
Reporting Tools >Pivot Grid >Pivot Grid Administration >Copy Model
Image: Copy Pivot Grid Model page
This example illustrates the fields and controls on the Copy Pivot Grid Model page.
To copy a specific model and its associated views in the database:
1. Select Reporting Tools, Pivot Grid, Pivot Grid Administration, Copy Model.
2. Search for and select a model.
3. Enter a new model name and its description.
4. Optionally, select the Include Personalizations option to copy all user personalizations.
Copyright
©
1988, 2020, Oracle and/or its affiliates. 273

Pivot Grid Administration Chapter 10
5. Optionally, select the Include All Views option to copy all customized views.
6. Click the Copy Model button to copy the model.
A successful message appears if the copy is completed.
An error message appears if:
• You copy the Pivot Grid model that was created using a component as the data source.
• The name of the new model already exists.
• The name of the new model is empty.
• The description of the new model is empty.
Copying the Fluid Component Between Databases
When you copy a fluid component with Pivot Grid real time search, the following items must be
packaged:
• The Pivot Grid definition.
• The auto-generated query that have the same name as the component.
• The query access tree that you selected in the Pivot Grid Wizard – Select Data Source page. This
query access tree contains the component search record.
• The component and its related definitions; for example, the component PeopleCode, component
record field PeopleCode, search record, pages, and so on.
Note: You can copy Pivot Grid models that are associated with the component data source between
databases. However, you cannot copy a model that is created using component data source within a
database using the Copy Pivot Grid Model page.
Configuring Notification Frequency
Pivot Grid administrators use the Notification Frequency page (PTPG_RECUR_MAP) to map a pivot
grid model with a recurrence. The recurrence defines the frequency with which a process can be run.
Based on the notification frequency requirements, pivot grid administrators can map the models with a
recurrence.
See "Defining Recurrence Definitions" (PeopleTools 8.58: Process Scheduler).
Based on the recurrence mappings, an application engine program processes the models as scheduled.
This scheduled process picks all the models attached to a recurrence and processes them.
274 Copyright
©
1988, 2020, Oracle and/or its affiliates.
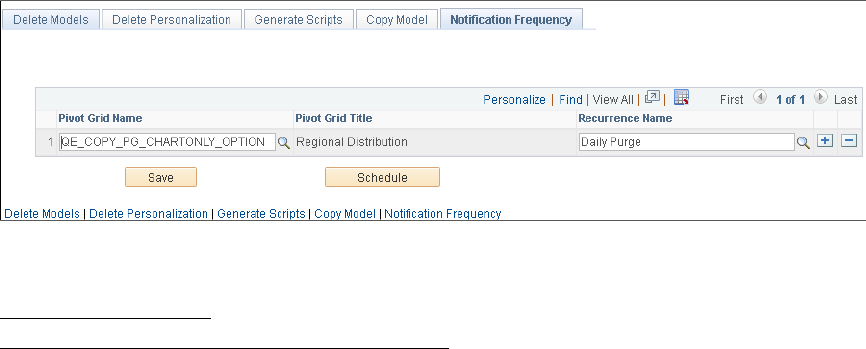
Chapter 10 Pivot Grid Administration
Image: Notification Frequency
The example describes the Notification Frequency tab. Click the Schedule button to begin the process of
running the process request which will send notifications to the user on threshold violations.
Related Links
Configuring Thresholds
Understanding Personalized Analytics Notification
Copyright
©
1988, 2020, Oracle and/or its affiliates. 275
Pivot Grid Administration Chapter 10
276 Copyright
©
1988, 2020, Oracle and/or its affiliates.

Chapter 11
Preserving Pivot Grid Configuration and
Personalizations
Preserving Pivot Grid Configuration and Personalizations
Overview
Using the delivered PIA interface, customers can perform configuration actions on specific PIA-
based objects, such as Related Actions, Activity Guides, Pivot Grids, Work Centers, and so on. In the
subsequent application upgrades, when fixes are delivered on these PIA-based objects, all configurations
are identified and preserved on the customer environment. This is only valid if the customer uptakes fixes
using PUM (PeopleSoft Update Manager).
Pivot Grid uses ADS Framework, interfaces, the compare process, and the copy process to:
• Define intra-object and inter-object relationships.
• Define Pivot Grid configurations.
• Preserve the Pivot Grid customized configurations and personalizations.
Terminology
Pure configurations Independent object-level attributes that can be merged without
additional business logic.
For example, Pivot Grid chart options, related actions node
name, and so on.
Merge process The process that determines the original configuration and
retains the customized configurations.
Merge-able groups A group of object-level configurations that are bundled together.
Secondary transformation The process of applying additional business logic to reconcile
after the merge process is complete.
For example, reconciling view options after a new dimension
has been added in the Pivot Grid models.
Related object family A group of tightly coupled related objects for which merge or
secondary transformation of one object affects the other object.
Sequence is also important in a related object cluster.
Copyright
©
1988, 2020, Oracle and/or its affiliates. 277

Preserving Pivot Grid Configuration and Personalizations Chapter 11
Pivot Grid Customizations
Pivot Grid customizations are the customers’ saved settings, which are not automatically preserved. When
customizations are not preserved, the merge is not completed for that object instance, and the differences
are flagged in the compare report. Customers then have the option as to whether to uptake the object
instance as a whole or not. Examples of Pivot Grid customizations are:
• Changing the data source value, such as the name of the PSQuery that is used as the data source in the
Pivot Grid model.
• Deleting an existing axis or value.
• Changing the type of the column from axis to value, axis to display, and so on.
Pivot Grid Personalizations
Pivot Grid user personalizations are configured at the user level and are considered special configurations.
To preserve customer personalizations:
• Pivot Grid separates personalizations into different tables.
The personalizations are saved in separate tables to ensure that they do not appear in the normal ADS
compare and copy process. These tables are processed separately.
• All personalization changes are logged as part of the compare and copy process so that the
information is available for customers to view.
Customizations Versus Configurations
When you run the process to preserve the configurations and personalizations, use this table as a guide for
recognizing the type of modification and if the merge process is valid for the listed use cases.
Use Case Type of
Modification
Will merge retain the changes?
Updating Pivot Grid details: Pivot Grid title,
Pivot Grid long description, and Pivot Grid
owner ID.
Configuration No
Updating Pivot Grid type to Public or Private. Configuration No
Adding a new dimension or fact. Configuration Yes
Updating a dimension or fact attribute:
changing aliases, adding totals or total names,
and changing aggregate functions for facts.
Configuration No
Changing prompt values Configuration No
Changing display type to Pivot Chart Only,
Grid Only, or Pivot Chart and Grid.
Configuration Yes
278 Copyright
©
1988, 2020, Oracle and/or its affiliates.

Chapter 11 Preserving Pivot Grid Configuration and Personalizations
Use Case Type of
Modification
Will merge retain the changes?
Changing the view options for a Pivot Grid
model that has the default view set to Pivot
Grid and Chart.
Configuration Yes
Changing the chart options. Configuration No
Changing the grid options. Configuration No
Changing the viewer display options. Configuration No
Adding a new related action on a new or
existing axis.
Configuration Yes
Marking a related action on an axis as inactive. Configuration No
From a Pivot grid perspective, a related content ADS
instance needs a merge.
Changing the menu layout for existing actions. Configuration No
From a Pivot grid perspective, a related content ADS
instance needs a merge.
Defining layout for a new or existing fact. Configuration No
From a Pivot grid perspective, a related content ADS
instance needs a merge.
Changing actions for a detailed view. Configuration No
From a Pivot grid perspective, a related content ADS
instance needs a merge.
Updating query name for a Pivot Grid model. Customization N/A
Changing a field type from dimension to fact
or display column, or vice versa.
Customization N/A
Removing a dimension or fact. Customization N/A
ADSs Used for Preserving Pivot Grid Configurations and Personalizations
Pivot grid leverages the following ADSs for preserving Pivot Grid configurations and personalizations:
• ADS relationship framework
Pivot Grid uses the relationship framework that is provided by ADS to create inter-object
relationships (with related actions) and intra-object relationships (different records in the Pivot Grid
ADS definition).
These relationships are used to:
• Get the related objects in the source and target.
Copyright
©
1988, 2020, Oracle and/or its affiliates. 279
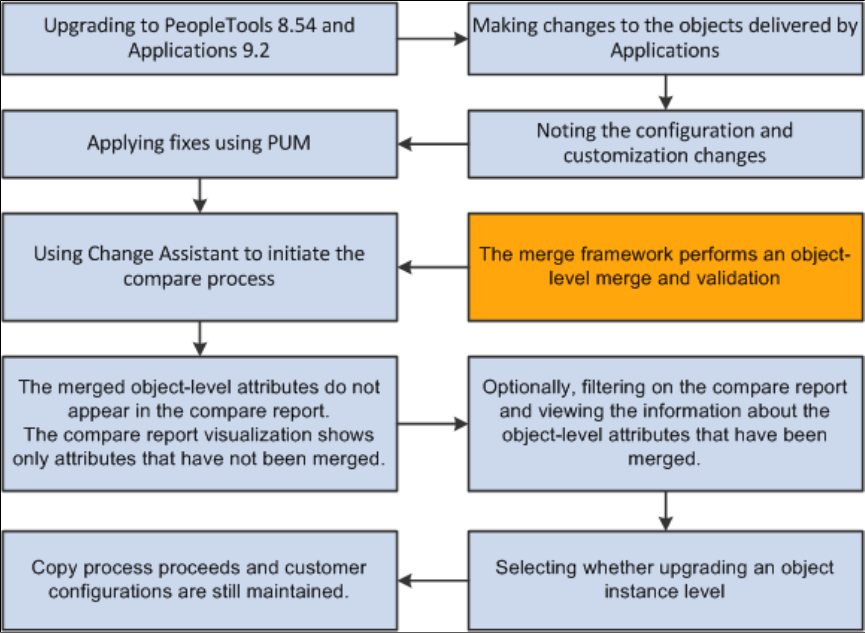
Preserving Pivot Grid Configuration and Personalizations Chapter 11
• Validate the referential integrity of the Pivot Grid object.
• ADS merge framework
Pivot Grid uses the merge framework that is provided by ADS to:
• Define the different configuration actions on the Pivot Grid object using merge-able groups.
• Merge the Pivot Grid object to preserve the customer configurations during compare, copy, and
validation.
• Validate the referential integrity of the Pivot Grid object.
• Perform the data transformation of the Pivot Grid object to reflect as in the previous release shape.
• Orchestrate the different steps in the ADS process for the Pivot Grid related object family, which
are Pivot Grids and related actions.
Image: Process of preserving Pivot Grid configurations and personalizations
This diagram shows the process of preserving Pivot Grid configurations and personalizations.
280 Copyright
©
1988, 2020, Oracle and/or its affiliates.

Chapter 11 Preserving Pivot Grid Configuration and Personalizations
Note: The only relationship that Pivot Grid needs is an ADS definition - related actions. Thus, the
Pivot Grid related object family consists of two ADS definitions: Pivot Grid and related actions. The
relationships are identified between Pivot Grid and Related Actions ADS definitions. The orchestrator
for the Pivot Grid related object family is within the Pivot Grid. Orchestrator can properly sequence the
actions of merge, compare, copy, and validate for the Pivot Grid and related action instances.
Merging Configurations, Customizations, and Personalizations
Using ADS
The merge provided by Application Data Sets (ADS) framework applies to the merge able attributes and
records defined in a data set. The merge property value determines whether the customer value for that
attribute or record is retained or not. The merge using ADS takes place when there are modifications on
attributes like labels, titles of a pivot grid model provided by Oracle PeopleSoft.
In the secondary merge process the framework provides options which determine the merge behavior for
modifications made by the customer. Pivot Grid ADS uses the secondary merge for cases like addition of
new dimensions or facts, changing the view options and so on.
See, "Application Data Set Overview" (PeopleTools 8.58: Lifecycle Management Guide).
Note: These examples assume that the user follows the default merge process. After the compare, user has
the option to override the merge and accept values for merge-able attributes.
The following scenarios compare the impact on pivot grid objects when you have to merge data between
existing application and the application update available using the default merge process or the secondary
merge process.
The scenarios describe a customer who is on an application version and how he proceeds for an
application update using the ADS framework:
1. The customer decides to take the new update from PeopleSoft Update Manager (PUM) which
includes an ADS project containing the pivot grid update.
2. He selects the updates he wants and creates a change package in the Change Assistant. If the customer
selects an update containing a pivot grid, then the update is included as one of the ADS values.
3. The customer applies the change package in the target database. The change package with the ADS
project has several steps like:
a. Copy to file.
b. Compare.
c. Review.
In this step the customer reviews the compare reports and overrides actions if required.
d. Copy from file.
Copyright
©
1988, 2020, Oracle and/or its affiliates. 281

Preserving Pivot Grid Configuration and Personalizations Chapter 11
The following sections describe the process and result of an application update in different scenarios
where secondary merge is required or not required and changes are applied by application development,
customer, or user.
Related Links
"PUM Enabled PeopleSoft Systems" (PeopleTools 8.58: Change Assistant and Update Manager)
"Copy Compare Overview" (PeopleTools 8.58: Lifecycle Management Guide)
Merging Configurations from Customer and Application Update
Changes from Application
Update
Changes from Customer Result of the Merge on the Pivot
Grid Object
Configurations from application
development which do not require
secondary merge.
For example, change in dimension
aliases.
Configurations from customer which do not
require secondary merge.
For example, updates the chart options.
The customer’s configurations are
maintained in the target database.
Application changes are not applied
because the changes were not on merge-
able objects.
Only the application fix is copied; the
customer’s chart option configurations are
maintained.
Configurations from application
development which require
secondary merge.
For example, adding a new
dimension.
Configurations from customer which do not
require secondary merge.
For example, updates the chart options.
The customer’s configurations are
maintained and the application changes are
applied.
Only the application fix is copied; the
customer’s chart option configurations are
maintained.
Configurations from application
development which do not require
secondary merge.
Configurations from customer which
require a secondary merge.
The customer’s changes are preserved,
but the application fixes are not applied
because the customer configurations
always have a higher priority.
Configurations from application
development which do not require a
secondary merge.
Customer does not make any change to the
pivot grid model but the user personalizes
the pivot grid views.
The customer personalizations are
preserved but the application changes
are not applied because they are part of a
merge-able group where the target values
have preference over the source.
After the instance level compare of the merge-able objects:
1. The compare process determines that there are changes in Pivot Grid chart options and aliases. These
being a part of the merge-able groups for the Pivot Grid, target values are preserved by default.
2. In the final compare, the target values for the merge-able attributes are preserved and displayed to the
users.
3. Customer accepts the fix and then initiates a copy process.
4. The same merge framework is run to preserve the customer configuration.
282 Copyright
©
1988, 2020, Oracle and/or its affiliates.

Chapter 11 Preserving Pivot Grid Configuration and Personalizations
Merging Customer Changes on Delivered Pivot Grid Objects
Changes from Application
Update
Changes from Customer Result of the Merge on the Pivot Grid Object
Update from application
development on the pivot grid
model and related objects.
For example, changes to the query
that is associated with the Pivot Grid
model.
Configurations from customer
which do not require secondary
merge.
For example, updates the chart
options.
No merge is performed. If the customer selects to
copy over the new version, all personalizations for the
model need to be removed.
Updates from application
development on the pivot grid
model and related objects.
Configurations from customer
which require a secondary
merge.
No merge is performed because customizations are
detected. If customer decides to upgrade, the behavior
is the same as in the previous PeopleTools releases
(that is earlier than PeopleTools 8.54) where the source
definition replaces the existing target definition.
Configurations from application
development which do not require a
secondary merge.
Customization from customer
on the Pivot Grid model.
No merge is performed because customizations are
detected. If customer decides to upgrade, the behavior
is the same as in the previous PeopleTools releases
(that is earlier than PeopleTools 8.54) where the source
definition replaces the existing target definition.
Configurations from application
development which require
secondary merge.
Customization from customer
on the Pivot Grid model.
No merge is performed because customizations are
detected. If customer decides to upgrade, the behavior
is the same as in the previous PeopleTools releases
(that is earlier than PeopleTools 8.54) where the source
definition replaces the existing target definition.
Updates from application
development on the pivot grid
model and related objects.
Customer does not make any
change to the pivot grid model
but the user personalizes the
pivot grid views.
All personalizations are removed.
After the instance level compare of the merge-able objects:
1. The Pivot Grid custom merge code detects the customization and updates.
2. The updates including customizations are logged, and the merge process aborts.
3. A compare process is repeated, and the system displays the compare report visualization to the user.
All changes, like the query name change, are listed in the compare report.
4. Customer can either select to retain the existing Pivot Grid model or copy over the new one.
5. An upgrade is run based on the customer’s selection.
Copyright
©
1988, 2020, Oracle and/or its affiliates. 283

Preserving Pivot Grid Configuration and Personalizations Chapter 11
Merging Changes to Merge-able Attributes
Changes from Application
Update
Changes from Customer Result of the Merge on the Pivot
Grid Object
Configurations from application
development which require
secondary merge.
For example, adds a new dimension.
Configurations from customer which
require secondary merge.
For example, adds a new dimension which
has a related action.
Customer’s configurations are preserved
and the application fixes are also copied.
After the instance level compare of the merge-able objects:
1. The compare process highlights a newly added dimension.
2. If there are any merge-able attributes, the values are preserved in the target database.
3. Additional dimension in the target are reconciled with the source because the dimension is preserved.
The additional dimension in the source is also preserved.
4. If there are any view related changes because of the additional dimensions, then those changes are
also preserved.
5. The same merge and compare process is run for the related action object.
6. The related actions object in the merge reconciles the menu folders and layouts.
7. In the compare report visualization, user can identify the merge-able attribute values which are
preserved in the target. The newly added dimension in the target are also preserved whereas the
dimension in the source is displayed as a change to be added.
This behavior also applies to the related actions object.
8. Customer selects to uptake the fixes and initiates a copy.
9. The merge framework is run to preserve the customer’s configuration.
Merging Configurations from Application Development and User
Personalizations
Changes from Application
Update
Changes from Customer Result of the Merge on the Pivot
Grid Object
Configurations from application
development which require
secondary merge.
For example, adds a new dimension.
Customer does not make any change to the
pivot grid model but the user personalizes
the pivot grid views.
Customized personalizations are preserved,
and the application changes are applied to
the view that is associated with the Pivot
Grid model.
After the instance level compare of the merge-able objects:
1. No changes related to merge-able groups or secondary merge is found.
284 Copyright
©
1988, 2020, Oracle and/or its affiliates.

Chapter 11 Preserving Pivot Grid Configuration and Personalizations
2. The compare process is repeated, and the system displays the compare report visualization to the user.
The personalizations do not appear in the compare report but it shows a new dimension added to the
pivot grid model.
3. Customer selects to uptake the fixes and initiates a copy.
4. The same merge framework is run to preserve the customer configuration.
Merging Changes Dependent on One Another
Changes from Application
Update
Changes from Customer Result of the Merge on the Pivot
Grid Object
Updates from application
development on the pivot grid
model and related objects.
For example, removing a dimension.
Customer makes no change to the Pivot
Grid model, but customer is using
the dimension (that was removed by
Application developer) in one of the Pivot
Grid related actions.
No merge is performed because of the
customization. However, during validation,
the conflict is detected and flagged as an
error in the validation report, and customer
has to modify the related action.
Copyright
©
1988, 2020, Oracle and/or its affiliates. 285
Preserving Pivot Grid Configuration and Personalizations Chapter 11
286 Copyright
©
1988, 2020, Oracle and/or its affiliates.

Appendix A
Creating and Viewing a Pivot Grid Pagelet
Using the Pagelet Wizard
Pivot Grid Pagelet Overview
Pivot Grid Pagelet Overview
PeopleSoft Pivot Grid functionality is currently used by Pagelet Wizard. Pagelet Wizard uses the Pivot
Grid Viewer component and publishes the pivot grid as a pagelet. During pagelet creation using the
Pagelet Wizard, the system stores all the parameters that were required for the Pivot Grid Viewer
component: Pivot Grid Name and Pivot Grid View Name. When the pagelet is invoked, these parameters
are passed to the component, which parses them and renders the display.
Note: If the query used in the Pivot Grid model is changed after the Pivot Grid pagelet is created, you
need to modify and save the Pivot Grid model to ensure that Pivot Grid Viewer and Pivot Grid pagelet
display all changes properly.
Pagelet Creation
Image: Pagelet creation process flow
This diagram shows the pagelet creation process flow.
In the Pagelet Wizard, you are able to:
• Select the data source type of Pivot Grid.
• Select the Pivot Grid model to use.
Copyright
©
1988, 2020, Oracle and/or its affiliates. 287

Creating and Viewing a Pivot Grid Pagelet Using the Pagelet Wizard Appendix A
• Select the Pivot Grid view.
• Publish the pagelet.
Pagelet Viewing
Image: Pagelet viewing process flow
This diagram shows the flow for viewing a Pivot Grid pagelet.
When you open a pagelet that contains a pivot grid, all of the registered parameters are passed to the Pivot
Grid Viewer. From the pagelet, you can perform all of the tasks that can be performed directly from the
Pivot Grid Viewer.
Note: Pagelet Wizard is not supported in WSRP; therefore, Pivot Grid pagelets that were created using
Pagelet Wizard are not usable in WSRP.
See "Understanding WSRP" (PeopleTools 8.58: Portal Technology).
Pivot Grid as a Subscriber
Pivot Grid subscribes to Inter Window Communication (IWC) publications from transaction pages and
other pivot grids and charts. The subscription can only happen on the filters and prompts, and then pivot
grids are refreshed with the subscribed values. When subscribing to publications from another pivot
grid or chart filter, the subscription supports the multi-select option in filters. When subscribing from a
transaction page, the values in publication should be separated by semicolons (;) to support multiselect
filter values.
The IWC configuration for subscriptions contains the following values:
288 Copyright
©
1988, 2020, Oracle and/or its affiliates.
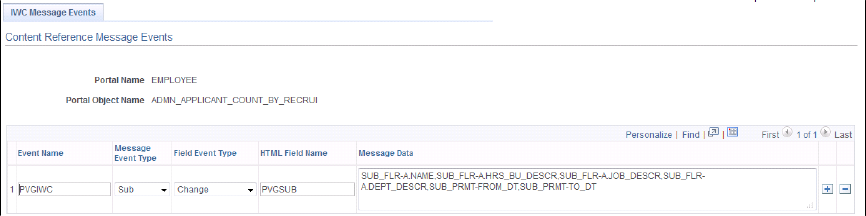
Appendix A Creating and Viewing a Pivot Grid Pagelet Using the Pagelet Wizard
• Event Name: Enter the named configuration for this subscription.
This name matches the publication configuration event name that runs the publication.
• Message Event Type: Sub.
• Field Event Type: Change.
• HTML Field Name: PVGSUB.
• Message data: Enter the prompts and filters in the following format:
•
Filter: SUB_FLR-<Query field name>
•
Prompt: SUB_PRMT-<Unique query prompt name> (available in query definition)
Image: Content Reference Message Events page with IWC configuration for subscription
This example illustrates the Content Reference Message Events page with IWC configuration for
subscriptions.
If a subscription is in multiple prompts and filters, the message data separates prompts and filters using
commas. A corresponding publication configuration exists with a list of corresponding publication fields
that are separated by commas. The publication is from transaction pages or from other pivot grids and
charts.
Pivot Grid as a Publisher
Pivot grid also publishes the changes in prompts and filter values for which IWC is configured. The
subscriber for this publication is another pivot grid.
The IWC configuration for publications contains the following values:
• Event Name: Enter the named configuration for this subscription.
This name matches the subscription configuration event name that subscribes to the publication.
• Message Event Type: Pub.
• Field Event Type: Click.
• HTML Field Name: PVGPUB.
• Message data: Enter the prompts and filters in the following format:
•
Filter: PUB_FLR-<Query field name>
Copyright
©
1988, 2020, Oracle and/or its affiliates. 289

Creating and Viewing a Pivot Grid Pagelet Using the Pagelet Wizard Appendix A
•
Prompt: PUB_PRMT-<Unique query prompt name> (available in query definition)
Image: Content Reference Message Events page with IWC configuration for publication
This example illustrates the Content Reference Message Events page with IWC configuration for
publications.
In the previous example, note that:
• Pagelet names are ADMN_APPLICANTS_COUNT_BY_RECRUI and
ADMN_APPLICANTS_COUNT_BY_LOCAT.
• The publishing and subscribing filter query fields are A.NAME, A.HRS_BU_DESCR,
A.JOB_DESCR, and A.DEPT_DESCR.
• The publishing and subscribing prompt unique field names are FROM_DT and TO_DT.
• The subscriber and publishing fields need not be the same.
One-to-one mapping exists between the comma separated publisher and subscriber fields.
If a publication involves multiple prompts and filters, the message data separates prompts and filters using
commas. A corresponding subscription configuration exists with a list of corresponding subscription
fields that are separated by commas.
Note: Between a pair of publisher and subscriber, only a single publication and subscription configuration
should exist. That is, if pivot grid A publishes to pivot grid B, then pivot grid A uses a single-named
publication configuration for all the fields it publishes to pivot grid B, and pivot grid B subscribes to the
same-named IWC configuration. The lists of fields to be published and subscribed to are separated by
commas in the IWC message data field. This is true for IWC between transaction pages and pivot grids.
For IWC between a pair of pivot grids, you should configure publications and subscriptions with all
the common intersecting filters between the pivot grids to ensure consistent behavior with progressive
filtering in the publisher and subscriber.
Creating a New Pivot Grid Pagelet Using the Pagelet Wizard
Specifying Pagelet Information
Use the Specify Pagelet Information page (PTPPB_WIZ_INFO) to enter the pagelet title and other
pagelet information.
290 Copyright
©
1988, 2020, Oracle and/or its affiliates.
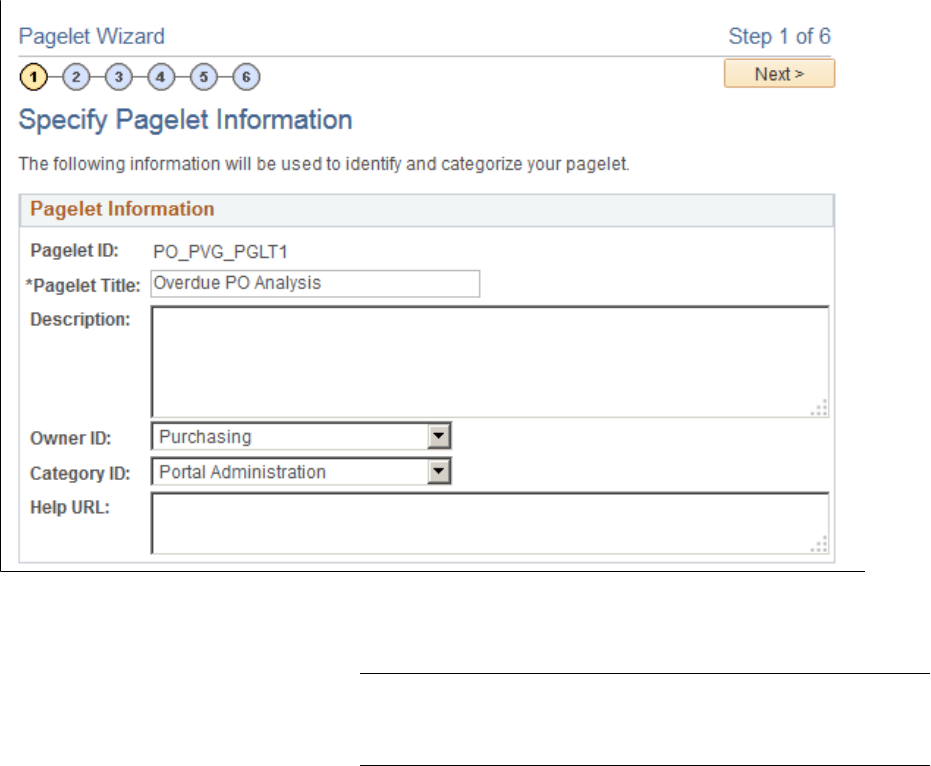
Appendix A Creating and Viewing a Pivot Grid Pagelet Using the Pagelet Wizard
Navigation
Access the Specify Pagelet Information page by selecting PeopleTools > Portal > Pagelet Wizard >
Pagelet Wizard.
Image: Specify Pagelet Information page
This example illustrates the fields and controls on the Specify Pagelet Information page. Definitions for
the fields and controls appear following the example.
Pagelet Title Enter a title for the Pivot Grid pagelet. This field is required.
Category ID Select the pagelet category ID.
Note: The portal administrator can use this value when running
pagelet reports and when searching for pagelets that need to be
moved between different portal sites.
Next The Next button is available after you enter the pagelet title in
the Pagelet Title field and move the cursor to any other field.
Click this button to advance the wizard to the next page.
Selecting a Data Source
Use the Select Data Source page (PTPPB_WIZ_DATASRC) to select the pagelet data source type that
will be used for the pivot grid and to select the Pivot Grid model to be created as a pagelet.
Copyright
©
1988, 2020, Oracle and/or its affiliates. 291

Creating and Viewing a Pivot Grid Pagelet Using the Pagelet Wizard Appendix A
Navigation
Access the Select Data Source page by clicking the Next button on the Specify Pagelet Information page.
Image: Select Data Source page
This example illustrates the fields and controls on the Select Data Source page. Definitions for the fields
and controls appear following the example.
Data Type
Select the data type Pivot Grid.
Pivot Grid Name
This field appears after you select the data type Pivot Grid.
Click the search icon to select a pivot grid from existing pivot
grids.
Next The Next button is available after you select a pivot grid from
the Pivot Grid Name field.
Click this button to advance the wizard to the next page.
Specifying Data Source Parameters
Use the Specify Data Source Parameters page (PTPPB_WIZ_DATAPRMS) to select a view for the Pivot
Grid model, create new views for the model using the Pivot Grid View Options component, and specify
the initial width and height of the pagelet.
Navigation
Access the Specify Data Source Parameters page by clicking the Next button on the Select Data Source
page.
292 Copyright
©
1988, 2020, Oracle and/or its affiliates.

Appendix A Creating and Viewing a Pivot Grid Pagelet Using the Pagelet Wizard
Image: Specify Data Source Parameters page
This example illustrates the fields and controls on the Specify Data Source Parameters page. Definitions
for the fields and controls appear following the example.
Configure pivot grid views Click this link to open the Pivot Grid Views Component dialog
box, where you can define pivot grid display options.
Description Enter a description for the pagelet. The default values are:
•
View Name
•
Narrow Viewer
•
Report Width
•
Report Height
Usage Type Select a usage type for your pivot grid. Available options are:
•
Admin Specified
•
Context Sensitive
•
Fixed
•
Not Used
•
System Variable
Copyright
©
1988, 2020, Oracle and/or its affiliates. 293

Creating and Viewing a Pivot Grid Pagelet Using the Pagelet Wizard Appendix A
•
User Specified
Next Click to advance the wizard to the next page.
Narrow Viewer
The Narrow Viewer mode is useful for pivot grid pagelets in the work center. You can set the Narrow
Viewer mode for pagelets using the Publish as Pagelet page or the Pagelet Wizard - Specifying Data
Source Parameters page.
The published pagelet has a single column filter mode in the chart-only models. All functionalities
available in the normal viewer are also available in Narrow Viewer mode.
Oracle PeopleSoft recommends that you use the Narrow Viewer mode for the chart-only models. You can
expand the width of charts in the narrow viewer from their default settings by using the advanced chart
options in the viewer. If you use the Narrow Viewer mode for the grids, the grids occupy the same real
estate as in the normal viewer.
Image: Narrow chart viewers
This example illustrates a dashboard showing the narrow chart view in the left pane, unexpanded from the
default width, and in the right pane expanded from the default width.
Note that:
• Options Menu and chart icons are available for all views.
Pivot Grid administrator or Pivot Grid developers can set to show or hide the Options Menu and chart
icons using the Viewer Options section in the Pivot Grid Wizard - Specify Data Model Options page.
• If the Pivot Grid model has filters, the default narrow view of a Pivot Grid pagelet shows the width of
the chart at 210 pixels.
294 Copyright
©
1988, 2020, Oracle and/or its affiliates.

Appendix A Creating and Viewing a Pivot Grid Pagelet Using the Pagelet Wizard
Image: Narrow Viewer, the minimum width for Pivot Grid models with filters
This example shows the narrow view of Pivot Grid pagelets with the minimum width for Pivot
Grid models that have filters. The width of the chart is 210 pixels, and group boxes are collapsed by
default. You can click the bars in the chart to access the detailed view.
• If the Pivot Grid model has no filters, the default narrow view of a Pivot Grid pagelet can be scaled
back to 175 pixels, and you can set the narrow view to a smaller size.
Copyright
©
1988, 2020, Oracle and/or its affiliates. 295

Creating and Viewing a Pivot Grid Pagelet Using the Pagelet Wizard Appendix A
Image: Narrow Viewer, the narrowest view for Pivot Grid models without filters
This example shows the narrowest view for a model with no filters. The width of the chart is 175
pixels. You can click the bars in the chart to access the detailed view.
• If the width of the chart is less than 300 pixels, then when you click the chart sector or bar, you access
the detailed view directly without the drill-down or Related Action menu.
• If the width of the chart is greater than 300 pixels, the narrow view of pagelets shows locator links,
the drill-down menu, the detailed view, and the Related Action menu.
296 Copyright
©
1988, 2020, Oracle and/or its affiliates.

Appendix A Creating and Viewing a Pivot Grid Pagelet Using the Pagelet Wizard
Image: Narrow Viewer, the minimum width for the models with the drill-down menu
This example shows the minimum width of the Pivot Grid models with the drill-down menu.
• If the drill-down menu has multiple levels, then the side of the chart is adjusted to show all drill-down
levels.
Defining the Pivot Grid Display Options
Use the Pivot Grid Views page (PTPG_VIEWOPTIONS) to configure different views for the selected
Pivot Grid model.
Navigation
Open the Pivot Grid Views Component dialog box by clicking the Configure pivot grid views link on the
Specify Data Source Parameters page.
Copyright
©
1988, 2020, Oracle and/or its affiliates. 297

Creating and Viewing a Pivot Grid Pagelet Using the Pagelet Wizard Appendix A
Image: Pivot Grid Views Component dialog box
This example illustrates the fields and controls on the Pivot Grid Views Component dialog box.
Definitions for the fields and controls appear following the example.
View Name Select the Pivot Grid view to use for this pagelet.
Data Source Prompts Enter the default values for the PSQuery runtime prompts.
Note: This section is only available when the selected query that
built the grid has prompts attached.
Display Options Define pagelet view options for the grid and the chart.
Available options are:
• Pivot Grid Only
• Chart Only
• Pivot Grid and Chart
Calculation Formula The Calculation Formula column is available only for number
(facts) fields.
Select either the Percentage or the Percentage Grand Total
option to display the number (fact) values in the grid and chart.
You are able to apply or remove this calculation option using the
Options Menu icon in the Pivot Grid Viewer.
298 Copyright
©
1988, 2020, Oracle and/or its affiliates.
Appendix A Creating and Viewing a Pivot Grid Pagelet Using the Pagelet Wizard
Grid Options Define whether drag-and-drop functionality is allowed in
the grid, whether the initial view of the grid is expanded or
collapsed, and whether the grid can be expanded or collapsed.
Available options are:
• Collapsible Data Area
• Expanded State
• No Drag and Drop
Chart Options Define information for axis and value columns of the grid, and
define chart type and axes information for the chart.
Available options are Title, Type, X axis label, and Y axis label.
Advanced Options Define the 3D rotation angle and height of the chart.
Save As Click to open the Save View As dialog box, where you can
either save the current Pivot Grid model as a new view or
update an existing view.
Close Click to close the Pivot Gird Views component and copy
the selected view name to PVG_VIEWNAME data source
parameter.
Selecting a Display Format
Use the Select Display Format page (PTPPB_WIZ_DISPFRMT) to confirm the display format of the
pagelet.
Navigation
Access the Select Display Format page by clicking the Next button on the Specify Data Source
Parameters page.
Copyright
©
1988, 2020, Oracle and/or its affiliates. 299

Creating and Viewing a Pivot Grid Pagelet Using the Pagelet Wizard Appendix A
Image: Select Display Format page
This example illustrates the fields and controls on the Select Display Format page. Definitions for the
fields and controls appear following the example.
Specify Display Options Confirm the display format of the pagelet.
Note: Passthru is the only display option available for Pivot
Grid.
Next Click to advance the wizard to the next page.
Specifying Display Options
Use the Specify Display Options page (PTPG_PGVIEWER) to define the display options of the pagelet,
preview the Pivot Grid model, and view the pagelet that is selected.
Navigation
Access the Specify Display Options page by clicking the Next button on the Select Display Format page.
300 Copyright
©
1988, 2020, Oracle and/or its affiliates.
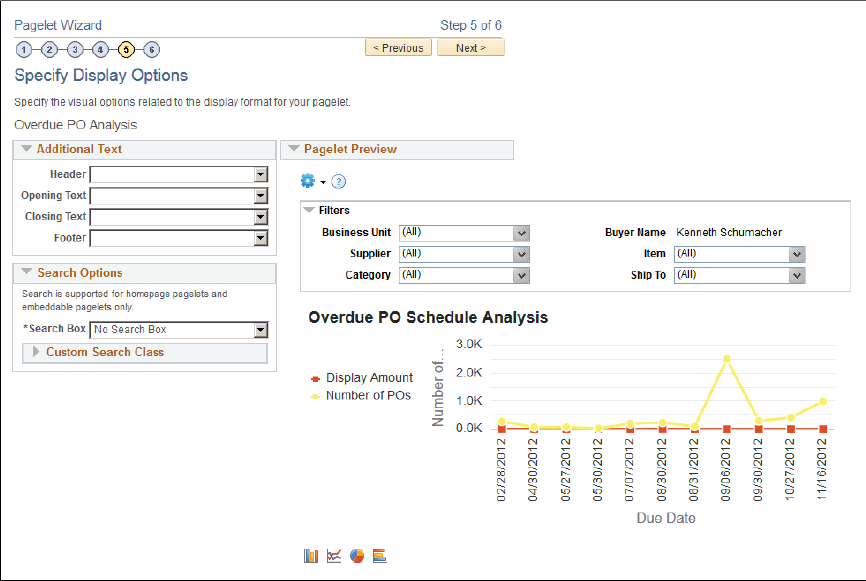
Appendix A Creating and Viewing a Pivot Grid Pagelet Using the Pagelet Wizard
Image: Specify Display Options page
This example illustrates the fields and controls on the Specify Display Options page. Definitions for the
fields and controls appear following the example.
Additional Text The Additional Text region contains the options to add headers,
footers, opening text, and closing text to a pagelet.
See "Specifying Passthru Display Options" (PeopleTools 8.58:
Portal Technology).
Search Options The Search Options region contains the options to override the
default search functionality for the current pagelet only.
Pagelet Preview When you change the Additional Text or Search Options, the
changes automatically update the preview.
Next Click to advance the wizard to the next page.
Specifying Publishing Options
Use the Specify Publishing Options page (PTPPB_WIZ_PUBOPT) to define the location, type, and
security attributes for the pagelet and publish the pagelet.
Navigation
Access the Specify Publishing Options page by clicking the Next button on the Select Display Options
page.
Copyright
©
1988, 2020, Oracle and/or its affiliates. 301

Creating and Viewing a Pivot Grid Pagelet Using the Pagelet Wizard Appendix A
Image: Specify Publishing Options page
This example illustrates the fields and controls on the Specify Publishing Options page. Definitions for
the fields and controls appear following the example.
Note: You can include the Pivot Grid pagelet in Operational Dashboards, WorkCenters (pagelet width 256
pixels when configured in a workcenter), and homepages. Only the Homepage Pagelet and Embeddable
Pagelet options are applicable for Pivot Grid pagelets.
Homepage Pagelet Select this option to publish the pagelet as a homepage pagelet
that can be added to a homepage or WorkCenter operational
dashboard page.
Template Pagelet This option is not applicable for pivot grids.
Embeddable Pagelet Select this option to make your pagelet available as an
embeddable pagelet that can be generated by the Pagelet Wizard
API for rendering within an HTML area of a PeopleSoft Pure
Internet Architecture target page or using an iScript.
Pagelet Security Administrators can set pagelet security as public, or they can set
a permission list based on user roles.
302 Copyright
©
1988, 2020, Oracle and/or its affiliates.

Appendix A Creating and Viewing a Pivot Grid Pagelet Using the Pagelet Wizard
Save Click to save the pagelet.
Finish Click to transfer to the Pagelet Creation Confirmed page, where
you also can save the pagelet.
Access the homepage to personalize it to include the newly
created pagelet.
Note: While working with the Pagelet Wizard, you can modify your previous selections at any step by
clicking a step number icon. Changes in your selection could change the structure of a pagelet.
See "Specifying Pagelet Publication Options" (PeopleTools 8.58: Portal Technology).
Viewing a Pivot Grid Homepage Pagelet
Use the Pivot Grid homepage pagelet to view and update the Pivot Grid model.
Navigation
Access the Pivot Grid homepage pagelet from the PeopleSoft Pure Internet Architecture home page.
Image: Pivot Grid homepage pagelet
This is an example of the Pivot Grid homepage pagelets.
Note: Viewing the pivot grid from a pagelet is the same as viewing it from the Pivot Grid Viewer.
See Viewing Pivot Grid Models Using Pivot Grid Viewer.
Copyright
©
1988, 2020, Oracle and/or its affiliates. 303
Creating and Viewing a Pivot Grid Pagelet Using the Pagelet Wizard Appendix A
304 Copyright
©
1988, 2020, Oracle and/or its affiliates.
